Fantom Drives PS4 User manual

PS4 Upgrade Kit Manual
FOR PLAYSATION 4, PLAYSTATION 4 SLIM AND PLAYSTATION PRO
What’s Included:
• 2.5” Hard Disk Drive
• Fantom Drives G-Force
• Aluminum External Enclosure
• Usb 3.0 Flash Drive
• Screw Driver
• Quick Installation Guide

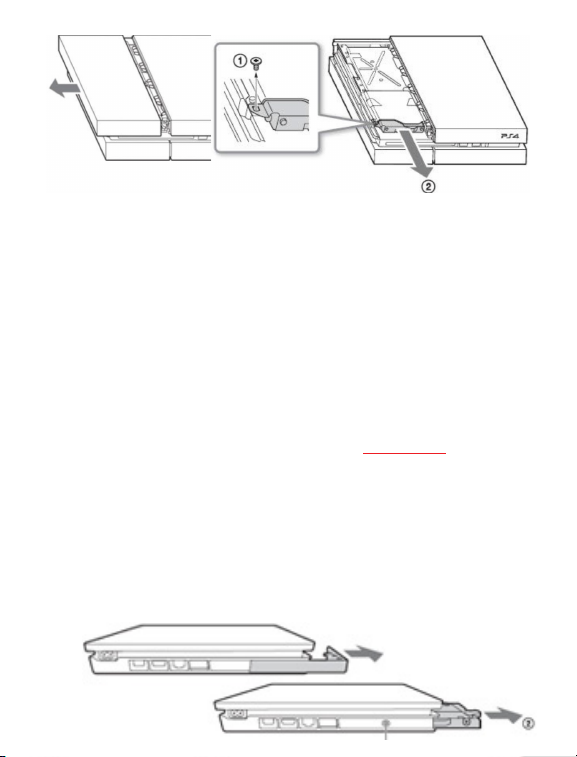
Step 3A: Hard Drive Upgrade for PS4
1. Power down your PS4 and disconnect all cables attached to
the PS4.
2. Slide the drive bay cover o.
3. Use the included screwdriver to remove the screws that is
holding the HDD carrier in place.
4. Pull the HDD carrier towards the front of the PS4 to remove it.
SET UP
Step 1: Preparation
1. On a PC, visit https://www.playstation.com/en-us/support/
hardware/ps4/system-software/ to download System Soft-
ware. Scroll to Download the reinstallation le for a PS4
console and download (approximately 900mb).
*** Be sure to download the larger le under “Perform a
New Installation of the System Software”
2. Connect the USB Flash Drive and create a folder within the
USB Flash Drive name (in capital letters) “PS4.” Inside the “PS4”
folder, create another folder name (in capital letters) “UP-
DATE.”
3. Place the downloaded “PS4UPDATE.PUP” le into the “UP-
DATE” folder.
Step 2: Backing-Up Games
1. Connect USB Flash Drive after turning PS4 on.
2. Go to Settings > Applications Saved Data Management > Saved
Data in System Storage > Copy to USB Storage Device and
select the games you want to back up. (This will back up your
saved games, not the entire game. You will have to download
the entire game manually and upload the backup to retain
your original location of your games.

5. Remove the four screws that anchors the HDD and remove
the HDD.
6. Slide the replacement HDD into the carrier (label side up).
Make sure the SATA ports are oriented towards the open end
of the carrier. Reattach the screws to the HDD.
7. Slide the carrier back into the drive bay and attach the screw
removed in step 3.
8. Slide the drive bay cover back into place. (Complete installa-
tion instructions are available at the PlayStation website).
Step 3B: Hard Drive Upgrade For PS4 Slim
1. Power down your PS4 SLIM and disconnect all cables attach to
the PS4 SLIM.
2. Turn the PS4 SLIM around to face rear panel.
3. Locate Hard Drive bay cover on the right and slide the drive
bay cover o.
4. Once you reveal the HDD bay, use a screwdriver to remove the
screw.

5. Pull on the ribbon and slide Hard Drive carrier out.
6. Remove the four screws that anchors the HDD and remove
HDD.
7. Slide the replacement HDD into the carrier. Make sure label
is facing inside the carrier and SATA port is facing oriented
towards the open end of carrier. Reattach the screws to the
HDD.
8. Reinsert the carrier back into the drive bay and attach the
screw removed in step 4.
9. Slide the drive bay cover back into place.
Step 3C: Hard Drive Upgrade For PS4 Pro
1. Power down your PS4 PRO and disconnect all cables attach to
the PS4 PRO.
2. Turn the PS4 PRO around to face the rear panel and place the
PS4 PRO upside down.
3. Locate the Hard Drive plastic cover on the left. Apply pressure
to remove (see image). There may be a sticker covering the
HDD bay cover. It’s safe to remove this and it will not aect the
warranty.
4. Once you reveal the HDD bay, use a screwdriver to remove the
screw.
5. Pull and Slide the Hard Drive carrier out.
6. Remove the four screws that anchors the HDD and remove
HDD.

7. Slide the replacement HDD into the carrier. Make sure label
is facing inside the carrier and SATA port is facing oriented
towards the open end of carrier. Reattach the screws to the
HDD.
8. Reinsert the carrier back into the drive bay and attach the
screw removed in step 4.
9. Reattach the drive bay cover back into place.
Step 4: System Software Install
After the HDD has been replaced, the system software must be
reinstalled.
1. Reconnect your PS4 back to the respected cables.
2. Connect USB Flash Drive to your PS4 System.
3. Hold down power button (1st beep) for 8 seconds and upon
2nd beep, release the button.
4. Screen should display SAFE MODE and prompt you to
5. connect DUALSHOCK 4 controller via USB cable and press PS4
button. If it doesn’t detect the controller; remove and retry the
connection.
6. Select option “Initialize PS4 (Reinstall System Software) and
press OK.
7. Your screen should ag “The PS4 will be initialized. All users
and all data will deleted, Are you sure you want to continue?”
Select “YES” and the PS4 will begin initializing the installation.
8. When the installation is nished, your PS4 will restart. It will
prompt you to connect the controller to the PS4 via USB cable
and click PS4 button.
9. Follow the instructions on the screen to setup your new
Playstation 4 set up.

Step 5: Restoring Saved Games
1. Connect the USB Flash Drive with your backed up data to PS4.
2. Visit Setting > Application Saved Data Management > Saved
Data on USB Storage Device and select “Copy to System
Storage.”
3. Select a game/media title, press X to add a check mark to the
box. Select “Copy” and conrm overwrite with “Yes.”
Step 6: Reusing the Old HDD
1. Remove the plastic cover end of the enclosure, if it is not
already removed. If it has previously been screwed into place,
remove the screws rst.
2. Carefully slide out the hard drive tray.
3. Connect the 2.5” hard drive to the SATA / power connector in
the tray.
4. Place the plastic end cover back into the enclosure and secure
it with the screws provide.
5. You can use the external hard drive for Windows PC or Mac
OS. For Windows, format it to NTFS. For Mac, format it to HFS.
You can nd more information on how to upgrade your PS4
on PlayStation’s Ocial Website: https://www.playstation.com/
en-gb/get-help/help-library/system---hardware/storage---data/
upgrade-playstation-4-hdd/
Please retain a copy of your receipt. You will need it if warranty
repair service is required in the future.

02/11/2017
The material in this document is for information only and is subject
to change without notice. While reasonable eorts have been made
in the preparation of this document to assure its accuracy, Fantom
Drives assumes no liability resulting from errors or omissions
in this document, or from the u se of the information contained
herein. Fantom Drives reserves the right to make changes in the
product design without reservation and without notication to its
users.
Fantom Drives and the Fantrom Drives Logo are registered
trademarks of BNL Technologies, Inc. PlayStation is a registered
trademark of Sony Corporation. This product is made by Fantom
Drives and is not endorsed, manufactured, or distributed by Sony.
All other names, logos, and images are property of their respective
owners.
Copyright © 1999, 2017 Fantom Drives. All rights reserved. This
publication may not be reproduced, stored in a retrieval system, or
transmitted in any for or by any means, in whole or in part, without
the prior written consent of Fantom Drives, 20525 Manhattan
Place, Torrance CA 90501.
Fantom Drives
20525 Manhattan Place
Torrance, Ca 90501
Sales: 310-320-7272
Email: [email protected]
Www.fantomdrives.com
Table of contents