Bluesound RT100 User manual


SAFETY
INFORMATION
This
device
complies
with
Part
15
of
the
FCC
Rules.
Operation
is
subject
to
the
following
two
conditions:
(1)
This
device
may
not
cause
harmful
interference,
and
(2)
This
device
must
accept
any
Interference
received,
Including
interference
that
may
cause
undesired
operation.
Note:
This
product
has
been
tested
and
found
to
comply
with
the
limits
for
a
Class
B
digital
device,
pursuant
to
Part
15
of
the
FCC
Rules.
These
limits
are
designed
to
provide
reasonable
protection
against
harmful
interference
In
a
residential
Installation.
This
product
generates,
uses,
and
can
radiate
radio
frequency
energy
and,
if
not
Installed
and
used
In
accordance
with
the
Instructions,
may
cause
harmful
Interference
to
radio
communications.
However,
there
Is
no
guarantee
that
Interference
will
not
occur
In
a
particular
Installation.
If
this
product
does
cause
harmful
interference
to
radio
or
television
reception,
which
can
be
determined
by
turning
the
equipment
off
and
on,
the
user
Is
encouraged
to
try
to
correct
the
Interference
by
one
or
more
of
the
following
measures:
-Reorient
or
relocate
the
receiving
antenna.
-Increase
the
separation
between
the
equipment
and
receiver.
-Connect
the
equipment
Into
an
outlet
on
a
circuit
different
from
that
to
which
the
receiver
Is
connected.
-Consult
the
dealer
or
an
experienced
radio/TV
technician
for
help.
Please
note
that
changes
or
modifications
not
expressly
approved
by
the
party
responsible
for
compliance
could
void
the
user's
authority
to
operate
the
equipment.
This
equipment
should
be
Installed
and
operated
with
a
minimum
distance
20cm
between
the
radiator
and
your
body
This
device
complies
with
Industry
Canada
licence-exempt
RSS
standard(s).
Operation
Is
subject
to
the
following
two
conditions:
(1)
this
device
may
not
cause
Interference,
and
(2)
this
device
must
accept
any
Interference,
Including
Interference
that
may
cause
undesired
operation
of
the
device.
Under
Industry
Canada
regulations,
this
radio
transmitter
may
only
operate
using
an
antenna
of a
type
and
maximum
(or
lesser)
gain
approved
for
the
transmitter
by
Industry
Canada.
To
reduce
potential
radio
Interference
to
other
users,
the
antenna
type
and
Its
gain
should
be
so
chosen
that
the
equivalent
lsotroplcally
radiated
power
(e.l.r.p.)
Is
not
more
than
that
necessary
for
successful
communication.
The
user
manual
for
local
area
network
devices
shall
contain
Instructions
related
to
the
restrictions
mentioned
In
the
above
sections,
namely
that:
(I)
the
device
for
operation
In
the
band
5150-5250
MHz
Is
only
for
Indoor
use
to
reduce
the
potential
for
harmful
Interference
to
co-channel
mobile
satellite
systems;
(II)
the
maximum
antenna
gain
permitted
for
devices
In
the
band
5725-5825
MHz
shall
comply
with
the
e.l.r.p.
limits
specified
for
point-to-point
and
non
point-to-point
operation
as
appropriate.
RESPONSIBLE
PARTY
Lenbrook
Industries
Limited.
633
Granite
Court,
Pickering,
Ontario,
Canada
L
1W
3K1
2

WHAT'S
IN
THE BOX
@
RT1
00
Wireless
Speaker
Link
~
Mini
USB
Cable
GETTING STARTED
Stereo
RCA
to
3.5mm
Cable
Two
Adhesive
Mounting
Strips
The
RT1
00
Wireless
Speaker
Link
provides
a
quick
and
easy
way
to
wlrelessly
connect
your
audio
components.
Using
Its
own
dedicated
network,
the
RT1
00
can
pair
with
another
RT100,
or
synchronous
devices,
to
create
a
flexible
multi-unit
wireless
audio
setup.
Status/Pairing
Button
Analog
OUT
LED Indications
LED
Colour
Solid
Blue
Solid
Yellow
Sollcf
White
Solid
Magenta
Flashing
Green
(faat)
Solid
Green
Flashing
Green
(slow)
INDICATES
RT1
00
In
Transmit
(Tx)
Mode
RT100
In
Receive
(Rx)
Mode
USB
Audio
Input
Analog
Audio
Input
RT1
00
In
Pairing
Mode
RT1
00
paired
with
another
module
RT1
00
disconnected
from
paired
device
3
USB
Power
&Audio
In
NOTES
Available
in
Tx
Mode
only
.
Available
In
Tx
Mode
only
Three
Red
Flashes
Indicates
failed
pairing

Status/Pairing Button:
Pressing the Status/Pairing Button is a quick way to check the current status
of
the
RT1
00. The LED will run through a series
of
colors, first indicating mode, then input,
and finally pairing status.
For example, ifyou press the Status/Pairing button and the LED shows Solid Blue,
then Solid Magenta, then Solid Green, the
RT1
00 is functioning as a transmitter,
using the analog audio input, and is successfully paired with another module.
CONNECT FOR POWER
Use the Mini USB Cable provided to power the
RT1
00, by plugging into a compatible
wall charger (not supplied) or powered USB output located on the intended connected
device.
Connect to
powered
USB output
CONNECT FOR SOUND
The RT100 As A Transmitting Device {Tx
Mode)-
USB Audio
When you first plug in the Mini USB Cable and there are no analog connections
attached, the
RT1
00 will be in Tx Mode and set to use USB Audio by default.
Connecting the
RT1
00 to your source device will take advantage
of
this feature if USB
Audio is available from the source. USB Audio is available in
Tx
Mode only -you cannot
use USB to pass audio out ofthe
RT1
00.
NOTE: Please see the POPULAR CONFIGURATIONS section for example diagrams
of
different ways to connect your
RT1
00.
4
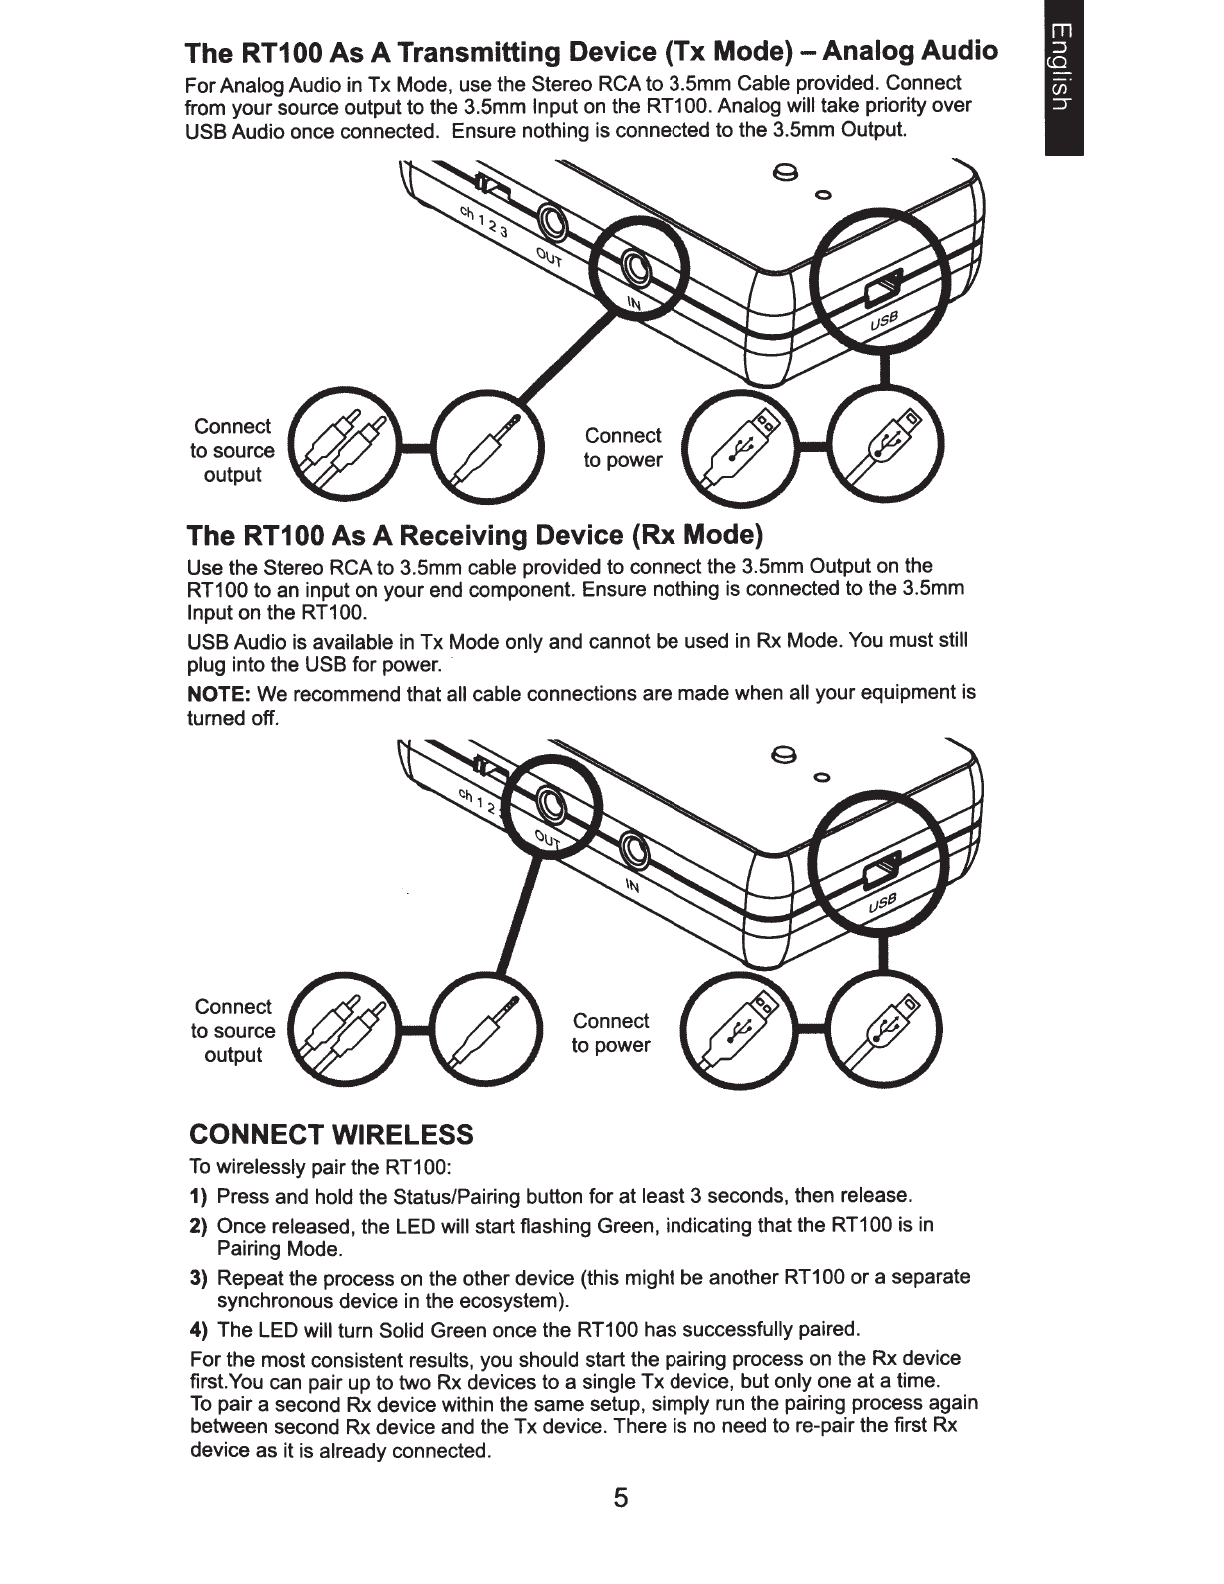
The RT100 As A Transmitting Device (Tx
Mode)-
Analog Audio
ForAnalog Audio in Tx Mode, use the Stereo RCA to 3.5mm Cable provided. Connect
from your source output to the 3.5mm Input on the
RT1
00. Analog will take priority over
USB Audio once connected. Ensure nothing is connected to the 3.5mm Output.
Connect
to source
output
Connect
to power
The
RT1
00 As A Receiving Device (Rx Mode)
Use the Stereo RCA to 3.5mm cable provided to connect the 3.5mm Output on the
RT1
00 to an input on your end component. Ensure nothing is connected to the 3.5mm
Input on the RT100.
USB Audio is available
in
Tx Mode only and cannot be used
in
Rx
Mode.
You
must still
plug into the USB for power. ·
NOTE:
We recommend that all cable connections are made when all your equipment is
turned off.
Connect
to source
output
CONNECT WIRELESS
To
wirelessly pair the
RT1
00:
Connect
to power
1) Press and hold the Status/Pairing button for at least 3 seconds, then release.
2) Once released, the LED will start flashing Green, indicating that the
RT1
00 is
in
Pairing Mode.
3) Repeat the process on the other device (this might be another
RT1
00 or a separate
synchronous device in the ecosystem).
4) The LED will turn Solid Green once the
RT1
00 has successfully paired.
For the most consistent results, you should start the pairing process on the Rx device
first.You can pair up to two Rx devices to a single
Tx
device, but only one at a time.
To
pair a second
Rx
device within the same setup, simply run the pairing process again
between second Rx device and the Tx device. There is no need to re-pair the first Rx
device as it is already connected.
5
POPULAR CONFIGURATIONS
([
H
nf
@
Tx-Enabled Speaker
to Subwoofer
1...
c::::::J
0
~
t [
~]
Stereo to Rx-Enabled
Subwoofer
1...
c::::::J
0
~
t @ Stereo to Powered
Speaker/Subwoofer
CONNECTING MULTIPLE RT100 SYSTEMS
The
RT1
00 can operate on three different channel IDs, allowing you to use up to three
different system setups
in
the same area. The Channel Selector Switch lets you select
the
channeiiD
you wish to use, so that you can specify which modules should
be
paired together. Ensure all devices are on the same channel
ID
ifthey are part
of
the
same setup.
NOTE: Certain synchronous products that can pair with the
RT1
00 will only work on
a specific channel. Please consult the online help articles for that specific brand and
product.
NOTE: If you happen to get interference in the signal between paired RT100s, you
can also adjust the channel selector switch to see ifthe connection is improved on a
different channel.
TROUBLESHOOTING
No Wireless Connection
• Confirm the
RT1
00 is powered on using the Mini USB Cable.
• Confirm the
RT1
00 is paired to a mating device.
• Try selecting a different
channeiiD
ifyou are using multiple RT100s together.
No Sound
• Confirm all cable connections are attached correctly.
·Confirm
the RT100 is powered on.
• Confirm the
RT1
00 is paired to a mating device.
No Power
• Confirm the USB Power Source for the
RT1
00 is working.
6

EN
-Lenbrook Industries Ltd reserves the right to change specifications or features without
notice. All rights reserved. No part
of
this publication may be reproduced, stored,
or
transmitted
in
any form whatsoever without the written permission
of
Lenbrook
Industries
Ltd.©
04/17 17-046
ArnernberofThe
Lenbrook
Group
of
Companies
1633
Granite
Court,
Pickering,
Ontario
L
1W
3K1
FR-
Lenbrook Industries Ltd se reserve le droit
de
modifier les specifications ou les
caracteristiques sans preavis. Tous droits reserves. Aucune partie de cette publication
ne peut etre reproduite, stockee ou transmise sous quelque forme que
ce soit sans l'autorisation ecrite de Lenbrook Industries Ltd. © 04/17 17-046
Un
rnernbre
de
Lenbrook
Group
of
Companies
1633
Granite
Court,
Pickering,
Ontario
L
1W
3K1
ES-
Lenbrook Industries Ltd se reserva el derecho a modificar las especificaciones o
caracteristicas sin previa aviso. Todos los derechos reservados. Ninguna parte de esta
publicaci6n puede ser reproducida, almacenada o transmitida de ninguna forma sin el
permiso escrito de Lenbrook Industries Ltd. © 04/17 17-046
Miembro de The Lenbrook Group
of
Companies 1
633 Granite Court, Pickering, Ontario L1W 3K1, Canada
DE-
Lenbrook Industries Ltd se reserva el derecho a modificar las especificaciones o
caracteristicas sin previa aviso. Todos los derechos reservados. Ninguna parte de esta
publicaci6n puede ser reproducida, almacenada o transmitida de ninguna forma sin
el
permiso escrito de Lenbrook Industries Ltd. © 04/17 17-046
Miembro
de
The
Lenbrook
Group
of
Companies
I
633
Granite
Court,
Pickering,
Ontario
L
1W
3K1,
Canada
IT-
Lenbrook Industries Ltd si riserva
il
diritto di modificare le specifiche
ole
caratteristiche
senza preavviso. Tutti i diritti riservati. Nessuna parte di questa pubblicazione puo
essere riprodotta, memorizzata o trasmessa
in
qualsiasi forma senza l'autorizzazione
scritta di Lenbrook Industries
Ltd.©
04/17 17-046
Societa
appartenente
al
Gruppo
Lenbrook
1633
Granite
Court,
Pickering,
Ontario
L
1W
3K1
NO-
Lenbrook Industries Ltd behoudt zich het recht voor specificaties
of
functies te wijzigen
zonder voorafgaande kennisgeving. Aile rechten voorbehouden. Geen enkel deel van
deze publicatie mag worden gereproduceerd, opgeslagen
of
verzonden,
in
welke vorm
dan ook, zonder de schriftelijke toestemming van Lenbrook Industries
Ltd.©
04/17
17-046
Lid
van
de
The
Lenbrook
Group
of
Companies
1633
Granite
Court,
Pickering,
Ontario
L
1W
3K1
POR-
A Lenbrook Industries Ltd. reserva-se o direito de alterar as especificac;oes ou
as funcionalidades sem aviso previa. Todos os direitos reservados. Eproibida a
reproduc;ao, o armazenamento ou a transmissao de qualquer parte desta publicac;ao,
por qualquer forma que seja, sem a autorizac;ao por escrito da Lenbrook Industries Ltd.
© 04/17 17-046
Membro
do
The
Lenbrook
Group
of
Companies
1633
Granite
Court,
Pickering,
Ontario
L
1W
3K1
RU-
KoMnaHIA~
Lenbrook Industries Ltd
ocraen~er
aa
co6o~
npaeo
f..13MeH~Tb
cneL.~IAcpiAKal.IIAIA,.,
xapaKTepiACTIAKIA
6ea
npep,ynpe>K,D,eHIA~.
Bee npaea
aall.IIALl.leHbl.
3anpell.laerc~
eocnpoiA3Be,D,eHf..1e,
xpaHeHIAe
f..1Ilf..1
nepep,aya B
mo6o~
cpopMe
Hacro~Ll.lero
p,oKyMeHra
f..1Ilf..1
mo6o~
ero
YaCTIA
6ea
niACbMeHHoro
paapeweHIA~
KOMnaHIAIA
Lenbrook Industries
Ltd.©
04/17 17-046
Bxo,D,IAT
e rpynny
KOMnaHIA~
Lenbrook 1633 Granite Court, Pickering, Ontario L1W
3K1
CH-
Lenbrook
Industries
Ltd
'!*m£&~m~rJJ~I¥J~~~IJ.
HB::f:~rrimmo
'!*m.Pff~~~
~Uo
*!~
Lenbrook
Industries
Ltd.
1¥J.:t5imifPJ.
1'f~~1:ffDJ~it~tiJ,
ff:fii~f~
~~tljJt&!lo/.JI¥Jf:ffDJHB~o
<Cl
04/17
17-046
Len
brook
-~1J1ff~~
I633
Granite
Court,
Pickering,
Ontario
L1W 3K1

ENGLISH
LIMITED WARRANTY
Lenbrook International, a division
of
Lenbrook Industries Limited, warrants this component to be free from all defects
in
materials and workmanship
as
follows: electronic components and electro-mechanical products
for
one
(1) year, parts
and labour; loudspeaker and subwoofer drivers
for
five (5) years; powered speakers and wireless accessories for one
(1) year; and headphones
for
two
(2) years.
This warranty is valid only in the country
of
purchase. This warranty is non-transferable and is valid for the first original
purcha$er purchasing from an authorized retailer
or
dealer. Note: This warranty requires proof-of-purchase prior to any
in-warranty repairs. Always retain
your
original sales receipt.
How
to
obtain service:
For
warranty service and information, please contact a local authorized dealer
or
distributor
of
the
product.
What
Is
covered:
All labourand material expenses
for
covered items,
but
you
must
pay
any
shipping charges
if
it is necessary to ship the
product to Lenbrook
or
to an authorized Lenbrook
dealer
or
distributor.
If
the
repairs
are
covered
by
the
warranty,
Lenbrook, the dealer
or
distributor will
pay
the
return shipping charges.
What
is
not
covered:
This warranty
does
not
cover a component which
has
been:
1. Damaged in transit
or
by
act
of
God;
2. Overloaded, abused, misused,
or
operated with faulty
or
unsuitable
equipment,
or
contrary to instructions;
3. Serviced
by
unauthorized personnel;
4. The serial
number
has been altered
or
removed.
IN NO EVENT SHALLTHE WARRANTOR BE LIABLE FOR INCIDENTAL, OR CONSEQENTIAL DAMAGES, where damages
resulting from breach or express
or
implied warranties, tort, negligence,
or
otherwise. Some states, provinces,
or
countries
do
not
allow exclusion
or
limitation
of
incidental
or
consequential damages so the above limitation
or
exclusion may not apply to you. This
warranty gives you specific legal rights, and you may also have other rights which may vary, based on your state, province or
country.
WARNING
DO
NOT
ENTRUST
ANY
REPAIR
WORK
TO UNAUTHORIZED PERSONS. THE COMPONENTS NECESSARYTO MAINTAIN
THE ORIGINAL PERFORMANCE
OF
THIS PRODUCT
ARE
AVAILABLE ONLY THROUGH AUTHORIZED DEALERS
AND
DISTRIBUTORS. THE WARRANTY
WILL
BE
INVALIDATED IF THE EQUIPMENT IS TAMPERED WITH OR INCORRECT PARTS
ARE
SUBSTITUTED.

LENBROOK INTERNATIONAL, A DIVISION
OF
LENBROOK INDUSTRIES LIMITED,
633 GRANITE COURT, PICKERING, ONTARIO L
1W
3K1
Other manuals for RT100
2
Table of contents
Other Bluesound Speakers manuals

Bluesound
Bluesound PULSE M User manual

Bluesound
Bluesound PULSE MINI 2i User manual

Bluesound
Bluesound Pulse User manual

Bluesound
Bluesound POWERNODE 2i User manual

Bluesound
Bluesound Pulse Flex User manual

Bluesound
Bluesound DUO D30 User manual

Bluesound
Bluesound Pulse Flex User manual

Bluesound
Bluesound NODE User manual

Bluesound
Bluesound Pulse User manual

Bluesound
Bluesound Pulse Mini User manual


