Blueview AM8-D User manual

AM8-D
01(5)
HIGH VOLTAGE
MODULAR LIGHTING
AM8-D
Suitable for 5-15cm depth of advertising light box, soft film ceiling,
ceiling light box background wall and other applications; also suitable for
irregular light boxes.
- Advanced design, less using quantities per square meter
- Directly connect to the utility power.
- Self-designed big beam angle lens.
- Bluetooth control
- Remote control, APP control, group control.
New function
OPTICAL & ELECTRICAL PARAMETERS
FEATURES
3Years
Note:
3030 AC 220V 170° IP60
Model No.
Model No.
AM8-D
AM8-D
CCT (K)
8000-9000
Typical Luminous Flux value(lm/pcs)
411
4 8 8
Efficacy (lm/W)
111
Voltage (V AC)
220
Ra
70+
Beam Angle
170°
Power (W/pcs)
4.0
OTHER PARAMETERS
LED Qty/pc
-20~+60℃-20~+70℃
72.5*72.5*7.0
Working Temperature Storage TemperatureStandard Packing Quantity(pcs)
Product Size L*W*H(mm) Max Run (pcs)
First 4 groups can not be cut
- Test environment temperature : 25±2°C.
- The above data is typical values. The actual data of each single product may differ from the typical values. The data is subject to change without notice.
- The luminous flux is tested with single light on.
- Different color temperature will make luminous flux different.
- Power tolerance within ±10%.
PROFILE DRAWING
Note: Please ask the sales for detail drawing.
Unit: mm
AM8-D
02(5)
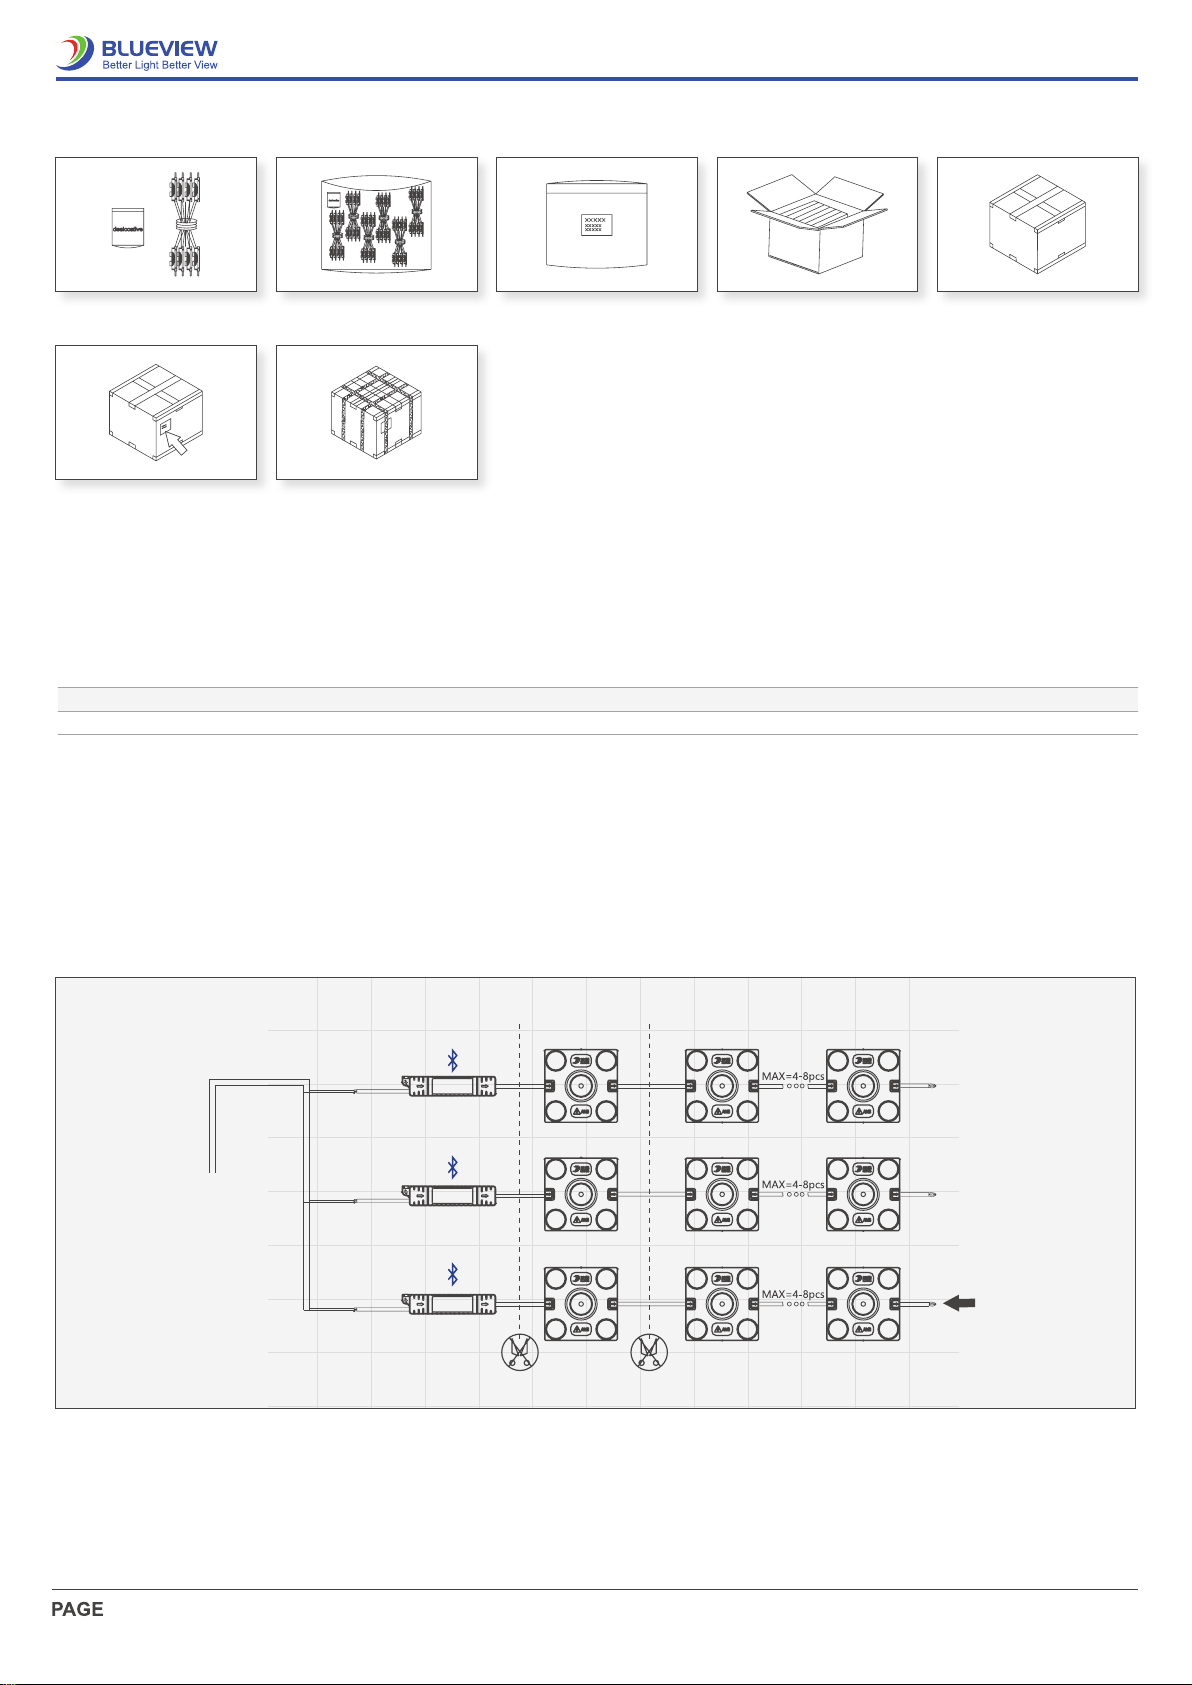
PACKING METHODS
1. Prepare the desiccant and bind the product.
2. Put the product and desiccant into static shielding bag.
3. Seal and label the static shielding bag.
4. Put the static shielding bag side by side into carton box.
5. Seal the box.
6. Label the box;
7. Use packing belt to pack after adding the edge protectors.
Positive and negative wires
Model No.
AM8-D
Product Size L*W*H(mm) Carton Size(mm)
17.6(1±10%) 18.9(1±10%)
Pcs/Bag
72.5*72.5*7.0
①
⑥
②
⑦
③ ④ ⑤
380*380*345 8 32
Bag/Carton Box Net Weight(kg) Gross Weight(kg)
Note: the above quantity and weight are only for the illustrated packaging method. there will be differences in the quantity and weight with other packaging methods.
CONNECTION DIAGRAM
PROFILE DRAWING
AC 220V input
AM8-D
03(5)
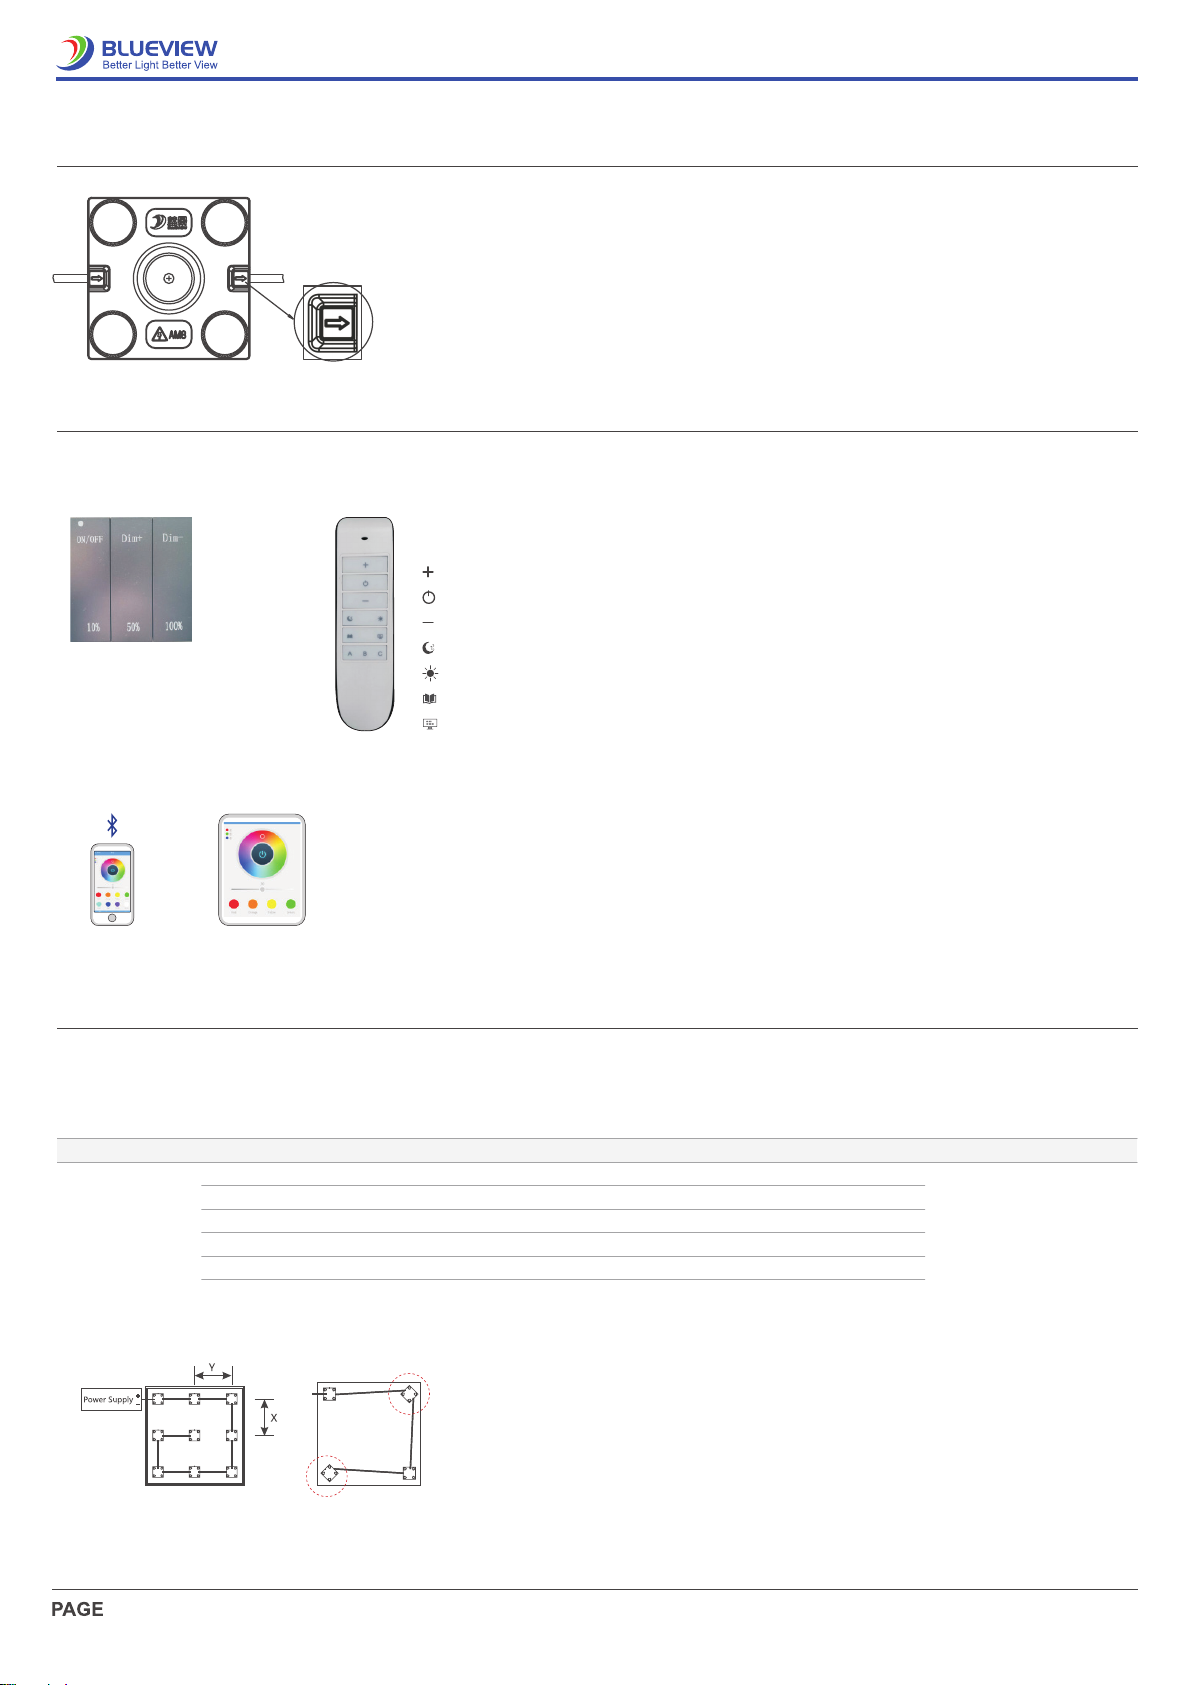
Mobile Phone Pad
RF5 remote control
RC10 remote control
ON/OFF
Dim+
Dim -
: switch
: turn lighten
: turn darken
ABC is three groups. To add and remove lamps, you need to press the corresponding group
button first.
Add lamps to group A (B.C): first press'A(B.C)', re-power on the lamps that need to be
grouped, and then press the power button and'+' until the lamps flashes, indicating that the
addition is successful.
Remove grouped lamps: first press'A(B.C)', re-power on the lamps to be removed from the
group, and then press the power button and'-' until the fixtures flash, indicating that the
removal is successful.
Blueview Smart Control APP: Enter the main page, after confirming that the lamp to be
connected is in the flashing state, if not, press the reset button on the power supply until the
lamp flashes, and then click the "+" sign in the upper right corner of the interface,
automatically discover, match, click to add the scanned device.
power button
turn lighten
turn darken
light-off mode
sleeping mode
reading mode
working mode
INSTALLATION REFERENCE
8cm 0.87 5*5 18*18cm 1006330-7310
10cm 0.86 4*4 25*25cm 643810-4450
12cm 0.86 3*3 33*33cm 362480-2870
15cm 0.92 3*3 33*33cm 362210-2400
18cm 0.93 3*3 33*33cm 361910-2050
Depth (H) Illumination (lux) Visual Effects
OK
White Soft Film
Density (pcs/m²)Evenness Spacing (X*Y) Power Density (W/m²)
Surface Material
1. X indicates the horizontal center spacing between modules;
2. Y indicates the longitudinal center spacing between modules;
3. Single LED modules are arranged in a square, X=Y.
4. When the depth of lightbox H>15cm, use more products to satisfy Illumination demand
5. Please ask the sales for other data.
6. Customized wire length available.
7. The above data is for common demand , you can increase the density for actual demand.
8. The module rotates around the center point does not change use effect, see the figure below.
Note:
Note:
-The connection of marked place means that it cannot be cut, see the figure above;
-Each string of this product has positive and negative wires at the end of the eighth product.
if only the first 4 pcs are used, please connect the positive and negative wires at the end of the fourth piece;
if the number of products used is between 5-8 and you need to cut, please short the two wires at the cutting
place to ensure that the circuit is unblocked;
if one of the products is not connected in the right direction when using it , the light will not turn on;

AM8-D
04(5)
4PCS 5PCS 8PCS
COMMON ARRANGEMENTS
ACCESSORIES & TOOLS
INSTALLATION STEPS
LED power supply Screw(M4) Connection terminal Insulation tapeDiagonal pliers
Clean the mounting surface free of
dust and debris.
Peel away the self adhesive tape
on the back of product and mount
it onto the lightbox bottom.
Prefix the product and make sure it
is flat and evenly arranged in light
box.
Fix the product with screws and
check and ensure correct wiring,
then power on for self-test.

AM8-D
05(5)
COMMON FAULTS AND TROUBLESHOOT
Quick Guide
Problems
All LEDs can not light on.
LEDs can not light on partly.
Brightness of LED is
inconsistent tor insufficient.
LED flicker.
Automatic power protection from the open or short
circuit in output of the power supply.
Fix the short circuit problem.
Correctly connection
Check the power supply system to fix it.
Replace with more powerful power
Make sure the working voltage of the product within ±5% of standard
voltage, or keep balance by circuit power consumption.
Reduce the quantities of the product in series connection to
meet requirement.
Power on
Wrong connection of power supply.
Some switching mode power supplies are not powered.
Power supply line error.
Mistaken wire connection of some of products
Power overloaded.
Connection point fault. Remove bad connection point.
Replace a new power supply.
Please follow the instructions
Power supply circuit excessive consumption.
Excessive quantities in series connection of the product
Switching power supply failure.
Wrong Installation or use of products
Reasons
No electric supply.
Solutions
STATEMENTS AND RECYCLING
Repair should be operated by a qualified technician, if the external circuit or main line of this product is damaged.
The parameters given in this manual are typical values and for reference only.
All illustrations and drawings in this manual are for reference.
This product is subject to change without notice.
Statements:
LED lighting products belongs to electronic products, please do recycling treatment according to the relevant WEEE directives.
Recycling:
■
■
■
■
■
BLUEVIEW ELEC-OPTIC TECH CO.,LTD
□Tel: +86-28-8148 0011
□Fax: +86-28-8148 1258
□Web.: www.blueviewled.com
□Email: sales@blueviewled.com
□Add.: No. 1000, Section 2, Konggang 2nd Road, Shuangliu, Chengdu 610207, Sichuan, CHINA
Before installation, check that the product parameters are consistent with the requirements (Seeing product specifications or product labels) Load voltage,
current, power and power supply should be matched with the product.
Follow the instructions of wiring diagram (first connect the load and then the power supply) to avoid short circuit.
Make sure the correct connection of positive and negative poles between products and power supply. Otherwise, the light will not be on.
Make sure the power cord firmly screwed into the terminal and it should not be pulled out by hands.
The terminal should have insulation,waterproof and anti-corrosive treatment.
When using our high-voltage products, you need to match our surge protective devices; Prevent the impact and damage of surge current on products
ATTENTIONS BEFORE INSTALLATION
■
■
■
■
■
■
■
Table of contents


