Bluewheel HK400 User manual

DE
EN
ES
FR
IT
NL

2
Benutzerhandbuch
INHALTSVERZEICHNIS
Inhalt DE
1. TEILELISTE....................................................................................... 4
2. AUFBAUANLEITUNG .......................................................................... 6
3. GURTBEFESTIGUNG .......................................................................... 8
4. STEUERUNG DES HOVOKARTS........................................................... 9
5. SICHERHEITSHINWEISE ..................................................................... 9
Stand: 11.01.2021

3
Unsere Video Tutorials für dich!
Link zu den Videos:
https://service.innovamaxx.de/hk400_video
Uns gibt es auch auf Social Media!
Instagram-Seite Facebook-Seite
Hol dir die neuesten Produktinfos, Trainingsinhalte uvm. auf unserer:
Aufbau, Benutzung, Abbau.
1. QR-Code scannen
2. Videos anschauen
3. Schnell und sicher starten
https://www.instagram.com/bluewheel.de/https://www.facebook.com/bluewheelberlin/


5
iDAS HK400 HOVOKART-SET IST KOMPATIBEL MIT
ALLEN GÄNGIGEN 6,5 - 10 ZOLL HOVERBOARDS.
NICHT KOMPATIBEL MIT HX420 UND HX600.
Ausnahme bei HX510: Um das Board nach Benutzung ausschalten zu können, müssen
zuerst die Befestigungsgurte etwas gelockert werden.
Denn solange das Kart fest mit dem Board vergurtet ist, wird einerseits der An-/Ausschalter
vom Gurt teils verdeckt und andererseits aktiviert sich die automatische Ausschalt-Sperre
des HX510. Durch Lockern der Gurte haben Sie wieder vollen Zugriff auf den An-/Aus-
schalter und können Ihr Gerät wie gewohnt abschalten.
Das maximale Benutzergewicht beträgt 70kg.
Recyclingkreislauf
Verpackungsmaterialien können wieder dem Rohstoffkreislauf zugeführt werden.
Entsorgen Sie die Verpackung gemäß den aktuellen Bestimmungen. Informationen erhalten Sie bei den Rückgabe- und Sammelsystemen Ihrer Gemeinde.

6
2. AUFBAUANLEITUNG
Entfernen Sie die Schrauben vom
Hauptrahmen (#6).
Entfernen Sie die zwei M4*30 Schrau-
ben über der Feder am Lenkrohr auf
der Lenkachse (#4).
Befestigen Sie die Lenkstange (#3) mit
den Schrauben des Lenkrohrs, so dass
es vom Trittflächenrahmen (#5) weg
zeigt.
Verbinden Sie Hinterachse (#2) und
Hauptrahmen (#6) und ziehen Sie die
Schrauben fest.
Stecken Sie den Trittflächenrahmen
(#5) über das Lenkrohr der Lenkach-
se.
Entfernen Sie die Schrauben am
Trittflächenrahmen (#5). Verbinden
Sie die Rahmen-Kolbenstange (#8)
mit dem Trittflächenrahmen (#5) und
ziehen Sie die zwei M8*75 Schrau-
ben fest.
Schieben Sie die Rahmen-Kolbenstan-
ge (#8) in den Hauptrahmen (#6) und
befestigen Sie beide mit der Ver-
schluss-Schraube (#11).
Setzen Sie die Unterlegscheibe wieder
auf das Lenkrohr. Schieben Sie die
Lenkstange (#3) mit der kurzen Seite
auf das Lenkrohr.
Schrauben Sie den Sitz (#1) mit den
vier M5*16 Schrauben und Muttern an
den Hauptrahmen (#6).
123
456
7 8 9

7
Stecken Sie das Lenkradrohr (#10) in
die Lenkstange (#3) und befestigen Sie
es mit dem Schnellverschluss (#14).
Ziehen Sie die Gurte (#9) von der ge-
genüberliegenden Seite durch die Ösen
und befestigen Sie den Klettverschluss.
Befestigen Sie das Lenkrad (#7) mit
den M5*10 Schrauben und Muttern
am Lenkradrohr (#10).
Lenkachse (#4) VOR- und RÜCK- Be-
wegung: Mit der Schraube unter dem
Kipp-Lager stellen Sie den Gleichge-
wichtspunkt Ihres Hoverboards ein.
Dieser muss in Ruhelage stehen.
Platzieren Sie den Hovokart-Rahmen
mittig auf dem Hoverboard. Lockern Sie
die Muttern der Haltebügel und passen
Sie sie auf die Breite der Trittflächen an
(danach festziehen).
Lenkachse (#4) LINKS- RECHTS- Be-
wegung: Über die vier äußeren Stütz-
füße stellen Sie das seitliche Gleich-
gewicht ein. Dieser muss in Ruhelage
stehen.
Das Hoverkart ist nun einsatzbereit.
10 11 12
13 14 15

8
1. Führen Sie den Gurt durch die Öffnungen des Haltebügels. Achten Sie darauf, dass die Klett-Flächen nach außen (zum Lenk-
rad hin) zeigen und der Gurt nicht verdreht ist. (Abbildung 1, 2)
2. Führen Sie den Gurt um das Hoverboard herum. Öffnen Sie, durch Drücken, die Metall-Schnalle des Gurtes und stecken Sie
das andere Ende des Gurtes durch die Öffnung der Metall-Schnalle (von der Unterseite des Hoverboards nach außen). Ziehen
Sie den Gurt solange hindurch, bis das Hoverboard festsitzt und der Gurt fest anliegt. (Abbildung 3, 4)
3. Drücken Sie die beiden Klett-Flächen zusammen, sodass der Gurt nicht am Boden schleift oder die Räder blockiert. (Abbil-
dung 5)
Das Hoverkart ist nun einsatzbereit.
3. GURTBEFESTIGUNG
1 2
4
3
5

9
4. STEUERUNG DES HOVOKARTS
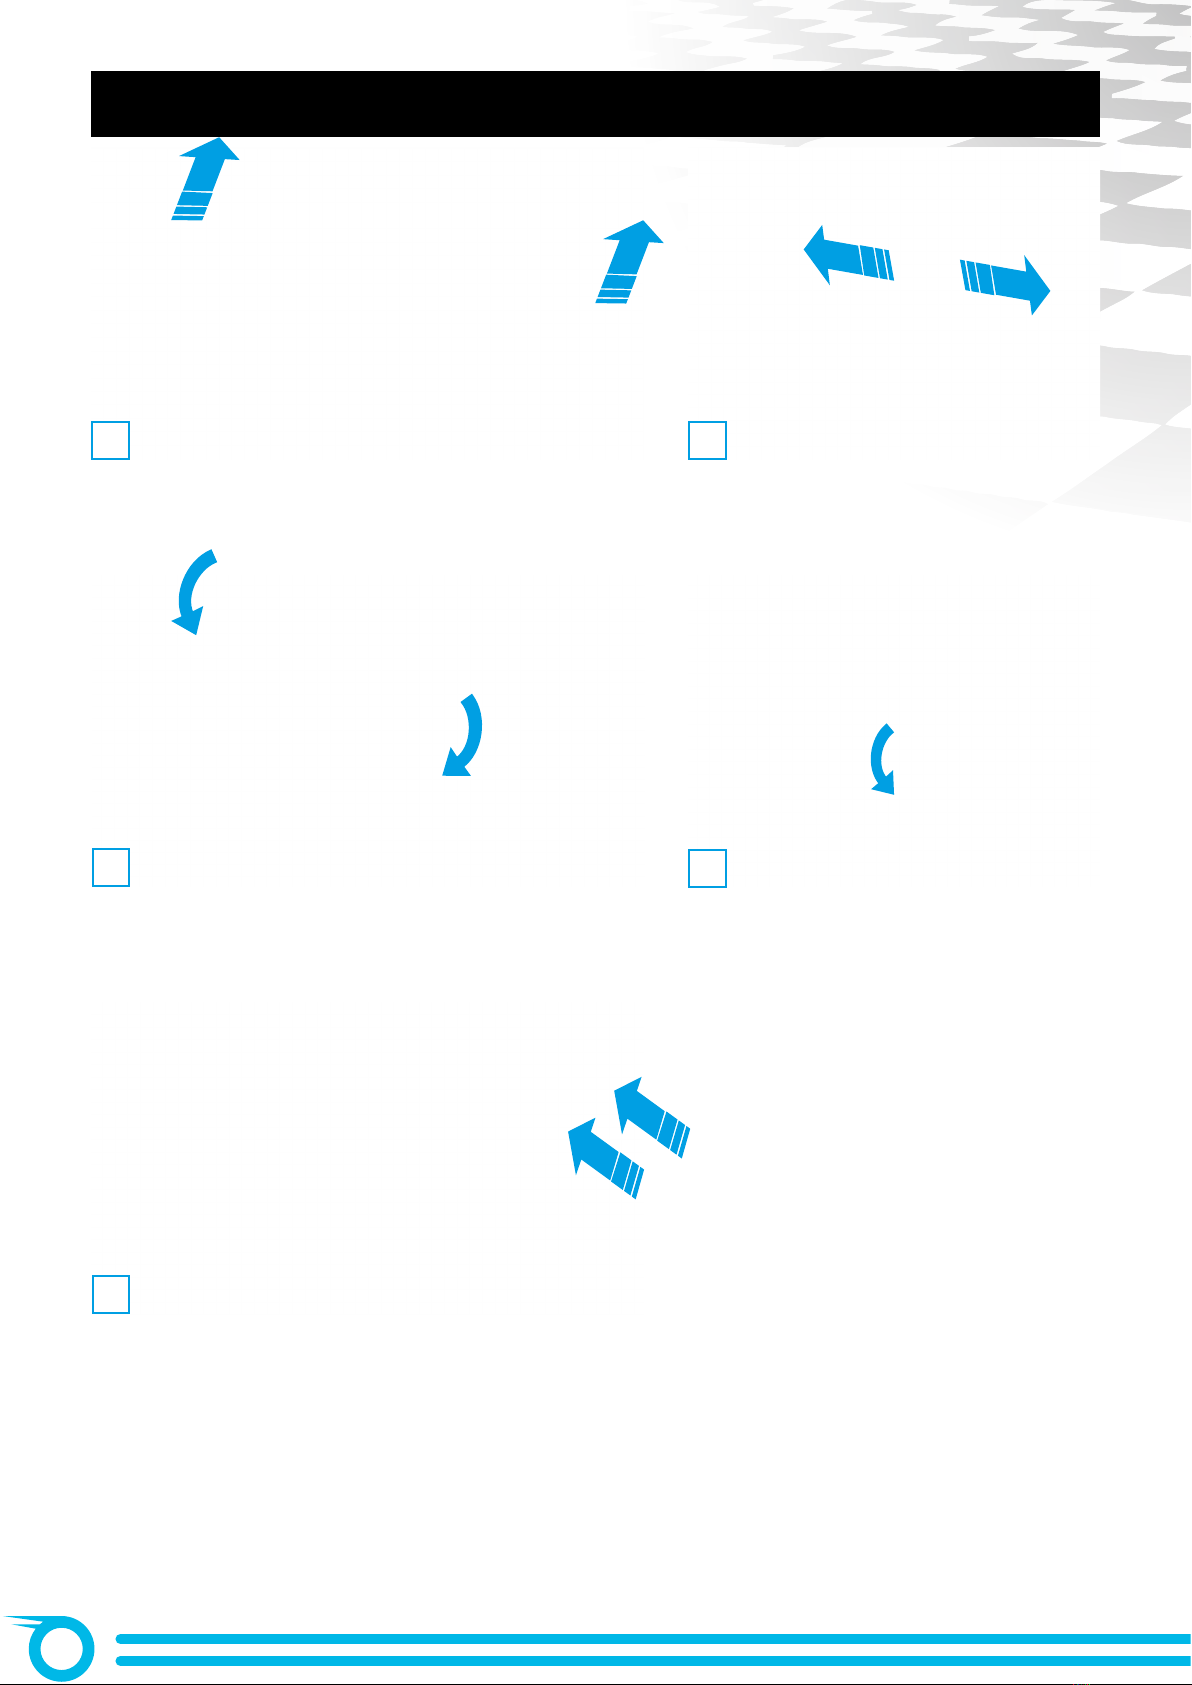
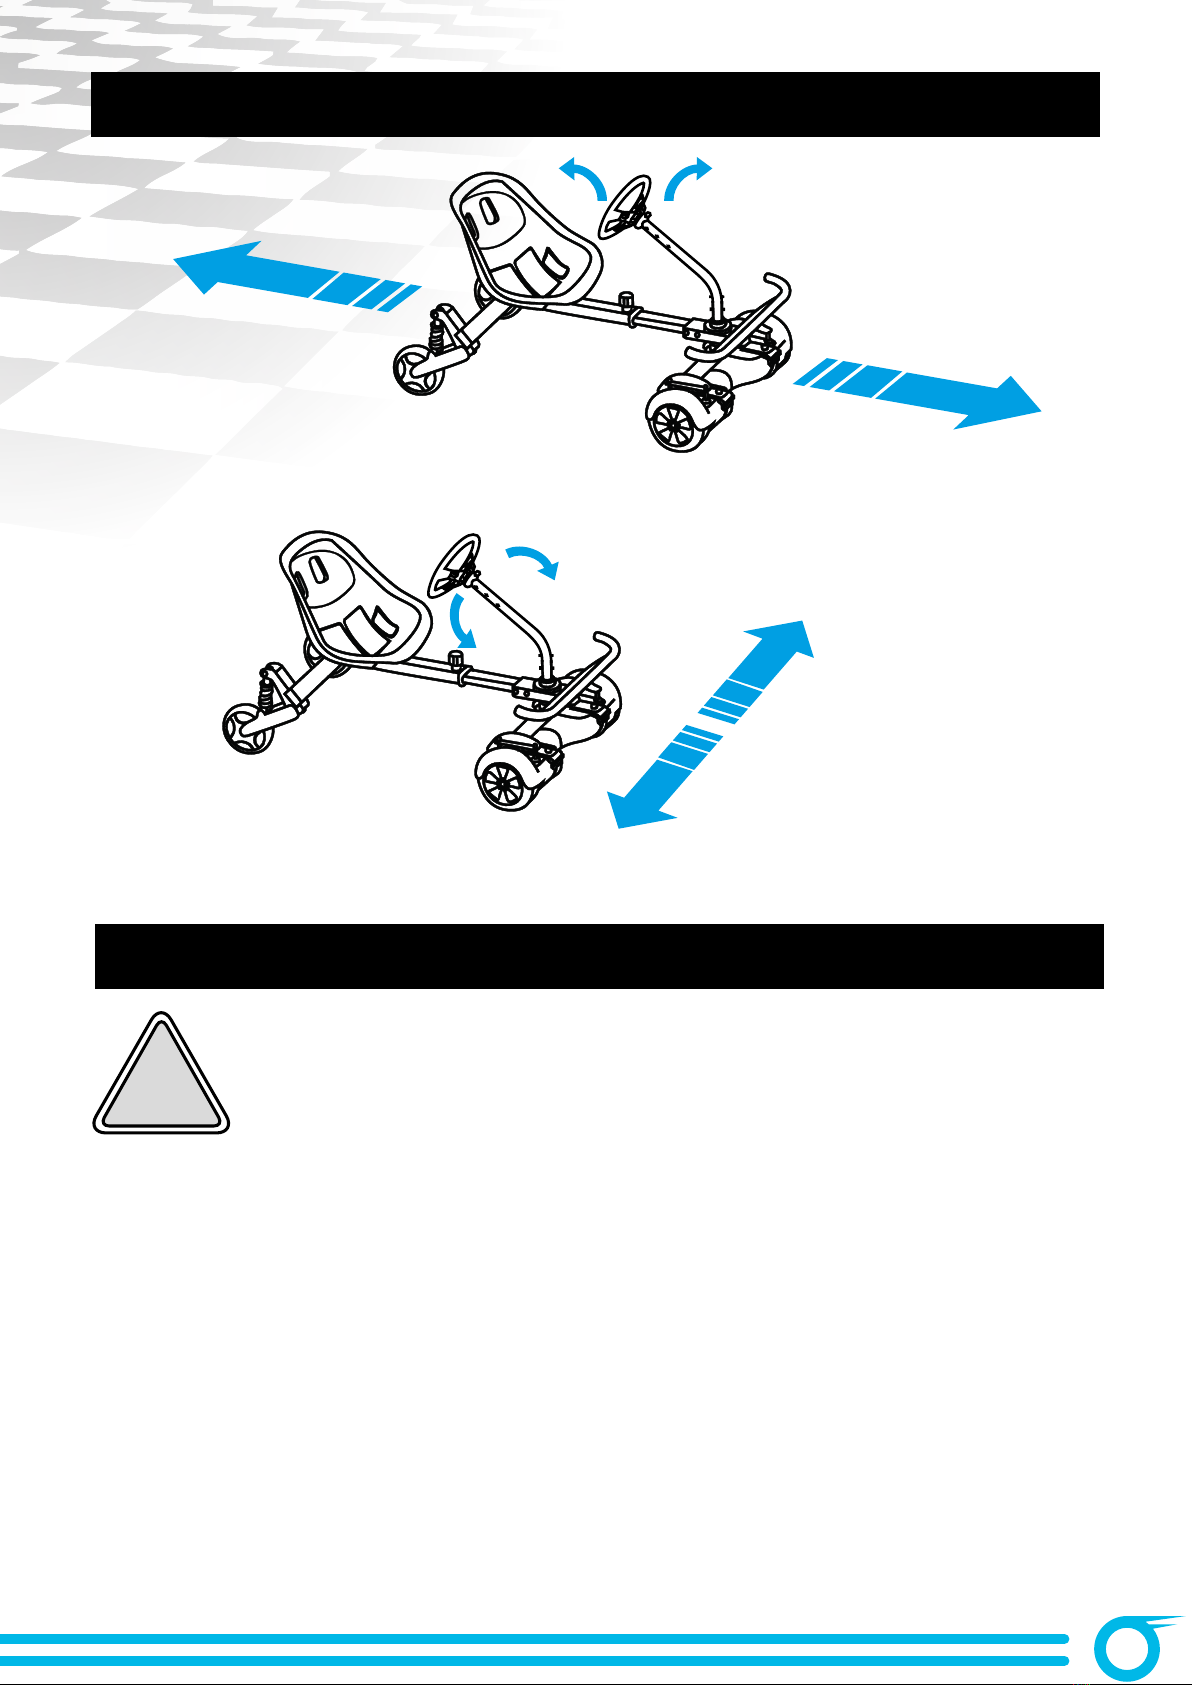
Drücken Sie das Lenkrad nach vorne oder hinten, für eine VOR- oder RÜCK- Bewegung.
Drücken Sie das Lenkrad nach links oder rechts, für eine LINKS- oder RECHTS- Bewegung.
5. SICHERHEITSHINWEISE
!BITTE BEACHTEN SIE ZU IHRER EIGENEN
SICHERHEIT FOLGENDE HINWEISE
Zulassung
Hoverboards und Hovokarts sind nach StVZO nicht
für den öffentlichen Straßenverkehr zugelassen.
Dazu zählen neben der Straße auch Fußgänger- und
Radwege. Nutzen Sie dieses Gerät daher nur außer-
halb des Straßenverkehrs oder auf Privatgeländen.
Schutzkleidung
Tragen Sie angemessene und zugelassene Schutz-
kleidung bestehend aus Helm, Ellbogenschoner,
Knieschoner und Handgelenkschoner. Kinder und
ältere Menschen sollten nur unter Aufsicht erwach-
sener Personen fahren.
Abnutzung
Das Fahren mit dem Hovokart erweitert das Fahrer-
lebnis eines Hoverboards auf eine ursprünglich so
nicht vom Hersteller vorgesehene Art und Weise. Ab-
hängig von der eigenen Fahrweise kann es dadurch
zu einer schnelleren Entstehung von Abnutzungs-
und Gebrauchsspuren führen, als wenn man das
Board herkömmlich, also stehend, verwendet.
Versicherungsschutz
Verursachte Sach- oder Personenschäden mit die-
sem Gerät werden nicht von der privaten Haftpflicht-
versicherung übernommen. Für alle entstandenen
Schäden muss der Fahrer selbst aufkommen.

10
Usermanual
TABLE OF CONTENT
Inhalt EN
1. SPARE PARTS LIST ........................................................................... 12
2. INSTALLATION INSTRUCTIONS ........................................................... 14
3. STRAP ATTACHMENT ........................................................................ 16
4. CONTROLLING THE HOVOCART.......................................................... 17
5. SECURITY ADVICES........................................................................... 17

11
Our video tutorials for you!
Link to the videos:
https://service.innovamaxx.de/hk400_video
We are also on social media!
Instagram-page Facebook-page
Get the latest product information, training content and much more on our:
Assembly, use, disassembly.
1. Scan the QR code
2. Watch videos
3. Start fast and safely
https://www.instagram.com/bluewheel.de/https://www.facebook.com/bluewheelberlin/

13
iTHE HK400 HOVOCART SET IS COMPATIB-
LE WITH ALL COMMON 6.5 - 10 INCH HOVER-
BOARDS.
NOT COMPATIBLE WITH HX420 AND HX600.
Exception with HX510: To be able to switch off the self balancing scooter after use, the
fastening straps must first be slightly loosened.
When the Go Kart is firmly strapped to the self balancing scooter, the on/off switch is partly
covered by the strap and the HX510‘s automatic switch-off lock is activated. By loosening
the straps you have full access to the on/off switch again and you can switch off your device
as usual.
The maximum user weight is 70kg.
Recycling loop
Packaging material can be conveyed back to the raw material cycle. Dispose of packaging material in accordance with legal provisions. Information can be
retrieved from the return or collections systems of your community.

14
2. INSTALLATION INSTRUCTIONS
Remove the screws from the main
frame (# 6).
Remove the two M4 * 30 screws
above the spring on the steering tube
of the steering axle (# 4).
Attach the handlebar (# 3) with the
steering tube screws so it positions
away from the tread frame (# 5).
Connect the rear axle (# 2) and the
main frame (# 6) and tighten the
screws.
Insert the tread frame (# 5) over the
steering tube of the steering axle.
Remove the screws on the tread
frame (# 5). Connect the frame pis-
ton-rod (# 8) to the tread frame (# 5)
and tighten the two M8 * 75 screws.
Slide the frame piston-rod (# 8) into
the main frame (# 6) and secure both
together with the locking screw (# 11).
Place the washer back on the handle-
bar. Push the handlebar (# 3) with the
short side onto the steering tube.
Screw the seat (# 1) to the main frame
(# 6) with the four M5 * 16 bolts and
nuts.
123
456
7 8 9
15
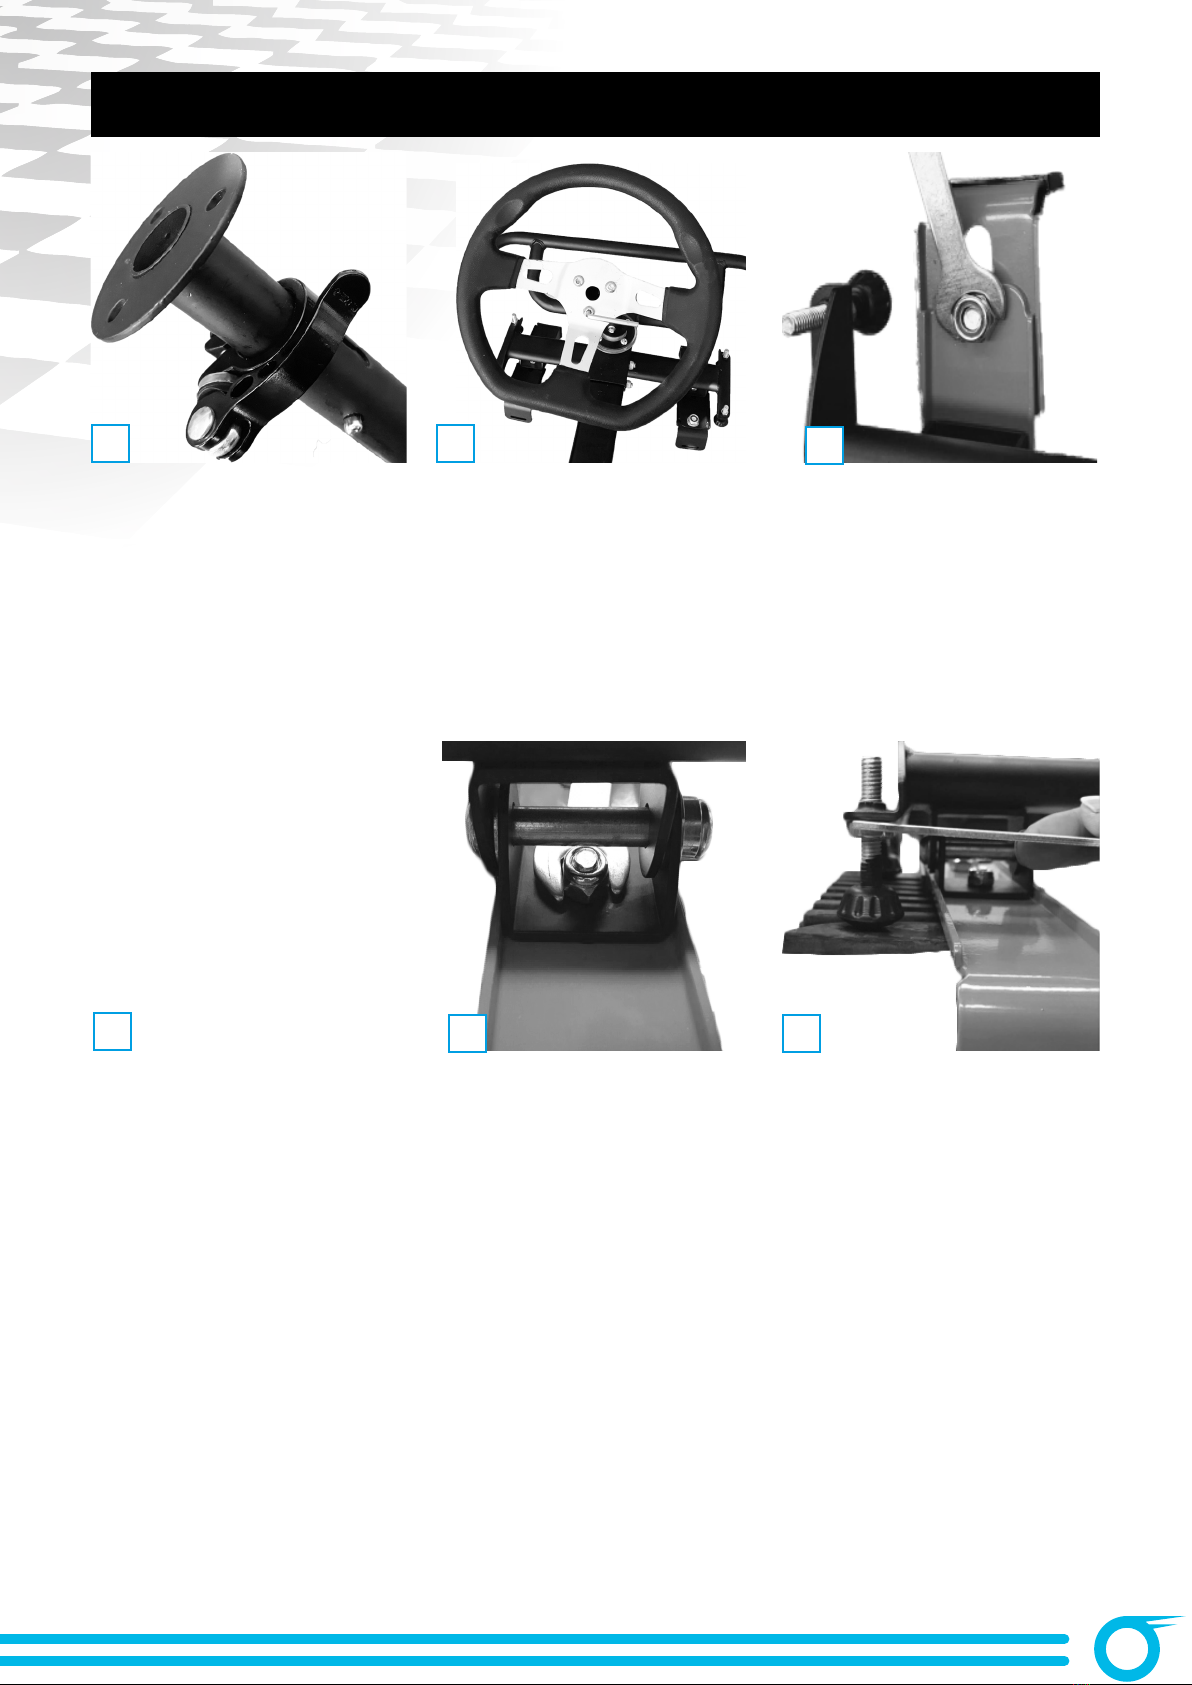
The Hovocart is now ready for ride.
Insert the steering wheel tube (# 10)
into the handlebar (# 3) and secure it
with the quick release (# 14).
Pull the straps (# 9) through the eyelets
from the opposite side and attach the
velcro fastener.
Attach the steering wheel (# 7) to the
steering wheel tube (# 10) with the
M5 * 10 bolts and nuts.
Steering axle (# 4) Forward and back-
ward movement: Use the screw below
the balancing point to set the balance
point of your hoverboard. This must
be in rest position.
Place the Hovokart frame in the center
of the hoverboard. Loosen the nuts on
the brackets and adjust them to the
width of the treads (then tighten).
Steering axle (# 4) LEFT-RIGHT motion:
Set the lateral balance using the four
outer support feet. This must be in rest
position.
10 11 12
13 14 15
16
1. Thread the strap through the openings in the retaining bracket. Make sure the velcro fastening surfaces are facing outwards
(in the direction of the wheels) and that the strap is not twisted in any way. (Images 1,2)
2. Thread the strap around the hoverboard. Open, by pressing down, the metal buckle of the strap and insert the other end of
the strap through the opening of the metal buckle (from the bottom of the hoverboard to the outside). Pull the strap through
until the hoverboard is secure on the strap and the strap is tight (Images 3,4)
3. Securely press the two velcro surfaces together so that the belt does not drag on the ground or impair or block the wheels
in any way. (Image 5)
The Hoverboard is now ready for use.
3. STRAP ATTACHMENT
1 2
4
3
5
17
4. CONTROLLING THE HOVOCART
5. SECURITY ADVICES
!PLEASE NOTE THE FOLLOWING INSTRUCTIONS
FOR YOUR OWN SAFETY
Permission
Hoverboards and Hovocarts are not permitted for
public road traffic. It applies to all roads and also for
sidewalks and bike lanes. Use this device only off the
road or on private ground.
Insurance
Damage to property or personal injury caused by
this device are not covered by private liability in-
surance. The driver must pay for all damages incur-
red.
Protective clothing
Wear appropriate and approved protective clothing
consisting of helmet, elbow protector, knee protector
and wrist protector. Children and the elderly should
only drive under the supervision of adult persons.
Abrasion
The Hoverkart provides a driving experience of a
self-balancing scooter in a way not originally inten-
ded by the manufacturer. Depending on your riding
style, it can lead to a faster appearance of usage
than if you use the self-balancing scooter conventio-
nally, i.e. standing.
Push the steering wheel forward or backward for a FORWARD or REVERSE movement.
Push the steering wheel left or right for a LEFT or RIGHT movement.
18
Manual de usuario
TABLA DE CONTENIDOS
Inhalt ES
1. LISTA DE REPUESTOS....................................................................... 20
2. INSTRUCCIONES DE INSTALACIÓN...................................................... 22
3. FIJACIÓN DEL CINTURÓN .................................................................. 24
4. CONTROL DE LA CARPA.................................................................... 25
5. CONSEJOS DE SEGURIDAD ............................................................... 25
19
Nuestros tutoriales en video para usted!
Enlace a los videos:
https://service.innovamaxx.de/hk400_video
¡También estamos en redes sociales!
Instagram Facebook
Obtenga la última información sobre nuestros productos, entrenamientos y mucho
más aquí:
Montaje, Utilizar, Desmontaje.
1. Escanear el código QR
2. Ver vídeos
3. Comienza rápido y seguro
https://www.instagram.com/bluewheel.de/https://www.facebook.com/bluewheelberlin/

Table of contents
Languages:


