BLUGARDA BluPressure User manual
BluPressure
PRESSURE FILTER
DRUKFILTER
DRUCKFILTER
FILTRE À PRESSION

LANGUAGES
English � � � � � � � � � � � � � � � � � � � � � � � � � � � � � � � � � � � 4
Nederlands � � � � � � � � � � � � � � � � � � � � � � � � � � � � � � � 14
Deutsch � � � � � � � � � � � � � � � � � � � � � � � � � � � � � � � � � 24
Français � � � � � � � � � � � � � � � � � � � � � � � � � � � � � � � � � 35
Over 30 years of experience in pond equipment
With over 30 years of experience, we know all about pond equipment. Our mis-
sion is to help pond lovers with buying the best equipment for their pond in the
most sustainable way possible. We trust in the quality of our products and give 3
year warranty* on all our pond products.
Enjoying your pond
A pond is to be enjoyed. Let us help you with the difficulties of the technical sys-
tems around your pond, so you have more time to enjoy your pond with its beau-
tiful fish and plants. No more worries.
From starter to professional
Starting a pond and taking care of it can be complicated at first. There are many
factors to take into account. We help you with making the right choices for your
pond in terms of setup, equipment and maintenance. We will help you with all
the answers regarding your pond. From small to large ponds. From starter to
professional.
Want to know more or get in touch? Visit www.BluGarda.shop.
ABOUT
Quick delivery &
service
Customer service
available to help
Reliable & easy to
use products

1� Unboxing � � � � � � � � � � � � � � � � � � � � � � � � � � � � � � � � 5
1.A Contents . . . . . . . . . . . . . . . . . . . . . . . . . . . . . . . . . . . . . . . . . . . . . . . . . . . . . 5
1.B Checking technical data . . . . . . . . . . . . . . . . . . . . . . . . . . . . . . . . . . . . . . . 5
1.C Technical data . . . . . . . . . . . . . . . . . . . . . . . . . . . . . . . . . . . . . . . . . . . . . . . 5
1.D Application . . . . . . . . . . . . . . . . . . . . . . . . . . . . . . . . . . . . . . . . . . . . . . . . . . 6
2� Safety � � � � � � � � � � � � � � � � � � � � � � � � � � � � � � � � � � 6
3� Operation of the pressure filter � � � � � � � � � � � � � � � � � � � 7
4� Installing the pressure filter � � � � � � � � � � � � � � � � � � � � � 8
4.A Placing the filter . . . . . . . . . . . . . . . . . . . . . . . . . . . . . . . . . . . . . . . . . . . . . . 8
4.B Connecting pond hoses to the filter . . . . . . . . . . . . . . . . . . . . . . . . . . . . . 8
4.C Starting up the pressure filter . . . . . . . . . . . . . . . . . . . . . . . . . . . . . . . . . . 8
4.D Proper operatioin of the pressure filter . . . . . . . . . . . . . . . . . . . . . . . . . 8
5� Maintenance � � � � � � � � � � � � � � � � � � � � � � � � � � � � � � 9
5.A Periodic cleaning of filter with rotary handle . . . . . . . . . . . . . . . . . . . . . 9
5.B Complete cleaning of the filter sponges . . . . . . . . . . . . . . . . . . . . . . . . . 9
5.C Replacing the filter sponges . . . . . . . . . . . . . . . . . . . . . . . . . . . . . . . . . . 10
5.D Disassembling and cleaning the UV-c device . . . . . . . . . . . . . . . . . . . . 10
6� Winter preparations � � � � � � � � � � � � � � � � � � � � � � � � � 11
7� Troubleshooting � � � � � � � � � � � � � � � � � � � � � � � � � � � 11
8� Parts � � � � � � � � � � � � � � � � � � � � � � � � � � � � � � � � � � 12
9� Warranty conditions � � � � � � � � � � � � � � � � � � � � � � � � � 13
9.A What does the warranty include . . . . . . . . . . . . . . . . . . . . . . . . . . . . . . . 13
TABLE OF CONTENTS
English

5
EN
BluPressure manual
1. UNBOXING
Getting started!
Check the pressure filter, power cable and plug for possible damage, if so, do not use the unit. Take
pictures and contact BluGarda.
1.A CONTENTS
1x Pressure filter with 5-metre power cable
3 set hose couplings
1x Manual
If everything is fine, follow further instructions in the manual.
Read the instructions carefully and follow them!
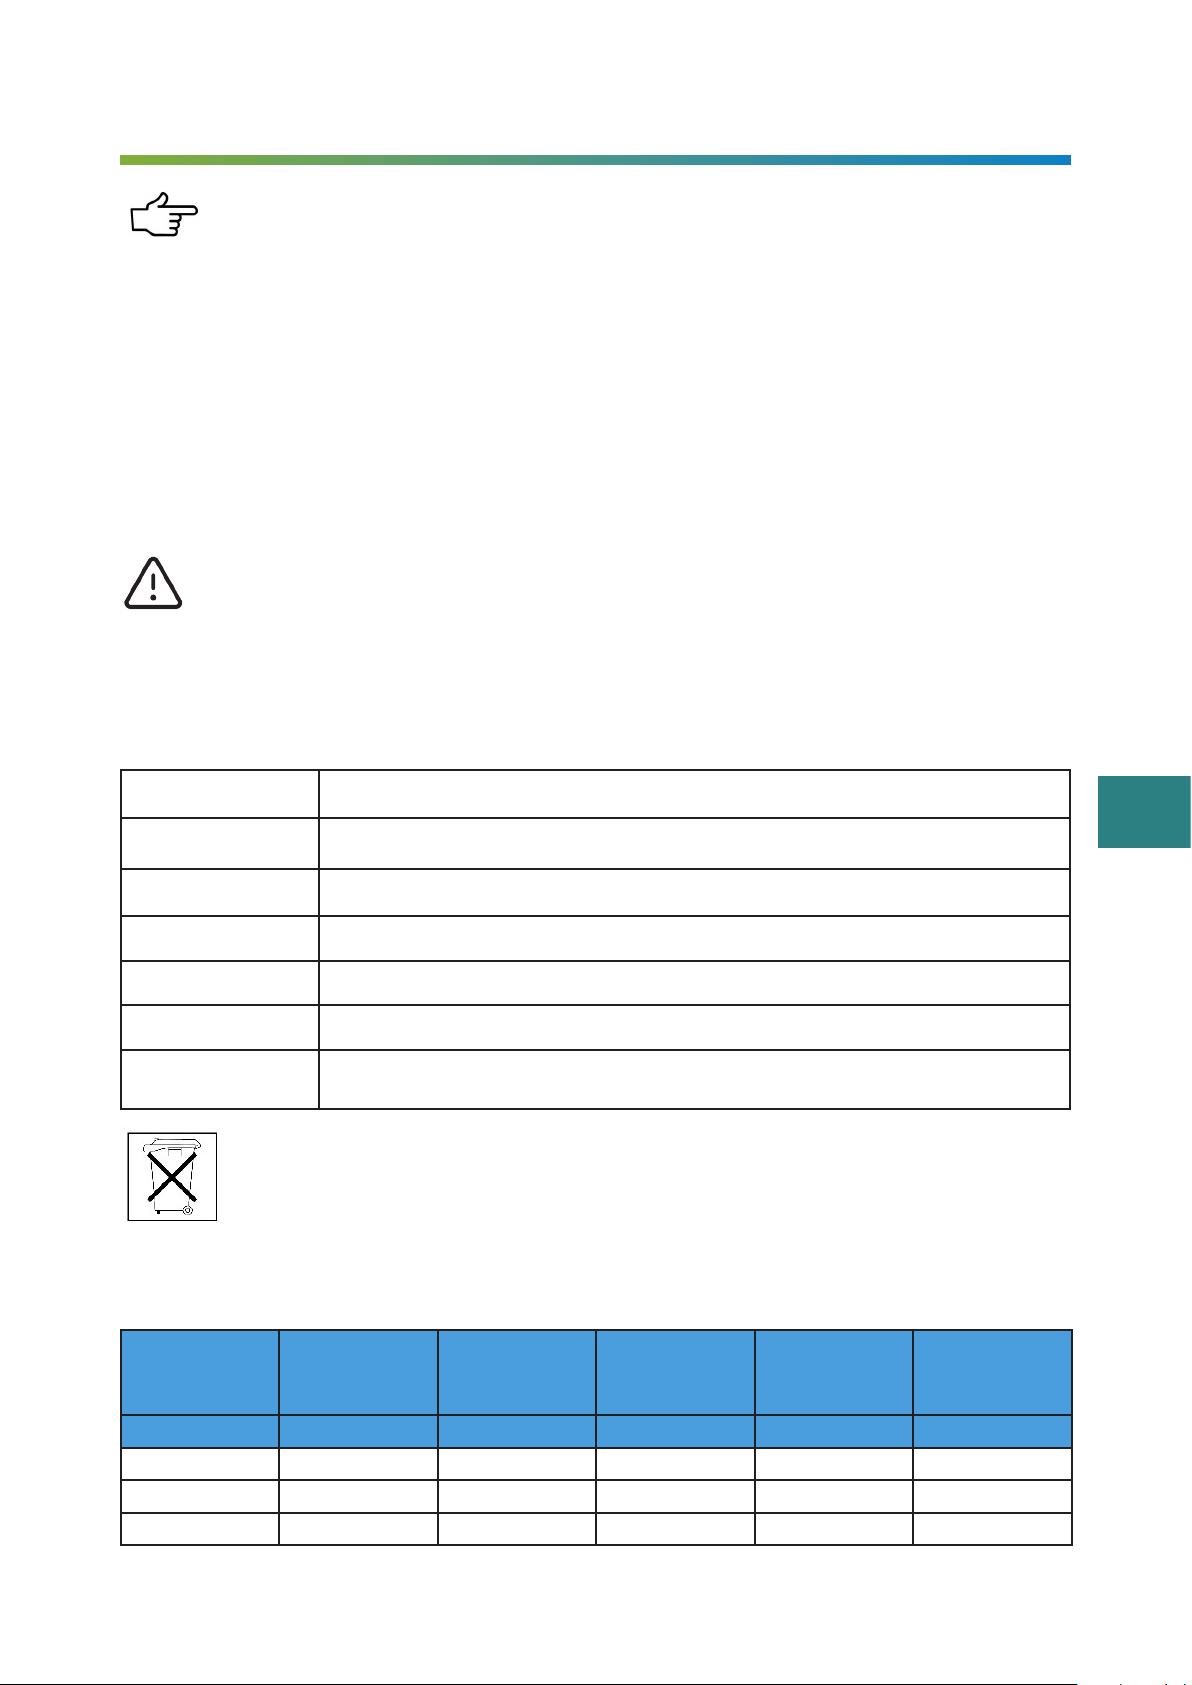
1.B CHECKING TECHNICAL DATA
Check the data on the rating plate.
The rating plate lists all important technical data.
Voltage V/Hz The listed voltage must match the existing house voltage.
Flowadvise max Maximum flow-through capacity pressure filter.
UV-C lamp W Wattage/power of UV-C lamp.
IP 44 Protection code; the filter is splash-proof
Max 0.3 Bar Maximum pressure in Bar.
T.max Maximum temperature for the filter.
CE The sign indicates that the product complies with European legislation.
Defective electrical appliances that have been used in the household should be disposed of
according to EU directives. This product should not be disposed of with normal household
waste but should be collected separately.
More information on local waste collection points can be found at your hometown council.
1.C TECHNICAL DATA
Type Voltage Power UV-C
lamp/type
Cable Filter volume Maximum
throughput
V/Hz Watt Meter Litres Litres/hour
BGPF-6000 220-240/50 11 Watt/PL 5 16 6.000
BGPF-8000 220-240/50 11 Watt/PL 5 20 8.000
BGPF-10000 220-240/50 18 Watt/PL 5 25 10.000
EN
6BluPressure manual
1.D APPLICATION
This product is only suitable for freshwater with a water temperature of +4°C to +35°C, in ponds and
water features. Not suitable for sea (salt) water and/or liquids to which the product is not resistant (e.g.
chemical liquids).
The BGPF pressure filters are for cleaning pond water with or without ornamental fish (no koi) and are
installed outside the pond.
2. SAFETY
Caution! The use of this filter is only permitted if the existing electrical
installation complies with legal standards.
The filter must never be in operation when there are people in the water! (Disconnect filter from mains).
The filter should only be connected to an installation with a residual current device (30mA) and an
earthed socket.
The socket should be placed in a moisture-free place, at least 2 metres from the water’s edge.
The filter is equipped with a built-in UV-C lamp: UV-C radiation is harmful to eyes and skin: Avoid direct
contact with the lamp. It should only be in operation when the lamp is inserted in the housing and set
up in the pond.
If in doubt, consult a competent installer.
Persons, who cannot follow these instructions, must not use the filter!
This device is not intended for use by persons and children with physical, sensory or mental impair-
ment, or lack of experience and/or knowledge.
Unless they are accompanied by a person responsible for their safety, or by being instructed how to
use the device.
Care must be taken to ensure that children cannot play with the device.
When doing any work on the filter and/or pond or other system, with which the filter is connected, first
remove the mains plug of the filter from the socket and any other devices that are connected.
Keep the plug free of moisture. To prevent water from running through the cord to the plug, form a loop.
Before operating the filter, examine the power cord and plug for damage.
If the power cord, filter, UV-C lamp are damaged, the filter should no longer be used.
Never move or hang the filter by the power cord.

7
EN
BluPressure manual
3. OPERATION OF THE PRESSURE FILTER
A Water input The pond pump is connected with a pond hose to the water inlet of
the pressure filter, use as large a hose diameter as possible to keep
resistances as low as possible.
B Vortex operation Gravity and vortex flow separate suspended particles and water.
C Mechanical filtering Filter sponges ensure that solid particles are separated from the
water.
D Biological filtration The holes in the sponges through which the water flows form a
large surface area where micro-organisms can attach. These en-
sure good filtration of the water. The yellow and blue sponges have
different flow volumes. The blue sponge has a fast flow rate, where
micro-organisms mainly grow, supporting the nitrification process
(ammonia to nitrite). The yellow sponge has a slower flow rate,
where microorganisms that support the de-nitrification process
(nitrite to nitrate) mainly grow. Both are essential for good pond
water filtration.
E Algae destruction Water is briefly exposed to UV-C light at the return flow. This de-
stroys micro-organisms such as bacteria and algae. This ensures
healthier and clearer pond water.
FReturn water connection The water is returned to the pond via the water outlet to, for exam-
ple, a waterfall or watercourse.
G Drainage Dirty water outlet. During cleaning of the filter material, dirty water
is discharged to the sewer or garden via this outlet.
H Function switch Functions: Filter mode ("filter") and cleaning ("clean") of the filter.
I Cleaning handle When the function switch is set to clean, the sponges can be cleaned
by turning the handle. Turn the function switch back to filter ("fil-
ter"), after the sponges are cleaned and clear water flows from the
drain connection.

EN
8BluPressure manual
4. INSTALLING THE PRESSURE FILTER
The filter should never be operated without water, as this may cause dam-
age to the device.
4.A PLACING THE FILTER
1. When installed outdoors, protect the filter from direct sunlight and rain.
Ensure that the filter cannot fall into the pond.
Place the filter at least 2 metres from the pond edge.The filter may be partially buried in the
earth, up to the underside of the lid.
2. Ensure that the filter cover is always easily accessible for cleaning and maintenance. Protect
the filter from direct rain and sunlight.
3. Installation in an enclosed area near the pond, protected from sunlight, rain and frost is pre-
ferred.
4. Do not place the pressure filter too high above the water surface. The head from pump to filter
leads to loss of pump capacity.
5. CAUTION : The return hose from the filter to the pond/waterfall must never be higher than max.
1.0 m above the filter. At higher water lift, seals in the filter may leak due to excessive pressure and
damage electrical components.
4.B CONNECTING POND HOSES TO THE FILTER
1. Lubricate the ends of the pond hose with warm water. This will make it easier to fit them onto
the hose couplings.
2. Attach the largest possible diameter hose to the hose coupling provided, on both input and out-
put. This prevents loss of capacity of the pump. Fit a hose to the waste discharge connection that runs
to the garden or drain.
3. Cut the supplied hose grommets to the required size
4. Use hose clamps to secure the hoses watertight to the hose couplings
4.C STARTING UP THE PRESSURE FILTER
When starting up the pressure filter, always check that the hoses and hose clamps are properly con-
nected. The function switch should be in the “filter” position.
1. First switch on only the pond pump.
Please note: The UV-C lamp of the pressure filter should not be connected to the mains when
no water is flowing through the pressure filter.
2. Next, check the pressure filter and connections for leaks.
3. When everything is working, connect the pressure filter to the mains.
4.D PROPER OPERATIOIN OF THE PRESSURE FILTER
1. The filter with UV-C lamp and pump must be in continuous operation to maintain good filter
performance.
2. The performance of a UV-C lamp decreases over time. Replace the UV-C lamp after 8,000 oper-
ating hours and in any case after each season.
3. It is important to clean the filter material regularly, depending on the pollution in the pond. It’s
better to clean briefly every week, than just occasionally. Heavily soiled filter sponges significantly re-
duce filter performance and wear out faster.

9
EN
BluPressure manual
5. MAINTENANCE
Observe safety regulations
The pressure filter is low-maintenance, but not maintenance-free!
To extend the life of the filter and ensure trouble-free operation, we recommend regular maintenance
and cleaning. By just doing a few things, any person can perform the maintenance work without any
problems.
5.A PERIODIC CLEANING OF FILTER WITH ROTARY HANDLE
The filter sponges become saturated over time, performance and effectiveness decrease. Clean the
filter sponges regularly (depending on the contamination, e.g. weekly) to keep them working optimally.
1. Switch off the filter’s pump and UV-C.
2. Set the function switch (H) to clean(“clean”).
3. Close the valve of the return hose(F).
4. Open the tap of the dirty water hose(G).
5. Now only switch on the pump to flush the filter.
6. Turn the cleaning lever (I). The cleaning mechanism pushes the filter sponge inwards so that
dirt is rinsed out.
7. The filter is now being cleaned. Contaminated water is now drained off. As soon as clear pond
water becomes visible through the transparent connection, cleaning is complete.
8. Switch the pump off again.
9. Open the tap of the return hose (F) and close the tap of the dirty water hose (G).
10. Reset the function switch from “clean” to the “filter” position.
11. Switch the pump on again.
12. The filter material is now cleaned. Check that water comes out of the pressure filter again.
13. Now switch on the filter’s UV-C device again.
Brief cleaning every week is best, depending on the contamination in the pond.
5.B COMPLETE CLEANING OF THE FILTER SPONGES
Note: Never use chemical cleaners to clean the filter sponges or the filter.
This kills the built-up biomass in the sponges.
If the water capacity decreases and the cleaning function does not improve this, the filter sponges
should be manually cleaned, or completely replaced.
1. Switch off the filter by unplugging it.
2. Switch off the pond pump.
3. Disconnect all pond hoses from the pressure filter.
4. Open the housing clamp (12).
5. Remove the filter cover with the filter sponges (7) from the pressure filter, drain it.
Caution!: the filter package may be heavy at high pollution levels.
Place the lid with the filter pack facing upwards on a clean surface.
6. Turn the UV-C tube cap (10) counterclockwise and remove it from the UV-C tube.
7. Unscrew the screw (15) from the pivot rod (18).
8. Remove the partition plate (9)
9. Remove the filter sponges and clean them under running water and squeeze them well.
10. Also clean the pressure filter on the inside.

EN
10 BluPressure manual
11. The largest filter model is equipped with a basket with bio-balls, take it out of the filter tank and
rinse it with clean tap or pond water and place it back in the tank.
12. Fit the filter pack as described below.
5.C REPLACING THE FILTER SPONGES
1. Place yellow and blue sponges alternately on the UV-C tube and fit the separator plate (9) and
mount the turning rod.
2. Mount the UV-C tube head clockwise on the UV-C tube.
3. Place the filter tank O-ring back on the tank, this should be done with some care.
4. Place the filter cover with foam pack straight back into the tank.
5. Fit the clamping ring and then clamp it shut.
6. Then reinstall all hoses on the filter.
7. Operate the pump and check that everything is watertight.
8. Then operate the UV-C device.
5.D DISASSEMBLING AND CLEANING THE UV-C DEVICE
Pond water flows past the quartz glass in the housing, causing (scale) deposits on the glass after some
time. UV-C light will therefore not reach the flowing water as well, reducing its effect. Periodically clean
the quartz glass together with the filter material.
Avoid direct contact with the lamp: hold UV-C lamp with a cloth
1. Switch off the UV-C and pump.
2. Remove the four screws from the lid.
3. Take the UV-C holder with tube straight out the unit.
4. Clean the quartz glass with a damp cloth, avoid scratches.
5. Check for any damage or breaks in the quartz glass.
6. Replace if necessary.
7. Push the UV-C holder back into the filter cover
Inserting the UV-C holder back into the lid may be met with some resis-
tance. Pressing too hard may cause damage!
Smear some petroleum jelly on the inside of the UV-C holder’s housing to make replacing the UV-C
holder easier.
Replacing the UV-C lamp and quartz glass
1. Unscrew the swivel (6) on the quartz glass.
2. Take out the quartz glass tube and replace the UV-C lamp.
3. Check the quartz glass, replace it if broken or damaged.
4. Assemble all parts back together
5. Check the O-ring of the quarter glass, it should not be damaged. Clean it with a damp cloth.
6. Replace the UV-C holder as described in section 7 chapter 3.2.
11
EN
BluPressure manual
6. WINTER PREPARATIONS
When approaching (persistent frost), disconnect the filter, remove water and clean as described in
these instructions. Store dry and frost-free.
Freezing can cause irreparable damage to the filter.
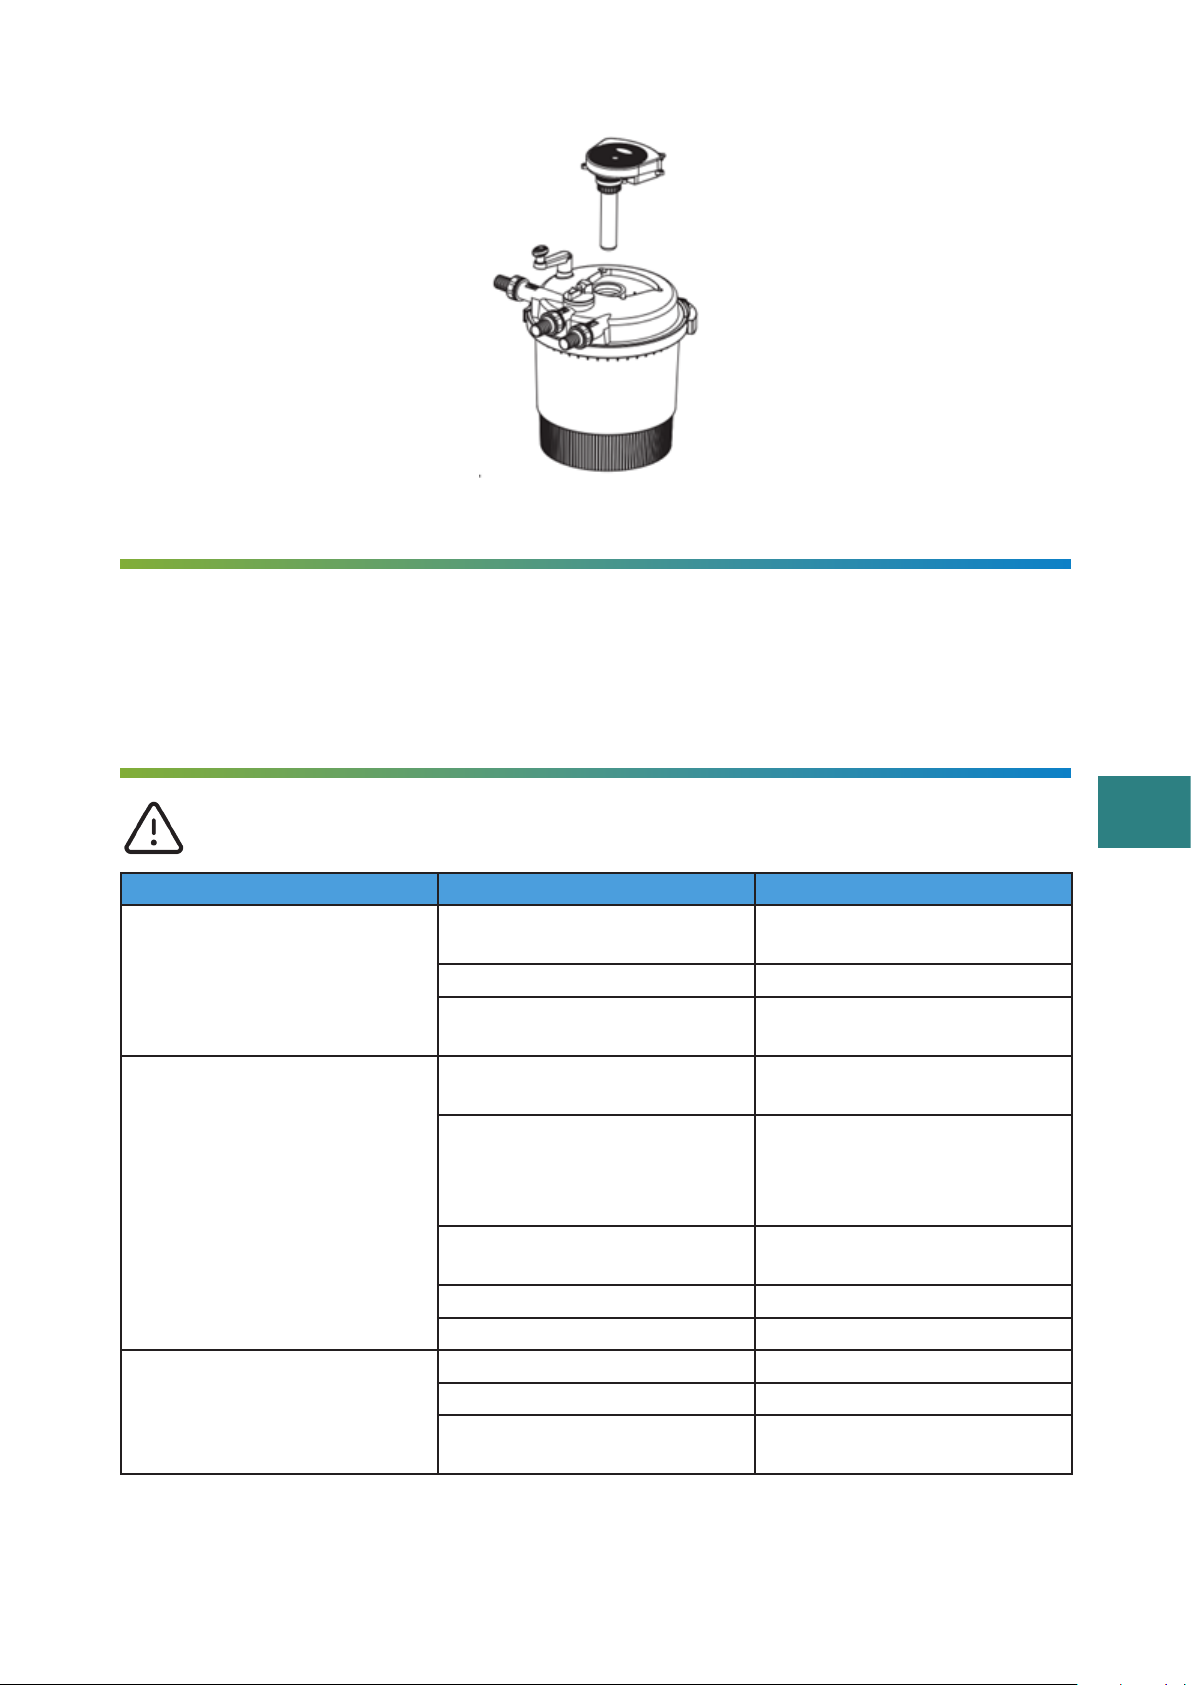
7. TROUBLESHOOTING
Observe safety instructions
Problem Cause Solution
UV-C indicator light is not on
Pressure filter plug not in socket Switch on the pressure filter by
plugging it into the socket
UV-C lamp is broken Replace the UV-C lamp
Connection of lamp wrong Check that lamp is properly con-
nected in the holder
Water does not get clean
Filter has not been on for a long
time
The filter effect is optimal after a
period of 1 to 2 weeks.
Low pressure on water input Reconnect or replace the pump,
or the pump capacity is too low
in relation to filter/pond capac-
ity.
Water is too polluted Remove algae and leaves from
the pond and/or change water
Filter sponge is contaminated Clean the filter sponge
Quartz glass of the UV-C is dirty Clean the quartz glass
No water from filter
Function button is set to 'clean' Set the function button to 'filter'
Pump plug not in socket Plug in the pump
Vijverpomp defect of ernstig
vervuild
Controleer pomp
Can’t solve the problem yourself? Please contact our customer service, we will be happy to help. www.
BluGarda.shop

EN
12 BluPressure manual
8. PARTS
With proper use and maintenance, you will enjoy this product for a long time, yet it may happen that you
need a part. BluGarda believes that supplying parts is important to get your product back in working
order.
1 UV-C holder
2 O-ring cover
3 UV-C lamp
4 O-ring quartz glass
5 Quartz glass
6 Swivel quartz glass
7 Filter cover
8 Sponge
9 Partition plate
10 UV-C spray hood
11 Filter basket
12 Housing clamp
13 O-ring filter tank
14 Filter tank
15 Screw
16 Padding ring
17 Bearing
18 Rotary handle
19 In/out gland
20 Input/output hose grommet
21 Sealing ring
22 Bearing
23 Clutch rotary lever
24 Cleaning lever

13
EN
BluPressure manual
9. WARRANTY CONDITIONS
The filter is covered by a 36-month warranty, effective from the time of purchase. The date on the
purchase invoice is the effective date. Keep the invoice, you will need it if you want to claim warranty.
9.A WHAT DOES THE WARRANTY INCLUDE
We grant a warranty on material and/or construction faults, defective parts will be repaired or replaced
free of charge within the warranty period.
Natural wear and tear on filter sponges, UV-C lamp and quartz glass are not covered by the warranty.
During a warranty assessment, we check whether your product has been properly maintained. If there
is poor maintenance, scaling, damage caused by improper use, damage to the power cable, we have
the right to exclude warranty claims. In that case, a cost proposal will follow to repair or replace the
filter.
Changes to the filter, such as shortening the power cable or cutting the plug, will void the warranty
claim.
Consequential damage caused by failure or misuse of the filter is beyond BluGarda’s liability.
Misprints and technical changes reserved.
This product complies with the LVD Directive (2014/35/EU) and EMC Directive (2014/30/
EU), and we declare compliance with the following standard(s):
LVD EN60335-1: 2012+A11+A13
EN60335-2-109:2010
EN62233:2008

1� Uitpakken � � � � � � � � � � � � � � � � � � � � � � � � � � � � � � � 15
1.A Inhoud . . . . . . . . . . . . . . . . . . . . . . . . . . . . . . . . . . . . . . . . . . . . . . . . . . . . . 15
1.B Technische gegevens controleren . . . . . . . . . . . . . . . . . . . . . . . . . . . . . 15
1.C Technische gegevens . . . . . . . . . . . . . . . . . . . . . . . . . . . . . . . . . . . . . . . . 15
1.D Toepassing . . . . . . . . . . . . . . . . . . . . . . . . . . . . . . . . . . . . . . . . . . . . . . . . . 16
2� Veiligheid � � � � � � � � � � � � � � � � � � � � � � � � � � � � � � � 16
3� De werking van het drukfilter � � � � � � � � � � � � � � � � � � � 17
4� Installeren van het drukfilter � � � � � � � � � � � � � � � � � � � 18
4.A Plaatsen van het filter . . . . . . . . . . . . . . . . . . . . . . . . . . . . . . . . . . . . . . . . 18
4.B Verbinden van vijverslangen aan het filter . . . . . . . . . . . . . . . . . . . . . . 18
4.C Opstarten van het drukfilter . . . . . . . . . . . . . . . . . . . . . . . . . . . . . . . . . . 18
4.D Goede werking van het drukfilter . . . . . . . . . . . . . . . . . . . . . . . . . . . . . . 18
5� Onderhoud � � � � � � � � � � � � � � � � � � � � � � � � � � � � � � 19
5.A Periodiek reinigen filter met draaihendel . . . . . . . . . . . . . . . . . . . . . . . 19
5.B Geheel reinigen van de filtersponzen . . . . . . . . . . . . . . . . . . . . . . . . . . 19
5.C Vervangen van de filtersponzen . . . . . . . . . . . . . . . . . . . . . . . . . . . . . . . 20
5.D UV-c apparaat demonteren en reinigen . . . . . . . . . . . . . . . . . . . . . . . . 20
6� Kleine storingen zelf verhelpen � � � � � � � � � � � � � � � � � � 21
7� Onderdelen � � � � � � � � � � � � � � � � � � � � � � � � � � � � � � 22
8� Garantievoorwaarden � � � � � � � � � � � � � � � � � � � � � � � � 23
8.A Wat houdt garantie in . . . . . . . . . . . . . . . . . . . . . . . . . . . . . . . . . . . . . . . . 23
INHOUDSOPGAVE
Nederlands
15
NL
BluPressure manual
1. UITPAKKEN
Aan de slag!
Controleer het drukfilter, de stroomkabel en de stekker op mogelijke beschadigingen, mocht dat het
geval zijn, neem het apparaat dan niet in gebruik. Maak foto’s en neem contact op met BluGarda.
1.A INHOUD
1x Drukfilter met 5 meter stroomkabel
3 set slangkoppelingen
1x Handleiding
Als alles in orde is, volg dan de verdere instructies van de handleiding.
Lees deze voorschriften aandachtig door en volg ze op!
1.B TECHNISCHE GEGEVENS CONTROLEREN
Controleer de gegevens op het typeplaatje.
Het typeplaatje vermeldt alle belangrijke technische gegevens.
Spanning V/Hz De vermelde spanning moet overeenkomen met de aanwezige huisspanning.
Flowadvise max Maximale doorstroomcapaciteit drukfilter.
UV-c lamp W Wattage/vermogen van de UV-c lamp.
IP 44 Protectiecode; het filter is spatwaterdicht
Max Bar Maximale druk in Bar.
T.max Maximale temperatuur voor het filter.
CE Het teken geeft aan dat het product in overeenstemming is met de Europese
wetgeving.
Defecte elektrische apparaten die in het huishouden zijn gebruikt, dienen volgens EU-richt-
lijnen verwijderd te worden. Dit product mag niet met het normale huisvuil worden afgevo-
erd, maar dient apart te worden verzameld.
Meer informatie over lokale afvalverzamelpunten vind je bij de gemeente van je woon-
plaats.
1.C TECHNISCHE GEGEVENS
Model Spanning Vermogen
UV-c lamp/
type
Kabel Filter volume Max. door-
stroom
capaciteit
V/Hz Watt Meter Liter liter/uur
BGPF-6000 220-240/50 11 Watt/PL 5 16 6.000
BGPF-8000 220-240/50 11 Watt/PL 5 20 8.000
BGPF-10000 220-240/50 18 Watt/PL 5 25 10.000

NL
16 BluPressure manual
1.D TOEPASSING
Dit product is uitsluitend geschikt voor zoet water met een watertemperatuur van +4°C tot +35°C, in
vijvers en waterpartijen. Niet geschikt voor zee(zout) water en/of vloeistoffen waartegen het product
niet bestand is (b.v. chemische vloeistoffen).
De BGPF drukfilters zijn voor reiniging van vijverwater met of zonder siervissen (geen koi) en worden
buiten de vijver opgesteld.
2. VEILIGHEID
Let op! Het gebruik van dit filter is alleen toegestaan als de aanwezige
elektrische installatie voldoet aan de wettelijke normen.
Het filter mag nooit in werking zijn, wanneer zich personen in het water bevinden! (filter van het
stroomnet scheiden).
Het filter mag alleen aangesloten worden op een installatie met een aardlekschakelaar (30mA) en een
contactdoos met randaarde.
De contactdoos dient op een vochtvrije plaats, minstens 2 meter van de rand van het water geplaatst
te zijn.
Het filter is voorzien van een ingebouwde UV-c lamp: UV-c straling is schadelijk voor ogen en huid:
Vermijd direct contact met de lamp. Deze mag uitsluitend in gebruik zijn als de lamp in de behuizing is
geplaatst en in de vijver opgesteld staat.
Bij twijfel een vakkundige installateur raadplegen.
Personen, die deze handleiding niet kunnen opvolgen, mogen de pomp niet gebruiken!
Personen, die deze handleiding niet kunnen opvolgen, mogen het filter niet gebruiken!
Dit apparaat is niet bestemd voor gebruik door personen en kinderen meteen lichamelijke, zintuiglijke
of geestelijke vermogensbeperking, of gebrek aan ervaring en/of kennis.
Tenzij ze worden begeleid door een persoon die verantwoordelijk is voor hun veiligheid, of door het
krijgen van een instructie hoe het apparaat te gebruiken.
Er moet op worden toegezien dat kinderen niet met het apparaat kunnen spelen.
Bij alle werkzaamheden aan het filter en/of vijver of ander systeem, waarmee het filter in verbinding
staat, dient eerst de netstekker van het filter uit de contactdoos genomen te worden en eventueel an-
dere apparaten die aangekoppeld zijn.
Houdt de stekker vrij van vocht. Om te voorkomen dat water via het snoer naar de stekker loopt, moet
er een lus gevormd worden.
Voordat het filter in gebruik wordt genomen, eerst het netsnoer en de stekker onderzoeken beschad-
igingen. Bij beschadiging van het netsnoer, filter, UV-c lamp, mag het filter niet meer gebruikt worden.
Verplaats of hang het filter nooit op aan het netsnoer.

17
NL
BluPressure manual
3. DE WERKING VAN HET DRUKFILTER
A Water invoer De vijverpomp wordt met een vijverslang verbonden aan de water-
invoer van het drukfilter, gebruik een zo groot mogelijke slangdi-
ameter om weerstanden zo laag mogelijk te houden.
B Vortex werking Door zwaartekracht en vortex stroom worden zwevende deeltjes en
water gescheiden.
C Mechanisch filteren Filtersponzen zorgen ervoor dat vaste deeltjes worden gescheiden
uit het water.
D Biologisch filteren De gaten in de sponzen waar het water doorheen stroomt, vormen
een groot oppervlak waar micro-organismen kunnen aanhechten.
Deze zorgen voor goede filtering van het water. De gele en blau-
we sponsen hebben verschillende doorstroomvolumes. De blauwe
spons heeft een snelle stroomsnelheid, hier groeien voornamelijk
micro-organismen die het nitrificatie proces ondersteunen (ammo-
niak naar nitriet). De gele spons heeft een langzamere strooms-
nelheid, hier groeien voornamelijk micro-organismen die het
de-nitrificatieproces ondersteunen (nitriet naar nitraat). Beiden zijn
essentieel voor goede filtering van vijverwater.
E Algen-vernietigen Water wordt bij de retourstroom kort blootgesteld aan UV-c licht.
Hiermee worden micro-organismen zoals bacteriën en algen mee
vernietigd. Dit zorgt voor gezonder en helderder vijverwater.
F Aansluiting retourwater Het water wordt via de wateruitvoer teruggebracht naar de vijver
naar bijvoorbeeld een waterval of beekloop.
G Vuilwaterafvoer Afvoer vuil water. Tijdens reiniging van het filtermateriaal wordt het
vervuilde water via deze uitvoer naar het riool of tuin afgevoerd.
H Functie-schakelaar Functies: Filterstand(“filter”) en schoonmaken (“clean”) van het fil-
ter.
I Reinigingshendel Wanneer de functie schakelaar op reinigen is gezet, kunnen de
sponsen worden gereinigd door de handel te draaien. Zet de functie
schakelaar terug naar filteren (“filter”), nadat de sponzen gereinigd
zijn en er helder water stroomt uit de afvoeraansluiting.

NL
18 BluPressure manual
4. INSTALLEREN VAN HET DRUKFILTER
Het filter mag nooit zonder water in werking zijn, beschadiging is niet uit
te sluiten.
4.A PLAATSEN VAN HET FILTER
1. Bij buitenopstelling het filter beschermen tegen direct zonlicht en regen. Zorg ervoor dat het
filter niet in de vijver kan vallen. Plaats het filter ten minste 2 meter vanaf de vijverrand.
2. Het filter mag gedeeltelijk ingegraven worden in de aarde, tot aan onderzijde van het deksel.
Zorg dat het filterdeksel altijd gemakkelijk bereikbaar is, om reinigen en onderhoud uit te kunnen vo-
eren. Het filter beschermen tegen direct invallende regen en zonlicht.
3. Opstelling in een afgesloten ruimte in de nabijheid van de vijver, beschermd tegen zonlicht,
regen en vorst heeft de voorkeur.
4. Plaats het drukfilter niet te hoog boven het wateroppervlak. De opvoerhoogte vanaf pomp naar
het filter leidt tot capaciteitsverlies van de pomp.
5. LET OP: De retourslang vanaf het filter naar de vijver/waterval mag nooit hoger uitkomen als
max. 1,0 meter boven het filter. Bij hogere opvoerhoogte van het water kunnen afdichtingen in het filter
door te hoog oplopende druk gaan lekken en schade ontstaan aan elektrische delen.
4.B VERBINDEN VAN VIJVERSLANGEN AAN HET FILTER
1. Maak de uiteinden van de vijverslang soepel met warm water. Dit maakt het gemakkelijker om
ze op de slangkoppelingen te plaatsen.
2. Bevestig de grootst mogelijke diameter slang op de meegeleverde slangkoppeling, op zowel
de invoer als uitvoer. Dit voorkomt capaciteitsverlies van de pomp. Plaats aan de vuilafvoeraansluiting
een slang die naar de tuin of afvoerputje loopt.
3. De meegeleverde slangtules op de gewenste maat afzagen.
4. Gebruik slangklemmen om de slangen waterdicht vast te kunnen klemmen op de slangkoppe-
lingen.
4.C OPSTARTEN VAN HET DRUKFILTER
Controleer bij het opstarten van het drukfilter altijd of de slangen en slangklemmen goed aangesloten
zijn. De functieschakelaar moet in de stand “filter” staan.
1. Schakel eerst alleen de vijverpomp in.
Let op: de UV-c lamp van het drukfilter mag niet aangesloten zijn op het stroomnet als er geen
water door het drukfilter stroomt.
2. Controleer vervolgens het drukfilter en verbindingen op lekkage.
3. Als alles werkt, verbindt dan het drukfilter op de netstroom.
4.D GOEDE WERKING VAN HET DRUKFILTER
1. Het filter met UV-c lamp en de pomp moeten continu in werking zijn om een goede filterwerking
te behouden.
2. De werking van een UV-c lamp neemt na verloop van tijd af . Vervang de UV-c lamp na 8.000
branduren en in elk geval na elk seizoen.
3. Het is het belangrijk om het filtermateriaal regelmatig te reinigen, afhankelijk van de vervuiling
in de vijver. Beter elke week kortstondig, als af en toe reinigen. Sterk vervuilde filtersponzen vermin-
deren de filterwerking aanzienlijk en verslijten sneller.
19
NL
BluPressure manual
5. ONDERHOUD
De veiligheidsvoorschriften in acht nemen.
Het drukfilter is onderhoudsarm, maar niet onderhoudsvrij!
Om de levensduur van het filter te verlengen en een probleemloze werking te garanderen, adviseren
wij regelmatig onderhoud en reiniging uit te voeren. Met weinig handelingen kan elke persoon het on-
derhoudswerk probleemloos uitvoeren.
5.A PERIODIEK REINIGEN FILTER MET DRAAIHENDEL
De filtersponzen raken na verloop van tijd verzadigd, de werking en effectiviteit verminderen. Reinig
de filtersponzen regelmatig (afhankelijk van de vervuiling, bijv. wekelijks), zodat ze optimaal blijven
werken.
1. Schakel de pomp en UV-c van het filter uit.
2. Zet de functieschakelaar (H) op reinigen(“clean”).
3. Sluit de kraan van de retourslang(F).
4. Open de kraan van de vuilwaterslang(G).
5. Schakel nu alleen de pomp, in om het filter te kunnen spoelen.
6. Draai aan de reinigingshendel (I). Het reinigingsmechanisme duwt de filterspons naar binnen
zodat vuil wordt uitgespoeld.
7. Het filter wordt nu gereinigd. Vervuild water wordt nu afgevoerd. Zodra er helder vijverwater
door de transparante aansluiting zichtbaar wordt, is het reinigen klaar.
8. Schakel de pomp weer uit.
9. Open de kraan van de retourslang (F) en sluit de kraan van de vuilwaterslang (G).
10. Zet de functieschakelaar weer van “clean” naar de “filter” positie.
11. Schakel de pomp weer in.
12. Het filtermateriaal is nu gereinigd. Controleer of er weer water uit het drukfilter komt.
13. Schakel nu het UV-c apparaat van het filter weer in.
Elke week kortstondig reinigen is de beste methodiek, afhankelijk van de vervuiling in de vijver.
5.B GEHEEL REINIGEN VAN DE FILTERSPONZEN
Let op: gebruik nooit chemische reinigingsmiddelen om de filtersponzen
of het filter te reinigen. Dit doodt de opgebouwde biomassa in de sponzen.
Wanneer de watercapaciteit vermindert en de reinigingsfunctie hieraan geen verbetering brengt, moet-
en de filtersponzen handmatig gereinigd, of geheel vervangen worden.
1. Schakel het filter uit door de stekker uit het stopcontact te nemen.
2. Schakel de vijverpomp uit.
3. Koppel alle vijverslangen van het drukfilter af.
4. Open de behuizingklem (12).
5. Neem de filterdeksel met de filtersponzen (7) van het drukfilter, laat deze uitlekken.
Voorzichtig!: het filterpakket kan zwaar wegen bij hoge vervuiling.
Leg het deksel met het filterpakket naar boven op een schone ondergrond.
6. Draai de UV-c buiskap (10) tegen de klok in open en neem deze van de UV-cv buis.
7. Draai de schroef (15) van de draaistang (18).
8. Verwijder de scheidingsplaat (9)
9. Verwijder de filtersponzen en maak deze schoon onder stromend water en knijp ze goed uit.

NL
20 BluPressure manual
10. Reinig ook het drukfilter aan de binnenzijde.
11. Het grootste filtermodel is voorzien van een korf met bio-ballen, neem deze uit de filtertank en
spoel reinig deze met schoon leiding- of vijverwater en plaats weer terug in de tank.
12. Monteer het filterpakket zoals hieronder omschreven.
5.C VERVANGEN VAN DE FILTERSPONZEN
1. Plaats gele en blauwe sponzen om en om op de UV-c buis en plaats de scheidingsplaat (9) en
monteer de draaistang.
2. Monteer de UV-c buiskop met de klok mee op op de UV-c buis.
3. Plaats de o-ring van de filtertank terug op de tank, dat moet met enige zorg uitgevoerd worden.
4. Plaats het filterdeksel met schuimpakket rechtstandig terug in de tank.
5. Monteer de klemring en klem deze vervolgens dicht.
6. Monteer vervolgens alle slangen weer op het filter.
7. Zet de pomp in werking en controleer of alles waterdicht is.
8. Zet vervolgens het UV-c apparaat in werking.
5.D UV-C APPARAAT DEMONTEREN EN REINIGEN
Vijverwater stroomt in de behuizing langs het kwartsglas, waardoor na enige tijd (kalk)aanslag op de
het glas ontstaat. UV-c licht zal daarom minder goed het doorstromende water bereiken, waardoor de
werking vermindert. Maak het kwartsglas samen met het filtermateriaal periodiek schoon.
Vermijd handcontact met de lamp: UV-c lamp met een doekje vasthouden
1. Schakel de UV-c en pomp uit.
2. Verwijder de vier schroeven van het deksel.
3. Neem de UV-c houder met buis rechtstandig het apparaat eruit.
4. Maak het kwartsglas schoon met een vochtige doek, voorkom krassen.
5. Controleer op eventuele schade of breuken in het kwartsglas.
6. Zonodig vervangen.
7. UV-c houder terug drukken in het filterdeksel
LET OP! Het terugplaatsen van de UV-c houder in het deksel kan stroef
gaan. Te hard drukken kan schade veroorzaken!
Smeer wat vaseline aan de binnenzijde van de behuizing van de UV-c houder om het terugplaatsen van
de UV-c houder gemakkelijk en licht uit te voeren.
UV-c lamp en kwartsglas vervangen
1. Draai de wartel (6) op het kwartsglas open.
2. Haal de kwartsglas buis eruit en vervang de UV-c lamp.
3. Controleer het kwartsglas, vervang deze als deze gebroken of beschadigd is.
4. Monteer alle onderdelen weer terug in elkaar
5. Controleer de o-ring van het kwartglas, deze mag niet beschadigd zijn. Reinig deze met een
vochtige doek.
6. Plaats de UV-c houder weer terug zoals onder punt 7 hoofdstuk 3.2 omschreven.
Table of contents
Languages:
Other BLUGARDA Water Filtration System manuals

Popular Water Filtration System manuals by other brands


MSA
MSA 81857 instructions

SEI Industries
SEI Industries RAINDRAIN Operation manuals

Kessel
Kessel NS 3 Installation and operating instructions

LifeSource
LifeSource ScaleSolver SS-5544E Installation, operation and maintenance manual

Clean Water Systems
Clean Water Systems Tannin 5900e Series Installation & start?up guide

GE
GE SmartWater FX12M installation instructions