SimPure Q3-600 User manual

Who
We
Are
o
SimPure®
is
a
purification
brand
based
in
the
United
States,
focusing
on
engineering
filtration
and
advanced
purification
technologies.
o
SimPure®
promotes
the
philosophy
of
a
minimalist
lifestyle,
returning
to
nature
with
clean
water
and
fresh
air.
o
SimPure®designs
products
to
be
both
smart,
easy
to
operate,
and
practical
in
appearance
and
functionality.
Contact
Us
If
you
require
technical
assistance,
please
contact
our
friendly
professional
support
engineers,
who
will
be
pleased
to
assist
you.
4530
B
STREET
NW
#A,
AUBURN
WA
98001,
USA
Customer
Service:
Toll-Free:
1-866-528-4572
Website:
www.simpurelife.com
'/,l:.::jl(/flyffij
4530
B
STREET
NW
#A,
Stay
Simple,
Stay
Pure
AUBURN
WA
98001,
USA
e,
2
o
@
GUnEe
Stay
Simple,
Stay
Pure
RO
Water
Filtration
System
Model:
Q3-600
Retain
owner's
manual
for
future
reference
Overview
Getting Started
Introduction
Getting
Started
Thank
you
for
purchasing
the
SimPure®Q3-600
RO
Water
Filtration
System
which
delivers
purified
water
to
your
home
or
office.
Please
refer
to
the
SimPure®
website
for
the
latest
product
information,
including
manuals,
product
videos,
support
materials,
and
where
to
purchase
SimPure®
products
and
consumables.
e
Introduction
e
Warning
&
Caution
e
Operating
Guidelines
e
Typical
Installation
The
Q3-600
is
a
piece
of
durable
equipment,
with
proper
care
it
will last
for
many
years.
This
owner's
handbook
outlines
the
installation,
operation,
and
maintenance
requirements
to
—_——
-
| ]
sustain
better
product
performance.
The
Q3-600
features
different
stage
of
filtration
.
.
to
produce
clean
water
for
your
family.
Installation
Guide
. N
e
Sediment
removal
e
Installation
Kit
¢
Installation
Guide
e
Chlorine
removal
e
Taste
&
odor
filtration
e
Installation
Steps
e
Reverse
Osmosis
(RO)
e
Assemble
Components
Operation
Guide
Customer
Service:
e
Operation
&
Maintenance
Guide
Toll-Free
:1-866-528-4572
i
.
/
\
*
Replacement
Filter
Website:
www.simpurelife.com
e
Frequently
asked
questions
L
|
e
Warranty
\\
Q3-600
can
filter
out
impurities
and
particles
from
your
water,
such
as
sediment,
dirt,
rust,
chlorine,
odors,
lead,
organic
matter,
and
heavy
metals,
offering
a
better
water
quality.

Warning
&
Caution
SimPure®
products
are
designed
with
safety
in
mind.
However,personnel
working
on
these
units
must
be
familiar
with
any
potential
dangers.
All
safety
information
detailed
in
this
handbook
should
be
reviewed
before
installing
and
operating
this
water
purification
system.
Thoroughly
flushing
of
the
unit
is
required
at
start-up
and
when
filters
replaced
(flushing
instructions
on
page
15
of
manual).
The
purpose
of
flushing
is
to
remove
protective
liquid
(Food-Grade
Glycerin)
in
RO
membrane
and
possible
shipping
dust.
This
product
is
not
a
toy,
please
keep
children
away from
the
System
or
use
under
adult
supervision.
Please
keep
packing
materials
out
of
children's
reach.
The
System
has
been
designed
for
indoor
use
only.
Install
the
System
out
of
direct
sunlight
and
secure
it
to
a
vertical
surface
such
as
a
wall
or
inside
a
cupboard
at
ambient
room
temperature.
Do
not
move
the
System
without
first
shutting
off
the
water
supply,
draining,
and
releasing
the
water
pressure.
This
unit
is
for
use
with
cold
municipal
tap
water
or
potable
well
water
that
has
been
tested
safe
by
a
certified
laboratory.
Never
use
hot
water
or
unknown/unsafe
sources
of
water.
The
installation
of
the
System
must
comply
with
your
local
and
state
regulations.
Please
check
before
commencing
installation.
In
case
of
malfunction,
shut-off
the
water
supply
to
the
System.
Ifany
part
of
the
System
is
damaged
or
missing,
replace
the
item
before
use.
Warnings
and
Cautions
are
provided;
Failing
to
observe
the
instructions
could
result
in
damage
to
the
equipment,
associated
parts,
surroundings,
or
personal
injury.
Operating
Guidelines
The
following
table
lists
the
operating
parameters
for
this
product.
Operating
this
product
outside
these
specifications
may
cause
system
performance
issues
and
may
even
lead
to
personal
injury
and
void
any
warranty.
Please
contact
SimPure®
for
further
advice
and
support
if
you
are
uncertain
about
the
requirements.
e
ng
Parameters
Model
SimPure®
Q3-600
600
Gallons
per
day
Maximum
Flow
Rate
Note:
Dependent
on
feedwater
type,
operating
pressure
and
water
temperature.
Power
Requirements
110Volts
60Hz
AC.
85w
Municipal
Potable/Tap
water
or
Well
water
Feed
Water
Type
meeting
government
drinking
water
standards.
15-60
PSI
Feed
Water
Pressure
Note:
Install
a
pressure
regulator
if
exceeding
this
feed
water
pressure.
Feed
Water
Temperature
|
41-100°F
(5-38°C)
Ambient
Temperature
40-104°F
(4-40°C)
Feedwater
TDS*
level
<500
ppm
Water
Hardness
For
optimal
results, use
feed_water
with
a
(Optional)
hardne§s
level
below
10
grains
per
gallon
and
no
iron
present.
*TDS
=
Total
Dissolved
Solids,
which
i
thetotal
weight
of
al
solids
dissolved
ina given
volume
of
water,expressed
i
units
of
mg
per
unit
volume
of
water
(/L)
also
referred
to as
parts-per-million
(pprm).
With
a
SimPure®
TDS
meter,
you
can
easily
compare
the
system
outlet
quality
with
your
source
water
to
help
monitor
the
performance
of
the
system
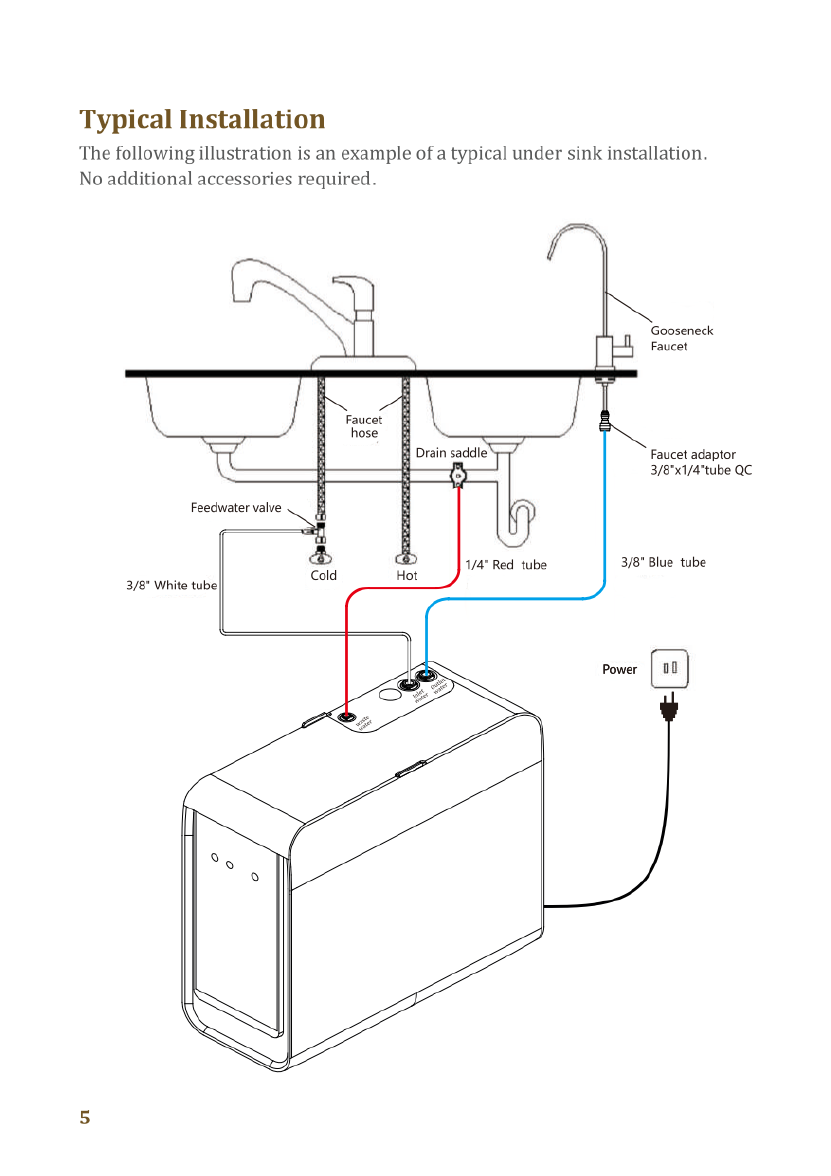
Typical
Installation
Installation
The
following
illustration
is
an
example
of
a
typical
under
sink
installation.
No
additional
accessories
required.
System
Contents
Your
SimPure®
Q3-600
Water
Filtration
System
was
carefully
assembled,
packaged,
and
shipped
complete
with
the
parts
required
for
a
standard
installation.
Gooseneck
Faucet
Integrated
waterway
board
High
pressure
switch
Double
buckle
CF
Filter
Faucet
adaptor
3/8"1/4°tube
QC
Right-side
plate
3/8"
Blue
tube
3/8"
White
tube
Left
side
plate
Inlet
water
valve
Booster
pump-
RO
Filter
Control
board
Glass
panel
Uncertain
about
something?
Is
there
a
problem?
Please
contact
SimPure®
through
our
website
or
toll-free
number.
Customer
Service:
Toll-Free
:1-866-528-4572
Website:
www.simpurelife.com
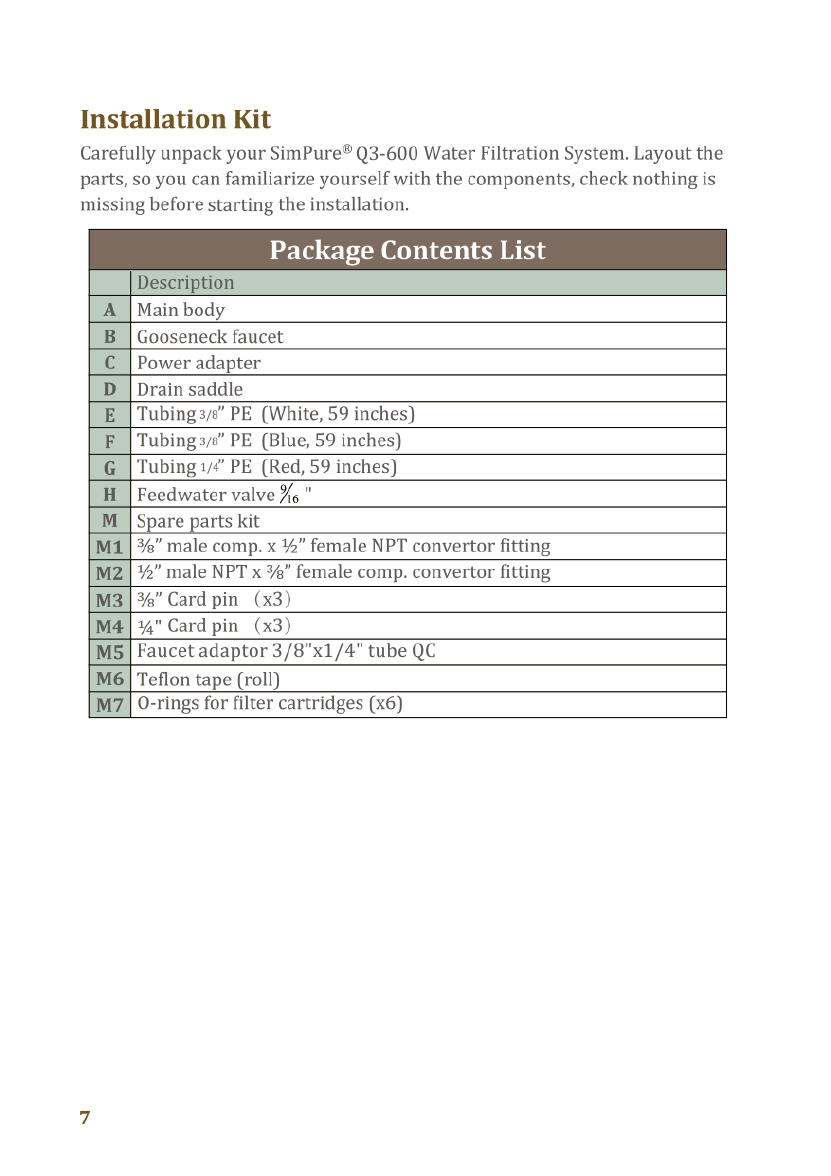
Installation
Kit
Carefully
unpack
your
SimPure®
Q3-600
Water
Filtration
System.
Layout
the
parts,
so
you
can
familiarize
yourself
with
the
components,
check
nothing
is
missing
before
starting
the
installation.
Description
Main
body
Gooseneck
faucet
Power
adapter
Drain saddle
Tubing
¢’
PE_(White,
59
inches)
Tubing
¢’
PE_(Blue,
59
inches)
Tubing
/4’
PE
(Red,
59
inches)
Feedwater
valve
%
"
2l=z|o|=|m|o|o|=|>
Spare
parts
kit
%"
male
comp.
x
%"
female
NPT
convertor
fitting
1"
male
NPT
x
%"
female
comp.
convertor
fitting
3"
Card
pin
(x3)
14"
Card
pin
(x3)
Faucet
adaptor
3/8"x1/4"
tube QC
Teflon
tape
(roll)
O-rings
for filter
cartridges
(x6)
Installation
Guide
Read
the
entire
manual
thoroughly
before
beginning
the
installation.
Take
note
of
the
safety
tips
and
follow
all
steps
to
ensure
your
system
is
installed
correctly
before
use.
Installation
needs
to
comply
with
state
and
local
laws
and
regulations;
It
is
required
to
check
and
comply
with
all
local
plumbing
codes.
Warning:
Massachusetts,
requires
installation
by
a
licensed
plumber
and
does
not
permit
the
use
of
saddle
valves.
(plumbing
code
248-CMR
of
the
Commonwea)
of
Massachusetts)

Installation
Kit
Carefully
unpack
your
SimPure®
Q3-600
Water
Filtration
System.
Layout
the
parts,
so
you
can
familiarize
yourself
with
the
components,
check
nothing
is
missing
before
starting
the
installation.
Description
Main
body
Gooseneck
faucet
Power
adapter
Drain saddle
Tubing
¢’
PE_(White,
59
inches)
Tubing
¢’
PE_(Blue,
59
inches)
Tubing
/4’
PE
(Red,
59
inches)
Feedwater
valve
%
"
2l=z|o|=|m|o|o|=|>
Spare
parts
kit
%"
male
comp.
x
%"
female
NPT
convertor
fitting
1"
male
NPT
x
%"
female
comp.
convertor
fitting
3"
Card
pin
(x3)
14"
Card
pin
(x3)
Faucet
adaptor
3/8"x1/4"
tube QC
Teflon
tape
(roll)
O-rings
for filter
cartridges
(x6)
Installation
Guide
Read
the
entire
manual
thoroughly
before
beginning
the
installation.
Take
note
of
the
safety
tips
and
follow
all
steps
to
ensure
your
system
is
installed
correctly
before
use.
Installation
needs
to
comply
with
state
and
local
laws
and
regulations;
It
is
required
to
check
and
comply
with
all
local
plumbing
codes.
Warning:
Massachusetts,
requires
installation
by
a
licensed
plumber
and
does
not
permit
the
use
of
saddle
valves.
(plumbing
code
248-CMR
of
the
Commonwea)
of
Massachusetts)

Hand
tools
required
Essential
hand
tools
are
required
to
install
the
SimPure®
Q3-600
RO
water
purification
system.
An
electric
drill,
drill
bits
up
to
%"
(12.5mm),
Adjustable
wrench,
tube
cutters
(or
knife),
cross-head
screwdriver
(Phillips).
|
<
Plan
your
Installation
Your
SimPure®
Q3-600
Water
Purifier
can
be
installed
under
a
sink
or
in
a
remote
location.
Typical
remote
sites
include
a
laundry
room
or
utility
room.
Review
the
location
options
below
and
determine
where
you
are
going
to
install
your
system.
®
Option
1:
Under-Sink.
The
unit
can
be
installed
in
a
kitchen
or
bathroom
sink
cabinet.
A
suitable
drainpoint
is
required
to
drain
water
from
the
Reverse
Osmosis
system.
®
Option
2:
Remote
Location.
The
unit
may
also
be
installed
in
a
remote
location
away
from
the
RO
Faucet.
A
nearby
feed
water
source
and
drain
point
connection
are
necessary,
and
you
may
need
additional tubing
or
a
delivery
pump
depending
on
how
far
away
you
plan
to
install
or
if
you
plan
to
link
to
a
refrigerator.
Please
Attention:
1.
When
the
Q3-600
RO
system
is
connected
to
the
refrigerator/ice
maker
at
the
same
time,
the
water
flow
rate
will
slow
down.
2.
You
may
need
to
purchase
additional
pressure
tank
equipment
and tubing
to
alleviate
water
flow
problems.
3.Itis
recommended
that
contact
our
customer
service
before
connecting
the
refrigerator/ice
maker.
Check
Location
and
Space
Requirements
Determine
and
check
the
size
and
position
of
the
Q3-600
for
proper
installation
into
the
chosen
space
and
remember
to
leave
enough
room
around
the
System
for
changing
filters
and
maintenance.
9
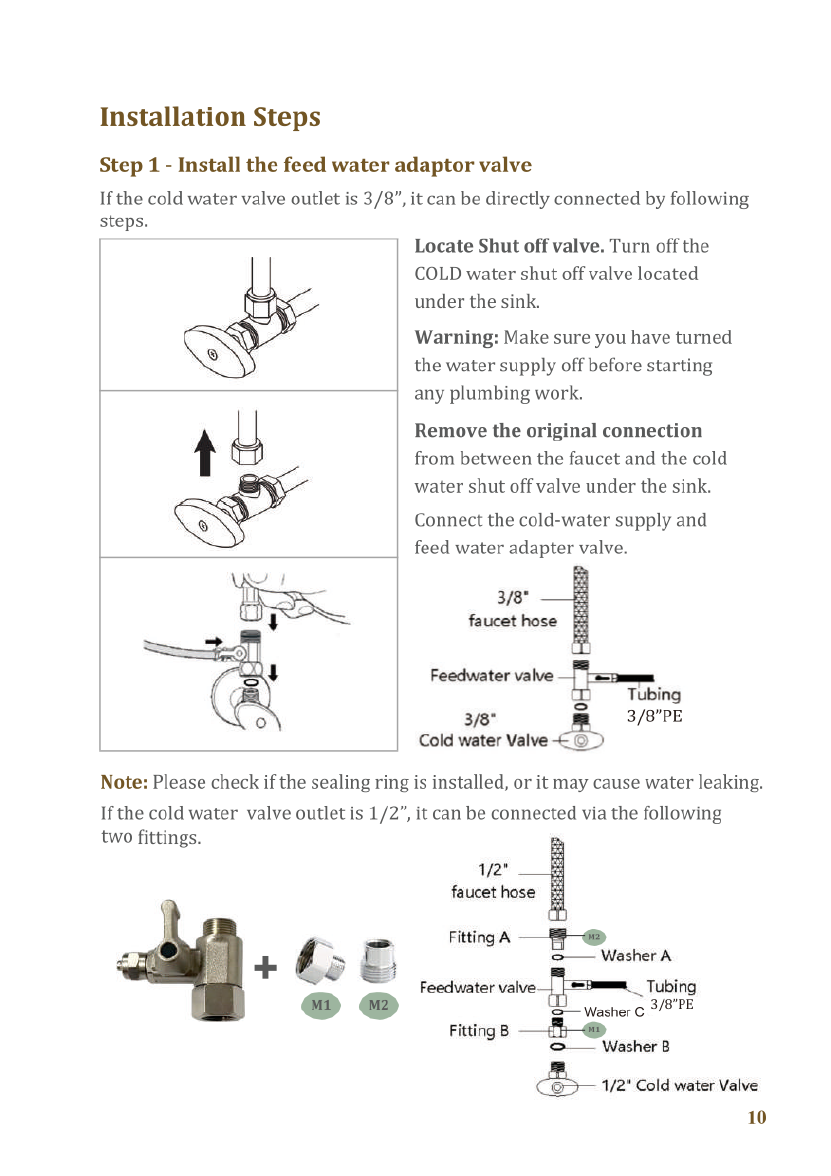
Installation
Steps
Step
1
-
Install
the
feed
water
adaptor
valve
If
the
cold
water
valve
outlet
is
3/8”,
it
can
be
directly
connected
by
following
steps.
Locate
Shut
off
valve.
Turn
off
the
COLD
water
shut
off
valve
located
under
the
sink.
Warning:
Make
sure
you
have
turned
the
water
supply
off
before
starting
any
plumbing
work.
Remove
the
original
connection
from
between
the
faucet
and
the
cold
water
shut
off
valve
under
the
sink.
Connect
the
cold-water
supply
and
feed
water
adapter
valve.
3/8°
faucet
hose
Feedwater
valve
Tubing
3/8"
3/8"PE
Cold
water
Valve
<
©
O
Note:
Please
check
if
the
sealing
ring
is
installed,
or
it
may
cause
water
leaking.
If
the
cold
water
valve
outlet
is
1/2”,
it
can
be
connected
via
the
following
two
fittings.
172"
faucet
hose
Fitting
A
——@®
o——
Washer
A
Feedwater
vaIVE«QI\
Tubing
=
Washer
¢
3/%"PE
Fitting
8
S
Washer
8
@
1/2*
Cold
water
Valve
10
Hand
tools
required
Essential
hand
tools
are
required
to
install
the
SimPure®
Q3-600
RO
water
purification
system.
An
electric
drill,
drill
bits
up
to
%"
(12.5mm),
Adjustable
wrench,
tube
cutters
(or
knife),
cross-head
screwdriver
(Phillips).
|
<
Plan
your
Installation
Your
SimPure®
Q3-600
Water
Purifier
can
be
installed
under
a
sink
or
in
a
remote
location.
Typical
remote
sites
include
a
laundry
room
or
utility
room.
Review
the
location
options
below
and
determine
where
you
are
going
to
install
your
system.
®
Option
1:
Under-Sink.
The
unit
can
be
installed
in
a
kitchen
or
bathroom
sink
cabinet.
A
suitable
drainpoint
is
required
to
drain
water
from
the
Reverse
Osmosis
system.
®
Option
2:
Remote
Location.
The
unit
may
also
be
installed
in
a
remote
location
away
from
the
RO
Faucet.
A
nearby
feed
water
source
and
drain
point
connection
are
necessary,
and
you
may
need
additional tubing
or
a
delivery
pump
depending
on
how
far
away
you
plan
to
install
or
if
you
plan
to
link
to
a
refrigerator.
Please
Attention:
1.
When
the
Q3-600
RO
system
is
connected
to
the
refrigerator/ice
maker
at
the
same
time,
the
water
flow
rate
will
slow
down.
2.
You
may
need
to
purchase
additional
pressure
tank
equipment
and tubing
to
alleviate
water
flow
problems.
3.Itis
recommended
that
contact
our
customer
service
before
connecting
the
refrigerator/ice
maker.
Check
Location
and
Space
Requirements
Determine
and
check
the
size
and
position
of
the
Q3-600
for
proper
installation
into
the
chosen
space
and
remember
to
leave
enough
room
around
the
System
for
changing
filters
and
maintenance.
9
Installation
Steps
Step
1
-
Install
the
feed
water
adaptor
valve
If
the
cold
water
valve
outlet
is
3/8”,
it
can
be
directly
connected
by
following
steps.
Locate
Shut
off
valve.
Turn
off
the
COLD
water
shut
off
valve
located
under
the
sink.
Warning:
Make
sure
you
have
turned
the
water
supply
off
before
starting
any
plumbing
work.
Remove
the
original
connection
from
between
the
faucet
and
the
cold
water
shut
off
valve
under
the
sink.
Connect
the
cold-water
supply
and
feed
water
adapter
valve.
3/8°
faucet
hose
Feedwater
valve
Tubing
3/8"
3/8"PE
Cold
water
Valve
<
©
O
Note:
Please
check
if
the
sealing
ring
is
installed,
or
it
may
cause
water
leaking.
If
the
cold
water
valve
outlet
is
1/2”,
it
can
be
connected
via
the
following
two
fittings.
172"
faucet
hose
Fitting
A
——@®
o——
Washer
A
Feedwater
vaIVE«QI\
Tubing
=
Washer
¢
3/%"PE
Fitting
8
S
Washer
8
@
1/2*
Cold
water
Valve
10
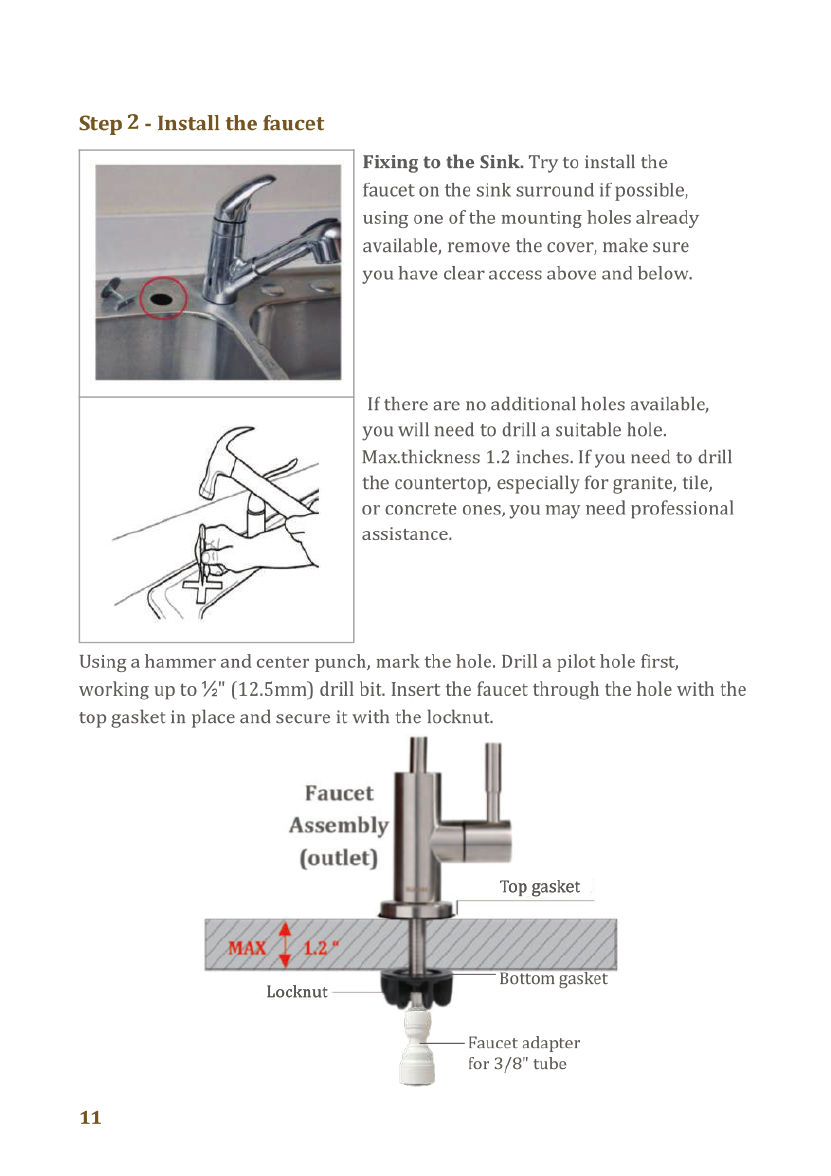
Step
2
-
Install
the
faucet
Fixing
to
the
Sink.
Try
to
install
the
faucet
on
the
sink
surround
if
possible,
using
one
of
the
mounting
holes
already
available,
remove
the
cover,
make
sure
you have
clear
access
above
and
below.
If
there
are no
additional
holes
available,
you
will
need
to
drill
a
suitable
hole.
Max.thickness
1.2
inches.
If
you
need
to
drill
the
countertop,
especially
for
granite,
tile,
or
concrete
ones,
you
may
need
professional
assistance.
Using
a
hammer
and
center
punch,
mark
the
hole.
Drill
a
pilot
hole
first,
working
up
to
%"
(12.5mm)
drill
bit.
Insert
the
faucet
through
the
hole
with
the
top
gasket
in
place
and
secure
it
with
the
locknut.
Faucet
Assembly
(outlet)
Bottom
gasket
1
Faucet
adapter
_,'
for
3/8"
tube
11
Step
3
-
Install the
Drain
Saddle
If
installing
the
product
under
a
sink,
make
sure
you
connect
the
drain
to
a
straight
piece
of
pipe
and
make
sure
it
is
BEFORE
the
water
trap
('P'
trap
or
'U’
bend)
see
diagram
below.
Garbage
Disposal
P
Trap
INSTALLATION
WARNING!
Only
install
saddle
Never
mount
drain
valve
on
straignt
pipe
saddle
on
bends
or
above
any
water
traps!
below
the
water
trap!
12

Step
2
-
Install
the
faucet
Fixing
to
the
Sink.
Try
to
install
the
faucet
on
the
sink
surround
if
possible,
using
one
of
the
mounting
holes
already
available,
remove
the
cover,
make
sure
you have
clear
access
above
and
below.
If
there
are no
additional
holes
available,
you
will
need
to
drill
a
suitable
hole.
Max.thickness
1.2
inches.
If
you
need
to
drill
the
countertop,
especially
for
granite,
tile,
or
concrete
ones,
you
may
need
professional
assistance.
Using
a
hammer
and
center
punch,
mark
the
hole.
Drill
a
pilot
hole
first,
working
up
to
%"
(12.5mm)
drill
bit.
Insert
the
faucet
through
the
hole
with
the
top
gasket
in
place
and
secure
it
with
the
locknut.
Faucet
Assembly
(outlet)
Bottom
gasket
1
Faucet
adapter
_,'
for
3/8"
tube
11
Step
3
-
Install the
Drain
Saddle
If
installing
the
product
under
a
sink,
make
sure
you
connect
the
drain
to
a
straight
piece
of
pipe
and
make
sure
it
is
BEFORE
the
water
trap
('P'
trap
or
'U’
bend)
see
diagram
below.
Garbage
Disposal
P
Trap
INSTALLATION
WARNING!
Only
install
saddle
Never
mount
drain
valve
on
straignt
pipe
saddle
on
bends
or
above
any
water
traps!
below
the
water
trap!
12
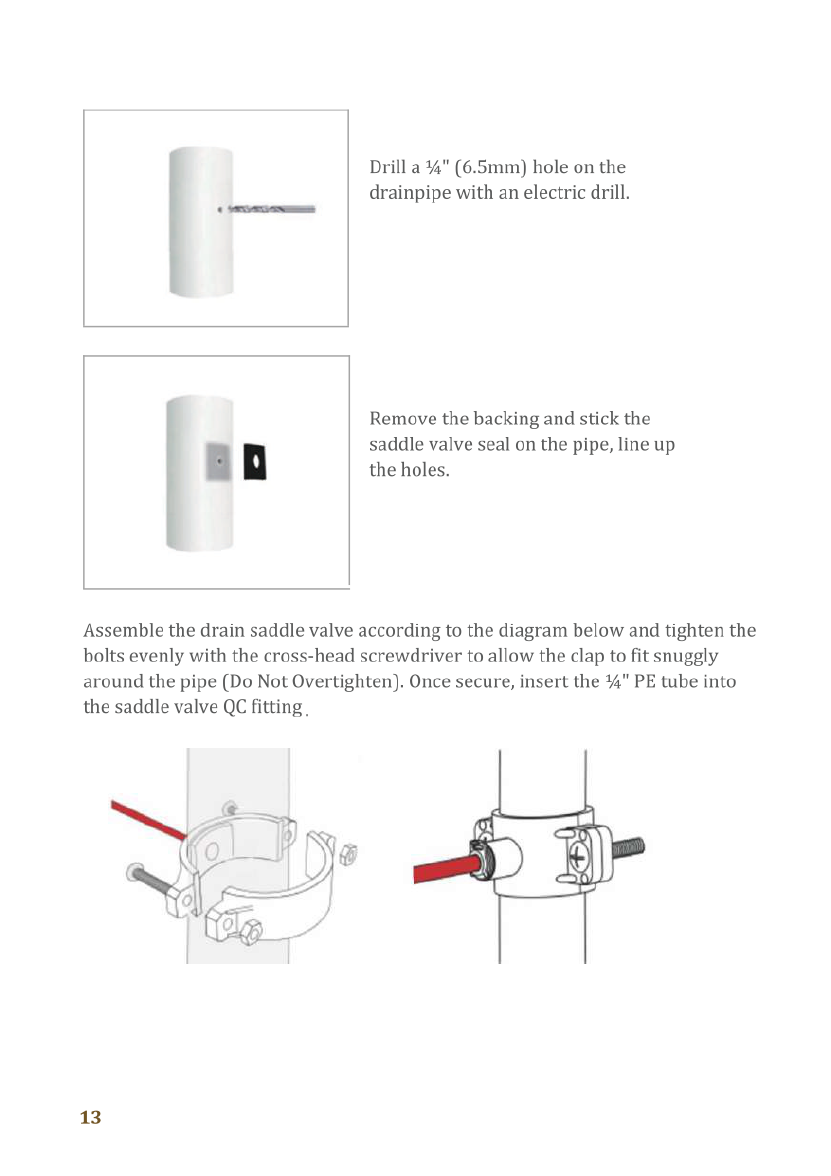
Drill
a
%"
(6.5mm)
hole
on
the
drainpipe
with
an
electric
drill.
Remove
the
backing
and
stick
the
{
saddle
valve
seal
on
the
pipe,
line
up
‘
n
the
holes.
Assemble
the
drain
saddle
valve
according
to
the
diagram
below
and
tighten
the
bolts
evenly
with
the
cross-head
screwdriver
to
allow
the
clap
to
fit
snuggly
around
the
pipe
(Do
Not
Overtighten).
Once
secure,
insert
the
%"
PE
tube
into
the
saddle
valve QC
fitting
13
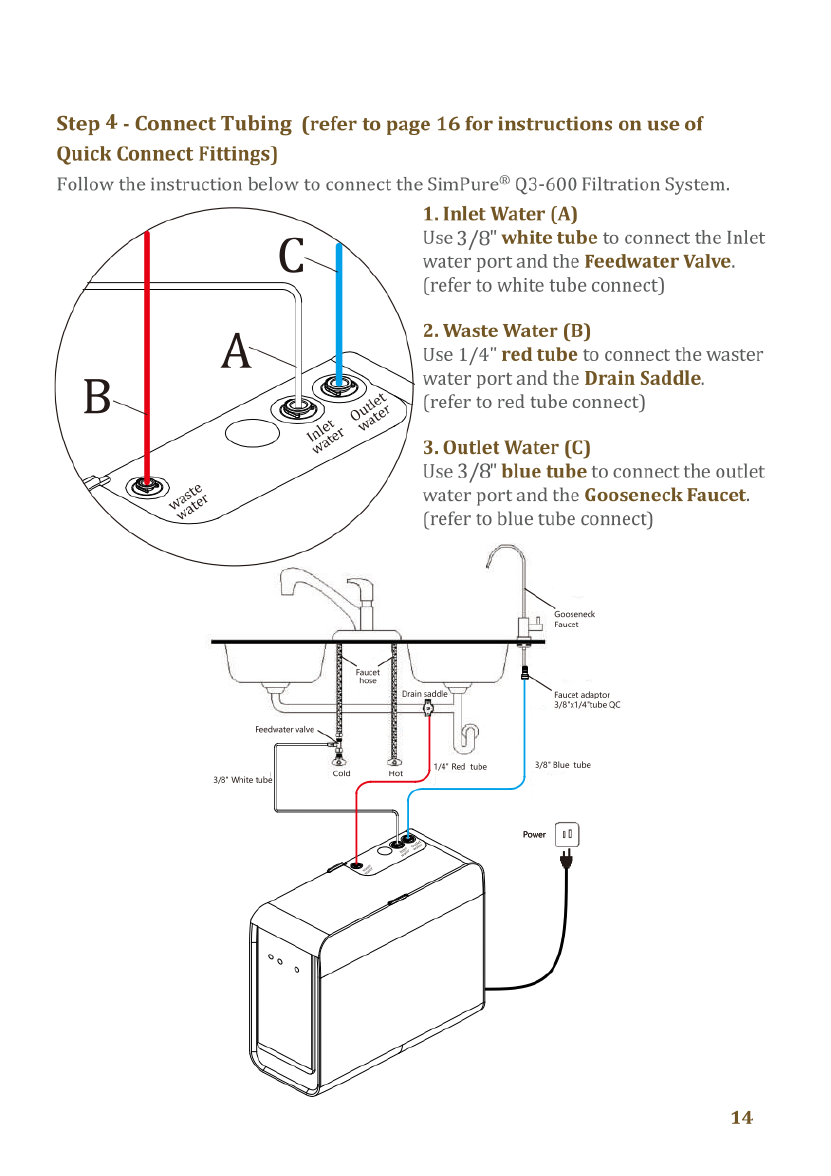
Step
4
-
Connect
Tubing
(refer
to
page
16
for
instructions
on
use
of
Quick
Connect
Fittings)
Follow
the
instruction
below
to
connect
the
SimPure®
Q3-600
Filtration
System.
1.
Inlet
Water
(A)
Use
3/8"
white
tube
to
connect
the
Inlet
water
port
and
the
Feedwater
Valve.
(refer
to
white
tube
connect)
2.
Waste Water
(B)
Use
1/4"
red
tube
to
connect
the
waster
water
port
and
the
Drain
Saddle.
(refer
to
red
tube
connect)
3.
Outlet
Water
(C)
Use
3/8"
blue
tube
to
connect
the
outlet
water
port
and
the
Gooseneck
Faucet.
(refer
to
blue
tube
connect)
Faucetsdspor
siTube
ac
3
8he
wbe
315
whie
e
ol
14
Drill
a
%"
(6.5mm)
hole
on
the
drainpipe
with
an
electric
drill.
Remove
the
backing
and
stick
the
{
saddle
valve
seal
on
the
pipe,
line
up
‘
n
the
holes.
Assemble
the
drain
saddle
valve
according
to
the
diagram
below
and
tighten
the
bolts
evenly
with
the
cross-head
screwdriver
to
allow
the
clap
to
fit
snuggly
around
the
pipe
(Do
Not
Overtighten).
Once
secure,
insert
the
%"
PE
tube
into
the
saddle
valve QC
fitting
13
Step
4
-
Connect
Tubing
(refer
to
page
16
for
instructions
on
use
of
Quick
Connect
Fittings)
Follow
the
instruction
below
to
connect
the
SimPure®
Q3-600
Filtration
System.
1.
Inlet
Water
(A)
Use
3/8"
white
tube
to
connect
the
Inlet
water
port
and
the
Feedwater
Valve.
(refer
to
white
tube
connect)
2.
Waste Water
(B)
Use
1/4"
red
tube
to
connect
the
waster
water
port
and
the
Drain
Saddle.
(refer
to
red
tube
connect)
3.
Outlet
Water
(C)
Use
3/8"
blue
tube
to
connect
the
outlet
water
port
and
the
Gooseneck
Faucet.
(refer
to
blue
tube
connect)
Faucetsdspor
siTube
ac
3
8he
wbe
315
whie
e
ol
14
Step
5
-
System
Flushing(start
up
the
system
and
filter
replacement)
1.System
flushing---Turn
on
the
Feedwater
valve
and
gooseneck
faucet,
then
plug
in
and
let
the
system
run
for
20
minutes
to
rinse
all
fittings
and
the
new
filters.
Check
if
any
signs
of
leaks.
Warning:
Make
sure
the
socket
under
the
sink
is
powered
on,
and
ensure
the
system
has
been
plugged
correctly
into
the
power
outlet.
2.Enjoy
your
drinking
water---After
flushing,
the
system
is
ready
for
use.
Turn
on
the
faucet
and enjoy
it.
Note:
There
will
be
some
noise
when
the
system
is
running,
this
is
normal.
The
noise
will
disappear
when
the
faucet
is
turned
off.
Uncertain
about
something?
Is
there
a
problem?
Please
contact
SimPure®
through
our
website
or
toll-free
number.
Customer
Service:
Toll-Free
:1-866-528-4572
Website:
www.simpurelife.com
CONGRATULATIONS!
You
have
completed
the
installation!
15
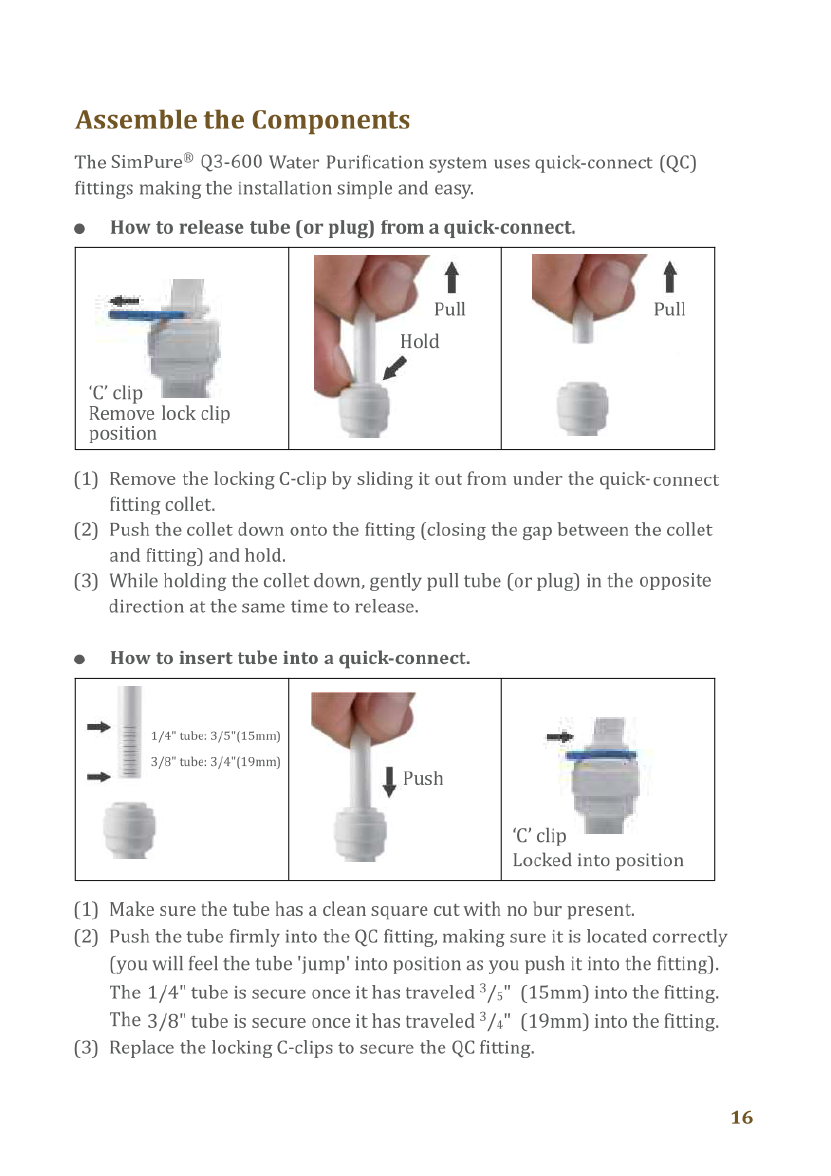
Assemble
the
Components
The
SimPure®
Q3-600
Water
Purification
system
uses
quick-connect
(QC)
fittings
making
the
installation
simple
and
easy.
e
How
to
release
tube
(or
plug)
from
a
quick-connect.
.
t
t
-
.
Pull
Pull
Hold
I'4
‘¢’
clip
Remove
lock
clip
position
(1)
Remove
the
locking
C-clip
by
sliding
it
out
from
under
the
quick-
connect
fitting collet.
(2)
Push
the
collet
down
onto
the
fitting
(closing
the
gap
between
the
collet
and
fitting)
and
hold.
(3)
While
holding
the
collet
down,
gently
pull
tube
(or
plug)
in
the
opposite
direction
at
the
same
time
to
release.
e
How
to
insert
tube
into
a
quick-connect.
-
1/4”
tube:
3/5"(15mm)
e
B
3/8"
tube:
3/4"(19mm)
-y
‘
Push
’
‘C’
clip
Locked
into
position
(1)
Make
sure
the
tube
has
a
clean
square
cut
with
no
bur
present.
(2)
Push
the
tube
firmly
into
the
QC
fitting,
making
sure
it
is
located
correctly
(you
will
feel
the
tube
'jump'
into
position
as
you
push
it
into
the
fitting).
The
1/4"
tube
is
secure
once
it
has
traveled
*/s"
(15mm)
into
the
fitting.
The
3/8"
tube
is
secure
once
it
has
traveled
/4"
(19mm)
into
the
fitting.
(3)
Replace
the
locking
C-clips
to
secure
the
QC
fitting.
16
Step
5
-
System
Flushing(start
up
the
system
and
filter
replacement)
1.System
flushing---Turn
on
the
Feedwater
valve
and
gooseneck
faucet,
then
plug
in
and
let
the
system
run
for
20
minutes
to
rinse
all
fittings
and
the
new
filters.
Check
if
any
signs
of
leaks.
Warning:
Make
sure
the
socket
under
the
sink
is
powered
on,
and
ensure
the
system
has
been
plugged
correctly
into
the
power
outlet.
2.Enjoy
your
drinking
water---After
flushing,
the
system
is
ready
for
use.
Turn
on
the
faucet
and enjoy
it.
Note:
There
will
be
some
noise
when
the
system
is
running,
this
is
normal.
The
noise
will
disappear
when
the
faucet
is
turned
off.
Uncertain
about
something?
Is
there
a
problem?
Please
contact
SimPure®
through
our
website
or
toll-free
number.
Customer
Service:
Toll-Free
:1-866-528-4572
Website:
www.simpurelife.com
CONGRATULATIONS!
You
have
completed
the
installation!
15
Assemble
the
Components
The
SimPure®
Q3-600
Water
Purification
system
uses
quick-connect
(QC)
fittings
making
the
installation
simple
and
easy.
e
How
to
release
tube
(or
plug)
from
a
quick-connect.
.
t
t
-
.
Pull
Pull
Hold
I'4
‘¢’
clip
Remove
lock
clip
position
(1)
Remove
the
locking
C-clip
by
sliding
it
out
from
under
the
quick-
connect
fitting collet.
(2)
Push
the
collet
down
onto
the
fitting
(closing
the
gap
between
the
collet
and
fitting)
and
hold.
(3)
While
holding
the
collet
down,
gently
pull
tube
(or
plug)
in
the
opposite
direction
at
the
same
time
to
release.
e
How
to
insert
tube
into
a
quick-connect.
-
1/4”
tube:
3/5"(15mm)
e
B
3/8"
tube:
3/4"(19mm)
-y
‘
Push
’
‘C’
clip
Locked
into
position
(1)
Make
sure
the
tube
has
a
clean
square
cut
with
no
bur
present.
(2)
Push
the
tube
firmly
into
the
QC
fitting,
making
sure
it
is
located
correctly
(you
will
feel
the
tube
'jump'
into
position
as
you
push
it
into
the
fitting).
The
1/4"
tube
is
secure
once
it
has
traveled
*/s"
(15mm)
into
the
fitting.
The
3/8"
tube
is
secure
once
it
has
traveled
/4"
(19mm)
into
the
fitting.
(3)
Replace
the
locking
C-clips
to
secure
the
QC
fitting.
16
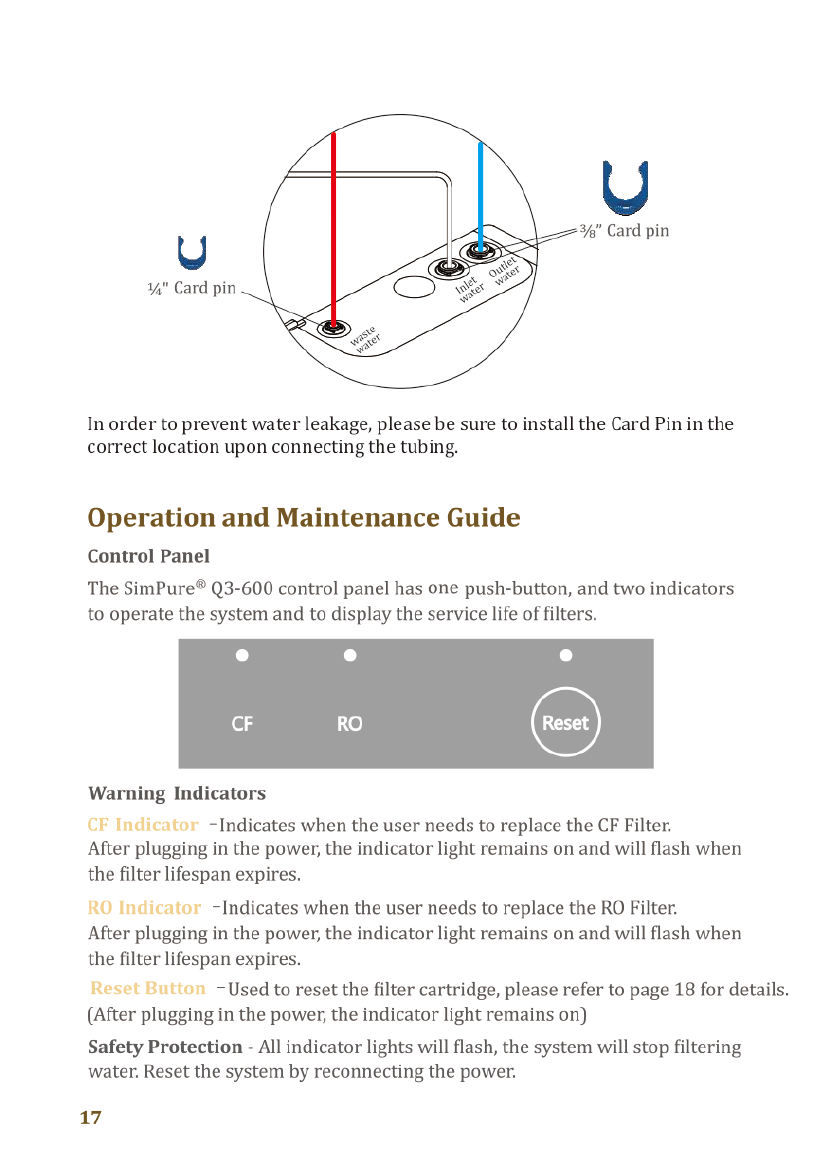
L
%"
Card
pin
V
%"
Card
pin
In
order
to
prevent
water
leakage,
please
be
sure
to
install
the
Card
Pin
in
the
correct
location
upon
connecting
the
tubing.
Operation
and
Maintenance
Guide
Control
Panel
The
SimPure®
Q3-600
control
panel
has
one
push-button,
and
two
indicators
to
operate
the
system
and
to
display
the
service
life
of
filters.
Warning
Indicators
CF
Indicator
-Indicates
when
the
user
needs
to
replace
the
CF
Filter.
After
plugging
in
the
power,
the
indicator
light
remains
on
and
will
flash
when
the
filter
lifespan
expires.
10O
Indicator
-Indicates
when
the
user
needs
to
replace
the
RO
Filter.
After
plugging
in
the
power,
the
indicator
light
remains
on
and
will
flash
when
the
filter
lifespan
expires.
Reset
Button
-Used
to
reset
the
filter
cartridge,
please
refer
to
page
18
for
details.
(After
plugging
in
the
power,
the
indicator
light
remains
on)
Safety
Protection
-
All
indicator
lights
will
flash,
the
system
will
stop
filtering
water.
Reset
the
system
by
reconnecting
the
power.
17
Replacing
Filter
Cartridges
After
replacing
the
filter
cartridges,
please
follow
the
following
steps
to
reset
the
filter
indicator
light,
and
then
flush the
system
(refer
to
page
15
for
details).
Reset
Button
—To
reset
the
filter
cartridge.
S
Step1:
Hold
the
Reset
button
down
for
3-seconds;
you
will
hear 1-beeps.
Step2:
Select
the
filter
cartridge
you
want
to
reset.
After
1-beeps.
the
"CF"
indicator
light
will
flash.
Move
to
step
3
to
complete
CF
reset;
if
you
want
to
reset
the
RO
filter,
please
just
press
the
Reset
button
once
to
select
the
"RO",
then
the
"RO"
indicator
light
will
flash.
Step3:
Hold
the
Reset
button
down
for
at
least
3-second
to
complete
the
reset
process,
you
will
hear
1-beeps,
the
selected
filter
indicator
light
will
change
from
flashing
to
steady,
and
the
system
will
return
to
regular
operation.
If
there
is
no
operation
within
10
seconds,
during
each
stage
of
the
filter
reset
process,
the
System
will exit
the
setting
state
automatically.
Note:
the
above
steps
can
only
reset
one
selected
filter
cartridge
at
a
time,
and
it
cannot
reset
two
filter
cartridges
at
the
same
time.
Filter
Replacement
Details
Replacement
Filter
Part
Number
Q3-CF
CF
Filter
Cartridge
6-12months
Q3-RO
RO
Filter
Cartridge
12-18months
Note:
Due
to
the
difference
in
feed
water
quality, the
above
is
an
estimate
only.
Please
contact
SimPure®
for
purchase
options:
Customer
Service:[email protected]
Toll-Free
Phone:
1-866-528-4572
18

Filter
cartridge
replacement
steps
Note: Before
replacing
the
filter
cartridge,
please
be
sure
to
follow
the
following
step.
Firstly,
turn
off
the
feedwater
valve,
then
turn
on
the
faucet
to
release
the
water
pressure
inside
the
machine.
Finally,
turn
off
the
power
supply.
Locking
Latch
RO CF
Figure
A
Figure
B
Step
1
-
Open
the
side
plate
(See
Figure
A),
you
can
see
the
CF
Filter
Cartridge
and
the
RO
Filter
Cartridge.(See
Figure
B)
Tip:Firstly,
press
the
filter
cartridge
and
release
the
right
latch
to
make
it
easier
to
remove
the old
flter
cartridge.
Figure
C
Figure
D
Step
2
-
Open
the
locking
latch(See
Figure
C),
and
then
open
the
latch
to
both
sides(See
Figure
D).
Now
you
can
take
out
the old
CF(RO)
Filter
Cartridge.
19
Figure
E
Figure
F
Step
3
-
Match
the
corresponding
labels('RO
to
RO’
or
‘CF
to
CF)
and
install
the
new
CF(RO)
Filter
Cartridge
(See
Figure
E).
Finally,
lock
the
Locking
Latch.
(See
Figure
F)
Note:
Refer
to
the
markings
to
ensure
that
each
filter
cartridge
is
installed
in
the
correct
location.
Figure
G
Step
4
-
Align
the
hole
position
and
close
the
side
plate.(See
Figure
G)
*Tips:
1.Before
installing
the
filter,
ensure
that
the
markings
on
the
filter
and
the
markings
on
the
locking
latch
are
consistent.
2.After
installing
the
filter,
ensure
the
locking
latch
is
securely
fastened.
Customer
Service:
Toll-Free
:1-866-528-4572
Website:
www.simpurelife.com
20
Table of contents
Other SimPure Water Filtration System manuals

SimPure
SimPure Y6 Installation instructions

SimPure
SimPure Y7P-W User manual

SimPure
SimPure T1 User manual

SimPure
SimPure T1-6 RO User manual

SimPure
SimPure Y7 User manual

SimPure
SimPure Q6 User manual

SimPure
SimPure V7 User manual

SimPure
SimPure Y7 User manual

SimPure
SimPure T1-400 User manual

SimPure
SimPure Y6 User manual


Popular Water Filtration System manuals by other brands


Advance acoustic
Advance acoustic FREEZE WS8824 manual

US Water Systems
US Water Systems Fusion Oxi-Gen 089-FSF OG Series Installation, operation and maintenance manual

EINHELL
EINHELL BT-VC500 Original operating instructions

PureEffect
PureEffect ULTRA-UC installation instructions

Global Industrial
Global Industrial 641753 manual

Grunbeck
Grunbeck GENODOS DME 6 Operation manual