BN Products BNG5500iE User manual
| 1 |
BN Products-USA www.bnproducts.com
PRODUCT: BNG5500iE
Inverter/ Generator
OPERATIONS MANUAL
BN PRODUCTS_USA, LLC.
3450 Sabin Brown Road • Wickenburg, AZ 85390
(800) 992-3833 • mail@bnproducts.com
BNG5500iE Owners Manual 04112022.indd REV | 04112022

| 2 |
BN Products-USA www.bnproducts.com
ank you for choosing our BNG5500iE Inverter Generator.
is manual covers the proper operation and maintenance.
Before operating, please read this manual carefully for essential procedures
and safety.
All technical data and drawings in this manual are consistent with the infor-
mation on this product. However, as a result of revisions and other ongoing
updates, the contents of this manual may be slightly different from the actu-
al product. Please understand that BN Products reserves the right to make
changes without notice and without incurring any obligation.
e copyright of this instruction manual belongs to us. No reproduction
is allowed without written consent from BN Products-USA. All rights are
reserved.
is manual is a permanent part of this generator set. Please keep it in a safe
location.

| 3 |
BN Products-USA www.bnproducts.com
SAFETY MESSAGES
Your safety and the safety of others are very important. erefore, we have pro-
vided important safety messages in this manual and on the generator.
Please read these messages carefully. A safety message alerts you to potential
hazards that could hurt you or others. A warning symbol precedes each safety
message.
You can be killed or seriously injured if you don’t follow instructions.
SAFETY NOTICE
Read and understand this owner’s manual before operating your generator. You
can help prevent accidents by being familiar with your generator’s controls and
observing safe operating procedures.
• DO NOT operate indoors.
• DO NOT operate in wet conditions.
• DO NOT directly connect to the household power supply.
• DO NOT smoke when refueling.
• DO NOT overfill the fuel tank when refueling
• STOP THE ENGINE before refueling or servicing.
• PLEASE keep it away from any other flammable materials
SPECIAL REQUIREMENTS
• Electrical equipment, including lines and plug connections, must be
properly insulated.
• e circuit breakers should be matched with the generator equipment.
• If the circuit breakers require replacement, they must be replaced with a
circuit breaker with identical ratings and performance characteristics.
• Don’t operate the generator before grounding.
| 4 |
BN Products-USA www.bnproducts.com
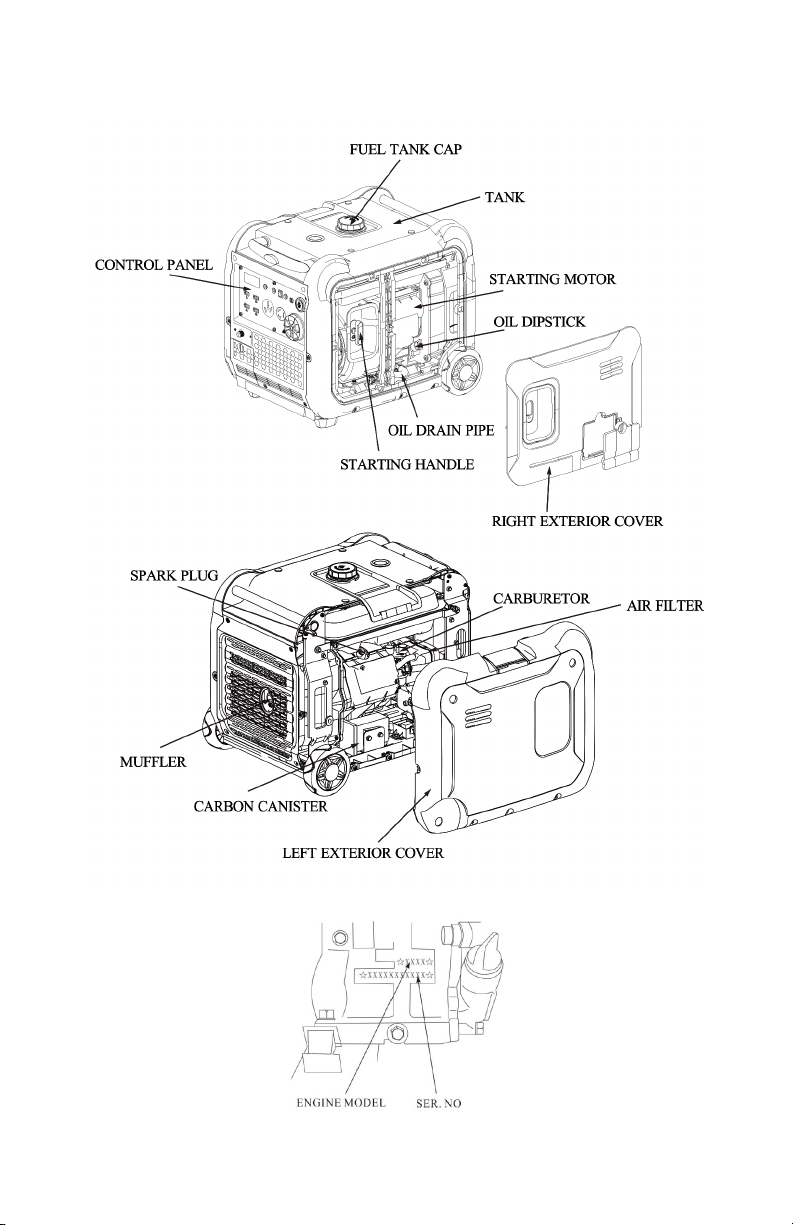
COMPONENT IDENTIFICATION
| 5 |
BN Products-USA www.bnproducts.com
CONTROL FUNCTIONS
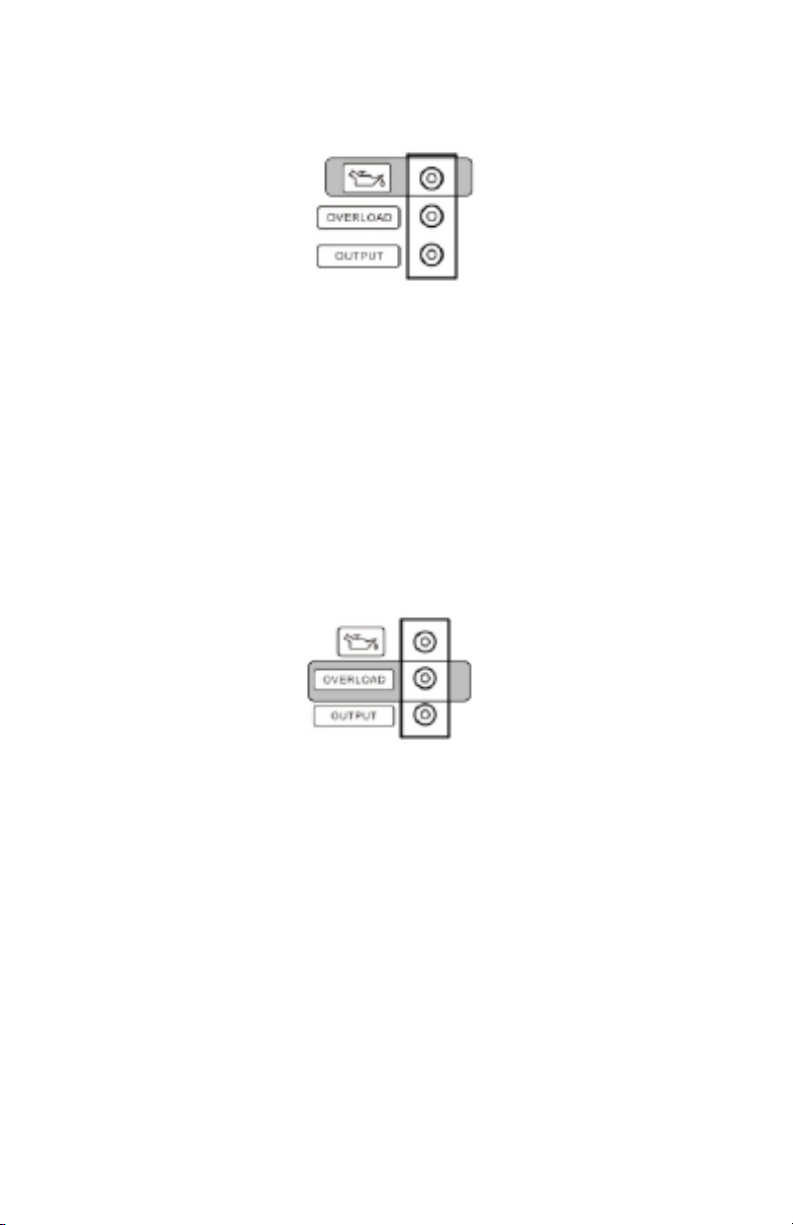
Oil Warning Light (Red)
When the oil level falls below the minimum requirements, the oil warning light
comes on and the engine will stop automatically. Unless you refill with oil, the
engine will not start again.
Tip: If the engine stalls or does not start, turn the engine switch to “ON” and
then pull the recoil starter.
If the oil warning light flickers for a few seconds, the engine oil is too low to
protect the engine.
Add oil and restart.
Overload indicator light (Red)
e overload indicator light comes on when an overload of a connected elec-
trical device is detected, the inverter control unit overheats, or the AC output
voltage rises. en, the AC protector will trip, stopping power generation to
protect the generator and any connected electric devices. e AC pilot light
(Green) will go off, and the overload indicator light (Red) will stay on, but the
engine will not stop running.
When the overload indicator light comes on, and power generation stops,
proceed as follows:
• Turn off any connected electric devices and stop the engine.
• Reduce the total wattage of connected electric appliances within the
rated output.

| 6 |
BN Products-USA www.bnproducts.com
• Check for blockages in the cooling air inlet and around the control
unit.
• If any blockages are found, remove them.
• After checking, restart the engine
Tip: e overload indicator light may come on for a few seconds when us-
ing electric devices that require a large starting current, such as a compres-
sor or a submersible pump. is is normal and not a malfunction.
AC Pilot Light (Green)
e AC pilot light comes on when the engine starts and produces power.
Engine Smart Control (ECO)
“ON”
When the ECO switch is turned to “ON,” this feature controls the engine speed
according to the connected load. e results are better fuel consumption and
less noise.
“OFF”
When the ECO switch is turned “OFF,” the engine runs at the rated/min (3600r/
min) regardless of whether it is connected to a load.
Tip: e ECO must be turned to “OFF” when using electric devices that re-
quire a large starting current, such as a compressor or a submersible pump.

| 7 |
BN Products-USA www.bnproducts.com
Ground (Earth) Terminal
e ground terminal should be connected to the appropriate ground to prevent
electric shock. Consult a qualified electrician for proper instruction.
PREPARATION
Fuel
Fuel is highly flammable and poisonous. Check “SAFETY INFORMATION”
carefully before filling.
• Do not overfill the fuel tank; ermal expansion can cause the fuel to
overflow and leak from the cap or vent.
• After filling the fuel, ensure the fuel tank cap is tightened securely.
• Immediately wipe off spilled fuel with a clean, dry cloth since fuel may
deteriorate painted surfaces or plastic parts.
• Use unleaded gasoline only, as leaded gasoline can severely damage inter-
nal parts of the generator.
• Remove the fuel tank cap and fill the tank to the red level.
• Recommended fuel: Unleaded gasoline
• Fuel tank capacity: 3.5 Gallons
Engine Oil
Because of transportation regulations, this generator has been shipped without
engine oil. erefore, please do not start the engine until it is filled properly
with sufficient 10W-30 engine oil.
Engine Oil Capacity: 0.84 Quarts

| 8 |
BN Products-USA www.bnproducts.com
Recoil Starter
Pull the starter grip lightly until resistance is felt to start the engine, then pull
briskly. Do not allow the starter to snap back against the machine. Instead,
return it gently to prevent damage to the starter or other mechanisms.
Fuel Valve
e fuel valve controls the fuel flowing from the fuel tank to the carburetor. Be
sure to return the lever to “OFF” after stopping the engine.
AC Circuit Breaker/Over Current Protector
e overload current will automatically switch off the circuit breaker to avoid a
short circuit overload.

| 9 |
BN Products-USA www.bnproducts.com
e over-current protector is in the “OFF” position when the protector switch
is raised. Press the button of the AC over-current protector to the “ON’ posi-
tion to reset the protector. If the circuit breaker is switched OFF automatically,
switch the circuit breaker ON again.
GENERATOR OPERATION
Generator Operation Environment:
• Temperature: -41°F ~104°F
• Humidity: Below 95%
• Height above sea level: 3000ft or lower (If the area is above 3000ft, the
power output will be slightly lower).
It is not recommended to connect this generator to your building’s electrical
power. is can potentially back feed electricity to the utility lines, putting
utility workers’ lives at risk while performing repairs. Instead, if you need a
backup generator or “whole house” standby power, please consult a qualified
electrician to help you determine the best solution for your needs.
It is acceptable to run individual appliances only if they are directly plugged into
the generator and are within the generator’s rated capacity. Do not run a gener-
ator inside your home for any reason. Make sure it is outside in a well-ventilated
area
AC Current
Before starting the generator, make sure the total load appliance power (the
total resistance, capacitive and inductive) does not exceed the generator’s rated
capacity.
Overloading this generator will significantly shorten the generator service life. If
the generator is connected to multi-loads or several electric appliances, please
connect the largest load first, then the second-largest load, followed by the
lightest load.

| 10 |
BN Products-USA www.bnproducts.com
e DC terminals provide a power supply for DC power loads and charge other
batteries. e terminals are colored red to identify the positive ( +) terminal and
black to identify the negative (-) terminal. Load connection method: e load
must be connected to DC terminals with the proper polarity (load positive to
positive of DC terminal and load negative to negative of DC terminal).
High Altitude Operation
At high altitudes, a standard carburetor calibration will make the air-fuel
mixture too rich. is will reduce the output power and increase fuel consump-
tion. In addition, a rich mixture can foul the spark plug and cause hard starting
of the engine. Extended operation at an altitude that differs from the engine’s
calibration can also increase emissions. A carburetor modification can improve
high-altitude performance.
If you always operate the generator at high altitudes above 3300ft (1000m)
from sea level, you can take it to one of our authorized dealers to make that
adjustment. Even with the carburetor modification, engine horsepower will be
reduced, thus lowering the output rating of the generator. Every 1,000 ft (300m)
rise in altitude reduces the engine’s power by about 3.5%. is decline is even
more significant if the carburetor has not been appropriately adjusted.
Please note: If the carburetor has been modified for high-altitude operation,
the air-fuel mixture will be too lean for low altitude use. is can cause over-
heating and damage to the engine while being used at low altitudes. Return
the unit to your dealer to adjust the engine for low-altitude use.

| 11 |
BN Products-USA www.bnproducts.com
STARTING THE ENGINE
Recoil Starter
• Unplug all appliances from the generator.
• Turn the fuel valve to the full “ON” position. is activates the choke
• If the unit is already warm, turn the fuel valve to the mid “ON” position
• Turn the generator switch to the “ON” position.
• Pull the starter grip until compression is felt, then pull briskly.
• Turn the fuel valve to the mid “ON” position after the engine is warm.
Electric starting
• Unplug all appliances from the generator.
• Turn the fuel valve to the full “ON” position. is activates the choke
• Turn the fuel valve to the mid “ON” position if the unit is already
warm.
• Press the start button.
• After starting the engine, immediately release the start switch.
• Turn the fuel valve to the mid “ON” position after the engine is warm.
• If the starter is sluggish or fails to start the generator, the battery may
require charging. Starting the generator with the pull cord and allowing
it to run will charge the battery.
Electric Start with Remote
• Hold down the start button for 3 seconds to start the generator.
• Hold down the stop button for 3 seconds to shut the generator down.
Programming a new remote.
• Press and hold the “match” button on the generator’s front panel.
• While holding the “match” button, press and hold the start button on
the remote until the engine light flashes three times.
• Let go of both buttons and start the generator by holding the start
button.
Stopping the Engine
• Turn the AC circuit breaker to the “OFF” position.
• Turn the generator switch to the “OFF” position.
• Turn the fuel valve to the “OFF” position.

| 12 |
BN Products-USA www.bnproducts.com
To stop the engine in an emergency,
turn the generator switch to the “OFF” position.
MAINTENANCE
Proper maintenance is essential for safe, economical, and trouble-free opera-
tion. e following pages are a guide to proper maintenance procedures and
maintenance schedules using basic hand tools. Other service procedures are
best handled by professionals and are typically performed by a factory-autho-
rized repair facility.
e listed maintenance schedule applies to normal operating conditions. How-
ever, if you use your generator in excessively hot or dirty environments, consult
your service facility for recommendations for your individual needs.
MAINTENANCE / PERIOD EACH
USE
1 MONTH
OR 25
HOURS
3 MONTHS
OR 50
HOURS
EVERY
YEAR
ENGINE OIL CHECK/REFILL X
REPLACE X X
AIR FILTER CHECK X
ELEMENT CLEAN X
PRECIPITATION
CUP
CLEAN X
SPARK PLUG CHECK/AD-
JUST
X
SPARK
ARRESTOR
CLEAN X X
IDLE** CHECK/AD-
JUST
X
FUEL TANK
AND FILTER**
CLEAN X
FUEL LINE CHECK EVERY 2 YEARS. REPLACE IF NECESSARY
CYLINDER
HEAD
REMOVE
CARBON**
DISPLACEMENT 225cc
** THESE ITEMS REQUIRE ADVANCED KNOWLEDGE TO PERFORM AND
SHOULD BE SERVICED BY THE FACTORY.
• Reduce the maintenance interval in extreme environments like exces-
sively hot or dusty conditions.
• Replace engine oil every 10 hours.
• Clean air filter every 10 hours

| 13 |
BN Products-USA www.bnproducts.com
• Replace the air filter every 25 hours.
• lf you have missed the scheduled time to maintain your engine, do it as
soon as possible.
A spot inspection should be performed before starting your generator. If the
maintenance cycle time has passed, the maintenance should be carried out as
soon as possible, according to the maintenance table.
Stop the engine before servicing and put the generator on a level surface. Never
run your machine in a poorly ventilated room or any other enclosed area, be
sure to keep good ventilation in the working environment. e exhaust from the
engine contains poisonous CO2, and inhalation can cause shock, unconscious-
ness, and even death.
Engine Oil Change
Drain the oil while the engine is warm to assure complete and rapid draining.
Engine Oil capacity: 0.8 Qtr
• Ensure the fuel shut-off switch is in the “off” position to prevent fuel
leakage.
• Place a suitable container next to the engine to catch the oil as it’s
draining.
• Remove the oil drain bolt and let the oil run into the container. It
may be necessary to tip the generator slightly to ensure all the oil has
drained.
• Reinstall the oil drain bolt, and with the engine in a level position, refill
the engine oil to the proper level.
• Wash your hands with soap and water after handling used oil.
• SAE oil viscosities are on the API label of the oil container. erefore,
we recommend using API service category SJ or later (or equivalent)
oil.
• SAE 10W-30 is recommended for general use.

| 14 |
BN Products-USA www.bnproducts.com
Please dispose of used engine oil in a manner that is compatible with the envi-
ronment. Do not throw it in the trash or pour it on the ground. Please recy-
cle your used oil properly. Need help finding somewhere to recycle your oil?
Earth911.com is a network that connects you to local environmental programs
in the United States and parts of Canada. Visit Earth 911 or call 1-800-CLEAN-
UP for more information and to find a location near you.
Air Filter Maintenance
A dirty air filter will affect the flow of air into the carburetor. is can lead to
excessive fuel use and high emissions levels and even prevent the generator
from starting. erefore, air filters should be regularly maintained. If used in a
dusty environment, it should be maintained more frequently.
Cleaning the filter element with gasoline or flammable solvents may cause fire
or explosion. Clean with soap and water only. Let dry thoroughly before install-
ing the filter.
Running the generator without an air filter or running with a damaged filter will
cause internal damage to the engine. Running the generator in this condition
will not be covered by the unit’s warranty.
• Open the air filter cover latch and remove the air filter element. Check
the filter element for any tears, holes, or other damage. Replace if dam-
aged.
• If the foam filter element is dirty, clean it by washing it in warm soapy
water. Be sure to rinse the filter element thoroughly.
• Allow the filter element to dry completely.
• Once the filter is dry, add a few drops of clean engine oil and squeeze
the filter, so the oil soaks the entire filter. Do not twist the filter element
as that can cause damage. Also, do not apply too much oil as this can
cause the generator to smoke once started.
• Clean any debris from the filter housing with a damp cloth. Do not allow
any dirt or debris to enter the opening leading to the carburetor.
• Install the filter element and replace the air filter cover.

| 15 |
BN Products-USA www.bnproducts.com
Fuel Sediment Cup Cleaning
• Turn the fuel valve to the OFF position.
• Remove the sediment cup, O-ring, and
strainer according to the arrow direction.
• Clean the sediment cup, O-ring, and strainer
in nonflammable or high flash point solvent.
• Reinstall O-ring and strainer and screw
down the sediment cup.
• Turn the fuel valve ON and check for leaks.
Spark Plug Service
Replace the spark plug with the original type: 7RTC
• Remove the spark plug wire.
• Clean any dirt or debris that might
have collected around the spark plug
before removing the spark plug
• Use a spark plug socket wrench to
remove the spark plug. (Available
commercially)
• Visually inspect the spark plug insula-
tor and contacts for damage or wear.
Replace the spark plug if necessary.
• Measure the spark plug gap with a thickness gauge. Bend the electrode to
adjust the clearance. e clearance should be between .028-.030 in. (0.7 –
0.8) mm.

| 16 |
BN Products-USA www.bnproducts.com
• Check that the spark plug sealing washer is in good condition.
• Install the spark plug and tighten it with the spark plug socket wrench.
• Reinstall the plug wire on the spark plug. Make sure to push it down firmly.
>>> Use only recommended spark plugs <<<
Spark Arrester Cleaning
e spark arrester must be serviced every 50
hours to function as designed.
If the engine has been running, the muffler
will be too hot to repair. Let the muffler cool
completely before servicing the spark arrester.
Cleaning procedure
• Locate the two screws at the rear of the muffler that holds the spark
arrester in the muffler.
• Remove screws and spark arrester screen
• Lightly brush the screen with a wire brush to remove carbon deposits.
• Take care not to damage the screen. If the screen is torn or damaged, it
must be replaced.
• Install the spark arrester in the reverse order
STORAGE
Following proper storage preparation procedures will help keep your generator
trouble-free. Reference the steps listed below before storing your generator.
Cleaning before storage
Wipe the generator with a damp cloth to clean any dirt or debris that may have
been collected. en, allow it to air dry.
Draining the gas tank
Gasoline will oxidize and deteriorate in storage. In addition, old gasoline will
cause hard starting and can leave deposits that will clog the carburetor, fuel
tank, and fuel lines. If this happens in your generator, you may need to have the
fuel system components serviced or replaced.
e length of time you can leave gasoline in your generator depends on several
factors. Gasoline blend, storage temperature, and even how much fuel is in the
tank can accelerate deterioration. For example, warm storage will accelerate
gasoline deterioration to just a few months. Less if the gasoline was not fresh
when you filled the tank.

| 17 |
BN Products-USA www.bnproducts.com
Gasoline is highly flammable. You can be burned or seriously injured when
handling fuel.
• Stop the engine and let it cool completely.
• Keep all heat, sparks, and flame away.
• Only drain fuel outdoors in a well-ventilated area.
• Wipe up spills immediately.
• Unscrew the fuel filler cap, remove the fuel filter and empty the tank
into a suitable container. We recommend a hand pump suitable for
gasoline. Do not use an electric pump.
• Clean the fuel filter and precipitation cup. Next, unscrew the carbure-
tor drain bolt, drain the fuel from the carburetor entirely, then reinstall
and tighten the carburetor drain bolt.
STORAGE TIME RECOMMENDED FUEL STOR-
AGE PROCEDURES
Less than one month No preparation required
1 to 2 months Fill with fresh gasoline and add a
stabilizer to the fuel. *
Two months to 1 year Drain fuel system and follow storage
procedures.
One year or more Drain fuel system and follow storage
procedures. Change engine oil and
lubricate the cylinder.
*Use a stabilizer that is formulated for extended storage life.
Draining e Oil
It is recommended to change the oil before storing the generator long-term.
Prepare Engine For Storage.
• Make sure the fuel switch is in the “off” position.
• Remove the spark plug. Pour approximately one teaspoon of clean en-
gine oil into the combustion chamber. Pull the start handle several times
to distribute the oil. Reinstall the spark plug.
• Gently pull the starting handle until resistance is felt. en return the
starting handle gently. is will leave the intake and exhaust valves
closed to help keep moisture out of the combustion chamber.
• Store the generator in a clean and dry area.

| 18 |
BN Products-USA www.bnproducts.com
Storage Precautions
• Storing your generator with fuel in the tank can pose a risk of gasoline
vapor ignition. It is important to reduce that risk by only storing the
generator in a well-ventilated area. Do not store next to any sources of
ignition. Such as a furnace or water heater.
• Avoid areas with high humidity. is can cause excessive rust that is
damaging to the generator.
• Place the generator on a level surface. Tilting or laying it on its side can
cause fuel or oil leakage.
• Be sure the fuel switch is in the “off” position.
Removal From Storage.
• Use the instructions outlined in the startup section of this manual
• If fuel was drained for storage, fill the tank with fresh gasoline.
• If the combustion chamber was coated with oil during storage, the
engine might smoke briefly at startup. is is normal and should clear
up within a few seconds.
Item BNG5500iE
Engine Gasoline Engine
Type
Single Cylinder. 4-stroke,-
Forced Air Cooling, OHV
Displacement 312 cc
Igniting System CDI
Oil Capacity 0.8 Qt
Generator Fuel Volume 13.5 Gal
Rated Frequency 50/60 Hz
Rated Voltage 230/120/240 V
Rated Output
Power
5 kW
Maximum Output
power
5.5 kW
DC 12/8.3 V/A
Gen Set Length (mm) 24” (610)
Width (mm) 18.5” (470)
Height (mm) 21” (535)

| 19 |
BN Products-USA www.bnproducts.com
| 20 |
BN Products-USA www.bnproducts.com
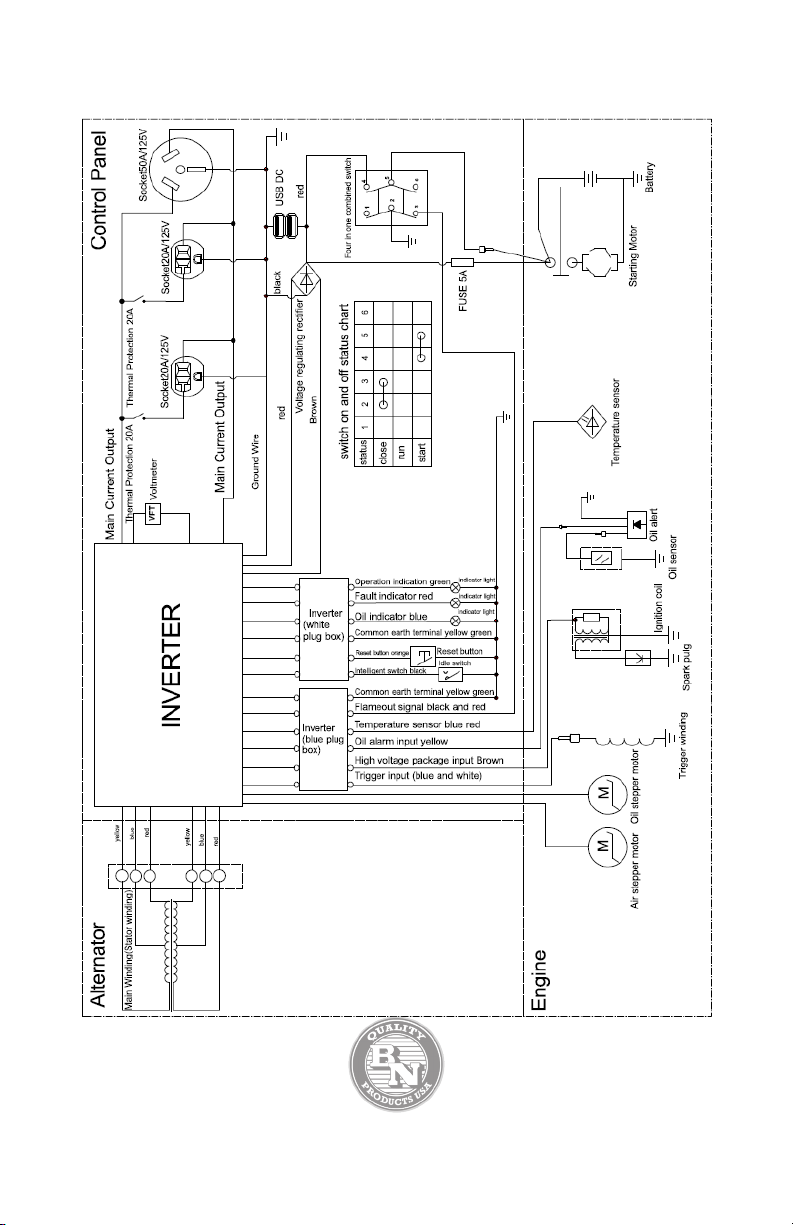
ELECTRICAL SCHEMATIC
Table of contents
Other BN Products Portable Generator manuals


Popular Portable Generator manuals by other brands

VOLTCRAFT
VOLTCRAFT FSP 2/4 operating instructions

MULTIQUIP
MULTIQUIP Power WHISPERWATT DCA25SSIU Operation and parts manual

Generac Power Systems
Generac Power Systems PowerPact 6561 Installation notes

DAYLIFF
DAYLIFF DG1200E Installation & operating manual

Kohler
Kohler 6.5RMY Operation manual

Tektronix
Tektronix AVG1 user manual

LIPOWER
LIPOWER G1600L user manual

Bryant
Bryant ASPAS1BBA007 Specification sheet

Briggs & Stratton
Briggs & Stratton 030360-0 Wiring diagram

Kodiak
Kodiak SXB12000HXV Series operating instructions

Scheppach
Scheppach SG3400i Translation from the original instruction manual

Black Max
Black Max PM0435252 manual


