BN Products BNSPW-100 User manual

PAGE | 1 BNSPW-100 Tech Manual • October 23, 2013
To reduce the risk of injury, please read
and understand this operation manual.
BNSPW-100
5” Wet Polisher for Stone
Operation Manual
All manuals and user guides at all-guides.com
all-guides.com
PAGE | 2
INTRODUCTION
e Wet Polisher has many features
for making the use of this tool more
pleasant and enjoyable. Safety, perfor-
mance, and dependability have been
given top priority in the design of this
polisher making it easy to maintain
and operate.
GENERAL SAFETY RULES
Read all instructions. Failure to fol-
low all instructions listed below may
result in electric shock, re and/or se-
rious injury. e term “power tool”
in all of the warnings listed below re-
fers to your variable speed wet pol-
isher.
WORK AREA
• Keep your work area clean and
well lit. Cluttered benches and dark
areas invite accidents.
• Do not operate power tools in ex-
plosive atmospheres, such as in the
presence of ammable liquids, gases,
or dust. Power tools may create sparks
that may ignite the dust or fumes.
• Keep bystanders, children, and visi-
tors away while operating a power
tool. Distractions can cause you to
lose control.
ELECTRICAL SAFETY
• Power tool plugs must match
the outlet. Never modify the plug
in any way. Do not use any adapt-
er plugs with grounded power tools.
Unmodied plugs and matching out-
lets will reduce risk of electric shock.
• Avoid body contact with ground-
ed surfaces, such as pipes, radiators,
ranges, and refrigerators. ere is an
increased risk of electric shock if your
body is grounded.
• Do not abuse the cord. Never use the cord
to carry the tools or pull the plug from an out-
let. Keep cord away from heat, oil, sharp edg-
es, or moving parts. Replace damaged cords
immediately. Damaged cords increase the risk
of electric shock.
ELECTRICAL SAFETY
• When operating a power tool outside use
an outdoor extension cord suitable for outdoor
use. Use of a cord suitable for outdoor use re-
duces the risk of electric shock.
• Make sure your extension cord is in
good condition. When using an extension
cord, be sure to use one heavy enough to carry
the current your product will draw. An un-
dersized cord will cause a drop in line voltage
resulting in loss of power and overheating.
PERSONAL SAFETY
• Stay alert, watch what you are doing and
use common sense when operating a power
tool.Do not use tool while tired or under the
inuence of drugs, alcohol, or medica- tion. A
moment of inattention while operating power
tools may result in serious personal injury.
• Use safety equipment. Always wear eye pro-
tection. Safety equipment such as dust mask,
non-skid safety shoes, hard hat, or hearing
protec- tion used for appropriate conditions
will reduce the risk of personal injury.
• Avoid accidental starting. Ensure the
switch is in the o position before plugging
in. Carrying power tools with your nger
on the switch or plugging in power tools that
have the switch on invites accidents.
• Remove any adjusting keys or wrenches
before turning the tool on. A wrench or a key
that is left attached to a rotating part of the
tool may result in personal injury.
• Do not overreach. Keep proper footing and
balance at all times. is enables better con-
trol of the power tool in unexpected situations.
• Dress properly. Do not wear loose
clothing or jewelry. Keep your hair
clothing and gloves away from mov-
ing parts. Loose clothes, jewelry or
long hair can be caught in moving
parts.
• If devices are provided for the con-
nection of dust extraction and collec-
tion facilities, ensure these are con-
nected and properly used. Use of
these devices can reduce dust related
hazards.
SPECIFIC SAFETY
PRECAUTIONS
• Accessories used with this tool must
be rated for at least 4000 RPM.
• Check backer pad and polishing
discs for damage before operating.
Replace damaged pad/discs imme-
diately prior to use.
• When using tool, always wear safe-
ty glasses.
• Do not use this tool with wood
or metal cutting blades.
• Hold tool rmly at all times.
• Keep hands away from moving
parts.
• Make sure the work piece is ade-
quately supported.
• Do not touch work piece imme-
diately after polishing. It may be very
hot.
• Wear rubber gloves and boots to
protect against electric shock.
• Be careful not to allow water into
the motor.
• Always use a Ground Fault Cir-
cuit Interrupter (GFCI) with this
tool.
All manuals and user guides at all-guides.com
PAGE | 3
GENERAL SAFETY
GUIDELINES
• Know your power tool. Learn its ap-
plication and limitations, as well as
the specic potential hazards related
to this tool. Read operator ’s manual
carefully.
• Always wear safety glasses. Every-
day eyeglasses have only impactre-
sistant lenses; z they are NOT safety
glasses.
• Protect your lungs. Wear a face or
dust mask if the operation is dusty.
• Protect your hearing. Wear hearing
protection during extended periods
of operation.
• Inspect tool cords periodically and,
if damaged, have repaired at your
nearest Factory Service Center or
other Authorized Service Organiza-
tion. Constantly stay aware of cord
location.
• Check damaged parts. Before fur-
ther use of the tool, a guard or other
part that is damaged should be care-
fully checked to determine that it
would operate properly and perform
its intended function.
• Check for alignment of mov-
ing parts, binding of moving parts,
breakage of parts, mounting, and
any other conditions that may aect
its operation, a guard or other part
that is damaged should be properly
repaired or replaced by an authorized
service center. Following this rule will
reduce the risk of shock, re, or seri-
ous injury.
• Save these instructions. Refer to
them frequently and use them to in-
struct others who may use this tool.
If you loan someone this tool, loan
them these instructions also.
TOOL USE AND CARE
Do not force the power tool. Use the correct
power tool for your application. e correct
power tool will do the job better and safer at
the rate for which it is designed.
• Do not use tool if switch does not turn it
on or o. Any tool that cannot be controlled
with the switch is dangerous and must be re-
paired.
• Disconnect the plug from power source
befor making any adjustments, changing ac-
cessories, or storing the tool. Such preventive
safety measures reduce the risk of starting the
tool accidentally.
• Store idle tools out of the reach of children
and do not allow persons unfamiliar with
the power tool or these instructions to oper-
ate the power tool. Tools are dangerous in the
hands of untrained users.
• Maintain power tools. Check for misalign-
ment or binding of moving parts, breakage of
parts and any other condition that may aect
the power tools operation. If damaged, have
the power tool repaired before use. Poorly
maintained power tools can increase the risk
of accidents.
• Keep cutting tools sharp and clean. Prop-
erly maintained cutting tools with sharp cut-
ting edges are less likely to bind and are easier
to control.
• Use the power tool, accessories and tool bits
etc., in accordance with these instructions and
in the manner intended for the particular type
of power tool, taking into account the working
conditions and the work to be performed. Use
of the power tool for operations dierent from
intended could result in a hazardous situation.
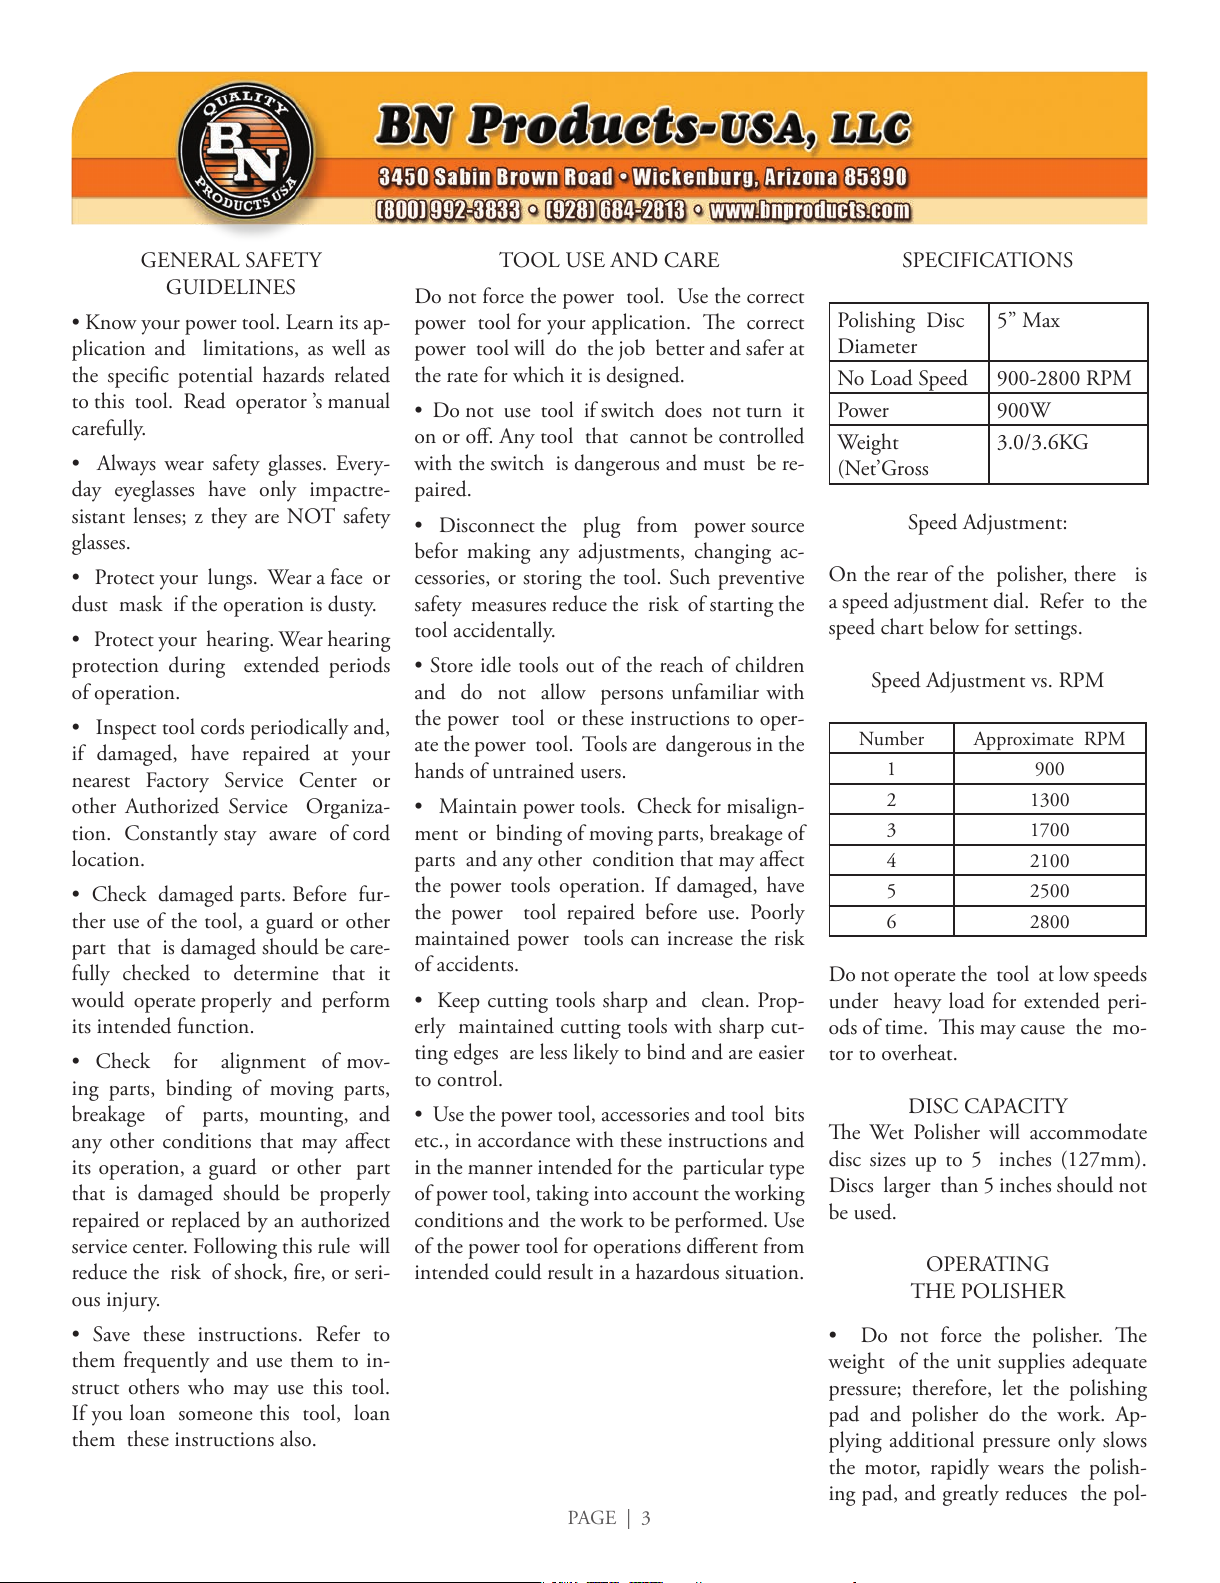
SPECIFICATIONS
Polishing Disc
Diameter
5” Max
No Load Speed 900-2800 RPM
Power 900W
Weight
(Net’Gross
3.0/3.6KG
Speed Adjustment:
On the rear of the polisher, there is
a speed adjustment dial. Refer to the
speed chart below for settings.
Speed Adjustment vs. RPM
Number Approximate RPM
1 900
2 1300
3 1700
4 2100
5 2500
6 2800
Do not operate the tool at low speeds
under heavy load for extended peri-
ods of time. is may cause the mo-
tor to overheat.
DISC CAPACITY
e Wet Polisher will accommodate
disc sizes up to 5 inches (127mm).
Discs larger than 5 inches should not
be used.
OPERATING
THE POLISHER
• Do not force the polisher. e
weight of the unit supplies adequate
pressure; therefore, let the polishing
pad and polisher do the work. Ap-
plying additional pressure only slows
the motor, rapidly wears the polish-
ing pad, and greatly reduces the pol-
All manuals and user guides at all-guides.com
PAGE | 4
ishing speed. Excessive pressure will
overload the motor causing possible
damage from overheating.
• Do not polish one spot too long.
• When used in one spot for extend-
ed periods, 50 and 100 grit polishing
pads will remove excessive mate- rial,
making the surface uneven. Excessive
pressure may overheat the motor.
• If this occurs, turn o the polisher
and wait until the polishing disc or
blade come to a complete stop. en
remove the polisher from the work
piece.
• Remove your hand from the vent
area, remove the polishing disc, then
(with your hand removed from the
vent area) turn on the polisher and
run it free, without a load, to cool the
motor.
PACKAGE CONTENTS
Your wet polisher is shipped with the
following contents
• Wet polisher with water supply line
and hose adapter
• Water shroud
• Ground Fault Circuit Interrupter
(GFCI)
• Shaft wrench (2)
• Side Handle
• Gearbox cover
• Operation manual
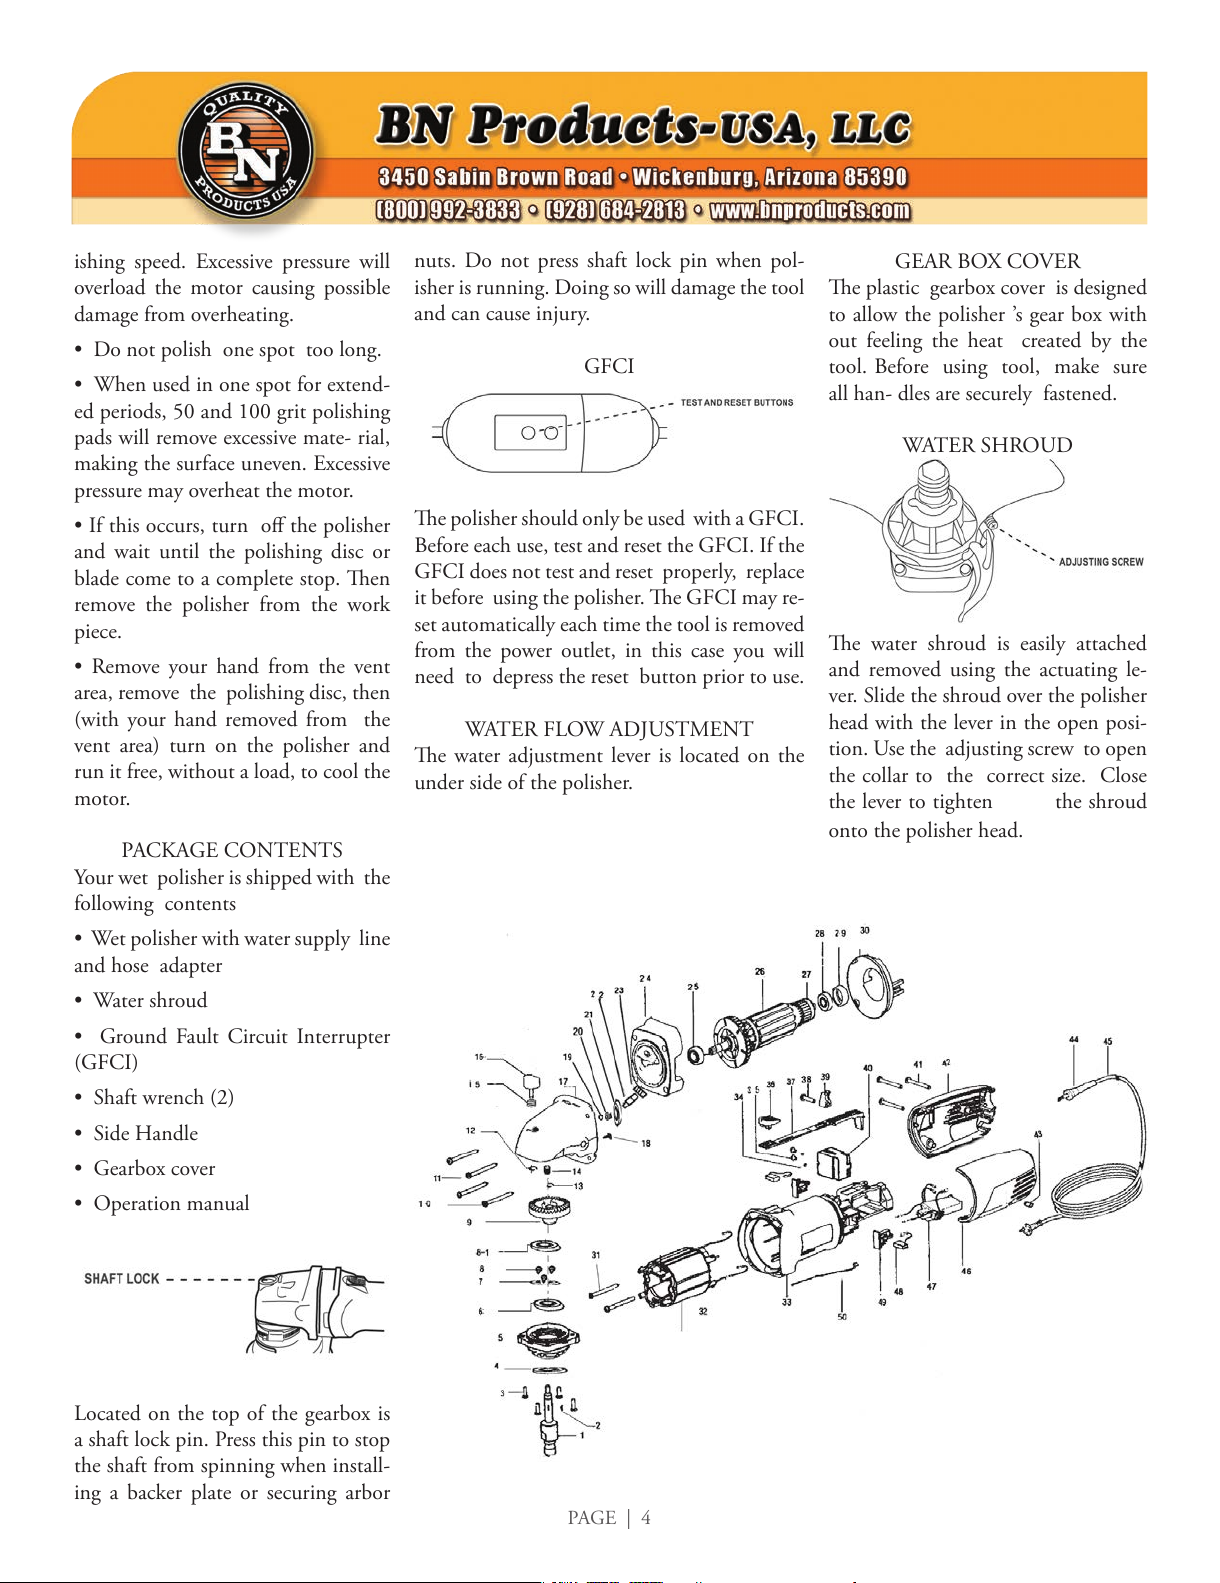
Located on the top of the gearbox is
a shaft lock pin. Press this pin to stop
the shaft from spinning when install-
ing a backer plate or securing arbor
nuts. Do not press shaft lock pin when pol-
isher is running. Doing so will damage the tool
and can cause injury.
GFCI
e polisher should only be used with a GFCI.
Before each use, test and reset the GFCI. If the
GFCI does not test and reset properly, replace
it before using the polisher. e GFCI may re-
set automatically each time the tool is removed
from the power outlet, in this case you will
need to depress the reset button prior to use.
WATER FLOW ADJUSTMENT
e water adjustment lever is located on the
under side of the polisher.
GEAR BOX COVER
e plastic gearbox cover is designed
to allow the polisher ’s gear box with
out feeling the heat created by the
tool. Before using tool, make sure
all han- dles are securely fastened.
WATER SHROUD
e water shroud is easily attached
and removed using the actuating le-
ver. Slide the shroud over the polisher
head with the lever in the open posi-
tion. Use the adjusting screw to open
the collar to the correct size. Close
the lever to tighten the shroud
onto the polisher head.
All manuals and user guides at all-guides.com
Other BN Products Sander manuals


Popular Sander manuals by other brands

DeWalt
DeWalt DW430 manual

Triton
Triton TQTRSS Operating/safety instructions

Bosch
Bosch GSS 18V-10 Professional Original instructions

Craftsman
Craftsman 351.22632 owner's manual

Swarts Tools
Swarts Tools SW1871 Instruction booklet and warranty information

Festool
Festool ROTEX RO 90 DX FEQ instruction manual


