Boca SuperX VGA board User manual

1
SuperX VGA
by BOCATM
A
CCELERATED
P
ERFORMANCE
PRODUCT CODES:
SVGA25 (512K; non-upgradeable)
SXVGA5 (upgradeable to 1MB)
SXVGA1 (1MB)
Installation Guide

2
SuperX VGA by BOCA
3
Before You Begin your Installation
The product you have purchased is designed
to be easily installed into most IBM PC or
compatible systems. Many products have
large, easy-to-read legends to allow for the
easy configuring of the product. This
installation manual contains detailed
instructions. Most included software has automatic installation
programs to place the software correctly onto your computer.
However, as all computers are configured differently, you may
be required to perform some basic DOS or Windows tasks. If
you are not familiar with basic DOS commands such as DIR,
CD, or EDIT, you should check your DOS manual, or seek
assistance from you local computer dealer to install the
product.
How to get Technical Assistance
The dealer that you purchased this
product or your computer from is the first
place you should go for technical
assistance. The dealer is usually the most
qualified source of help, and is most
familiar with your system and how this product should be
installed. Many dealers have customer service and technical
support programs, with varying levels of support offered,
depending on your needs and computer knowledge. Please
contact the dealer first whenever a problem occurs.
If your Dealer Can’t Assist you
If you can’t get assistance from your dealer, the manufacturer
provides varying levels of technical assistance as summarized
on the following page.
4
SuperX VGA by BOCA
The Standard Free Technical
Support number is for quick
answers to specific inquiries on
product features and technical
questions (call 407-241-8088; M-
F, 8 am to 6:30 pm EST). Direct
access to technical support
representatives is provided on a
limited basis. If you require
immediate attention or in-depth help with the installation of the
product, please call our 900-priority support number for service. This
number gives you immediate access to senior-level technicians. The
number is 900-555-4900. You will be charged $2.00 per minute. The
charges will appear on your next phone bill.
Damaged or Missing Items
We use many world-class quality assurance programs to ensure the
product you purchased is of the highest caliber. Sometimes, however, a
component may be missing from the box, or is damaged or corrupt in
some way. If this happens, immediately return the entire package to
your place of purchase so you may exchange it for a new one. Your
dealer should be able to provide you with an exchange far more quickly
than by contacting us directly. If for some reason you are unable to
return the product directly to its place of purchase, refer to the
“Servicing Your Product” and “Warranty” sections in this manual for
instructions.
Boca BBS
407-241-1601
Priority Service
900-555-4900
($2 per minute)
Standard Free
Technical Support
407-241-8088
On-Line Support!
CompuServe: GO BOCA
Internet:
email: [email protected]
on the World-wide WEB:
http://[email protected]
2
3
1
4
5
6
79
8
Automated
Fax Retrieval
System
407-995-9456
2
3
1
4
5
6
79
8
Technical
Support Fax
407-997-0918

5
Contents
Section One: Introduction........................................6
Section Two: Compatibility & Requirements ......... 8
2.1 Installation Requirements........................................................ 8
2.2 Monitor Compatibility ............................................................. 8
2.3 System Compatibility ...............................................................9
Section Three: Physical Installation ......................11
Section Four: Preparing Your Monitor................... 14
4.1 Choosing the Attached Monitor Type ................................. 14
4.2 CLMODE.................................................................................. 17
4.3 Previewing the Video Mode.................................................. 17
4.4 Getting Help............................................................................. 18
4.5 Command Line Options ........................................................ 18
Section Five: Display Drivers................................21
5.1 Installing the Display Drivers ............................................... 22
5.2 Microsoft Windows ................................................................ 24
5.3 SETRES Utility......................................................................... 25
Appendix A: Troubleshooting ................................26
Appendix B: Servicing Your Boca Product ........... 30
Appendix C: Technical Specifications.................. 32
FCC Compliance ......................................................35
Glossary....................................................................36
Suggested Reference Works ..................................39

6
SuperX VGA by BOCA
Section One: Introduction
Congratulations on the purchase of your SuperX VGA board. The
SuperX VGA is IBM VGA compatible and is designed to work in
all standard AT and compatible computers. This manual explains
how to set up, install, and use the SuperX VGA board.
Information is also provided for installing software drivers
which provide enhanced video display with many popular
applications. Drivers are included on the diskette shipped with
your SuperX VGA, but it is NOT necessary to install these drivers
for normal VGA operation.
NOTE: We recommend running the included CLMODE utility
to achieve optimum performance with the SuperX and your
monitor
. Refer to Section Four: Preparing Your Monitor.
Features:
• Hardware graphics cursor
• Compatible with ISA and EISA bus systems
• 16-bit interface
• Integrated RAMDAC with a 262,144-color palette
• Extensive graphic mode support
• Feature connector for use with multi-media applications
• Supports 132-column text modes.

7
Your Package Includes:
• the SuperX VGA board
• display drivers on 3.5-inch high-density (1.44MB) diskette.
the SuperX
VGA board
Introduction
Installation Guide
SuperX VGA
by BOCA
3.5-inch
diskette installation
guide
12
12
12
12
12
12
12
12
12
12
12
12
12
12
12345
12345
12345
FCC ID:EUD 5U9 BRI4495
○○○○○○○○○
1
1
1
1
1
1
1
1
1
1
1
1
1
1
○○○○○○○○○

8
SuperX VGA by BOCA
Section Two: Compatibility & Requirements
Please examine the SuperX VGA board and driver diskette to see
if there is any damage which may have occurred during
shipment. If damage exists or if anything appears to be missing,
please contact the retailer from whom the SuperX VGA was
purchased.
2.1 Installation Requirements
This user manual is designed to answer questions you might
have concerning the installation and use of the SuperX VGA, as
well as provide descriptions of legitimate system configurations.
Please take a little time to read through this manual before
installing your SuperX VGA.
2.2 Monitor Compatibility
The SuperX VGA board is compatible with VGA Color and
monochrome Analog monitors. TTL monochrome monitors with
9-pin connectors are NOT compatible with the SuperX VGA. It is
also compatible with Multiple Frequency Monitors, provided the
proper 15-pin cable adapter is used with the monitor and the
monitor is set to analog.
IMPORTANT: The SuperX VGA uses the same 15-pin (DB15)
cable available from monitor manufacturers to interface with
the IBM PS/2 computers. Using an incorrect cable may result in
damage to the monitor and/or adapter. Contact the monitor
manufacturer for proper cabling and pin-outs if you have
questions.

9
2.3 System Compatibility
Most clones are compatible with the SuperX VGA. If you are
uncertain, refer to your system’s guide to operation or check with
the dealer or manufacturer of your computer. The SuperX VGA
board is compatible with the IBM Video Graphics Array and
Enhanced Graphics Adapter.
Most compatible systems support the IBM VGA or EGA
standard. If your computer supports the IBM Enhanced Graphics
Adapter, then the SuperX VGA board will work in your system.
Some systems may require a ROM BIOS upgrade to support
VGA display. Consult your computer dealer regarding
availability of such an upgrade for your particular system.
NOTE: Drivers are not necessary for normal VGA operation.
Drivers are included on a 1.44MB 3.5-inch high-density diskette
only. You may download drivers released after the printing of this
manual from our BBS 24 hours a day at (407) 241-1601 (N, 8, 1).
However, if you decide to use the drivers, run the utilities as
described in Section Four.
Compatibility & Requirements

10
SuperX VGA by BOCA
1
1
1
1
1
1
1
1
1
1
1
1
1
1
1
1
1
1
12345678
12345678
12345678
FCC ID:EUD 5U9 BRI4495
○○○○○○○○○
12
12
12
12
12
12
12
12
12
123
123
123
123
123
123
123
123
123
○○○○○○○○○
DB-15 VGA
CONNECTOR
VIDEO
DRAM
SXVGA5 (512K)
(upgradeable) SVGA25 (512K)
1234567
1234567
1234567
1234567
1234567
1234567
1234567
1234567
1234567
1234567
1234567
1234567
1234567
1234
1234
1234
1234
1234
1234
1234
1234
1234
1234
1234
123
123
123
123
123
123
123
123
123
123
123
1234567
1234567
1234567
1234567
1234567
1234567
1234567
1234567
1234567
1234567
1234567
1234567
1234567
SXVGA1 (1MB)
12
12
12
12
12
12
12
12
12
12
123
123
123
123
123
123
123
123
123
123
123
12345678
12345678
12345678
12345678
12345678
12345678
12345678
12345678
12345678
12345678
12345678
12345678
12345678
1234567
1234567
1234567
1234567
1234567
1234567
1234567
1234567
1234567
1234567
1234567
1234567
1234567
123
123
123
123
123
123
123
123
123
123
12
12
12
12
12
12
12
12
12
12
12
VIDEO
BIOS
FEATURE
CONNECTOR
MAIN CHIP SET

11
Section Three: Physical Installation
Installation of the SuperX VGA board is simple and quick for the
expert and novice alike. The following instructions assume an
AT-style or compatible machine. Obviously, locations and types
of screws as well as type of case cover will vary based on your
particular system. Refer to your computer system documentation
for additional assistance.
1. Turn the power switch to the OFF position.
2. Remove the power cord from the back of the computer.
3. Unplug the keyboard cable found in the lower middle of the
computer’s rear panel.
4. Use a small screwdriver to remove the screws that attach the
computer’s cover to the rear panel.
5. Carefully slide the cover forward—away from the rear panel.
Be careful not to let the cover catch on internal cables to the
disk drive and power supply.
The SuperX VGA board must be installed in any
available 16-bit slot in your system.Adapter card
connector slots normally reside in the rear of the system
board adjacent to the power supply. There are usually
anywhere from five to eight edge connectors, depending
on the model of your system.
Physical Installation

12
SuperX VGA by BOCA
6. Select any available 16-bit expansion slot and remove the screw
and the metal plate that covers
the external access to the slot
you have selected.
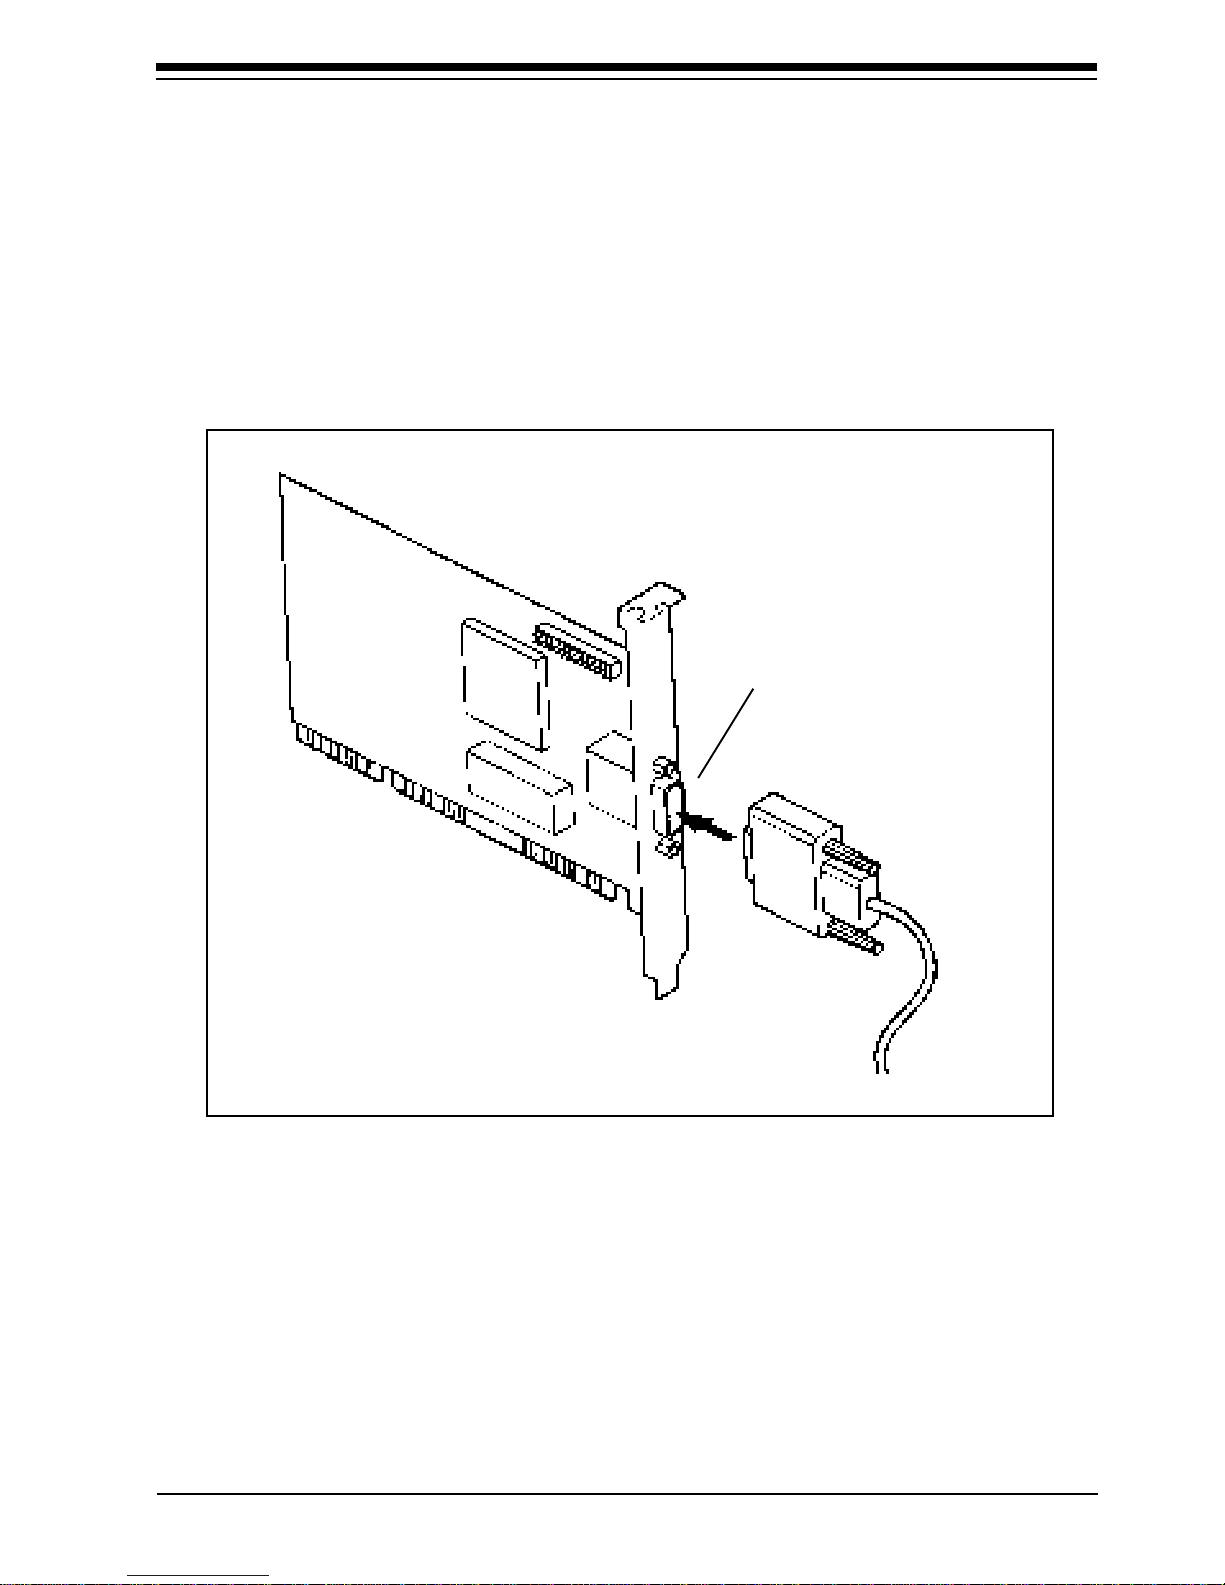
7. Insert the SuperX VGA board in
the slot that you have selected,
so that the edge connector on
the bottom rear of the board
mates with the socket on the
motherboard. Press down
firmly on the board. Secure the
board with the screw which
you just removed.
8. Some older motherboards
require that switches or jumpers be set for VGA (EGA on still
older machines). With newer systems, this is done through the
system CMOS setup. Refer to your system documentation for
instructions on either jumper settings or running CMOS setup.
13
9. Slide the computer cover back over the chassis taking care not
to let it catch on the disk drive or power cables. Once the cover
is in place, replace all the screws that you removed earlier. Re-
attach all cables and power cords to their original positions.
Attach the appropriate monitor cable to the SuperX VGA.
To monitor
15-pin
Connector
Physical Installation
14
SuperX VGA by BOCA
Section Four: Preparing Your Monitor
The CLMODE utility allows you to define the type of monitor
attached and preview the video modes supported by your
monitor. CLMODE is installed by running INSTALL from the
driver diskette and choosing “SUPERX VGA UTILITIES”, the
first selection on the menu. After installation, type the command
CLMODE from the subdirectory in which CLMODE was
installed (e.g., C:\CLUTIL\CLMODE). Refer to section 5.1 on
“Installing Display Drivers” for more information.
4.1 Choosing the Attached Monitor Type
Selecting the proper monitor type will allow the Boca SuperX
VGA to display the highest quality output that it is capable of
with the attached monitor. The monitor type determines what
video modes will be available to your system. It will also
determine the vertical refresh rates available to your system.
Generally, the higher the refresh rate, the better the screen will
look.
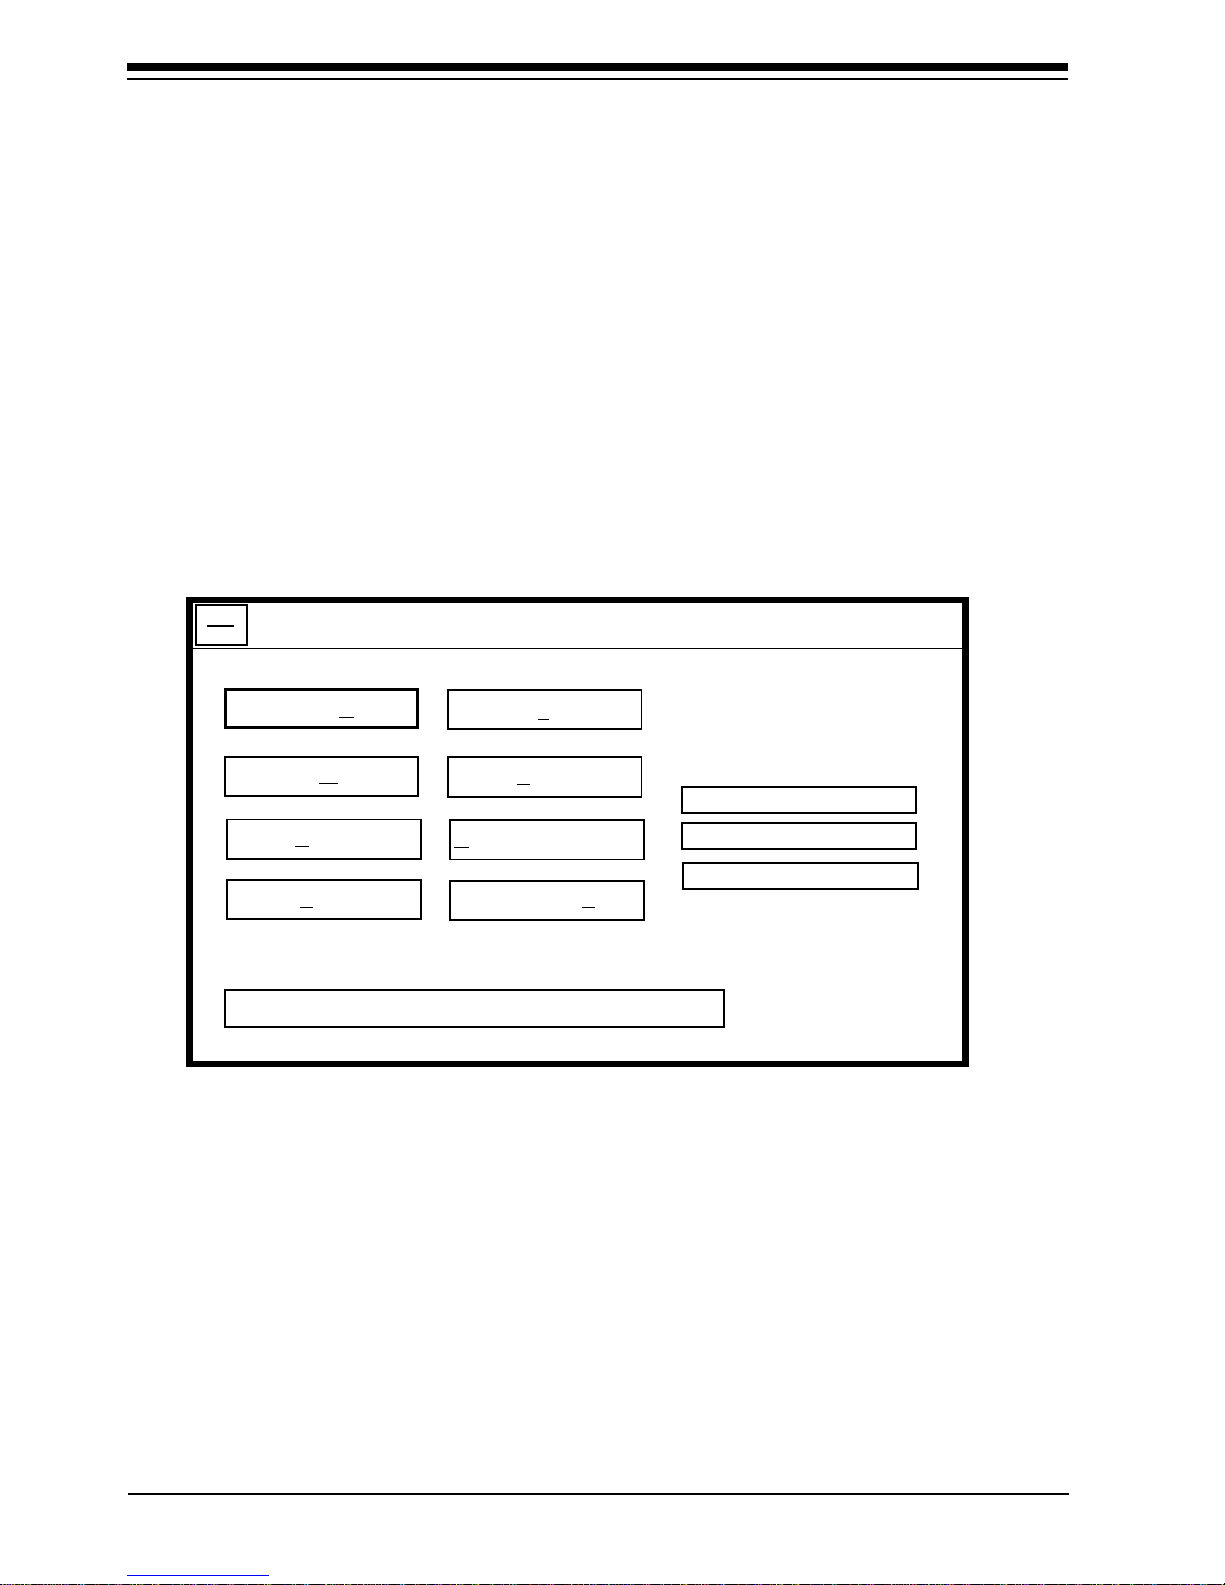
CLMODE Utility Program
To make a selection, press the underlined letter
MonitorType
VideoModes
Help on Monitor Type
Help onVideo Modes
Help on Keyboard
Help on Mouse
About...
Exit
CL-GD5424
BIOS Version X.X
1024K Video Memory

15
Preparing Your Monitor
Select Monitor Type to display the Monitor Type Setup window.
The current monitor type and refresh rate will be highlighted
initially. Use the keyboard or the mouse to choose the type of
monitor attached. Press the OK button to set the new monitor
type. Press the CANCEL button to discard any changes. Press
HELP for an explanation of the monitor types and VGA refresh
rates. For example, if you choose monitor type 1, CLMODE will
restrict the maximum non-interlaced resolutions to 640x480 at
60Hz and the maximum interlaced resolutions to 1024x768 at
87hz, only. See sample screen below:
If you choose monitor type 6, CLMODE allows the maximum
non-interlaced resolution to be 1024x768 at 70Hz. See sample
screen which follows:
Monitor Type Setup
MONITOR SELECTION
0VGA
18514 Compatible
2Super VGA
3Extended Super VGA
4Multifrequency
5Extended Multifrequency
6Super Multifrequency
7Extended Super Multifrequency
Advanced
Cancel
Verify OK Help
Horizontal frequency: 35.5 KHz
640x480 @ 60Hz 1024x768 @ 87iHz

16
SuperX VGA by BOCA
On some systems the monitor type is remembered from one
session to the next. To test this, select a monitor type and exit the
CLMODE program. Turn the computer off for approximately ten
seconds.
After rebooting the computer, run CLMODE and verify whether
or not the monitor you selected is still enabled. If it is, it should
never be necessary to set the monitor type again during normal
operation. If the monitor type was not kept, then it will be
necessary for CLMODE to be added to your AUTOEXEC.BAT.
IMPORTANT: Never choose a selection that your
monitor does not support. See the chart on page 20
for some examples.
Monitor Type Setup
MONITOR SELECTION
0VGA
18514 Compatible
2Super VGA
3Extended Super VGA
4Multifrequency
5Extended Multifrequency
6Super Multifrequency
7Extended Super Multifrequency
Advanced
Verify OK Help
Cancel
Horizontal frequency: 56.0 KHz
640x480 @ 72Hz 1024x768 @ 70Hz

17
4.2 Using CLMODE’s Menu-driven Interface
From the CLMODE directory, type the following at the DOS
prompt: CLMODE [Enter]
The main window, as shown on page 14 consists of the following
selections: Monitor Type, Video Modes, and Help. Each selection
contains one or more menu items. The underlined letter of a
menu item specifies the hot keys combination for that item. For
example, pressing the [T] key selects the Monitor option. Note
that a mouse driver must first be installed prior to running the
CLMODE utility in order to use the mouse pointer for menu
selection.
4.3 Previewing the Video Mode
Select Video Modes from the main window. The Video Modes
Preview window displays all the modes supported according to
the monitor type selected and the video memory present. Use the
mouse or the keyboard to move the highlighted bar to the video
mode you wish to preview.
To preview the mode, press [ALT] and [P], or position the mouse
cursor on the Preview button, and press the left mouse button.
After CLMODE exits back to DOS, the desired video mode will
be set.
Preparing Your Monitor

18
SuperX VGA by BOCA
Retrieving the current VGA controller status
The information in the main window displays the VGA controller
type, the BIOS version number, and the amount of video memory
present.
4.4 Getting Help
CLMODE provides Help for the following items: Monitor, Video
Modes, Mouse, Keyboard and About. The Monitor help window
explains the different capabilities of each monitor type. The
Display help window gives a detailed description of the video
modes and the VGA controller status. The Keyboard and Mouse
help windows explain how to use the keyboard and the mouse to
make selections. The About window displays the CLMODE
version number.
Exiting the CLMODE Menu-driven Utility Program
To exit CLMODE at any time, select EXIT or press ALT X.
4.5 Using CLMODE’s Command Line Options
When command line options for CLMODE.EXE are given at the
DOS prompt, the menu-driven windows will not be displayed.
Instead, monitor type, video mode, and refresh rate will be set at
the DOS prompt. The command line options for CLMODE.EXE
are as shown below:
CLMODE [[modenum][+*-]] [m[montype] | t6=x t8=x t1=x t2=x]
[modenum] =mode number (valid values listed in the Video
Modes Preview window, when Video Modes is selected from
the CLMODE main window.

19
[+*-] + selects 400 lines (default)
* selects 350 lines
- selects 200 lines
[montype]=monitor type (valid values are listed in the table
on page 20); the following are settings for advanced monitor
type:
t6=x(Hz) 640x480 @ (0 = 60, 1 = 72)
t8=x(Hz) 800x600 @ (0 = 56, 1 = 60, 2 = 72)
t1=x(Hz) 1024x768 @ (0 = 87i, 1 = 60, 2 = 70, 3 = 72)
t2=x(Hz) 1280x1024 @ (0 = 87i, 1 = Not available)
For example, to select mode 3 for a SuperX VGA monitor
(montype 2), type the following command at the DOS prompt:
CLMODE 3+ m2[Enter]
To select custom monitor timings with 640x480 at 60Hz and
800x600 at 72Hz refresh type:
CLMODE t6=0 t8=2[Enter]
Typing an invalid option will display the command line help text.
Typing [S] as a command line option will display the current
monitor setting e.g.,
CLMODE S [ENTER]
Following is a table of common monitor types and associated
values that you should use for the [montype] option. Resolutions
with more than one entry per line in the vertical frequency
column signify availability of the high-refresh option.
Preparing Your Monitor

20
SuperX VGA by BOCA
VALID MONITOR SETTINGS
LOW or HIGH
Valid Monitor Horizontal Vertical Display
Value* Type Frequency Frequency Resolution
0IBM 8512 31.5 640x480
IBM 8513 60
IBM 8503
1IBM 8514 31.5 60 640x480
IBM 8515 35.5 87i 1024x768
2 NEC 2A 31.5 60 640x480
35.1 56 800x600
3NEC II 31.5 60 640x480
35.1 56 800x600
35.5 87
interlaced
1024x768
4 NEC3D 31.5 60 640x480
35.5 87
interlaced
1024x768
37.8 60 800x600
5
Sony CPD-1304
31.5 72 640x480
NEC 3FGx 48.0 72 800x600
Nanao 9065S 48.0 60 1024x768
6 NEC 4D 31.5 72 640x480
NEC4FG 48.0 72 800x600
Nanao T240i 56.5 70 1024x768
7 NEC 5D 31.5 72 640x480
NEC 5FG/6FG 48.0 72 800x600
Nanao T560i 56.5 70 1024x768
This manual suits for next models
3
Table of contents
Other Boca Video Card manuals


