Kiloview REN-100 User manual

REN-100 Video Encoding Card
Dual Input NDI|HX encoding card
(2022-01 version)
Leading solution provider of IP-based video transmission
Quick Start Guide
Contents
◼Packing List
◼Device interfaces and functions
◼Device connection, login and applications
◼Device upgrade and restore the factory settings
Before using this product, it is recommended that you read the guide carefully. To ensure your personal safety and avoid physical or electrical damage to the
device, please strictly follow the instructions of this guide to install and use it under the guidance of professionals. Incorrect electrical connections or physical
installation may cause permanent damage to the device and even threaten personal safety.

1Packing List
(1) Device ×1
(2) Warranty Card ×1
(3) Quick Start Guide ×1
2Device Interface
(1) Reset
(2) 100M Ethernet
(3) SDI 2 input
(4) SDI 2 loop out
(5) SDI 1 input
(6) SDI 1 loop out
1
2
3
4
5
6

3REN-100 Card Installation
Align the card to the up and down of the card slot, push in parallel and tighten the 2 screws of up and down. When
disassembling, loosen the two screws, and pull out the card in parallel.
Website for more information about Kiloview RU03S:
https://www.Kiloview.com/en/support/docs/3u/card-board/
1. Align the card to the up and down of the card slot, push in parallel.
2. Tighten the 2 screws of up and down.

4Device Connection
Note
⚫RU03S chassis equips with dual power supplies, one power supply is working well. When dual power supplies are
connected, it will be used as a redundant power supply.
⚫REN-100 encoding card supports two SDI inputs simultaneously.
⚫Loop is not a must, connect to the SDI OUT port when needed.
⚫Turn on/off the device by the power switch if the power cable connected.
5Device Discovery
5.1 Install Kiloview Multiview NDI Player for free
Download Kiloview Multiview for free
Visit website https://www.Kiloview.com/en/ndi/multiview/, select “NDI Series”“ Multiview”and click download,
then install software step by step as instructions.
Kiloview Multiview is a free software for NDI video discovery, management and multi-view, which is popular and
highly praised all over the world.
SDI Video Source
LOOP
PC
AC100~240V
Switcher
Power Supply Cable
Network

Start the Kiloview Multiview, open the setting interface.
Find the device in the device discovery list. Enter management interface through web browser.
Note
REN-100 naming rules: REN100-<serial number>.
Serial number refers to the numbers pasted on the device label.
Two ways of accessing to the device management page

5.2 Use Studio Monitor in the NDI SDK Tools
Right click on the Studio Monitor interface,find the name of REN-100 in the pop up menu, click it for
playing NDI video. At the same time, a gear icon will appear in the lower right corner, click it and then a
browser window will pop up for logging in and accessing the Web UI of REN-100.
5.3 Solutions for the device cannot be found
If the device with REN-100 can’t be found in the network with the above two methods due to the
network, please kindly try to access the device by its default IP address. The default IP address of SDI1 is
192.168.1.168, for SDI2 is 192.168.1.167. For example, enter http://192.168.1.168/ in the browser to enter
the Web UI.
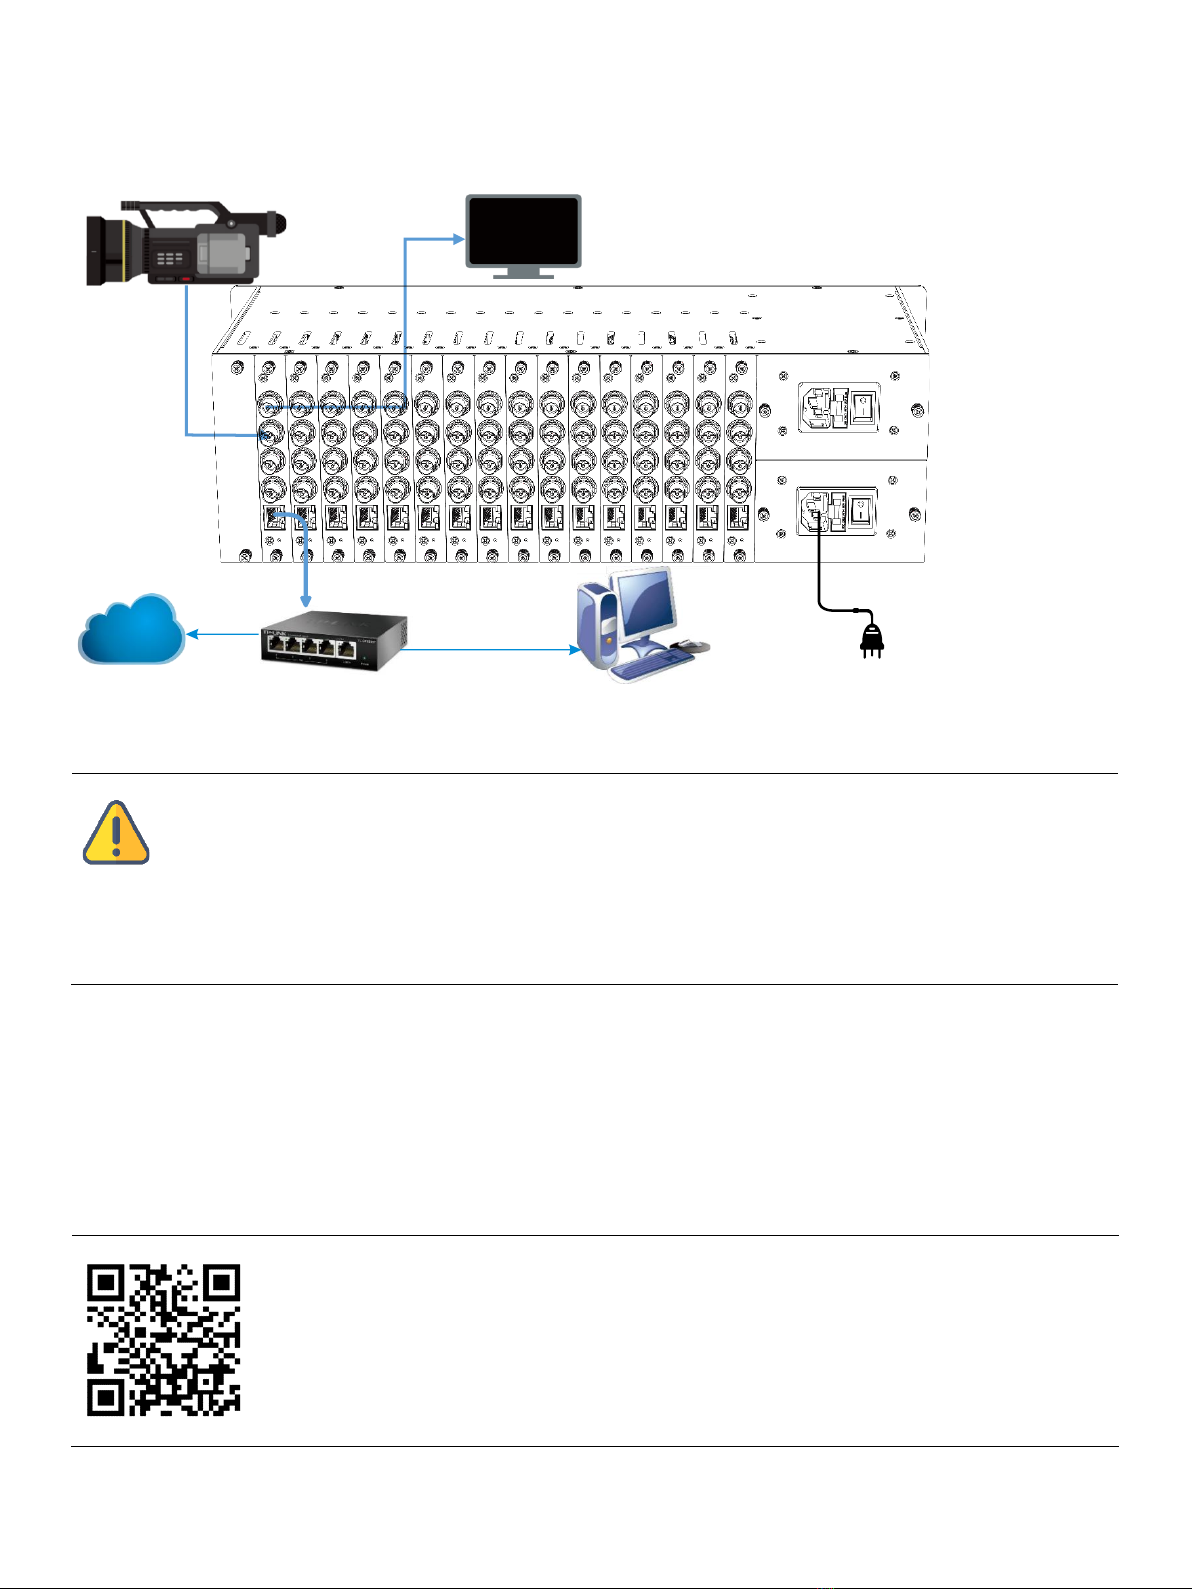
Method 1:Drag the device directly in the discovery list to the left window, wait and click
the icon ⓔappeared in the upper right to access Web UI directly.
Method 2:Open Web browser, enter: http://device IP address/ (Kindly note the device
IP address for REN-100 is showed in the discovery device list.)
SDI1 and SDI2 should use two different IP addresses to log into two different WEB
management pages, but the steps are the same.
Download NDI SDK Tools
Download and install NDI SDK Tools through NDI official website https://www.ndi.tv/tools/. Kindly follow the NDI
official instructions for download method and installation process.
Studio Monitor is one of the NDI SDK Tools for free,which is provided officially by NDI for discovery and monitoring
NDI video.
Note
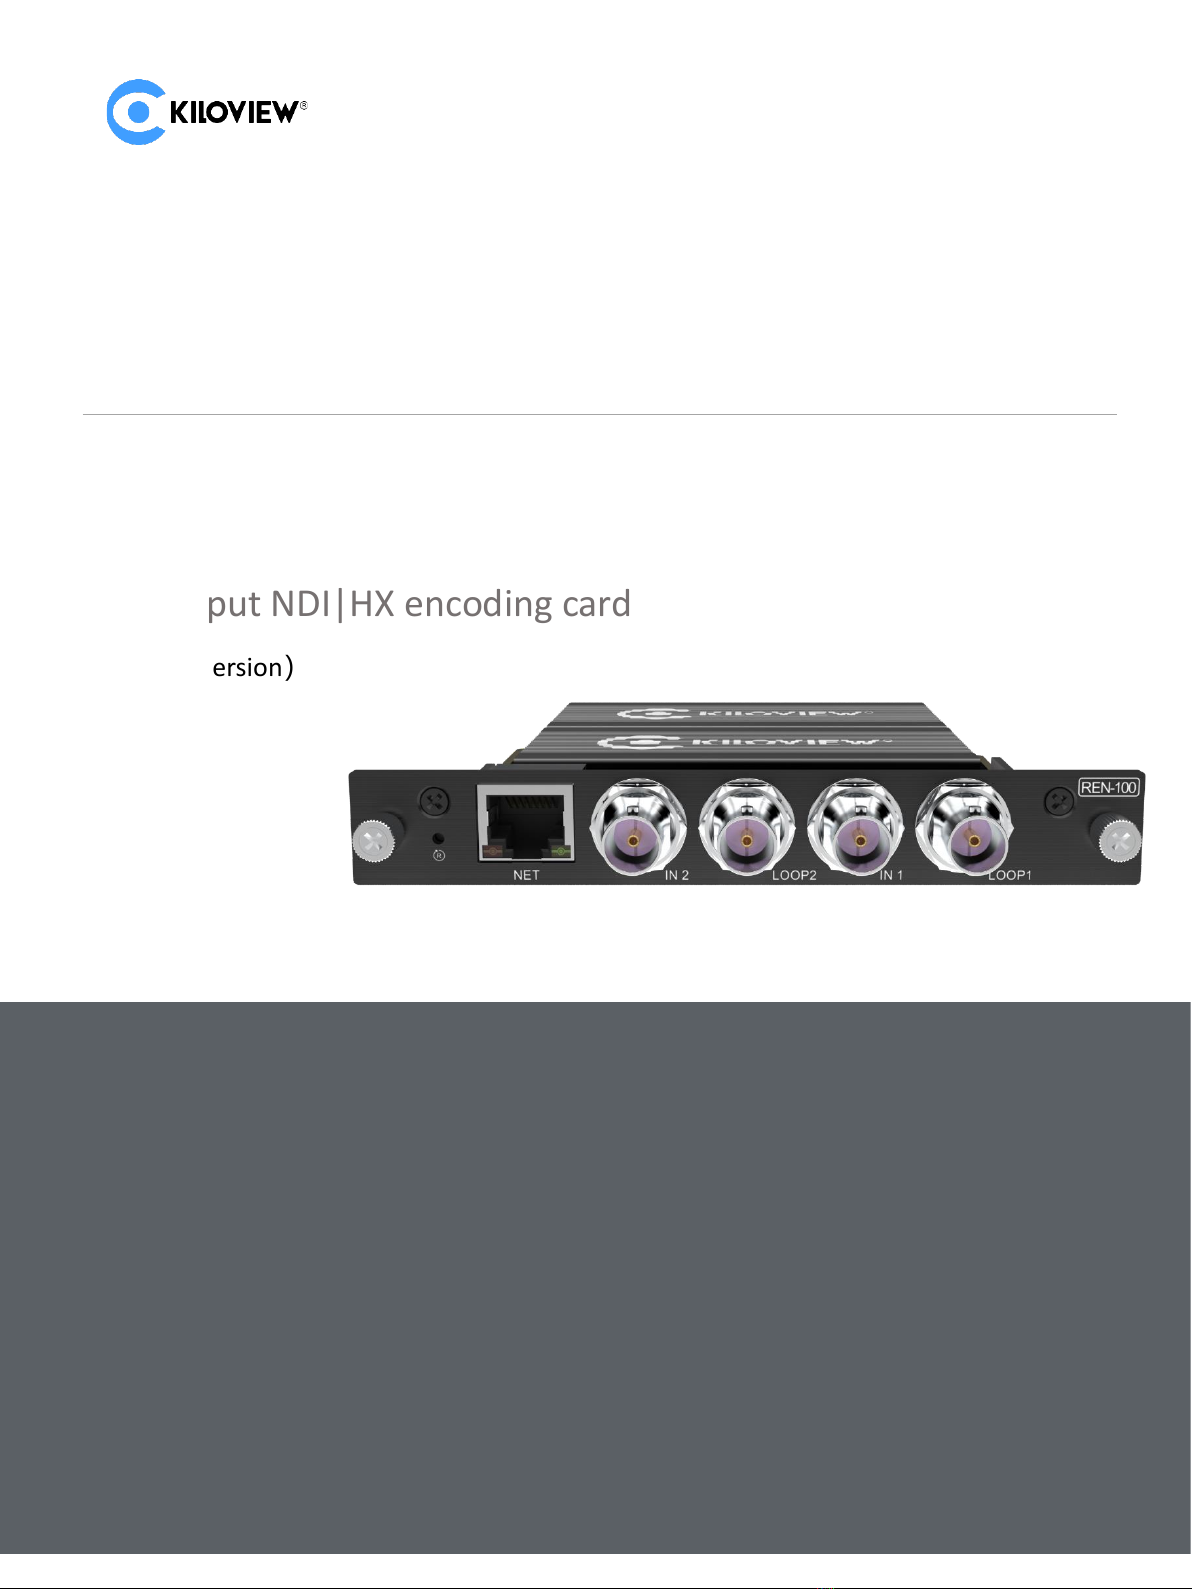
⚫REN-100 naming rules:REN-100-<Serial Number>. Serial number refers to the numbers
pasted on the device label.

6Login to the device management page
Enter to the Web page of the device, both the username and password are admin by default.
Note
⚫To ensure information security, it is recommended to change your password immediately after logging in for the first
time!
⚫Due to the browser compatibility issues, it is recommended to use Chrome, Firefox or Edge.
7Device Working
7.1 Video source checking
Enter to the device web page, click "Encoding and Stream" - "Encoding and Stream Settings" to check the
Motion JPEG stream. When there is no video signal input, the Motion JPEG stream displays a blue image. If
the video input, there will be a real-time video displayed and changes every three seconds.
Note
If the video source connected, there is still a blue screen or video displayed abnormality. Please check the input video source,
the video resolution format or cables, etc.

7.2 Encoding streams checking
1. Click the "Encoding and Stream" - "Encoding and Stream Settings";
2. In the H.264 stream, copy the URL address displayed on the right side of RTSP;
3. Open "Media" ----“Network Streaming" of VLC;
4. Enter the URL address of RTSP in the network, and click the [Play] button in the lower right corner;
5. VLC will play the input video of device.
Download the VLC
Download and install the VLC through the official address https://www.videolan.org/vlc/. Please
follow the official guidelines of VLC for the download /installation.
VLC is a free, open source, cross-platform multimedia player and framework that can play most
multimedia files, as well as DVD, CD, VCD and various streaming protocols.
Website for more information about the REN-100:
https://www.Kiloview.com/en/support/docs/REN100/

7.3 RTMP Live Streaming
First, add an RTMP push point on the device side. Click "Encoding and Stream" --- "Encoding and Stream
Settings", and then click "Add a Streaming Service" under the H.264 main stream, and select "RTMP Push" in
the pop-up window ". After confirmed, a push pint is generated.
Take FACEBOOK as an example, first obtain the RTMP push URL on the live platform. Login to FACEBOOK,
click "Live Video" to enter the live room, and click "Use Stream Key" for live broadcast. Fill in the URL of live
broadcast and Stream Key into the URL address of the RTMP push point, and start the streaming service. You
can see the video in the live broadcast room.

8Firmware Upgrading
8.1 Download upgrade firmware
8.2 Upgrade device firmware
Login to the web page of REN-100, click "Settings"-- "Firmware Upgrade" to check whether the latest
firmware version downloaded is higher than your current version. If yes, select the downloaded firmware
and click "Firmware Upgrade".
After uploaded the firmware successfully, it needs to reboot the device. After clicking “ok”, the device will
restart, please be patient.
Introduction
⚫If the platform RTMP streaming address and live broadcast code are separate, please use the symbol "/" to add the live
broadcast code after the RTMP address. The format is: rtmp address/live code.
⚫Please make sure the device is connected to the network, and configure the correct IP address, DNS and other
parameters.
Kiloview will continue to provide the firmware of updating functions and fixing bug for
REN-100, please visit:
https://www.Kiloview.com/en/support/download/
Select “video encoders” > “REN-100”, find and download the latest firmware.

Note
⚫Please not power off during the upgrade process, otherwise the device couldn’t work.
⚫Generally, it will take 3-5 minutes to upgrade the device. If it’s still not completed after 5 minutes, please try refreshing
webpage, if you still can’t access it, please try to contact technical support.
9Restore factory settings
If the device cannot work normally after modified the parameters or forgot internet IP configuration and
couldn’t search and find the device, please restore factory settings.
Two methods for restoring factory settings:
1) If you can login to web page, then via the WEB page, click "Settings—System settings--Restore factory
settings".
2) If you can’t login to web page, press the RESET button for 5 seconds in the bottom of device.。
Note: After restoring factory setting, below parameters will be turned to default value:
⚫Login username and password will be “admin”;
⚫IP address will be restored as 192.168.1.168, subnet mask will be 255.255.255.0;
⚫All encoding parameters of video and audio will be restored to default value;
For more questions, please contact us via:
https://www.kiloview.com/en/support
KILOVIEW Electronics CO., LTD.
Tel:86-18573192787 Email:support@kiloview.com Web:www.kiloview.com/en
Address: B4-106/109, Jiahua Intelligence Valley Industrial Park, 877 Huijin Road, Yuhua District,
Changsha City, Hunan Province, China.
Table of contents