Body Charger GT8600RF User manual

GT8600RF
MOTORIZED TREADMILL
OWNER’S MANUAL

1
TABLE OF CONTENTS
Table of Contents
Safety Precaution
Exploded Drawing
Parts List
Assemble Instruction
Computer Operating
Maintenance and Technical data
Fitness Tips
P1
P2
P5
P6
P8
P18
P22
P26

2
SAFETY PRECAUTION
1.To begin, straddle the belt, standing on the bumpers, turn on the machine at a slow speed, and then step onto the belt, holding the handrails.
2.Begin walking slowly, then gradually increase speed, setting control to appropriate walking speed for your level.
3.Walk with the same form recommended for road walking.
4.Begin at a “0” percent grade and gradually increase it and/or speed as you become more fit.
5.When you have finished, step onto the bumpers of the machine before turning it off.
1. Always position the treadmill on a flat, level surface.
2. Keep the treadmill away from water. Avoid getting water or other liquids on the electronics or power cord.
3. Keep small children away from the treadmill while in operation.
4. Keep walking surface and shoes clean and dry. Keep mud and dirt off of the walking belt. Clean as needed with a damp cloth, but wait until dry before using the
treadmill, do not walk on a wet walking belt. The surface may be slippery.
5. Wear proper clothing and shoes. Clothing that allows free movement (exercise suit or shorts and T-shirt) is recommended. Avoid wearing robes, gowns,
or oversized clothing that may get tangled. Air cushion shoes (tennis, running, or aerobic) are also suggested.
6. Do not start the treadmill while you are standing on the walking belt.
7. Do not place the treadmill at outdoor and high humidity area.
8. Keep away all loose clothing, shoelaces, and towels from the moving parts.
9. Do not insert objects into any opening in the treadmill. If an object should drop inside of machine, switch off the power, unplug the power cord from the outlet.
Be sure carefully retrieve it, if can't, please call for technical maintenance service.
10. Do not place any kind liquids units on machines except on the tray or holder.
Treadmill Walking Tips
If at any time while exercising, the user feeling faintness, dizziness, pain, or shortness of breath, must stop immediately.
6.Be sure the Safety Key is clipped to the user's clothes and placed proper position on the bottom of the console before starting any workout. To stop the
running belt on the treadmill, pull the cord , removing it from the magnet, if the user need.
Before beginning any fitness program, a complete physical examination by your personal physician is strongly recommended.
CAUTION:
Read carefully all instructions before using the treadmill
SAFETY PRECAUTION
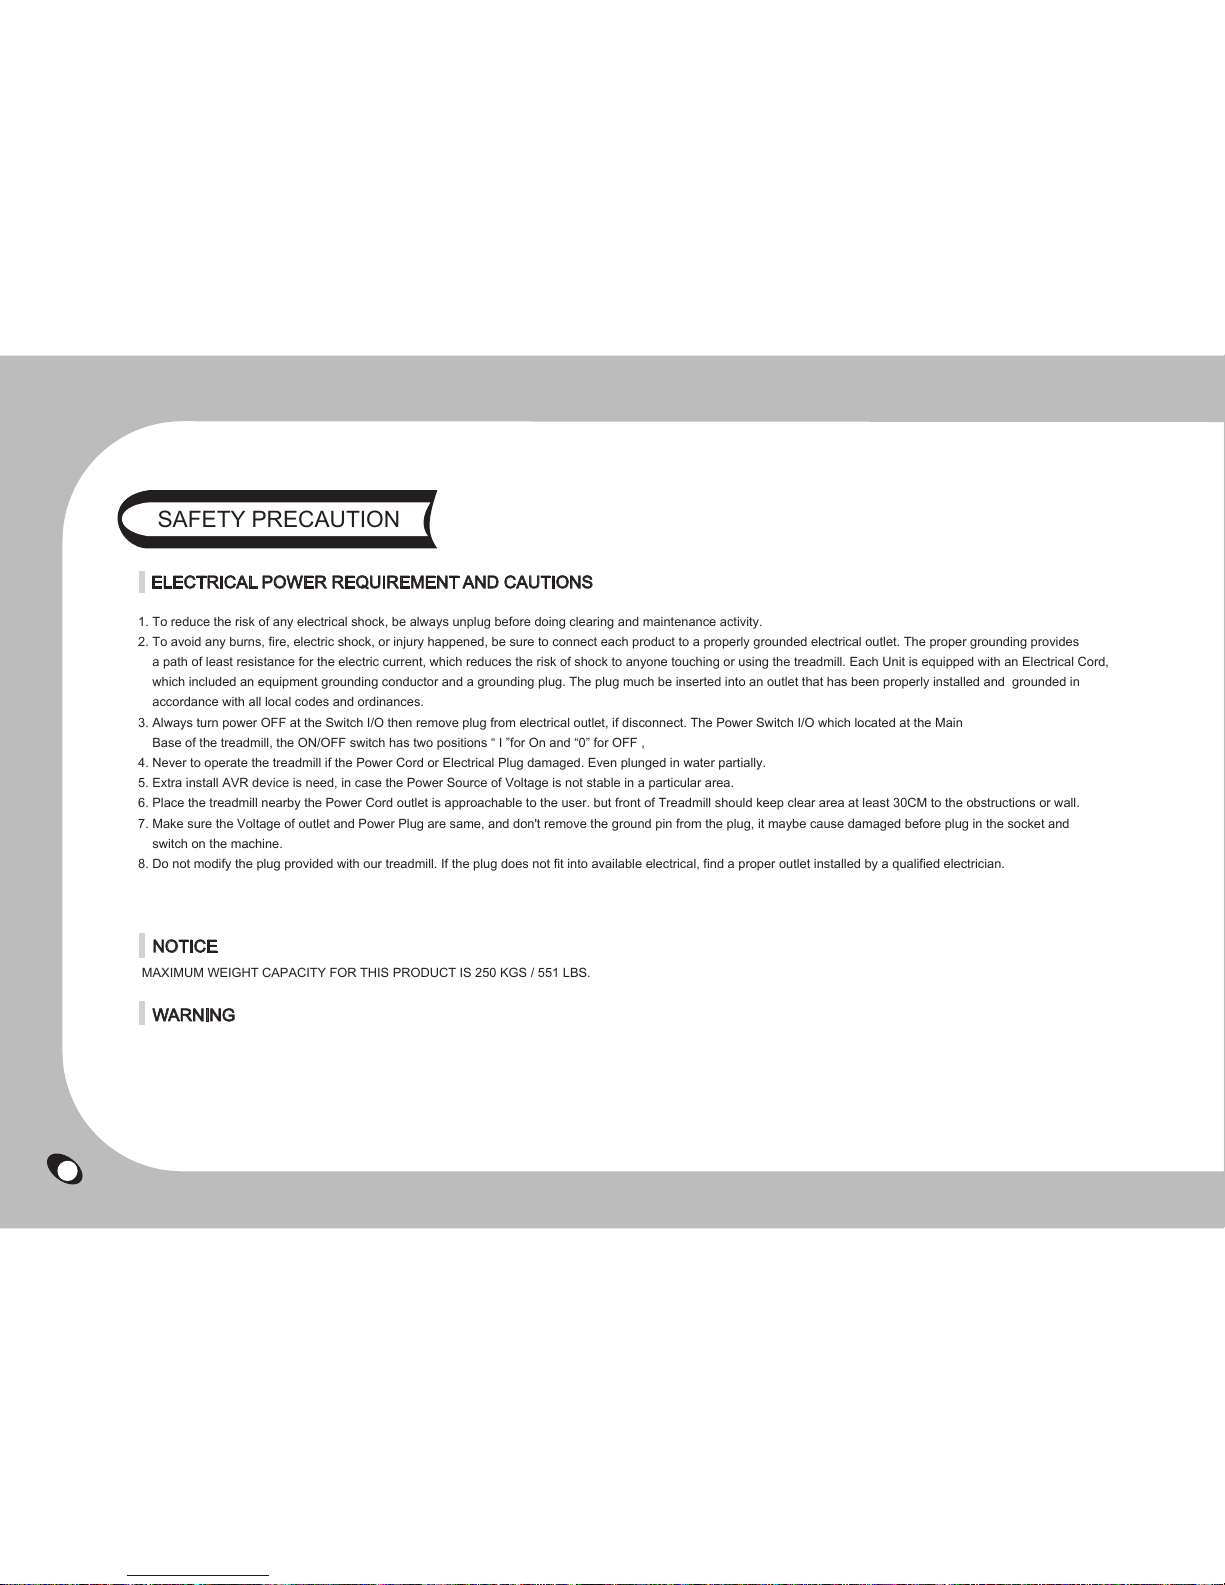
NOTICE
MAXIMUM WEIGHT CAPACITY FOR THIS PRODUCT IS 250 KGS / 551 LBS.
WARNING
ELECTRICAL POWER REQUIREMENT AND CAUTIONS
1. To reduce the risk of any electrical shock, be always unplug before doing clearing and maintenance activity.
2. To avoid any burns, fire, electric shock, or injury happened, be sure to connect each product to a properly grounded electrical outlet. The proper grounding provides
a path of least resistance for the electric current, which reduces the risk of shock to anyone touching or using the treadmill. Each Unit is equipped with an Electrical Cord,
which included an equipment grounding conductor and a grounding plug. The plug much be inserted into an outlet that has been properly installed and grounded in
accordance with all local codes and ordinances.
3. Always turn power OFF at the Switch I/O then remove plug from electrical outlet, if disconnect. The Power Switch I/O which located at the Main
Base of the treadmill, the ON/OFF switch has two positions “ I ”for On and “0” for OFF ,
4. Never to operate the treadmill if the Power Cord or Electrical Plug damaged. Even plunged in water partially.
5. Extra install AVR device is need, in case the Power Source of Voltage is not stable in a particular area.
6. Place the treadmill nearby the Power Cord outlet is approachable to the user. but front of Treadmill should keep clear area at least 30CM to the obstructions or wall.
7. Make sure the Voltage of outlet and Power Plug are same, and don't remove the ground pin from the plug, it maybe cause damaged before plug in the socket and
switch on the machine.
8. Do not modify the plug provided with our treadmill. If the plug does not fit into available electrical, find a proper outlet installed by a qualified electrician.
3
EXCESSIVE OR INCORRECT TRAINING MAY CAUSE BODILY HARM. BEFORE BEGINNING ANY EXERCISE PROGRAM CONSULT YOUR PHYSICIAN.
THIS IS ESPECIALLY IMPORTANT FOR INDIVIDUALS OVER THE AGE OF 35 OR PERSONS WITH PRE-EXISTING HEALTH PROBLEMS. READ ALL
INSTRUCTIONS BEFORE USING ANY FITNESS EQUIPMENT. WE ASSUME NO RESPONSIBILITY FOR PERSONAL INJURY OR PROPERTY DAMAGE
SUSTAINED BY OR THROUGH THE USE OF THIS OF PRODUCT. READ ALL INSTRUCTION CAREFULLY BEFORE OPERATING THIS MACHINE. RETAIN
THIS OWNER’S MANUAL FOR FUTURE REFERENCE.

4
SAFETY PRECAUTION
Press down to STOP
Pull out the safety key
By reversing the direction indicated button to resume operation.
Detail enlarged view(A/B)
Detail enlarged view(C)
Handheld pause button function:
Click to make treadmill stop, click
again to resume operation.
NOTE
E
M
E
R
G
E
N
C
Y
S
T
O
P
B
C
A

5
EXPLODED DRAWING
73
85
54
3
32
21
37
4
5
2
76
77
84
25
17
68
67
69
29
78
35
15
31
26
50
12
6
80
9
34
33
10
51
79
1
36
7
8
44
71
30
61
45
28
16
47
48
66
23
49
56
46
65
18
58
59
57
22
60
20
24
53
52
62
70
72
64
63
11
40
39
74
82 81
14
13 83
42
75
19
27
51
61
53
35
51
33
52
61
50
3535
38
41
41
4141
43
5555
35
4343
49
33
35
61
3535
38
86

6
PARTS LIST
NO. Description Qty NO. Description Qty NO. Description Qty
001 Main Frame 1 030 Handle Support Base(L) 1 059 Plastic Washers 4
002 Suspension 12 031 Handle Support Base(R) 1 060 Mushroom Head Hexagonal Bolt M8*115L 2
003 Front Roller 1 032 Cross Screw M8*30L 12 061 Nylon Nut M5 6
004 Running Deck 1 033 Nut M8 16 062 Nut M5 2
005 Rear Roller 1 034 Washer 8 063 Cross Screw M5*25L 2
006 Side Rail(R) 1 035 Washer 32 064 ON/OFF Light Switch - large 1
007 25 tapping iron plates 8 036 Mushroom Head Hexagonal Bolt M8*100L 8 065 Mushroom Head Hexagonal Bolt M8*65L 2
008 Side Rail(L) 1 037 Mushroom Head Hexagonal Bolt M8*65L 3 066 Hexagonal Bolt M8*35L 2
009 Running Belt Adjust End Cap(R) 1 038 Washer 8 067 Hexagonal Bolt M8*25L 2
010 Running Belt Adjust End Cap(L) 1 039 Motor cushion plug 2 068 Hexagonal Bolt M8*45L 2
011 Incline Motor 1 040 Hexagonal Bolt M10*50L 1 069 Hexagonal Bolt M8*55L 2
012 Acrylic Side Rails 2 041 Nylon Nut 8 070 Power Set 1
013 Lower control board 1 042 Cross Screw M5*15L 4 071 Hexagonal Bolt M8*50L 2
014 AC Servo Motor 1 043 Washer 12 072 15A Circuit Breaker 1
015 Upright Pole(R) 1 044 Washer 4 073 Safety Key 1
016 Upright Pole(L) 1 045 Clips 5 074 Lower Control Wire 1
017 Computer Rack 1 046 Cross Screw M6*15L 5 075 Middle Control Wire 1
018 Frame Tubing Set 1 047 Concave Buffer M8*16L 4 076 Upper Control Wire 1
019 Computer Rack Cover 1 048 Concave Buffer M8*55L 4 077 Middle Control Wire 1
020 Motor Cover 1 049 Mushroom Head Hexagonal Bolt M8*50L 8 078 Heart Rate Handle Bar 1
021 Running Belt with logo 1 050 Mushroom Head Hexagonal Bolt M8*20L 4 079 Dipping Iron Cover(L) 1
022 PVC Roller 6 051 Metal screw 22 080 Dipping Iron Cover(R) 1
023 Hand Pole - Long type 2 052 Washer 4 081 Inductor 1
024 Acrylic adjust 2 053 Mushroom Head Hexagonal Bolt M8*25L 4 082 Filter 1
025 Side Handle Bar Cover 2 054 Cross Screw M5*10L 4 083 Energy Saving control board 1
026 Concave Buffer 4 055 Mushroom Head Hexagonal Bolt M8*16L 4 084 Fixed Holder 1
027 Console 1 056 Hexagonal Bolt M10*67L 2 085 Control Wire 1
028 Lower Hand Pole 2 057 Rubber band 1 086 Nut M8 3
029 Handle Support Tube - Long type 2 058 Hexagonal Bolt M10*60L 1

7
Allen
Key PC
1) All the parts, screw need to assemble on this machine. Before you start to assemble, please check the Q'ty
to make sure all that included. If there are any problem with the equipment, please remove the damaged
parts as soon as possible and keep the equipment out of use until repair.
2) Please note it may be dangerous if replace parts.
3) A statement that the training equipment is in compliance with Class SA EN ISO20957-1.
This Treadmill is for Indoor use only and applies to EN957-6Class SA.
Supplier:
GEE HOO INDUSTRIAL CORP.
Address: No. 38 Jihe Rd. Shilin District,Taipei City 11166 Taiwan R.O.C.
NOTE
Tools
*
ASSEMBLE INSTRUCTION
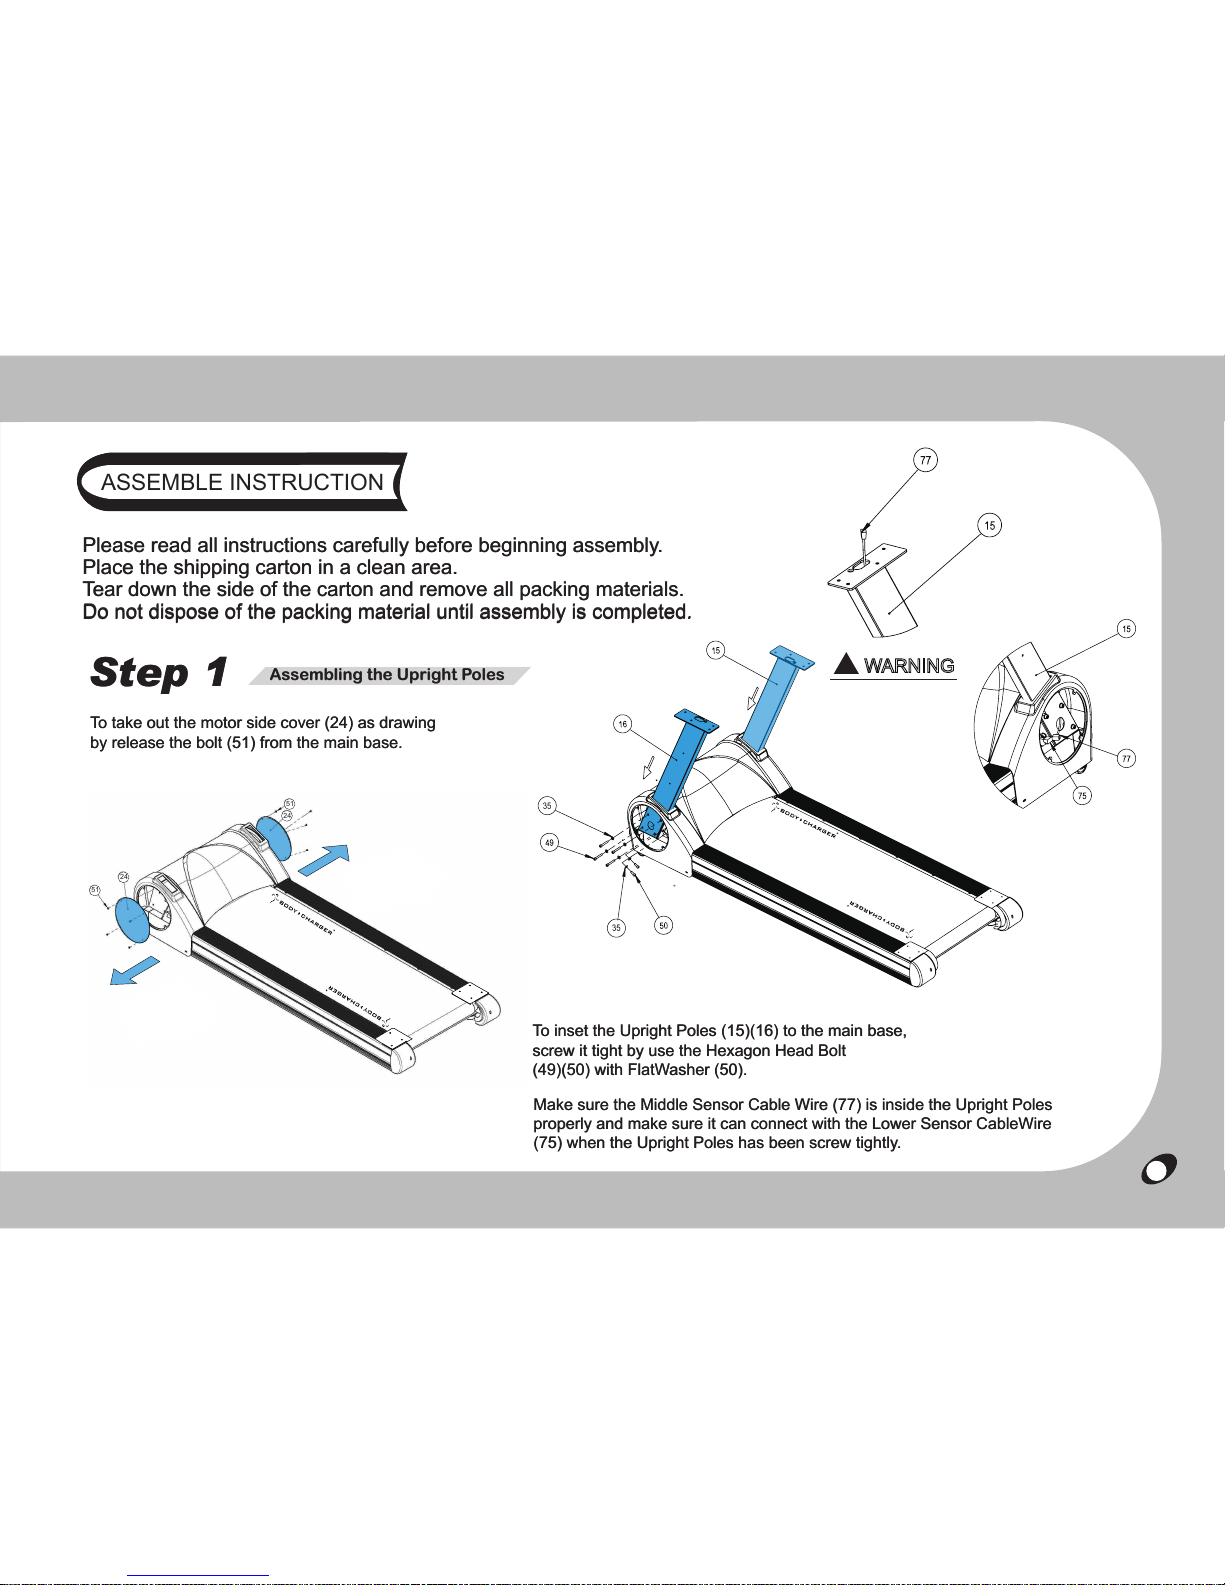
Please read all instructions carefully before beginning assembly.
Place the shipping carton in a clean area.
Tear down the side of the carton and remove all packing materials.
Do not dispose of the packing material until assembly is completed.
To take out the motor side cover (24) as drawing
by release the bolt (51) from the main base.
To inset the Upright Poles (15)(16) to the main base,
screw it tight by use the Hexagon Head Bolt
(49)(50) with FlatWasher (50).
Make sure the Middle Sensor Cable Wire (77) is inside the Upright Poles
properly and make sure it can connect with the Lower Sensor CableWire
(75) when the Upright Poles has been screw tightly.
Step 1 Assembling the Upright Poles
51
51
24
24
ASSEMBLE INSTRUCTION
Please read all instructions carefully before beginning assembly.
Place the shipping carton in a clean area.
Tear down the side of the carton and remove all packing materials.
Do not dispose of the packing material until assembly is completed.
To take out the motor side cover (24) as drawing
by release the bolt (51) from the main base.
To inset the Upright Poles (15)(16) to the main base,
screw it tight by use the Hexagon Head Bolt
(49)(50) with FlatWasher (50).
Make sure the Middle Sensor Cable Wire (77) is inside the Upright Poles
properly and make sure it can connect with the Lower Sensor CableWire
(75) when the Upright Poles has been screw tightly.
Step 1 Assembling the Upright Poles
51
51
24
24
35
35
8
!WARNING
Wire Pinch Point

ASSEMBLE INSTRUCTION
Place Computer Rack (17) on top of Upright poles and
screw it tightly with Cross Hexagonal Bolt (47)(48).
Take another head of Middle Sensor CableWire(77)
connect with the Upper Sensor CableWire(76) firmly.
Using Nut andWasher to connect the Hand Pole –long type (23) to the Frame.
To assemble lower right and left side hand pole(28) with side caps (25) as
drawing to use Hexagon Head Bolt (65) andWasher (38) and make sure screw tightly.
Connecting the hand pole-long type and lower hand pole to the Handle Support Tube
(29) by use Hexagonal Bolt (68)(69) and Nylon Nut (61). To insert the Handle Support
Tube into the Handle Support Base by use Hexagonal Bolt(71) with Nylon Nut (61).
Step 2 Step 3
Assembling the Computer Rack Connecting the Hand Pole to the Frame
NOTE
Hand Pole(long type) underneath the treadmill
is only as a reinforcing purposes.
Do not use as a grip
49
50
49
50
78
77
51
17
47
47
48
48
77
76
9
53
14
63
64
12
65
61
62
46
66
67
46
61
33
23
68
61
29
61
71
35
28
25
38
69

ASSEMBLE INSTRUCTION
Attaching the Curve Hand Pulse Set (78) to the computer
rack and screw it tight by use the Hexagonal Bolt (66) (67).
To put on the computer rack cover (19) as drawing to use Cross
Screw (54) to screw it firmly.
Step 4 Step 5
Attaching the Hand Pulse Set Attaching the Computer Rack Cover
54
55
56
56
55
78
66
66
67
67
10
!WARNING
Wire Pinch Point

ASSEMBLE INSTRUCTION
Pick up the computer (27) connect the computer sensor wire with the upper pulse sensor
wire in advance. Install computer with computer rack together by use Mushroom Head
Hexagonal Bolt (55) andWasher (35) to screw it tightly.
Step 6 Connecting the Computer
14
58
59
75
27
55
73
35
11

ASSEMBLE INSTRUCTION
After everything are fabricated properly, put Motor Side Cover (24) back and screw it tight by use self-drilled screw (51).
The treadmill is not yet completed.
Step 7 Attaching the Motor Side Cover
12
51
24
51
51
51
24
51
ASSEMBLE INSTRUCTION
13
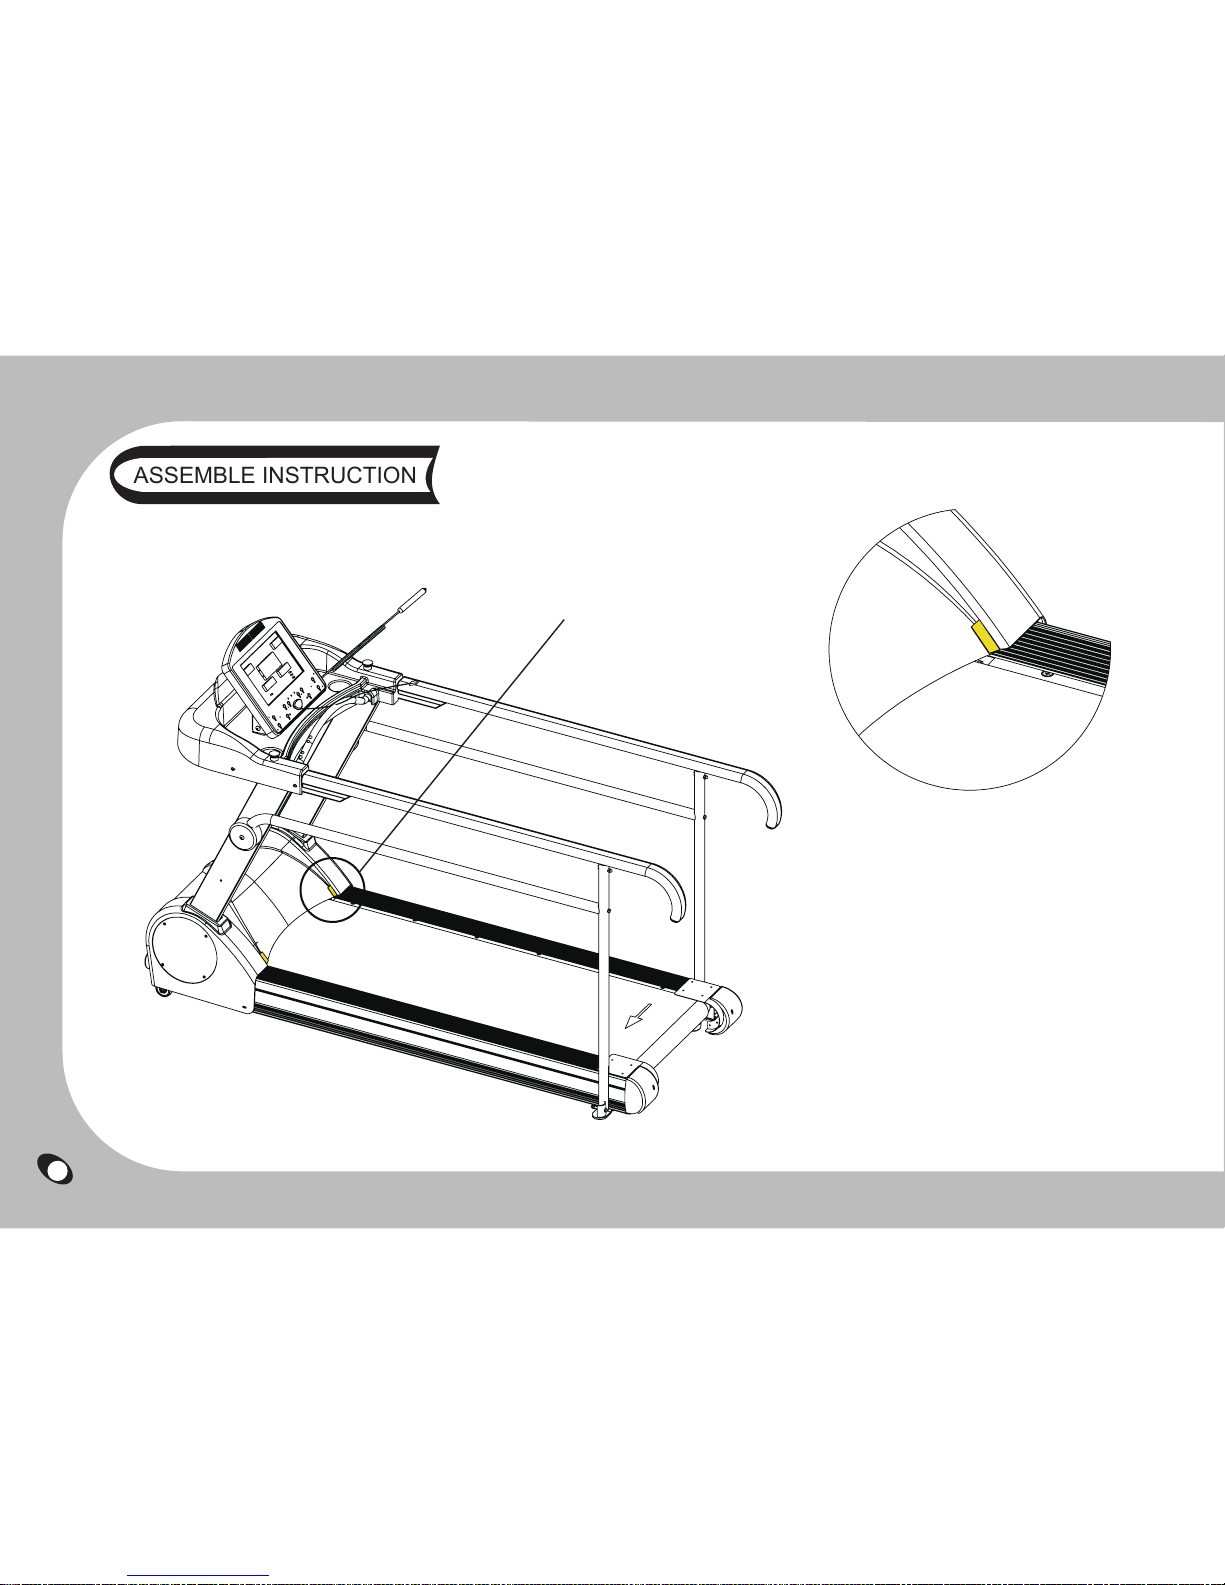
Detail enlarged view
The adjustment limit of running belt.
The adjustment range of running belt
cannot exceed the mark shown in yellow.

ASSEMBLE INSTRUCTION
2.1 first plug in the Power Cord, Switch on the power, place the Safety Key on the console and click it to the user as well,
turn on the machines, but do not step on the belt this moment. Press the Quick Start Key speed up to 7.0 KM/H, or 4.5 M/H
speed and then reduce the speed 4.0 KM/H or 2.5M/H, walking on the Treadmill, tightly hold the handrails and apply force with
feet on the Running Belt near the Motor Cover against the Running Belt direction, if the belt slips, remove the Safety Key or press
the Emergency Key to stop the treadmill. Use the Hex Key Wrench to turn the tensioning bolts a half-turn clock-wise for each side.
2.2 Do it again as instructions 2.1until the Running Belt is no longer slips. Be sure Do Not over turning a half-turn each side when
adjusting the belt tensions bolts. See following the instructions for reference.
2.3 After that check Running Belt again, see instruction 1 to ensure the proper tracking of the Running Belt in center.
1. Checking the running belt in centering, first plug in the Power Cord,
Switch on the power, place the Safety Key on the console and click it to the user as well,
turn on the machines, but do not step on the belt this moment.
Press the Quick Start Key speed up to 7.0 KM/H, or 4.5 KM/H speed.
2. Tension of Belt has to be inspected before exercising.
(A) If the running belt moves to the right, using the Hex Key Wrench to turn the right adjuster cap a half-turn clockwise,
and then turn the left adjuster cap a half-turn counter- clockwise see the showing in order to set the running belt back to the center.
(B) If the running belt moves to the left, using the Hex Key Wrench to turn the left adjuster cap a half-turn clockwise, and then turn
the right adjuster cap a half-turn counter- clockwise see the showing in order to set the running belt back to the center.
(A)
(B)
Adjust running belt to the left Adjust running belt to the right
14
ASSEMBLE INSTRUCTION
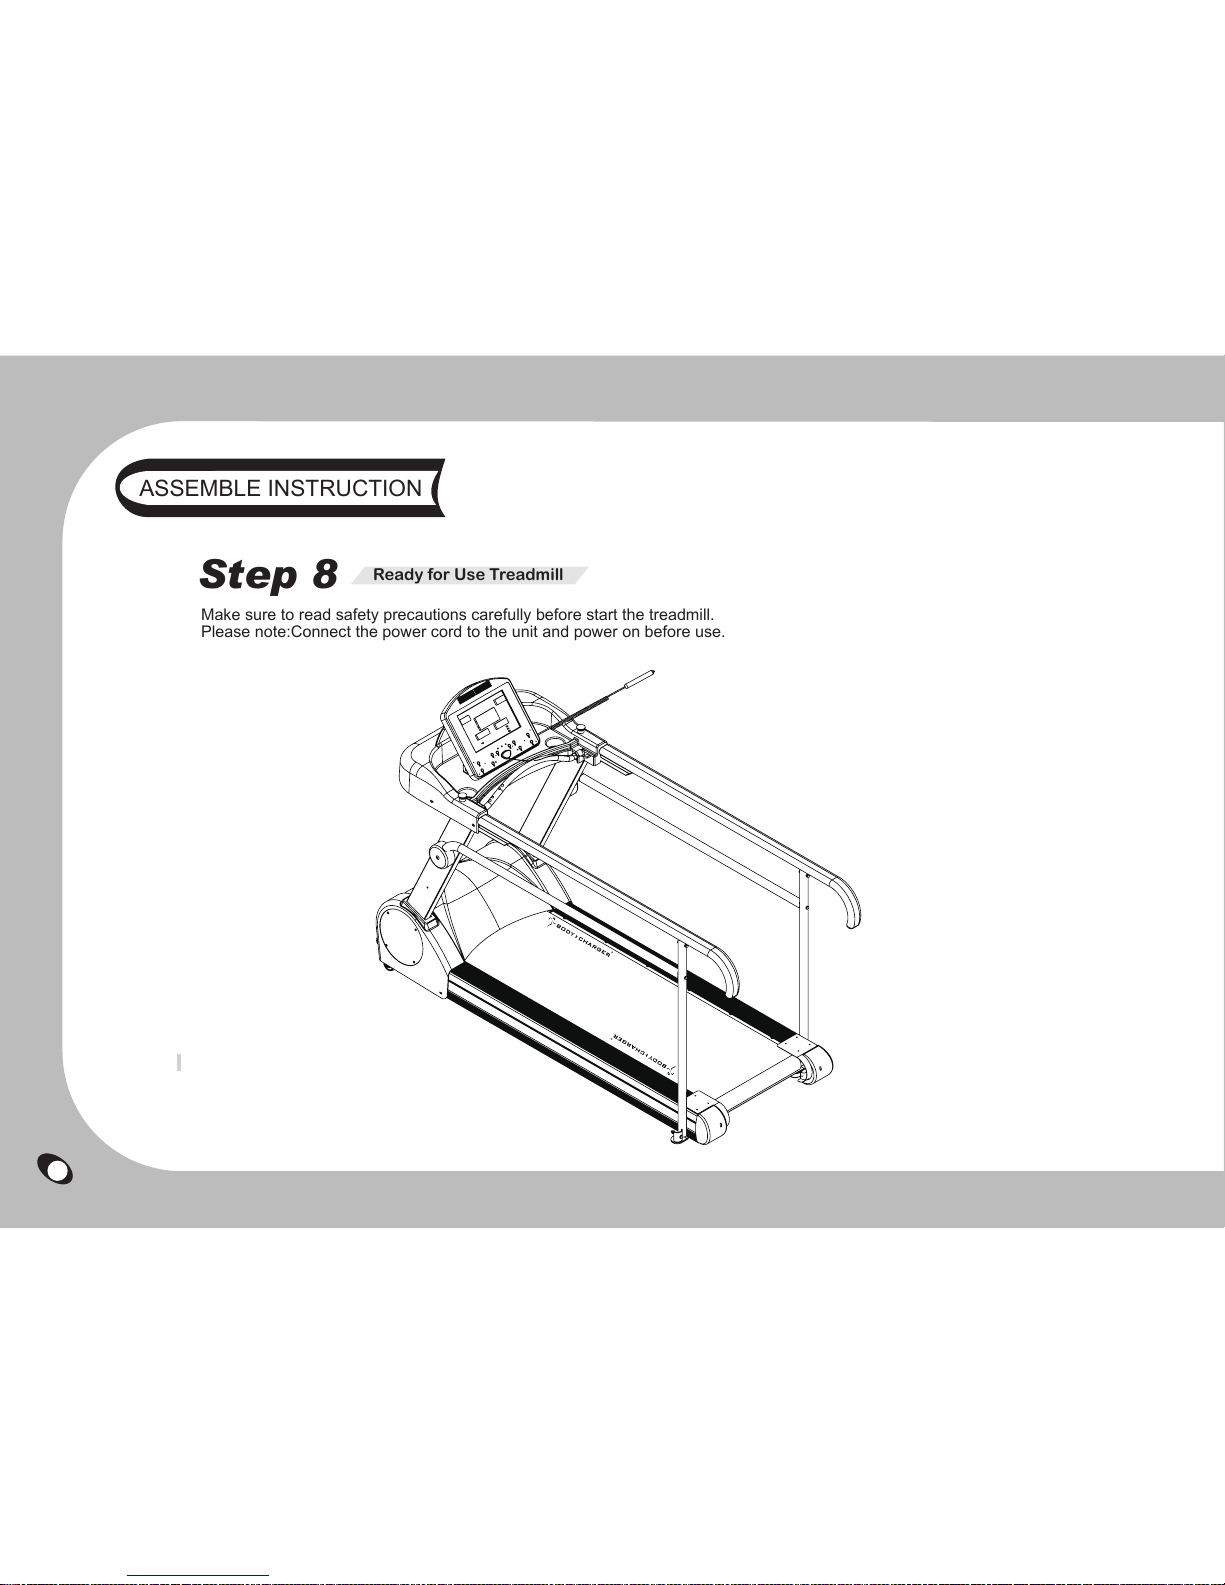
Make sure to read safety precautions carefully before start the treadmill.
Please note:Connect the power cord to the unit and power on before use.
Step 8 Ready for Use Treadmill
15
NOTE
1) The acoustic pressure is 74 decibel when user training.
2) Noise emission under load is higher than without load.
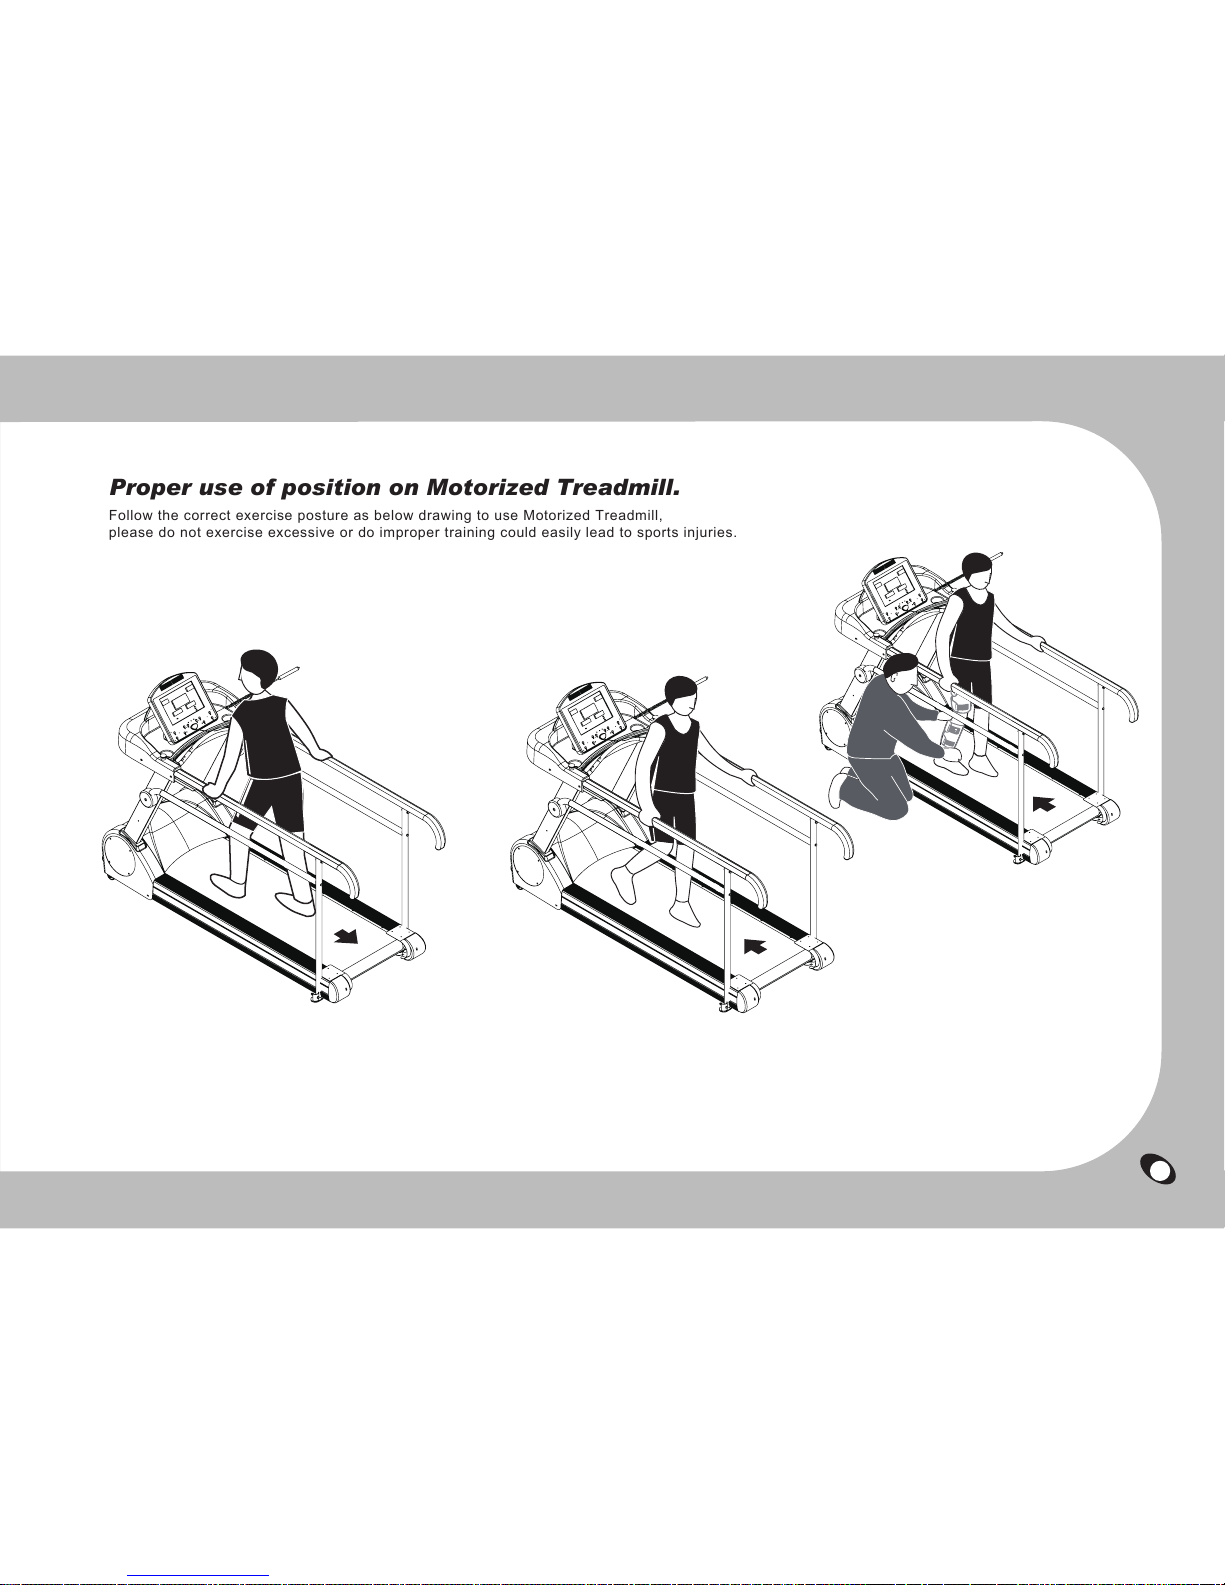
Proper use of position on Motorized Treadmill.
Follow the correct exercise posture as below drawing to use Motorized Treadmill,
please do not exercise excessive or do improper training could easily lead to sports injuries.
16
Forward Backward(Reverse)

WARNING
2.2m
3.6m
1m
2.4m
0.6m0.6m
2m
0.6m 0.6m
safety area
free area
free area
free area
free area
Indication that the free area shall be not less than 0.6 m greater than the training area in the directions from which the
equipment is accessed. The free area must also include the area for emergency dismount. Where equipment is
positioned adjacent to each other the value of the free area may be shared. The free area and training area shall be
illustrated with a dedicated figure.
Warning that if any of the adjustment devices are left projecting, they could interfere with the user’s movement.
Please examined regularly for running deck, running belt, connection points. If there are any problem with the equipment, pleas e
remove the damaged parts as soon as possible and keep the equipment out of use until repair. Please use the equipment
on a firm and flat ground.
530mm
17
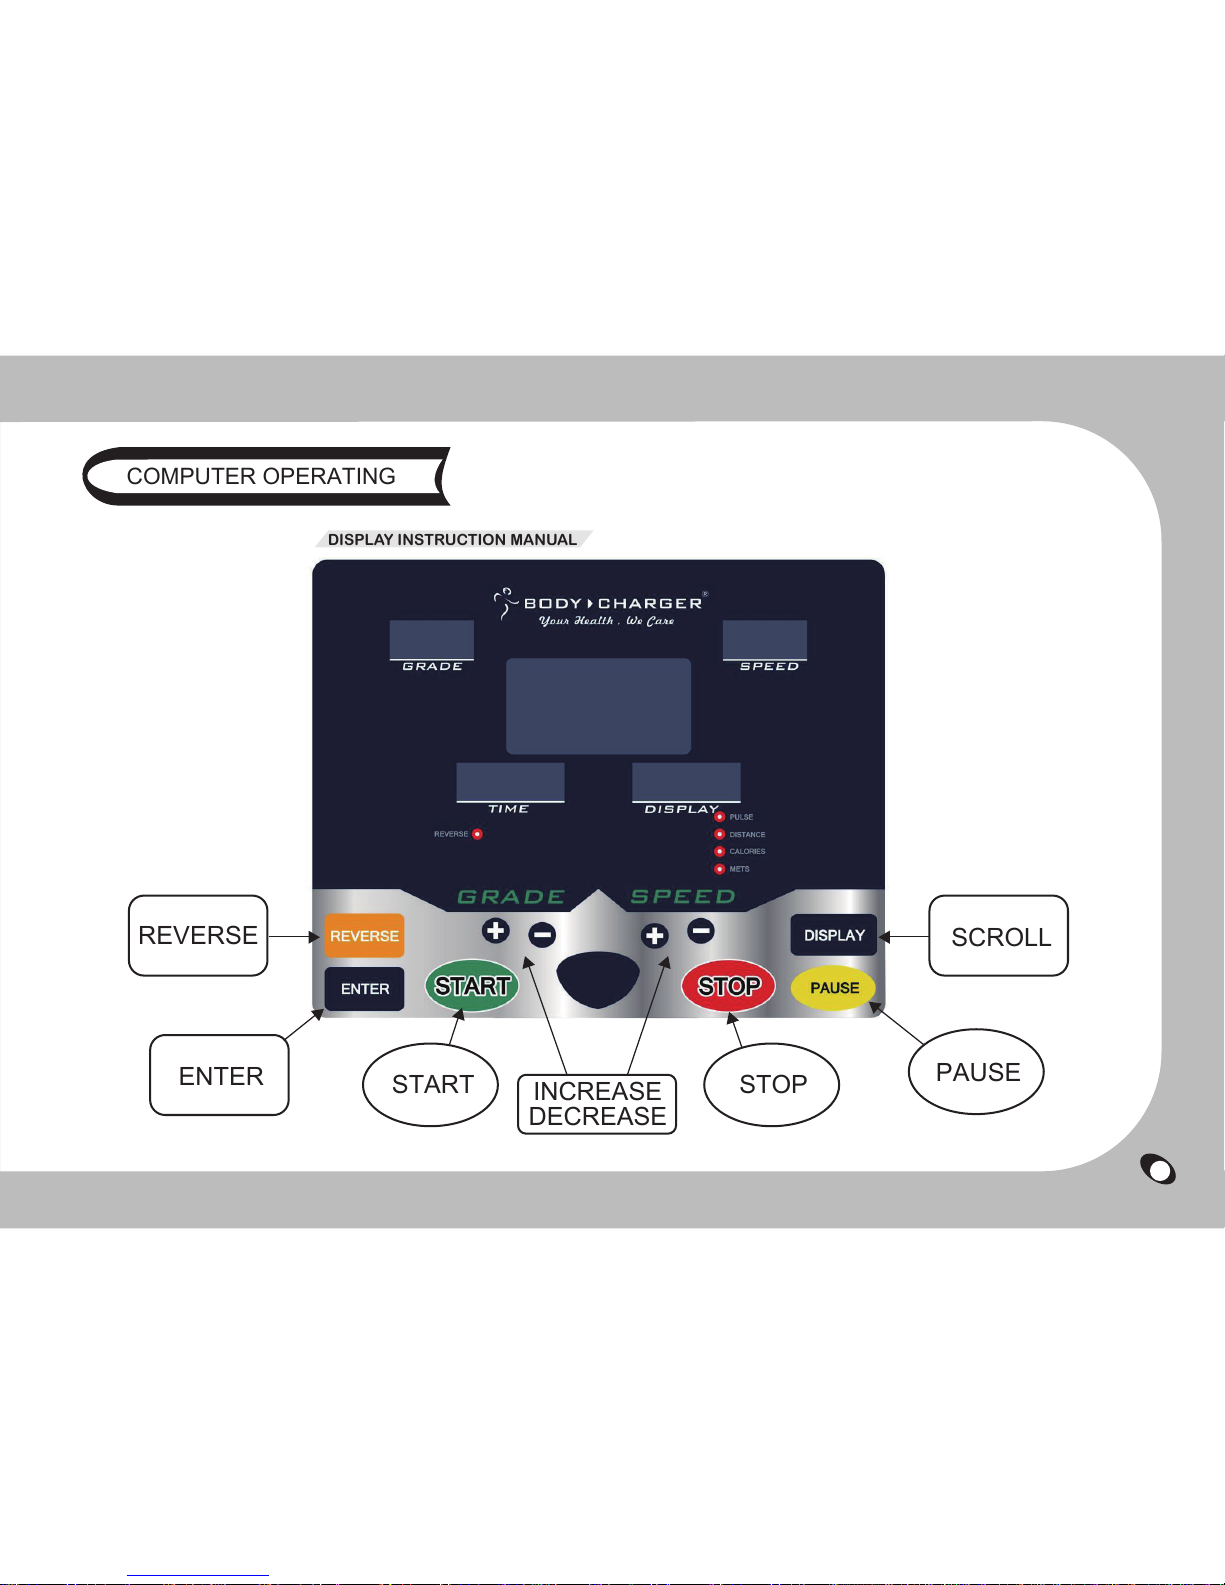
DISPLAY INSTRUCTION MANUAL
ENTER START INCREASE
DECREASE
STOP
REVERSE SCROLL
PAUSE
COMPUTER OPERATING
18

1. START BUTTON
1.1.
1.2.
Pressin
When non-operation within 5 mins treadmill will
enter into Sleep Mode, pressing the START
button to wake up the treadmill.
g the START button starts the treadmill.
2. STOP BUTTON
2.1. Pressing the STOP button strops the treadmill.
3. PAUSE BUTTON
3.1. Pressing the PAUSE button pauses your session.
4. [+] BUTTON
4.1. Press the [+] button to increase values.
4.2. Holding the [+] button will rapidly increase values.
6. DISPLAY BUTTON
6.1. Scrolls through Pulse, Distance, Calories, & METs.
7. ENTER BUTTON
7.1. The ENTER button allows the use of reserve.
*See Reverse Operation
8. REVERSE BUTTON
8.1. To switch the belt direction to reverse follow this sequence.
8.1.1. Press the PAUSE button.
8.1.2. Press the REVERSE button.
8.1.3. Press the START button.
To Return to Forward Repeat 8.1.1 - 8.1.3
Button Functions
5. [-] DOWN BUTTON
5.1. Press the [-] button to decrease values.
5.2. Holding the [-] button will rapidly decrease values.
COMPUTER OPERATING
19
Table of contents


