Boly MG983G-30M User manual

Boly Trail Cameras – MG983 Series
Boly Inc. | User Manual 03/01/2017
1
Table of Contents
1. Getting Started.............................................................................................................. 2
2.1 Batteries / Power Supply..................................................................................... 3
2.2 SD Card Information............................................................................................ 3
2.3 SIM Card Information...........................................................................................3
2.4 Camera Modes......................................................................................................4
2.5 Manual Image / Video Capturing....................................................................... 4
2.6 Manage Images and/or Videos.......................................................................... 4
2.7 Sending Images via MMS or GPRS.................................................................. 4
2.8 Trigger Modes....................................................................................................... 5
2.9 Laser Pointer......................................................................................................... 6
3. Camera Setup Settings & Display............................................................................. 7
3.1 Settings Interface & Display................................................................................7
3.2 Mobile Communication........................................................................................ 8
3.3 Camera Setup Software...................................................................................... 8
3.4 Mobile Applications............................................................................................ 10
3.4.1 Changing settings via Android APP............................................................. 10
3.4.2 Changing settings via SMS – Command List............................................. 13
3.5 Camera Setup Options......................................................................................15
4. Advanced Operations................................................................................................ 18
4.1 Advanced Surveillance Modes.........................................................................18
4.2 Security Mode Remote Control........................................................................ 18
4.3 Pairing the Security Remote Control...............................................................18
4.4 Entering into Security mode..............................................................................19
4.5 Wireless Security Devices................................................................................ 19
5. Detection Ranges – PIR Detection Zones............................................................. 20
6. Technical Specifications............................................................................................21
Boly Trail Cameras – MG983 Series
Boly Inc. | User Manual 03/01/2017
2
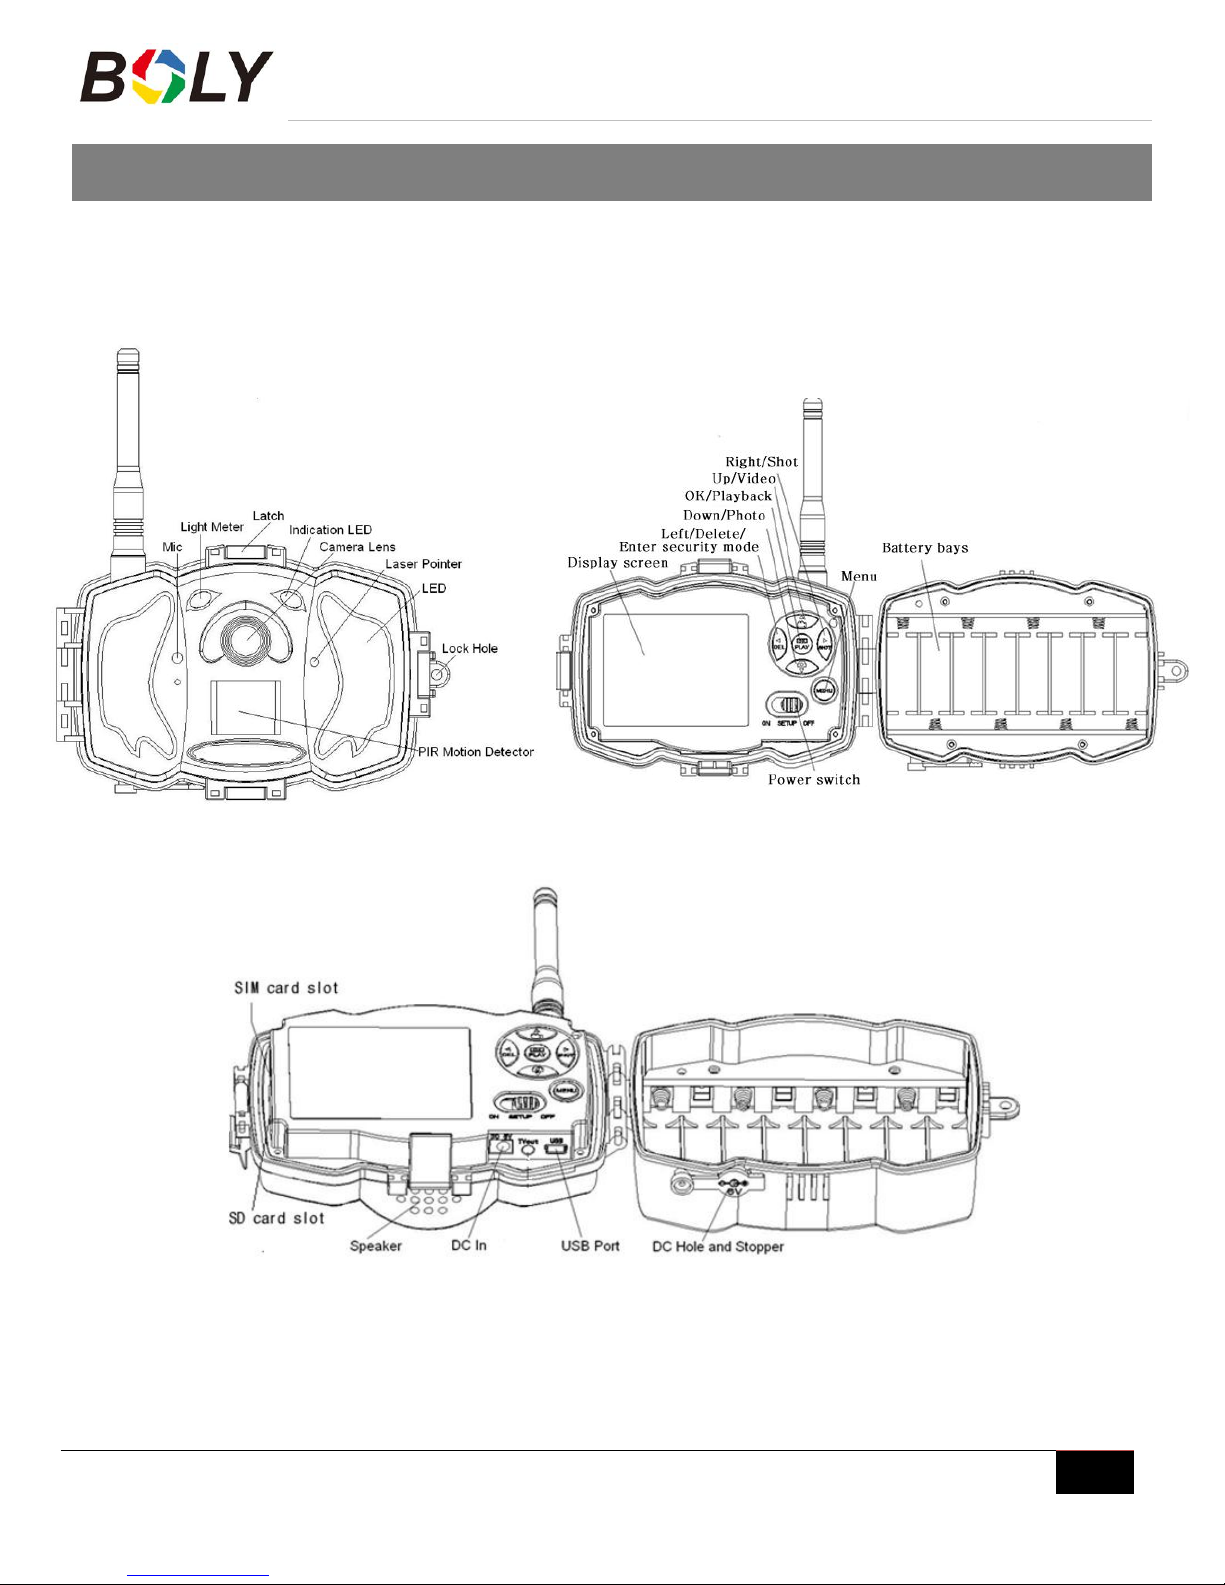
1. Getting Started

Boly Trail Cameras – MG983 Series
Boly Inc. | User Manual 03/01/2017
3
2.Camera Operations
2.1 Batteries / Power Supply
The camera is powered by four or eight AA batteries - High-density, high-performance alkaline, rechargeable
Alkaline or NiMH batteries are recommended. When the batteries are low, the camera will beep twice and
automatically shut down.
A DC 6-Volt, 2 Amp external power supply adapter can also be used to power the camera (not included).
2.2 SD Card Information
To take full advantage of the latest technologies, we recommend Class 10 SD cards or better, which have fast
transfer speeds and long durability for extensive shooting in the most extreme outdoor conditions. Secure
Digital High Capacity (SDHC) PRO cards work with SDHC compatible devices only. Please check that your
product is compatible with SDHC cards.
Insert the SD card into the camera before turning on the camera
This camera supports up to a 32GB capacity SD card and has no built-in internal memory. The camera
will not function without the SD card properly inserted into the camera.
Make sure the SD card is unlocked before inserting the SD card into the camera
The camera will operate normally with a locked SD card inserted, but the card will not be able to store
captured images or videos taken by the camera.
Do not remove the SD card while the camera is on
By removing the SD card while the camera is on risks damaging the internal components of the camera.
If you experience any problems with an inserted SD card
Try reformatting the SD card, utilizing the camera’s main settings option.
2.3 SIM Card Information
Insert the SIM card into the camera before turning on the camera
The camera SIM slot is sized for a standard SIM card. If you have a nano or micro size SIM card, utilizing
a SIM card adapter (included with most of our cameras) will be required to connect your camera to the
cellular network.
Note: The camera will still function without a SIM card. The SIM card is needed only for the
wireless/cellular capabilities.

Boly Trail Cameras – MG983 Series
Boly Inc. | User Manual 03/01/2017
4
2.4 Camera Modes
The different modes are accessed by sliding the power switch to the different positions marked on the camera:
OFF Mode
Turns the camera off. The camera will still consume a small amount of power while in OFF mode. It is
recommended to remove the batteries if the camera will not be used for a long period of time.
TEST/SETUP Mode
Customize the camera settings, or play back pictures and videos the camera has taken on the LCD
display.
ON Mode [ Hunting Mode ]
Camera will take pictures or video when motion is detected and/or at specific time intervals, according to
the programmed settings. After switching the camera to the ON position, the motion indicator LED (red)
will blink for about 10 seconds and then turn off. This preset time allows you to adjust the cameras
position if needed, before the camera becomes active.
2.5 Manual Image / Video Capturing
Place the camera in ON mode and press to manually capture photos or record video. Press again to stop
capturing video.
2.6 Manage Images and/or Videos
Place the camera in TEST/SETUP mode and press on the remote to view images or videos. The latest
image or video will be shown on the LCD screen.
To view:
Press ▲ or ▼ to view the previous or next image or video. Press OK to start a video.
To delete:
Press OK on the remote in Test/Setup Mode to access the pictures and videos. Press the MENU key to
enter into Playback mode. Press the ▲ or ▼ keys to find the Delete option. Press OK when the Del One
option is selected. Press OK again to confirm you want to delete the picture or video.
2.7 Sending Images via MMS or GPRS
Images can be sent directly to your wireless device or email, based on the Send Mode settings. Email and
wireless device information need to be set up while the camera is in TEST/SETUP Mode. Images can only be
sent when a correctly setup SIM card is recognized, installed and the wireless signal strength is adequate.
You have the options of email MMS, email GPRS, Phone MMS in the internet tab of the camera settings.
Videos will not send due to the size of video files and limitations set by the SIM card carrier.

Boly Trail Cameras – MG983 Series
Boly Inc. | User Manual 03/01/2017
5
To manually send a photo:
Put the camera in TEST/SETUP mode
Wait for the camera to acquire a network signal and the SIM card to be recognized
indicates the SIM card is recognized by the camera.
indicates the SIM card is not recognized by the camera or the SIM card is not working due to
connection/activation issues.
Take a manual photo by pressing the SHOT button or press OK to view the photos stored on the
camera
Find the picture you want to manually send
Press the MENU button to pull up the Send To: option that is currently set in the camera settings
Press OK again to send the picture
Send Mode settings will dictate how often you want pictures sent to you and the options “Daily Report” and
“Instant” will only be active when the camera is in the ON mode. You can find more detailed information on the
Send Mode options in the proceeding Command List section.
2.8 Trigger Modes
There are 3 different trigger modes for the camera: PIR Trigger/Sensitivity, Time Lapse, and a combined
PIR/Time Lapse mode. These modes are activated by three different menu options (PIR Trigger/Sensitivity, PIR
Interval, and Time Lapse).
PIR Trigger/Sensitivity
The camera will activate when motion is detected. If the PIR Trigger/Sensitivity option is set to OFF, the
camera will not respond to any motion within the camera’s range.
Time Lapse
The camera will activate at the set time interval regardless of motion detection. If the Time Lapse option is
set to OFF, this trigger function will be disabled.
Combined PIR/Time Lapse
For the combination of both PIR and Lapse triggering, the following settings must be set correctly:
PIR Trigger/Sensitivity must NOT be set to OFF
The Time Lapse interval must be set to a non-zero value.
The camera will capture pictures or video when motion is detected and at the preset time, regardless of
motion detection.
Additional PIR settings to note:
PIR Interval
This setting indicates how long the PIR sensor will be disabled after each camera triggering. During this
interval time, the camera will not react to any detected motion or activate at the scheduled Time Lapse
interval.
Further detailed information about the trigger modes can be found in Camera Setup Options section of the
manual.

Boly Trail Cameras – MG983 Series
Boly Inc. | User Manual 03/01/2017
6
2.9 Laser Pointer
The laser light pointer beam can be activated to assist in the camera’s positioning by pressing *on the remote
control.
NOTE: Do not point the laser at people – The laser can cause physical harm, if shined into eyes.
Boly Trail Cameras – MG983 Series
Boly Inc. | User Manual 03/01/2017
7
3. Camera Setup Settings & Display
The remote control is required for initial setup and changing any camera settings. When powering on the camera,
please allow 10-20 seconds for the camera to recognize the remote. An icon on the LCD screen will appear once the
camera has recognized the remote. The maximum detectable range for the remote is 30 feet. The remote will not
work properly without the antenna attached to the camera.
3.1 Settings Interface & Display
To update the camera settings, place the power switch to the TEST/SETUP position.
To navigate the menus, utilize the following built-in buttons:
MENU: Enter the program menu in Preview Mode
: Selecting menu options
OK / PLAY: Save parameter settings and play videos
DEL / : to delete an image or video
SHOT / : Capture a photo or record a video manually
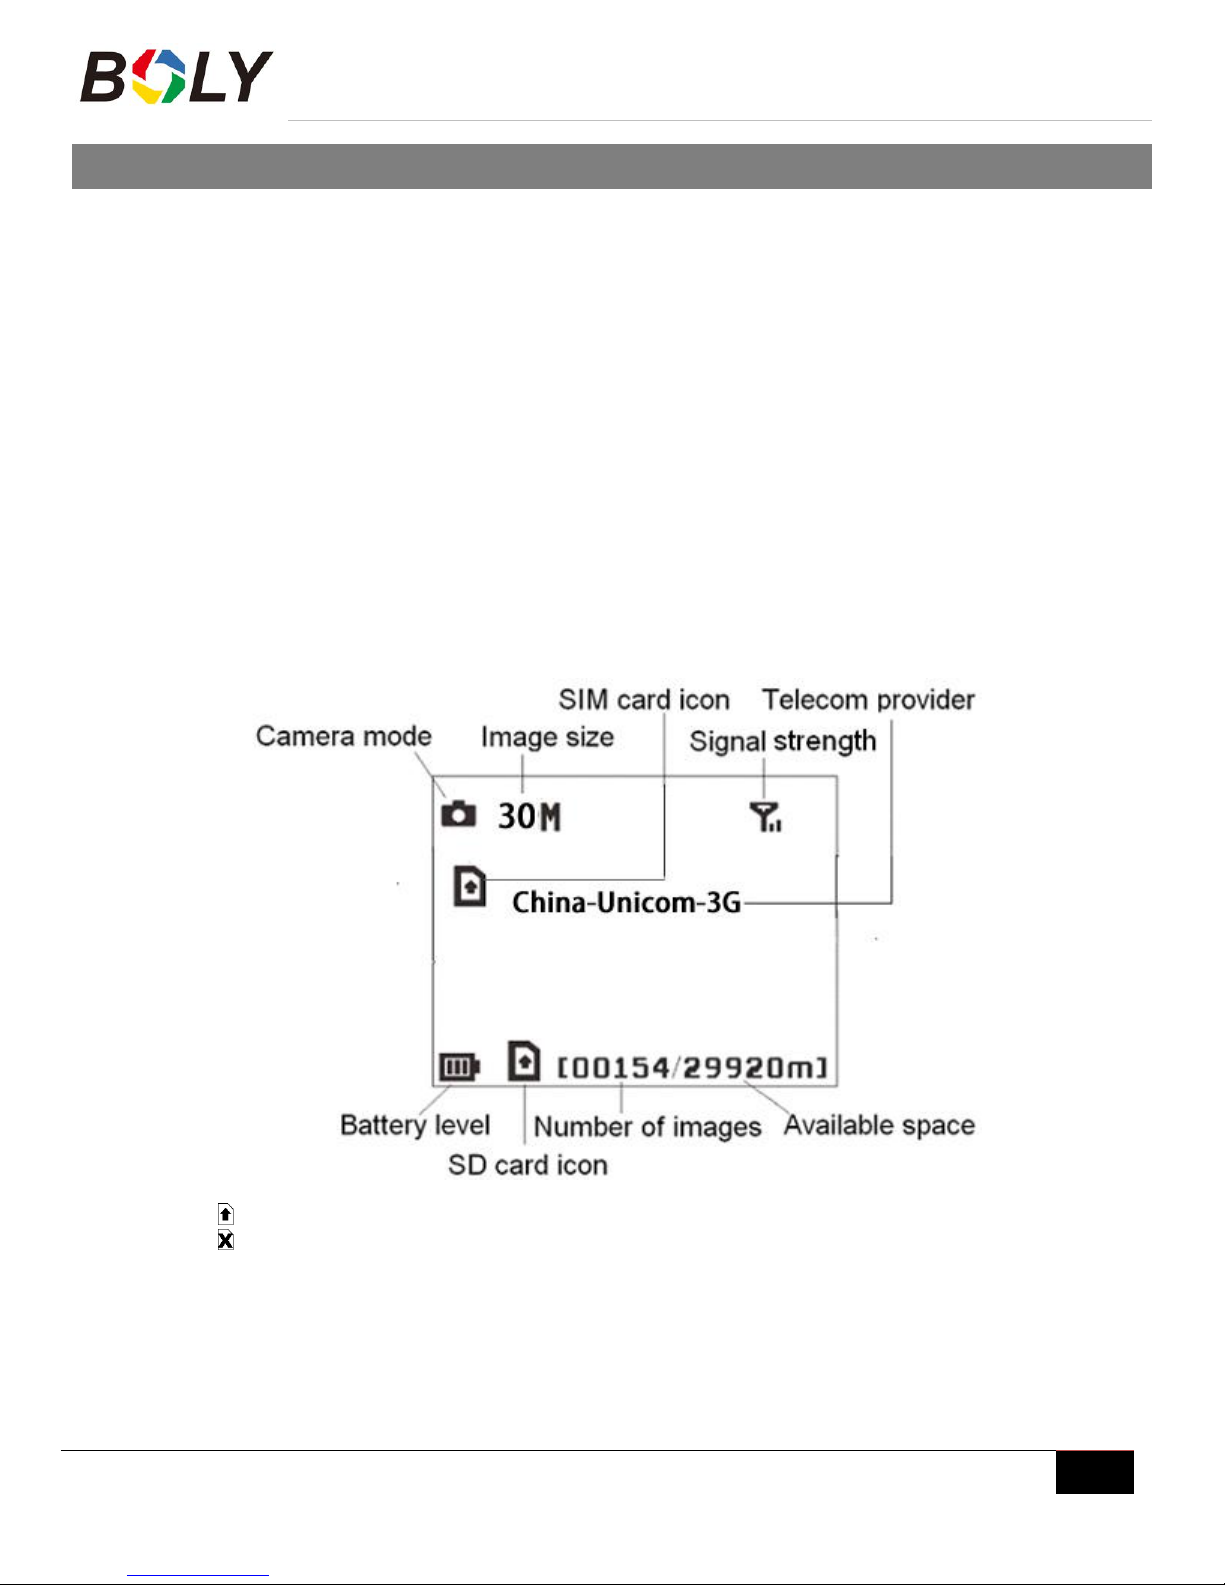
When the camera is in TEST/SETUP Mode, the screen will activate and display the following:
indicates the SIM card is recognized by the camera.
indicates the SIM card is not recognized by the camera or the SIM card is not working due to
connection/activation issues.
Boly Trail Cameras – MG983 Series
Boly Inc. | User Manual 03/01/2017
8
3.2 Mobile Communication
The camera can receive and respond to commands sent via SMS, MMS, GRPS and the Apple or Android
application, as long as the camera is correctly connected to a wireless carrier.
Supported wireless carrier bands:
GSM (MHz): 850, 900, 1800, 1900
WCDMA (MHz): 850, 900, 1900, 2100
To enable the SMS functionality using the mobile application, complete the following steps:
Place the camera in Test/Setup Mode and go into the menu Setup options
Set SMS control to ON
For MMS and GPRS functionality, the following menu Setup options will need to be set:
MMS network settings (varies depending on carrier)
GPRS network settings (varies depending on carrier)
Send to Phone option (MMS or GPRS)
The settings for the network options vary between service providers. You will need to contact your SIM
service provider for specifics on these settings.
3.3 Camera Setup Software
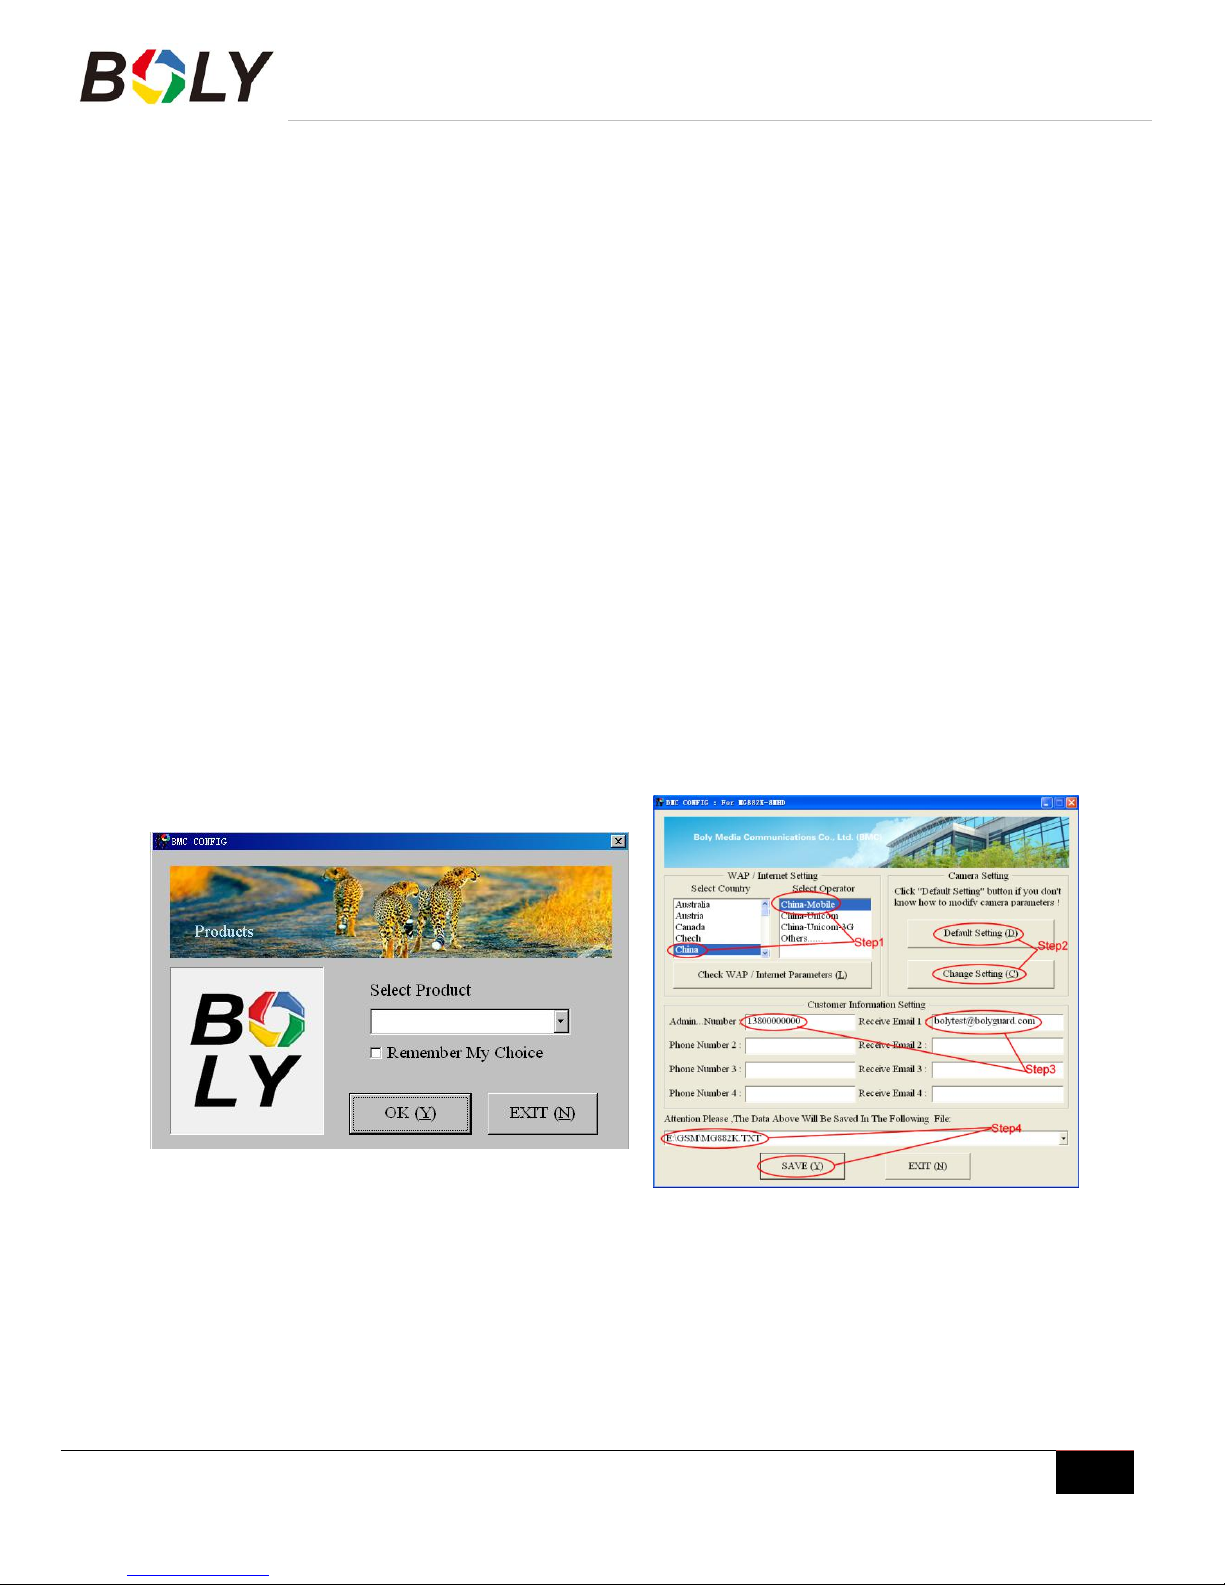
For easier camera setup, download the camera setup application (BMC_config.zip), along with the basic
instructions from our website. (https://bolyinc.com/updates/)In summary,
Boly Trail Cameras – MG983 Series
Boly Inc. | User Manual 03/01/2017
9
STEP 1: Select your country and carrier.
STEP 2: Choose between default or manual settings. For first time use, we suggest using the default settings.
STEP 3: Input the phone number of the phone to receive/send the remote commands and images in the
“administrator number” field and email address in “Receive Email 1” field (This is NOT the phone number
of the inserted SIM card that resides in the camera).
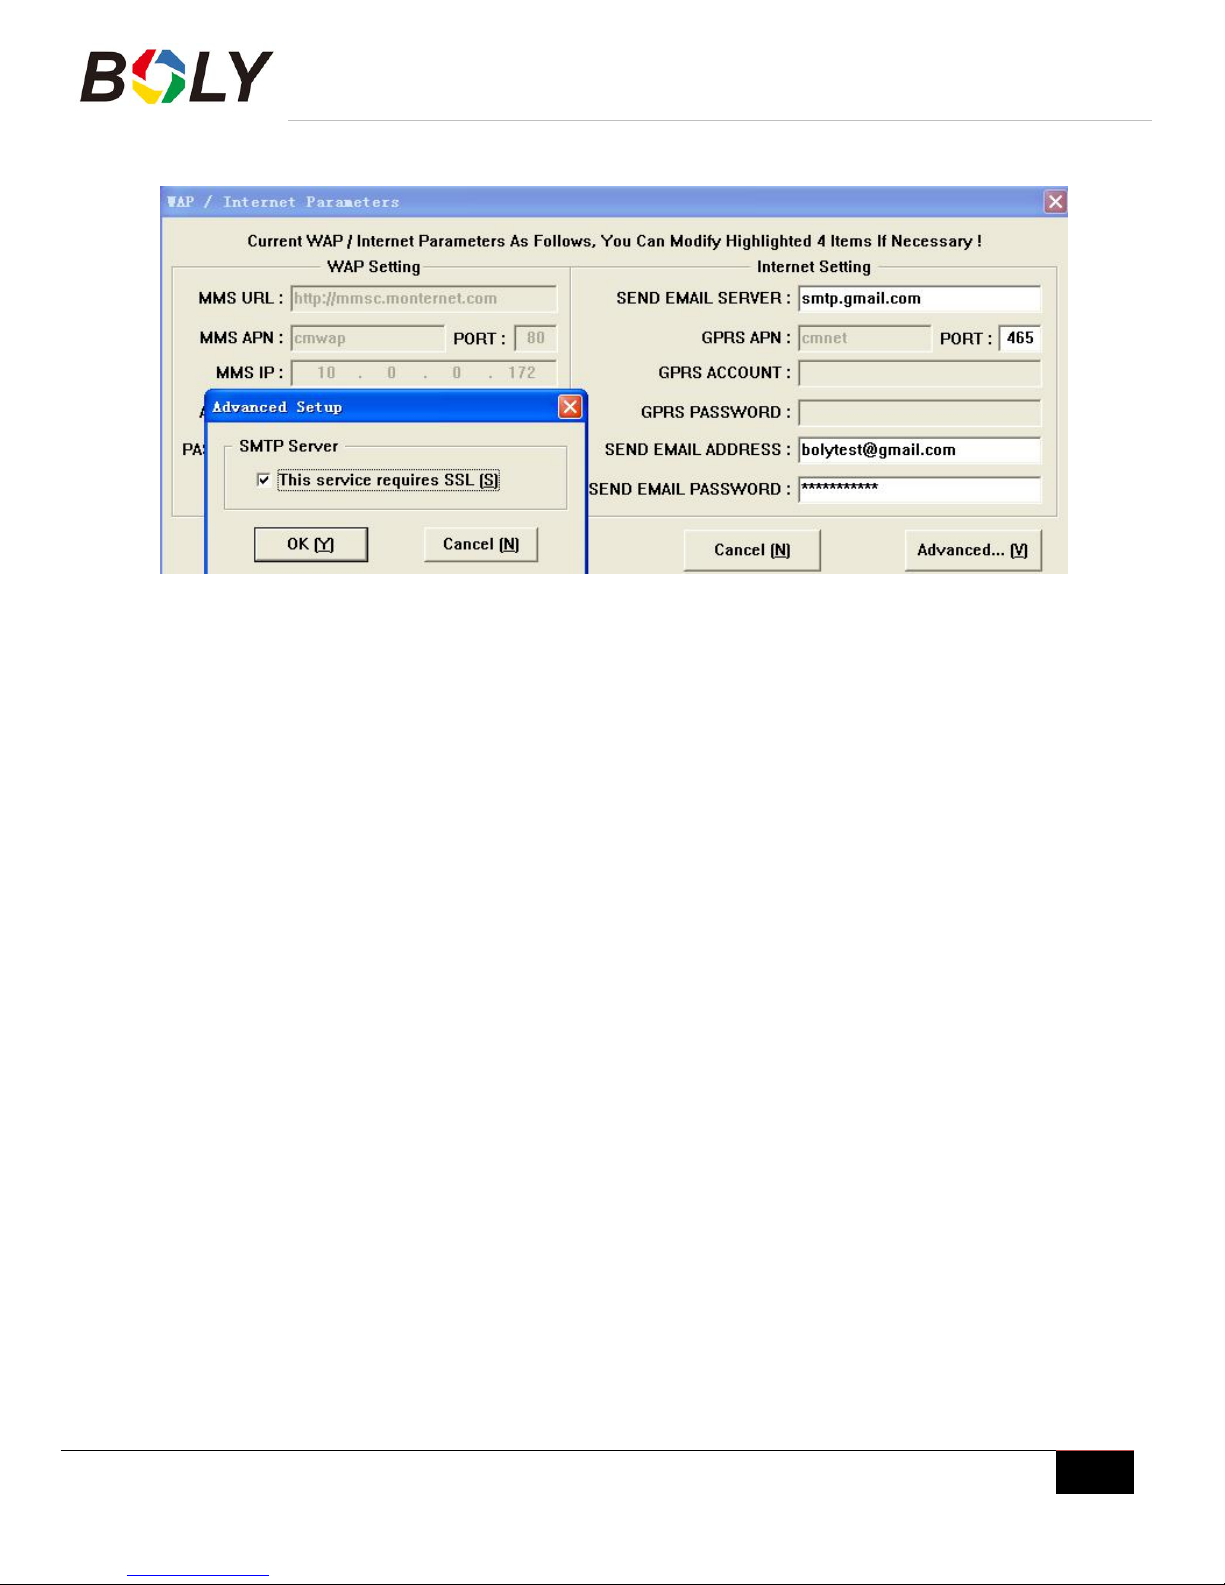
STEP 4:Click “Check WAP/Internet Parameters”to check weather you have all parameters filled in.
Note: If you use an SSL Email such as Gamil as sending Email ,Please click “Advanced” button to mark
it.
STEP 5: Save the .txt file in the GSM folder of SD card after all settings are complete.
If your country or SIM card provider is not listed, select “Others”. You will need to ask the SIM card provider for
their specific MMS URL, MMS APN, Port, MMS IP, Account, Password, GPRS APN, GPRS account, GPRS
password. For email sending, your email service provider will be able to provide the send email server and port
settings.
Note: Once the SD card is inserted into the camera and the camera is turned on, this file will automatically be
uploaded to the camera and be deleted from the SD card.
Boly Trail Cameras – MG983 Series
Boly Inc. | User Manual 03/01/2017
10
3.4 Mobile Applications
When the camera is switched to the ON mode, you can change some of the basic camera settings through the
mobile application. There are currently apps supported by Android and Apple devices. Charges or fees may be
incurred through your cellular provider when sending text messages to the camera.
For Android, you can download the application directly from our websit(https://bolyinc.com/updates/),
under the Downloads section.
For Apple, search BGTools in the official Apple Apps store.
3.4.1 Changing settings via Android APP
Basic settings can be changed through the Android app.
There are two user authorization levels for this feature: administrator and normal users.
Functions
User Level
Set administrator phone number
Only administrator’s password
Set administrator’s password
administrator
Set camera parameters
administrator
Set normal user
administrator
Receive emergency calling
administrator, normal user
Send SMS for on spot picture
administrator
Receive MMS when triggered
administrator, normal user
Check camera status
administrator, normal user
Get help information
administrator, normal user
Select the camera in the application that you would like to access. Setting and camera command options will be
under the COMMON tab of the application.
Camera setup via APP:
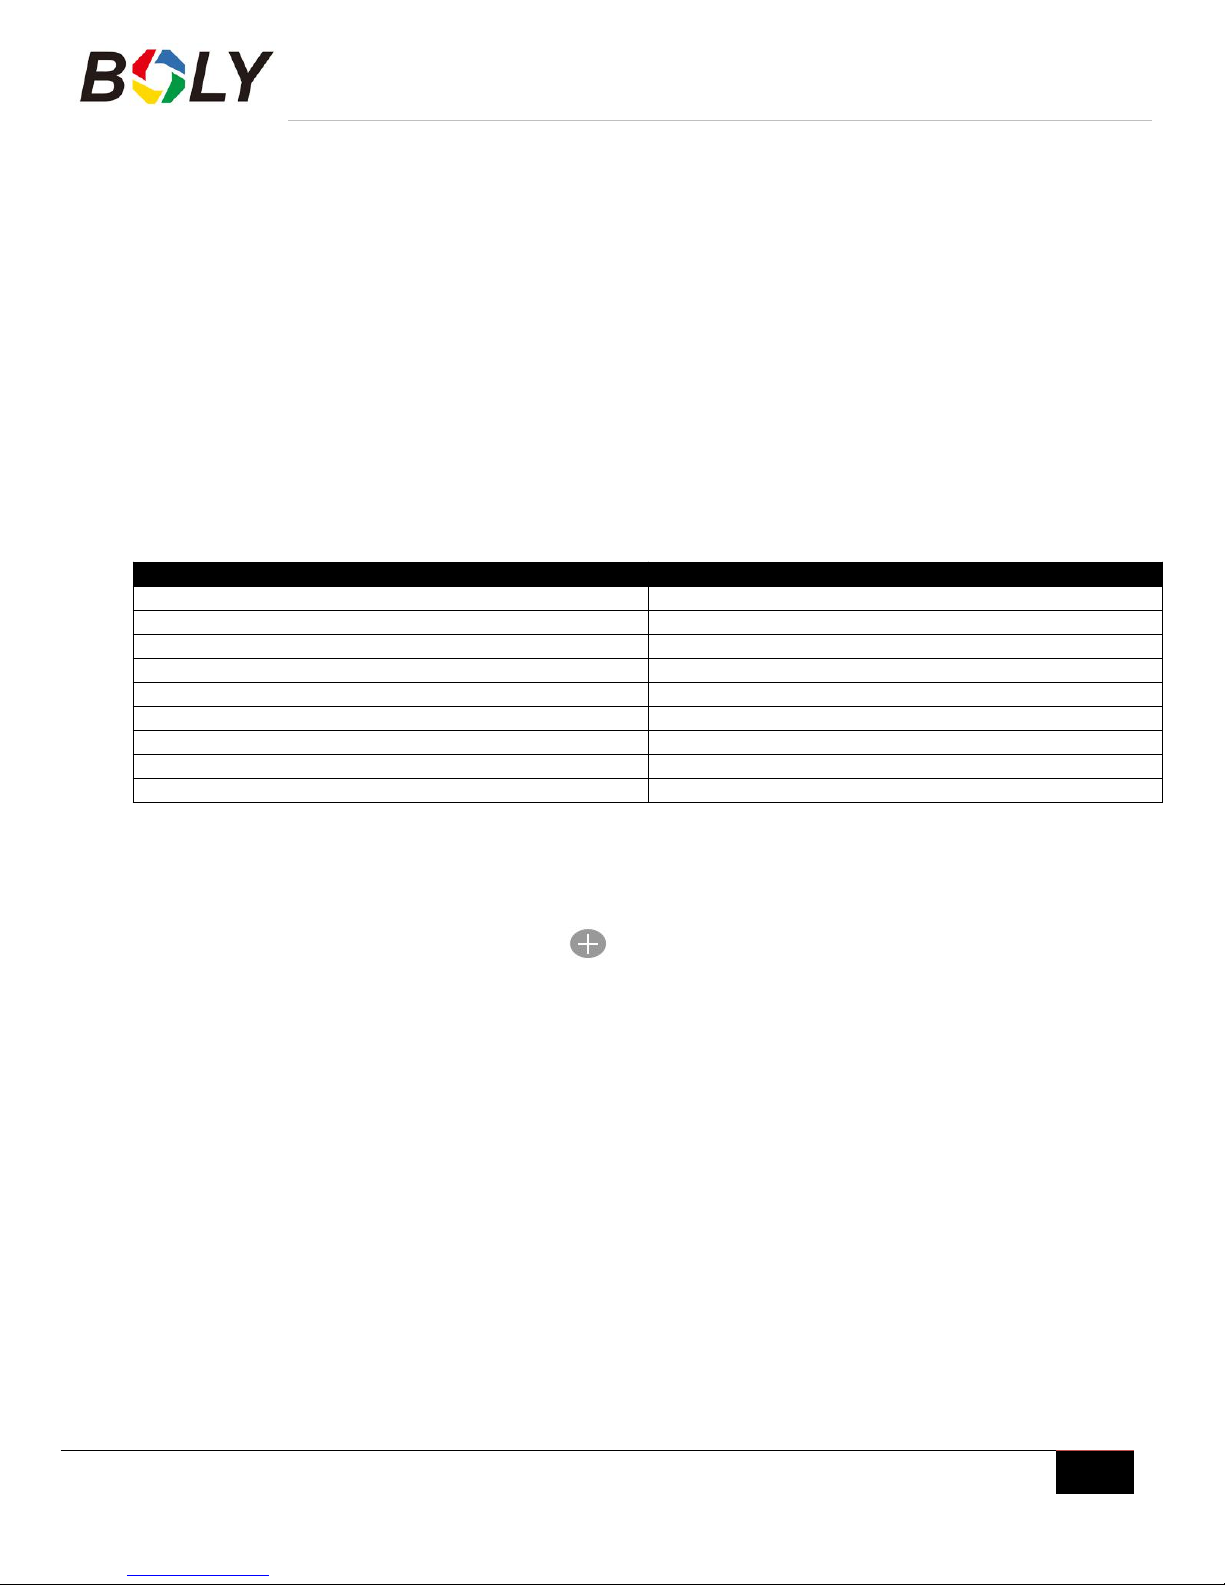
STEP 1:Open the BG Tools app,click on the icon add a new device.
STEP 2 : Select your camera model
①Input a name for you camera .②Input your SIM card number which is inserted in your camera.③Choose
your camera model number,then click “Add”。
STEP 3:Set super user number and password.For the first time use the super user password is 0518.(The Super
User number is the SIM card number which is inserted in your mobile phone).
Boly Trail Cameras – MG983 Series
Boly Inc. | User Manual 03/01/2017
11
STEP 1 STEP 2 STEP 3
STEP 4: In the step 3 Click“send”,then choose the country and provider
STEP 5: Click “Check WAP/Internet Parameters”to check whether you have all parameters filled in.
STEP 6: Select Mail Server:Boly Email or Other Email.If you select the other Email service.You should input
your Email address、Password、Email Server and Email Port. (If you use an SSL email such as Gmail as sending
email, please click “Advanced”button to mark it.)
STEP 5 STEP 6

Boly Trail Cameras – MG983 Series
Boly Inc. | User Manual 03/01/2017
12
STEP 7:Select“my device”you can add or delete a device.
STEP 8:Select“Seting”to set users parameters or set to default.
STEP 9:Select “Get Photos”means you can get a photo from you camera device.There are two ways Cellphone:
Send MMS to phone . Email : Send to email by GPRS.
STEP 10:Select “Advanced”to set Super user information, change password,Format SD card, System Checking,
Arming, Disarming. View the Version.
Set password:Set a new super user password If you forget it.
Super User Password: Change your super user and password.
STEP 7 STEP 9 STEP 10
If you aren’t able to use the Android APP for setting changes or commands, the list below shows all available commands
through SMS.

Boly Trail Cameras – MG983 Series
Boly Inc. | User Manual 03/01/2017
13
3.4.2 Changing settings via SMS – Command List
All fields within brackets [ ] needs to be replaced with information respective to your carrier’s network settings.
Note: Only the Admin phone number is able to send SMS commands to the camera - The Admin number
is the first phone number you enter in the software setup outlined in the Camera Setup Software section of the
manual.
Functions
Text Commmands
Set MMS
Parameters
#m#[URL]#[IP]#[Port]#[APN]#[Account]#[Password]#
Example:
#m#http://mmsc.cingular.com#66.209.11.32#8080#wap.cingular#account#password#
Set GPRS
Parameters
#s#[Email]#[Homepage URL]#[Port]#[APN]#[smtp]#[Account]#[Password]#
Example:
#s#bm[email protected]#bmc123#25#cmnet#smtp.163.com#account#password#
Set Normal User’s
Phone
#n#[Phone Nbr]#[Phone Nbr] #[Phone Nbr]#
Set to Receive
Email
Real Time Photo
#t# (Send MMS to phone)
#t#e# (Send GRPS to email)
Check Camera
Settings
#L#
Format SD Card
#F#
Help
#H#
Change Camera
Mode
#e#cp# (photo mode)
#e#cv# (video mode)
#e#ct# (pic+video)
Change Photo Size
#e#s5# (5mp)
#e#s10# (10mp)
Change Photo
Burst
#e#b1# (1~3 photos)
Change Video Size
#e#fh# (720p)
#E#fl# (VGA)
Change Video
Length
#e#v5# (5 seconds)
#E#v30# (change number to desired length)
Change Date Time
#e#t# (adjustment the time)
Change Time
Lapse
#e#l1h# (1 hour)
#e#l5m# (5 min)
Change PIR
Trigger
#e#po# (Off)
#e#ph# (High)
#e#pn# (Normal)
#e#pl# (Low)
Change PIR
Interval
#e#i30m# (30min)
#e#i30s# (30sec)

Boly Trail Cameras – MG983 Series
Boly Inc. | User Manual 03/01/2017
14
Functions
Text Commmands
Change Send To
#e#mp# (phone)
#e#me# (email)
#e#mc# (call)
#e#mg# (e-mail gprs)
Change Send
Mode
#e#ed# (daily)
#e#ei10# (to set instant mode and the max number per day)
#e#eo# (off)
#e#em# (Manual)
Change Game Call
#e#gon18:00[5]# (On)
#e#goff# (Off)
Change Camera
Position
#e#oa# (a~z) to set the camera position function
#e#ooff# (Turn off)
Change Work Hour
#e#hoff# (Off)
#e#hon10:00-18:00#

Boly Trail Cameras – MG983 Series
Boly Inc. | User Manual 03/01/2017
15
3.5 Camera Setup Options
To view the camera settings menu, slide the power switch to TEST/SETUP mode and press MENU on the
remote. Use ▲ or ▼ keys to select the sub-menu. Use ◄ or ► keys to select the different options. Press “OK”
to save the settings.
After changing EACH setting in the Setup menu, you must press OK or the camera will retain the previous setting.
Dependent on the model and firmware version, not all Menu options may be available on your specific camera.
Menu Options
Descriptions
Language
Choose the language you prefer. Language options include: English,
Finnish, German and Swedish.
Default: English
Camera Mode
Choose between capturing images, videos or both at the same time:
Photo, Video, Pic+Video
Default: Photo
Set Clock
Set the cameras date and time. The date format is month/day/year.
The time format is hour: minute: second. The valid values for the
year is between 2015 and 2050.
Photo Size
Choose the image size: 14MP, 20MP, or 30MP (mega pixel) options
are available.
Default: 30 MP
Photo Burst
Choose the number of photos taken after the camera is triggered: 1
Photo, 2 Photo, or 3 Photo. If Pic+Video is selected, Photo burst
defaults to 1 photo, regardless of entered value.
Default: 1 Photo
Video Size
Choose the video size: 1920x1080, 1280x720 or 640x480.
Default: 1920x1080
Video Length
Choose the duration of the video recording: Valid values extend from
5 to 180 seconds with a one second delay. Press ◄ and ► keys to
decrease or increase the video length.
Default: 10 seconds
Working Hour
This setting allows the camera to be active only during the set period
of time per day. If activated, the camera will NOT take pictures or
video outside of the specified working hour, regardless of any other
setup option settings. The values are set to military time that range
from 00:00 to 23:59.
Default: OFF
Beep Sound
Enable or disable the sound the camera will make while navigating
the menu settings.
Default: On
Time Stamp
This setting allows you to include or exclude time/date information
displayed on the photos or video the camera captures: Off or On
Default: On
Position ID
Used for multiple cameras in an area. You can set an A-Z indicator
for each of your cameras in order to distinguish between which
photos are from a specific camera.
Default: Off
Format SD
All information on the SD card will be deleted. Make sure that you
have made a backup of important data already on the SD card.
Default Settings
Restore all settings back to the default values.
Version
Shows firmware and IMEI (International Mobile Equipment Identity)
information of the camera.
cont.

Boly Trail Cameras – MG983 Series
Boly Inc. | User Manual 03/01/2017
16
Menu Options
Descriptions
Time Lapse
The camera can capture images or videos at a preset time interval
regardless of motion detection. Changing this setting to a non-zero
value turns on Time Lapse mode and the camera will take photos at
the set interval time – Values range from 5 minutes to a maximum of
8 hours.
If PIR Trigger/Sensitivity and Time Lapse options are BOTH OFF,
the camera will not capture any photos or videos.
Default:OFF
PIR Trigger/Sensitivity
This setting is for the sensitivity of the PIR sensor. There are four
sensitivity parameters: High, Normal, Low and Off. It is
recommended to use HIGH sensitivity in areas with little
environmental interference and also for warmer, humid temperatures
or climates. Use LOW sensitivity for areas that have a lot of
interference. The sensitivity of the PIR is effected by temperature.
Higher temperatures leads to lower sensitivity.
If PIR Trigger/Sensitivity and Time Lapse options are BOTH OFF,
the camera will not capture any photos or videos.
Default: Normal
PIR Interval
This setting indicates how long the PIR sensor will be disabled after
each camera triggering. During this time the PIR sensor will not react
to any detected motion or scheduled timer functions. The PIR
Interval can be set between zero seconds to a maximum of 1 hour.
Press LEFT or RIGHT to decrease or increase the desired PIR
Interval time.
Default: 5 seconds
MMS Settings
The camera sends MMS messages through a GPRS network. All
MMS and GPRS settings need to be completed. Required MMS
settings: URL, APN, IP and Port. Contact your cellular service
provider if you are not familiar with these settings.
GPRS Settings
The camera sends images to email through GPRS networks with
SMTP protocol. Required GPRS settings: Homepage, Port, APN,
SMTP. Contact your cellular or network service provider if you are
not familiar with the settings.
Send Mode
There are 4 options for this setting.
Manual: Only works in TEST/SETUP Mode. Allows you to
select specific photos to send while you are in range of the
camera.
Daily Report: Only works in ON mode. This setting will send
summarized information and the last picture taken per day. If
set in Video Mode, the summarized information will include
how many videos were taken.
Instant: Only works in ON mode. The camera will send a
message instantly after it captures a photo or video.
OFF: Disable all communication functions.
Please Note: Some cellular carriers limit the size of files being
sent. Some image and video files may be too large to send.
Default: Off
SMS Control
SMS Control enables mobile communication functionality. When
SMS Control to ON, the camera can receive and respond to your
SMS commands.
Default: OFF

Boly Trail Cameras – MG983 Series
Boly Inc. | User Manual 03/01/2017
17
Menu Options
Descriptions
Game Call
It means this camera can play audio file at a preset time clock for
preset times.
The audio file must be saved in the directory of \DCIM\100BMCIM\
with a name of IMAG0001.WAV .You must delete the IMAG0001.jpg
from your SD card.
Note that Game Call will not function if the SD card is full or there is
a trigger when it is time to playback the audio.
Default:ON
Send To
Send the image to your phone or email options.
Phone [MMS]: Send the image to cellular device via WAP.
Email [MMS]: Send the image to email address via WAP.
Email [GPRS]: Send the image to email address via SMTP.
Default: Phone[MMS]
Security Mode
Security mode is primarily used indoors. It is recommended to use
an AC power supply. Batteries can be used as backup for
emergency power. The remote control included with the camera is
needed for security mode. The camera will need to be in
TEST/SETUP mode for Security mode to work.
Default: OFF
Work Day
Choose the days of the week you want the camera to work.
This setting is only available in Security Mode.
Study Code
Needed to pair the camera with a specified 433MHz wireless device.
PIR sensor, wireless door magnet, wireless smoke detector are a
few products the camera can be paired to. These products are
integrated into Security mode when paired to the camera. All
additional products need to be paired with the camera before setting
up Security mode. Please see following chapters to find the method
to connect or remove a wireless sensor.
This setting is only available in Security Mode.
Boly Trail Cameras – MG983 Series
Boly Inc. | User Manual 03/01/2017
18
4. Advanced Operations
4.1 Advanced Surveillance Modes
Security mode: Similar to Hunting mode with remote functionality. This mode also uses more power and it is
recommended to be used indoors, connected with an AC power supply. To switch to the security mode, place
the camera’s switch in the ON position and once the camera fully connects to the network, press the DEL /
key.
4.2 Security Mode Remote Control
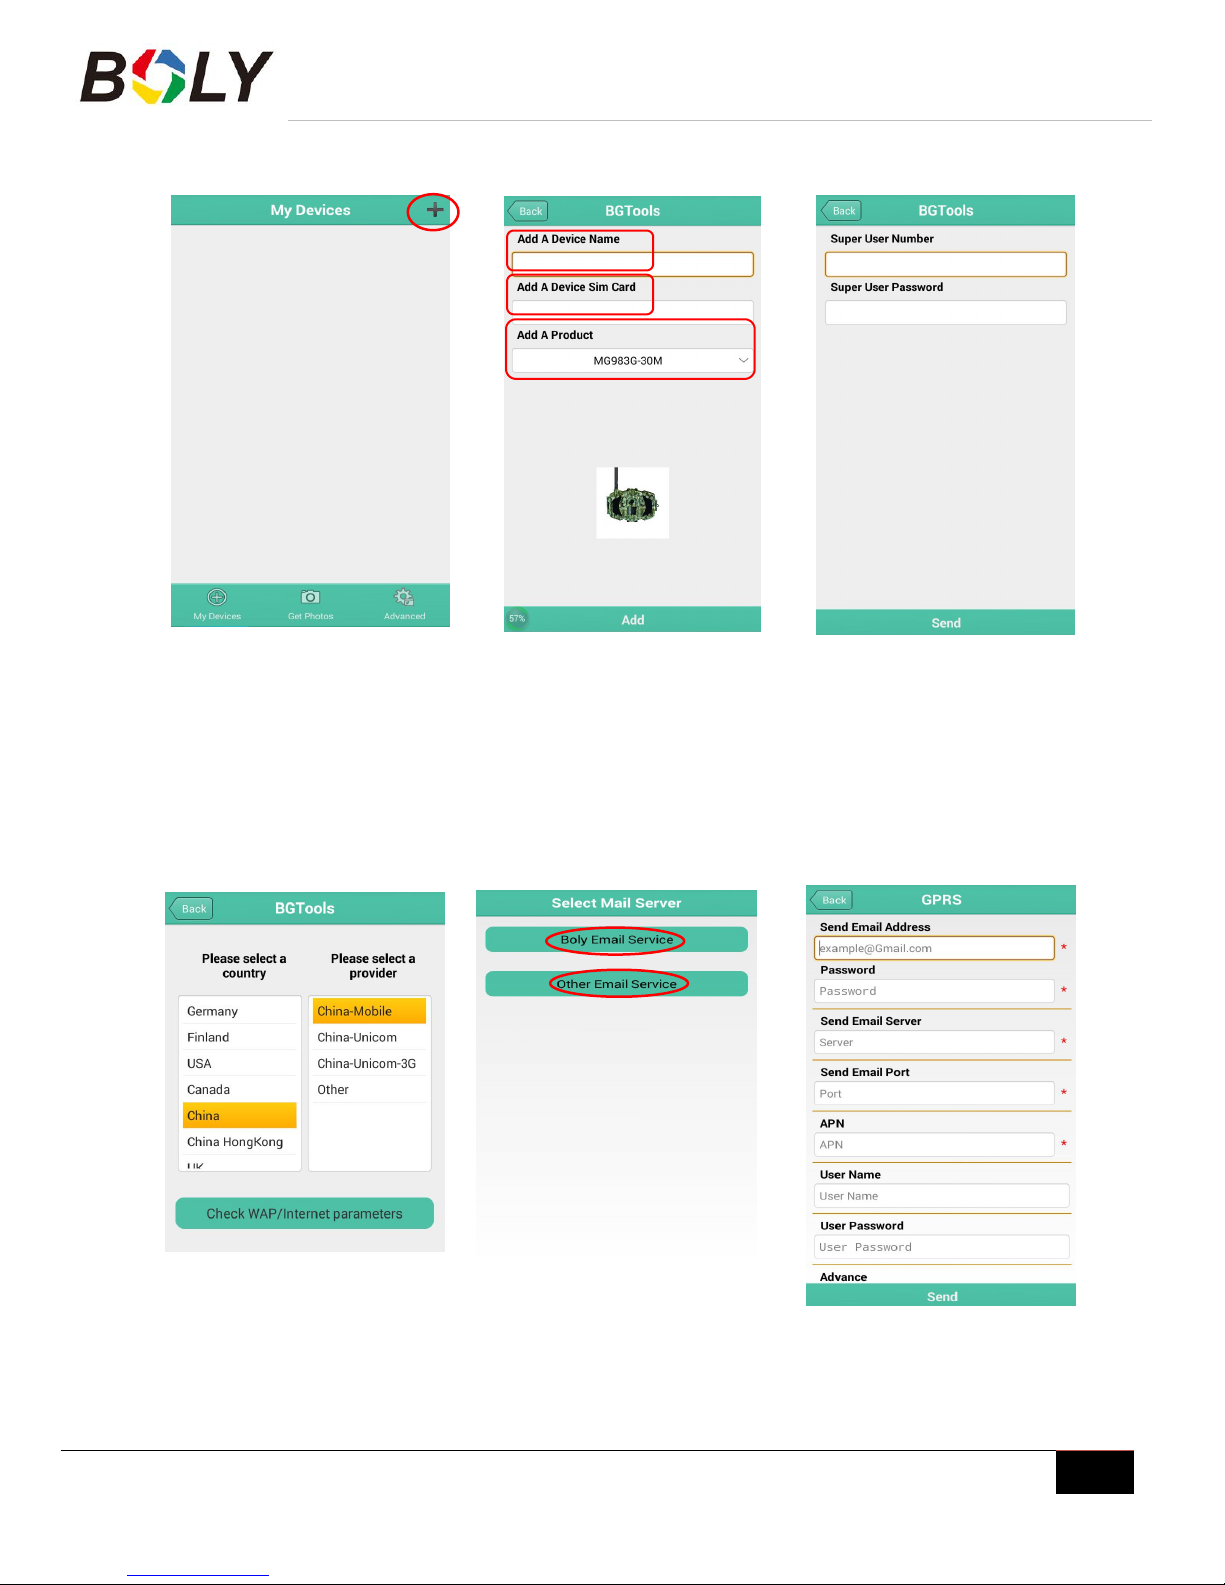
Button A: Arms the camera
Button B: Turns on and off the laser pointer
Button C: Calls the emergency phone number
Button D: Disarms the camera
4.3 Pairing the Security Remote Control
Setup Status Study Code Menu Study Code Menu
To pair the security remote to the camera:
Put the camera in TEST/SETUP mode
Press the MENU button to go into the camera settings
Set Security Mode to ON
Press the MENU button and navigate to the Study Code setting in the Internet tab
Choose RCH and press the OK button
Press the button A on the remote control
When it's successful, there will be a √ next to RCH
Boly Trail Cameras – MG983 Series
Boly Inc. | User Manual 03/01/2017
19
4.4 Entering into Security mode
The camera can be placed into Security mode after setting the Security mode setting to ON and pairing the
security camera by pressing the ◄ key in TEST/SETUP mode. The S will change to an A on the LCD display
indicating the camera is now in security mode.
4.5 Wireless Security Devices
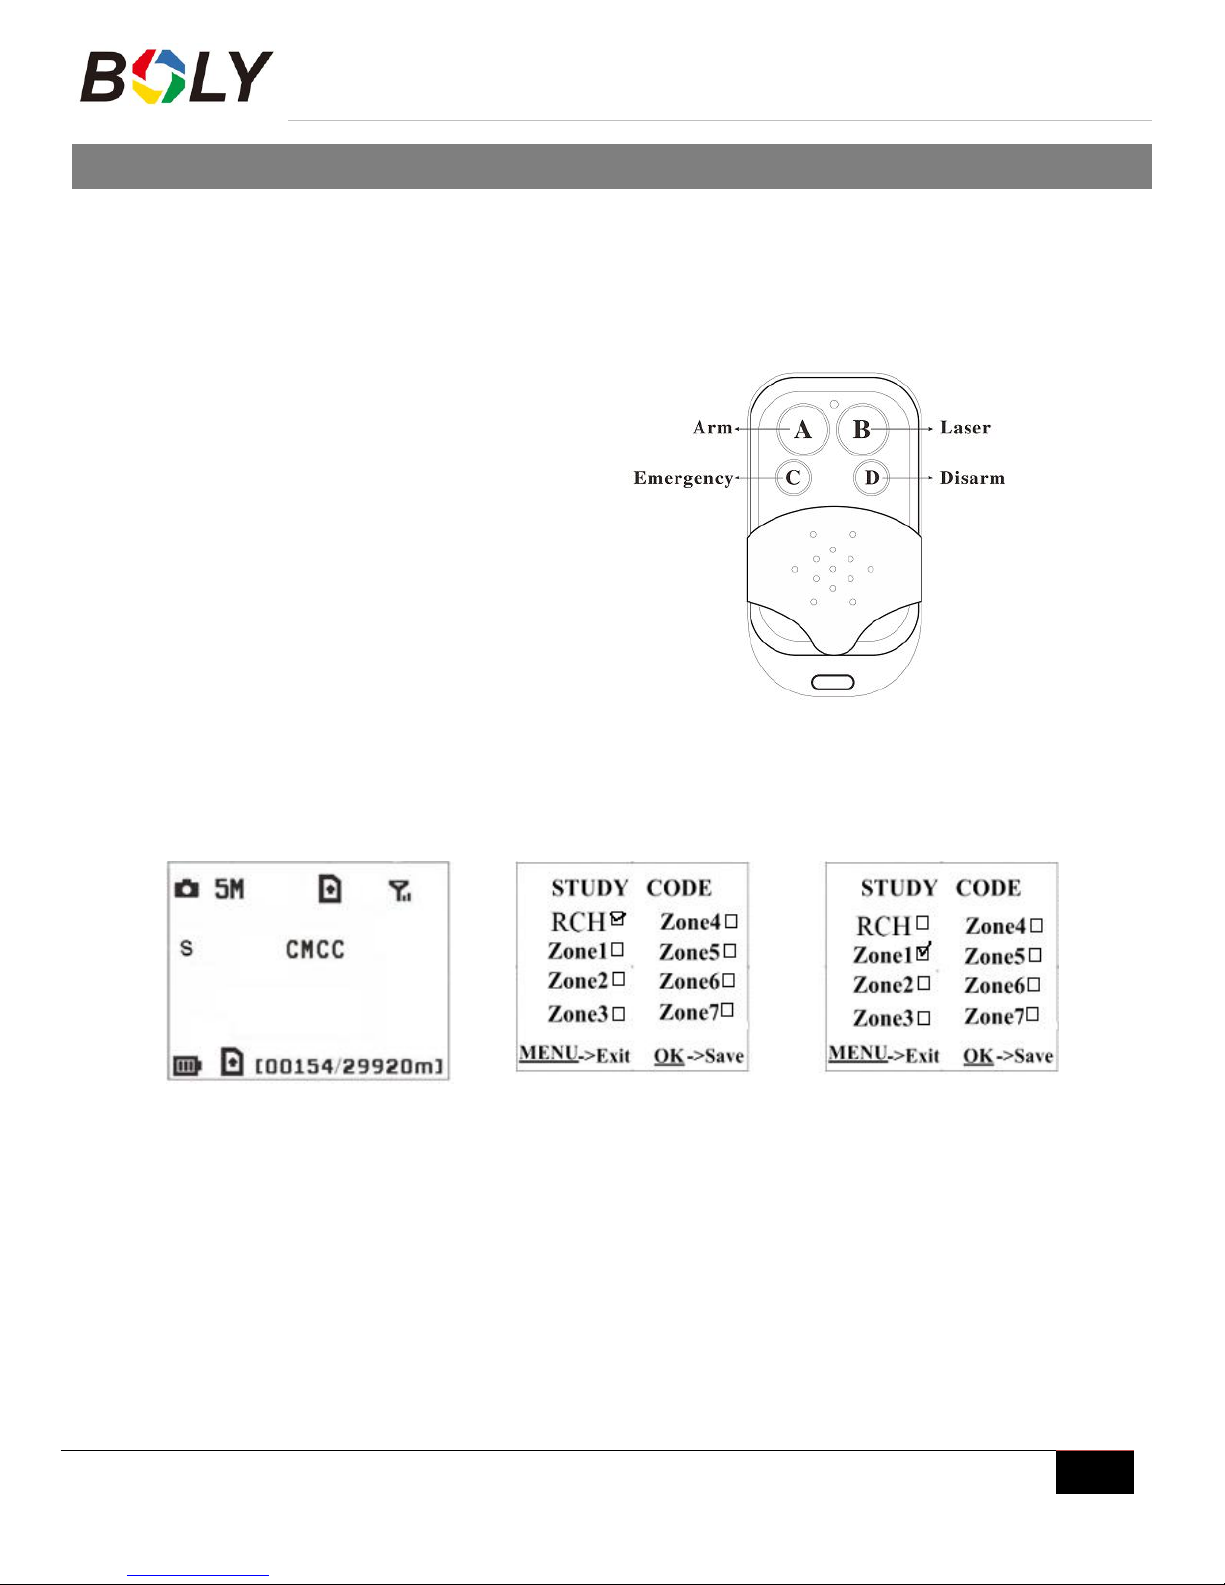
433MHZ sensors for infrared heat sensors, wireless door magnets and wireless smoke detectors that have the
capability to pair and connect to an alarm system. To add or remove a wireless sensor accessory:
Power on and set wireless sensor into pairing mode
Put the camera TEST/SETUP mode
Press the Menu key and navigate to the Study Code setting
Choose a zone that to pair the wireless accessory to and select the OK option
A √ will appear next to the zone if paired correctly
Trigger or set of the wireless accessory to make sure it is working correctly
When you want to remove a wireless security accessory, navigate to the study code setting and press ◄ or ►
keys to cancel the √.
NOTE: Wireless security accessories can ONLY be used in Security Mode.

Boly Trail Cameras – MG983 Series
Boly Inc. | User Manual 03/01/2017
20
5. Detection Ranges – PIR Detection Zones
A passive infrared sensor (PIR sensor) is an electronic sensor that measures infrared (IR) light radiating from objects in its
field of view. PIR Angle refers to the degree that the sensor can sense movement. Cameras that have a large PIR Angle
can detect movement over larger areas and have a better chance of capturing the subject in the center of the frame as
opposed to the edges like some lower quality cameras do. The longer the distance that the camera can sense, the more
area that is detectable and the more opportunities the camera will have to capture that perfect picture.
In Boly cameras, the PIR Angle is slightly smaller than the camera’s field of view angle. This feature is inherent in our
camera designs without reducing the overall possible detection area, due to our patented technology that enhances
increased sensor angles and lengthens trigger distance. By making the PIR Angle slightly less than the camera’s field of
view, we have reduced empty pictures rates and helped assure that the entire subject is captured within the photos and
videos.
With our patented sensor technology, we have increased the camera’s effectiveness over standard PIR cameras to
assure that all detectable motion is captured. Combined with our patented BolyRaw image processing technology, we are
confident that the images captured are of the highest quality that you can display and enjoy for years to come.
This manual suits for next models
1
Table of contents
Other Boly Security Camera manuals


