Bona Edge UX 130 mm Operating instructions

SERVICE INSTRUCTIONS
Bona Service Kit for Bona Edge UX 130 mm
Bona.com
EN
DE
FR
ES

TABLE OF CONTENTS
HOW TO REPLACE THE COGGED BELT AND THE PULLEY ............................... 3
HOW TO ATTACH THE DUSTBAG ...................................................................... 10
HOW TO CHANGE THE VELCRO DISC .............................................................. 11
HOW TO CHANGE THE WHEEL ......................................................................... 13
Watch the instruction
videos here!

3| BONA SERVICE KIT - SERVICE INSTRUCTIONS
HOW TO REPLACE THE COGGED BELT AND THE PULLEY
Tools you need: Wrench, Blocking tool, Philips Screw driver, Allen Key, Hammer
STEP 1
EN
DE
FR
ES
Remove the plastic cap.
Den Stopfen entfernen.
Retirez le capuchon en plastique.
Retire la tapa de plástico.
STEP 2
EN
DE
FR
ES
Turn the machine and remove the abrasive.
Die Maschine umdrehen und das Schleifmittel
abnehmen.
Retournez la machine et retirez l’abrasif.
Gire la máquina y retire el abrasivo.
STEP 3
EN
DE
FR
ES
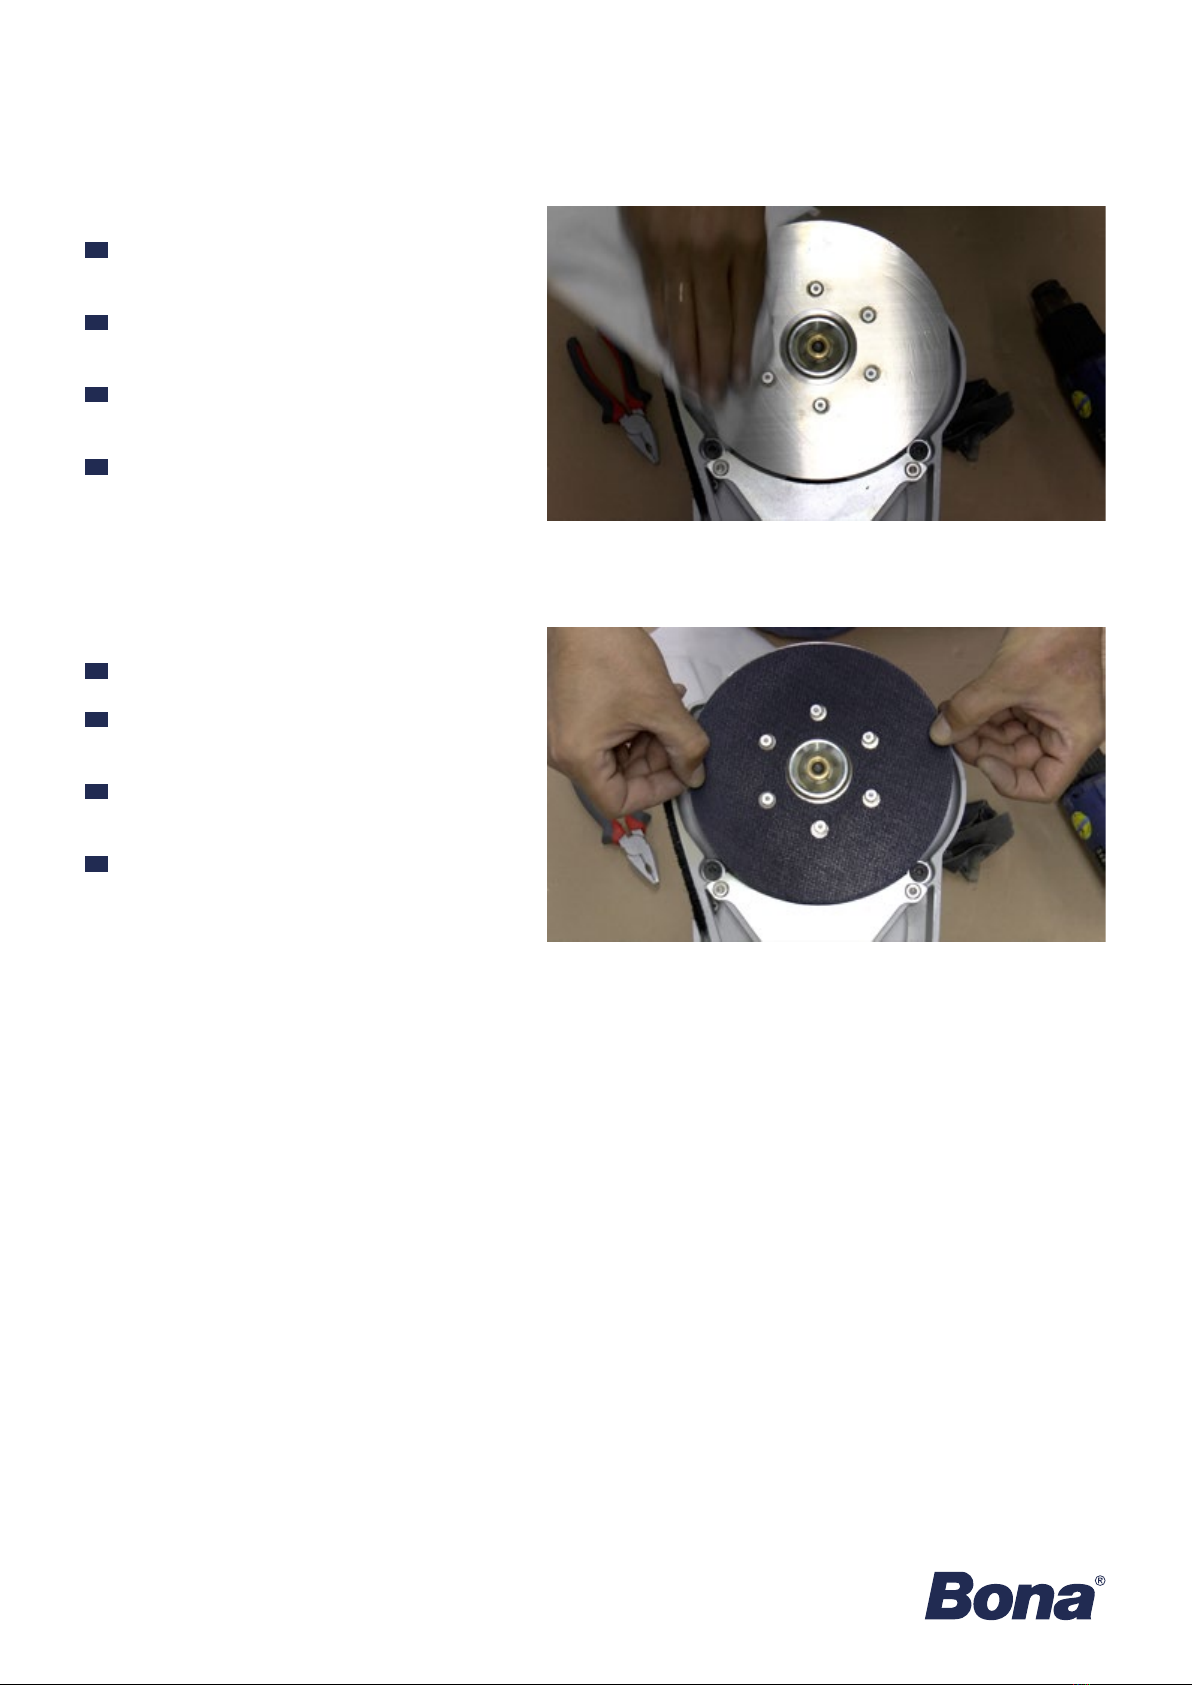
Remove the center screw.
Die mittlere Schraube entfernen.
Retirez la vis centrale.
Retire el tornillo central.
Before starting, make sure that the machine is switched off and the power cord disconnected from the socket.

4| BONA SERVICE KIT - SERVICE INSTRUCTIONS
STEP 4
EN
DE
FR
ES
Insert the blocking tool into the hole on the
machine arm. Rotate the disc until the tool slides
into place.
Zum Blockieren des Schleiftellers einen Blockier-
stift in das Loch im Maschinenvorsatz einführen.
Dafür die Scheibe drehen, bis der Stift von selbst
hineinrutscht.
Insérez l’outil de blocage dans l’orice du bras de
la machine. Faites tourner le disque jusqu’à ce que
l’outil soit bien en place.
Inserte la herramienta de bloqueo en el oricio del
brazo de la máquina. Gire el disco hasta que la
herramienta entre en su sitio.
STEP 5
EN
DE
FR
ES
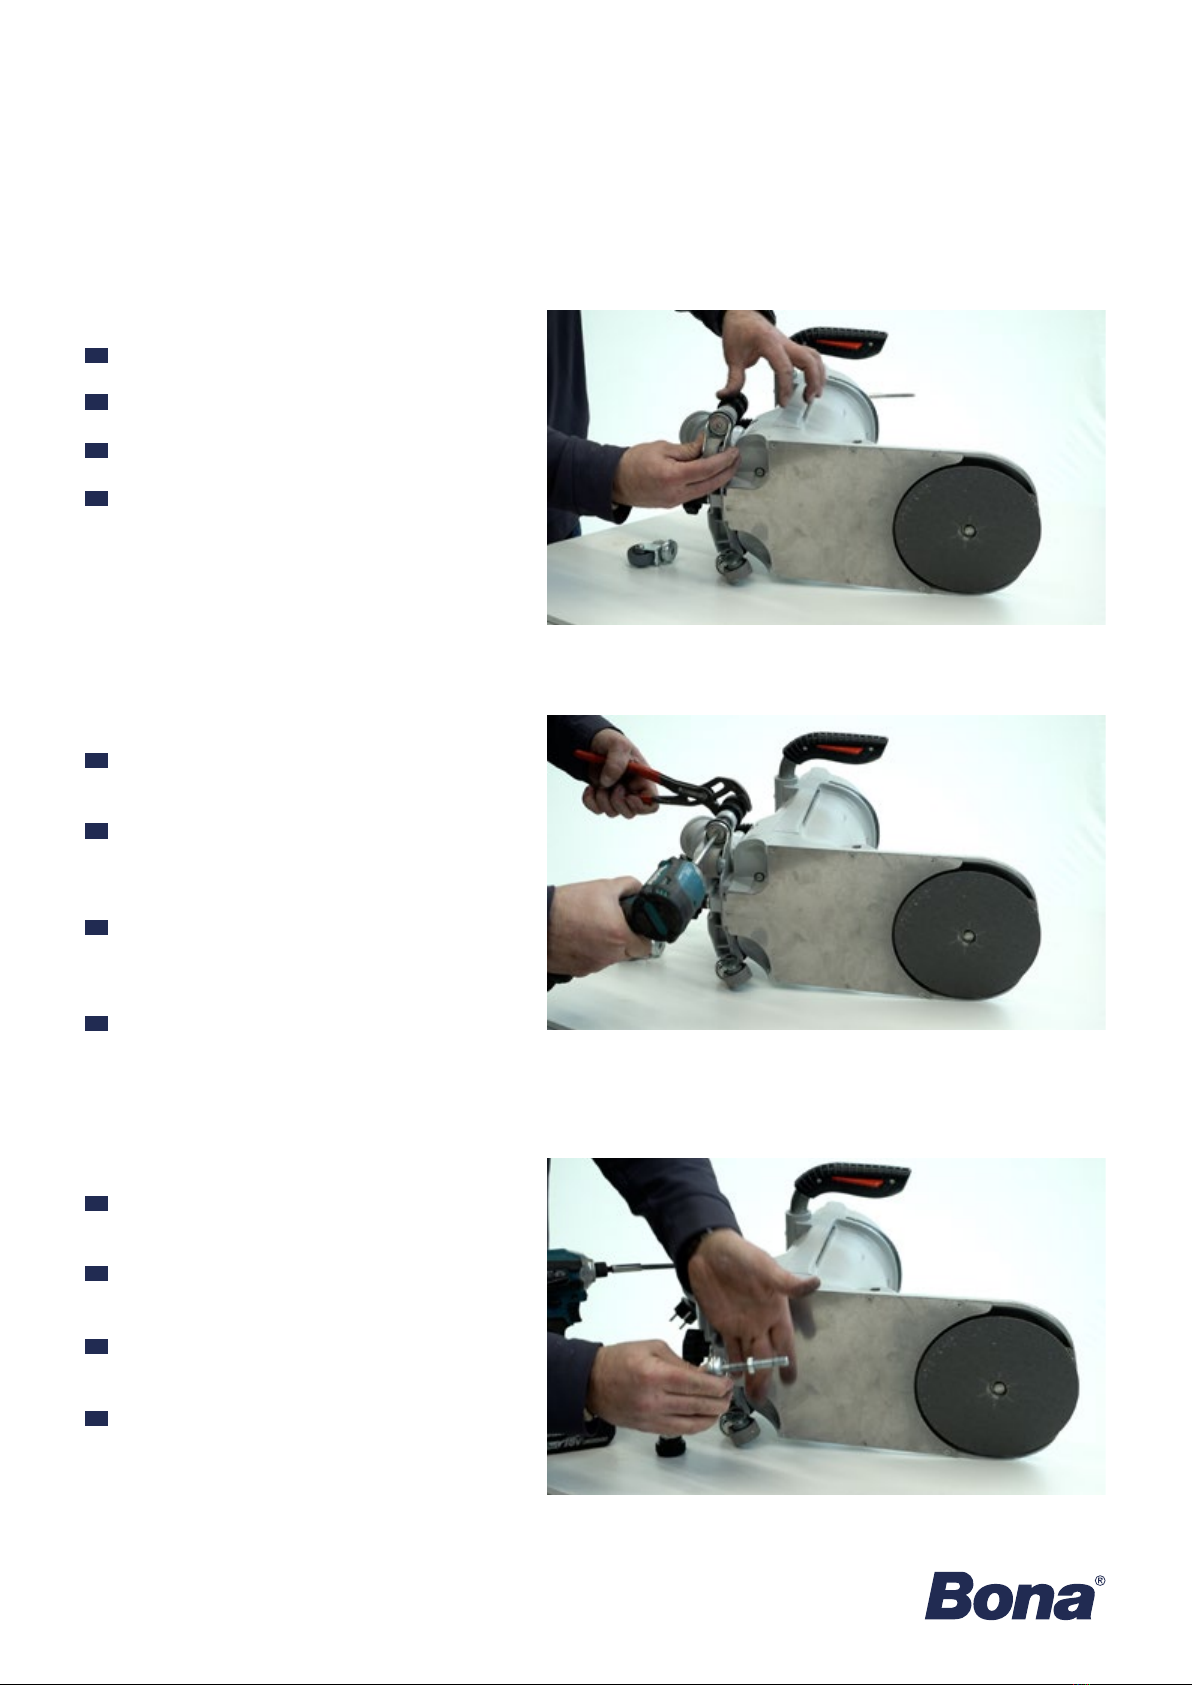
Hold the blocking tool steady while turning the
sanding disc counter clockwise.
Den Blockierstift festhalten, während die
Schleifscheibe gegen den Uhrzeigersinn gedreht
wird.
Faites tourner le disque de ponçage dans le sens
inverse des aiguilles d’une montre tout en tenant
fermement l’outil de blocage.
Sujete rmemente la herramienta de bloqueo mien-
tras gira el disco de lijado en el sentido contrario a
las agujas del reloj..
STEP 6
EN
DE
FR
ES
Remove the 6 screws from the bottom metal plate.
Die 6 Schrauben von der unteren Metallplatte
entfernen.
Retirez les six vis pour retirer la plaque métallique
inférieure.
Retire los 6 tornillos de la placa metálica inferior.

5| BONA SERVICE KIT - SERVICE INSTRUCTIONS
STEP 7
EN
DE
FR
ES
Remove all screws from the Belt Protection plate.
Alle Schrauben von der Riemenschutzplatte ab-
nehmen.
Retirez toutes les vis de la plaque de protection de
la courroie.
Retire todos los tornillos de la placa de
protección de la correa.
STEP 8
EN
DE
FR
ES
Remove the blocking tool on the back side.
Den Blockierstift auf der Oberseite herausziehen.
Retirez l’outil de blocage de l’arrière de la machine.
Retire la herramienta de bloqueo de la parte tras-
era.
STEP 9
EN
DE
FR
ES
Rotate the pulley until you see the 3 screws.
Die Riemenscheibe drehen, bis 3 Schrauben zu
sehen sind.
Faites tourner la poulie jusqu’à ce que les trois vis
soient visibles.
Gire la polea hasta que vea los 3 tornillos.

6| BONA SERVICE KIT - SERVICE INSTRUCTIONS
STEP 10
EN
DE
FR
ES
Remove the 3 screws.
Diese 3 Schrauben entfernen.
Retirez les trois vis.
Retire los 3 tornillos.
STEP 11
EN
DE
FR
ES
Remove the pulley by inserting the blocking tool
into the hole on the machine arm and gently knock
it with a hammer.
Den Blockierstift wieder in das Loch im Maschinen-
vorsatz einführen und mit einem Hammer leicht
darauf schlagen, um die Riemenscheibe zu lösen.
Retirez la poulie en insérant l’outil de blocage
dans l’orice du bras de la machine et en frappant
doucement avec un marteau.
Retire la polea insertando la herramienta de
bloqueo en el oricio del brazo de la máquina y
golpéela suavemente con un mazo.
STEP 12
EN
DE
FR
ES
Replace the old belt with a new one.
Den alten Riemen durch einen neuen ersetzen.
Remplacez l’ancienne courroie.
Sustituya la correa antigua por una nueva.

7| BONA SERVICE KIT - SERVICE INSTRUCTIONS
STEP 13
EN
DE
FR
ES
Install the new pulley.
Eine neue Riemenscheibe einsetzen.
Installez la nouvelle poulie.
Instale la polea nueva.
STEP 14
EN
DE
FR
ES
Make sure that you place the pulley in the right
position by using the blocking tool to xate it.
Auf die richtige Positionierung der Riemenscheibe
achten, indem sie durch Einstecken des Blockier-
stifts xiert wird.
Veillez à positionner correctement la poulie, en
vous aidant de l’outil de blocage pour la xer.
Asegúrese de colocar la polea en la posición
correcta utilizando la herramienta de bloqueo para
jarla.
STEP 15
EN
DE
FR
ES
Rotate the pulley until you see the screw holes and
put the screws back in place.
Die Riemenscheibe drehen, bis die Schraublöcher
sichtbar sind und die Schrauben wieder eindrehen.
Faites tourner la poulie jusqu’à ce que les orices
des vis soient visibles et remettez les vis en place.
Gire la polea hasta que vea los oricios de los
tornillos y ponga los tornillos en su sitio.

8| BONA SERVICE KIT - SERVICE INSTRUCTIONS
STEP 16
EN
DE
FR
ES
Insert the blocking tool into the hole on the ma-
chine arm.
Zum Blockieren des Schleiftellers den Blockierstift
in das Loch im Maschinenvorsatz einführen.
Insérez l’outil de blocage dans l’orice du bras de
la machine.
Inserte la herramienta de bloqueo en el oricio del
brazo de la máquina.
STEP 17
EN
DE
FR
ES
Put the Belt protection back.
Den Riemenschutz wieder anbringen.
Remettez la protection de la courroie en place.
Vuelva a colocar la protección de la correa.
STEP 18
EN
DE
FR
ES
Hold the blocking tool steady while screwing the
sanding disc back in place.
Den Blockierstift festhalten, während die
Schleifscheibe wieder festgeschraubt wird.
Remettez le disque de ponçage en place à l’aide
de la vis de xation tout en tenant fermement l’outil
de blocage.
Sujete rmemente la herramienta de bloqueo mien-
tras vuelve a atornillar el disco de lijado en su sitio.

9| BONA SERVICE KIT - SERVICE INSTRUCTIONS
STEP 19
EN
DE
FR
ES
Install the bottom plate.
Die untere Platte anbringen.
Installez la plaque inférieure.
Instale la placa inferior.
STEP 20
EN
DE
FR
ES
Put the the center screw back.
Die mittlere Schraube wieder eindrehen.
Remettez la vis centrale en place.
Vuelva a colocar el tornillo central.
STEP 21
EN
DE
FR
ES
Put the plastic cap back.
Den Stopfen wieder einsetzen.
Remettez le capuchon en plastique en place.
Vuelva a colocar la tapa de plásti.

10 | BONA SERVICE KIT - SERVICE INSTRUCTIONS
HOW TO ATTACH THE DUSTBAG
STEP 1
EN
DE
FR
ES
Slide the dustbag over the tube.
Den Staubsack über das Rohr ziehen.
Faites glisser le sac à poussière sur le tube.
Coloque la bolsa para el polvo sobre el tubo.
STEP 2
EN
DE
FR
ES
Tie it to the tube using the strings on the dustbag.
Den Staubsack mithilfe der integrierten Bind-
ebänder festbinden
Attachez-le au tube à l’aide des liens prévus à cet
effet.
A te la bolsa para el polvo utilizando las
cuerdas de la bolsa.
Tools you need: No tools needed
Before starting, make sure that the machine is switched off and the power cord disconnected from the socket.

11 | BONA SERVICE KIT - SERVICE INSTRUCTIONS
HOW TO CHANGE THE VELCRO DISC
STEP 1
EN
DE
FR
ES
Heat up the velcro for approx. 20 seconds.
Die Klettscheibe für etwa 20 s erwärmen.
Chauffez le Velcro pendant environ 20 secondes.
Caliente el velcro durante aproximadamente
20 segundos.
STEP 2
EN
DE
FR
ES
Make a cut in the velcro.
Die Klettscheibe einschneiden.
Faites une entaille dans le Velcro.
Haga un corte en el velcro.
STEP 3
EN
DE
FR
ES
Remove the old velcro using a pincers.
Die alte Klettscheibe mit einer Zange abziehen.
Retirez l’ancien Velcro à l’aide d’une pince.
Retire el velcro antiguo con unas tenazas.
Tools you need: Heating gun, Knife, Pincers, White Spirit
Before starting, make sure that the machine is switched off and the power cord disconnected from the socket.
12 | BONA SERVICE KIT - SERVICE INSTRUCTIONS
STEP 4
EN
DE
FR
ES
Clean the disc with White Spirit to remove the
residuals.
Die Scheibe mit Terpentinersatz reinigen und alle
Rückstände entfernen.
Nettoyez le disque avec du White Spirit pour élimi-
ner les résidus.
Limpie el disco con aguarrás para eliminar los
residuos.
STEP 5
EN
DE
FR
ES
Place the new velcro disc on the cleaned surface.
Die neue Klettscheibe auf der sauberen Oberäche
befestigen.
Placez le nouveau disque Velcro sur la surface
nettoyée.
Coloque el nuevo disco de velcro sobre la
supercie limpia.
13 | BONA SERVICE KIT - SERVICE INSTRUCTIONS
HOW TO CHANGE THE WHEEL
STEP 1
EN
DE
FR
ES
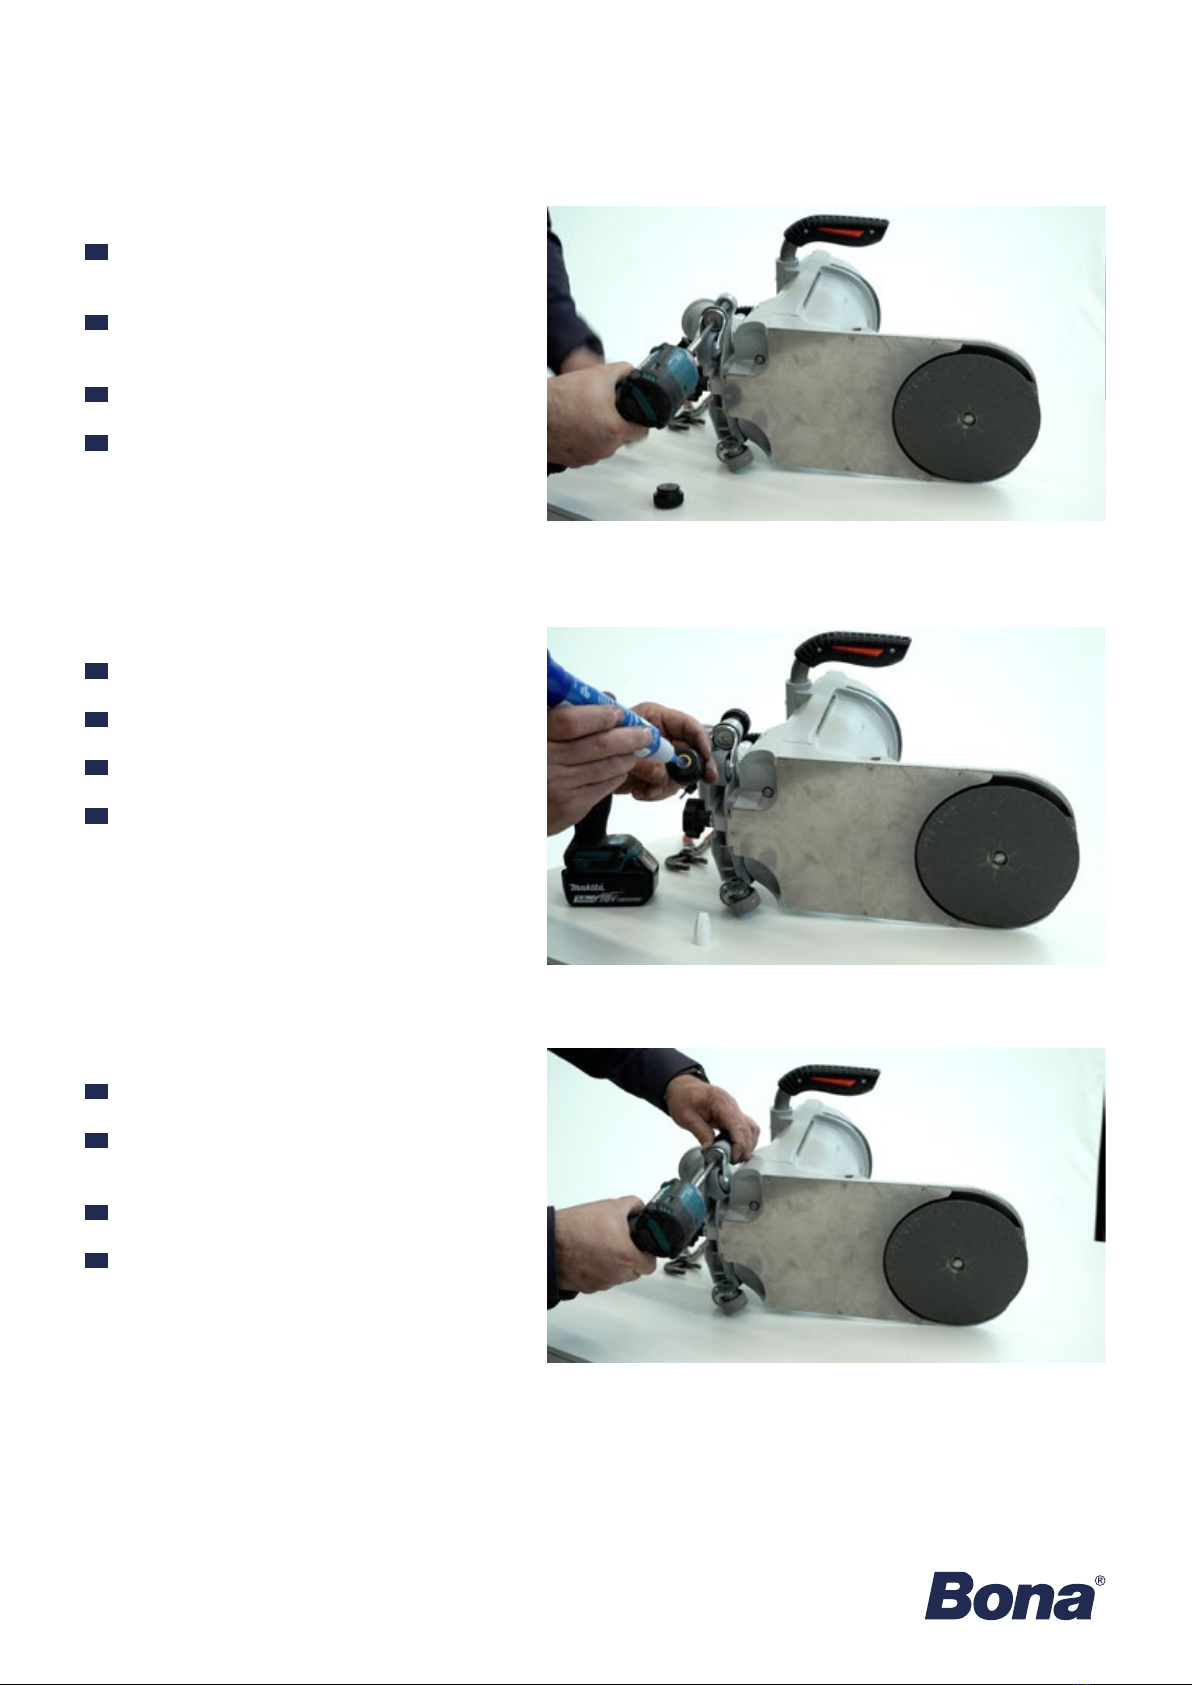
Loosen the bottom black handwheel.
Das untere schwarze Handrad lösen.
Desserrez la roulette inférieure noire.
Aoje la rueda de mano negra inferior.
STEP 2
EN
DE
FR
ES
Hold the top handwheel with a pipe wrench while
removing the bottom screw using an Allen Key.
Das obere Handrad mit einer Rohrzange halten,
während die untere Schraube mit einem In-
busschlüssel gelöst wird.
Retirez la vis inférieure à l’aide d’une clé Allen
tout en maintenant la roulette supérieure avec une
pince.
Sujete la rueda de mano superior con una llave de
tubo mientras retira el tornillo inferior con una llave
allen
STEP 3
EN
DE
FR
ES
Remove the screw and nut from the old wheel and
mount it on the new wheel.
Schraube und Mutter vom alten Rad abnehmen
und an das neue Rad montieren.
Retirez la vis et l’écrou de l’ancienne roulette et
montez-les sur la nouvelle.
Retire el tornillo y la tuerca de la rueda antigua y
móntelos sobre la rueda nueva.
Tools you need: Pipe wrench, Allen key, Loctite
Before starting, make sure that the machine is switched off and the power cord disconnected from the socket.
14 | BONA SERVICE KIT - SERVICE INSTRUCTIONS
STEP 4
EN
DE
FR
ES
Reinstall the new wheel and the bottom
handwheel.
Das neue Rad und das untere Handrad wieder
anbauen.
Installez la nouvelle roulette et la roulette inférieure.
Vuelva a instalar la rueda nueva y la rueda de mano
inferior.
STEP 5
EN
DE
FR
ES
Use Loctite to secure the top handwheel.
Mit Loctite das obere Handrad sichern.
Fixez la roulette supérieure avec de la colle Loctite.
Utilice Loctite para jar la rueda de mano superior.
STEP 6
EN
DE
FR
ES
Adjust the height of the wheel by adjusting the nut.
Die Höhe des Rads durch Verstellen der Mutter
anpassen.
Ajustez l’écrou pour régler la hauteur de la roulette.
Ajuste la altura de la rueda ajustando la tuerca.
Table of contents
Other Bona Industrial Equipment manuals


Popular Industrial Equipment manuals by other brands


Aventics
Aventics GPC manual

Dover
Dover OPW 301 Series Installation and maintenance instructions

Schäfter+Kirchhoff
Schäfter+Kirchhoff 60SMS Series manual

Magnescale
Magnescale RS97-1024EGZ Series instruction manual

DANA
DANA TRAC-LOK 60 Service manual

Rockwell Automation
Rockwell Automation Allen-Bradley Guardmaster MSR124RT installation instructions


