BONHOEFFER BON-P-BC36 User manual

INSTRUCTION MANUAL
BRUSHCUTTER
BON-P-BC36 I BON-P-BC45

2 / 26
DESCRIPTION OF THE SYMBOLS
The use of symbols in this manual is intended to draw your attention to
possible risks. The safety symbols and the explanations that accompany
them must be perfectly understood. The warnings in themselves do not
remove the risks and cannot replace correct actions for preventing
accidents.
Read the instruction handbook and follow all warning and safety instructions
before any use, refer to the corresponding paragraph in the present
manual.
Complies with European regulations applicable to this product.
Remove the ignition cable before all maintenance work, and read the
instructions for use.
Take care of the proportion when handling fuel and lubricants!
Do not expose to rain.
The exhaust and exhaust gases are hot. Do not touch them.

3 / 26
Danger of injury from flying parts! Always maintain a sufficiently safe
distance. Beware of thrown objects. The distance between the machine and
bystanders should be at least 15 meters
Start engine creates sparking.
Sparking can ignite nearby flammable gases.
Engines give off carbon monoxide, an odorless, colorless, poison gas.
Breathing carbon monoxide can cause nausea, fainting or death.
For outdoor use only.
Strictly no naked flames or smoking near the appliance!
Wear ear protection, eye protection and head protection and gloves when
using the product.
Wear slip-resistant footwear when using the device.
Push the bubble 10 times before use to make sure the fuel full of the oil
way.

4 / 26
Choke closed (cold start position).
Choke open (run position)
Beware of blade thrust
Make sure the cutting head isn’t at startup and during work in contact with
foreign objects.
Do not use toothed saw type blade.
Pay more attention to the operator's feet to avoid injured.
Keep bystanders away. Do not touch the nylon line until it stops completely.
Cutting path of trimmer head:450mm
Cutting path of brush cutter:255mm

5 / 26
SAFETY WARNINGS
IMPORTANT
READ CAREFULLY BEFORE USE
KEEP FOR FUTURE REFERENCE
The machine shall always be used in accordance with the manufacturer’s instructions laid
down in the instruction handbook.
The manufacturer will not be liable in cases of inappropriate use or modifications of the
appliance. Also, follow the safety advice, the installation and operation manual and also
to the valid accident prevention regulations.
Appliances with incorrect or missing parts or without a security case are not to be operated.
The service center provides you with information concerning replacement parts.
1). Training
a) Read the instructions carefully. Be familiar with the controls and proper use of the
equipment.
b) Never allow children or people unfamiliar with these instructions to use the machine. Local
regulations can restrict the age of the operator.
c) Never work while people, especially children, or pets are nearby.
d) Keep in mind that the operator or user is responsible for accidents or hazards occurring
to other people or their property.
e) Major repair work shall be carried out only by specifically trained personnel.
f) All persons and animals must be kept at least 15 meters from the machine while it is
working.
2). Preparation
a) WARNING-Petrol is highly flammable:
-store fuel in containers specifically designed for this purpose;
-refuel outdoors only and do not smoke while refueling;
-add fuel before starting the engine. Never remove the cap of fuel tank or add petrol while
the engine is running or when the engine is hot;
-if petrol is spilled, do not attempt to start the engine but move the machine away from the
area of spillage and avoid creating any source of ignition until petrol vapors have
dissipated;
-replace all fuel tank and container caps securely.
b) Replace faulty silencer.
c) Before using, always visually inspect to see that the tools are not worn or damaged.
Replace worn or damaged elements and bolts in sets to preserve balance.
d) Do not smoke near the machine.
e) Do not wear loose clothing, jewellery, or similar items that could be caught in the starter
or other moving parts.
f) Never put any items into the ventilation openings. Non-observance may lead to injury, or
damage to the machine.
g) It is necessary reduction in power due to use in higher temperatures, altitudes and
humidity as below conditions.

6 / 26
-Max Working Temperature: 40°C
-Max altitudes: 1000 m
-Max humidity: 95%
3). Operation
a) Do not operate the engine in a confined space where dangerous carbon monoxide fumes
can collect.
b) Keep the machine free of oil, dirt and other impurities.
c) Please always place the appliance on even and stable surfaces.
d) Never operate the appliance inside buildings or in an environment without proper
ventilation. Pay attention to air flow and temperature.
e) Do not operate or store the appliance in wet or humid surroundings.
f) Ensure the sound absorber and air filter work properly. These parts serve as flame
protection in case of misfire.
g) To avoid possible burn injuries, do not touch the exhaust system or other parts that
become hot during operation. Pay attention to the warnings on the machine.
h) The engine must not be operated with excessive rotary speed. The operation of the engine
with excessive rotary speed raises the risk of injury. Parts which affect the rotary speed
must not be altered or replaced.
i) Regularly check for leakage or traces of abrasion in the fuel system, such as porous pipes,
loose or missing clamps and damage to the tank or tank cap. Before use all defects must
be repaired.
j) Work only in daylight or in good artificial light.
k) Never pick up or carry a machine while the engine is running
l) Stop the engine:
-whenever you leave the machine
-before refueling
m) Before checking or adjusting the machine, the ignition plug and the ignition wire
respectively must be removed to prevent accidental starting.
n) Do not use of the machine when the operator is tired, ill or under the influence of alcohol
or the drugs.
o) Comply with local regulations to use the brush cutter.
p) Contact your local government offices for information regarding minimum age
requirements for operating the equipment.
q) Wear safety goggles and ear protection. Other safety equipment for the hands, legs and
feet is recommended. Correct safety equipment reduces the risk of injury caused by
catapulted foreign bodies or in the event of accidental contact with the brush cutter.
r) Ensure that you maintain a steady foothold. Only use the brush cutter on flat surfaces
where you have a firm footing.
s) While working, always wear substantial footwear and long trousers. Do not operate the
equipment when barefoot or wearing open sandals. Always keep proper footing and
operate the brush cutter only when standing on fixed, secure and level surface.
t) Always hold the brush cutter with two hands (right hand hold the right handle to control
the trigger and the left hand hold on handle bar). To put hands in wrong positions increases
the risk of injury and must therefore be avoided. Changing regularly of work position and
taking frequent breaks are needed.
u) Always use the harness when operate the tool, and adjust the length of the harness to
ensure it is suitable for operation.
v) Always use the correct blade and spool recommended by the manufacturer.
w) Take care against injury to feet and hands from the cutting means.
x) Always ensure that the ventilation openings are kept clear of debris
y) Perform daily inspection before use and after any fall or other impact to identify significant
defects.

7 / 26
z) Keep a correct working position, rest frequently and change working positions. Keep
balance position during operation, use the harness.
aa) It has been reported that, for some people, the vibrations produced by the motorized hand
tools can lead to develop a disease called Raynaud's syndrome or white finger. Symptoms
may include tingling, numbness and blanching of the fingers, usually caused by exposure
to cold. Heredity, exposure to cold and dampness, diet, smoking and work habits are all
thought to contribute to the development of these symptoms. There is currently no
evidence that a certain type of vibration or exposure actually contributes to the
development of this assignment. Some measures that can reduce the effects of vibration,
can be taken by the operator:
• Keep your body warm in cold weather. During use, wear gloves to keep your hands and
wrists warm. It has been reported that cold weather is one of the main causes of Raynaud's
Syndrome.
• After each period of operation, exercise to increase circulation.
• Take frequent breaks. Limit the duration of daily exposure.
• Keep the tool well maintained, all fasteners tightened and worn parts replaced.
• In case of occurrence of one or more of the symptoms described above, stop using the
tool and seek medical attention.
4). Maintenance and storage
a) Keep all nuts and screws tight to be sure the equipment is in safe working condition.
b) Never store the equipment with petrol in the tank inside a building where fumes can reach
an open flame or spark.
c) Allow the engine to cool before storing in any enclosure.
d) To reduce the fire hazard, keep the engine, silencer and petrol storage area free of
vegetative material and excessive grease.
e) Replace worn or damaged parts for safety.
f) If the fuel tank has to be drained, this should be done outdoors.
g) Always clean and maintenance before storage.
h) Never disassembly the guards for cutting attachments.
i) Always store the metal blade in cool and dry place, never use rusted blade. It may cause
serous injure during working.
5) TRANSPORTATION AND HANDLING
a) Whenever the machine is to be handled or transported you must:
-turn off the engine, wait for the cutting device to stop and disconnect the spark plug cap;
-fit the cutting device guard;
-use protective gloves when handling the blades.
-Keep the blade protection device on.
-only hold the machine using the handgrips and position the cutting device in the opposite
direction to that used during operation.
b) When using a vehicle to transport the machine, position it so that it can cause no danger
to persons and fasten it firmly in place to avoid it from tipping over, which may cause
damage or fuel spillage.
INTENDED USE
This unit is designed to be used in accordance with the descriptions and safety
instructions indicated in this operating manual
- for private use
- for trimming lawn edges and small inaccessible areas of grass (e.g. under bushes)

8 / 26
- for cutting wild growth, shrubs and undergrowth.
It is not permitted to use this unit for any other purposes.
The user is liable for all injuries to third parties and damage to their property.
Operate the unit only in the technical condition as stipulated and delivered by the
manufacturer.
Arbitrary changes to the unit will exclude the manufacturer from any liability for resulting
injury and/or damage.
TECHNICAL SPECIFICATIONS
Model
BON-P-BC36
BON-P-BC45
Equipment mobility
Hand-held
Hand-held
Engine type
2-stroke
2-stroke
Maximum power
1.2 kW/7500min-1
1.6 kW/7500min-1
Fuel ratio
40:1 40:1
Volumes of fuel tank
750cm³
950cm³
Engine displacement
35.5cm3
44.8cm3
Max engine speed for brush
cutter
10000 min-1
10000 min-1
Max engine speed for grass
trimmer
9200 min-1
9500 min-1
Gear ratio
19:14
19:14
Cutting diameter
2T blader:255mm
Nylon head:
450mm
2T blader:305mm
Nylon head:
450mm
Spool for grass trimmer line
Ø2,4mm/4m
Max:6800min-1
Ø2,8mm/4m
Max:7000min-1
Engine idling speed
3000min-1±300
min-1
3000min-1±300
min-1
Clutch engagement speed
4200min-1
4200min-1
Unit mass (empty tanks
without cutting attachment)
7.2kg 8.7kg
Noise Information
Measured sound values determined according to ISO 11806-1
The noise figures quoted are emission levels and are not necessarily safe working levels.
Whilst there is a correlation between the emission and exposure levels, this cannot be

9 / 26
used reliably to determine whether or not further precautions are required. Factors that
influence the actual level of exposure of work-force include the characteristics of the work
room, the other sources of noise, etc. i.e. the number of machines and other adjacent
processes, and the length of time for which an operator is exposed to the noise. Also the
permissible exposure level can vary from country. This information, however, will enable
the user of the machine to make a better evaluation of the hazard and risk.
Wear hearing protection!
Vibration total values (triax vector sum) determined according to ISO 11806-1:
The vibration emission level given in this information sheet has been measured in
accordance with a standardized test given in ISO 11806-1 and may be used to compare
one tool with another.
It may be used for a preliminary assessment of exposure.
The declared vibration emission level represents the main applications of the tool.
However if the tool is used for different applications, with different accessories or poorly
maintained, thevibration emission may differ.This may significantly increase the exposure
level over the total working period.
An estimation of the level of exposure to vibration should also take into account the
times when the tool is switched off or when it is running but not actually doing the job.
This may significantly reduce the exposure level over the total working period.
Identify additional safety measures to protect the operator from the effects of vibration
such as: maintain the tool and the accessories, keep the hands warm, organization of
work patterns.

10 / 26
LIST OF MAIN PART
ASSEMBLY
1Tube
15 Guard fixture
2Throttle trigger
16
Cutting attachment guard
3Engine switch
17 Socket wrench
4Throttle trigger lockout
18 Spanner
5
Suspension
point
19 Allen keys S5
6Cable
20 Allen keys S4
7Muffler cover
21 Trimmer head
8Cylinder cover
22 Harness
9Spark plug cover
23 Fuel mixture container
10 Air filter cover
24 Line Cutter
11 Choke lever
26 Additional guard
12 Fuel tank cap
27 Glass
13 3T
B
lade
28 Gloves
14 Gearbox
11 / 26
WARNING!
Please ensure that the brush cutter is switched off properly and that the engine has
stopped completely before assembly and adjustment.
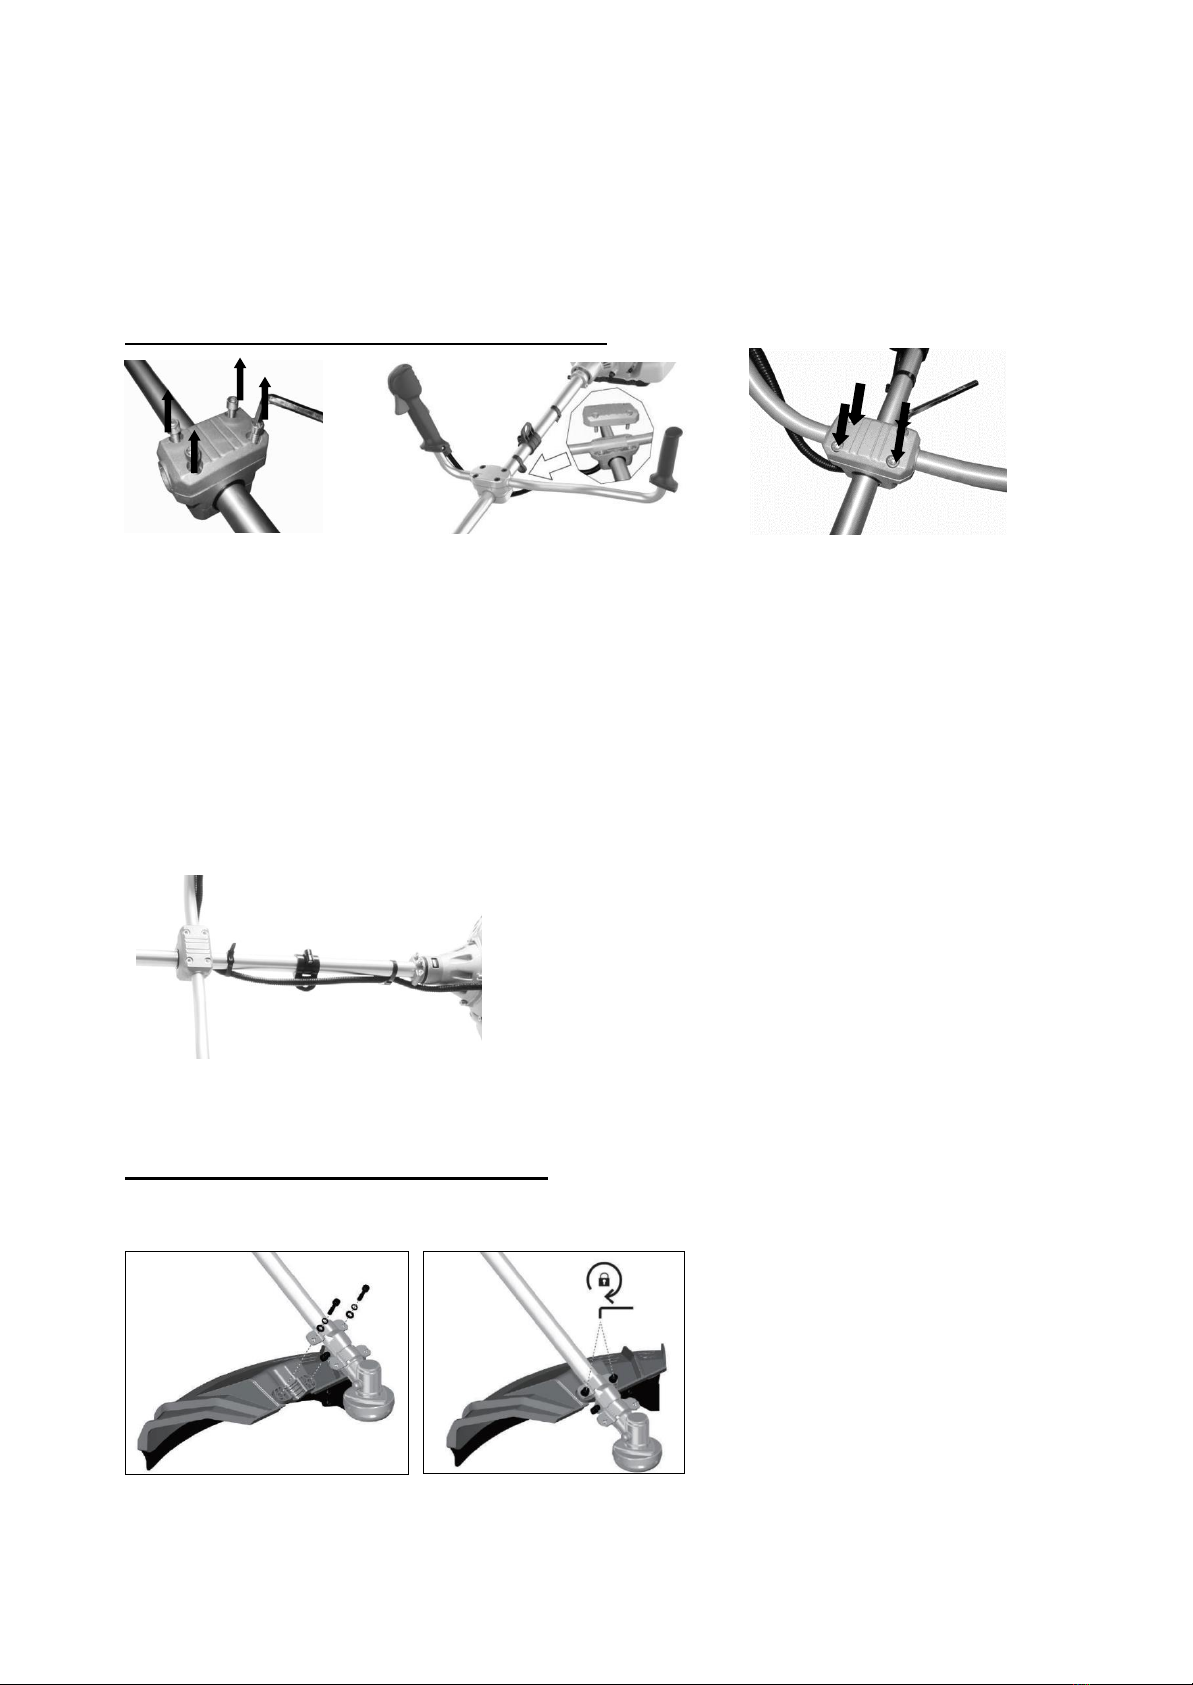
Assembly of the handle (Fig.1-1,1-2,1-3)
Fig.1-1 Fig.1-2 Fig.1-3
1) Remove the screws infixing device and remove the upper cover.(fig.1-1)
2) Place the handle in position and assemble the upper cover.(fig.1-2)
3) Assemble and tighten the screw.(fig.1-3)
CAUTION!
Do not tighten the screws until you have set the handle in optimal working position. Please
always adjust the handle position with full assembled accessories.
The black cable tie can be used to fix the throttle cable to the metal tube. (Fig.2)
Fig.2
Assembly the guard (Fig.3-1, Fig.3-2)
1) Place the guard on the fixture.(fig3-1)
2) Assemble and tighten the screws.(fig.3-2)
Fig.3-1 Fig.3-2

12 / 26
WARNING!
1. When using the cutting line head, the additional guard, with line cutting knife, must
always be fitted. (Fig.3-3,Fig.3-4)
Secure the additional guard (26) using the screw (B). (Fig.3-3)
Fig.3-3
2. Take off the additional guard .
Screw off the screw (B); (Fig. 3-3)
Push the clip(C), and pull out the additional guard. (Fig.3-4)
Fig.3-4
WARNING!
Please check the blade and output shaft after each adjustment or assembly, it must be
correctly assembled and running smoothly.
Wear protective gloves when handling the guard.
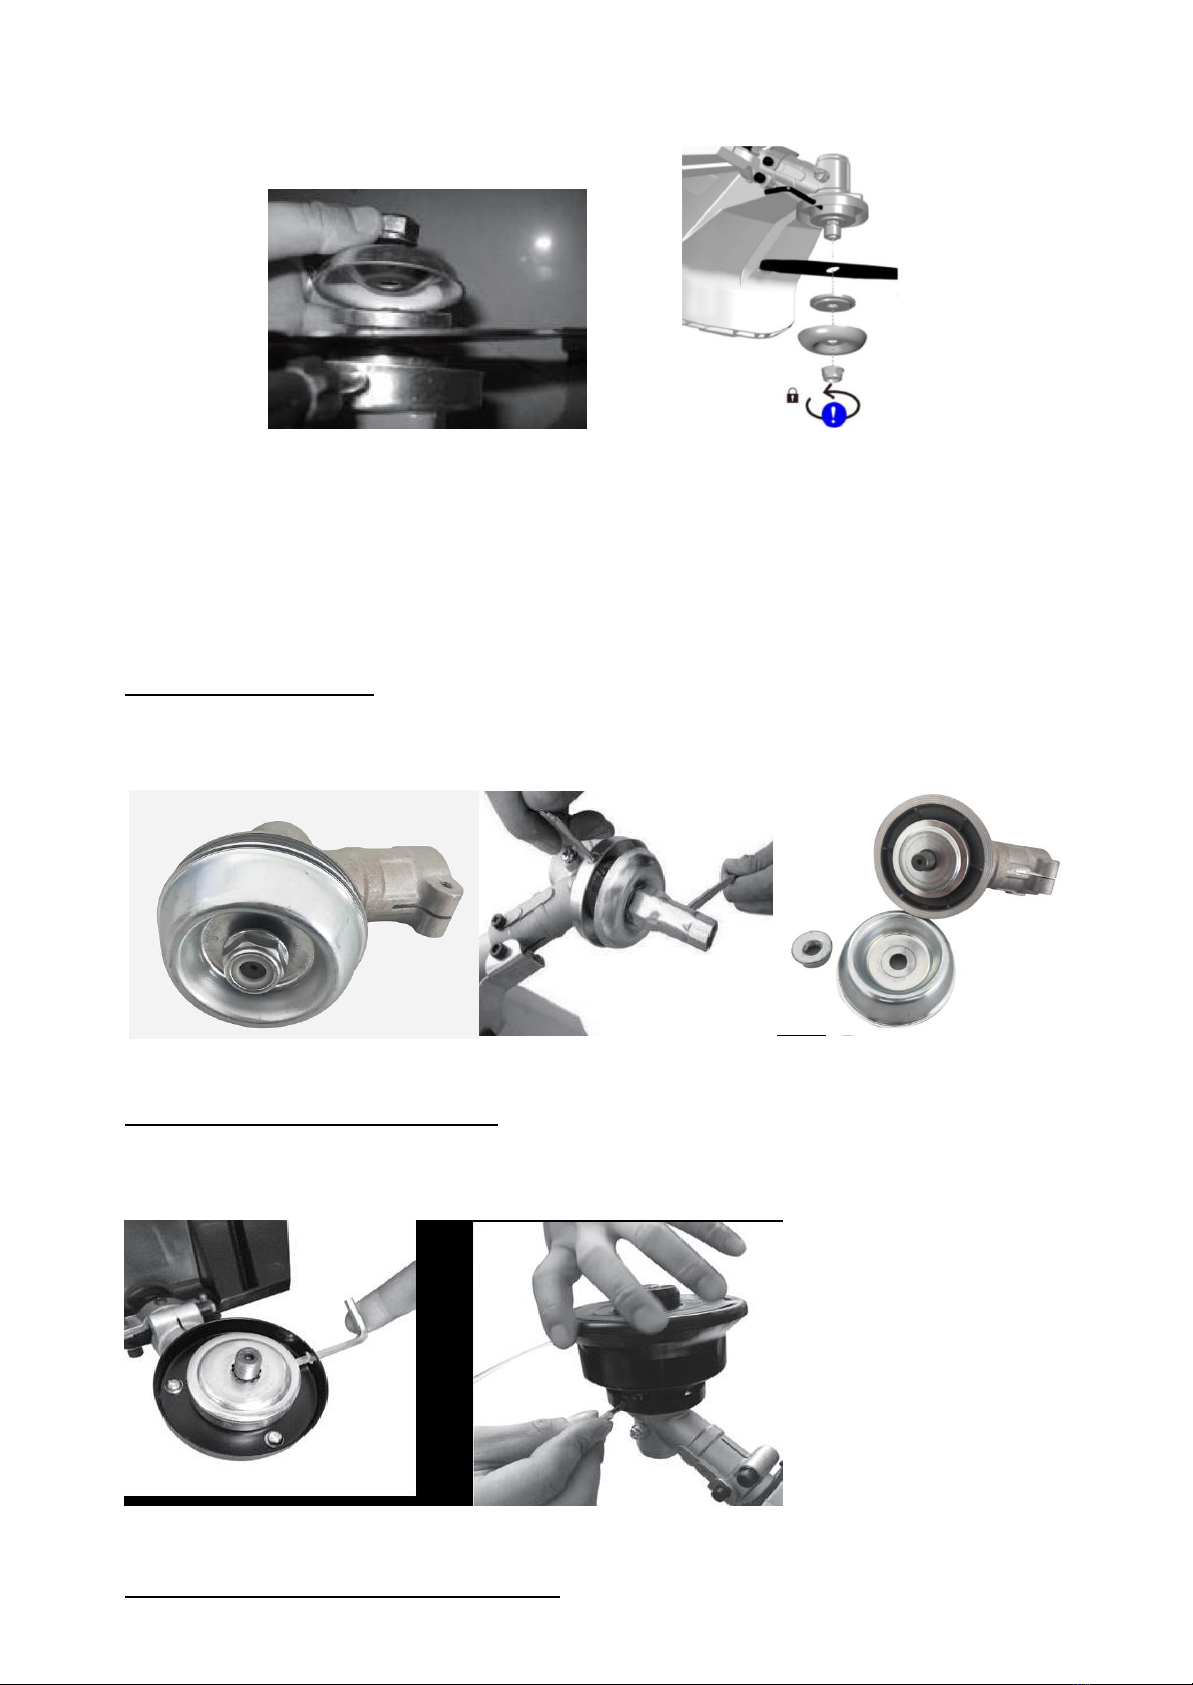
Fitting the 2T blade
Take the outer flange off after release the nut, then put the blade, outer flange, shield and
nut according to priority as below picture. Note the blade rotation direction needs be same
as below picture. Use screw driver to hold flange and tighten nut counter-clockwise,
ensure the nut is tightened enough.
.
Fig.4.1
Release blade (Fig.5)
C
16
13 / 26
Use screw driver to hold flange and release nut, the blade can be took off.
Fig.5-1 Fig.5-2
WARNING!
Please make sure the cutting head has been assembled correctly before use!
Nylon head
Release the nut(Fig.6)
Line up the two holes of flange and shield, use one screw driver to hold the flange as
below and turn the socket wrench clockwise, the nut will be released.
Fig.6
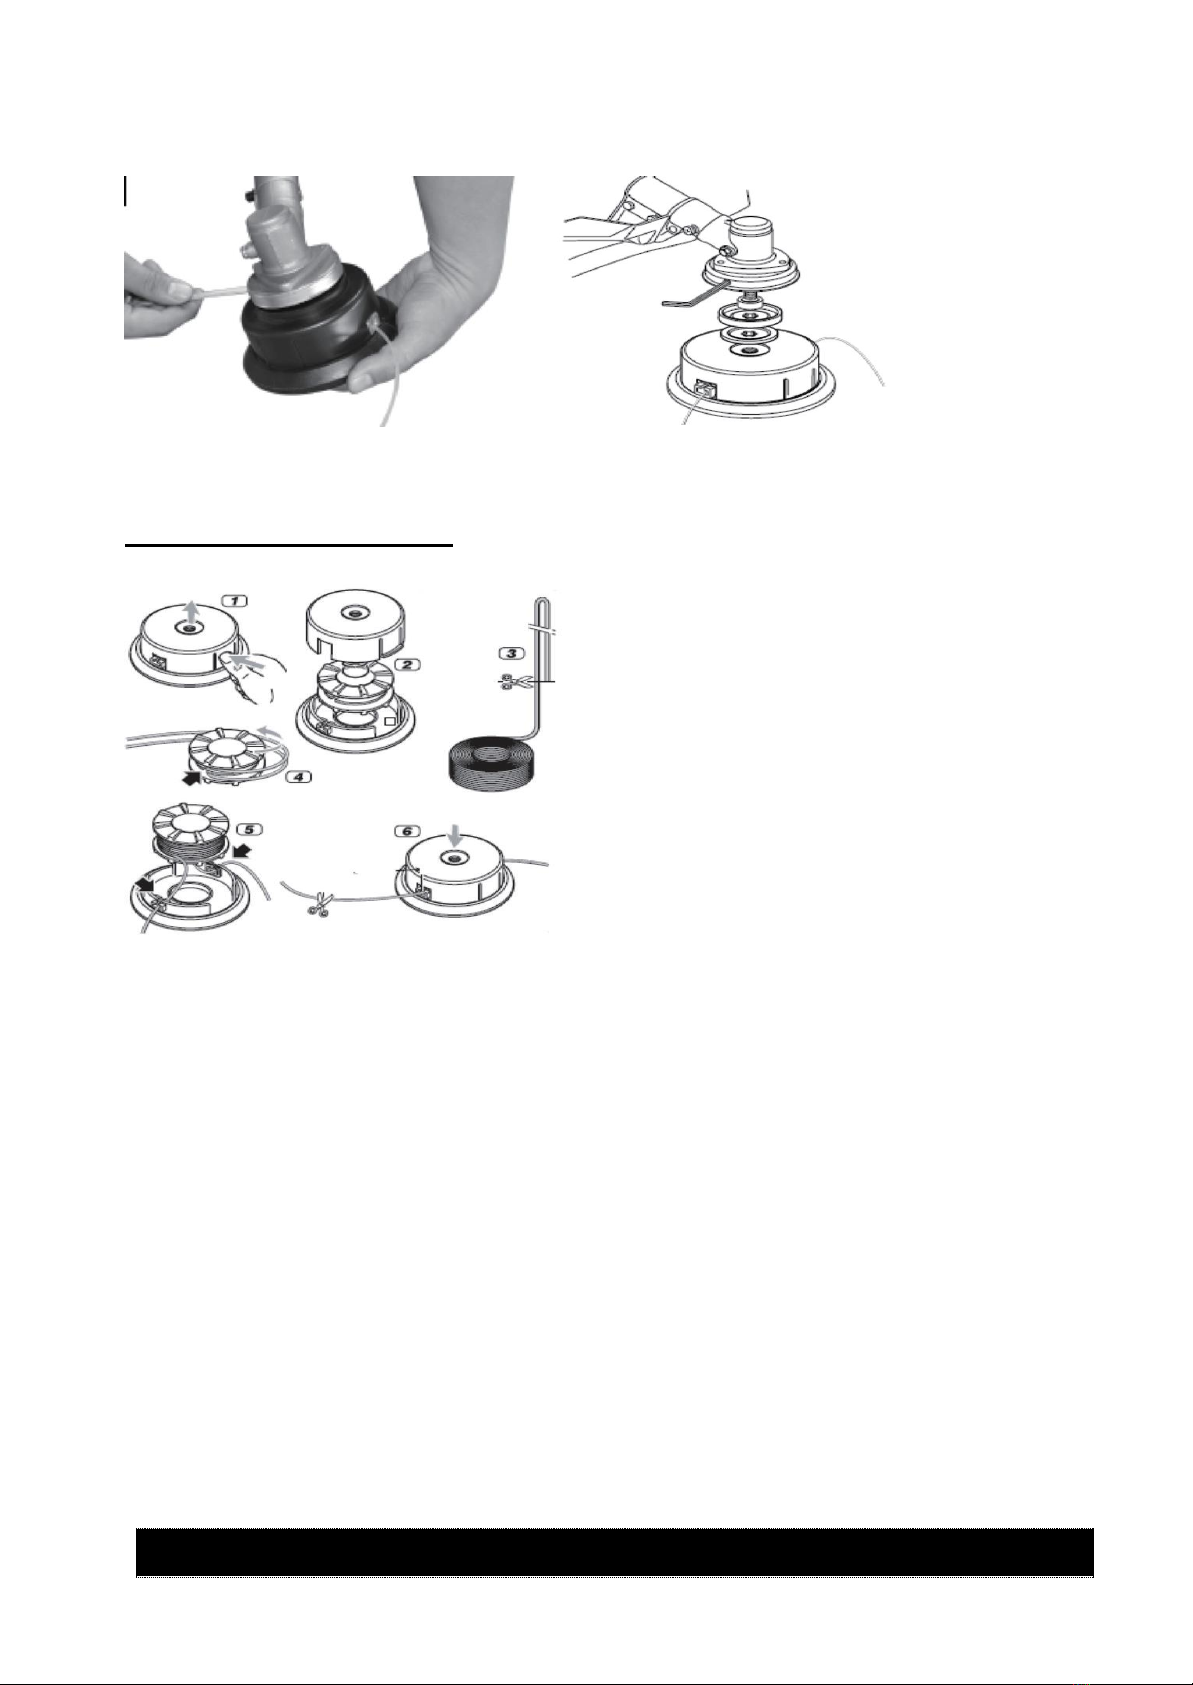
Fit the Nylon cutting head.(Fig.7)
Remove another shield after release the nut. Still hold the flange, take the Nylon cutting
head on the shaft and rotate counter-clockwise, the Nylon cutting head is fitted.
Fig.7
Release the Nylon cutting head.(Fig.8)
14 / 26
Use screw driver to hold flange and then rotate the Nylon cutting head clockwise till it is
well fixed, it will be replaced.
Fig.8
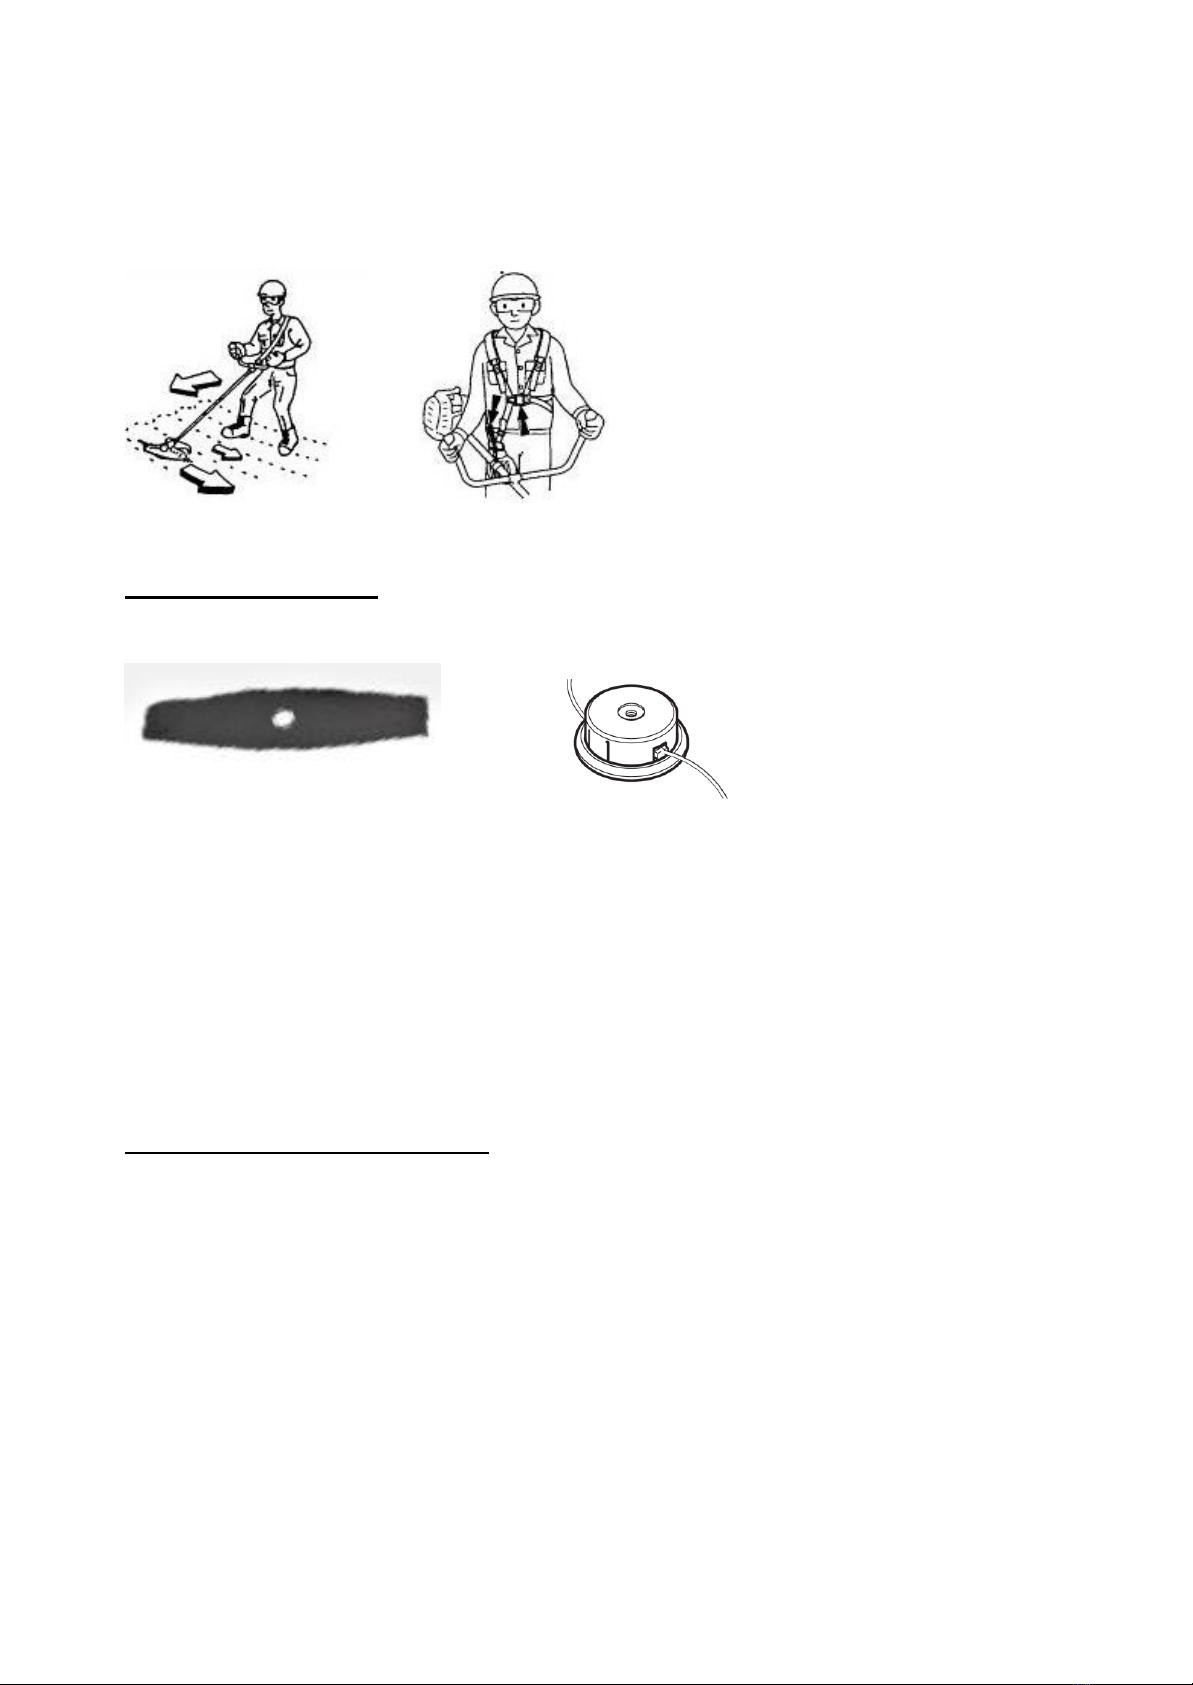
Replacing cutting line.(Fig.9)
Stop the engine, follow the sequence below.
Fig.9
WARNING!
Never use non-recommended cutting attachments and appropriate guards and their
location. The non approved cutting attachments may cause serous injure during working.
OPERATION

Before use
Please always read the instruction manual carefully and check the machine before
operating.
WARNING!
The brush cutter is fitted with a two-stroke engine, so no need fill oil separately. Fill
the oil mixed with fuel, please consult below section .
Check the cutting attachment, never use blades that are dull, cracked or damaged.
Make sure the handle and safety features are in good working order. Never use a machine
that lacks a part or has been modified outside its specifications.
The enclosures must be correctly fitted and undamaged before you start the machine.
WARNING!
Please always use quality gloves, foot, ear and eye protector. They should be with CE
mark and tested according to PPE (Person Protective Equipment) directive.
The poor equipments may reduce the protection and result in personal injury during
working.
Engine fuel
WARNING!
The brush cutter is fitted with a two-stroke engine; use fuel mixed with oil only.
Onlyfuel the machine in well-lit areas. Avoid fuel spillage. Never refuel the machine during
operation. Let the engine cool down for about two minutes before refueling.
Refueling must not be carried out near naked flames, control lamps or spark producing
electrical equipment such as electric tools, welders or sanders.
1. Make sure the machine is turned off, by turn the engine switch to the “off” position.
2. Check the fuel by a visual check, remove the fuel cap and reviewing the fuel level.
3. Fill unleaded fuel mixed with oil from an approved fuel container into the fuel tank,
because of fuel expands, please fill the tank to the neck of tank only.
4. Turn the fuel cap clockwise to assemble it in position.
WARNING
Do not refill fuel while engine is running or hot.
Make sure fuel is not leaking.
Use quality two-stroke engine oil and make a mixture of 40 parts petrol to one part oil
only (4% oil mixed in fuel).
Never use two-stroke oil intended for water-cooled engines.
Never use oil intended for four-stroke engines.
A poor oil quality and/or too high oil/fuel ratio may jeopardize function and decrease the
life time of catalytic converters.
Use at least 90 octane fuel. We recommend unleaded petrol as it leaves fewer residues
inside the motor and on the ignition plug, and prolongs thelife cycle of the exhaust system.
Never use old or dirty petrol or oil/petrol mixtures. Avoid contamination with dirt or water
15 / 26

16 / 26
in the tank. Occasionally ignition knocking or clanging can be heard with high loads. This
is normal and no cause for alarm. If ignition knocking or clanging occurs during normal
loads and with constant motor speed you should change the petrol quality. If this does not
solve the problem contact an authorized specialist dealer.
When working at continuous high revs a higher octane rating is recommended.
Check the air filter
Check the air filter to be sure it is clean and in good condition.
Loosen the air filter cover screw, and remove the air filter cover, then check the air filter.
Clean or replace the air filter if necessary.
Starting the engine
WARNING!
The cutting attachment may start to move when the engine is started. Make sure the
attachment can not come into contact with any object.
Make sure that no unauthorized persons are in the working area, otherwise there is a
risk of serious personal injury.
1) Press the fuel pump several times until it fills with fuel. (fig.12)
Fig.12
2) Turn the engine switch to the ”I “position.(Fig.13)
Fig.13
Press the throttle trigger, throttle trigger lockout and lock pin together to lock the trigger .
Attention:the switch is auto-returned switch, it would always stays in “I” position,
press it to “O” manually if needed.
3) Move the choke lever to position. (fig.14)

17 / 26
Fig.14
Close the choke: Start position
4) Slowly pull the recoil starter until it pops. (fig.15)
Fig.15
Attention: Check and make sure cutting attachment always stops when the engine
is idling.
Note: when the engine is started for the first time. It will require a number of
attempts
to
start until the fuel travelled from the tank to the
motor
.
5) Turn the choke lever to the run position.(Fig.16)
Fig.16
6) Pull the starter quickly until the engine starts.
7) After starting the engine, let the engine run for 2 to 3 minutes so that it warms up
before subjecting it to any load.
8) Hot start: When the machine is hot, stays the choke level in “Start position”, the user
can start the machine by repeating steps of 1,2,5,6.
Under the following conditions the machine must be stopped:

18 / 26
1. When the motor rotary speed changes
2. When sparks occur
3. When blade are damaged
4. In case of misfire
5. In case of high vibration
6. When flames or smoke appear
7. In rain or stormy weather
WARNING!
Check the cutting attachment always stops when the engine is idling.
Fit the bet. (Fig.17)
According to picture showing, fit the belt well. Stretch the belt and as below pic, and then
fit the belt on shoulder,
Fig.17-1
The design and type of carry strap may vary..
•Put on the shoulder strap (1).
•Adjust the length of the belt so that the spring hook (2)
is roughly a hand’s width below your right hip.
PLEASE NOTE: This carry strap has a safety device
allowing you to immediately disconnect the strap from
the machine in an emergency. To do so, pull forcefully
on the red pull tab (3) on the strap. This disconnects
the strap from the holding fixture immediately.
NOTE: Never start the motor with the carry strap attached to the machine!
Cutting
During cutting, please don’t keep the running speed just above clutch engagement speed.
Any prolonged use at low speed is likely to cause premature wear of the clutch.
On the other hand, the user should not keep the engine speed in max speed after cutting.
Any prolonged use at the highest speed is likely to reduce lifetime of engine.
Cut the grass from right to left. (fig.18)
CAUTION!
19 / 26
In an emergency, stop the engine by moving the engine switch to the stop position.
If the cutting attachment strikes stone or other debris, stop the engine and check whether
something has been damaged and the cutting attachment is still secure.
If wet grass or branches are remain in the cutting attachment, stop the engine and remove
them.
Fig.18
Cutting attachements:
Attention! Use only original cutting devices from the Manufacturer.
Fig.19
WARNING!
In consideration that the selection, application and usage of the accessory to be
fitted in the variety of possible usage are actions made solely by the user, the
latter assumes responsibility for damages of any kind due to such actions. When
in doubt or if lacking knowledge of the specificity of each accessory, contact
specialised gardening centre.
Kickback and Related Warnings
Kickback is a sudden reaction to a pinched or snagged rotating blade. Pinching or
snagging causes rapid stalling of the rotating accessory which in turn causes the
uncontrolled power tool to be forced in the direction opposite of the accessory’s rotation
at the point of the binding.
For example, if a blade is snagged or pinched by the stone, the edge of the blade that is
entering into the pinch point can dig into the surface of the material causing the blade to
climb out or kick out. The blade may either jump toward or away from the operator,
depending on direction of the blade’s movement at the point of pinching.
Kickback is the result of power tool misuse and/or incorrect operating procedures or
conditions and can be avoided by taking proper precautions as given below.

20 / 26
a) Maintain a firm grip on the tool and position your body and arm to allow you to
resist kick back forces.
b) Never place your hand near the rotating accessory. Accessory may kick back over
your hand.
c) Use special care when working corners, sharp edges etc. Avoid bouncing and
snagging the accessory. Corners, sharp edges or bouncing have a tendency to snag
the rotating accessory and cause loss of control or kickback.
Extending the cutting line
WARNING: Do not use any kind of metal wire or metal wire encased in plastic in the
cutting head. This may cause serious injuries to the user.
To extend the cutting line run the motor at full speed and tap the cutting head on the
ground. This will automatically extend the line. The cord cutter under the outer guard will
cut the line to the appropriate length. (fig.20)
Fig.20
Stopping the engine
1. Release the throttle trigger and let it run idling for a few minutes.
2. Switch off the engine by moving the engine switch to the stop position.
The cutting attachment may cause an accident if it continues to turn after the engine has
stopped or after the engine switch has been released. When the unit has stopped, check
carefully that the cutting attachment has stopped turning before putting the unit down.
MAINTENANCE
Good maintenance is essential for safe, economical and trouble-free operation. It will also
help reduce air pollution.
The purpose of the maintenance and adjustment schedule is to keep the machine in
the best operating condition.
Turn off the engine before performing any maintenance. If the engine must be run, make
sure the area is well ventilated. The exhaust contains poisonous carbon monoxide gas.
This manual suits for next models
1
Table of contents


