BORNIAK BBDST-70 User manual

Manufacturer:
ZUT BORNIAK Dawid Szurlej
ul. Aleja Niepodlełości 41,
78-449 Borne Sulinowo
NIP: PL 8992343025
Tel: (+48) 94 373 00 02
E-mail: info@borniak.pl
Web: www.borniak.pl
User manual for Electric Smokers with
smoke generator for domestic use
Before using the device,
read the instructions.
MANUAL FOR SMOKERS: BBDST-70, BBDST-150, UWDT-70, UWDT-150
I. Safety requirements and precautions
II. Terms of use
III. Technical parameters
IV. Composition of the set
V. Construction and description of the operation
VI. Operation of the electronic control panel
VII. Assembly and installation
VIII. First start
IX. Maintenance
X. Regulations
XI. Vorschriften
The sections included in this manual
EN

Page 2
I. Safety requirements and precautions
• Device should be powered from the mains with an alternating current of 220 - 240V.
• Internal installation must have a 16A fuse.
• Device must be unconditionally connected to the socket outlet with earthing contact.
• If the power cord or plug is damaged, to avoid danger, it should be replaced at the
manufacturer, or by a specialised repair shop, or by a qualied electrician.
• Before starting cleaning the device, disconnect the power supply.
• Smoke generator can only be connected to the power supply after it has been installed in
the device adapted to its assembly.
• If you use an electric extension cord, its current load should be at least as much as the rated
load of the device.
• If you use an electric extension cord, make sure it has an ecient earthing contact (ground).
• Lay the power cords in such a way that they are not crushed, prevent it against pulling or
stumbling over by children.
• If you use electric extension cords, they must be adapted for outdoor use and should be
labelled "for outdoor use".
• The socket outlet from which the device is to be powered should be protected with an earth
leakage circuit breaker with Ir < or = 30 mA.
• Power cords of the device should be arranged in such a way that they are not in contact with
hot parts of the housing.
• The smoker is intended for outdoor use but it must not be exposed to atmospheric
precipitation and strong gusts of wind. The optimal solution is to work in roofed, sheltered
and, at the same time, ventilated places.
• Do not use the device in closed rooms, in case of use under a roof ensure sucient
ventilation.
• Do not use the device near gasoline or other ammable liquids, gases or places where
ammable vapours may be present.
• Do not use the device near ammable objects.
• Do not use the device when it comes in contact with parts, objects made of materials not
resistant to high temperature.
• It is recommended to put an extinguisher near the device. Information on the proper size
and type of the extinguisher can be obtained from the local authorities.
• Do not connect the device until it has been fully assembled.
• Do not move the device before removing all moving objects inside the smoker and the
smoke generator.
• Do not connect the device to the chimney, ventilation grille or other wires that may cause
forced air draft.
• Do not place the device next to the wall, keep a minimum distance of 5 cm.

Page 3
• When using parts, they can get very hot. There is a risk of burns when carelessly handled.
• Do not touch hot surfaces, use suitable gloves.
• Children and pets must not approach the device unattended, there may be a risk of burns.
• Before cleaning the device, allow the device to cool down.
• Do not use gasoline, kerosene, spirits or other ammable substances to clean the device.
• Do not allow the device to be ooded with water (e.g. during cleaning or by leaving the
device uncovered outside during atmospheric precipitation).
• The smoke generator can only work with smoking unit recommended by the manufacturer.
• Using accessories not recommended by the manufacturer may result in injury or damage to
the device for which the manufacturer is not responsible.
• Be careful with sharp edges when assembling and disassembling the device.
• Do not use the device contrary to its intended use.
• The device is intended for home use.
• Do not leave the device switched on after nishing smoking.
• The device should be inaccessible to animals.
• Do not allow children to use the device without strict surveillance and care.
• This device is not intended for use by persons (including children) with limited physical,
sensory, or mental capabilities, or insucient knowledge and experience.
• Children should not have access to the device.
• Do not use the device contrary to its intended use.
• The devices require strict surveillance during use.
Please read the above notes and tips,
it will ensure safe and comfortable work
with your new device.

Page 4
II. Terms of use
• Do not use the smoker as an oven (do not use high temperatures for a long time).
• Do not leave the device unattended.
• Do not exceed the maximum temperature.
• Do not use damaged electric cables.
• Do not use the smoker during rain, strong wind or storm.
• Do not use the smoker near ammable substances.
• It is not recommended to wear loose clothing or untied hair.
• Do not move the device during operation.
• Do not use in closed rooms, only for outdoor use.
• Do not put the device in a place accessible to children or animals.
• Do not touch hot components to avoid burns, it is recommended to use gloves protecting
against high temperature.
• Do not use the packaging to cover the device.
• It is mandatory to connect the device to a grounded electrical outlet, an extension cord.
• Protect against rain and water access.
• After each use, switch off the device from mains / power supply if it is not used.
• Thoroughly clean the smoker after each use.
• Do not cover or put anything on it when the device is in use.
• Empty the bowl for ash and fat every 2 - 3 hours and ll it with fresh water.
• The socket outlet from which the device is to be powered should be protected with an earth
leakage circuit breaker with Ir < or = 30 mA
• Do not place the device next to the wall, keep a minimum distance of 5 cm.
• When smoking fatty foods (and when there is a risk of fat melting), protect the drip tray to
prevent fat from dripping onto it - it is best to use an additional metal tray where fat can
collect. The drip pan should be inserted at least on the second shelf, counting from the
bottom.
If you have questions or concerns about using
Borniak products, we encourage you to contact us.
You can find contact information on the website www.borniak.com

Page 5
III. Technical parameters
Model/Typ
Rated voltage 230V 230V 230V 230V 230V
Power 615W 1115W 1515W 2015W 115W
Power of the
chamber burner 500W 1000W 1400W 1900W 110W
Fuse 8A (1,25A) 10A (1,25A) 8A (1,25A) 10A (1,25A) 1,25 A
Chamber
capacity 70L 70L 150L 150L 2L
Maximum
temperature 120°C 150°C 120°C 150°C -
The Degree of
the housing
tightness
IP20
TECHNICAL PARAMETERS OF THE SMOKER
Width [mm] 630 720 360
Depth [mm] 400 520 180
Height [mm] 1040 1220 250
OVERALL DIMENSIONS (EXTERNAL)
Width [mm] 400 490 -
Depth [mm] 300 420 -
Height [mm] 580 755 -
DIMENSIONS OF THE CHAMBER (INTERNAL)
630
*
(720**)
440* (530**)
360* (480**)
400* (520**)
825* (990**)
970* (1135**)
* Typ 70
** Typ 150

Page 6
IV. Composition of the set
MODEL: UWDT/BBDST:
SMOKE GENERATOR GD-01/GDS-01:
Smoker chamber
Smoke generator
Control panel Drip tray Condenser
Adjustable legs
4 pcs.
Door handle
+ screws 2 pcs.
Carrying handles
2 pcs.
Water bowl
2 pcs.
Chimney with
an air damper
Illustrative drawings do not reect the actual dimensions of the parts.
* the plug type depends on the distribution country
** type of product and quantity dependent on the set
Power cord
EU* - C13
GN ½ tray
(only BBQ version)
Crossbars for
hanging 3 pcs.
A ( 10 : 1 )
A
Cover for
the generator
Wood chips 2x2L
Smoker rack** Smoking hooks** Power cord
C12 - C13
Power cord
EU* - C13
Wood chips 3x2L

Page 7
V. Construction and description of the operation
1. Lid
2. Wood chips hopper
3. Feeder and burner ON switch
4. Fuse
5. Power cord
6. Burner (heater)
7. Sawdust feeder
8. Latch
9. Burner cover
10. Air shutter
SMOKE GENERATOR
After switching on the smoke generator, the
feeder (7) starts to rotate, at the same time
the burner (6) begins to heat.
The feeder uniformly transports chips from
the storage tank (2) to the burner, where
they start to smoulder. Smouldering chips
are pushed through the entire length of the
burner (6) where at the end they fall into a
container lled with water.
8
9
7
6
4
1
5
3
2
10
Using a smoker does not require
any special skills, and the perfect
smoking effect is achieved with
a minimum of involvement.

Page 8
SMOKER
The smoke generator (10) causes slow and even smoke generation. A chimney with a bae (1)
at the top of the smoker regulates the smoke density in the chamber. A burner with a radiator
(7) is installed in the main chamber.
Set the desired temperature in the chamber on the panel (3). The burner switches on depending
on the needs and maintains the desired temperature. The condenser (8) is used to protect the
smoked meats against dripping of smoke condensate. It should be cleaned after each use of
the smoker. The drip tray (4) protects the smoking unit burner and the generator against the
juice from the smoked meats.
In the smoking unit there are two bowls which are lled halfway with water and one is placed
under the generator burner, the other under the drip tray opening (4). The rst bowl is used to
extinguish the falling chips, the second one is used to collect the juices from smoked meats.
The ambient temperature and wind have a large impact on the operating conditions of the
device. In unfavourable atmospheric conditions, the chamber heating time may increase. It is
advisable to use an independent thermometer to measure the temperature inside the smoked
product. The consumption of materials for the production of smoke is small - for about 1 hour
about 250ml of smoking chips.
One generator charge of about 2l is enough for 6 to 8 hours of operation.
1
2
3
4
5
10
6
7
8
9
1. Exhaust chimney with a bae
2. Carrying handle
3. Electronic control panel
4. Drip tray
5. Door with magnetic closing
6. Temperature measurement probe
7. Burner
8. Condenser
9. Adjustable legs
10. Smoke generator
Reminder on the rules of use
When smoking fatty foods (and when there is a risk of fat melting), protect the drip tray so that
fat does not drip onto it - it is best to use an additional metal bowl where fat may accumulate.
The fat pan should be placed at least on the second shelf, counting from the bottom

Page 9
1. Time controller display
2. Function keys
3. Temperature controller display
4. Information lamps for display (1)
5. Knob for temperature setting
6. Dryer power socket
7. Smoke generator power socket
8. Main switch
9. Fuse
10. Electrical connector - connection to the
chamber
11. Power socket - connection to the power
supply
Connection:
Before connecting the power cables, connect
the panel to the smoker in accordance with
the instructions from chapter VII Assembly
and installation. The socket (11) is used
for connecting the panel with the smoking
chamber. Connect the dryer to the dryer’s
power socket (6) (optional accessories not
included with the device). Connect the smoke
generator to the generator power socket (7).
After connecting the socket (6) [optional]
and socket (7), connect the power cord to the
socket (11).
Description of the operation:
After connecting the cables, start the device
with the button (8).
Turn on the heat:
• Start the control panel with the button (8),
• Press (2) on the control panel.
The lamp of heating function
button will light up. The heating function is
switched on.
Turn on the smoke generator:
• Before switching on, make sure that the
generator is positioned according to the
instructions from chapter VII Assembly and
installation.
• Turn on the power button on the smoke
generator rst
• Start the control panel with the button (8),
• Press (2) on the control panel.
The lamp of smoke function
button will light up. The heating function is
switched on.
Turn on the dryer (optional):
• Before switching on, make sure that
the dryer is connected to the smoker
in accordance with the instructions.
(Remember: the dryer cannot be connected
with a smokegenerator!)
• Start the control panel with the button (8),
Press (2) on the control panel.
The lamp of drying function
button will light up. The heating function is
switched on.
IMPORTANT: When the dryer is turned on, the
smoke generator is turned off.
6
FRONT
BACK
7
8
1
2
3
5
10
9
11
VI. Digital Control Panel Operation
4

Page 10
Change target temperature:
• Press the knob
• Set the desired temperature
• Press the knob again
After setting the temperature correctly, you will hear the sound.
PRESS SET PRESS
Setting the time:
• Keep the button (2) pressed for 2s, or or
• The rst two elds for setting the hours
will start ashing on the display (1).
• Use the rotary knob (5) to set the appropriate value and conrm by pressing the knob.
•
• The next two elds to set the minutes
will start ashing on the display.
• Use the rotary knob (5) to set the appropriate value and conrm by pressing the knob.
After switching on or or the time for a specic
function is counted down, the lamp starts ashing. When the countdown ends, the device
turns off.
The illuminated symbol (4) shows the function for which the time is shown on the display (1).
Turn the knob (5) to change the lit icon (4) and the operating time shown on the display (1).
Pressing - turns the heater on / off
Press for approx. 2 seconds - time setting
The lamp is on - heating is on
The lamp ashes - the heater is running with a time countdown
Pressing - turns on/off the smoke generator
Press for approx. 2 seconds - time setting
The lamp is on - the smoke generator is on
The lamp ashes - the smoke generator is running with a countdown
Pressing - turns dryer on/off
press for approx. 2 seconds - time setting
Lamp is on - dryer is on
The lamp ashes - the dryer is turned on with the countdown of time
TIME
Heating Smoke generator Dryer
Description of the function keys:

Page 11
Turning off time:
Follow the instruction to set the time. Set the value to 00:00 (--:--)
• The temperature in the chamber cannot be lower than the atmospheric temperature.
• If we do not use the cold smoking adapter, the temperature in the chamber may rise to 70 °C
depending on the model of the smoker and weather conditions. This is because the smok
generator produces heat while burning the wood chips, which raises the temperature inside
the device.
• When the set temperature is reached for the rst time, it is possible to exceed it by 10–15%.
It is not a malfunction of the controller.
• At high temperatures, above 100 ° C, it may take longer to reach the set temperature due to
the slowing down of the heating process.
• Fat can melt at high temperatures. Use an extra bowl (do not place this on top of the separator
bowl) to prevent excess fat from dripping onto the separator bowl.
COMMENTS
Error: damaged or wrong type of temperature probe. Turn off
the device. Disconnect the power cord from the power supply.
The error should be reported to the seller or service.
Error: temperature probe not detected. Turn off the device.
Disconnect the power cord from the power supply. Check the
connection between the cabinet and the panel. If the error
persists, report it to the seller or service.
The lower right dot indicates the operation of the heater.
Light’s On - the heater works constantly
Blinking - the heater is working cyclically
Light’s Off - the heater is not working
Continuous acoustic signal means that the limit temperature
is exceeded. Be careful it may be caused by the ame!
Remember: When preparing fatty smoked meats, place an
additional bowl for the dripping fat.
Note:
The time can be set for each of the three functions. Heating, smoke generator or dryer. If the
time is not set, the display (1) will show how much time has passed since the function was
enabled.
Electronic temperature controller operates on the principle of reaching the desired
temperature by cycling on and off the heating element. This provides a stable temperature.

Page 12
WsunąćWsunąć
WsunąćWsunąć
VII. Assembly and installation
1. After taking out of the carton, remove unnecessary packaging
and elements protecting the product and read the instructions.
2. Screw two handles to carry the device.
3. Screw the handle to open the door.

Page 13
WsunąćWsunąć
WsunąćWsunąć
WsunąćWsunąć
WsunąćWsunąć
Nałożyć i Nałożyć i
zaczepićzaczepić
WsunąćWsunąć
4. Place the device in a suitable place, slightly tilting the smoking
unit, insert the legs into the slots on the bottom and adjust
them so that the device reaches the level.
5. Insert the protruding heating element of the smoke generator
into the side hole on the left side of the smoker. Tilt the
generator slightly to put it on the latches.
6. Insert the chimney into the hole at the top of the smoker. Pay
attention to the correct position of the throttle valve.
7. Insert the condenser under the chimney.
8. Insert the drip tray onto the bottom rack.
9. Mount the electronic control panel - see the description p. 14.
WsunąćWsunąć
WsunąćWsunąć
WkręcićWkręcić
Nałożyć i Nałożyć i
zaczepićzaczepić
WsunąćWsunąć
WkręcićWkręcić
Wsunąć i Wsunąć i
dokręcićdokręcić
WsunąćWsunąć
WsunąćWsunąć
When smoking very fatty foods on the grates, please use an additional drip tray or metal
bowl over the separating plate to catch melting fat to prevent a fat re. Position the tray in
the second slot from the bottom. With the size of the bowl, make sure there is sucient air
circulation on all sides. Alternatively, smoke the food directly in a bowl. Make sure the two
bowls under the divider are emptied when needed. There should always be some water in the
bowl for the ashes.
PLEASE NOTE THE FOLLOWING SAFETY INFORMATION

Page 14
Embed electronic panel on the left side of the
smoker having regard to protruding screws
from the wall - they should enter into the
corresponding holes (point. A) of the panel.
Move the electronic panel to the left so that the
connectors on the panel and the smoker are
joined.
Finally, tighten the holding and locking screws
in the appropriate places (point B).
A
B
VIII. First start
Fill the bowls halfway with water and place them under the generator burner - under the drip
tray openings. Fill the generator hopper with the supplied chips and slightly open the air
damper at the top of the smoker. The bowls should be cleaned and lled with fresh water
every 2 - 4 hours.
Connect the generator and the smoker to 230V mains with protective grounding. Switch to
star t the smoke generator and the smoking unit, on the electronic panel set the temperature
to approx. 80°C (see: Operation of the electronic control panel)
Heat the smoker for about 2 hours. This will reduce technological odours and ensure initial
avouring of the device. After heating, you can start the proper smoking.
NOTE: Fill the storage tank of the smoke generator only with wood chips indicated by the
device manufacturer.
Warm smoking (30°C - 60°C) - With only the smoke generator on, we can conduct warm
smoking. In unfavorable atmospheric conditions, we can turn on the smoking unit by
setting
the right temperature on the temperature controller.
Hot smoking (60°C - 90°C) - Turn on the generator and the smoking unit, and set the
electronic
panel to the desired temperature.

Page 15
IX. Maintenance
After nishing smoking, disconnect the generator and the smoking unit from the power
supply. It is necessary to clean the smoker: it is best to use water with washing-up liquid. The
interior of the smoker should have residue after smoking, it should not be scrubbed or washed
with caustic agents. If there is fat or other deposits on the housing, wipe them gently with a
damp cloth.
The shutter and the bowl in which fat and ash are collected, must be kept clean because
excess fat may ignite.
NOTE: When smoking excess fat falling very fat products, control on the shutter, it must be
removed unconditionally.
NOTE: During the operation of the device, carbon deposit forms on the part of the sawdust
feeder. It should be removed after 8 hours of the generator operation, using a scraper, pliers or
other blunt tool. Failure to remove carbon deposits can result in poor operation of the device
and, in the worst case, its damage.
When cleaning, make sure that you do not use any cleaning agents containing chlorine,
bleaching agents, or strong acidic or alkaline agents. Before using a cleaning agent, we
recommend that you always check the compatibility on the surface to be cleaned in an
invisible place.

Page 16
X. Questions and answers
higher than set on the thermostat.
When working in an empty chamber, the air stream passes through the centre where the tip of
the thermometer is located. Temperatures should be the same when working with the charge,
which causes mixing of warm air and its even distribution in the whole chamber. Temperature
differences may also be affected by atmospheric conditions.
The temperature in the chamber increases after turning off the thermostat due to inertia.So
the heating element releases heat accumulated in itself after turning off for a certain time.
For stable operation of the device, it is recommended to place a bowl with water under the
generator burner. This improves the temperature stability inside the chamber.
The chips burn on the smoke generator burner.
Do not connect the smoker chimney outlet to chimneys, ventilation shafts or other extensions
of the smoke outlet due to the possibility of producing draft in the smoker, which can cause
wood chips to ignite. The only way that is acceptable for extending the smoke outlet, is to
apply a hood over the smoker so that smoke can be extracted from the smoker at its own
speed.
Igniting wood chips may cause accumulated carbon deposit on the feeder and unfavourable
weather conditions (e.g. wind gusts). Both these factors should be eliminated by removing
the carbon deposit and protecting the smoker from the gusts of wind or covering the air inlet
under the smoke generator.
Smoke is led outside at the bottom of the smoker or through the smoke generator.
The chimney is too closed, it should be tilted enough to let the smoke come out only through it.
There is no smoke escaping from the chimney.
No smoke is a sign that a ame has appeared on the smoke generator. Stop the smoke
generator immediately and put out the ame. The reason for this phenomenon may be the
connection of the smoker to chimney ues or gusts of wind.

Page 17
X. Warranty card
This warranty is effective for 24 months from the date of purchase. The warranty as
described herein shall only apply in the territory of the Republic of Poland.
TERMS OF WARRANTY:
1. ZUT BORNIAK guarantees the user ecient operation of the appliance provided its proper
installation, maintenance and operation, in accordance with the guidelines of this MANUAL.
2. ZUT BORNIAK takes responsibility for manufacturer's defects (i.e. in material or
workmanship) of the appliance for 24 months from the date of its selling.
3. The defects of products which shall arise during the warranty period will be removed in the
time not longer than 30 days from the day of returning it to the manufacturer.
4. The warranty ows only to the Buyer, i.e. a natural person, who purchases a moveable item
for a purpose different than conducting business activities or any professional activities.
(Journal of Laws of 2002, No 141, item 1176).
5. The defective appliance must be returned with its standard accessories, in its original
packaging.
6. When sending in your defective appliance for service, a valid Warranty Card, without any
traces of changes or interference, must be included.
7. Damage resulting from events such as: lightning strike, power surge in power lines,
mechanical impacts, res, ooding or other uncontrollable events beyond the Seller's
control, are not covered by this warranty.
8. The User shall deliver the defective product for service repair purposes at their own expense.
After the repair, the appliance shall be returned to its owner at the Manufacturer's expense.
9. It is recommended to contact the Manufacturer before sending in the defective appliance.
10. While sending the appliance to the Manufacturer, the User must include their contact
details, the return address, as well as a short description of the defect.
11. Liability of the Manufacturer is limited to the amount equal to the price of the defective
product.
12. Damages and missing goods in the case of orders delivered by Poczta Polska or courier
companies shall be dealt with only based on the report drawn up by the courier while
delivering the parcel.
Date of sale:
Proof of purchase No:
Seller’s signature: Stamp:
Device serial number:
This manual suits for next models
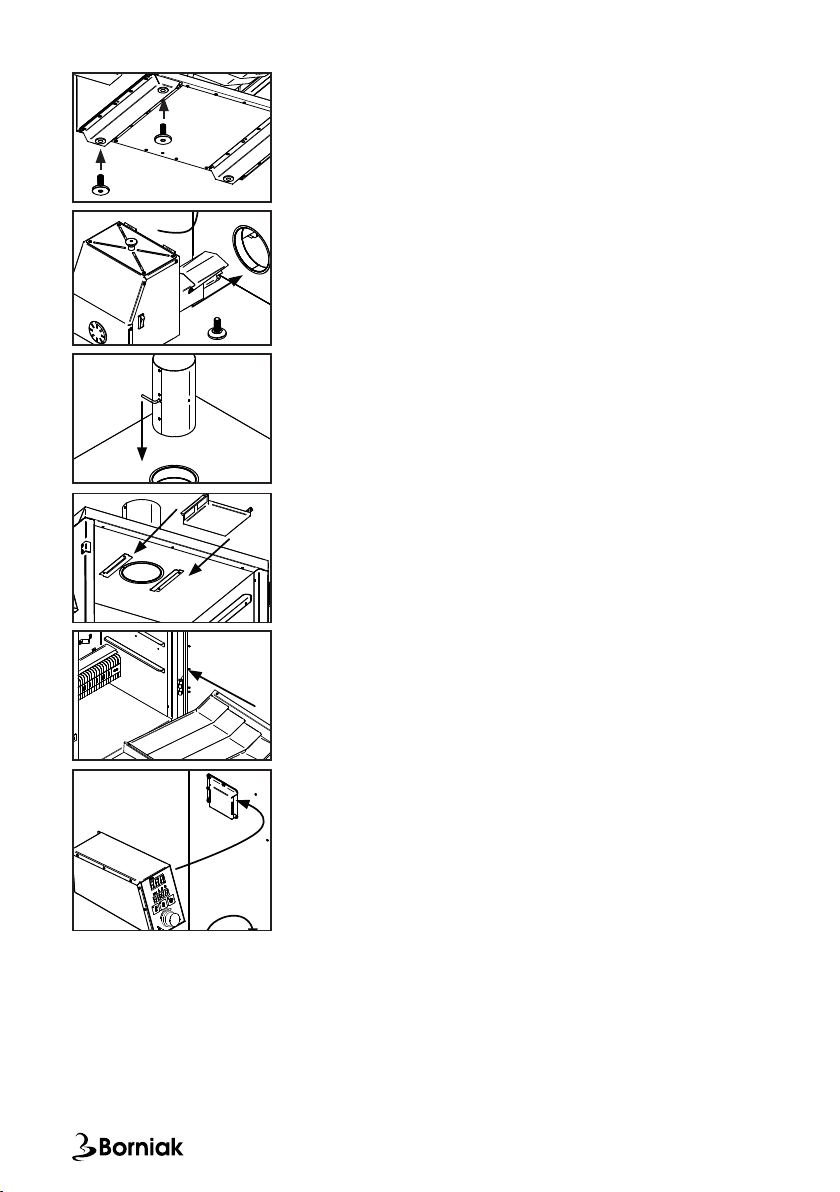
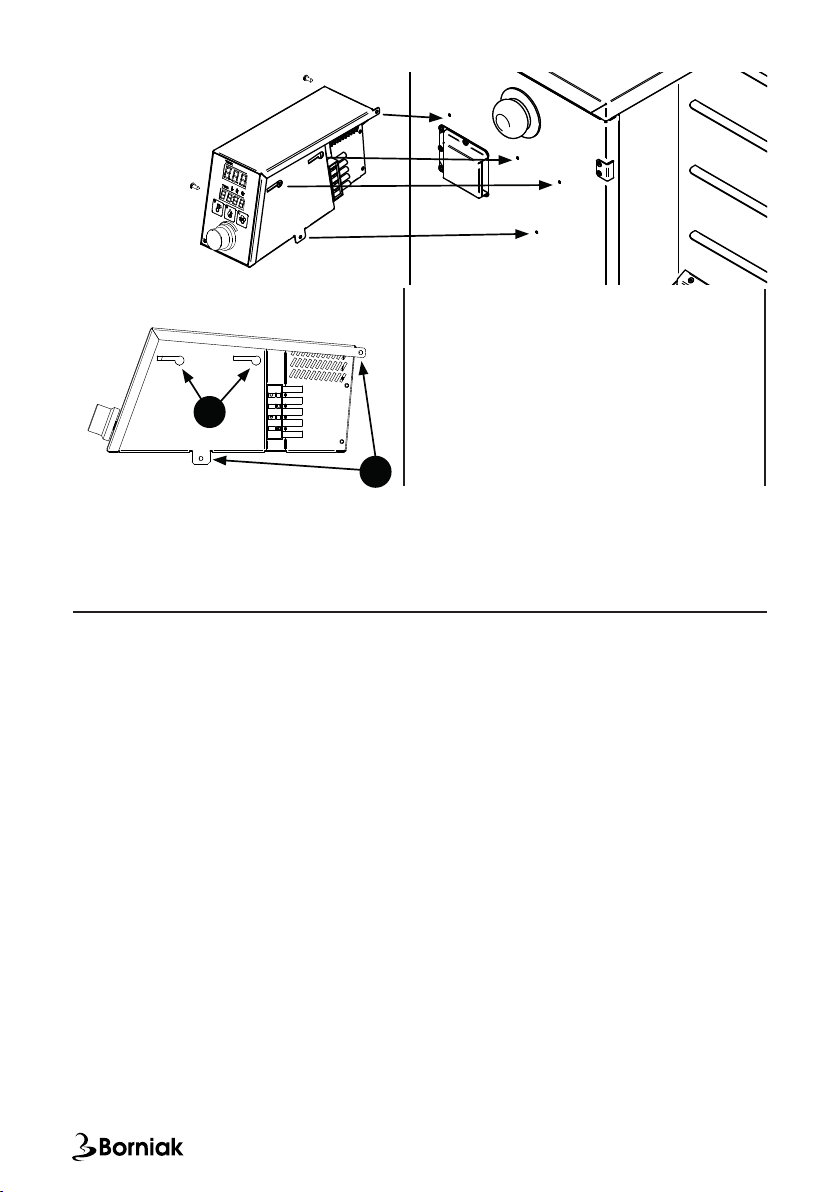
3
Table of contents
Other BORNIAK Smoker manuals
Popular Smoker manuals by other brands

Auber
Auber WS-1500DPMS user guide

Pit Boss
Pit Boss BLUE BLAZING 3 Series Assembly and operation

Masterbuilt
Masterbuilt 20070910 DIGITAL SMOKEHOUSE Assembly, care & use manual

Masterbuilt
Masterbuilt MB20073420 Get started

Ole Hickory Pits
Ole Hickory Pits UltraQue Installation & operating instructions

Cajun Injector
Cajun Injector Electric Smoker owner's manual