Bosch PS31 Assembly instructions

IMPORTANT: IMPORTANT : IMPORTANTE:
Read Before Using Lire avant usage Leer antes de usar
For English ersion ersion française ersión en español
See page 2 oir page 15 er la página 28
Operating/Safety Instructions
Consignes de fonctionnement/sécurité
Instrucciones de funcionamiento y seguridad
1-877-BOSCH99 (1-877-267-2499) www.boschtools.com
Call Toll Free for
Consumer Information
& Service Locations
Pour obtenir des informations
et les adresses de nos centres
de service après-vente,
appelez ce numéro gratuit
Llame gratis para
obtener información
para el consumidor y
ubicaciones de servicio
PS31
BM 2610007872 12/09:BM 2610007872 12-09 12/17/09 7:27 AM Page 1

-2-
'9<5+</+=+0/>C
//:A9<5+</+-6/+8+8.A/6663>Cluttered
or dark areas invite accidents.
9 89> 9:/<+>/ :9A/< >996= 38 /B:69=3@/
+>79=:2/</= =?-2 += 38 >2/ :</=/8-/ 90
06+77+,6/ 63;?3.= 1+=/= 9< .?=> Power
tools create sparks which may ignite the dust
or fumes.
//: -236.</8 +8. ,C=>+8./<= +A+C A236/
9:/<+>381 + :9A/< >996 Distractions can
cause you to lose control.
6/-><3-+6=+0/>C
!9A/< >996 :6?1= 7?=> 7+>-2 >2/ 9?>6/>
/@/<79.30C>2/:6?138+8CA+C989>
?=/ +8C +.+:>/< :6?1= A3>2 /+<>2/.
1<9?8./. :9A/< >996= Unmodified plugs
and matching outlets will reduce risk of
electric shock.
@93.,9.C-98>+->A3>2/+<>2/.9<1<9?8./.
=?<0+-/= =?-2 += :3:/= <+.3+>9<= <+81/=
+8.</0<31/<+>9<=There is an increased risk
of electric shock if your body is earthed or
grounded.
9 89> /B:9=/ :9A/< >996= >9 <+38 9< A/>
-98.3>398= Water entering a power tool will
increase the risk of electric shock.
989>+,?=/>2/-9<./@/<?=/>2/-9<.
09<-+<<C381:?663819<?8:6?11381>2/:9A/<
>996//:-9<.+A+C0<972/+>936=2+<:
/.1/=9<79@381:+<>=Damaged or entangled
cords increase the risk of electric shock.
'2/89:/<+>381+:9A/<>9969?>.99<=
?=/+8/B>/8=398-9<.=?3>+,6/09<9?>.99<
?=/ Use of a cord suitable for outdoor use
reduces the risk of electric shock.
09:/<+>381>2/:9A/<>99638.+7:69-+>398=
3=?8+@93.+,6/?=/+<9?8.+?6> 3<-?3>
8>/<<?:>/<:<9>/->/.=?::6CUse of
an GFCI reduce the risk of electric shock.
!/<=98+6=+0/>C
#>+C +6/<> A+>-2 A2+> C9? +</ .9381 +8.
?=/ -97798 =/8=/ A2/8 9:/<+>381 +
:9A/<>996989>?=/+:9A/<>996A236/
C9?+</>3</.9<?8./<>2/3806?/8-/90.<?1=
+6-92969<7/.3-+>398A moment of inattention
while operating power tools may result in
serious personal injury.
%=/:/<=98+6:<9>/->3@//;?3:7/8>6A+C=
A/+< /C/ :<9>/->398 Protective equipment
such as dust mask, non-skid safety shoes, hard
hat, or hearing protection used for appropriate
conditions will reduce personal injuries.
!</@/8>?838>/8>398+6=>+<>3818=?</>2/
=A3>-2 3= 38 >2/ 900:9=3>398 ,/09</
-988/->381>9:9A/<=9?<-/+8.9<,+>>/<C
:+-5:3-5381?: 9< -+<<C381>2/>996
Carrying power tools with your finger on the
switch or energizing power tools that have the
switch on invites accidents.
"/79@/+8C+.4?=>3815/C9<A</8-2,/09</
>?<8381 >2/ :9A/< >996 98 A wrench or a
key left attached to a rotating part of the
power tool may result in personal injury.
989>9@/<</+-2//::<9:/<099>381+8.
,+6+8-/ +> +66 >37/= This enables better
control of the power tool in unexpected
situations.
</==:<9:/<6C989>A/+<699=/-69>2381
9< 4/A/6<C //: C9?< 2+3< -69>2381 +8.
169@/= +A+C 0<97 79@381 :+<>= Loose
clothes, jewelry or long hair can be caught in
moving parts.
0./@3-/=+</:<9@3./.09<>2/ -988/->398
90.?=>/B><+->398 +8.-966/->3980+-363>3/=
/8=?</ >2/=/ +</ -988/->/. +8. :<9:/<6C
?=/.Use of dust collection can reduce dust-
related hazards.
!9A/<>996?=/+8.-+</
9 89> 09<-/ >2/ :9A/< >996 %=/ >2/
-9<</->:9A/< >99609<C9?<+::63-+>398The
correct power tool will do the job better and
safer at the rate for which it was designed.
989>?=/>2/:9A/<>99630>2/=A3>-2.9/=
89> >?<8 3> 98 +8. 900 Any power tool that
cannot be controlled with the switch is
dangerous and must be repaired.
"/+.+66=+0/>CA+<8381=+8.38=><?->398=Failure to follow the warnings
and instructions may result in electric shock, fire and/or serious injury.
#&'"##$"%$ # "%$%"""
The term “power tool” in all of the warnings refers to your mains-operated (corded) power tool
or battery-operated (cordless) power tool.
!
WARNING
/8/<+6!9A/<$996#+0/>C'+<8381=
BM 2610007872 12/09:BM 2610007872 12-09 12/17/09 7:27 AM Page 2

3=-988/->>2/:6?10<97>2/:9A/<=9?<-/
+8.9<>2/,+>>/<C:+-50<97>2/:9A/<>996
,/09</7+5381+8C +.4?=>7/8>= -2+81381
+--/==9<3/= 9< =>9<381 :9A/< >996= Such
preventive safety measures reduce the risk of
starting the power tool accidentally.
#>9</ 3.6/ :9A/< >996= 9?> 90 >2/ </+-2 90
-236.</8 +8. .9 89> +669A :/<=98=
?80+7363+< A3>2 >2/ :9A/< >996 9< >2/=/
38=><?->398= >9 9:/<+>/ >2/ :9A/< >996
Power tools are dangerous in the hands of
untrained users.
+38>+38:9A/<>996=2/-509<73=+63187/8>
9< ,38.381 90 79@381 :+<>= ,</+5+1/ 90
:+<>= +8. +8C 9>2/< -98.3>398 >2+> 7+C
+00/->>2/:9A/<>996=9:/<+>3980.+7+1/.
2+@/ >2/ :9A/< >996 </:+3</. ,/09</ ?=/
Many accidents are caused by poorly
maintained power tools.
//:-?>>381>996==2+<:+8.-6/+8Properly
maintained cutting tools with sharp cutting
edges are less likely to bind and are easier to
control.
%=/>2/:9A/<>996+--/==9<3/= +8. >996
,3>=/>-38+--9<.+8-/A3>2>2/=/38=><?->398=
>+538138>9+--9?8>>2/A9<5381-98.3>398=
+8. >2/ A9<5 >9 ,/ :/<09<7/. Use of the
power tool for operations different from those
intended could result in a hazardous situation.
+>>/<C>996?=/+8.-+</
"/-2+<1/986CA3>2>2/-2+<1/<=:/-303/.
,C >2/ 7+8?0+->?</< A charger that is
suitable for one type of battery pack may
create a risk of fire when used with another
battery pack.
%=/ :9A/< >996= 986C A3>2 =:/-303-+66C
./=318+>/.,+>>/<C:+-5= Use of any other
battery packs may create a risk of injury and
fire.
'2/8 ,+>>/<C :+-5 3= 89> 38 ?=/ 5//: 3>
+A+C 0<97 9>2/< 7/>+6 9,4/->= 635/ :+:/<
-63:= -938= 5/C= 8+36= =-</A= 9< 9>2/<
=7+66 7/>+6 9,4/->= >2+> -+8 7+5/ +
-988/->3980<9798/>/<738+6>9+89>2/<
Shorting the battery terminals together may
cause burns or a fire.
%8./< +,?=3@/ -98.3>398= 63;?3. 7+C ,/
/4/->/.0<97>2/,+>>/<C+@93.-98>+->0
-98>+-> +--3./8>+66C 9--?<= 06?=2 A3>2
A+>/<063;?3.-98>+->=/C/=+..3>398+66C
=//5 7/.3-+6 2/6: Liquid ejected from the
battery may cause irritation or burns.
#/<@3-/
+@/C9?<:9A/<>996=/<@3-/.,C+;?+6303/.
</:+3< :/<=98 ?=381 986C 3./8>3-+6
</:6+-/7/8> :+<>= This will ensure that the
safety of the power tool is maintained.
96.:9A/<>996= ,C 38=?6+>/. 1<3::381
=?<0+-/= A2/8 :/<09<7381 +8 9:/<+>398
A2/</ >2/ -?>>381 >996= 7+C -98>+->
23../8A3<381 Contact with a “live” wire will
make exposed metal parts of the tool “live”
and shock the operator.
%=/ -6+7:= 9< 9>2/< :<+->3-+6 A+C >9
=/-?</ +8. =?::9<> >2/ A9<5:3/-/ >9 +
=>+,6/:6+>09<7Holding the work by hand
or against your body is unstable and may
lead to loss of control.
9 89> .<366 0+=>/8 9< ,</+5 38>9 /B3=>381
A+66=9<9>2/<,638.+</+=A2/<//6/-><3-+6
A3<381 7+C /B3=> If this situation is
unavoidable, disconnect all fuses or circuit
breakers feeding this worksite.
6A+C= 296. >2/ >996 A3>2 ,9>2 2+8.= If
the bit jams two hands will give you
maximum control over torque reaction or
kickback.
6A+C= A/+< =+0/>C 19116/= 9< /C/
:<9>/->398A2/8?=381>23= >996 %=/ +
.?=> 7+=5 9< </=:3<+>9< 09< +::63-+>398=
A23-21/8/<+>/.?=>
#/-?</ >2/ 7+>/<3+6 ,/381 .<366/. /@/<
296. 3> 38 C9?< 2+8. 9< +-<9== 6/1=
Unstable support can cause the drill bit to
bind causing loss of control and injury.
3=-988/->,+>>/<C:+-50<97>9969<
:6+-/>2/=A3>-238>2/69-5/.9<900
:9=3>398 ,/09</ 7+5381 +8C +==/7,6C
+.4?=>7/8>= 9< -2+81381 +--/==9<3/=.
Such preventive safety measures reduce the
risk of starting the tool accidentally.
!9=3>398 C9?<=/60 >9 +@93. ,/381 -+?12>
,/>A//8>2/>9969<=3./2+8.6/+8.A+66=
-3-
#+0/>C"?6/=09<9<.6/==<366<3@/<=
BM 2610007872 12/09:BM 2610007872 12-09 12/17/09 7:27 AM Page 3

+>>/<C2+<1/<
/09</ ?=381 ,+>>/<C -2+<1/< </+. +66
38=><?->398= +8. -+?>398+<C 7+<5381= 98
,+>>/<C-2+<1/<,+>>/<C:+-5+8.
:<9.?->?=381,+>>/<C
%=/ 986C >2/ -2+<1/< A23-2 +--97:+83/.
C9?< :<9.?-> 9< .3</-> </:6+-/7/8> +=
63=>/.38>2/-+>+6919<>23=7+8?+6 Do not
substitute any other charger. Use only Bosch
approved chargers with your product. See
Functional Description and Specifications.
989>.3=+==/7,6/-2+<1/<9<9:/<+>/>2/
-2+<1/< 30 3> 2+= </-/3@/. + =2+<: ,69A
,//8.<9::/.9<9>2/<A3=/.+7+1/.38+8C
A+C "/:6+-/ .+7+1/. -9<. 9< :6?1=
377/.3+>/6CIncorrect reassembly or damage
may result in electric shock or fire.
9 89> </-2+<1/ ,+>>/<C 38 .+7: 9< A/>
/8@3<987/8>989>/B:9=/-2+<1/<>9<+38
9< =89A 0 ,+>>/<C -+=/ 3= -<+-5/. 9<
9>2/<A3=/ .+7+1/. .9 89> 38=/<> 38>9
-2+<1/< Battery short or fire may result.
2+<1/986C9=-2+::<9@/.</-2+<1/+,6/
,+>>/<3/= See Functional Description and
Specifications. Other types of batteries may
burst causing personal injury and damage.
2+<1/,+>>/<C:+-538>/7:/<+>?</=+,9@/
./1<//= ./1<//= +8. ,/69A
./1<//=./1<//=#>9</>996
+8. ,+>>/<C :+-5 38 69-+>398= A2/</
>/7:/<+>?</=A36689>/B-//../1<//=
./1<//= This is important to prevent
serious damage to the battery cells.
+>>/<C 6/+5+1/ 7+C 9--?< ?8./< /B></7/
?=+1/ 9< >/7:/<+>?</ -98.3>398= @93.
-98>+->A3>2=538+8./C/= The battery
liquid is caustic and could cause chemical
burns to tissues. If liquid comes in contact with
skin, wash quickly with soap and water. If the
-4-
9< :9=>= Should the bit become bound or
jammed in the work, the reaction torque of
the tool could crush your hand or leg.
0 >2/ ,3> ,/-97/= ,9?8. 38 >2/
A9<5:3/-/ </6/+=/ >2/ ><311/<
377/.3+>/6C </@/<=/ >2/ .3</->398 90
<9>+>398+8.=69A6C=;?//D/>2/><311/<>9
,+-5 9?> >2/ ,3> Be ready for a strong
reaction torque. The drill body will tend to
twist in the opposite direction as the drill bit is
rotating.
989>1<+=:>2/>9969<:6+-/C9?<2+8.=
>99 -69=/ >9 >2/ =:388381 -2?-5 9< .<366
,3>Your hand may be lacerated.
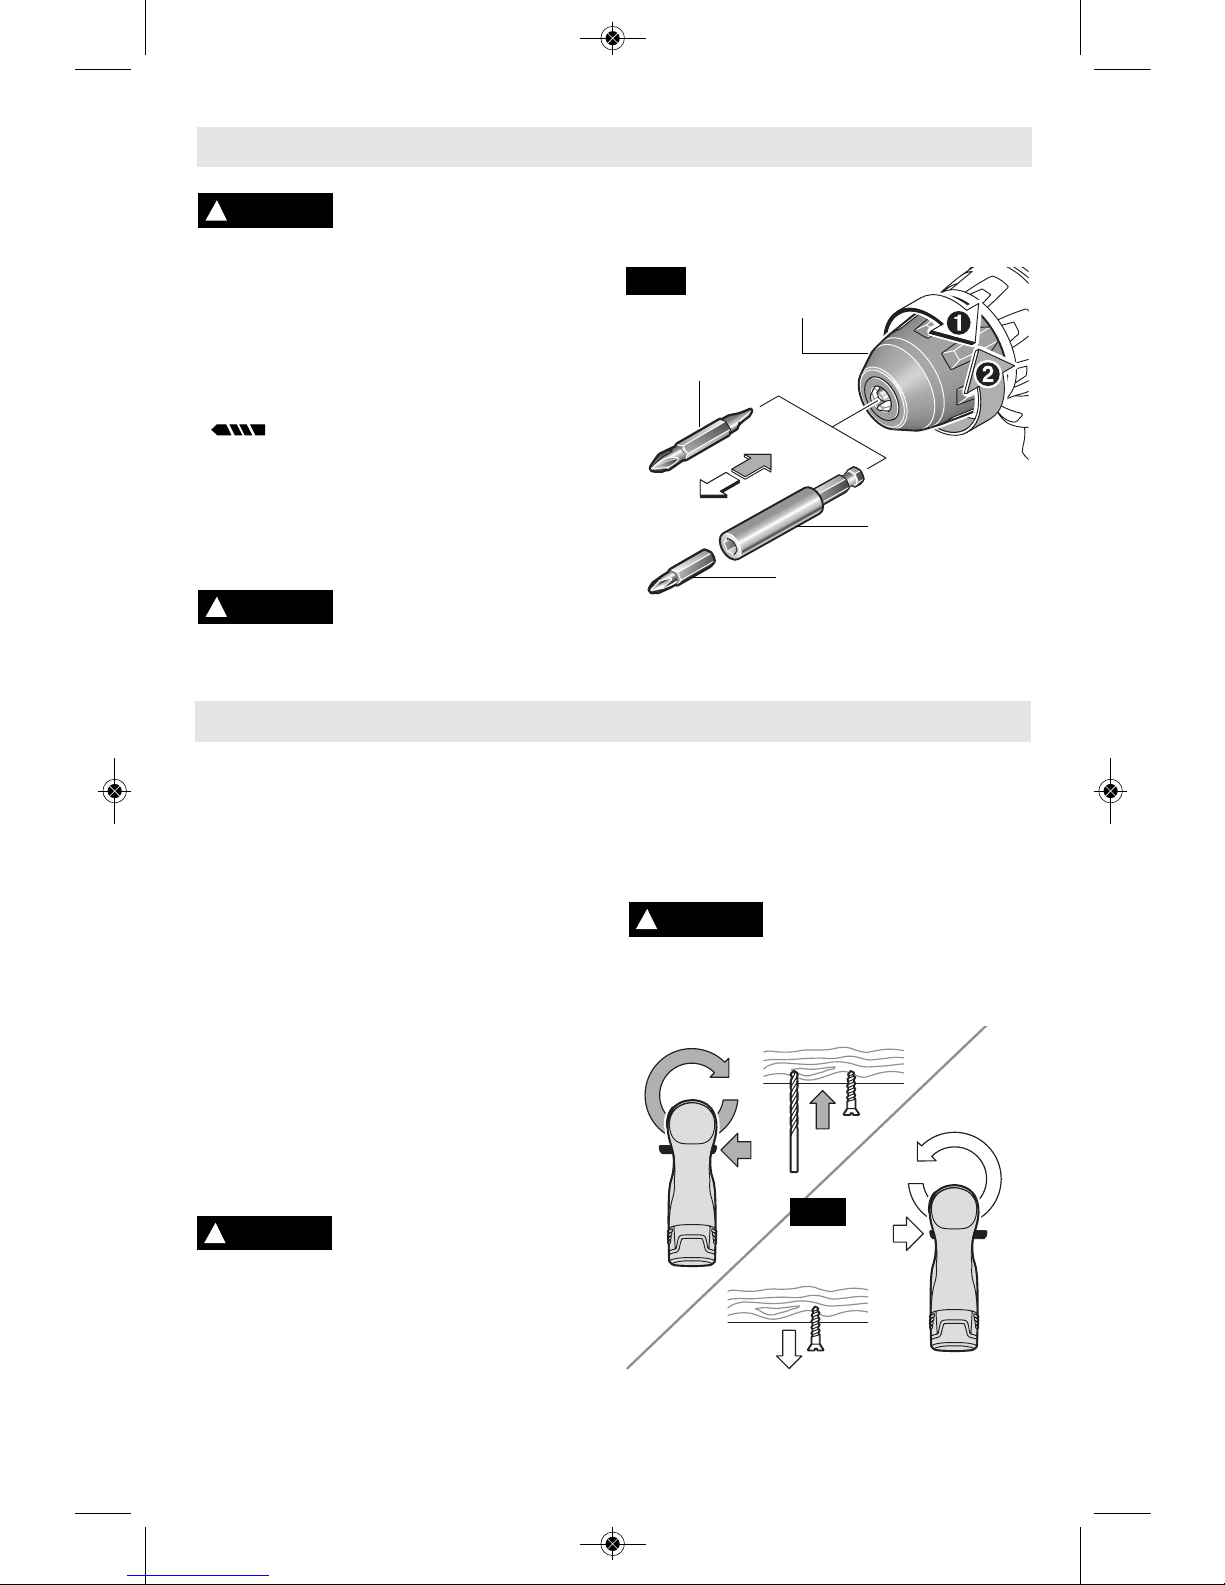
'2/8 38=>+66381 + ,3> 38=/<> >2/ =2+85 90
>2/ ,3> A/66 A3>238 >2/ -2?-5 If the bit is
not inserted deep enough, the grip of the
chuck over the bit is reduced and the loss of
control is increased. After bit insertion, pull
on bit to ensure it is locked.
9 89> ?=/ .?66 9< .+7+1/. ,3>= +8.
+--/==9<3/= Dull or damaged bits have a
greater tendency to bind in the workpiece.
'2/8</79@381>2/,3>0<97>2/>996+@93.
-98>+-> A3>2 =538 +8. ?=/ :<9:/<
:<9>/->3@/169@/=A2/81<+=:381>2/,3>9<
+--/==9<C Accessories may be hot after
prolonged use.
2/-5 >9 =// >2+> 5/C= +8. +.4?=>381
A</8-2/= +</ </79@/. 0<97 >2/ .<366
,/09</ =A3>-2381 >2/ >996 eys or
wrenches can fly away at high velocity
striking you or a bystander.
9 89> <?8 >2/ .<366 A236/ -+<<C381 3> +>
C9?<=3./A spinning drill bit could become
entangled with clothing and injury may result.
#97/ .?=> -</+>/. ,C
:9A/< =+8.381 =+A381
1<38.381 .<366381 +8. 9>2/< -98=><?->398
+->3@3>3/= -98>+38= -2/73-+6= 589A8 >9
-+?=/ -+8-/< ,3<>2 ./0/->= 9< 9>2/<
</:<9.?->3@/ 2+<7 #97/ /B+7:6/= 90
>2/=/-2/73-+6=+</
• Lead from lead-based paints,
• Crystalline silica from bricks and cement
and other masonry products, and
• Arsenic and chromium from chemically-
treated lumber.
Your risk from these exposures varies,
depending on how often you do this type of
work. To reduce your exposure to these
chemicals: work in a well ventilated area, and
work with approved safety equipment, such
as those dust masks that are specially
designed to filter out microscopic particles.
!
WARNING
BM 2610007872 12/09:BM 2610007872 12-09 12/17/09 7:27 AM Page 4

-5-
'2/8 ,+>>/<3/= +</ 89> 38
>9969<-2+<1/<5//:>2/7
+A+C 0<97 7/>+6 9,4/->= For example, to
protect terminals from shorting G $
place batteries in a tool box or pocket with
nails, screws, keys, etc. Fire or injury may
result.
$ !%$ $$"# $ " "
(! # $ $ They may
explode.
!
WARNING
+>>/<C+</
9 89> +>>/7:> >9 .3=+=
=/7,6/ >2/ ,+>>/<C 9<
</79@/ +8C -97:98/8> :<94/->381 0<97
>2/ ,+>>/<C >/<738+6= Fire or injury may
result. Prior to disposal, protect exposed
terminals with heavy insulating tape to
prevent shorting.
$% $$"#
If equipped with a lithium-ion battery, the battery
must be collected, recycled or disposed of in
an environ mentally sound manner.
“The EPA certified RBRC
Battery Recycling Seal on the
lithium-ion (Li-ion) battery
indicates Robert Bosch Tool
Corporation is voluntarily
participating in an industry
program to collect and recycle these batteries
at the end of their useful life, when taken out
of service in the United States or Canada. The
RBRC program provides a convenient
alterative to placing used Li-ion batteries into
the trash or the munici pal waste stream, which
may be illegal in your area.
Please call 1-800-8-BATTERY for information
on Li-ion battery recycling and disposal
bans/restrictions in your area, or return your
batteries to a Skil/Bosch/Dremel Service
Center for recycling. Robert Bosch Tool
Corporation’s involvement in this program is
part of our commitment to preserving our
environment and conserving our natural
resources.”
!
WARNING
+>>/<C3=:9=+6
liquid contacts your eyes, flush them with water
for a minimum of 10 minutes and seek medical
attention.
!6+-/ -2+<1/< 98 06+> 89806+77+,6/
=?<0+-/= +8. +A+C 0<97 06+77+,6/
7+>/<3+6= A2/8 </-2+<1381 ,+>>/<C :+-5
The charger and battery pack heat during
charging. Carpeting and other heat insulating
surfaces block proper air circulation which may
cause overheating of the charger and battery
pack. If smoke or melting of the case are
observed unplug the charger immediately and
do not use the battery pack or charger.
%=/ 90 +8 +>>+-27/8> 89> </-97
7/8./. 9< =96. ,C 9=-2 7+C </=?6> 38 +
<3=5 90 03</ /6/-><3- =29-5 9< 384?<C >9
:/<=98=
BM 2610007872 12/09:BM 2610007872 12-09 12/17/09 7:27 AM Page 5

-6-
! "$$ Some of the following symbols may be used on your tool. Please study them
and learn their meaning. Proper interpretation of these symbols will allow you to operate the
tool better and safer.
#C7,96 +7/ /=318+>398B:6+8+>398
V Volts Voltage (potential)
A Amperes Current
Hz Hertz Frequency (cycles per second)
W Watt Power
kg ilograms Weight
min Minutes Time
s Seconds Time
Diameter Size of drill bits, grinding wheels, etc.
n0No load speed Rotational speed, at no load
.../min Revolutions or reciprocation per minute Revolutions, strokes, surface speed,
orbits etc. per minute
0 Off position Zero speed, zero torque...
1, 2, 3, ... Selector settings Speed, torque or position settings.
I, II, III, Higher number means greater speed
Infinitely variable selector with off Speed is increasing from 0 setting
Arrow Action in the direction of arrow
Alternating current Type or a characteristic of current
Direct current Type or a characteristic of current
Alternating or direct current Type or a characteristic of current
Class II construction Designates Double Insulated
Construction tools.
Earthing terminal Grounding terminal
Warning symbol Alerts user to warning messages
Li-ion RBRC seal Designates Li-ion battery recycling
program
#C7,96=
0
This symbol designates
that this tool is listed by
Underwriters Laboratories.
This symbol designates
that this tool is listed by
the Canadian Standards
Association.
This symbol designates that
this tool is listed by the
Canadian Standards
Association, to United States
and Canadian Standards. This symbol
designates
that
this tool
complies
to NOM
Mexican
Standards.
This symbol designates that
this tool is listed by
Underwriters Laboratories, to
United States and Canadian
Standards.
This symbol designates that this tool is listed by the Intertek Testing
Services, to United States and Canadian Standards.
BM 2610007872 12/09:BM 2610007872 12-09 12/17/09 7:27 AM Page 6

9./68?7,/r PS31
Voltage rating 10.8V/12V MAX
No load speed 1 n00-350/min
No load speed 2 n00-1,300/min
+B37?7+:+-3>3/=
Chuck size 3/8"
Screw sizes 9/32"
Mild metal 3/8"
Wood 3/4"
Charge time BC330 (1 Hour)
BC430 (30 minutes)
+>>/<C:+-5 BAT411
2+<1/< BC330 & BC430
Voltage rating 120 V 60 Hz
-7-
?8->398+6/=-<3:>398+8.#:/-303-+>398=
3=-988/->,+>>/<C:+-50<97>9969<:6+-/>2/=A3>-238>2/69-5/.9<900
:9=3>398 ,/09</ 7+5381 +8C +==/7,6C +.4?=>7/8>= 9< -2+81381
+--/==9<3/=. Such preventive safety measures reduce the risk of starting the tool accidentally.
!
WARNING
FIG. 1
9<.6/==<366<3@/<
GEAR SHIFTER
FORWARD/RE ERSING
LE ER & TRIGGER LOCK
RUBBERIZED
GRIP
BATTERY
RELEASE
TABS
BATTERY
PACK
ADJUSTABLE
CLUTCH
KEYLESS
CHUCK
BATTERY CHARGE CONDITION
INDICATOR LIGHTS
ARIABLE SPEED
TRIGGER SWITCH
BUILT IN
WORK LIGHT
ENTILATION
OPENINGS
BM 2610007872 12/09:BM 2610007872 12-09 12/17/09 7:27 AM Page 7

-8-
:/<+>3818=><?->398=
==/7,6C
3=-988/-> ,+>>/<C :+-5
0<97 >996 ,/09</ 7+5381
+8C +==/7,6C +.4?=>7/8>= 9< -2+81381
+--/==9<3/=. Such preventive safety
measures reduce the risk of starting the tool
accidentally.
#"$$#
Move reverse switch lever to the center “OFF”
position. Remove battery pack and rotate the
clutch ring to the drill bit symbol
“ ”. Rotate the chuck sleeve counter-
clockwise viewing from chuck end, and open
chuck to approximate drill bit diameter. Insert
a clean bit up to the drill bit flutes for small bits,
or as far as it will go for large bits. Close chuck
by rotating the chuck sleeve clockwise and
securely tighten by hand (Fig. 2).
989>?=/>2/:9A/<90>2/
.<366 A236/ 1<+=:381 -2?-5
>9699=/89<>312>/8,3> Friction burn or hand
injury is possible if attempting to grasp the
spinning chuck.
!" $$ #$!
#"
The lithium ion battery is protected against
deep discharging by the “Electronic Cell
Protection (ECP)”. When the battery is empty,
the tool is switched off by means of a
protective circuit.
&"#! $"
$""#'$
Your tool is equipped with a variable speed
trigger switch. The tool can be turned "ON" or
"OFF" by squeezing or releasing the trigger.
The speed can be adjusted from the minimum
to maximum nameplate RPM by the pressure
you apply to the trigger. Apply more pressure
to increase the speed and release pressure to
decrease speed (Fig. 1).
"'""&"#
&"$""
After tool use, lock trigger in
“OFF” position to help prevent
accidental starts and accidental discharge.
Your tool is equipped with a forward/
reversing lever and trigger lock located above
the trigger (Fig. 3). This lever was designed
for changing rotation of the bit, and for locking
the trigger in an “OFF” position.
For forward rotation, (with chuck pointed
away from you) move the lever to the far left.
For reverse rotation move the lever to the far
right. To activate trigger lock move lever to
the center off position.
989>-2+81/.3</->39890
<9>+>398 ?8>36 >2/ >996
-97/= >9 + -97:6/>/ =>9: Shifting during
rotation of the chuck can cause damage to
the tool.
!
WARNING
CHUCK SLEE E
FIG. 2
SCREWDRI ER
BIT
BIT HOLDER
SCREWDRI ER BIT
!
WARNING
FIG. 3
!
CAUTION
!
WARNING
BM 2610007872 12/09:BM 2610007872 12-09 12/17/09 7:27 AM Page 8

-9-
"#$
Your tool is equipped with two separate gear
ranges, low gear and high gear. Low gear
provides high-torque and slower drilling
speeds for heavy duty work or for driving
screws. High gear provides faster speeds for
drilling lighter work. To change speeds slide
switch, to the high or low position (Fig. 1).
$$$ If your tool appears to be
running, but the chuck will not turn, check to
make sure the gear shifting switch is pushed
fully into desired setting.
%#$%$
Your tool features 20 clutch settings. Output
torque will increase as the clutch ring, is
rotated from 1 to 19. The drill “ ” position
will lock up the clutch to permit drilling and
driving heavyduty work, and also enables bits
to be changed quickly and easily in the
keyless chuck (Fig. 7).
"
When the trigger switch is released it
activates the brake to stop the chuck quickly.
This is especially useful in the repetitive
driving and removal of screws.
%$ E
Your tool is equipped with an automatic locking
system. This feature will lock the bit holder in
one position when the trigger switch is
released. This will allow you to tighten or loosen
a nut or screw by rotating the tool by hand with
the switch off. This is convenient when higher
turning torque is needed.
%$' "$
Your tool is also equipped with a light that turns
on automatically when the switch is activated,
for better visibility when drilling/driving (Fig. 7).
$$")" $
$ "$#
Your tool is equipped with charge condition
indicator lights (Fig. 1). The indicator lights
shows the charge condition of the battery for a
few second when the On/Off trigger is pressed
halfway or fully.
#"$"#
$$")!
Release battery pack from tool by pressing
on both sides of the battery release tabs and
pull downward (Fig. 4).
To insert battery, align battery and slide
battery pack into tool until it locks into position.
Do not force.
0,+>>/<C </6/+=/ >+,=+</
-<+-5/. 9< 9>2/<A3=/
.+7+1/..989> 38=/<> 38>9 >996 Battery
can fall out during operation.
+:+-3>C
Continuous lighting 3 x green > 2/3
Continuous lighting 2 x green > 1/3
Continuous lighting 1 x green < 1/3
Flashing light 1 x green reserve
!
WARNING
BATTERY
RELEASE
TABS
FIG. 4
! "$$" $#
1. The charger was designed to fast charge
the battery only when the battery
temperature is between 32˚F (0˚C) and
113˚F (45˚C). If the battery pack is too hot or
too cold, the charger will not fast charge the
battery. (This may happen if the battery pack
is hot from heavy use). When the battery
temperature returns to between 32˚F (0˚C)
and 113˚F (45˚C), the charger will
automatically begin charging.
2. A substantial drop in operating time per
charge may mean that the battery pack is
nearing the end of its life and should be
replaced.
3. Remember to unplug charger during
storage period.
4. If battery does not charge properly:
a. Check for voltage at outlet by plugging
in some other electrical device.
BM 2610007872 12/09:BM 2610007872 12-09 12/17/09 7:27 AM Page 9

The lithium ion battery is protected against
deep discharging by the “Electronic Cell
Protection (ECP)”. When the battery is empty,
the tool is switched off by means of a
protective circuit.
The battery is supplied partially charged.
Completely charge the battery before using
your cordless screwdriver for the first time.
The lithium ion battery can be charged at any
time, without reducing its service life.
Interrupting the charging procedure does not
damage the battery.
Plug charger cord into your standard power
outlet, then insert battery pack into charger
(Fig. 5).
The charger’s green indicator light will begin to
“BLIN ”. This indicates that the battery is
receiving a fast charge. Fast-charging will
automatically stop when the battery pack is
fully charged.
When the indicator light stops “BLIN ING”
(and becomes a steady green light) fast
charging is complete.
The battery pack may be used even though
the light may still be blinking. The light may
require more time to stop blinking depending
on temperature. When you begin the
charging process of the battery pack, a
steady red light could also mean the battery
pack is too hot or too cold.
The purpose of the green light is to indicate
that the battery pack is fast-charging. It does
not indicate the exact point of full charge.
The light will stop blinking in less time if the
battery pack was not completely discharged.
When charging several batteries in sequence,
the charge time may slightly increase.
When the battery pack is fully charged,
unplug the charger (unless you're charging
another battery pack) and slip the battery
pack back into the tool.
"$$")!9./6
If the indicator lights are “OFF”, the charger
is not receiving power from power supply
outlet.
If the green indicator light is
“ON”, the charger is plugged in
but the battery pack is not
inserted, or the battery pack is fully charged
and is being trickle charged.
If the green indicator light is
“BLIN ING”, the battery pack is
being fast-charged. Fast-
charging will automatically stop when the
battery pack is fully charged.
If the red indicator light is “ON”,
the battery pack is too hot or
cold for fast-charging. The
charger will switch to trickle charge, until a
suitable temperature is reached, at which
time the charger will switch automatically to
fast-charging.
If the red indicator light is
“BLIN ING”, the battery pack
cannot accept a charge or the
contacts of the charger or battery pack are
contaminated. Clean the contacts of the
charger or battery pack only as directed in
these operating instructions or those
supplied with your tool or battery pack.
""$ "##) #9./6
-10-
b. Check to see if outlet is connected to a
light switch which turns power “off” when
lights are turned off.
c. Check battery pack terminals for dirt.
Clean with cotton swab and alcohol if
necessary.
d. If you still do not get proper charging,
take or send tool, battery pack and charger
to your local Bosch Service Center. See
“Tools, Electric” in the Yellow Pages for
names and addresses.
9>/ Use of chargers or battery packs not
sold by Bosch will void the warranty.
BM 2610007872 12/09:BM 2610007872 12-09 12/17/09 7:27 AM Page 10

If the indicator lights are “OFF”, the charger
is not receiving power from power supply
outlet.
If the green indicator light is
“BLIN ING”, the battery
pack is being fast-charged.
Fast-charging will automatically stop when
the battery pack is fully charged.
If the green indicator light is
"ON", the charger is
plugged in but the battery
pack is not inserted, or the battery pack is
fully charged, or the battery pack is too hot or
cold for fast-charging. The charger will
automatically switch to fast-charging once a
suitable temperature is reached.
-11-
BATTERY
PACK
CHARGER
RED LIGHT
GREEN LIGHT
FIG. 5
The lithium ion battery is protected against
deep discharging by the “Electronic Cell
Protection (ECP)”. When the battery is empty,
the tool is switched off by means of a
protective circuit.
The battery is supplied partially charged.
Completely charge the battery before using
your cordless screwdriver for the first time.
The lithium ion battery can be charged at any
time, without reducing its service life.
Interrupting the charging procedure does not
damage the battery.
Plug charger cord into your standard power
outlet, then insert battery pack into charger
(Fig. 6).
The charger’s green indicator light will begin to
“BLIN ”. This indicates that the battery is
receiving a fast charge. Fast-charging will
automatically stop when the battery pack is
fully charged.
When the indicator light stops “BLIN ING”
(and becomes a steady green light) fast
charging is complete.
The battery pack may be used even though
the light may still be blinking. The light may
require more time to stop blinking depending
on temperature. When you begin the charging
process of the battery pack, a steady green
light could also mean the battery pack is too
hot or too cold.
""$ "##) #9./6
"$$")!9./6
BM 2610007872 12/09:BM 2610007872 12-09 12/17/09 7:27 AM Page 11

You will extend the life of your bits and do
neater work if you always put the bit in
contact with the work before pulling the
trigger. During the oper a tion, hold the tool
firmly and exert light, steady pressure. Too
much pressure at low speed will stall the tool.
Too little pressure will keep the bit from
cutting and cause excess friction by sliding
over the surface. This can be damaging to
both tool and bit.
"'$&"#!
The trigger controlled variable speed feature
will eliminate the need for center punches in
hard materials. The variable speed trigger
allows you to slowly increase RPM. By using
a slow starting speed, you are able to keep
the bit from “wander ing”. You can increase
the speed as the bit “bites” into the work by
squeezing the trigger.
"&'$&"#!
Variable speed drills will double as a power
screwdriver by using a screwdriver bit in the
drill mode. The technique is to start slowly,
increasing the speed as the screw runs
down. Set the screw snug ly by slowing to a
stop. Prior to driving screws, pilot and
clearance holes should be drilled.
#$'$#"'#
This procedure shown in (Fig. 7) will enable
you to fasten ma terials together with your
Cordless Drill/Screwdriver without stripping,
splitting or separating the material.
FIG. 6
BATTERY
PACK
CHARGER
GREEN LIGHT
-12-
The purpose of the green light is to indicate
that the battery pack is fast-charging. It does
not indicate the exact point of full charge.
The light will stop blinking in less time if the
battery pack was not completely discharged.
When the battery pack is fully charged,
unplug the charger (unless you're charging
another battery pack) and slip the battery
pack back into the tool.
:/<+>381$3:=
F Drill same
diameter as
screw shank.
F Countersink
same diameter
as screw head.
F Drill 2/3 diameter and
2/3 of screw length for
soft materials, full
length for hard
materials.
Adjustable
Screw
Drill
Screw
Apply a slight
even pressure
when driving
screws.
FASTENING
WITH SCREWS
FIG. 7
BM 2610007872 12/09:BM 2610007872 12-09 12/17/09 7:27 AM Page 12

-13-
First, clamp the pieces together and drill the
first hole 2/3 the diam eter of the screw. If the
material is soft, drill only 2/3 the proper
length. If it is hard, drill the entire length.
Second, unclamp the pieces and drill the
second hole the same diameter as the screw
shank in the first or top piece of wood.
Third, if flat head screw is used, countersink
the hole to make the screw flush with the
surface. Then, simply apply even pressure
when driving the screw. The screw shank
clearance hole in the first piece allows the
screw head to pull the pieces tightly together.
The adjustable screw drill accessory will do
all of these oper ations quickly and easily.
Screw drills are available for screw sizes No.
6, 8, 10 and 12.
"$#
Always inspect drill bits for excessive wear. Use
only bits that are sharp and in good condition.
TWIST BITS: Available with straight and
reduced shanks for wood and light duty metal
drilling. High speed bits cut faster and last
longer on hard ma terials.
CARBIDE TIPPED BITS: Used for drilling
stone, con crete, plaster, cement and other
unusually hard nonmetals. Use continuous
heavy feed pres sure when employing carbide
tip bits.
"'
Be certain workpiece is clamped or anchored
firm ly. Always apply pressure in a straight line
with the drill bit. Maintain enough pressure to
keep the drill “biting”.
When drilling holes in wood, twist bits can be
used. Twist bits may overheat unless pulled out
frequently to clear chips from flutes.
Use a “back-up” block of wood for work that is
likely to splinter, such as thin materials.
You will drill a cleaner hole if you ease up on
the pressure just before the bit breaks through
the wood. Then complete the hole from the
back side.
"$
There are two rules for drilling hard materials.
First, the harder the material, the greater the
pres sure you need to apply to the tool. Second,
the harder the material, the slower the speed.
Here are a couple of tips for drilling in metal.
Lubri cate the tip of the bit occasionally with
cutting oil except when drilling soft metals such
as alu minum, cop per or cast iron. If the hole to
be drilled is fairly large, drill a smaller hole first,
then enlarge to the required size, it’s often
faster in the long run. Main tain enough
pressure to assure that the bit does not just
spin in the hole. This will dull the bit and greatly
shorten its life.
"%%$# $#
Variable speed control must be used with
caution for driving nuts and bolts with socket
set attach ments. The technique is to start
slowly, increasing speed as the nut or bolt runs
down. Set the nut or bolt snugly by slowing the
drill to a stop. If this procedure is not followed,
the tool will have a tendency to torque or twist
in your hands when the nut or bolt seats.
BM 2610007872 12/09:BM 2610007872 12-09 12/17/09 7:27 AM Page 13

+38>/8+8-/
#/<@3-/
%#" #"&
!"$# # !</@/8>3@/
7+38>/8+8-/ :/<09<7/. ,C ?8+?>29<3D/.
:/<=988/6 7+C </=?6> 38 73=:6+-381 90
38>/<8+6 A3</= +8. -97:98/8>= A23-2
-9?6. -+?=/ =/<39?= 2+D+<. We recom -
mend that all tool service be performed by a
Bosch Factory Service Center or Authorized
Bosch Service Station. SERVICE MEN:
Disconnect tool and/or charger from power
source before servicing.
$$"#
/+6/<>09<,+>>/<C:+-5=>2+>+</8/+<381
>2/3< /8. 90 630/ If you notice decreased
tool performance or significantly shorter
running time between charges then it is time
to replace the battery pack. Failure to do so
can cause the tool to operate improperly or
damage the charger.
$ %"$
Your Bosch tool has been properly lubricated
and is ready for use.
$ "#
The motor in your tool has been engineered
for many hours of dependable service. To
maintain peak efficiency of the motor, we
recommend it be examined every six
months. Only a genuine Bosch replacement
motor specially designed for your tool should
be used.
6/+8381
$9 +@93. +--3./8>= +6A+C=
.3=-988/-> >2/ >996 +8.9<
-2+<1/< 0<97 >2/ :9A/< =?::6C ,/09</
-6/+8381 The tool may be cleaned most
effectively with com pressed dry air. 6A+C=
A/+< =+0/>C 19116/= A2/8 -6/+8381 >996=
A3>2-97:</==/.+3<
Ventilation openings and switch levers must be
kept clean and free of foreign matter. Do not
attempt to clean by inserting pointed objects
through opening.
/<>+38-6/+8381+1/8>=+8.
=96@/8>= .+7+1/ :6+=>3-
:+<>= Some of these are: gasoline, car bon
tetrachloride, chlorinated cleaning solvents,
ammonia and household detergents that
contain ammonia.
!
WARNING
!
WARNING
!
CAUTION
--/==9<3/=
0 +8 /B>/8=398 -9<. 3=
8/-/==+<C + -9<. A3>2
+./;?+>/=3D/-98.?->9<= >2+> 3= -+:+,6/
90-+<<C381>2/-?<</8>8/-/==+<C09<C9?<
>996 7?=> ,/ ?=/. This will prevent
excessive voltage drop, loss of power or
overheating. Grounded tools must use 3-wire
extension cords that have 3-prong plugs and
receptacles.
$The smaller the gauge number, the
heav i er the cord.
" #*# ($# "#
& $$"$%""$$ #
!
WARNING
$996H=
7:/</
"+>381
9<.#3D/38' '3</#3D/=3877
3-6
6-8
8-10
10-12
12-16
18 16 16 14 0.75 0.75 1.5 2.5
18 16 14 12 0.75 1.0 2.5 4.0
18 16 14 12 0.75 1.0 2.5 4.0
16 16 14 12 1.0 2.5 4.0 —
14 12 —— ————
25 50 100 150 15 30 60 120
9<./81>238//> 9<./81>238/>/<=
-14-
BM 2610007872 12/09:BM 2610007872 12-09 12/17/09 7:27 AM Page 14

Sécurité du lieu de travail
Maintenez le lieu de travail propre et bien éclairé.
Les risques d’accident sont plus élevés quand on
travaille dans un endroit encombré ou sombre.
N’utilisez pas d’outils électroportatifs dans des
atmosphères explosives, comme par exemple en
présence de gaz, de poussières ou de liquides
inflammables. Les outils électroportatifs produisent
des étincelles qui risquent d’enflammer les poussières
ou les vapeurs.
Éloignez les enfants et les visiteurs quand vous vous
servez d’un outil électroportatif. Vous risquez une
perte de contrôle si on vous distrait.
Sécurité électrique
Les fiches des outils électroportatifs doivent
correspondre à la prise. Il ne faut absolument jamais
modifier la fiche. N’utilisez pas d’adaptateur de prise
avec des outils électroportatifs munis d’une fiche de
terre. Le risque de choc électrique est moindre si on
utilise une fiche non modifiée sur une prise qui lui
correspond.
Évitez tout contact du corps avec des surfaces reliées
à la terre tels que tuyaux, radiateurs, gazinières ou
réfrigérateurs. Le risque de choc électrique augmente
si votre corps est relié à la terre.
N’exposez pas les outils électroportatifs à la pluie ou
à l’humidité. Si de l’eau pénètre dans un outil
électroportatif, le risque de choc électrique augmente.
Ne maltraitez pas le cordon. Ne vous en servez
jamais pour transporter l’outil électroportatif, pour le
tirer ou pour le débrancher. Éloignez le cordon de la
chaleur, des huiles, des arêtes coupantes ou des
pièces mobiles. Les cordons abîmés ou emmêlés
augmentent les risques de choc électrique.
Si vous utilisez un outil électroportatif à l’extérieur,
employez une rallonge conçue pour l’extérieur. Ces
rallonges sont faites pour l’extérieur et réduisent le
risque de choc électrique.
S'il est absolument nécessaire d'utiliser l'outil
électroportatif dans un endroit humide, utilisez une
alimentation protégée par un disjoncteur de fuite de
terre (GFCI). L'utilisation d'un disjoncteur GFCI réduit
les risques de choc électrique.
Sécurité personnelle
Restez concentré, faites attention à ce que vous
faites, et servez-vous de votre bon sens lorsque vous
utilisez un outil électroportatif. N'employez pas
d’outils électroportatifs quand vous êtes fatigué ou
sous l’emprise de drogues, d’alcool ou de
médicaments. Quand on utilise des outils
électroportatifs, il suffit d’un moment d’inattention pour
causer des blessures corporelles graves.
Utilisez des équipements de sécurité personnelle.
Portez toujours une protection oculaire. Le port
d'équipements de sécurité tels que des masques
antipoussières, des chaussures de sécurité
antidérapantes, des casques de chantier et des
protecteurs d'oreilles dans des conditions appropriées
réduira le risque de blessure corporelle.
Évitez les démarrages intempestifs. Assurez-vous que
l'interrupteur est dans la position arrêt (Off) avant de
brancher l'outil dans une prise de courant et/ou un
bloc-piles, de le ramasser ou de le transporter. Le
transport d'un outil électroportatif avec le doigt sur la
gâchette ou le branchement de cet outil quand
l'interrupteur est en position de marche (ON) est une
invite aux accidents.
Enlevez toutes les clés de réglage avant de mettre
l’outil électroportatif en marche. Si on laisse une clé
sur une pièce tournante de l’outil électroportatif, il y a
risque de blessure corporelle.
Ne vous penchez pas. Conservez toujours une bonne
assise et un bon équilibre. Ceci vous permettra de
mieux maîtriser l’outil électroportatif dans des situations
inattendues.
Habillez-vous de manière appropriée. Ne portez pas
de vêtements amples ou de bijoux. Attachez les
cheveux longs. N’approchez pas les cheveux, les
vêtements ou les gants des pièces en mouvement.
Les vêtements amples, les bijoux ou les cheveux longs
risquent d’être happés par les pièces en mouvement.
Si l’outil est muni de dispositifs permettant le
raccordement d’un système d’aspiration et de
collecte des poussières, assurez-vous que ces
dispositifs sont raccordés et utilisés correctement.
L'utilisation d'un dépoussiéreur peut réduire les
dangers associés à l'accumulation de poussière.
euillez lire tous les avertissements et toutes les consignes de sécurité. Si l'on
n'observe pas ces avertissements et ces consignes de sécurité, il existe un risque de
choc électrique, d'incendie et/ou de blessures corporelles graves.
CONSER EZ TOUS LES A ERTISSEMENTS ET TOUTES LES CONSIGNES
DE SÉCURITÉ POUR RÉFÉRENCE FUTURE.
Dans tous les avertissements, le terme « outil électroportatif » se rapporte à des outils branchés sur le secteur (avec
fil) ou à des outils alimentés par piles (sans fil).
Avertissements généraux concernant la sécurité des outils électroportatifs
A ERTISSEMENT
!
-15-
BM 2610007872 12/09:BM 2610007872 12-09 12/17/09 7:27 AM Page 15

Utilisation et entretien des outils
électroportatifs
Ne forcez pas sur l’outil électroportatif. Utilisez l’outil
électroportatif qui convient à la tâche à effectuer.
L’outil qui convient à la tâche fait un meilleur travail et
est plus sûr à la vitesse pour lequel il a été conçu.
Ne vous servez pas de l’outil électroportatif si son
interrupteur ne parvient pas à le mettre en marche ou
à l’arrêter. Tout outil électroportatif qui ne peut pas
être commandé par son interrupteur est dangereux et
doit être réparé.
Débranchez la fiche de la prise ou enlevez le bloc-pile
de l’outil électroportatif avant tout réglage,
changement d’accessoires ou avant de ranger l’outil
électroportatif. De telles mesures de sécurité
préventive réduisent le risque de démarrage intempestif
de l’outil électroportatif.
Rangez les outils électroportatifs dont vous ne vous
servez pas hors de portée des enfants et ne permettez
pas à des personnes qui ne connaissent pas l’outil
électroportatif ou qui ignorent ces consignes de s’en
servir. Les outils électroportatifs sont dangereux dans
les mains d’utilisateurs inexpérimentés.
Entretenez les outils électroportatifs. érifiez que les
pièces mobiles sont alignées correctement et ne
coincent pas. érifiez qu’il n’y a pas de pièces
cassées ou d’autre circonstance qui risquent
d’affecter le fonctionnement de l’outil électroportatif.
Si l’outil est abîmé, faites-le réparer avant de
l’utiliser. De nombreux accidents sont causés par des
outils électroportatifs mal entretenus.
Maintenez les outils coupants affûtés et propres. Les
outils coupants entretenus correctement et dotés de
bords tranchants affûtés sont moins susceptibles de
coincer et sont plus faciles à maîtriser.
Utilisez l'outil électroportatif, les accessoires et les
embouts d'outil, etc. conformément à ces instructions,
en tenant compte des conditions de travail et des
travaux à réaliser. L'emploi d’outils électroportatifs
pour des tâches différentes de celles pour lesquelles ils
ont été prévus peut résulter en une situation
dangereuse.
Utilisation et entretien des outils à piles
Rechargez les piles uniquement avec le chargeur
spécifié par le fabriquant. Un chargeur qui convient à
un type de bloc-piles peut entraîner un risque d’incendie
quand il est utilisé avec un autre bloc-piles.
Utilisez des outils électroportatifs uniquement avec
les bloc-piles spécifiquement désignés pour eux.
L’utilisation de tout autre bloc-piles peut créer un risque
de blessures et d’incendie.
Lorsque le bloc-piles n’est pas utilisé, gardez-le à
distances d’autres objets métalliques tels que des
trombones, des pièces de monnaie, des clés, des
clous, des vis ou de tout autre objet métallique
pouvant faire une connexion entre une borne et une
autre. Court-circuiter les bornes des piles peut causer
des brûlures ou un incendie.
Dans des conditions abusives, du liquide peut être
éjecté de la pile ; dans un tel cas, évitez tout contact
avec ce liquide. Si un contact se produit
accidentellement, rincez avec de l’eau. Si le liquide
entre en contact avec les yeux, consultez un médecin.
Du liquide éjecté de la pile peut causer des irritations ou
des brûlures.
Entretien
Faites réparer votre outil électroportatif par un agent
de service qualifié n’utilisant que des pièces de
rechange identiques. Ceci assure que la sécurité de
l’outil électroportatif est préservée.
Utilisez les poignées auxiliaires fournies avec
l'outil. Une perte de contrôle pourrait causer des
blessures physiques.
Tenez les outils électroportatifs par les surfaces
isolées de préhension en exécutant une opération
au cours de laquelle les outils de coupe peuvent
venir en contact avec les fils cachés. Le contact
avec un fil sous tension rendra les pièces métalliques
exposées de l'outil sous tension et causera des chocs
à l'opérateur.
Utilisez des brides ou d’autres moyens pratiques de
brider ou de supporter la pièce sur une plate-forme
stable. Tenir la pièce à la main ou contre le corps est
instable et risque de résulter en une perte de contrôle.
Ne percez, fixez et ne rentrez pas dans des murs
existants ou autres endroits aveugles pouvant
abriter des fils électriques. Si cette situation est
inévitable, débranchez tous les fusibles ou les
disjoncteurs alimentant ce site.
Tenez toujours l’outil à deux mains. Si le foret
venait à se coincer, vous serez plus à même de
maîtriser le couple de réaction ou le rebond de l’outil.
Portez toujours des lunettes à coques latérales ou
des lunettes de protection en utilisant cet outil.
Utilisez un respirateur ou un masque anti-poussières
pour les applications produisant de la poussière.
Assujettissez l'ouvrage à percer. Ne le tenez jamais
dans votre main ou par-dessus vos jambes. Un
support instable peut faire gripper le foret, provoquant
ainsi une perte de contrôle et des blessures.
Débranchez le bloc-piles de l'outil ou placez
l'interrupteur à la position de blocage ou d'arrêt
-16-
Consignes de sécurité pour perceuses/tournevis sans cordon
BM 2610007872 12/09:BM 2610007872 12-09 12/17/09 7:27 AM Page 16

-17-
Avant d'utiliser le chargeur de pile, lisez toutes les
consignes et tous les marquages d'avertissement
sur (1) le chargeur de pile, (2) le bloc-piles et (3) le
produit utilisant la pile.
N'utilisez que le chargeur qui accompagnait votre
produit ou remplacement direct, comme indiqué
dans le catalogue ou ce manuel. Ne substituez aucun
autre chargeur. N’utiliser que les chargeurs approuvés
par Bosch avec votre produit. Voir Description
fonctionnelle et Spécifications.
Ne désassemblez pas le chargeur et ne l'utilisez pas
s'il a reçu un choc violent, s'il est tombé ou s'il a
été endommagé par ailleurs. Remplacez
immédiatement les cordons ou les fiches abîmés.
Un remontage incorrect ou des dommages peuvent
provoquer un incendie ou des secousses électriques.
Ne rechargez pas la pile dans un environnement
mouillé ou humide. N'exposez pas le chargeur à la
pluie ou la neige. Si le boîtier de la pile est fissuré
ou endommagé par ailleurs, ne l'insérez pas dans le
chargeur. Il pourrait y avoir un incendie ou un court-
circuit de pile.
Ne charger que des piles rechargeables approuvées
par Bosch. Voir Description fonctionnelle et
Spécifications. Les autres types de piles peuvent
éclater causant ainsi des blessures et des dommages.
Chargez le bloc-piles à des températures de plus de
0 degrés C (+32°F) et de moins de 45 degrés C
(+113°F). Rangez l'outil et le bloc-piles à des
endroits dont la température ne dépasse pas 49
degrés C (+120°F). Ceci est important pour prévenir
des dommages considérables aux éléments des piles.
Il peut y avoir une fuite de pile dans des conditions
extrêmes d'utilisation ou de température. Évitez tout
contact avec la peau et les yeux. Le liquide de pile est
caustique et pourrait causer des brûlures chimiques
aux tissus. Si le liquide vient en contact avec la peau,
lavez rapidement à l'eau savonneuse. Si le liquide vient
en contact avec les yeux, rincez-les à l'eau pendant au
moins 10 minutes et sollicitez des soins médicaux.
Chargeur de pile
avant d'effectuer tout assemblage ou réglage ou de
changer les accessoires. Ces mesures de sécurité
préventives réduisent le risque d'une mise en marche
accidentelle de l'outil.
Placez-vous de manière à éviter d'être pris entre
l'outil ou la poignée latérale et les murs ou les
montants. Si le foret se coince ou grippe dans
l'ouvrage, le couple de réaction de l'outil pourrait
écraser votre main ou votre pied.
Si le foret grippe dans l'ouvrage, relâchez la
gâchette immédiatement, inversez le sens de
rotation et appuyez lentement sur la gâchette pour
faire ressortir le foret. Soyez prêt à un fort couple de
réaction. Le corps de la perceuse aura tendance à
tordre en sens opposé à mesure que le foret tourne.
Ne saisissez pas l'outil et ne placez vos mains trop
près du foret ou du mandrin en rotation. Votre main
pourrait être lacérée.
En installant un foret, insérez la tige de ce dernier
bien à l'intérieur de la pince du mandrin. Si le foret
n'est pas inséré assez profondément, la prise de la
pince sur le foret est réduite et la perte de contrôle est
accrue. Après avoir inséré le foret, tirez sur celui-ci
pour vous assurer qu’il est bien verrouillé.
N'utilisez pas de forets et d'accessoires émoussés
ou endommagés. Les forets émoussés ou
endommagés ont tendance à gripper dans l'ouvrage.
En retirant le foret de l'outil, évitez tout contact avec
la peau et utilisez des gants protecteurs appropriés
en saisissant le foret ou l'accessoire. Les
accessoires peuvent être chauds après une utilisation
prolongée.
Assurez-vous que les clés de serrage et de réglage
sont retirées de la perceuse avant de mettre l'outil
en marche. Les clés de serrage ou de réglage peuvent
être projetées à grande vitesse et frapper une
personne présente ou vous-même.
Ne faites pas fonctionner la perceuse en la portant à
votre côté. Un foret en rotation pourrait s'emmêlever
à vos vêtements, ce qui pourrait causer des blessures.
Les travaux à la machine
tel que ponçage, sciage,
meulage, perçage et autres travaux du bâtiment
peuvent créer des poussières contenant des produits
chimiques qui sont des causes reconnues de cancer,
de malformation congénitale ou d’autres problèmes
reproductifs. Ces produits chimiques sont, par
exemple :
• Le plomb provenant des peintures à base de plomb,
• Les cristaux de silices provenant des briques et du
ciment et d’autres produits de maçonnerie, et
• L’arsenic et le chrome provenant des bois traités
chimiquement.
Le niveau de risque dû à cette exposition varie avec la
fréquence de ces types de travaux. Pour réduire
l’exposition à ces produits chimiques, il faut travailler
dans un lieu bien ventilé et porter un équipement de
sécurité approprié tel que certains masques à poussière
conçus spécialement pour filtrer les particules
microscopiques.
A ERTISSEMENT
!
BM 2610007872 12/09:BM 2610007872 12-09 12/17/09 7:27 AM Page 17

-18-
Ne tentez pas de
désassembler le bloc-piles
ou d’enlever tout composant faisant saillie des bornes
de piles, ce qui peut provoquer un incendie ou des
blessures. Avant la mise au rebut, protégez les bornes
exposées à l’aide d’un ruban isolant épais pour prévenir
le court-circuitage.
PILES LITHIUM-ION
Si le produit est équipé d'une pile lithium-ion, la pile doit
être ramassée, recyclée ou mise au rebut d'une manière
qui ne soit pas nocive pour l'environnement.
“Le sceau RBRC de recyclage des
piles, homologué par l’EPA (Agence
pour la protection de l’environnement
des États-Unis), qui se trouve sur les
piles au lithium-ion (Li-ion) indique
que Robert Bosch Tool Corporation
participe volontairement à un programme industriel de
ramassage et de recyclage de ces piles au terme de leur
vie utile, pourvu qu’elles soient mises hors service aux
États-Unis ou au Canada. Le programme du RBRC offre
une alternative pratique à la mise des piles au Li-ion
usées au rebut ou au ramassage d’ordures municipal,
ce qui pourrait être interdit dans votre région.
Veuillez appeler le 1-800-8-BATTERY pour obtenir de
plus amples renseignements sur le recyclage des piles
au Li-ion et sur les restrictions ou interdictions de mise
au rebut qui s’appliquent à votre région ou renvoyez vos
piles à un Centre de Service Skil/Bosch/Dremel pour
recyclage. La participation de Robert Bosch Tool
Corporation à ce programme s'insère dans le contexte
de notre engagement à préserver notre environnement
et à conserver nos ressources naturelles.”
Mise au rebut des piles
A ERTISSEMENT
!
Entretien des piles
Lorsque les piles ne sont
pas dans l’outil ou le
chargeur, gardez-les à l’écart d’objets métalliques.
Ainsi, pour éviter un court-circuitage des bornes, NE
PLACEZ PAS les piles dans la boîte à outils ou dans la
poche avec des clous, des vis, des clés, etc. Ceci peut
provoquer un incendie ou des blessures.
NE METTEZ PAS LES PILES AU FEU ET NE LES
EXPOSEZ PAS À UNE CHALEUR ÉLE ÉE. Elles peuvent
exploser.
A ERTISSEMENT
!
Posez le chargeur sur une surface plate
ininflammable et à distance de matériaux
inflammables lorsqu’on recharge un bloc-piles. Le
chargeur et le bloc-piles s’échauffent pendant la
charge. Le coussinet de mousse souple et autres
surfaces isolantes empêchent la circulation normale
de l’air, ce qui peut provoquer une surchauffe du
chargeur et du bloc-piles. S’il y a dégagement de
fumée ou si le boîtier fond, débranchez le chargeur
immédiatement et n’utilisez ni le chargeur, ni le bloc-
piles.
L'utilisation d'un accessoire non recommandé ni
vendu par Bosch peut causer des risques d'incendie,
de chocs électriques ou de lésions corporelles.
BM 2610007872 12/09:BM 2610007872 12-09 12/17/09 7:27 AM Page 18

-19-
IMPORTANT : Certains des symboles suivants peuvent être utilisés sur votre outil. Veuillez les étudier et apprendre
leur signification. Une interprétation appropriée de ces symboles vous permettra d'utiliser l'outil de façon plus
efficace et plus sûre.
Symbole Nom Désignation/Explication
V Volts Tension (potentielle)
A Ampères Courant
Hz Hertz Fréquence (cycles par seconde)
W Watt Puissance
kg Kilogrammes Poids
min Minutes Temps
s Secondes Temps
Diamètre Taille des mèches de perceuse, meules,
etc.
n0Vitesse à vide Vitesse de rotation, à vide
.../min Tours ou mouvement alternatif par Tours, coups, vitesse en surface, orbites,
minute etc., par minute
0 Position d'arrêt Vitesse zéro, couple zéro ...
1, 2, 3, ... Réglages du sélecteur Réglages de vitesse, de couple ou de
l, ll, lll, ... position. Un nombre plus élevé signifie
une vitesse plus grande
Sélecteur variable à l'infini avec arrêt La vitesse augmente depuis le réglage 0
Flèche Action dans la direction de la flèche
Courant alternatif Type ou caractéristique du courant
Courant continu Type ou caractéristique du courant
Courant alternatif Type ou caractéristique du courant
ou continu
Construction classe II Désigne des outils construits avec double
isolation
Borne de terre Borne de mise à la terre
Symbole d'avertissement Alerte l'utilisateur aux messages
d'avertissement.
Sceau Li-ion RBRC Désigne le programme de recyclage des piles
Li-ion.
Symboles
0
Ce symbole signifie que cet
outil est approuvé par
Underwriters Laboratories.
Ce symbole signifie que cet
outil est approuvé par
l'Association canadienne
de normalisation.
Ce symbole signifie que cet outil
est approuvé par l'Association
canadienne de normalisation
selon les normes des États-Unis
et du Canada. Ce symbole
signifie que
cet outil se
conforme aux
normes
mexicaines
NOM.
Ce symbole signifie que cet outil
est approuvé par Underwriters
Laboratories selon les normes
des États-Unis et du Canada.
Ce symbole signifie que cet outil est approuvé par Intertek Testing
Services selon les normes des États-Unis et du Canada
BM 2610007872 12/09:BM 2610007872 12-09 12/17/09 7:27 AM Page 19

Numéro de modèle PS31
Tension nominale 10.8V/12V MAX
Régime à vide 1 n00-350/mn
Régime à vide 2 n00-1 300/mn
Capacités maximales
Dimension de mandrin 13 mm
Tailles de vis 7 mm
Métal doux 13 mm
Bois 19 mm
Temps de Charge BC330 1 heure
BC430 (30 minutes)
Bloc-piles BAT411
Chargeur BC330 et BC430
Tension nominale 120 V 60 Hz
-20-
Description fonctionnelle et spécifications
Débranchez le bloc-piles de l'outil ou placez l'interrupteur à la position de blocage
ou d'arrêt avant d'effectuer tout assemblage ou réglage ou de changer les
accessoires. Ces mesures de sécurité préventives réduisent le risque d'une mise en marche accidentelle de l'outil.
A ERTISSEMENT
!
FIG. 1
CHANGEMENT DE ITESSE
LE IER DE MARCHE
A ANT/ARRIÈRE ET
ERROUILLAGE DE
GÂCHETTE
POIGNÉE
CAOUTCHOUTÉE
TOUCHES DE
DE ERROUILLAGE
DES PILES
BLOC-PILES
EMBRAYAGE
REGLABLE
MANDRIN
SANS CLE
TÉMOINS D'ÉTAT DE
CHARGE DES PILES
GÂCHETTE DE COMMANDE
A ITESSE ARIABLE
ÉCLAIRAGE D’APPOINT
INTÉGRÉ
OU ERTURES DE
ENTILATION
Perceuse/visseuse sans fil
BM 2610007872 12/09:BM 2610007872 12-09 12/17/09 7:27 AM Page 20
Other manuals for PS31
2
Table of contents
Languages:
Other Bosch Cordless Driver Drill manuals