Bosch Lave-Vaisselle User manual

Dishwasher
en Operating instructions
Guide d’Utilisationfr
Lave-Vaisselle
9001070916 (9504)


1
Dear Valued Customer,
Thank you for selecting a Bosch® dishwasher. You have joined the
many consumers who demand quiet and superior performance from
their dishwashers.
This manual was written with your safety and convenience in mind,
and the information contained herein is very important. We highly
recommend that you read this manual before using your dishwasher
for the first time.
To learn more about your dishwasher and available accessories, as
well as many other top quality Bosch® appliances, visit our web site
at:
www.bosch-home.com/us (USA)
or
www.bosch-home.ca (Canada)
While there, don’t forget to register your new dishwasher by clicking
on the “Support” tab or filling out the product registration card
enclosed with your new unit.
If you have any questions or comments, please contact us by phone at:
1-800-944-2904
or write us at:
BSH Home Appliances Corporation
1901 Main Street, Suite 600
Irvine, CA 92614
Table of Contents
Important Safety Instructions............................................2-4
Dishwasher Components....................................................5-6
Dishwasher Setup..............................................................7-8
Dishware Materials...............................................................9
Loading the Dishwasher.................................................10-11
Loading the Silverware Basket............................................12
Rack Accessories................................................................13
Dishwasher Cycles and Options..........................................14
Wash Cycle Information......................................................15
Operating the Dishwasher..............................................16-18
Care and Maintenance....................................................19-20
Troubleshooting Guide...................................................21-23
Customer Service................................................................24
Statement of Limited Product Warranty.........................25-26

2
IMPORTANT SAFETY INSTRUCTIONS:
Please READ and SAVE this information
WARNING
Misuse of the dishwasher can result in serious injury or death. Do not
use the dishwasher in any way not covered in this manual or for any
purpose other than those explained in the following pages.
Severe product damage and/or injury could result from the use of
unqualified service technicians or non-original replacement parts. All
repairs must be performed by a qualified service technician using
only original equipment factory replacement parts.
Electrical shock or fire could result if the electrical supply for the
dishwasher covered in this manual is incorrectly installed or if the
dishwasher has been improperly grounded. Do not use the dish-
washer covered in this manual unless you are certain the electrical
supply has been correctly installed and the dishwasher has been
properly grounded.
Never use harsh chemicals to clean your dishwasher. Some chloride-
containing products can damage your dishwasher and may present
health hazards!
NOTICE
Never use steam cleaning products to clean your dishwasher. The
manufacturer will not be responsible for the possible damages or
consequences.
It is highly recommended for the end user to become familiar with
the procedure to shut off the incoming water supply and the proce-
dure to shut off the incoming power supply. See the Installation
Instructions or contact your installer for more information.
To avoid possible dishwasher damage, do not use harsh chemicals,
abrasive cleaners, scouring pads (metal or plastic), or abrasive
cloths/paper towels to clean your dishwasher’s exterior door panel.
Your dishwasher's exterior door panel can be damaged by doing so.
NSF/ANSI 184 Certified residential dishwashers are not intended for
licensed food establishments.

3
WARNING: To reduce the risk of fire, elec-
trical shock, or serious injury, observe the
following:
1 This dishwasher is provided with Installation Instructions and this
Use and Care Manual (operating instructions). Read and under-
stand all instructions before using the dishwasher.
2 This appliance must be grounded to a metal, permanent wiring
system, or an equipment grounding conductor must be run with
the circuit conductors and connected to the equipment grounding
terminal or lead on the dishwasher. See the Installation Instruc-
tions included with this dishwasher for more information on elec-
trical requirements.
3 Use this dishwasher only for its intended function, which is the
washing of household dishware and kitchenware rated as dish-
washer safe.
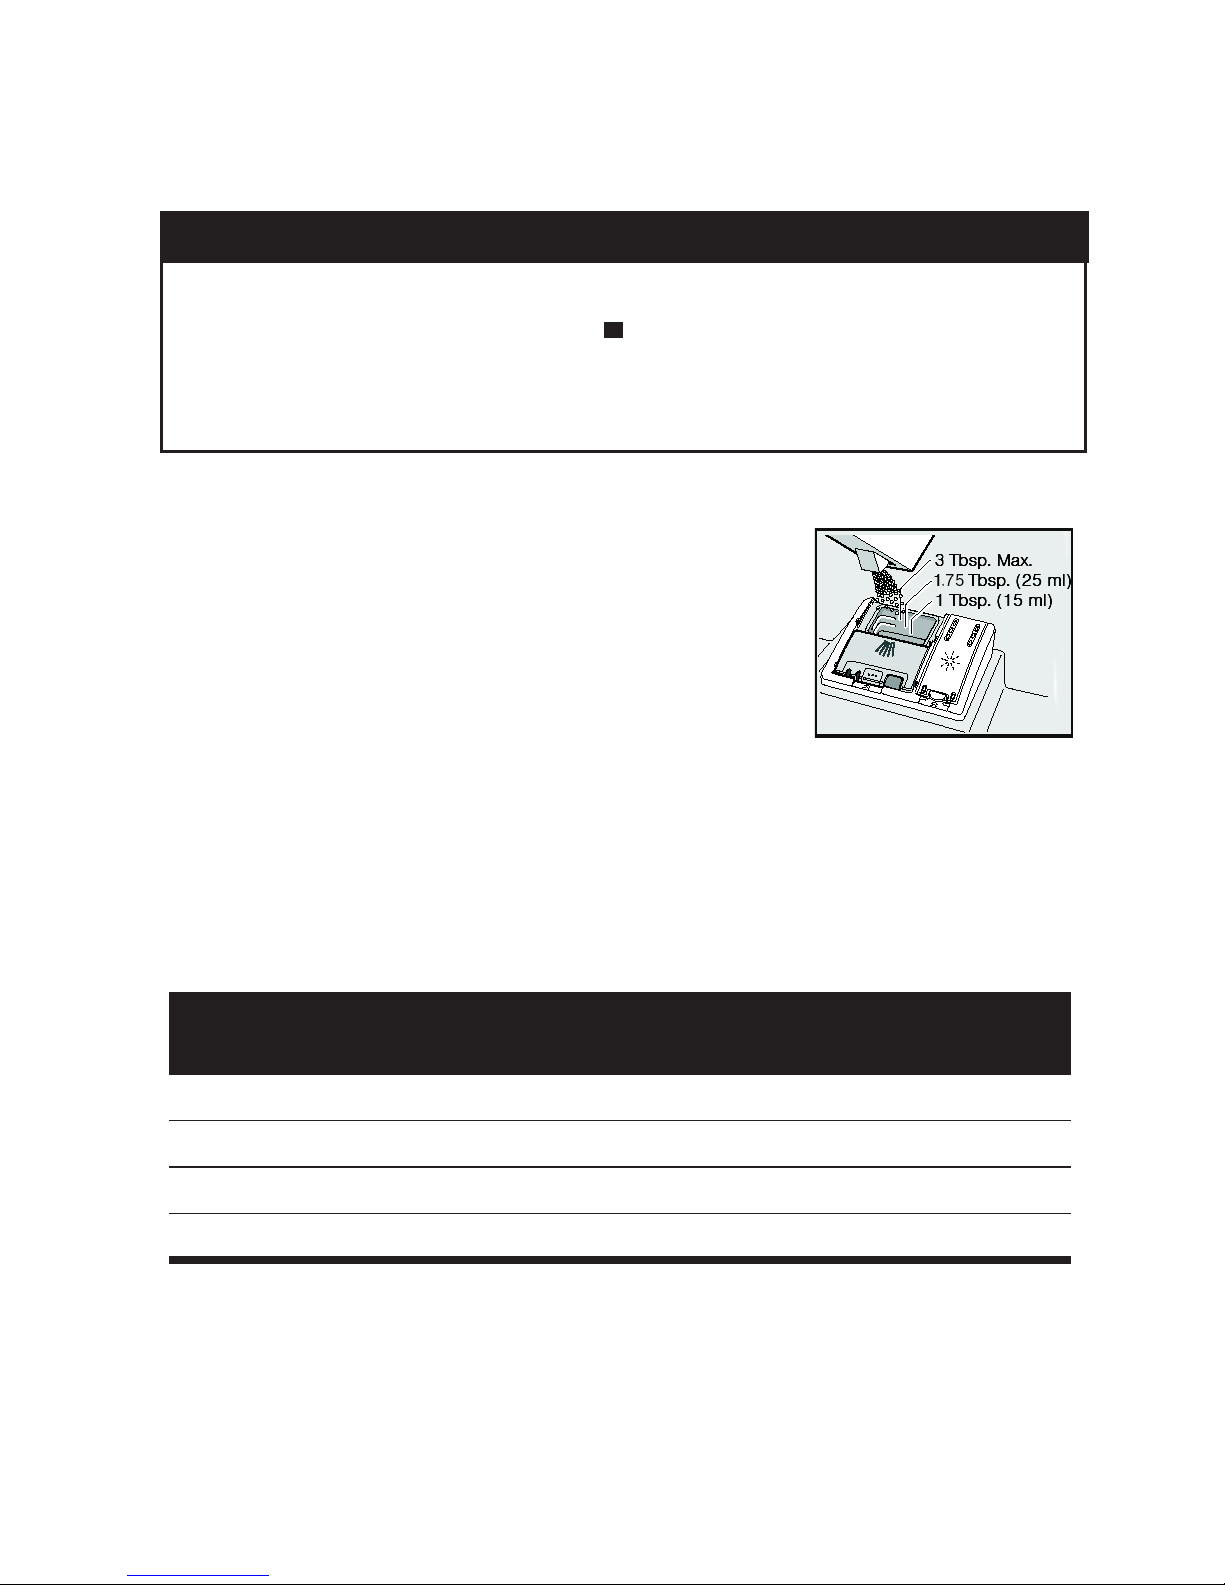
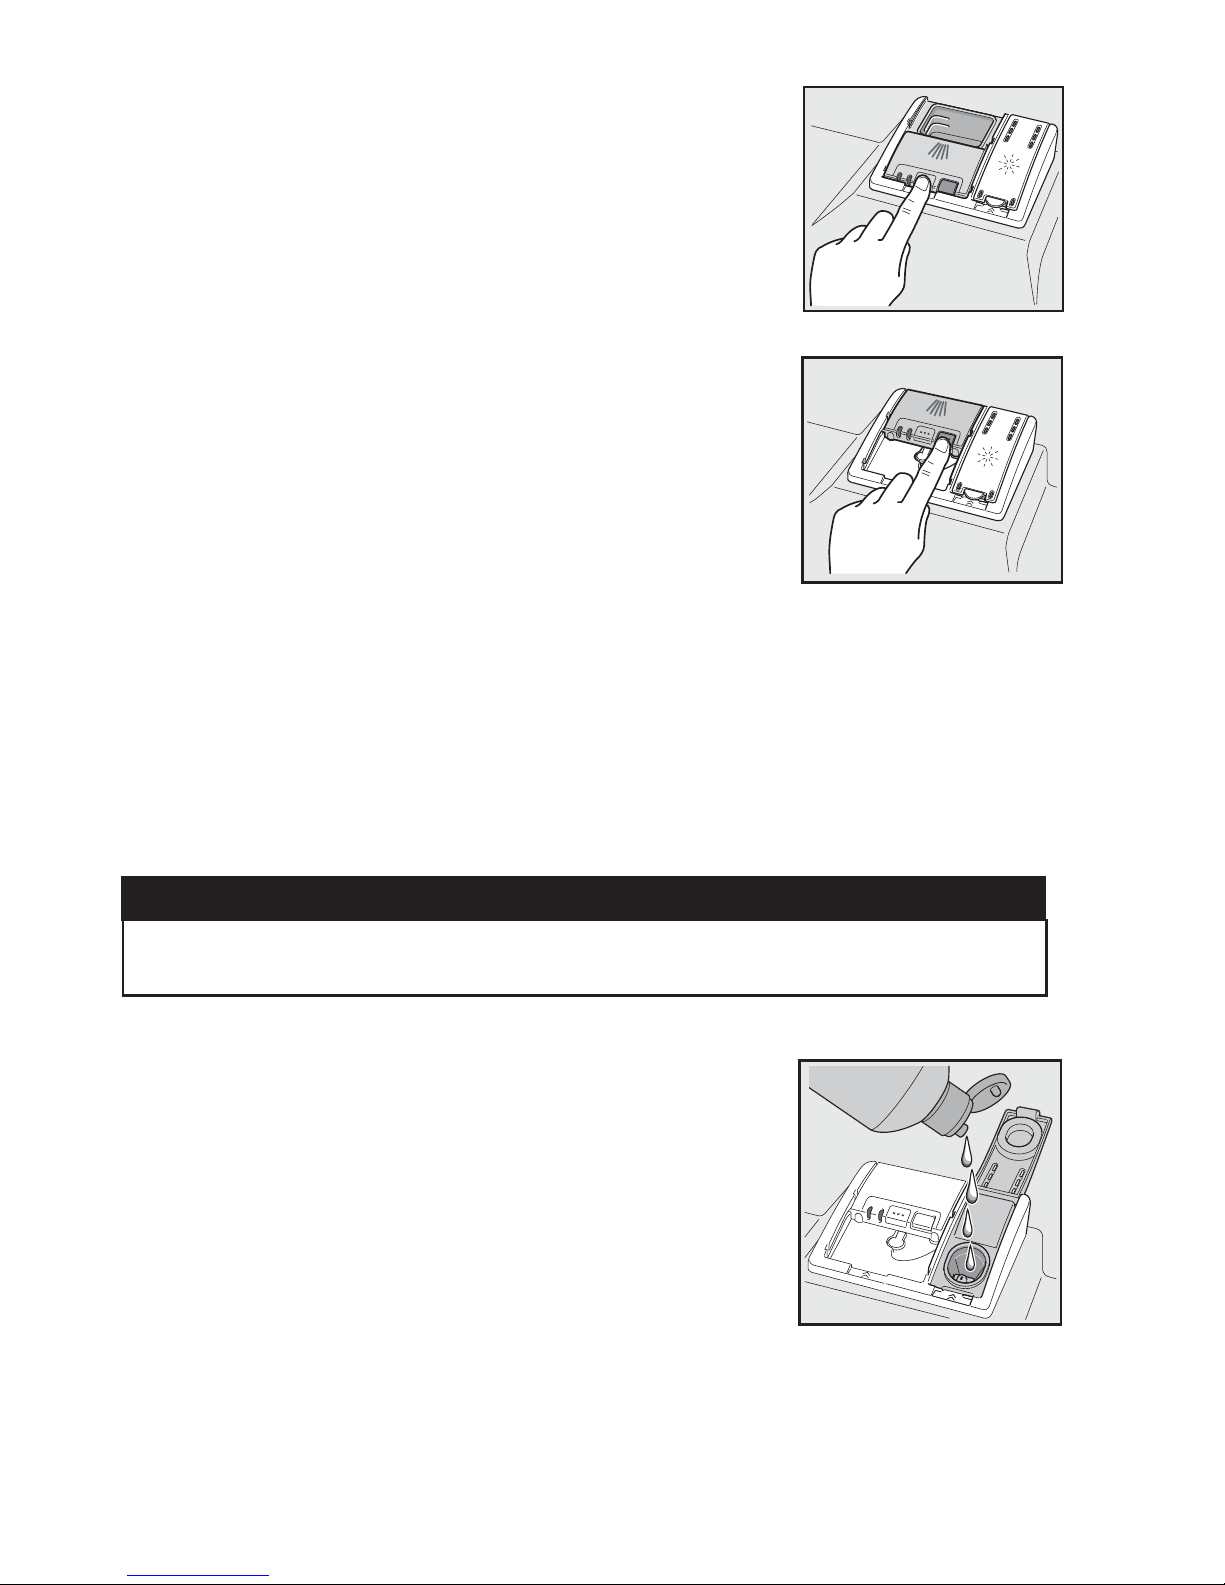
4 Use only detergents or rinsing agents recommended for use in a
dishwasher, and keep them out of the reach of children.
5 When loading items to be washed:
• Locate sharp items so they are not likely to damage the
door seal.
• Load knives and other sharp utensils with their HANDLES UP
to reduce the risk of cut-type injuries.
• Do not wash plastic items unless they are marked “dish-
washer safe” or the equivalent. For plastic items not so
marked, check the manufacturer’s recommendations.
• Do not operate your dishwasher unless all enclosure pan-
els are in place.
• Do not tamper with or override controls and interlocks.
6 Do not abuse, sit or stand on the door or dish racks of the dish-
washer.
7 To reduce risk of injury, do not allow children to play in or on the
dishwasher.
8 When children become old enough to operate the appliance, it is
the responsibility of the parents/legal guardians to ensure the chil-
dren are instructed in safe practices by qualified persons.
9 Under certain conditions, hydrogen gas may be produced in a hot
water system that has not been used for two weeks or more.
Hydrogen gas is explosive. Before using a dishwasher that is con-
nected to a hot water system that has been unused for two weeks
or longer, turn on all hot water faucets and let the water flow from
each for several minutes. This will release any accumulated hydro-
gen gas. As the gas is explosive, do not smoke or use an open
flame during this time.

4
10 Remove the dishwasher door to the washing compartment when
removing an old dishwasher for service or discarding.
11 To avoid floor damage and possible mold growth, do not allow
wet areas to remain around or under the dishwasher.
12 Protect your dishwasher from the elements. Protect against freez-
ing to avoid possible damage to the fill valve. Damage caused by
freezing is not covered by the warranty.
13
This appliance must be grounded. In the event of a malfunction or
breakdown, grounding will reduce the risk of electric shock by pro-
viding a path of least resistance for electric current. This appliance
is equipped with a cord having an equipment-grounding conductor.
• Improper connection of the equipment-grounding conductor
can result in risk of electric shock. Check with a qualified elec-
trician or service representative if you are in doubt whether the
appliance is properly grounded.
State of California Proposition 65 Warnings:
WARNING: This product contains one or more chemicals known to the
State of California to cause cancer, birth defects, or other reproductive
harm.

5
Dishwasher Components
Wash Cycles
Model Heavy Auto Normal Rinse
SHS63VLxUC*
Wash Cycle Options
Model Delay Delicate Sanitize ExtraDry ExtraScrub
SHS63VLxUC*
Additional Features Description
Rackmatic®
3 position adjustable upper rack.
The height of the
upper rack can be adjusted in 3 positions to create
more space.
Silverware Basket
Splits along its length resulting in 2 halves which can
be placed in a variety of positions in the lower rack to
improve loading versatility.
Infolight® A LED illuminates the floor to indicate the unit is
running.
Time Remaining
Indicator
Indicates the cycle time remaining.
44 dBA Sound Level
Quiet washing.
Delay Start
Start of a cycle can be delayed in 1-hour increments
up to 24 hours.
One Gallon “Rinse”
Cycle
If you need to pre-rinse dishes to avoid odors, let the
dishwasher do the work for you. Place unrinsed dishes
inside dishwasher and select the “Rinse” cycle. Uses
less water than hand rinsing and very low energy.
Note: Do not use detergent in this cycle.
Tab Tray / Upper
Rack Handle
Place detergent tabs inside the dispenser as normal.
The tabs fall into the tab tray and dissolve perfect
every time. Also serves as an upper rack handle.
24/7 AquaStop®
Leak Protection
If a leak has occurred, it shuts down operation and
automatically pumps out water to avoid contact
with the floor.
2 Flip Tine Rows in
Upper Rack
Folds down to improve loading versatility.
Two Cup Shelves
Can be used for cups or larger serving utensils.
* x can be any number

6
Plastic Item Clips
Securely holds light-weight plastic accessories (cups,
lids, etc.).
Low Rinse Aid Noti-
fication Light
Illuminates to indicate Rinse Aid is low.
Sanitized Notifica-
tion Light
Illuminates to indicate sanitation requirements are
met. Only available in Pots & Pans, Auto, or Normal
cycles.
Energy Efficient 259
kWh
ENERGY STAR® qualified.
Additional Features Description
Upper rack
Lower rack
Detergent Rinse aid
dispenser
dispenser
Upper rack
spray arm
basket
Lower rack
spray arm
Filter system
Vent hole
Rackmatic®
Cup shelves
Tab Tray/Rack Handle
Silverware
Rack Handle
Flip tines

7
Dishwasher Setup
Detergent
Use only detergent specifically designed for dishwashers. For best results,
use fresh powdered dishwashing detergent or detergent tabs.
NOTICE
To avoid dishwasher damage, do not use hand dishwashing products in
your dishwasher.
To avoid dishwasher damage, do not use too much detergent if your water
is soft. Using too much detergent with soft water may cause etching in
glassware.
-
The dishwasher uses less water than most, there-
fore, less detergent is required. With soft water, 1
tablespoon (15 ml) of detergent will clean most
loads. The detergent dispenser cup has lines that
measure detergent (Figure 1) to 1 tablespoon (15
ml) and 2 tablespoons (25 ml). 3 tablespoons (45
ml) of detergent will completely fill the detergent
dispenser.
Note: If you do not know the hardness of your water supply, use 15 ml (1 tbsp)
of detergent. Increase the amount if necessary to the least amount required to
get your kitchenware clean.
Use the measuring lines in the detergent dispenser cup as a guide to mea-
sure the amount of detergent recommended in Table 1.
Table 1- Recommended Detergent Amount
Wash Cycle Hard Water/
Heavy Soil
Medium Water/
Medium Soil
Soft Water/
Little Soil
Heavy 3 tbsp (45 ml) 3 tbsp (45 ml) 1.75-3 tbsp (25-45 ml)
Auto 1.75-3 tbsp (25-45 ml) 1.75 tbsp (25 ml) 1-1.75 tbsp (15-25 ml)
Normal 1.75-3 tbsp (25-45 ml) 1.75 tbsp (25 ml) 1-1.75 tbsp (15-25 ml)
Rinse None None None
Figure 1

8
To Close:
• Place finger as shown in Figure 2.
• Slide door closed and press down firmly until it
clicks.
To Open:
• To open the cover, push the button as shown in
Figure 3.
• Cover will slide open.
Rinse Aid
To achieve proper drying, always use a liquid rinse aid, even if your deter-
gent contains a rinse aid or drying additive.
Note: The dishwasher indicates low rinse aid by turning on the “Refill Rinse Aid”
LED in the display. If this light is on, you need to refill the rinse aid dispenser by
following the directions below.
Adding Rinse Aid
NOTICE
To avoid oversudsing or clogging, do not overfill the rinse aid dispenser.
Wipe up any spills with a damp cloth.
1 Add liquid rinse aid to the dispenser until it
is full (see Figure 4). Do not overfill.
2 Close the lid. Lid must be fully closed until it
clicks in order to seal.
3 Wipe up any excess rinse aid that may have pud-
dled when the dispenser reservoir is full.
The indicator light will go out a few moments after the
dishwasher door is shut. See page 18 for instructions on
how to adjust the amount of rinse aid dispensed.
Figure 2
Figure 3
Figure 4

9
Dishware Materials
Note: Before using your dishwasher for the first time, check the information in
this section. Some items are not dishwasher safe and should be hand
washed; others require special loading.
Recommended
Aluminum: Colored anodized aluminum may fade over time. Minerals in
your water may cause the aluminum to darken or spot. This can usually
be removed with a soap-filled steel wool pad.
China, Crystal, Stoneware: Some hand-painted utensils may discolor,
fade or spot. Hand wash these utensils. Position fragile glassware so
that it will not topple over or come in contact with other utensils during
the wash cycle.
Glass: Milk glass may discolor or become yellow.
Non-stick Coatings: Apply a light coating of vegetable oil to non-stick
surfaces after drying.
Plastics: Make sure the plasticware is dishwasher safe.
Stainless Steel, Sterling Silver and Silver Plates: Load these so they do
not come in contact with other metals.
Not Recommended
Acrylic: Crazing or small cracks throughout the acrylic, may occur.
Adhesive-Joined Pieces: Adhesives that join materials such as plastic,
wood, bone, steel copper, tin, etc. may loosen.
Bone-Handled Utensils: Handles may separate.
Iron: Iron will rust. Hand wash and dry immediately.
Non-Dishware Items: Your dishwasher is intended for use in cleaning ONLY
standard household dishware and kitchenware.
Pewter, Brass, Bronze: These items will tarnish. Hand wash and dry
immediately.
Tin: Tin will stain. Hand wash and dry immediately.
Wood: Wooden bowls, wooden utensils and utensils with wooden han-
dles can crack, warp and lose their finish.

10
Loading the Dishwasher
Do not pre-wash items with loosely attached food soil. Remove all food
particles, bones, toothpicks and excessive grease. Items having burned-on,
baked-on or starchy soils may require some pre-treatment. Refer to the
Dishware Materials section for more information about dishware suitabil-
ity.
Load only dishwasher safe items into the dishwasher. Load dishes in the
dishwasher racks so the insides of bowls, pots and pans are facing the
spray arms. Avoid nesting and contact points between dishes. Separate
items of dissimilar metals.
WARNING
The sharp points and edges of knives and other sharp utensils can cause
serious injuries. Load knives and other sharp utensils with edges down.
Do not allow children to handle or play near knives and sharp utensils.
NOTICE
To avoid dishwasher damage, do not load the dishwasher with paper
products, plastic bags, packing materials or anything other than normal,
dishwasher safe dishware and kitchenware.
Loading the Upper Rack
Ensure items do not protrude through the bottom of the racks and block
the spray arms.
Note: When pushing the upper rack into the dishwasher, push it until it stops
against the back of the tub so the upper rack spray arm connects to the water
supply at the back of the tub. Do not push racks in using the door.
Loading the Lower Rack
Place large items in the lower rack. Load pots, pans and bowls upside
down. Do not block vent with tall baking sheets. Load these items on the
right side of the dishwasher.
Unloading the Dishwasher
When unloading the dishwasher, it is recommended to unload the lower
rack first. Next, unload the silverware basket followed by the upper rack.
Note: Dishes are more likely to chip when unloading before cooling.

11
NOTE: Folding the cup shelves down will allow the cups to sit at an increased
angle and reduce water pooling on cup bottoms.
Suggested Loading Pattern
Upper Rack Lower Rack
Upper Rack
Additional Loading Pattern
Lower Rack

12
Loading the Silverware Basket
Place knives and sharp utensils with their HANDLES UP and forks and
spoons with their handles down. If large or oddly-shaped items are
loaded in the silverware basket, be sure they do not nest together.
WARNING
The sharp points and edges of knives and other sharp utensils can cause
serious injury. Load knives and other sharp utensils with edges down. Do
not allow children to handle or play near knives and sharp utensils.
The Silverware Basket
This basket splits along its length, resulting in two
halves that may be placed in a variety of positions
in the lower rack, greatly increasing the lower
rack’s loading versatility. The basket snaps
together either back to back or end to end as
shown.
To split the silverware basket:
Grasp the basket and slide the two halves in oppo-
site directions as shown at right and then pull the
two halves apart.
Loading pattern for Silverware Basket
The basket lid may also be snapped to the handle in
order to leave the basket open.
1234567
1- salad fork
2- teaspoon
3- dinner fork
4- knife
5 - tablespoon
6 - serving spoon
7 - serving fork
4
43
22
4
43
22

13
Rack Accessories
Flip Tines
The upper rack consists of tines that can be folded
down depending on what you may need to load in
the rack. To fold down, grasp the folding tine and
release from notch. Push folding tine downward to
desired position as shown in Figure 5.
RackMatic®
The height of the upper rack can be adjusted in 3
steps to create more space (see Figure 6).
1 Pull the upper rack out of the dishwasher
until it stops.
2 To lower the rack, push the lever inward.
3 To raise the rack, hold the basket on the sides
of the upper rack and lift up.
Plastic Item Clips
Light-weight plastic accessories (cups, lids, etc.) can
be held securely by the plastic item clips. See Figure 7.
Cup Shelves
The shelf and the space underneath can be used
for small cups or for larger serving utensils (see
Figure 8).
Figure 5
Figure 6
Figure 7
Figure 8

14
Dishwasher Cycles and Options
Wash Cycles
Note: In order to save energy, it is recommended to set the “Auto Power Off”
feature to “P:01” (see manual section titled “Auto Power Off”).
Heavy: Best for cleaning items with baked-on food or grease. These
dishes would normally require soaking.
Auto: Our smartest cycle, with our most flexible soil sensing capability,
this cycle is optimal for use with mixed dishware and food soils.
Normal:
This is the cycle recommended for daily, regular or typical use to
completely wash a full load of normally soiled dishes.
*OPSEFSUPPCUBJOPQUJNBMQFSGPSNBODFXJUINJOJNVNFOFSHZDPOTVNQ
UJPOJUJTSFDPNNFOEFEUPEJTBCMFBMMBWBJMBCMFPQUJPOTBOETFUUJOHT
FYDFQUi"VUP1PXFS0GGwBTOPUFEBUUIFTUBSUPGUIJTTFDUJPO
Note 1: See footnote for additional energy test setup instructions.
Rinse: If you need to pre-rinse dishes to avoid odors, let the dish-
washer do the work for you! Place unrinsed dishes inside the dish-
washer and select the “Rinse” cycle. Uses less water than hand rinsing
and very low energy.
Wash Cycle Options
Delay: Allows you to delay the start time of your dishwasher up to 24
hours.
Delicate: Available only in the Heavy, Auto and Normal cycles. This
option’s lower temperature will reduce the risk of cloudy glasses.
Sanitize: Available only in the Heavy, Auto and Normal cycles. The sani-
tize LED will light when sanitation requirements are met. The technical
sanitation measures may also improve the drying results.
Note: The dishwasher automatically defaults to Auto Wash when turned off
and back on. If you used the sanitize option in your last cycle, the dishwasher
will default to Auto Wash with the Sanitize option selected when you turn it
on.
ExtraDry: Used in combination with a wash cycle, the ExtraDry option
raises the temperature and extends the drying time to further enhance dry-
ing results and provides a brilliant shine.
ExtraScrub: This option increases pressure and temperature in the
lower rack for intensive cleaning.
Note 1: The Energy Guide label was based on the Normal or Regular soil sensing cycle as follows:
The unit was tested without any Rinse Aid (liquid) in the Rinse Aid chamber. A single dose of deter-
gent was inserted into the Detergent Dispenser, with no detergent being used in the prewash. The
unit was not subjected to truncated testing per the definitions in the test procedure. We recom-
mend that dish loads such as the one in the energy certification test have the rack position set in
the highest position.

15
Wash Cycle Information
The cycle times in this Use and Care Manual are based on normal soil
loads and 120°F incoming water and will vary based on your actual con-
ditions.
Heavy Auto Normal Rinse
cycle time 110-135 min 105-129 min 130-135 min 9 min
water cons. 18.6-24.2 L
4.9-6.4 gal 13.1-24.5 L
3.5-6.5 gal 8.8-20.8 L
2.4-5.5 gal 4.7 L
1.2 gal
wash temp. 66-71°C
150-160°F 53-66°C
127-150°F 45-55°C
113-131°F incoming
rinse temp. 72°C (162°F) 67°C (153°F) 69°C (156°F) incoming
Delicate
cycle time 105-110 min 90-105 min 100-120 min n/a
water cons. 18.6-24.2 L
4.9-6.4 gal 13.1-24.5 L
3.5-6.5 gal 8.8-20.8 L
2.4-5.5 gal n/a
rinse temp. 60°C (140°F) 60°C (140°F) 60°C (140°F) n/a
Sanitize
cycle time 130-150 min 125-140 min 135-155 min n/a
water cons. 18.6-24.2 L
4.9-6.4 gal 13.6-22.6 L
3.6-6.0 gal 8.8-20.8 L
2.4-5.5 gal n/a
rinse temp. 72°C (162°F) 72°C (162°F) 72°C (162°F) n/a
ExtraDry
cycle time 130-150 min 125-150 min 135-155 min n/a
water cons. 18.6-24.2 L
4.9-6.4 gal 13.1-24.5 L
3.5-6.5 gal 8.8-20.8 L
2.4-5.5 gal n/a
rinse temp. 72°C (162°F) 72°C (162°F) 72°C (162°F) n/a
ExtraScrub
cycle time 125-145 min 120-145 min 145-150 min n/a
water cons. 18.6-24.2 L
4.9-6.4 gal 13.1-24.5 L
3.5-6.5 gal 8.8-20.8 L
2.4-5.5 gal n/a
rinse temp. 72°C (162°F) 67°C (153°F) 69-72°C (156-162°F) n/a
Note: Only sanitizing cycles have been designed to meet the requirements of Section 6 of the NSF/
ANSI Standard for Residential Equipment for soil removal and sanitization efficacy. There is no
intention, either directly or indirectly, to imply that all cycles have passed sanitization performance
tests.

16
Operating the Dishwasher
NOTE: With hidden controls, the door must be opened before changing settings and
closed after changing settings.
Buttons are sensitive and should be touched gently. Avoid any grease or food parti-
cles resting on the buttons as they could activate the dishwasher. Wiping and clean-
ing can also activate the dishwasher. For best results, use bare, clean hands when
touching the buttons.
WARNING
To avoid risk of injury, always use caution when opening the door during or
following a wash cycle as hot water or steam may escape. Do not fully open
the door until water noises have stopped and steam has subsided.
Start the Dishwasher
1 Open the door and press the [On/Off] button.
2 Select a cycle and desired options and press [Start].
NOTE: You must press Start before closing the door.
Cancel a Cycle
1 Open the door and press and hold the [Start] button for approximately
3 seconds until the display reads “0:01”.
2 Wait about 1 minute while the dishwasher drains.
3 Open the door and press the [On/Off] button.
Interrupt a Cycle
1 Open the door and press the [On/Off] button to turn the unitoff.
2 To resume the cycle, press the [On/Off] button again.
Delay Start
You can delay the start of the cycle in one hour increments up to 24 hours.
To set delay start:
1 Open the door and press the [On/Off] button. Select a cycle.
2 Press the [Delay] button until the displayed time corresponds with
your requirements and press [Start] to activate delay start.
h:01 = 1 hour delay h:24 = 24 hour delay
To cancel delay start:
1 Open the door and press the [Delay] button until “h:00” is indicated on the
digital display.
2 Press [Start] to save setting.
SHS63VLxUC* C
B
A
* x can be any number
SanitizeDelicateDelay ExtraDry
ExtraScrub
Normal RinseHeavy Auto
Cycles Options

17
Cycle Completion Signal
1 Open the door and press the [On/Off] button.
2 Hold down the “A” button (see page 17) and press [Start] until the
display indicates “d:00”. Release both buttons.
3 Press the “A” button until the display shows “b:02”.
4 Press the “C” button to increase or decrease the tone “b:00” = OFF
and “b:03” = LOUDEST and press [Start] to save setting and close the
door.
Setting the Amount of Rinse Aid Used
The amount of rinse aid dispensed can be set from “r:00” to “r:06”.
1 Open the door and press the [On/Off] button.
2 Hold down the “A” button (see page 17) and press [Start] until the
display indicates “d:00”. Release both buttons.
3 Press the “A” button until the display shows “r:05”.
4 Press the “C” button to select the desired setting.
“r:00” = dispenser is OFF
“r:01” = lowest setting
“r:02” = low setting
“r:03” = medium setting
“r:04” = medium/high setting
“r:05” = high setting
“r:06” = highest setting
5 Press [Start] to save the setting and close the door.
Note: Using rinse aid and setting the dispenser to “r:00” may result in longer cy-
cle times.
Auto Power Off
To save energy, the dishwasher is turned off 1 minute after the wash
cycle ends. This setting can be adjusted from P:00 to P:02.
To change the setting:
1Open the door and press the [On/Off] button.
2 Hold down the “A” button (see page 17)and press [Start] until the
display indicates “d:0x” (x can be any number). Release both but-
tons.
3 Press the “A” button until the display indicates “P:0x”.
4 Press the “C” button until the display corresponds with your require-
ments.
P:00 = dishwasher does not turn off automatically
P:01 = dishwasher turns off automatically after 1 minute
P:02 = dishwasher turns off automatically after 120 minutes (2 hours)
5 Press [Start] to save the setting.

18
InfoLight®
An LED illuminates the floor to indicate the unit is running. If the appliance is
installed at eye-level, the LED is not visible.
To change the setting:
1 Open the door and press the [On/Off] button.
2 Hold down the “A” button (see page 17) and press [Start] until the dis-
play indicates “d:00”.
3 Release both buttons.
4 Press the “A” button until the display shows “1:01”.
5 Press the “C” button to switch between “1:01” = ON and “1:00” = OFF
and press [Start] to save. Close the door.
Aquastop® Leak Protection
Our AquaStop® system contains leaks through a precisely engineered tub
and sensor system that works with our solid molded base. If a leak has oc-
curred, it shuts down operation and automatically pumps out water to
avoid contact with the floor. It works 24/7 and can turn itself on.
Table of contents
Languages:
Other Bosch Dishwasher manuals

Bosch
Bosch SHS863WD5N User manual

Bosch
Bosch SMS6ECI38M Specification sheet

Bosch
Bosch SGV2ITX18G User manual

Bosch
Bosch SP Series User manual

Bosch
Bosch SRS4HMI3FR User manual

Bosch
Bosch SBV8EDX01A User manual

Bosch
Bosch 800 Series User manual

Bosch
Bosch SMV2ITX18E User manual

Bosch
Bosch SPI2HKS59E User manual

Bosch
Bosch SMD6EDX57G User manual

Bosch
Bosch SMI8YCS01E User manual

Bosch
Bosch SPS4HKW45G User manual

Bosch
Bosch ASCENTA User manual

Bosch
Bosch SMS4EMI00E User manual

Bosch
Bosch SMS69L22GB User manual

Bosch
Bosch Evolution SHE43P22UC User manual

Bosch
Bosch DISHWASHER User manual

Bosch
Bosch SMI4HTS01A User manual

Bosch
Bosch SMD8YCX01G User manual

Bosch
Bosch Dishwahser User manual