EnglishDeutsch
 logo
Brands
  1. Home
  2. •
  3. Brands
  4. •
  5. Bosch
  6. •
  7. Oven
  8. •
  9. Bosch HBL-HBN 5000 Series User manual

Bosch HBL-HBN 5000 Series User manual

Other Bosch Oven manuals

Bosch HBG636E 1 Series User manual

Bosch

Bosch HBG636E 1 Series User manual

Bosch HBM13B150B User manual

Bosch

Bosch HBM13B150B User manual

Bosch HBJ538EB0M/01 User manual

Bosch

Bosch HBJ538EB0M/01 User manual

Bosch CBG7341 1 Series User manual

Bosch

Bosch CBG7341 1 Series User manual

Bosch HBE5453UC User manual

Bosch

Bosch HBE5453UC User manual

Bosch CBG675B 1B Series User manual

Bosch

Bosch CBG675B 1B Series User manual

Bosch HBC86K7 3S Series User manual

Bosch

Bosch HBC86K7 3S Series User manual

Bosch Divar 700 Series User manual

Bosch

Bosch Divar 700 Series User manual

Bosch HSG7584 1 Series User manual

Bosch

Bosch HSG7584 1 Series User manual

Bosch HBM53R550B User manual

Bosch

Bosch HBM53R550B User manual

Bosch HEN301.1S User manual

Bosch

Bosch HEN301.1S User manual

Bosch HNG8764.7 Operating and maintenance instructions

Bosch

Bosch HNG8764.7 Operating and maintenance instructions

Bosch HBG7741 1 Series User manual

Bosch

Bosch HBG7741 1 Series User manual

Bosch CSG856R.7 User manual

Bosch

Bosch CSG856R.7 User manual

Bosch NBS113B 0B Series User manual

Bosch

Bosch NBS113B 0B Series User manual

Bosch HBA58B9 0B Series User manual

Bosch

Bosch HBA58B9 0B Series User manual

Bosch CBG7741 1 Series User manual

Bosch

Bosch CBG7741 1 Series User manual

Bosch HVA541NS0 User manual

Bosch

Bosch HVA541NS0 User manual

Bosch HRG6769 2 Series User manual

Bosch

Bosch HRG6769 2 Series User manual

Bosch HBG3414 0S Series User manual

Bosch

Bosch HBG3414 0S Series User manual

Bosch HGL10E150 User manual

Bosch

Bosch HGL10E150 User manual

Bosch HBN211.0GC User manual

Bosch

Bosch HBN211.0GC User manual

Bosch HBG675B 2 Series User manual

Bosch

Bosch HBG675B 2 Series User manual

Bosch HBL33B5 0W Series User manual

Bosch

Bosch HBL33B5 0W Series User manual

Popular Oven manuals by other brands

Electrolux EOF6P46X user manual

Electrolux

Electrolux EOF6P46X user manual

NEFF B44S32 5GB Series instruction manual

NEFF

NEFF B44S32 5GB Series instruction manual

Combi BLODGETT BC142GDS Specifications

Combi

Combi BLODGETT BC142GDS Specifications

AEG COMPETENCE 311704300 Installation and operating instructions

AEG

AEG COMPETENCE 311704300 Installation and operating instructions

Rational SCC WE 61G installation manual

Rational

Rational SCC WE 61G installation manual

Smeg DOSPA38X User manuals

Smeg

Smeg DOSPA38X User manuals

Electrolux air-o-convect 20 GN 2/1 user manual

Electrolux

Electrolux air-o-convect 20 GN 2/1 user manual

Miele HR 1954-2 operating instructions

Miele

Miele HR 1954-2 operating instructions

KHIND OT50 instruction manual

KHIND

KHIND OT50 instruction manual

Henny Penny Smoker Box installation manual

Henny Penny

Henny Penny Smoker Box installation manual

Lang ECOD-AP Installation and operation instructions

Lang

Lang ECOD-AP Installation and operation instructions

AEG BEK455310M user manual

AEG

AEG BEK455310M user manual

Frigidaire FNGE90JGR user manual

Frigidaire

Frigidaire FNGE90JGR user manual

Hotpoint FE9 S831 JSH IX user manual

Hotpoint

Hotpoint FE9 S831 JSH IX user manual

GE Advantium SCB2000 owner's manual

GE

GE Advantium SCB2000 owner's manual

AEG DE401301DM user manual

AEG

AEG DE401301DM user manual

DeLonghi XA660 Directions for use

DeLonghi

DeLonghi XA660 Directions for use

AEG BEB331010M user manual

AEG

AEG BEB331010M user manual

https://manuals.online logo
https://manuals.online logoBrands
  • About & Mission
  • Contact us
  • Privacy Policy
  • Terms and Conditions

Copyright 2026 Manuals.Online. All Rights Reserved.

Page 1 of 4 HBL-HBN 5000 SERIES
58300000112555 Rev. A
Reference: HBL-N5000-091405 September, 2005
Technical Support
1-800-444-9091
OVEN MODEL CONFIGURATION, TEST PROCEDURE & ERROR CODES
OVEN MODEL CONFIGURATION
Resistors R49, R51 and R52 on the display board must be configured properly, according to the oven model,
prior to installing the display board in the oven.
• Always cut R49 in single ovens.
• Always cut R52 in 27” ovens.
• Always cut R51 in ovens with a thermal cavity.
The test procedure must be completed to acknowledge and confirm this selection. If the control has never
been configured before, the display shows “F11 Err” at power-up. Once a configuration has been accepted,
the failure disappears.
At every power-up, the control runs a latch auto-test cycle. The lock icon flashes while the latch is moving.
Hold the [STOP] and [SET CLOCK] buttons at the same time for about 3 seconds. Check that all the display
elements and the buzzer turn on for about 5 seconds.
Press [+] to enter test mode, then press [+] to proceed to the next step or [-] to go back to the previous one.
Check the display board software version (d36 or d38).
Check the main power board software version (P32 or P34).
Check the lower oven power board software version (P32 or P34 - double ovens only).
Check whether the oven model has been correctly detected. Otherwise, check whether the configuration
resistors have been properly set as described earlier.
DISPLAY OVEN MODEL DISPLAY OVEN MODEL
Double 27”
Multifunction/Multifunction Single 27”
Multifunction
Double 27”
Multifunction/Thermal Single 27”
Thermal
Double 30”
Multifunction/Multifunction Single 30”
Multifunction
Double 30”
Multifunction/Thermal Single 30”
Thermal
Page 2 of 4 HBL-HBN 5000 SERIES
58300000112555 Rev. A
Reference: HBL-N5000-091405 September, 2005
Technical Support
1-800-444-9091
OVEN MODEL CONFIGURATION, TEST PROCEDURE & ERROR CODES
Verify that the meat probe option is off.
NOTE: In case of a thermal cavity, some steps are not necessary and are automatically skipped.
STEP 01: Check the oven lights.
STEP 02: Check the cooling fan.
STEP 03: Check the working fan.
STEP 04: Check the double line break (DLB) relay. The bottom element relay is closed, the DLB relay stays
open. The heating element must not energize, otherwise it means that the DLB relay has shorted.
STEP 05: Check the bottom heating element (3000W). The DLB relay is now closed.
STEP 06: Check the top heating element (3500W).
STEP 07: Check the ring heating element (2500W). The working fan is also running.
STEP 08: Check the additional heating element (1000W).
STEP 09: Check the cooking mode selector. Within 1 sec., “C00” is automatically displayed. Turn the knob
clockwise and check that the values match the ones in the following table:
Once back to the “off” position, the control automatically comes back to the S09 step indication.
STEP 10: Check the temperature selector. Within 1 sec., “dEf” (default) is automatically displayed in the
“preset” position. Turn the knob clockwise and verify that:
1. The temperature changes between 170°F and 550°F.
2. In “clean” position, the display must show “Cln”.
Once back to the “preset” position, the control automatically comes back to the S10 step indication.
STEP 11: Press [SET CLOCK] and check the temperature measured by the sensor inside the cavity.
CODE CONVECT THERMAL CODE CONVECT THERMAL
C00 OFF OFF
C01 CONV. BAKE C05 BAKE BAKE
C02 CONV. BROIL C06 BROIL BROIL
C03 CONV. ROAST C07 DEHYDRATE
C04 FAST PREHEAT C08 CLEAN CLEAN
Page 3 of 4 HBL-HBN 5000 SERIES
58300000112555 Rev. A
Reference: HBL-N5000-091405 September, 2005
Technical Support
1-800-444-9091
OVEN MODEL CONFIGURATION, TEST PROCEDURE & ERROR CODES
STEP 12: Press [SET CLOCK] to go back to the S11 indication.
Single Oven: Once “End” has been displayed, hold the [COOK TIME] and [TIMER] buttons at the same time
to quit manual test and go back to the normal oven operating mode. Go to section “FURTHER
VERIFICATIONS IN THE NORMAL OVEN OPERATING MODE” on the following page.
Double Oven:Repeat the same steps for the lower oven. In case of a thermal cavity, some steps are not
necessary and are automatically skipped.
STEP 13: Check the oven lights.
STEP 14: Check the cooling fan.
STEP 15: Check the working fan.
STEP 16: Check the double line break (DLB) relay. The bottom element relay is closed, the DLB relay stays
open. The heating element must not energize, otherwise it means that the DLB relay has shorted.
STEP 17: Check the bottom heating element (3000W). The DLB relay is now closed.
STEP 18: Check the top heating element (3500W).
STEP 19: Check the ring heating element (2500W). The working fan is also running.
STEP 20: Check the additional heating element (1000W).
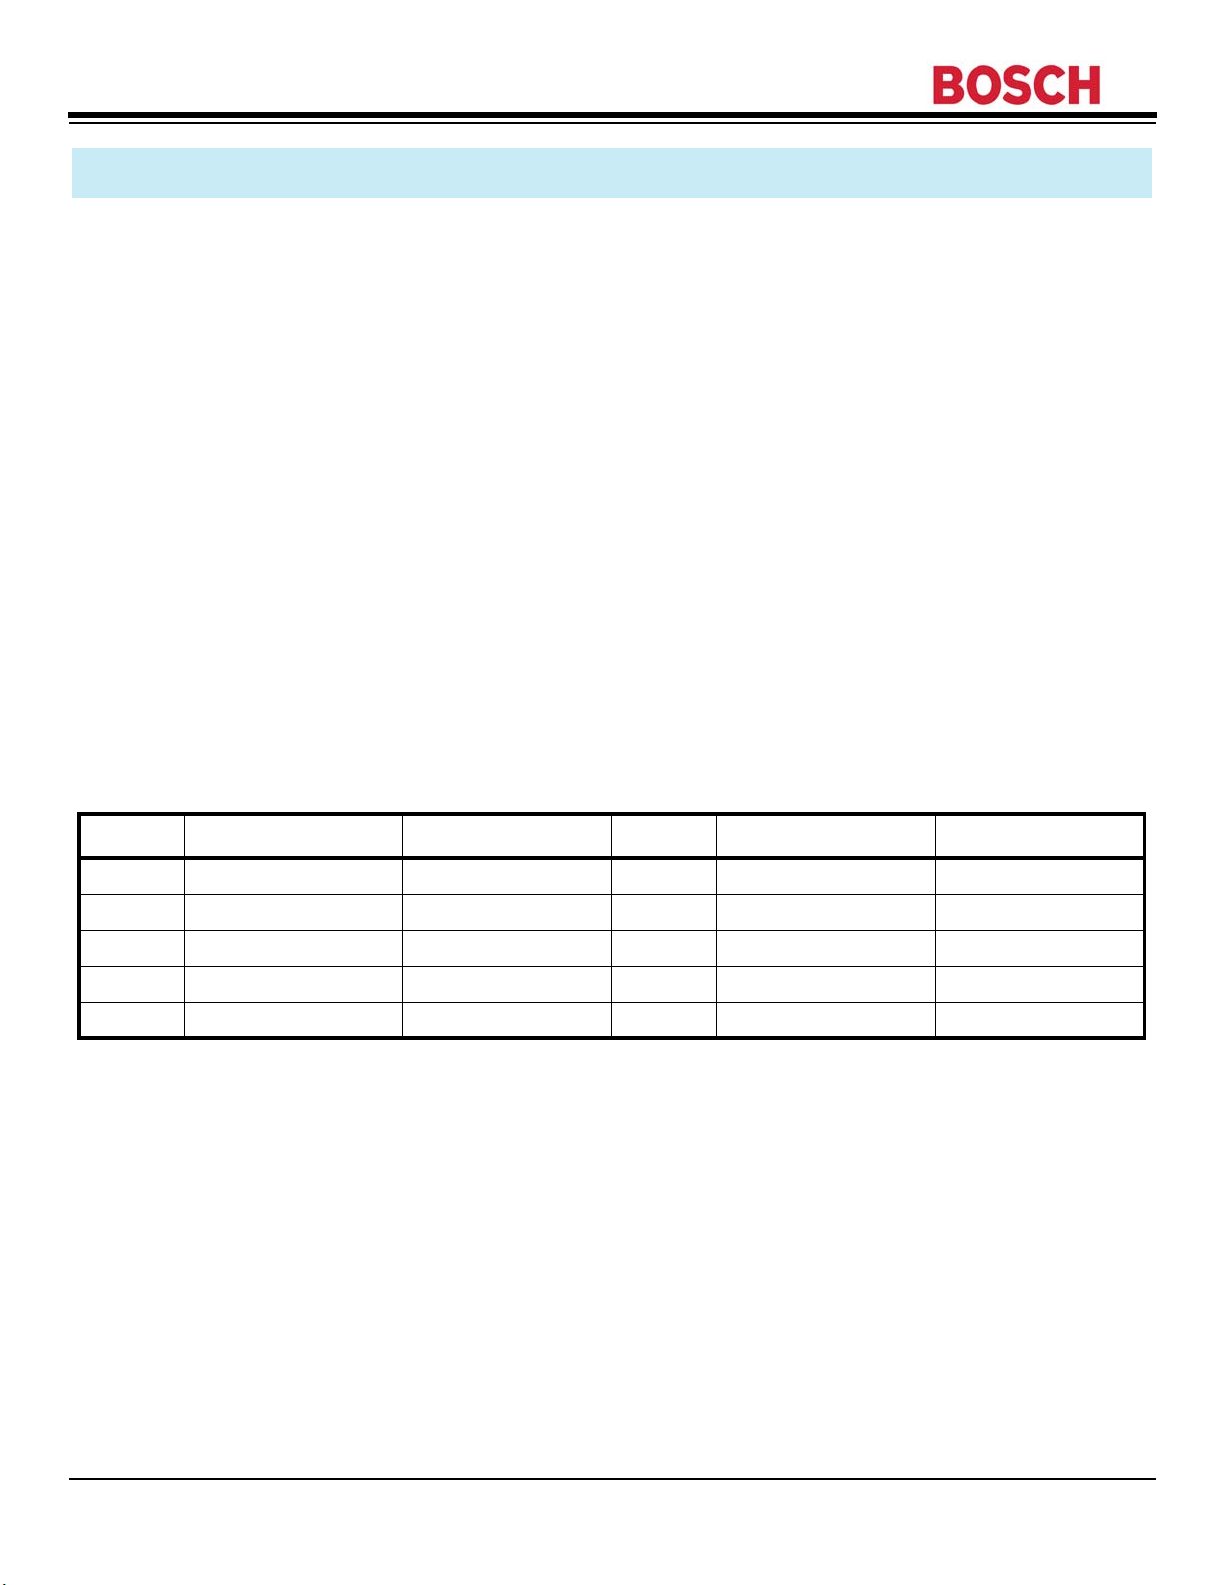
STEP 21: Check the cooking mode selector. Within 1 sec., “C00” is automatically displayed. Turn the knob
clockwise and check that the values match the ones in the following table:
Once back to the “off” position, the control automatically comes back to the S21 step indication.
STEP 22: Check the temperature selector. Within 1 sec., “dEf” (default) is automatically displayed in the
“preset” position. Turn the knob clockwise and verify that:
1. The temperature changes between 170°F and 550°F.
2. In “clean” position, the display must show “Cln”.
Once back to the “preset” position, the control automatically comes back to the S22 step indication.
STEP 23: Press [SET CLOCK] and check the temperature measured by the sensor inside the cavity. Press
[SET CLOCK] to go back to the S23 indication.
Once “End” has been displayed, hold the [COOK TIME] and [TIMER] buttons at the same time to quit manual
test and go back to the normal oven operating mode.
CODE CONVECT THERMAL CODE CONVECT THERMAL
C00 OFF OFF
C01 CONV. BAKE C05 BAKE BAKE
C02 CONV. BROIL C06 BROIL BROIL
C03 CONV. ROAST C07 DEHYDRATE
C04 FAST PREHEAT C08 CLEAN CLEAN
Page 4 of 4 HBL-HBN 5000 SERIES
58300000112555 Rev. A
Reference: HBL-N5000-091405 September, 2005
Technical Support
1-800-444-9091
OVEN MODEL CONFIGURATION, TEST PROCEDURE & ERROR CODES
FURTHER VERIFICATIONS IN THE NORMAL OVEN OPERATING MODE
Self-Clean:
1. Open the door and verify that the oven lights switch on. Close the door and verify that the lights switch
off (door microswitch verification).
2. Turn the cooking mode selector to “clean” position. Self-clean must not start.
3. Start self-clean in the main cavity by also turning the temperature knob to the “clean” position (two
steps on).
4. Check whether the door is actually locked. (As soon as the lock icon stops flashing and remains
steadily on, the door is locked.)
5. Stop self-clean by turning the cooking mode selector to the “off” position (one step off).
6. Check whether the door is actually unlocked. (As soon as the lock icon stops flashing and turns off, the
door is unlocked.)
7. Turn the temperature selector to the “preset” position.
8. FOR DOUBLE OVENS ONLY: Repeat the same sequence described above for the lower oven.
NOTE: The lock icon flashes when the latch is in motion.
Remaining Buttons Functionality:
1. Press the [LIGHT] button and verify that the oven lights switch on. Press it again to switch the lights off.
2. Press the button:
a. [UPPER/LOWER] (in the case of a double oven) and verify that the cavity selection box turns on
and switches up and down every time the button is pressed.
b. [LOCK] (in the case of a single oven) and verify that the buzzer sounds.
3. Press the [-] button and verify that the buzzer sounds.
When a failure occurs, the display shows “F07 Err”.
To reset the failure, the cause must be removed and the cooking mode selector must be turned to the “off”
position.
ERROR CODE
TEMPERATURE SENSOR F01
LOWER OVEN TEMPERATURE SENSOR F02
LATCH MECHANISM F03
LOWER OVEN LATCH MECHANISM F04
OVEN TEMPERATURE DETECTED WHILE COOKING F05
OVEN TEMPERATURE DETECTED WHILE COOKING (LOWER OVEN) F06
OVEN TEMPERATURE DETECTED IN SELF-CLEAN F07
OVEN TEMPERATURE DETECTED IN SELF-CLEAN (LOWER OVEN) F08
POSSIBLE SHORT CIRCUIT ON DISPLAY BOARD MICRO PINS F09
POSSIBLE SHORT CIRCUIT ON DISPLAY BOARD CIRCUITS F10
DISPLAY BOARD EEPROM DATA CANNOT BE ACCESSED F11
ELECTRONIC BOARDS OVER TEMPERATURE F12
MEAT PROBE ERROR F13
COMMUNICATION PROBLEM AMONG THE ELECTRONIC BOARDS F14