manuals.online logo
Brands
  1. Home
  2. •
  3. Brands
  4. •
  5. Bose
  6. •
  7. Home Theater System
  8. •
  9. Bose CineMate 120 User manual

Bose CineMate 120 User manual

owners.Bose.com
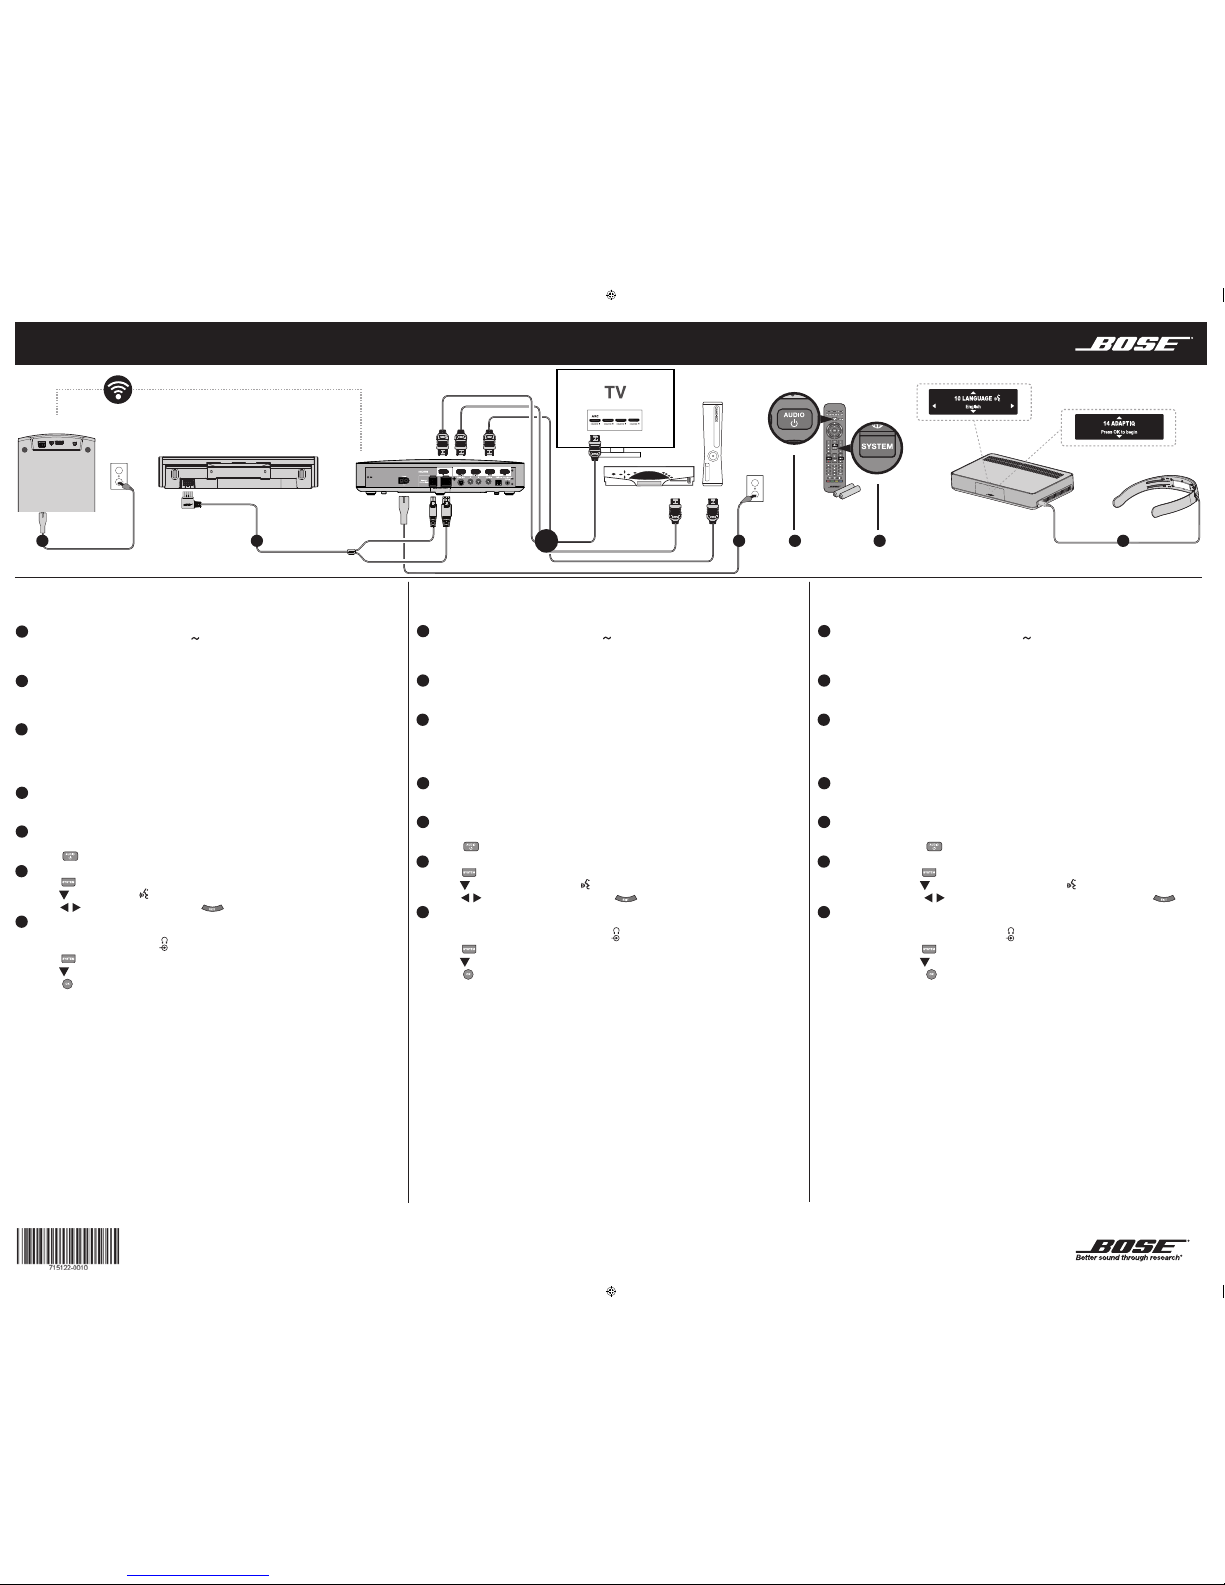
Before you begin: Place the console, speakers, and Acoustimass®module.
1
2 3 4 5 6 7 8 9
Connect the Acoustimass module to power
• Connect the power cord into the module’s
Powe
r
connector.
• Plug the other end of the power cord into an AC (mains) outlet.
Note: The module has a wireless connection to the console.
1
2
3 4 5 6 7 8 9
Connect the soundbar to the console
• Insert the two-pronged end of the speaker cable into the console’s
Speaker Connections
connectors.
• Insert the other end of the speaker cable into the 10-pin connector on the soundbar.
1 2
3
4 5 6 7 8 9
Connect the console to your TV and other devices
• Insert the HDMI™ cable into the console’s
TV
connector.
• Insert the other end of the cable into your TV’s
HDMI
connector.
Note: Use your TV’s
HDMI ARC
connector if available.
• Connect other devices to the console using HDMI cables.
1 2 3
4
5 6 7 8 9
Connect the console to power
• Insert the power cord into the console’s
Power
connector.
• Plug the other end of the power cord into an AC (mains) outlet.
1 2 3 4
5
6 7 8 9
Power on the system
• Install the batteries into the remote control.
• Press on the remote control.
1 2 3 4 5
6
7 8 9
Change the language on the console
• Press on the remote control. The System menu appears on the display.
• Press until
10 LANGUAGE
appears on the display.
• Press to select your language. Press .
1 2 3 4 5 6
7
8 9
Run ADAPTiQ®calibration
• Put the ADAPTiQ headset on your head.
• Insert the headset’s cable into the connector on the console.
• Press on the remote control. The System menu appears on the display.
• Press until
14 ADAPTiQ
appears on the display.
• Press . Follow the voice prompts.
Troubleshooting
No or low sound from speakers Remote control does not work
• Increase volume • Install batteries
• Unmute system • Program remote control to work with TV
• Connect Acoustimass module’s
and console’s power cords
Sound coming from TV speakers
• Power on system • Turn off your TV speakers
• Fully insert all cables • Decrease TV volume to lowest settings
• Connect devices using HDMI cables
HDMI is a trademark or registered trademark of HDMI Licensing LLC in the United States and other countries.
© 2014 Bose Corporation. No part of this work may be reproduced, modified, distributed, or otherwise used without prior written permission
Antes de comenzar: Coloque la consola, los altavoces y el módulo Acoustimass®.
1
2 3 4 5 6 7 8 9
Conecte el módulo Acoustimass a la red eléctrica
• Conecte el cable de alimentación al conector
Powe
r
del módulo.
• Enchufe el otro extremo del cable de alimentación a la toma de la red eléctrica de CA.
Nota: El módulo tiene una conexión inalámbrica con la consola.
1
2
3 4 5 6 7 8 9
Conecte el altavoz soundbar a la consola
•Inserte el extremo doble del cable del altavoz a los conectores
Speaker Connections
de la consola.
• Inserte el otro extremo del cable del altavoz al conector de 10 pines del altavoz soundbar.
1 2
3
4 5 6 7 8 9
Conecte la consola a su televisor y a otros dispositivos
• Inserte el cable HDMI™ en el conector
TV
de la consola.
• Inserte el otro extremo del cable en el conector
HDMI
de su televisor.
Nota: Utilice el conector
HDMI ARC
de su televisor, si está disponible.
• Conecte los otros dispositivos a la consola mediante cables HDMI.
1 2 3
4
5 6 7 8 9
Conecte la consola a la alimentación
• Inserte el cable de alimentación en el conector
Power
de la consola.
• Enchufe el otro extremo del cable de alimentación a la toma de la red eléctrica de CA.
1 2 3 4
5
6 7 8 9
Encienda el sistema
• Introduzca las pilas en el control remoto.
• Pulse en el control remoto.
1 2 3 4 5
6
7 8 9
Cambie el idioma de la consola
• Pulse en el control remoto. Aparecerá en la pantalla el menú Sistema.
• Pulse hasta que aparezca
10 IDIOMA
en la pantalla.
• Pulse para seleccionar su idioma. Pulse .
1 2 3 4 5 6
7
8 9
Ejecute la calibración ADAPTiQ®
• Colóquese los auriculares ADAPTiQ.
• Inserte el cable de los auriculares en el conector de la consola.
• Pulse en el control remoto. Aparecerá en la pantalla el menú Sistema.
• Pulse hasta que aparezca
14 ADAPTiQ
en la pantalla.
• Pulse . Siga las indicaciones de voz.
Resolución de problemas
No hay sonido o el volumen es bajo en los altavoces El control remoto no funciona
• Suba el volumen
• Recupere el sonido del sistema
• Conecte los cables de alimentación del módulo
Acoustimass y de la consola
• Encienda el sistema
• Inserte completamente todos los cables
• Conecte los dispositivos utilizando cables HDMI
• Introduzca pilas en el control remoto
• Programe el control remoto para que funcione
con el televisor
El sonido procede de los altavoces del televisor
• Apague los altavoces del televisor
• Baje el volumen del televisor a su nivel más bajo
HDMI es una marca comercial o una marca comercial registrada de HDMI Licensing LLC en Estados Unidos y otros países.
© 2014 Bose Corporation. Ninguna parte de este trabajo podrá reproducirse, modificarse, distribuirse o usarse de ninguna otra manera sin permiso
previo y por escrito.
supplémentaires.
Avant de commencer : placez la console, les enceintes et le module Acoustimass®.
1
2 3 4 5 6 7 8 9
Raccordez le module Acoustimass à la prise secteur
• Raccordez le cordon d’alimentation au connecteur
Powe
r
du module.
• Branchez l’autre extrémité du cordon à une prise secteur.
Remarque : Le module possède une fonctionnalité de connexion sans fil à la console
1
2
3 4 5 6 7 8 9
Raccordez la barre de son à la console
•Insérez l’extrémité à deux fils du câble d’enceinte aux connecteurs
Speaker Connections
de la console.
• Insérez l’autre extrémité du câble d’enceinte dans le connecteur à 10 broches de la barre de son.
1 2
3
4 5 6 7 8 9
Raccordez la console au téléviseur et aux autres appareils
• Insérez le câble HDMI™ dans le connecteur
TV
de la console.
• Insérez l’autre extrémité du câble dans le connecteur
HDMI
de votre téléviseur.
Remarque : Utilisez le connecteur
HDMI ARC
de votre téléviseur si celui-ci est disponible.
• Raccordez les autres appareils à la console à l’aide de câbles HDMI.
1 2 3
4
5 6 7 8 9
Raccordez la console à la prise secteur
• Insérez le cordon d’alimentation dans le connecteur
Power
de la console.
• Branchez l’autre extrémité du cordon à une prise secteur.
1 2 3 4
5
6 7 8 9
Mise sous tension du système
• Installez les piles dans la télécommande.
• Appuyez sur la touche de la télécommande.
1 2 3 4 5
6
7 8 9
Modifiez la langue sur la console
• Appuyez sur la touche de la télécommande. Le menu Système s’affiche
• Appuyez sur la touche jusqu’à ce que l’indication
10 LANGUE
s’affiche
• Appuyez sur la touche pour sélectionner votre langue. Appuyez sur la touche .
1 2 3 4 5 6
7
8 9
Exécutez l’étalonnage ADAPTiQ®
• Placez le casque ADAPTiQ sur votre tête.
• Insérez le câble du casque dans le connecteur de la console.
• Appuyez sur la touche de la télécommande. Le menu Système s’affiche
• Appuyez sur la touche jusqu’à ce que l’indication
14 ADAPTiQ
s’affiche
• Appuyez sur la touche . Suivez les instructions vocales.
Résolution des problèmes
Absence de son ou son faible provenant
des enceintes La télécommande ne fonctionne pas
• Augmenter le volume
• Restaurer le son du système
• Raccorder les câbles d’alimentation
du module Acoustimass et de la console
• Mettre le système sous tension
• Insérer correctement tous les câbles
• Raccorder les appareils à l’aide de
câbles HDMI
• Insérer des piles
• Programmer la télécommande de façon à ce
qu’elle contrôle le téléviseur
Son provenant des haut-parleurs du téléviseur
• Désactiver les haut-parleurs du téléviseur
• Régler le volume du téléviseur sur le niveau le
plus faible
HDMI est une marque commerciale ou une marque déposée de HDMI Licensing LLC, aux USA et dans d’autres pays.
© 2014 Bose Corporation. Toute reproduction, modification, distribution ou aut e utilisation, même partielle, de ce document est interdite sans
autorisation écrite préalable.
14 ADAPTiQ
©2014 Bose Corporation, The Mountain,
Framingham, MA 01701-9168 USA
AM715122 Rev.00
1 2 34 5 76
CineMate®120 home theater system Quick Start Guide • Guía de inicio rápido • Guide de démarrage rapide
ENGLISH
CAUTION: Refer to the owner’s guide for safety-related information, and additional setup, speaker placement,
and operating instructions.
ESPAÑOL
PRECAUCIÓN: Consulte en la guía del usuario información sobre seguridad, configuración adicional, et le placement des enceintes, ainsi que des instructions de fonctionnement et d’installation
FRANÇAIS
ATTENTION: Reportez-vous à la notice d’utilisation pour obtenir des informations concernant la sécurité
colocación de los altavoces e instrucciones de uso.
CineMate®120 home theater system Lynstartvejledning • Kurzanleitung • Beknopte handleiding
owners.Bose.com
Inden du starter: Placer konsollen, højttalere og Acoustimass®modulet.
1
2 3 4 5 6 7 8 9
Tilslut Acoustimass-modulet til lysnettet
• Sæt netledningen i modulets
Powe
r
stik.
• Sæt den anden ende af netledningen i en stikkontakt.
Bemærk: Modulet har en trådløs forbindelse til konsollen.
1
2
3 4 5 6 7 8 9
Tilslut soundbaren til konsollen
• Sæt den to-benede ende af højttalerkablet i konsollens stik til
højttalertilslutning
.
• Sæt den anden ende af højttalerkablet i det 10-benede stik på soundbaren.
1 2
3
4 5 6 7 8 9
Tilslut konsollen til dit tv og andre enheder
• Sæt HDMI™-kablet i konsollens
tv-
stik.
• Sæt den anden ende af kablet i tv’ets
HDMI
-stik.
Bemærk: Brug tv’ets
HDMI ARC
-stik, hvis det findes
• Tilslut andre enheder til konsollen ved hjælp af HDMI-kabler.
1 2 3
4
5 6 7 8 9
Slut konsollen til lysnettet
• Sæt netledningen i konsollens
strømstik
.
• Sæt den anden ende af netledningen i en stikkontakt.
1 2 3 4
5
6 7 8 9
Tænd systemet
• Sæt batterierne i fjernbetjeningen.
• Tryk på på fjernbetjeningen.
1 2 3 4 5
6
7 8 9
Skift sprog på konsollen
• Tryk på på fjernbetjeningen. Systemmenuen vises på displayet.
• Tryk på , indtil
10 SPROG
vises på displayet.
• Tryk på for at vælge dit sprog. Tryk på .
1 2 3 4 5 6
7
8 9
Kør ADAPTiQ®-kalibreringen
• Sæt ADAPTiQ-hovedtelefonen på dit hoved.
• Sæt hovedtelefonens kabel i stikket på konsollen.
• Tryk på på fjernbetjeningen. Systemmenuen vises på displayet.
• Tryk på , indtil
14 ADAPTiQ
vises på displayet.
• Tryk på . Følg stemmens anvisninger.
Fejlfinding
Ingen eller lav lyd fra højttalere Fjernbetjening fungerer ikke
• Øg lydstyrken • Isæt batterier
• Slå systemets lyd fra • Programmér fjernbetjening til at fungere sammen med tv
• Tilslut Acoustimass-modulets og
konsollens netledninger
Lyd kommer fra tv-højttalere
• Tænd systemet • Sluk dine tv-højttalere
• Sæt alle kabler helt ind • Sænk tv-lydstyrken til de laveste indstillinger
• Tilslut enheder ved hjælp af HDMI-kabler
HDMI er et varemærke eller et registreret varemærke, som tilhører HDMI Licensing LLC i USA og andre lande.
© 2014 Bose Corporation. Gengivelse, ændring, distribution eller anden brug af dette dokument eller dele heraf er forbudt uden forudgående skriftlig
tilladelse.
Bevor Sie beginnen: Stellen Sie die Konsole, die Lautsprecher und das Acoustimaß®-Modul auf.
1
2 3 4 5 6 7 8 9
Acoustimaß-Modul an den Strom anschließen
• Schließen Sie das Netzkabel an den Anschluss
Powe
r
des Moduls an.
• Stecken Sie den anderen Stecker des Netzkabels in eine Netzsteckdose.
Hinweis: Das Modul hat eine drahtlose Verbindung zur Konsole.
1
2
3 4 5 6 7 8 9
Soundbar an die Konsole anschießen
• Schließen Sie den Stecker mit zwei Stiften des Lautsprecherkabels in die Anschlüsse
Speaker
Connections
der Konsole an.
• Schließen Sie den anderen Stecker des Lautsprecherkabels an den 10-poligen Anschluss an der
Soundbar an.
1 2
3
4 5 6 7 8 9
Konsole an das Fernsehgerät und an andere Geräte anschließen
• Schließen Sie das HDMI™-Kabel an den
TV
-Anschluss der Konsole an.
• Schließen Sie das andere Ende des Kabels an den
HDMI
-Anschluss des Fernsehgeräts an.
Hinweis: Verwenden Sie den
HDMI ARC
-Anschluss des Fernsehgeräts, falls vorhanden.
• Schließen Sie andere Geräte mithilfe von HDMI-Kabeln an die Konsole an.
1 2 3
4
5 6 7 8 9
Konsole an den Strom anschließen
• Schließen Sie das Netzkabel an den
Power
-Anschluss der Konsole an.
• Stecken Sie den anderen Stecker des Netzkabels in eine Netzsteckdose.
1 2 3 4
5
6 7 8 9
System einschalten
• Legen Sie die Batterien in die Fernbedienung ein.
• Drücken Sie auf der Fernbedienung.
1 2 3 4 5
6
7 8 9
Sprache an der Konsole ändern
• Drücken Sie auf der Fernbedienung. Das Systemmenü wird auf dem Bildschirm angezeigt.
• Drücken Sie , bis
10 SPRACHE
auf dem Bildschirm angezeigt wird.
• Drücken Sie , um Ihre Sprache auszuwählen. Drücken Sie .
1 2 3 4 5 6
7
8 9
ADAPTiQ®-Kalibrierung ausführen
• Setzen Sie das ADAPTiQ-Headset auf Ihren Kopf.
• Schließen Sie das Kabel des Headsets an den Anschluss an der Konsole an.
• Drücken Sie auf der Fernbedienung. Das Systemmenü wird auf dem Bildschirm angezeigt.
• Drücken Sie , bis
14 ADAPTiQ
auf dem Bildschirm angezeigt wird.
• Drücken Sie . Befolgen Sie die Sprachbefehle.
Fehlerbehebung
Kein oder leiser Ton aus den Lautsprechern Fernbedienung funktioniert nicht
• Lautstärke erhöhen
• Stummschaltung des Systems aufheben
• Netzkabel des Acoustimass-Moduls und der
Konsole anschließen
• System einschalten
• Alle Kabel ganz hineinstecken
• Gerät mithilfe von HDMI-Kabeln anschließen
• Batterien einlegen
• Fernbedienung für den Betrieb mit dem
Fernsehgerät programmieren
Ton kommt aus den TV-Lautsprechern
• TV-Lautsprecher ausschalten
• TV-Lautstärke auf niedrigste Einstellung verringern
HDMI ist eine Marke oder eingetragene Marke von HDMI Licensing LLC in den Vereinigten Staaten und anderen Ländern.
© 2014 Bose Corporation. Dieses Dokument darf ohne vorherige schriftliche Genehmigung weder ganz noch teilweise reproduziert, verändert,
vertrieben oder auf andere Weise verwendet werden.
Voordat u begint: Plaats de console, luidsprekers en Acoustimass®-module.
1
2 3 4 5 6 7 8 9
De Acoustimass-module op het lichtnet aansluiten
• Sluit het netsnoer aan op de
Powe
r
-aansluiting van de module.
• Sluit het andere uiteinde van het netsnoer op een stopcontact aan.
Opmerking: De module heeft een draadloze verbinding met de console.
1
2
3 4 5 6 7 8 9
De soundbar op de module aansluiten
• Sluit het uiteinde met twee stekkers van de luidsprekerkabel aan op de aansluitingen
Speaker
Connections
op de console.
• Sluit het andere uiteinde van de audiokabel aan op de 10-pinsaansluiting op de soundbar.
1 2
3
4 5 6 7 8 9
De console op de tv en andere apparaten aansluiten
• Sluit de HDMI™-kabel op de
TV
-aansluiting van de console aan.
• Sluit het andere uiteinde van de kabel op de
HDMI
-aansluiting van de tv aan.
Opmerking: Gebruik de
HDMI ARC
-aansluiting van de tv indien beschikbaar.
• Sluit andere apparaten op de console aan met HDMI-kabels.
1 2 3
4
5 6 7 8 9
De console op het lichtnet aansluiten
• Sluit het netsnoer op de
Power
-aansluiting van de console aan.
• Sluit het andere uiteinde van het netsnoer op een stopcontact aan.
1 2 3 4
5
6 7 8 9
Het systeem aanzetten
• Plaats de batterijen in de afstandsbediening.
• Druk op op de afstandsbediening.
1 2 3 4 5
6
7 8 9
De taal op de console wijzigen
• Druk op op de afstandsbediening. Het systeemmenu verschijnt op de display.
• Druk op tot
10 TAAL
op de display verschijnt.
• Druk op om uw taal te selecteren. Druk op .
1 2 3 4 5 6
7
8 9
De ADAPTiQ®-kalibratie uitvoeren
• Zet de ADAPTiQ-headset op.
• Sluit de kabel van de headset aan op de -aansluiting op de console.
• Druk op op de afstandsbediening. Het systeemmenu verschijnt op de display.
• Druk op tot
14 ADAPTiQ
op de display verschijnt.
• Druk op . Volg de stemprompts.
Problemen oplossen
Geen of te zacht geluid uit de luidsprekers De afstandsbediening werkt niet
• Zet het volume hoger
• Schakel het geluid van het systeem in
• Sluit het netsnoer van de Acoustimass-module
en de console aan
• Zet het systeem aan
• Steek alle stekkers volledig in de aansluitingen
• Sluit apparaten aan met HDMI-kabels
• Plaats de batterijen
• Programmeer de afstandsbediening om met
de tv te werken
Er komt geluid uit de luidsprekers van de tv
• Zet de luidsprekers van de tv uit
•Zet het volume van de tv zo laag mogelijk
HDMI is een handelsmerk of gedeponeerd handelsmerk van HDMI Licensing LLC in de Verenigde Staten en andere landen.
© 2014 Bose Corporation. Niets in deze uitgave mag worden gereproduceerd, gewijzigd, gedistribueerd of op andere wijze gebruikt zonder
voorafgaande schriftelijke toestemming.
14 ADAPTiQ
1 2 34 5 76
DANSK
FORSIGTIG: Se brugervejledningen for at få sikkerhedsrelaterede oplysninger og instruktioner til yderligere
opsætning, højttalerplacering og betjening.
DEUTSCH
ACHTUNG: Sicherheitsrelevante Informationen und weitere Anweisungen zum Setup, zur
Lautsprecheraufstellung und zum Betrieb finden Sie in der Bedienungsanleitung.
DUTCH
LET OP: Raadpleeg de gebruikershandleiding voor veiligheidsinformatie en verdere instructies voor installatie,
plaatsing van de luidsprekers en bediening.

Other manuals for CineMate 120

3

Other Bose Home Theater System manuals

Bose 3-2-1 SERIES II User manual

Bose

Bose 3-2-1 SERIES II User manual

Bose Lifestyle 235 User manual

Bose

Bose Lifestyle 235 User manual

Bose Lifestyle 35 Series II User manual

Bose

Bose Lifestyle 35 Series II User manual

Bose SoundTouch 120 User manual

Bose

Bose SoundTouch 120 User manual

Bose Lifestyle V30 User manual

Bose

Bose Lifestyle V30 User manual

Bose Lifestyle 28 User manual

Bose

Bose Lifestyle 28 User manual

Bose LifeStyle DVD Entertainment System User manual

Bose

Bose LifeStyle DVD Entertainment System User manual

Bose LIFESTYLE 135 series II User manual

Bose

Bose LIFESTYLE 135 series II User manual

Bose CineMate 15 User manual

Bose

Bose CineMate 15 User manual

Bose 3-2-1 User manual

Bose

Bose 3-2-1 User manual

Bose Lifestyle V10 User manual

Bose

Bose Lifestyle V10 User manual

Bose CineMAte 520 User manual

Bose

Bose CineMAte 520 User manual

Bose 321 GSX Series III User manual

Bose

Bose 321 GSX Series III User manual

Bose LS28IIIBLK User manual

Bose

Bose LS28IIIBLK User manual

Bose Lifestyle 18 Series II User manual

Bose

Bose Lifestyle 18 Series II User manual

Bose Lifestyle 18 Series II User manual

Bose

Bose Lifestyle 18 Series II User manual

Bose Lifestyle Music Center User manual

Bose

Bose Lifestyle Music Center User manual

Bose Lifestyle 135 User manual

Bose

Bose Lifestyle 135 User manual

Bose Lifestyle 650 User manual

Bose

Bose Lifestyle 650 User manual

Bose LIFESTYLE V35 User manual

Bose

Bose LIFESTYLE V35 User manual

Bose Lifestyle 38 User manual

Bose

Bose Lifestyle 38 User manual

Bose Lifestyle 25 Series II User manual

Bose

Bose Lifestyle 25 Series II User manual

Bose LIFESTYLE 600 User manual

Bose

Bose LIFESTYLE 600 User manual

Bose Lifestyle 18 Series II User manual

Bose

Bose Lifestyle 18 Series II User manual

Popular Home Theater System manuals by other brands

Pioneer BCS-SB616 operating instructions

Pioneer

Pioneer BCS-SB616 operating instructions

Sharp HT-CN300W Operation manual

Sharp

Sharp HT-CN300W Operation manual

Akai DV-R3110SS Service manual

Akai

Akai DV-R3110SS Service manual

Akai DV-R4040VSMK Service manual

Akai

Akai DV-R4040VSMK Service manual

LG HX763W owner's manual

LG

LG HX763W owner's manual

Sanyo DC-AVD8501 instruction manual

Sanyo

Sanyo DC-AVD8501 instruction manual

Sony BRAVIA DAV-HDX500 Specifications

Sony

Sony BRAVIA DAV-HDX500 Specifications

Samsung HT-E4530 Service manual

Samsung

Samsung HT-E4530 Service manual

LG LH-TK3525Q owner's manual

LG

LG LH-TK3525Q owner's manual

Philips HTS5543/12 Brochure & specs

Philips

Philips HTS5543/12 Brochure & specs

Yamaha TSS-1 owner's manual

Yamaha

Yamaha TSS-1 owner's manual

Philips MX5000D user manual

Philips

Philips MX5000D user manual

Philips MCD 728 Specifications

Philips

Philips MCD 728 Specifications

Hisense HS205 quick start guide

Hisense

Hisense HS205 quick start guide

Yamaha YHT-391 release note

Yamaha

Yamaha YHT-391 release note

LG HB905SB owner's manual

LG

LG HB905SB owner's manual

akira HTS-595S Service manual

akira

akira HTS-595S Service manual

Philips HTS5591 user manual

Philips

Philips HTS5591 user manual

manuals.online logo
manuals.online logoBrands
  • About & Mission
  • Contact us
  • Privacy Policy
  • Terms and Conditions

Copyright 2025 Manuals.Online. All Rights Reserved.