BOSSCO eiQEGG 18 User manual

OWNER’S MANUAL
CERAMIC KAMADO BBQ
eiQEGG 18”
eiQEGGXL 22”

2
Thank you for purchasing a BOSS GRILL BBQ
Forged from iron, steel and solid, British values, our BBQ’s deliver a finger-licking
feast. We design high-quality grills, so you can serve up a sizzling experience for
your family and friends.
Tongs at the ready? Then step up to the plate, Boss.
CONTENTS
IMPORTANT SAFETY INFORMATION
3
PARTS
5
ASSEMBLING YOUR BBQ
6
LIGHTING AND USING YOUR BBQ
9
ADJUSTING THE COOKING TEMPERATURE
11
CERAMIC COOKING GUIDE
12
CLEANING AND MAINTENANCE
13
SPECIFICATIONS
14
SUPPORT
14

3
Important SAFETY INFORMATION
Read the following instructions carefully and make sure your BBQ is properly installed,
assembled and cared for. Retain the instructions for future reference.
•The appliance is for outdoor use only and
must not be used in enclosed areas such
as sheds or marquees!
•WARNING: Accessible parts may be very
hot. Keep young children away
•Wear heat proof gloves whilst operating
the appliance.
•Do not modify the appliance
•Never use the appliance as a heater.
•The minimum distance from the side and
back of the appliance to walls or fences is
60cm.
•No overhead obstruction is permitted
above the appliance.
•Keep a minimum clearance of 3 metres
from all combustible materials such as
wood, dry plants, grass, brush, paper,
vinyl, wood siding, or canvas.
•Keep combustible materials such as
gasoline and other flammable vapours
and liquids away from the appliance.
•Ensure the unit is on a level, non-
combustible, stable surface such as
concrete, brick or stone.
•Do not use the appliance on wooden or
flammable surfaces.
•The appliance must be stood on the
ground during operation. Do not place on
tables or raised surfaces.
•Do not move the unit across uneven
surfaces.
•Do not leave the appliance unattended.
•Store the appliance indoors when not in
use, it must be kept out of reach of
children.
•Never use the appliance for anything
other than its intended use. This unit is
not for commercial use.
•Keep a fire extinguisher accessible at all
times while operating the unit.
•Before each use check all fittings to make
sure they are tight and secure.
•Do not use in adverse weather such as
rain or high wind.
•Do not use around water or operate on
wet surfaces.
•Use of alcohol, prescription or non-
prescription drugs may impair user’s
ability to properly assemble or safely
operate unit.
•Keep children and pets away from the
unit at all times.
•This appliance can be used by children
aged from 8 years and above and persons
with reduced physical, sensory or mental
capabilities or lack of experience and
knowledge if they have been given
supervision or instruction concerning use
of the appliance in a safe way and
understand the hazards involved.
•Children shall not play with the
appliance.
•Cleaning and user maintenance shall not
be made by children without supervision.
•Do not leave children unsupervised with
this appliance.
•Do not allow anyone to conduct activities
around the unit during or following its
use until it has fully cooled.
•Avoid bumping or knocking the unit.

4
•Never move the unit while in use. Allow
the unit to cool completely (below 45°C)
before moving or storing.
•The unit is hot while in use and will
remain hot for a period of time after use.
Use caution. Wear protective
gloves/mitts.
•Do not touch hot surfaces.
•Ensure the grease cup is clean before
each use.
•Never burn charcoal or wood in this unit.
•Never use glass, plastic or ceramic
cookware on the unit. Never place empty
cookware on the unit while in use.
•Accessories and attachments not
supplied by the manufacturer are not
recommended and may cause injury.
•Do not repair or replace any part of the
appliance unless specifically
recommended by the manual or
manufacturer. Any parts used must be
supplied by the manufacturer.
•Be careful when removing food from the
unit. All surfaces are hot and may cause
burns. Use protective gloves and long
sturdy cooking tools designed for
barbecues.
•Fatty foods can have excess grease and
cause flare ups. When cooking fatty
foods, use a low setting with the lid open.
•Clean the internal base pan and grease
cup before each use. This will cut down
on fat build-up and the possibility of flare
ups.
•Do not clean the appliance with a water
spray or immerse in water.
GENERAL INFORMATION FOR
SUCCESSFUL ASSEMBLY
Please read the assembly instructions carefully and follow the safety precautions. Allow sufficient time for
assembly. Before starting assembly, clear an area measuring approximately two to three square metres.
Remove the item from the packaging and lay out all of the parts and any necessary tools so that they are
within easy reach.
Only tighten all of the screw connections firmly when you have finished assembly or are instructed to
within the manual. Otherwise this can result in unwanted tension and instability.

5
PARTS
Part
No
Description
QTY
1
Frame Section
4
2
Locking Castor
2
3
Castor
2
4
Frame Bracket
2
5
Cooking grid
1
6
Charcoal plate
1
7
Firebox
1
8
Main Body
1
9
Top Vent
1
10
Handle
1
11
Side shelf
2
12
Side Shelf Bracket
4
A
Bolt
16
B
Screwdriver
1

6
ASSEMBLING YOUR bbq
STEP 1 - ATTACH THE CASTORS
Screw the castors (2 & 3) into the base
of each of the four Frame Sections (1).
These should be tightened by hand.
STEP 2 - ASSEMBLE THE FRAME
To assemble the frame, insert the two Frame
Brackets (4) into two of the Frame Sections
(1) on both the top and bottom joints.
STEP 3 - COMPLETE THE FRAME
Fix the cross pieces fitted in step 2 by loosely tightening
2 x Bolts (A) into both the top and bottom of the frame
into the Frame Bracket.
Once the two Frame Sections are fitted to the Bracket,
place the other Frame Sections onto the bracket and
secure in the same way.
When all 4 Frame sections are fitted (Using 16 x Bolts) all
the bolts can be fully tightened.
2 & 3
1
4
1

7
STEP 4 - LIFT THE main BODY ONTO THE frame
Lock the wheels on the two locking Castors (2) to ensure the BBQ
cannot move.
To make lifting easier, before placing the Main Body (8) on to the
frame remove all the accessories from within it.
Place one of your hands in the bottom vent of the ceramic body and
the other under the main body while lifting.
CAUTION:
Use a minimum of two people when lifting the Main Body onto the
frame. Lifting by the hinge or the side tables could result in injury
and/or damage to the product. Place the Main Body on the cart with
the bottom vent facing to the front allowing the vent to open and
close without any obstruction.
STEP 5 - ATTACH THE TOP vent
Once the Main Body is securely seated in the frame,
attach the Top Vent (9). Align the side notch with the
thermometer at the front, and set over the top
opening. Secure using the pre-attached nut and bolt.
STEP 6 - INSTALL THE SIDE SHELF
BRACKETS
Attach the four Side Shelf Brackets (12) to the
Main Body (8) using the 16 pre-attached bolts
with their corresponding washers, locking
washers, and nuts.
When fitting the brackets, loosely fit all 4 bolts to
each bracket before fully tightening.
8
9
8
8
8
12

8
STEP 7 - Attach THE SIDE SHELVES
Insert the hinge bars on the underside of the Side
Shelves (11) into the Side Shelf Brackets (12).
STEP 8 –Insert the Plate and Grid
Add the Firebox (7), Charcoal Plate (6), and the Cooking
Grid (5) into the Main Body (8).
STEP 9 - ATTACH THE HANDLE
Attach the Handle (10) to the Main Body (8),
using the 2 pre-attached bolts with their
corresponding washers, locking washers, and
nuts. Once both bolts are located, they can be
fully tightened.
11
12
10

9
LIGHTING AND USING YOUR BBQ
FIRST USE –CURING THE UNIT
•Curing your ceramic BBQ is important for its long-term operation and care. Failing to follow the curing
procedure could lead to damage to the unit. If it is allowed to get too hot during its first few uses, the
heat could damage the felt gasket seal before it has had the chance to mature with use.
•To start your first fire, place one fire-lighter cube or solid firelighters and one handful of lump charcoal on
top of the charcoal plate (6). Open the bottom vent and light the solid firelighter using a long-nosed
lighter or safety matches. Do not use: gasoline, white spirit, lighter fluid, alcohol or other similar
chemicals for lighting or relighting.
•Once the lump charcoal has caught, cure the unit by closing the lid, and leaving both vents mostly closed.
See the guidance for smoking on page 12 (83 ºC - 108 ºC / 180 ºF - 225 ºF).
•Burn until all the fuel is used and the fire is extinguished. This should take approximately two hours. Do
not overload the unit with fuel.
•After first use, inspect all fasteners. The metal band connecting your lid to the base will expand from the
heat and could become loose. It is recommended you check and tighten the band, if necessary, with a
spanner. You can now use your BBQ as normal.
IGNITING THE FUEL
When petrol or white spirits are ignited uncontrollable heat can develop as a result of deflagration. You
should therefore only use safer fuel, such as firelighters.
Before using the BBQ, push down on both of the locking wheels to stop the unit from moving around
during use. Ensure the BBQ is positioned on a permanent, flat, level, heat-resistant non- flammable
surface, away from flammable items. Position it with a minimum of 2 m overhead clearance and away
from any surrounding flammable items.
1. To start a fire, place some solid firelighters on the charcoal plate (6), in the base of the BBQ. Then,
place lump charcoal over the top of the fire fighters.
2. The maximum amount of charcoal shall not exceed 4 kg.
3. DO NOT USE: Gasoline, white spirit, lighter fluid, alcohol or other similar chemicals for lighting or
relighting.
4. Make sure that the cooking grid is fully located into the supports.
5. Open the bottom vent and ignite the lighter cubes using a long nosed lighter or safety matches. Once
it is lit, leave the bottom vent and lid open for about 10 minutes to build a small bed of hot embers.
6. Allow the charcoal to heat up and keep it red hot for at least 30 minutes prior to cooking. Do not cook
before the fuel has a coating of ash.
7. It is recommended that you do not stoke or turn the coals once they are alight. This allows the
charcoal to burn more uniformly and efficiently.
8. Once alight, only use heat-resistant gloves when handling hot ceramics or cooking surfaces.

10
PROBLEMS LIGHTING YOUR BBQ
1. If you have trouble lighting the BBQ, ensure that both the top and bottom vents are open. The fire
needs oxygen to light. Once lit, leave the bottom vent and lid open for about 10 minutes to build a
small bed of hot embers.
2. The BBQ may quickly extinguish if there is not enough charcoal in the main body.
The recommended quantity of lump charcoal is a maximum of 2kg per burn. Be sure not to
overload the unit with fuel. If the fire is too intense, the excessive heat could damage the BBQ.
3. To prevent any back-draft or flare-ups that may cause injury, it is advised to initially only lift the lid
partially (also known as burping), which allows air to enter slowly and safely.
REFUELING
With the top and bottom vent closed, the BBQ will stay at a high temperature for several hours. If you
require a longer cooking time (e.g. when roasting a whole cut or slow-smoking), it may be necessary to add
more charcoal. Open the lid, add additional charcoal, and continue to cook as directed in this manual.
BARBECUE GETS TOO HOT
Close the lid, close both vents, and allow the barbecue to smother with lack of oxygen. For low
temperature cooking, use less fuel.
BARBECUE DOESN’T GET HOT ENOUGH
Add more fuel and leave both vents completely open. More oxygen flow will allow the fire to
increase, burning more lump charcoal.
EXTINGUISHING
To extinguish the BBQ: Stop adding fuel and close all the vents and the lid to allow the fire to die naturally.
Do not use water to extinguish the charcoal as this could damage the BBQ.
ENVIRONMENTAL PROTECTION & DISPOSAL
Pay attention to cleanliness when using the BBQ and dispose of waste in a clean and safe manner. As a
general rule, only dispose of waste in designated metal or non-flammable containers. The local regulations
for disposal apply.
GENERAL FOOD SAFETY
Read and follow this advice when cooking on your BBQ:
•Do not cook until the fuel has a coating of ash.
•Before cooking, ensure the Cooking Grid and tools are clean and free of old food residue.
•Always wash your hands before and after handling uncooked meat, and before eating.
•Do not use the same utensils to handle cooked and uncooked foods. Always keep raw meat away
from cooked meat, and other foods.
•Ensure all meat is cooked thoroughly before eating.

11
ADJUSTING THE COOKING TEMPERATURE
TO COOK AT LOW TEMPERATURES
1. Light the lump charcoal according to the lighting instructions in this manual. Do not move or stoke
the coals once lit.
2. Open the bottom vent fully and leave the lid open for about 10 minutes to build a small bed of hot
embers.
3. Monitor the BBQ until it has risen to the desired temperature. Fully close the bottom vent to
maintain the temperature.
4. You are now ready to use the BBQ for cooking.
TO COOK AT HIGH TEMPERATURES
1. Light the lump charcoal according to the lighting instructions in this manual.
2. Close the lid and fully open the top and bottom vents.
3. Close the top vent halfway and continue to check the temperature for a few more minutes.
4. You are now ready to use the barbecue for cooking.
IMPORTANT: When opening the lid at high temperatures, it is essential to lift the lid only slightly at first,
allowing air to enter slowly and safely, preventing any back-draft or flare-ups that may cause injury.
TO SMOKE YOUR FOOD
Always follow the Cooking Temperature Guide stated in this manual. Always use heat-resistant gloves
when handling hot ceramics or cooking surfaces.
1. Light the lump charcoal according to the lighting instructions in the manual. Do not move or stoke
the coals once lit.
2. Open the bottom vent fully and leave the lid open for about 10 minutes to build a small bed of hot
embers.
3. Monitor the BBQ until it has risen to the desired temperature.
4. Leave the bottom vent slightly open.
Close the top vent and continue to check the temperature for a few more minutes.
5. Using heat-resistant gloves, sprinkle wood chips in a circle over the hot charcoal. Always use heat-
resistant gloves when handling hot ceramics or cooking surfaces.
6. You are now ready to use the BBQ to smoke on.
TIP: Soak wood chips or cooking planks in water for 15 minutes to prolong the smoking process.
12
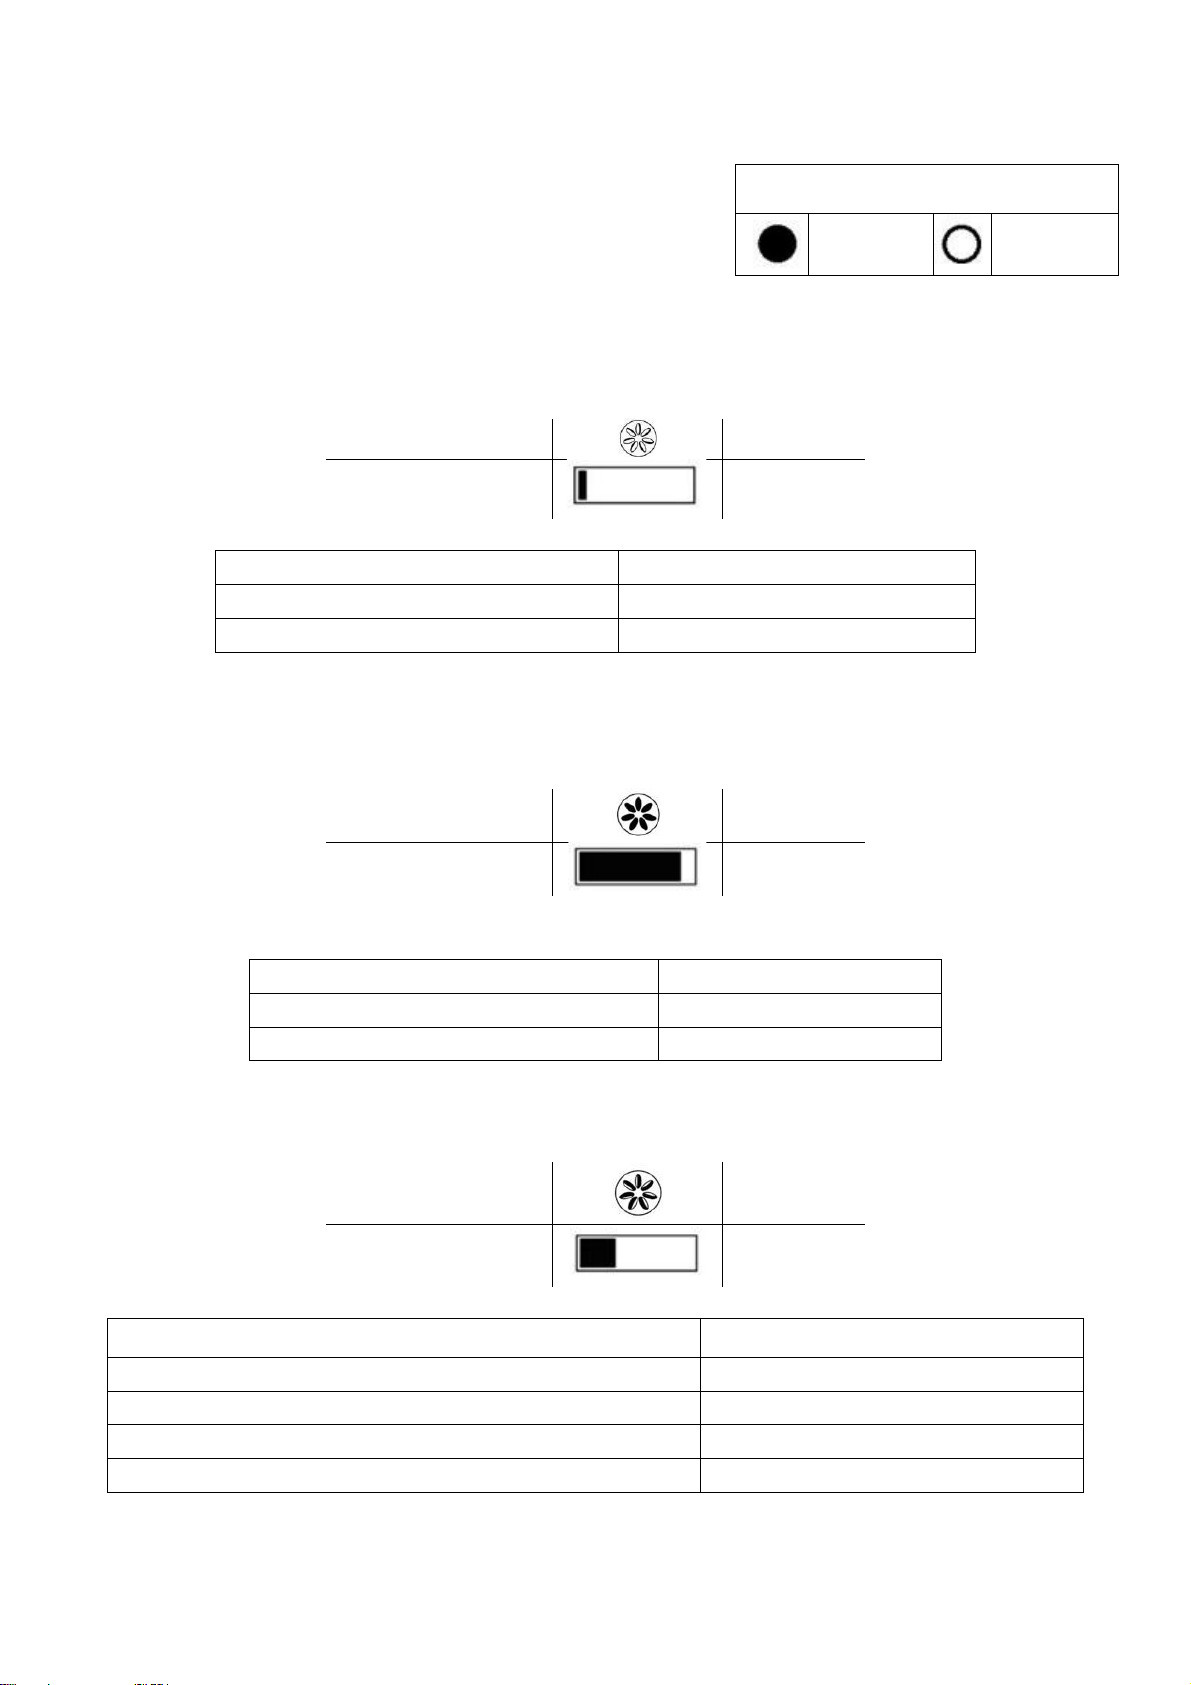
CERAMIC COOKING GUIDE
IMPORTANT: It is recommended to always use heat-resistant
gloves when working with hot appliances.
SLOW COOK I SMOKE (83 °C - 108 °C / 180 °F - 225 °F)
TOP VENT
Closed
BOTTOM VENT
Closed
Beef brisket: 4.5 hours per kg
Ribs: 3-5 hours
Pulled pork: 4.5 hours per kg
Roasts: 9+ hours
Whole chicken: 3-4 hours
SEAR (260 °C - 330 °C / 500 °F - 625 °F)
TOP VENT
Open
BOTTOM VENT
Open
Scallops: until opaque & firm
Steak: 5-8 minutes
Pork chops: 6-10 minutes
Burgers: 6-10 minutes
Sausages: 6-10 minutes
GRILL I ROAST I BAKE (163 °C - 191 °C / 325 °F - 375 °F)
TOP VENT
Partially
Open
BOTTOM VENT
Partially
Open
Seafood (crab, lobster, shrimp): until opaque & firm
Whole chicken: 1-1.5 hours
Seafood (clams, oysters): until shells open
Leg of lamb: 3-4 hours
Fish: 15-20 minutes
Turkey: 2-4 hours
Pork tenderloin: 15-30 minutes
Ham: 2-5 hours
Chicken pieces: 30-45 minutes
KEY
Open
Closed
13
CLEANING AND MAINTENANCE
The BBQ is self-cleaning. Heat it up to 260 ºC / 500 ºF for 30 minutes and it will scorch off all food and
debris.
Do not use water or any other types of cleaning product to clean the inside of your BBQ.
The walls are porous and will absorb any fluids used, which could cause the BBQ to crack. After the BBQ
has cooled, if the soot becomes excessive, use an ash tool to scrape off the carbon remnants before the
next use. Carefully open the bottom vent and rake the soot into a small waste container under the vent
opening.
To clean the grills and grates, use a non-abrasive cleaner once the unit has fully cooled.
The chrome-plated cooking grill is not dishwasher safe; use a mild detergent with warm water. To clean
the outer surface, wait until the BBQ is cool and use a damp cloth with a mild detergent.
It is important to check and tighten the bolts and bands, and oil the hinges, twice a year or more if needed.
You should not be able to easily turn the bolts while holding the nuts in place.
STORAGE
When not in use, and if stored outside, cover the BBQ with a suitable rain cover once completely cooled. It
is recommended that the BBQ should be stored under cover in a garage or shed over winter for complete
protection.
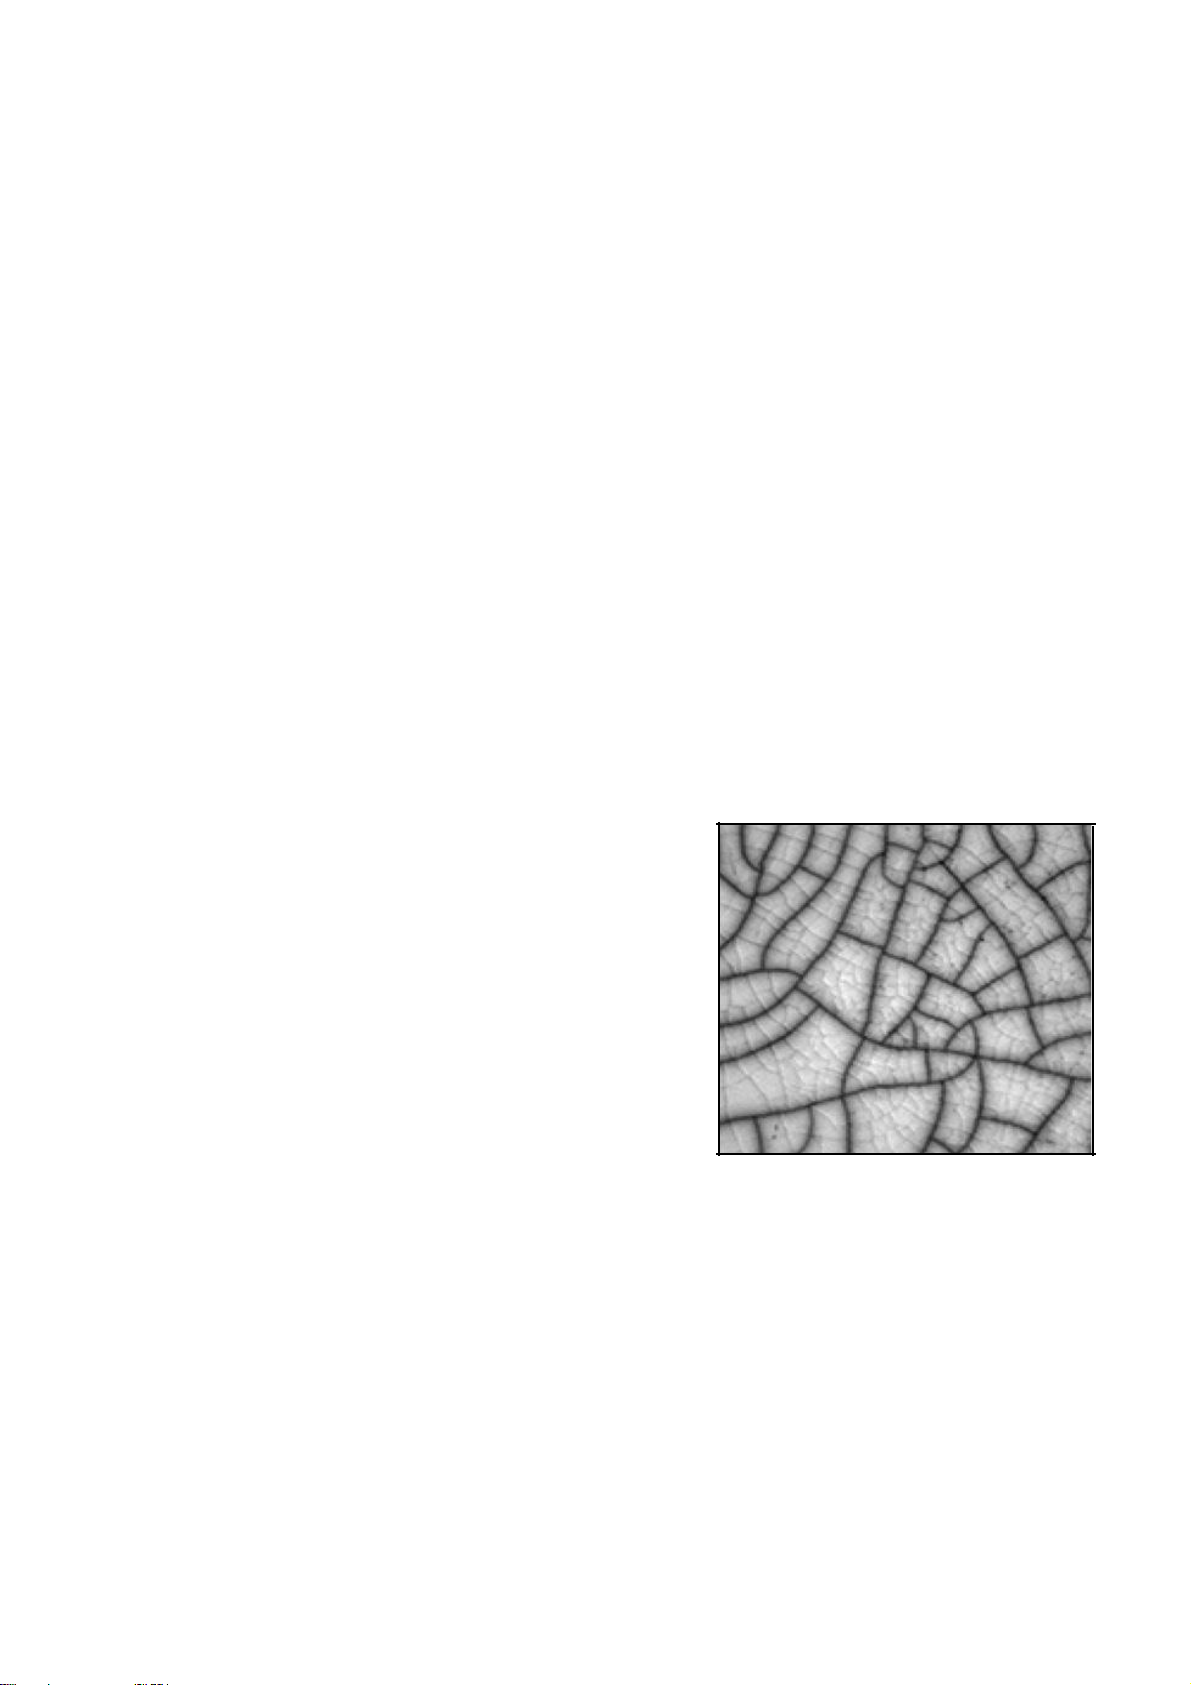
FINISHING PROBLEMS
The spider-web pattern of cracking is different from a break in
the aspect that it cannot be felt on the surface, unless using a
fingernail; however, it does become more visually apparent
when the surface is dusty or magnified. While these may
appear as imperfections, crazing does not affect the
performance or life span of your barbecue. The process of
crazing effectively increases the toughness of the unit, and is
not a defect with the unit,
Curing your BBQ is important for its long-term operation and care. If the first burns are too hot, they could
damage the felt gasket seal before it has had the chance to mature with use.
If the lid gets stuck, or sealed, together with the base, use a knife to carefully unseal and cut off the felt
gasket that trims the lid opening. Once removed, you will be able to open the lid. Before continuing to use
the unit, replace the high-heat felt gasket, which can be purchased at a local fireplace store.

14
SPECIFICATIONS
Model
eiQEGG
eiQEGGXL
Cooking Grid Diameter (CM)
41.5
47.5
Body Diameter (CM)
47.5
57
Weight
(Kg)
71
88
Fuel type
Charcoal
MANUFACTURER SUPPORT
Customer Services
0330 390 3062
Office hours: 9AM - 5PM Monday to Friday
Boss grill
Unit J6, Lowfields Business Park
Lowfields Way, Elland
West Yorkshire, HX5 9DA
This manual suits for next models
1
Table of contents
Other BOSSCO Grill manuals


