BossPac WASP WASP2 User manual

Applicant: BossPac Engineering And Technology
Inc. FCC ID: ZI8EA45
Test Report S/N: 45461472-R1.0 ISED ID 9648A-EA45
©2019 Celltech Labs Inc. This document is not to be reproduced in whole or in part without the expressed written permission of Celltech Labs Inc. Page 26 of 48
EXHIBIT 19A – USER’S MANUAL – HOST 1 – WASP2
See Attached

WASP™(WASP2)
Wireless Acceleration Sensor Puck
USER MANUAL
VERSION 1.00
2018/12/04

WASP™ is a registered trademark owned by
BossPac Engineering & Technology
WASP™ is a PATENT PENDING technology owned by
BossPac Engineering & Technology
BossPac Engineering & Technology
1450 –28 Street NE Bay 8, Calgary, Alberta, Canada T2A 7W6
Phone: (403) 216-1226 Fax: (403) 216-5557 E-Mail: info@bosspac.com
Visit our website for more information www.bosspac.com

WASPTM Wireless Acceleration Sensor Puck Operations Manual
- 1 -
WARNING
READ THIS MANUAL BEFORE OPERATING THIS DEVICE.
MISE EN GARDE
LISEZ LE MANUEL AVANT UTILISATER
WARNING
TO PREVENT EQUIPMENT FAILURE, AND/OR DAMAGE,
AND/OR PERSONAL INJURY, REGULAR CALIBRATION
AND INSPECTION OF THIS DEVICE IS REQUIRED.
MISE EN GARDE
POUR PRЀVENIR LE DOMMAGE À L’EQUIPMENT, ET/AU AUX
PERSON, LA CÀLIBRATION ET L’INSPECTION REGULIER EST
ŔEQUIS.

WASPTM Wireless Acceleration Sensor Puck Operations Manual
- 2 -
WARNING - EXPLOSION HAZARD
SUBSTITUTION OF COMPONENTS MAY IMPAIR
SUITABILITY FOR CLASS 1, DIVISION 2
AVERTISSEMENT –RISQUE D’EXPLOSION
LA SUBSTITUTION DECOMPOSANTS RENDRE CE MATÉRIEL
INACCEPTABLE POUR LES EMPLACEMENTS DE CLASSE 1,
DIVISION 2
WARNING - EXPLOSION HAZARD
DO NOT REMOVE BATTERIES UNLESS
AREA IS KNOWN TO BE NON-HAZARDOUS.
AVERTISSEMENT - RISQUE D’EXPLOSION
AFIN D’ÉVITER TOUT RISQUE D’EXPLOSION, S’ASSURER QUE
L’EMPLACEMENT EST DÉSIGNÉ NON DANGEREUX AVANT
CHANGER LA BATTERIE.

WASPTM Wireless Acceleration Sensor Puck Operations Manual
- 3 -
Table of Contents
1. Introduction......................................................................................................................... 4
1.1. WASP2 Sensor Inroduction ......................................................................................... 4
2. Installation........................................................................................................................... 4
2.1. Included In The Package ............................................................................................. 4
2.2. Assembling Of Wireless Sensor Pucks........................................................................ 4
2.1.1 Battery Installation ..................................................................................................... 4
2.1.2 Cap and Gasket Installation.......................................................................................... 5
2.1.3 WASP™ LED Error Indicator ........................................................................................ 6
2.3. Placement Of The WASP™ Pucks .............................................................................. 6
2.3.1 WASP™ Mounting........................................................................................................ 6
2.3.2 WASP™ Sensor Placement ........................................................................................... 6
2.3.3 Mounting Surface Preparation ..................................................................................... 6
2.4. Optional Thermal Calibration Of WASP™s .................................................................. 6
3. Troubleshooting WASP LED Flash Codes.......................................................................... 7
3.1. LED Flash Codes......................................................................................................... 7
3.2. What To Do When An Error Is Reported?.................................................................... 8
3.3. Contact Info ................................................................................................................. 8
WASPTM Wireless Acceleration Sensor Puck Operations Manual
- 4 -
1. Introduction
1.1. WASP2 Sensor Inroduction
This Operations Manual provides basic information on how to operate the
WASP™Wireless Acceleration Sensor Puck (WASP2)
This manual covers the following topics:
Installation of WASP™
Assembling of WASP™
Placement of WASP™
Optional Thermal Calibration of WASP™
Troubleshooting
2. Installation
2.1. Included In The Package
Each sensor puck is shipped complete with the WASP2 Vibration and Temperature
Sensor Assembly, a WASP2 Battery Cap Assembly, a Gasket, and mounting screws to
secure the top cap.
The BossPac WASP™ and WASP2 sensor pucks use an attached magnet base for
mounting to equipment. Optional mounting methods are available, (stud mount, pipe
clamp, epoxy).
2.2. Assembling Of Wireless Sensor Pucks
2.1.1 Battery Installation
Each sensor puck is shipped with a WASP2 Battery Cap Assembly containing a battery
circuit board. The Battery Cap Assembly contains a non-removable long-lasting lithium
battery.
WARNING –USE ONLY WITH REPLACEABLE BATTERY BOSSPAC EA00029X
WARNING –EXPLOSION HAZARD. DO NOT REMOVE BATTERIES UNLESS AREA
IS KNOWN TO BE NON-HAZARDOUS.
AVERTISSEMENT –RISQUE D’EXPLOSION. AFIN D’ÉVITER TOUT RISQUÉ
D’EXPLOSION, S’ASSURER QUE L’EMPLACEMENT EST DÉSIGNÉ NON
DANGEREUX AVANT CHANGER LA BATTERIE.
WASPTM Wireless Acceleration Sensor Puck Operations Manual
- 5 -
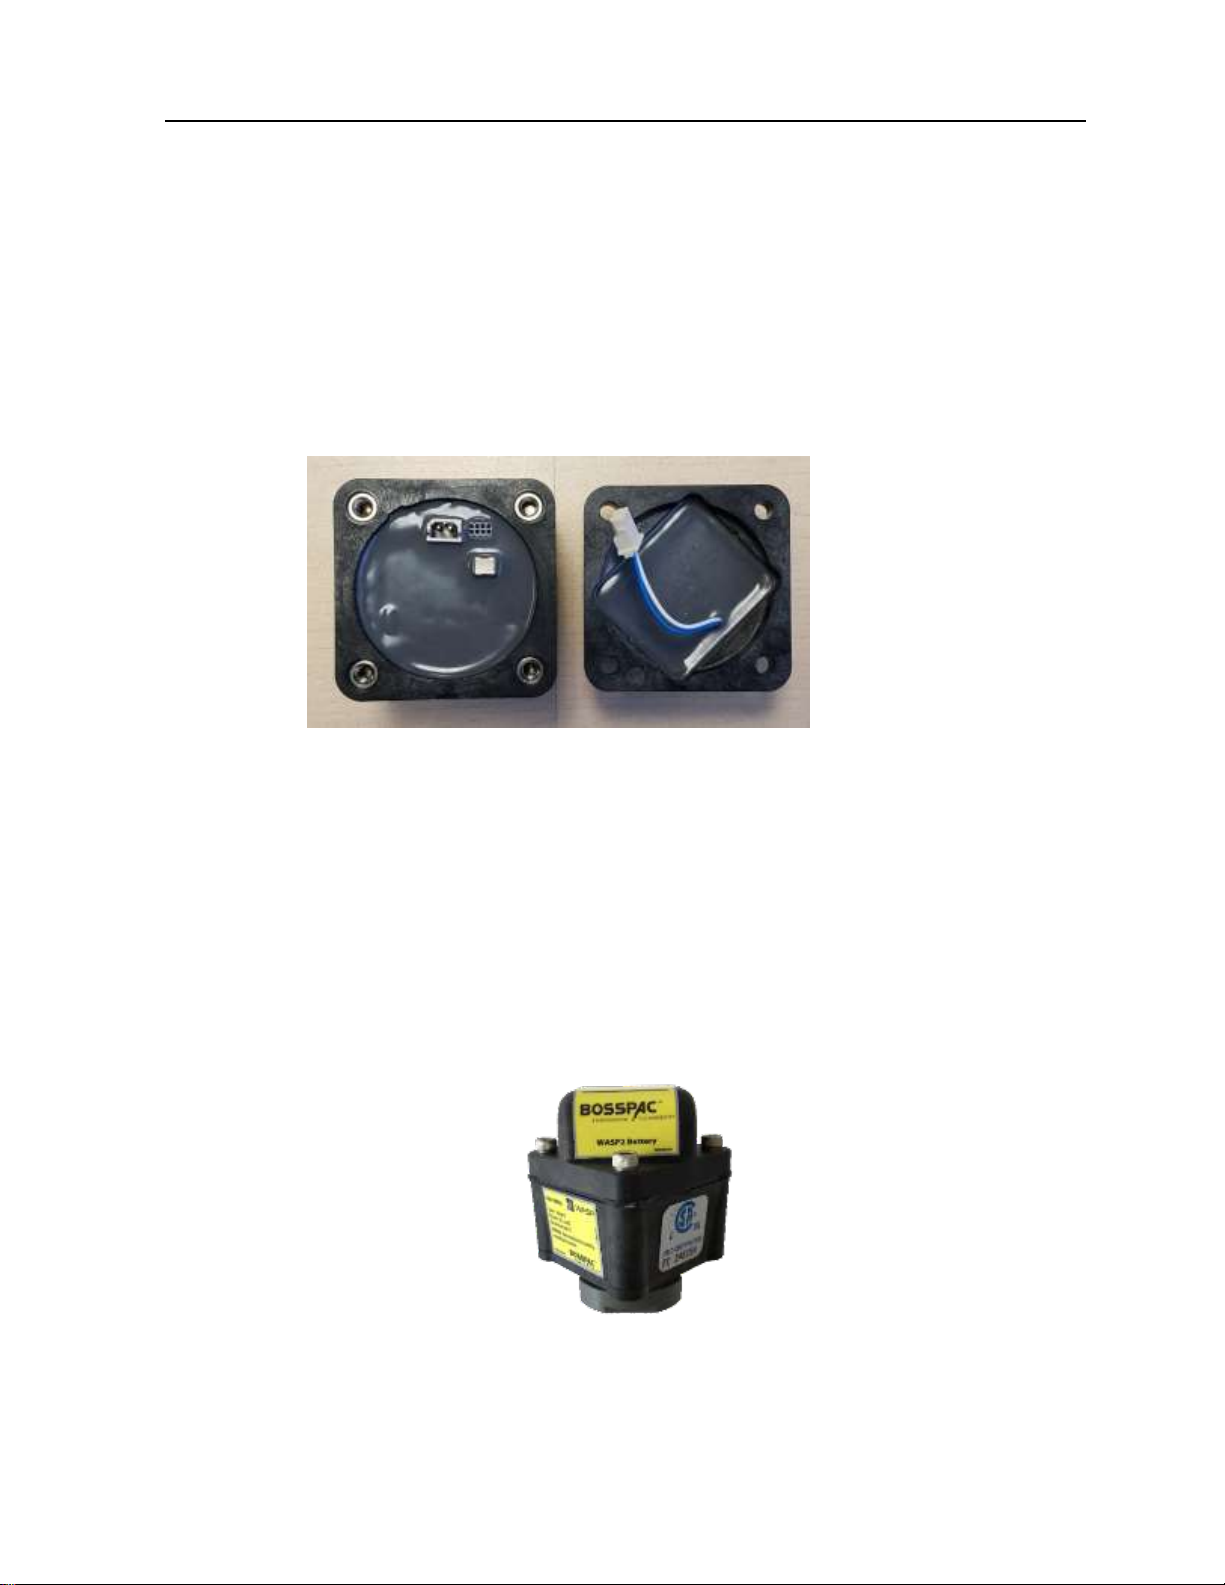
To turn on and activate each sensor puck you must carefully attach the battery cap
assembly to the sensor unit. Place gasket (see section 2.1.2) and plug the connector on
the battery assembly into the corresponding socket on the sensor puck housing. Figure 1.
It is important the battery board is properly mated to the WASP™ Sensor connector. An
incorrectly mated connection may result in intermittent/inconsistent power, or complete
loss of power to the Sensor. A loose connection may also cause damage to the connector
pins as well.
Once the connection is made the WASP™ device performs a power-on self test (POST).
The sensor is now detectable by any BossPac NEST receiver within the working radius.
Figure 1: Install WASPTM Battery Board
2.1.2 Gasket and Cap Installation
Each sensor comes with a gasket. Place gasket onto battery cap or housing prior to
connecting battery. The gasket isrequired to maintain an IP54 rating between the housing
and the top cap battery assembly.
There is no specific orientation required for the top cap, however it is important the power
connector wire maintains a reasonable bend radius and is not pinched during assembly.
A simple ¼ turn of the cap may be all is needed to ensure the wire lays securely in the
housing. The top cap is secured/retained by four 8-32 stainless steel screws.
WARNING –DO NOT REMOVE THE FOUR SCREWS ON THE BOTTOM OF THE DEVICE

WASPTM Wireless Acceleration Sensor Puck Operations Manual
- 6 -
2.1.3 WASP™ LED Error Indicator
Should the POST (Power On Self Test) fail, the device locks up and flashes the LED in a
discernible pattern to help diagnose the source of the problem. See the section at the
end of this manual on troubleshooting for details on the LED flash codes.
2.3. Placement Of The WASP™ Pucks
2.3.1 WASP™ Mounting
The sensor pucks can beattached securely to thedesired equipment by the magnet base.
Optional methods such as stud mount, clamp, or epoxy may be used. The supplied
magnets have an effective operating range of -40°C to 185°C (-40°F to 365°F)
WARNING –THE RARE EARTH MAGNET BASE HAS IN EXCESS OF 50 LBS OF FORCE
AND CAN CAUSE HARM IF CARE IS NOT TAKEN
2.3.2 WASP™ Sensor Placement
To ensure effective wireless transmission between sensor pucks and receiver it is
recommended there is a direct line of sight between the units, (WASP to NEST).
2.3.3 Mounting Surface Preparation
It is recommended the surface be prepared for the installation of the WASP™ sensors.
▪It is recommended the sensors are placed on a flat surface, (min. area of 1.50 diameter).
▪Ensure the surface is clear of debris and excess paint.
▪Check the magnetic base is screwed securely to the stud on the bottom of the WASP™.
▪Check the top cap screws are tightened to a maximum of 15 ft. lb or 1.7 N m
▪In less than ideal conditions a small amount of SILICON HEAT TRANSFER COMPOUND
may be used to facilitate a more efficient heat transfer from the mounting surface into the
sensor. It is necessary to only cover the “stud” part of the sensor. This requires only a
small amount of compound, approximately ¼” diameter, (or 5 mm dia.), at the center of
the magnet base.
▪Carefully set the sensor in place. Avoid snapping with the magnet base as it can damage
the magnet.
2.4. Optional Thermal Calibration Of WASP™s
To ensure the greatest accuracy of the monitored variables it is optional to do thermal
calibration of each WASP™ unit. The process of thermal calibration is as follows:
▪Ensure the machinery for which the WASP™ is to be attached is at operating temperature.
▪Place the WASP™ units at their desired mounting points using thermal paste. Allow 15
minutes for the temperature to stabilize.
▪Using a thermometer gun, record the temperature value on the valve cap at the mounting
point of the WASP™ unit.
▪At the receiver, adjust the display temperature to match the value of the thermometer gun
using the temperature offset function. (See the section on temperature calibration in the
“Setting Temperature Warning and Critical Alarm Thresholds” section of the WASP NEST
User Manual).

WASPTM Wireless Acceleration Sensor Puck Operations Manual
- 7 -
3. Troubleshooting WASP LED Flash Codes
3.1. LED Flash Codes
An LED indicator (light) is mounted on the board located in the sensor housing. The following
table contains a brief description of all flash codes reported by the device:

WASPTM Wireless Acceleration Sensor Puck Operations Manual
- 8 -
3.2. What To Do When An Error Is Reported?
Accelerator Failure (1-Flash)
This is indicative of an electrical failure: either the accelerometer isn’t receiving power or the
device has lost electrical connectivity between the MCU and the accelerometer. In either
event, the device is inoperative. Recommend replacing the WASP unit.
Battery Failure (2-Flash)
Recommend removing and reconnecting the battery as sometimes the power connectors do
not mate evenly. If the problem persists, replace the battery board.
Temperature Sensor Failure (3-Flash)
If the device is not powering up in extreme temperatures, this may be indicative of an electrical
fault with the RTD. Recommend replacing the WASP unit.
Radio Failure (4-Flash)
Much like an accelerometer failure, this is indicative of an electrical failure. The problem is
much more severe in this instance as the device cannot communicate. Recommend replacing
the WASP unit.
Regulator Failure (5-Flash)
This is indicative of an electrical failure. Replace the WASP unit.
4. Contact Info
BossPac engineers can be reached at:
Email: support@bosspac.com
Ph: +1 403-216-1226
BossPac Engineering & Technology
1450 28th Street NE, Bay 8, Calgary, Alberta, CANADA T2A 7W6
Toll Free 866 616-1226www.bosspac.com

WASPTM Wireless Acceleration Sensor Puck Operations Manual
- 9 -
FCC & IC Statements
FCC Class B Part 15
This device complies with part 15 of the FCC Rules. Operation is subject to the following two
conditions: (1) This device may not cause harmful interference, and (2) This device must accept
any interference received, including interference that may cause undesired operation.
Changes or modifications not expressly approved by BossPac Engineering Technology Inc. may
void the user’s authority to operate the equipment.
ISED RSP-100 Statement
This device complies with Industry Canada licence-exempt RSS standard(s). Operation is subject
to the following two conditions: (1) this device may not cause interference, and (2) this device
must accept any interference, including interference that may cause undesired operation of the
device.
Le présent appareil est conforme aux CNR d'Industrie Canada applicables aux appareils radio
exempts de licence. L'exploitation est autorisée aux deux conditions suivantes : (1) l'appareil ne
doit pas produire de brouillage, et (2) l'utilisateur de l'appareil doit accepter tout brouillage
radioélectrique subi, même si le brouillage est susceptible d'en compromettre le fonctionnement.
FCC/IC RF Exposure Statement
This equipment complies with FCC radiation exposure limits set forth for an uncontrolled
environment. The antenna(s) used for this equipment must be installed to provide a separation
distance of at least 8 inches (20cm) from all persons.
Cet équipement est conforme à l'exposition aux radiations de FCC et d'Industrie Canada établies
pour un environnement non contrôlé. L'antenne (s) utilisé pour cet équipement doit être installé
pour fournir une distance d'au moins 20cm à partir de toutes les personnes.
Table of contents
Other BossPac Accessories manuals

Popular Accessories manuals by other brands


Panasonic
Panasonic MA2J704 Specification sheet

Campbell
Campbell 61302V instruction manual

ALSENSE
ALSENSE ALS Tire BLE install guide

GAI-Tronics
GAI-Tronics XAAB002A Installation and service manual

Dorner
Dorner AquaPruf 7400 Ultimate CE Series Installation, Maintenance, and Parts Manual

Rydeen
Rydeen BSS-ONE owner's manual


