BOSUER BSE M2 2018 User manual

I
CONTENT
INSTRUCTION ........................................................................................................................ 1
NOTICE .................................................................................................................................... 2
Precautions and inspections before driving a motorcycle ......................................................... 4
First. The prepare working before riding a motorcycle
..................................................... 4
Second. Safety equipment
................................................................................................... 4
Third. Check everything before riding
............................................................................... 4
Forth. Safety ride prevention
............................................................................................... 6
Main components and corresponding functions of the vehicle ................................................. 7
Run-in...................................................................................................................................... 10
First. Run-in time
............................................................................................................... 10
Second. Operation way during run-in period
................................................................... 10
Third. How to change the lubricant during run-in period
............................................... 10
Start of the motorcycle ............................................................................................................ 11
First. Start working of engine
........................................................................................... 11
Second. When the engine is in the "cold" state
............................................................... 11
Third. When the engine is in the ‘warm’ state
................................................................. 11
Riding of the motorcycle......................................................................................................... 13
First. Shift operation
.......................................................................................................... 13
Second. Climbing or turning
............................................................................................. 14
Third. Stopping
.................................................................................................................. 14
Motorcycle maintenance ......................................................................................................... 15
First. Maintenance period table........................................................................................... 15
Second. Engine Lubricant ................................................................................................... 17
Third. Cooling system......................................................................................................... 19
Forth. Spark plug................................................................................................................. 21
Fifth. Air filter..................................................................................................................... 22
Sixth. Carburetor................................................................................................................. 24
Seventh. Chain..................................................................................................................... 26

II
Eighth. Brake system........................................................................................................... 28
Ninth. Front and rear shock................................................................................................. 30
Tenth. Wheels...................................................................................................................... 38
Eleventh. Batteries............................................................................................................... 40
Twelfth. Bearings................................................................................................................ 42
Cleaning work ......................................................................................................................... 46
Transporting ............................................................................................................................ 47
Storage..................................................................................................................................... 48
Troubleshooting....................................................................................................................... 49
Warranty regulations............................................................................................................... 51
Warranty range.................................................................................................................... 51
Warranty principle............................................................................................................... 54
Paid service description....................................................................................................... 54
Technical Parameters .............................................................................................................. 56
Wiring diagram........................................................................................................................ 59

1
INSTRUCTION
This manual mainly introduces the basic operation and maintenance methods
of the Bosuer M series off-road competitive off-road motorcycles. Please read them
carefully before driving.
This series is forbidden in road, street and residential area.
The proper way of using and
maintenance can ensure the safety while you are
driving and reducing the malfunction of motorcycle to keep the best performance
of them.
If you have other questions about driving and how to maintain this motorcycle,
please contact with the dealer of it.
The data and specifications indicated in this manual are based on the latest
information at the time of writing. However with the improvement of our products
we can’t ensure the motorcycle you bought from us was the same with the one we
showed in this manual. If you have any questions of it please contact with the dealer
or after-sales department of Bosuer.
Thanks for choosing the M series competitive off-road motorcycles of Bosuer.
May you have a nice riding.
ZHEJIANG BOSUER MOTION
APPATUS CO., LTD.

2
NOTICE
Before starting please read the introduction and ensure you have the skills and
tools which we need.
This Instruction is one of the necessary attachments when you sell it to other
people please take it with the motorcycle.
This is an off-road bike with two wheels and limited to be used by one person
only.
The fuel used by this bike is over 95#, because the fuel is flammable, if the
fuel tank, oil filter, oil tube, carburetor are destroyed or have the oil leaking
situation caused by ageing, users should use it after it is repaired.
Users can assemble or change the vehicle’s route on his own, nor can he
increase electrical equipment. Those changes will cause the overload of the
electrical system of this bike which will lead to the fuse is dissolved or the line is
short circuited, and even spark is created, resulting in danger of burning car and so
on. We are not responsible for any consequences arising from the addition of
electrical equipment.
Users should maintain the listed parts in strict accordance with the
requirements in the “Maintenance Periodic Table”.
Before any repair work, please turn off the engine.
1. Before you start the engine pleas choose a ventilation place.
2. The engine and exhaust system can only be touched after cooling, otherwise
it will cause burns;
3. When the engine is abnormal during use, please do not start the engine. Stop
and turn off the fire immediately. Please check it with professional maintenance
personnel.After abnormal exclusion, start the engine.
To reduce the possibility of fire or explosion, be careful when using fuel. Use
only non-flammable solvents to clean parts. Keep cigarettes, sparks and flames
away from all fuel-related parts.
Please record the number indicated in the following places, and keep the
certificate issued with the car for after-sales service.
Engine number 1 is on the middle cylinder of the engine.
Frame number 2 is on the right side of the frame head tube.

3
Note: if smear or change the original frame number or engine number, or
company will not be able to confirm the configuration list and batch of vehicle
identity, which will affect the after-sales processing, resulting in a state of
inconsistency with the purchase status.
The frame number and engine number are the lifetime identification number
of the vehicle and must not be altered, tampered or smeared.

4
Precautions and inspections before driving a motorcycle
First. The prepare working before riding a motorcycle
Before riding you must be prepared as follow:
Read the introduction;
(1) Ensure that you know the safety knowledges clearly;
(2) Ensure you know how to use all parts;
(3) You have a nice motion state when you are riding;
(4) Make sure that you wear appropriate helmets, goggles and protective
clothes in condition that you have not used alcohol or used drowsing drugs.
Second. Safety equipment
(1) In order to ensure your safety, you must wear high-quality anti-collision
helmets, goggles, gloves and other protective equipment when driving or competing;
(2) During the riding process, the temperature of the exhaust pipe is veryhigh, and
the rider driver should be protected to avoid burns;
(3) Do not wear loose and laced clothing to prevent clothing from being caught by
the handle, ankle or wheels. It may also be hit by the wind and hooked on the road,
causing accidents, but it must be borne in mind that high-quality protective equipment
can only play a protective role. Do not ignore traffic safety regulations because of
wearing protective equipment.
Riding the bike in the extreme sports racing venue should wear helmets,
goggles, trousers, long sleeves, gloves, knee pads, elbow pads, neck protectors,
chest protectors and boots to make you safer and more scientific during the ride.
Third. Check everything before riding
Be sure to carefullycheck the items in the table before riding, and never ignore
the importance of these checks. Complete all inspections and necessary repairs
before riding to ensure that the vehicle is safe and in optimum condition.
Check part
Check focus

5
Handle bar
(1)
Smooth and no deformation
(2)
The limit position is not leaving the
scale without the misplacement
(3)
No axial movement and looseness
(4)
The handlebar fixing screw is
completely fastened
Accelerator
(1)
Have a proper distance of
accelerator line
(2)
Smooth rotation without jamming,
the throttle can be automatic
returned when throttle loosed
Fuel quantity
Have enough fuel to keep engine
working
The front and rear break disc
(1)
Disc brake friction wear should not
exceed the limited range
(2)
The free travel distance of the disc
brake is correct
(3)
No drag brake, front and rear wheels
are flexible enough
Tires
(1)
Have a proper air pressure
(2)
Have a proper tires thread depth
(3)
No break crack
Engine oil
Make sure it can achieve the standard
requirement
Chain
(1)
Have a proper tightness
(2)
Add a little bit of proper lubricant

6
Forth. Safety ride prevention
Before you ride your bike, please recall the important safety information.
(1) If you have ridden other series bikes before, you need to familiar with this
bike also to have a nice feeling of it until you have mastered the skills and matched
the dimension and height of it.
(2) The rider must have a skilled riding skills and cross-country common sense,
and beginners must use it under the supervision of the coach.
(3) For your safety, please not to start the vehicle in a closed environment.
Harmful gases from vehicles will damage your health and even cause death.
(4) The bike doesn’t have a light system, so please don’t ride it without light
in a dark environment.
(5) This bike is an off-road bike and is strictly forbidden to be used on roads
and streets or it will cause punishment.
(6) Drivers must wear a full set of off-road special protective gear to avoid
physical damage.
7
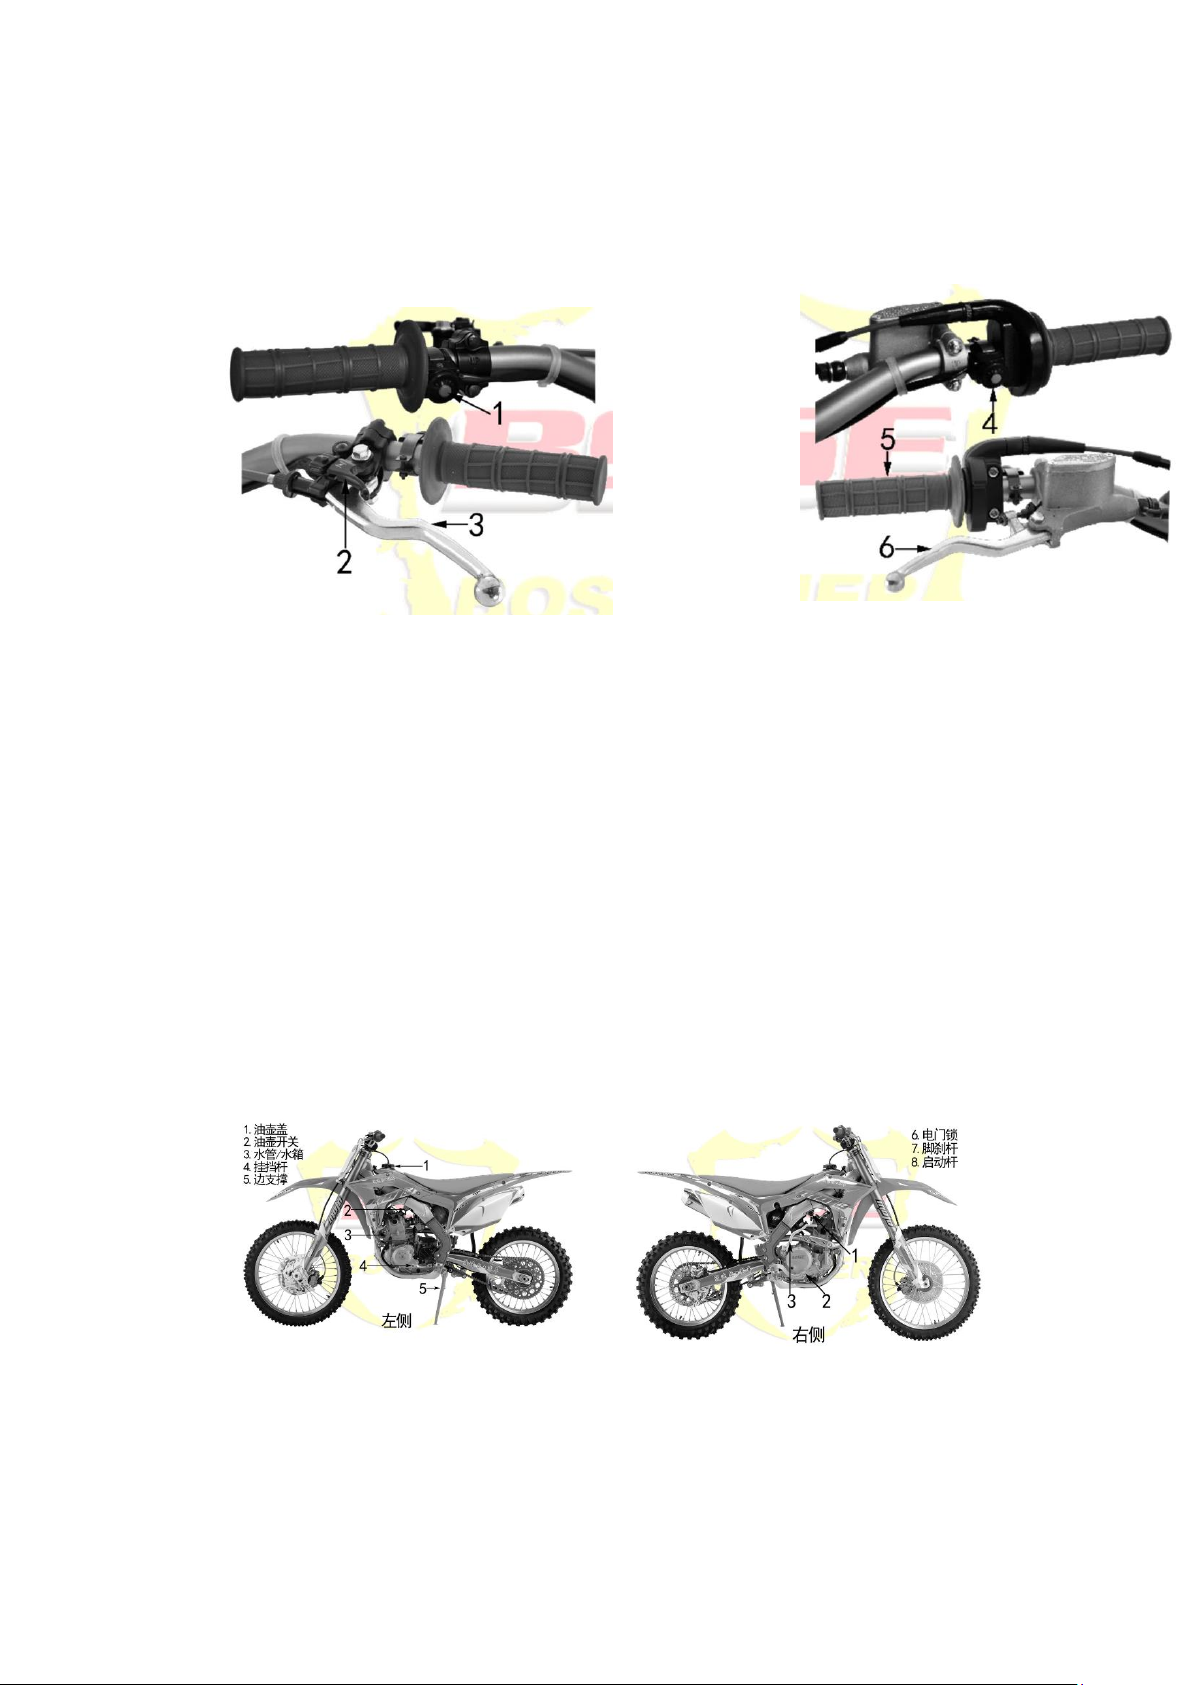
Main components and corresponding functions of the vehicle
(1) F
lameout switch: The red button disconnects the circuit and the engine
stalls.
(2) Damper switch (standby): used to reduce the amount of air entering the
carburetor inlet at low temperatures, increase the oil pressure at the fuel injection
port, and increase the concentration of the mixture to start.
(3) Clutch handle: Transfers or cuts off power transmission between the engine
crankshaft and the transmission.
(4) Start switch: The yellow button start the engine.
(5) Throttle handle: Control the flow rate of the carburetor, the free stroke
value is 2mm-6mm.
(6) Front brake handle: Controls the speed of the front wheels.

8
(1) Oil tank lid: Grasp the oil tank lid and unscrew it counterclockwise. The fuel
quantity can be viewed by opening the oil tank lid.
(2) Oil tank switch: The oil tank switch is under the oil tank, and the fuel is
filtered and sent to the carburetor. Before the engine is started, turn the oil switch to the
"ON" position to supply oil to the carburetor. After the engine is turned off, turn the oil
switch to the "OFF" position to stop supplying oil to the carburetor. The oil tank switch
is turned to the “FUEL” position, indicating that the oil is supplied by the spare oil
passage. Only when the normal oil supply is used up, the spare oil passage can be used
and the fuel can be added as soon as possible. After refueling, turn the oil pot switch to
the "ON" position to avoid consuming the backup fuel.
(3) Water tube and water tank: Grasp the lid on the right tank and unscrew it
counterclockwise we can open the water tank through this way. Align the hook inside
the tank cover with the groove of the tank, press down, and tighten clockwise we can
close it through this way. The hot water inside the engine is circulated to the water tank
through the water tube, and is cooled to be recirculated to the engine, so that the engine
is not overheated and loses its working ability.
(4) Shifting lever: The shift lever is used to change the components of the high
speed gear and the low speed gear. When the pinch clutch is lifted and the shift lever is
lifted, the loose clutch can be raised to the high speed gear, and the pinch clutch can be
lowered to the low speed gear position; half-clutch, do not pinch clutch shift.
(5) Side stand: Step on the side support to support the vehicle while parked.
(6) The electric locked switch must be turned on before starting the engine. After
parking, please pull out the key. The key position is shown in the follow table.

9
Location of the key
Features
State of the key
OFF
The engine can’t be
started
The key can be pulled out
ON
The engine can be started
The key can’t be pulled out
The engine can be started
and turn on the headlight.
The key can’t be pulled out
(7) F
oot break lever: when you push the foot break lever the rear disc break will
be started to slow down the bike.
(8)Start lever: Start the engine.

10
Run-in
First. Run-in time
The running-in period refers to a treatment method in which the new vehicle
is used for the first time in order to ensure that the joint surface between the part
and the part is optimally combined.
Notice:
(1) During the first running-in period, the throttle should be avoided from
full-open operation, and the maximum engine speed should not exceed 5000r/min;
(2) Each gear should be properly run-in;
(3) Do not ride the bike at a fixed throttle position;
(4) Change the lubricant every 200km during the running-in period and clean
the filter.
Second. Operation way during run-in period
(1) 0-200km: The throttle handle is opened to avoid exceeding 1/3 of the
maximum opening, and the engine speed is controlled at 4000r/min;
(2) 200-600km: The throttle handle is opened to avoid exceeding 1/2 of the
maximum opening, and the engine speed is controlled at 6000r/min;
(3) 600-1500km: The throttle handle is opened to avoid 3/4 of the maximum
opening, and the engine speed is controlled at 9000r/min.
Third. How to change the lubricant during run-in period
For the first time in the run-in period, 200km, or after a race or 2.5 hours of
riding, it is recommended to change the lubricant, and then after 6 matches or 15
hours of total change. Please use the recommended lubricant grade for replacement.

11
Start of the motorcycle
First. Start working of engine
(1) Turn the fuel tank switch to ‘ON’;
(2) Turn the electric locked switch to ‘ON’;
(3) Hang the engine to neutral.
Second. When the engine is in the "cold" state
Lift the damper switch up, pinch the clutch handle with your left hand, press
the yellow start switch with your right hand, and the throttle will rotate slightly.
After warming up, press the damper switch back to the original position.
Note: The colder the weather, the longer the engine needs to be warmed up,
and the engine will be fully warmed up to reduce engine wear.
Third. When the engine is in the ‘warm’ state
There is no need to use the damper switch just push the yellow start button.
Note:
(1) After starting, it should be preheated until the engine idle speed is stable,
and the fuel is smooth, so that it can be ridden on the road;
(2) When using the start switch button, each period should be released within
3-5 seconds, and the second start should be separated by more than 15 seconds,
otherwise it will easily cause the battery to discharge too fast and affect the battery
life;
(3) After the engine is started, the start switch button should be released
immediately. When the engine is running, it is not allowed to press the start switch
again, otherwise the starter motor and is easily damaged;
(4) Ensure that the side support is completely stowed, avoiding riding
hindrance and control failure when turning left;
(5) After starting or driving, you need to turn the throttle handle smoothly;
(6) Do not start the motorcycle in a small space to avoid the danger of the

12
exhaust gas spread;
(7) If the clutch lever was damaged you need to change it immediately;
(8) It is strictly forbidden to start the engine when the clutch handle is not
clamped, otherwise it will cause damage to parts or safety accidents.

13
Riding of the motorcycle
First. Shift operation
The bike is a six-speed transmission with constant meshing two-stage
transmission. The first and second gears are low speed, the 3rd and 4th gears are
medium speed, and the 5th and 6th gears are high speed. For shifting, please refer
to the following operations.
(1) When the engine is at idle speed, the left hand grasps the clutch handle to
disengage the clutch, and the left foot is used to step down the shift lever to make
the transmission enter the first gear position;
(2) Gradually increase the engine speed, slowly release the clutch handle, so
that these two actions cooperate with each other to ensure the smooth start of the
motorcycle;
(3) After reaching smooth running, reduce the engine speed, pinch the clutch
handle, hook the shift lever with the left foot and lift it up, so that the transmission
enters the second gear, then gradually increase the engine speed, slowly release the
clutch handle, two actions are required coordinate with coordination to ensure
smooth running of motorcycles;
(4) We can follow the third step when you want to change the gears;
(5) When the gear is downshifted, the speed should be reduced. The left hand
pinch the clutch handle to disengage the clutch, and use the left foot to step forward
and lower the lever. When downshifting, you need to downgrade step by step;
(6) When shifting gears, make sure the shift lever is in place and release the
clutch handle. It is strictly forbidden to shift gears when the throttle is not returned
and the clutch is not pinched, otherwise the engine and transmission system may
be damaged and a safety accident may occur.
Following picture shows the step of gear shift.

14
Second. Climbing or turning
(1) When the motorcycle is going uphill, even if the throttle is increased, the
deceleration of insufficient power will occur, which is caused by the gear being too
high. Therefore, it is necessary to quickly downshift before going uphill, and
change to low gear to avoid the car slowing down and causing the clutch to slip;
(2) When the motorcycle turns, the car is decelerated too fast due to the
emergency return to the throttle, which may cause the rear wheel to slip. Therefore,
when turning or returning to the throttle, first use the brake to decelerate and
quickly reduce to the low gear.
Third. Stopping
(1) Gradually return to the throttle and reduce the speed;
(2) Use the front and rear brakes softly to make the car stop smoothly;
(3) Turn the electric lock switch to “OFF” and pull out the key. If your
motorcycle will not be ridden for a long time, please turn the oil switch to the "OFF"
position;
(4) Put down the side support and prop up the vehicle.

15
Motorcycle maintenance
First. Maintenance period table
You need to maintenance the motorcycle according to the following table.
remarks
1 game
3 games
6 games
9 games
12 games
2.5 hours
7.5 hours
15 hours
22.5 hours
30 hours
Oil tube
(4)
I
R
Throttle seat
I
Air filter
element
(1)
C
Engine oil
(3)
I
R
Cooling water
(2)
I
Cooling system
I
Spark plug
I
Air filter
element
(1)
C
chain
I,L
C
,
A
,
R
Chain
guider/Tensioner
I
C
Sprocket
I,L
C
Brake fluid
(2)
I
Friction plate
I
Front/rear brake
I
Throttle/clutch
line
I,L
Front/rear shock
I
Fork/linkage
L
Front wheel
I

16
Fastener
I
Symbols in the above table: I means check and clean, adjust, lubricate or
replace if it is necessary; C means clear; A means adjust; L means lubricate; R
means replace it.
Something you need pay attention in remarks:
(1) Every time you use it in a dusty environment, you need to clean it;
(2) Replace every two years, replacement requires some mechanic repair
technology;
(3) You need to change them after first run-in period;
(4) You need to change them every year.
17
Second. Engine Lubricant
1. Choose of the engine lubricant
The lubricant acts on the engine to reduce friction, increase sealing, cool parts,
clean parts, and prevent rust. Poor quality of lubricant, excessive use time, insufficient
amount of lubricant, etc., will accelerate the wear of engine parts, reduce the service
life of the engine, and even cause excessive engine temperature, clutch wear or burnout,
power loss, abnormal noise, lubricant, etc. .
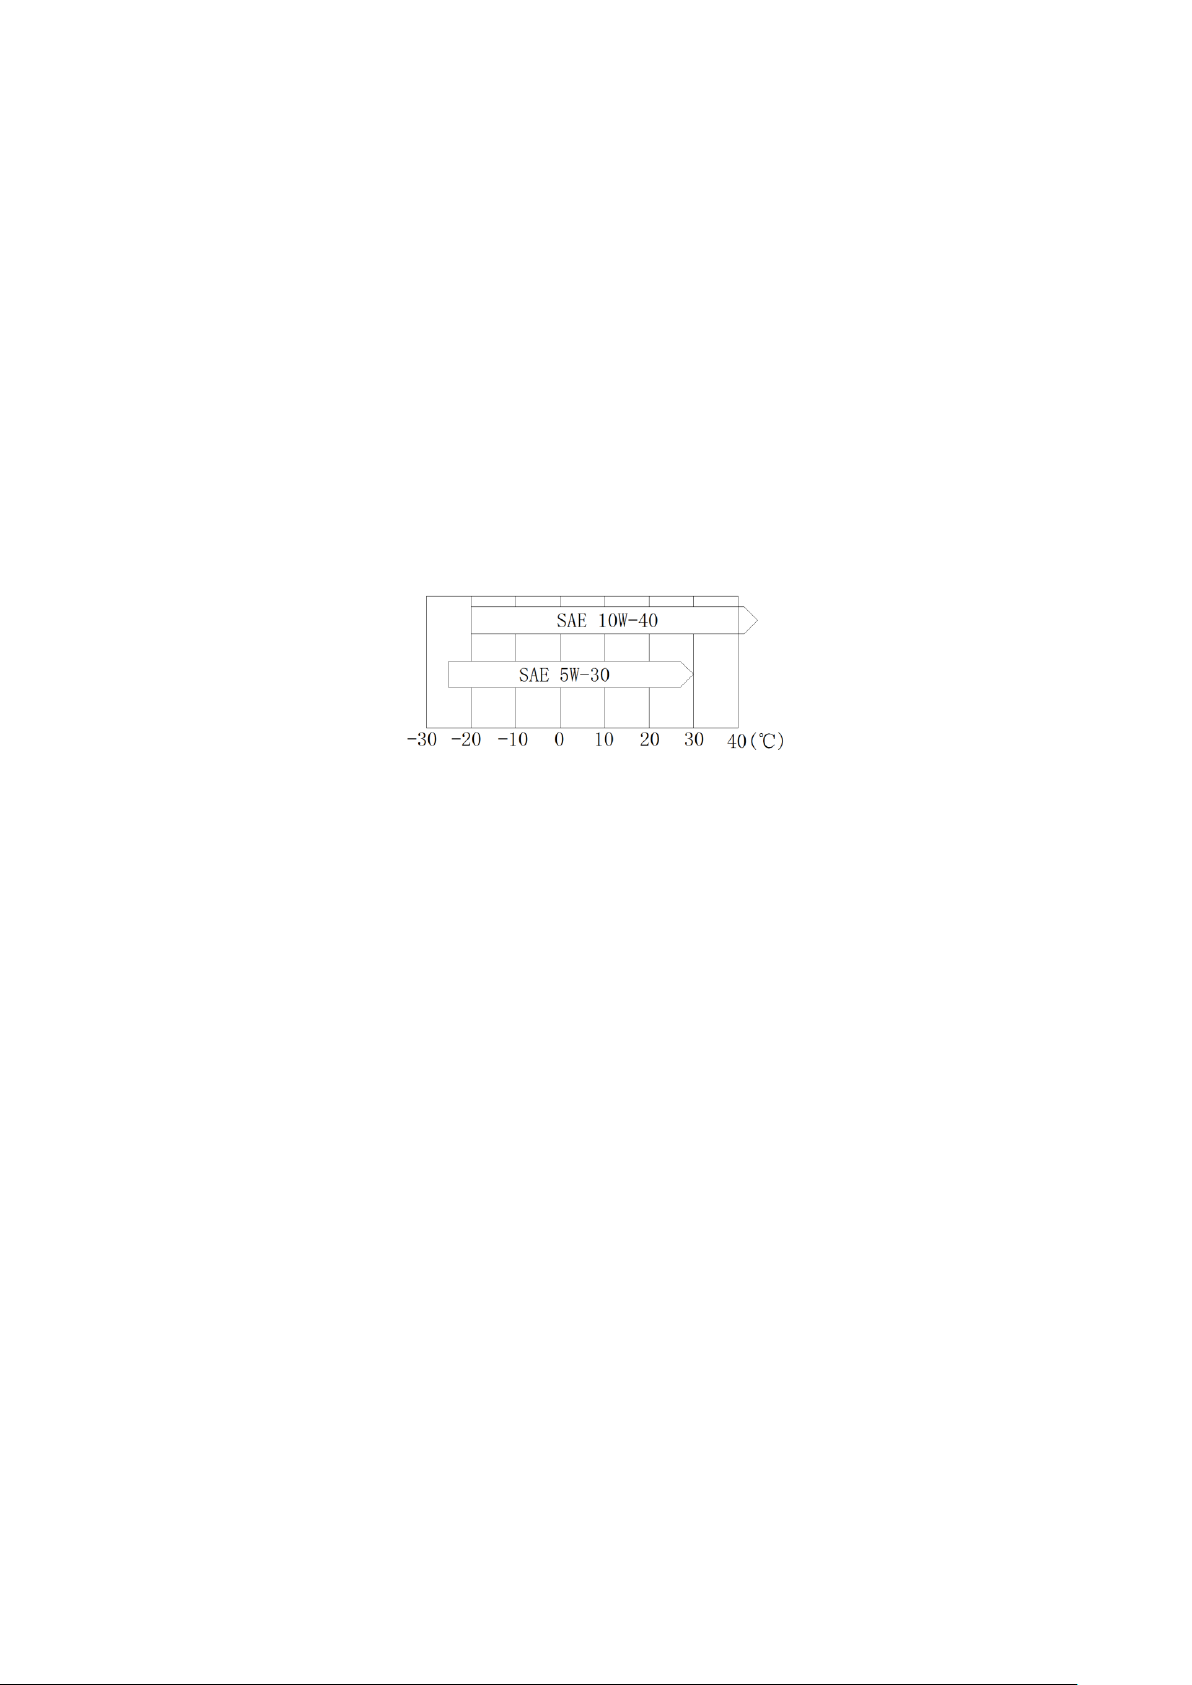
Use high-quality four-stroke lubricants to extend engine life. Lubricants should be
graded in API SG, SH, SJ, SL, SM or SN. The viscosity is SAE 10W-40, or according
to the local climate, please select the appropriate lubricant according to the following
table.
Pay attention:
(1) No need to add any chemical additives to the lubricating oil;
(2) Do not use any lubricant of poor quality.
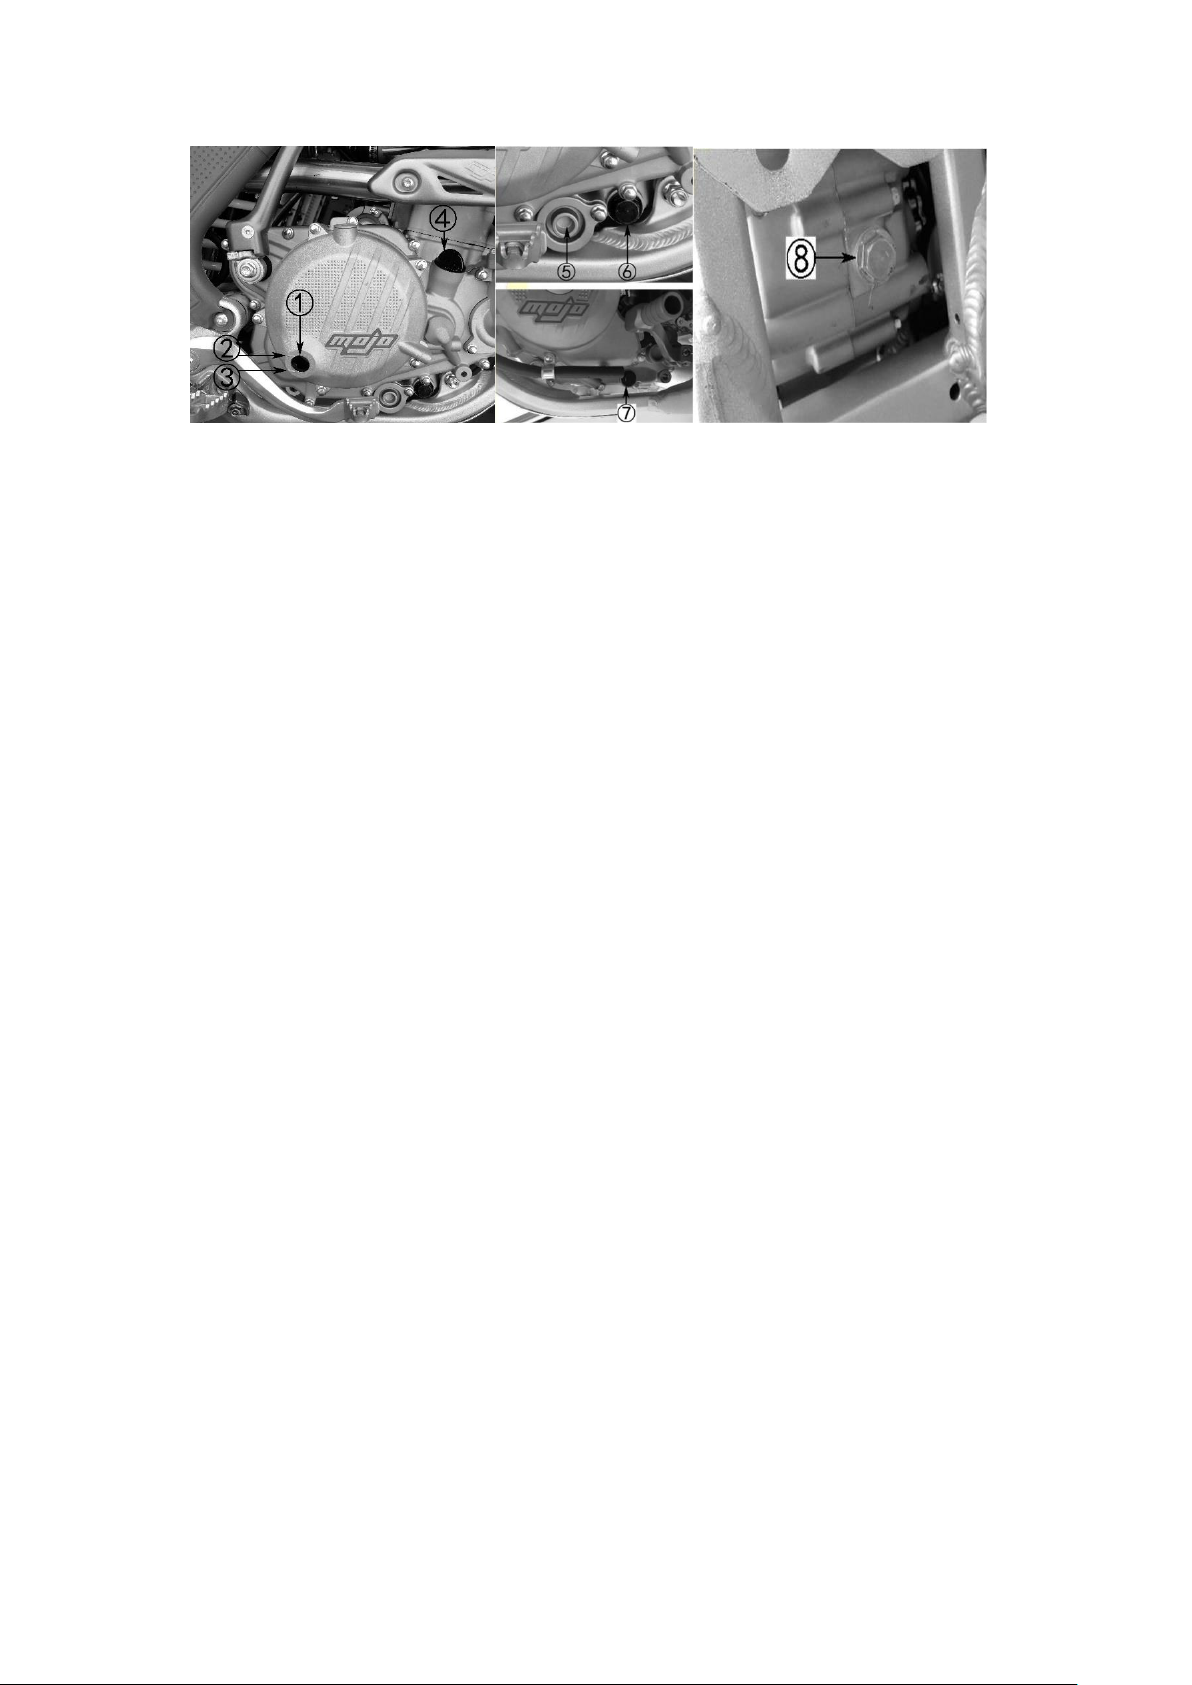
2. Check of lubricant
The level of the lubricant must be checked before each time of use. There is an oil
window on the right crankcase cover, as shown on the following picture. Checking step
as follows;
(1) Making the engine work in idle speed for 3 minutes then turn off it;
(2) Wait 3 minutes after turning off the engine to disperse the lubricant
throughout the engine;
(3) Put the motorcycle in a horizontal position when you are checking the
amount of oil;
(4) Check if the oil level is between the upper limit 2 and lower limit 3 marks
via the right crankcase oil window 1. If the oil is marked at 2 or close to 2, you do
not need to add oil; if the oil is below or near the lower level of the mark, you need
to add the recommended lubricant until it reaches the previous mark, taking care
not to overflow.
18
3. Change of the lubricant
(1) Making the engine work in idle speed for 3 minutes then turn off the
engine;
(2) Put the motorcycle in a horizontal position;
(3) On the right side of the engine, mark 5, 6 and use the tool to remove the
engine oil leakage bolt;
(4) On the left side of the engine, mark 7, remove the engine oil leak bolt
with the tool;
(5) Under the engine, mark 8, remove the engine oil leak bolt with the tool;
(6) If there is a filter inside the oil drain bolt, it needs to be cleaned with
gasoline;
(7) After the waste oil is drained, install the cleaned filter and drain bolt back
to the engine;
(8) We recommended you that the oil and filter should be changed every 6
games or approximately 15 hours per ride, refer to the maintenance schedule.
Please to deal with the wasted oil in a proper way to avoid polluting the
environment.
4. Raise the lubricant
The mark 4 can be unscrewed and lubricant can be added from there, and the
amount of oil can be confirmed by the crankcase oil window 1. Install 4 back after
reaching the oil level.
This manual suits for next models
1
Table of contents


