bouncepad luna User manual

Luna
Instruction
Manual

Trouble-shooting
Luna
Installation
Operation
Safety
Guidelines
Product
Components
Explained
3
2.1 Luna Case
2.2 Luna Dock
2.3 Luna RFID Fob
3.1 Installation Guidelines
3.2 Fixing from Below
3.3 Fixing from Above
3.4 Luna Case Installation
4.1 First Start-up
4.3 Undocking
4.2 Fob Registration
4.4 Docking/Undocking Best Practice
2
4
5
1
5.1 Tablet not charging
5.2 Tablet not on
5.3 Dock not locking Case
5.4 Case not docking
5.5 Can’t undock Case
5.6 Dock Reset access
5.7 Soft Reset
5.8 Medium Reset
5.9 Hard Reset
5.10 Fob re-registration

Your Luna device should be installed and treated with care. The information below has been
provided in the interest of safety, and to help you create a safe and successful installation.
• Before installing or using the product, first read this instruction manual in full.
• Only install and use the product as described in this instruction manual.
• For users of the installed product, ensure that they have also read the instruction manual,
or have otherwise been made aware of the operational instructions of the product.
• DO NOT use a power supply other than the one supplied with the product.
• DO NOT install the product outside, or where it may be exposed to humidity, moisture,
liquids, excessive low or high temperatures, mechanical shock or direct sunlight.
• DO NOT install in a low temperature environment as moisture could form inside the device,
which may damage the electronics.
• DO NOT install in a high temperature environment as electronics and plastic parts may be
damaged.
• DO NOT allow dust, dirt, food or fluids to be spilt on the unit, as this may damage the
electronics and mechanics.
• DO NOT use harsh chemical cleaners or solvents or detergents to clean the product. Wipe
carefully with a soft dry cloth to clean.
• DO NOT attempt to open the product, except for the opening of the tablet enclosure as
part of its operation. There are no user serviceable parts of the product and unauthorised
handling may damage the product and will void your warranty.
• DO NOT dock or undock the device without taking care.
• DO NOT use excessive force when handling the product and avoid any heavy impacts
caused by dropping the product as this may cause damage to the product.
Safety Guidelines1
3
2
4
6

The Luna Dock locks down your Luna Case, and can be unlocked using the contactless RFID Fob.
The tablet is seamlessly charged whilst the Case is docked.
Product Family Explained2
3
4
5
1
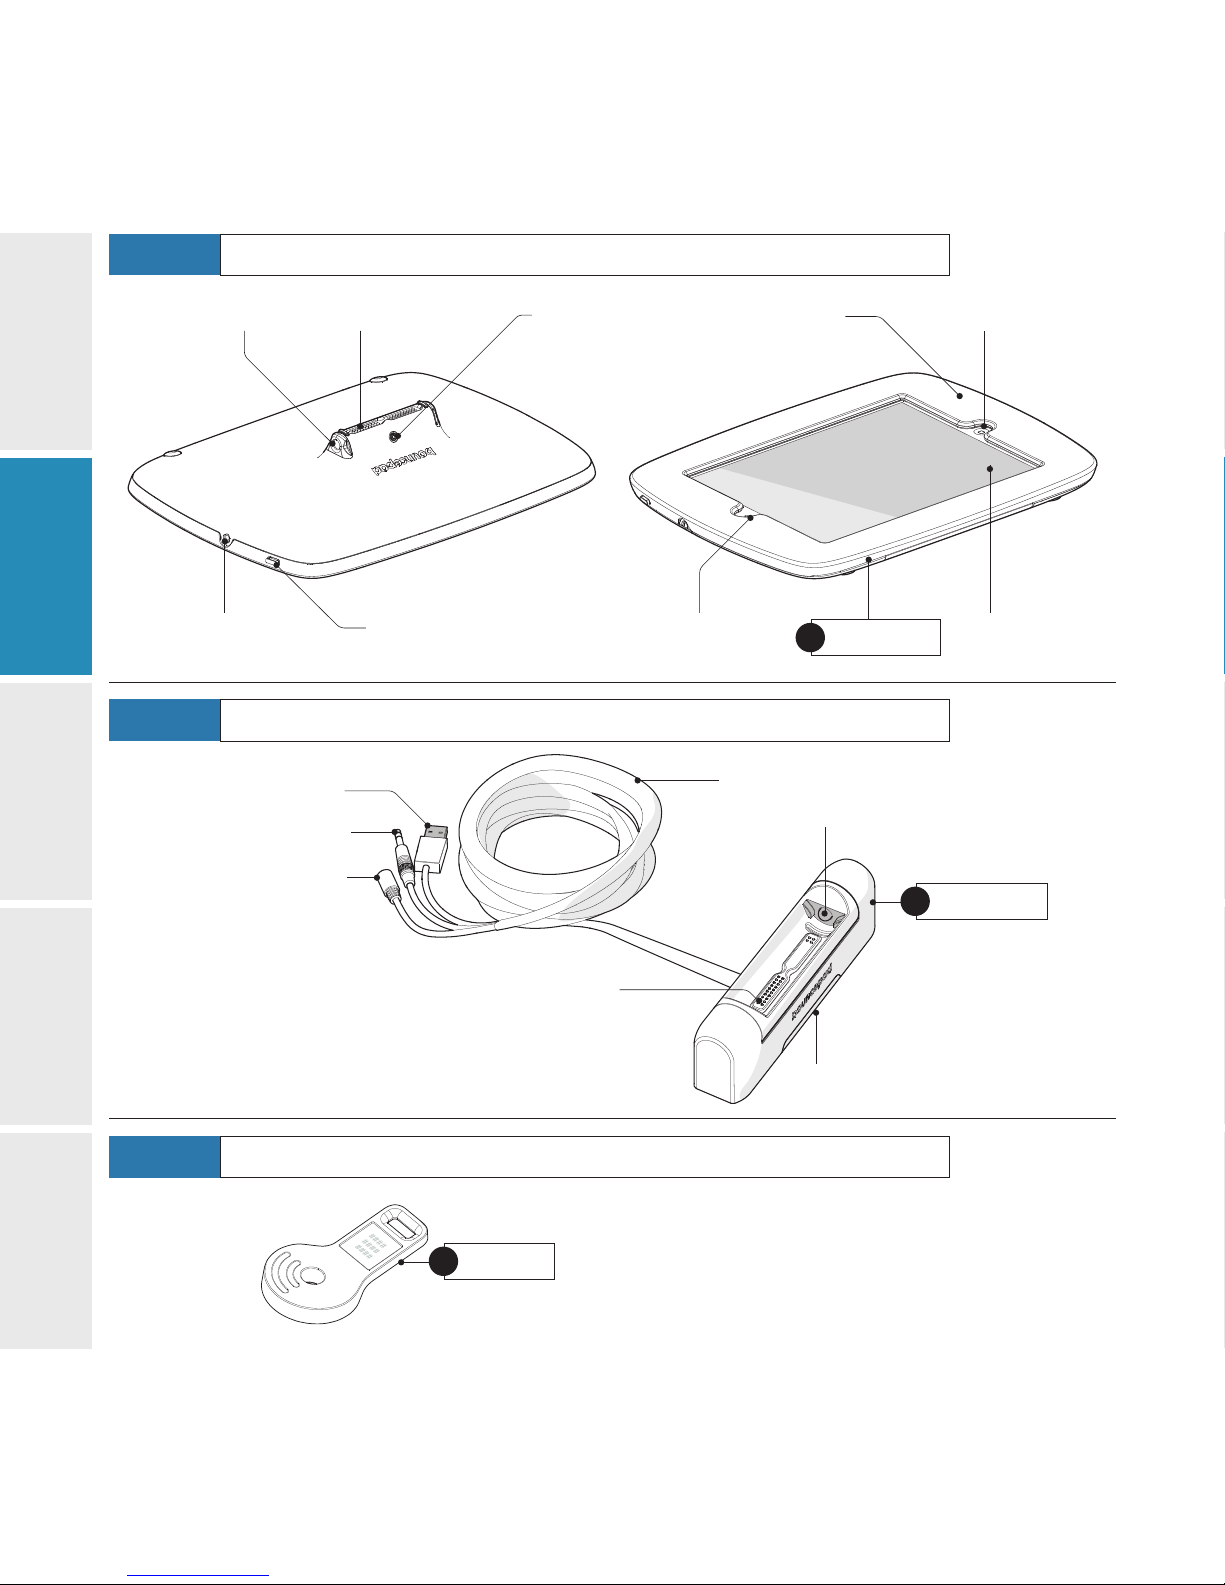
Luna Case
A*Tablet not
provided
Tablet Front
Camera Access
Case Charging
ContactsDocking Pin Recess
3.5mm Audio Port
Tablet Home
Button AccessCase Status Light
Tablet Power Push Button
Case Tablet
Access Lock
Dock Cable
Charging Contacts
Docking Pins
DC Connector
3.5mm Audio Jack
USB Plug
Luna Dock
B
Dock Power Light
RFID Fob
CPresenting a valid RFID Fob releases the Luna Case
from the Dock.
2.1 Luna Case
2.2
2.3
Luna Dock
Luna RFID Fob
2
3
4
5
1

2
4
5
1
Luna Installation3
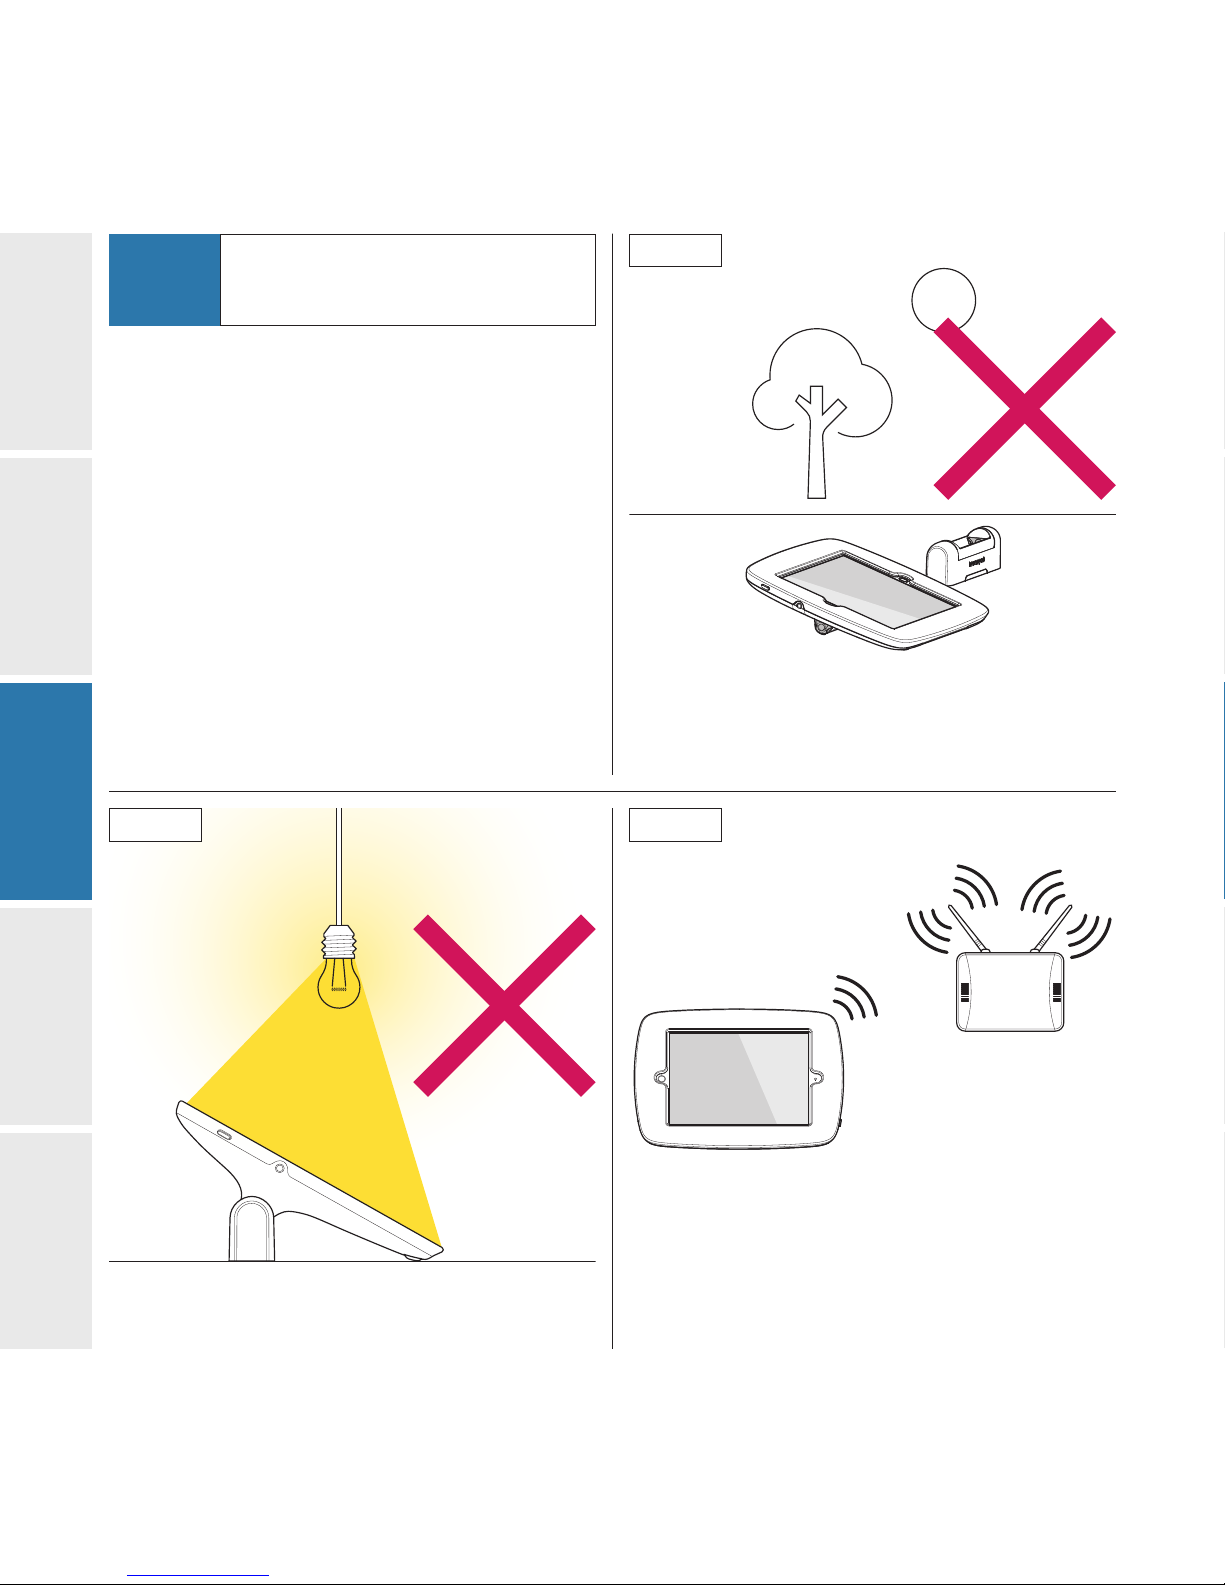
Avoid positioning your Luna directly below bright
lights to reduce screen glare.
The Luna Dock and Luna Case are designed for use
and installation inside only.
Do not install the unit outside, or expose it to extreme
environmental conditions.
www
Ensure that a secure and strong Wifi connection is
available if your tablet requires Internet access.
Installation Guidelines 3.1.1
3.1.2 3.1.3
3.1
2
4
5
1
3
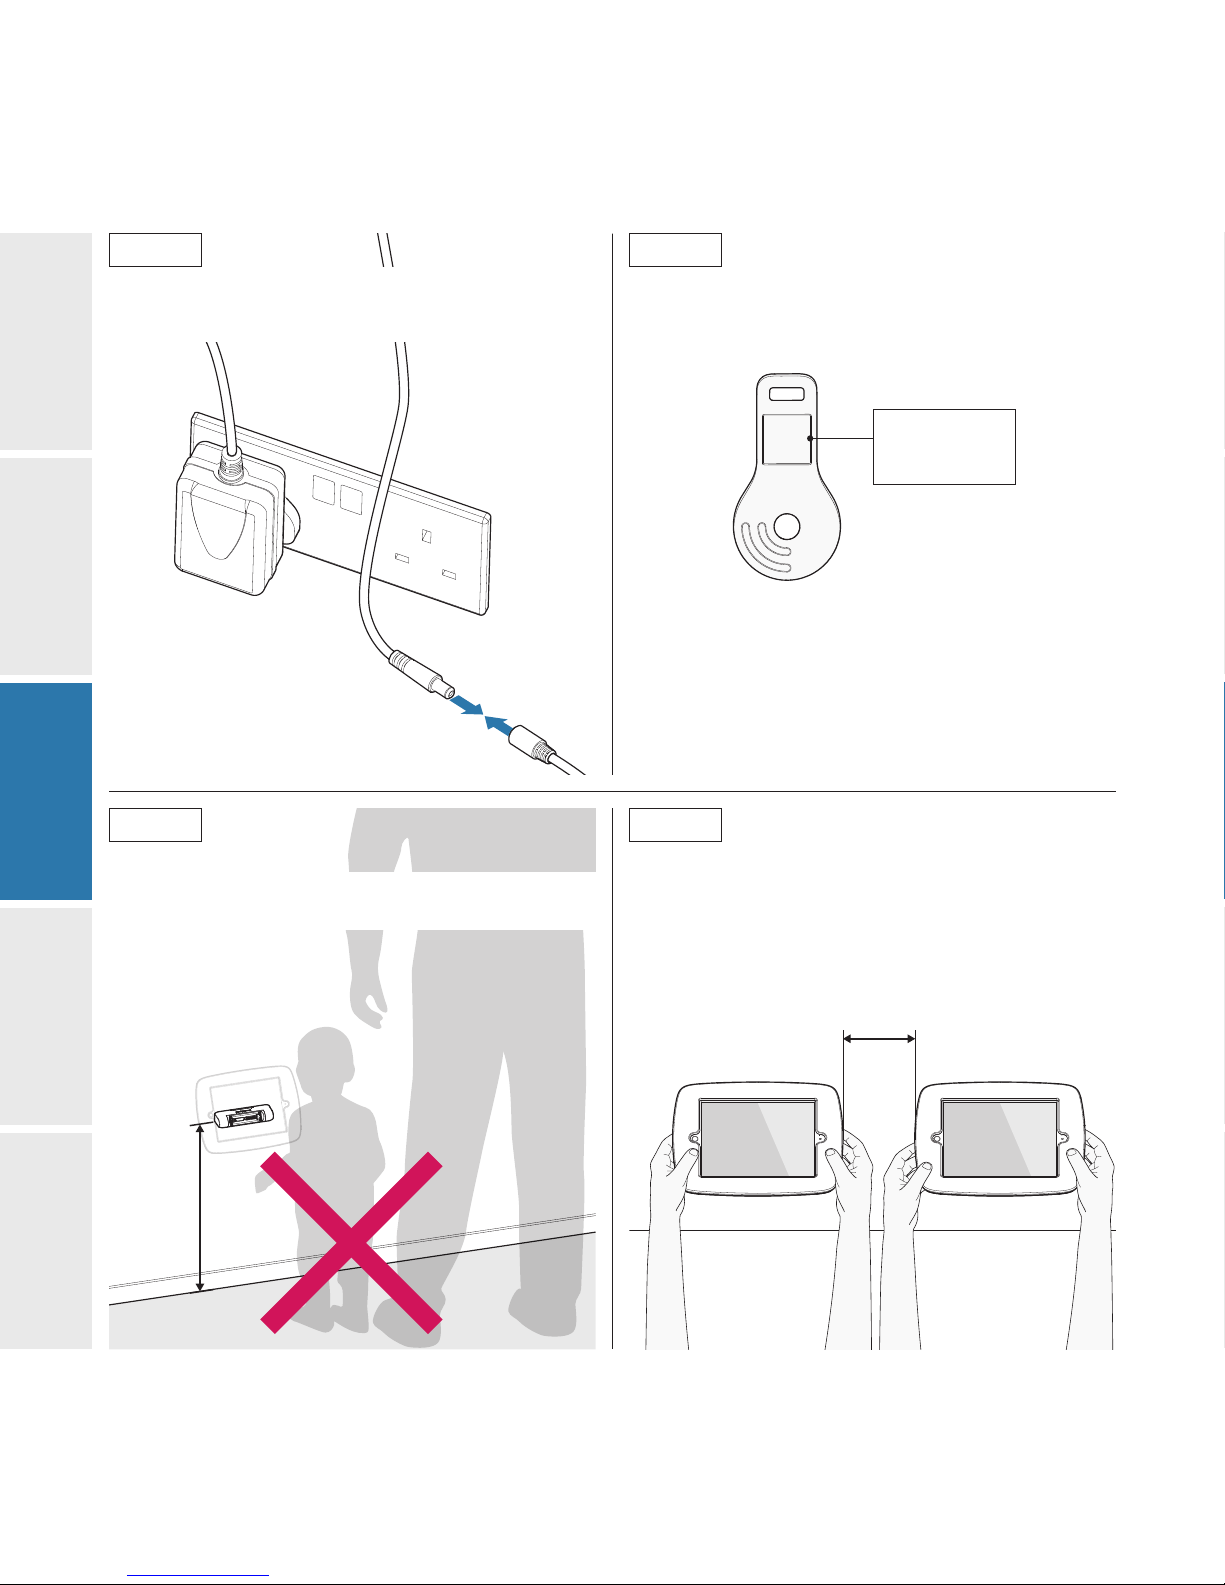
We do not recommend installing your Luna within
reach of small children.
Consider the distance to an available power supply
socket. Luna will only charge, lock and unlock if
connected to a reliable mains power supply.
Consider creating a database of the RFID Fob
identification numbers associated with each Luna
Dock and member of staff.
Consider how your staff or customers will interact
with the Luna Case when installing multiple units close
together - can they be easily accessed for docking
and undocking?
####
####
RFID Fob
Identification
Number
The Power Supply Cable is 1.5m
in length.
3.1.4
3.1.6
3.1.5
3.1.7
2
4
5
1
3
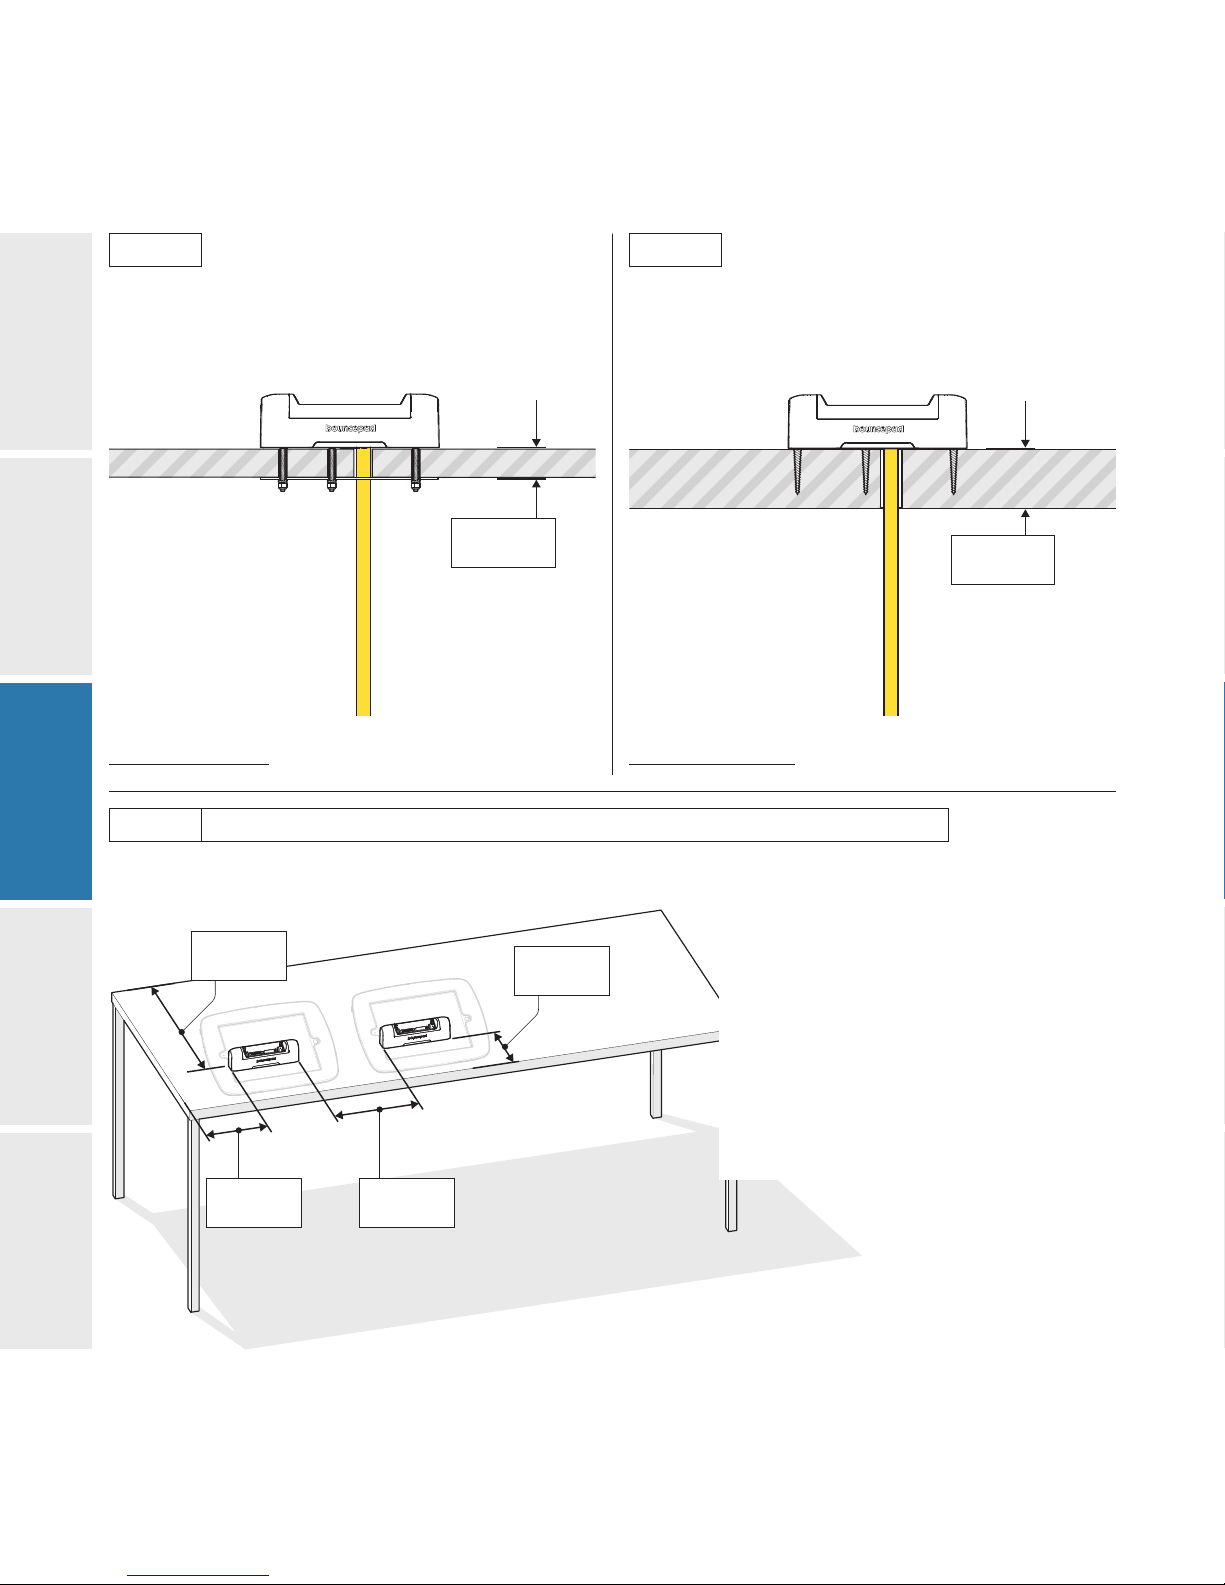
The recommended minimum surface thickness for
Fixing from Above is 30mm.
Maximum
30mm Minimum
30mm
The recommended maximum surface thickness for
Fixing from Below is 30mm.
Minimum
150mm
Minimum
300mm
Minimum
150mm Minimum
150mm
Docks must be mounted with at least
these minimum distances between them
and the surface edge.
Installing multiple units closer to each
other than this may result in being
unable to dock or undock your Luna
effectively.
3.1.10 Horizontal Surface Mounting Guidelines
3.1.8 3.1.9
2
4
5
1
3

Minimum
300mm
Minimum
1200mm
Minimum
150mm
Docks must be mounted with at least
these minimum distances between
them.
Installing multiple units closer to each
other than this may result in being
unable to dock or undock your Luna
effectively.
3.1.11 Vertical Surface Mounting Guidelines
2
4
5
1
3

Tape
Measure Pencil Drill
5mm
Drill bit
7mm
Spanner
Phillips #2
Driver bit
Socket
Driver
20mm
Drill bit
Maximum
30mm
Luna Dock
B
I
M4 40mm
Countersunk
Screws
x5
G
M4
Nylocs
x5
H
M4
Spring
Washers
x5
Mounting
Plate
EClamping
Plate
F
T10
Security
Driver
Bit
K
M
Closed
Dock USB
Cover
L
x2
M3 6mm
Torx Pin
Security
Screws
Parts required
Tools required
Fixing from Below
3.2
2
4
5
1
3
5mm
Drill bit
Customer
Facing
F
*If mounting on a vertical
surface and routing cable
downwards.
*If mounting on a
horizontal surface.
*If mounting on a vertical
surface and routing cable
upwards.
Bottom Edge of Vertical Surface
*distance not representative of actual recommended measurement
Bottom Edge of Vertical Surface
*distance not representative of actual recommended measurement
F
F
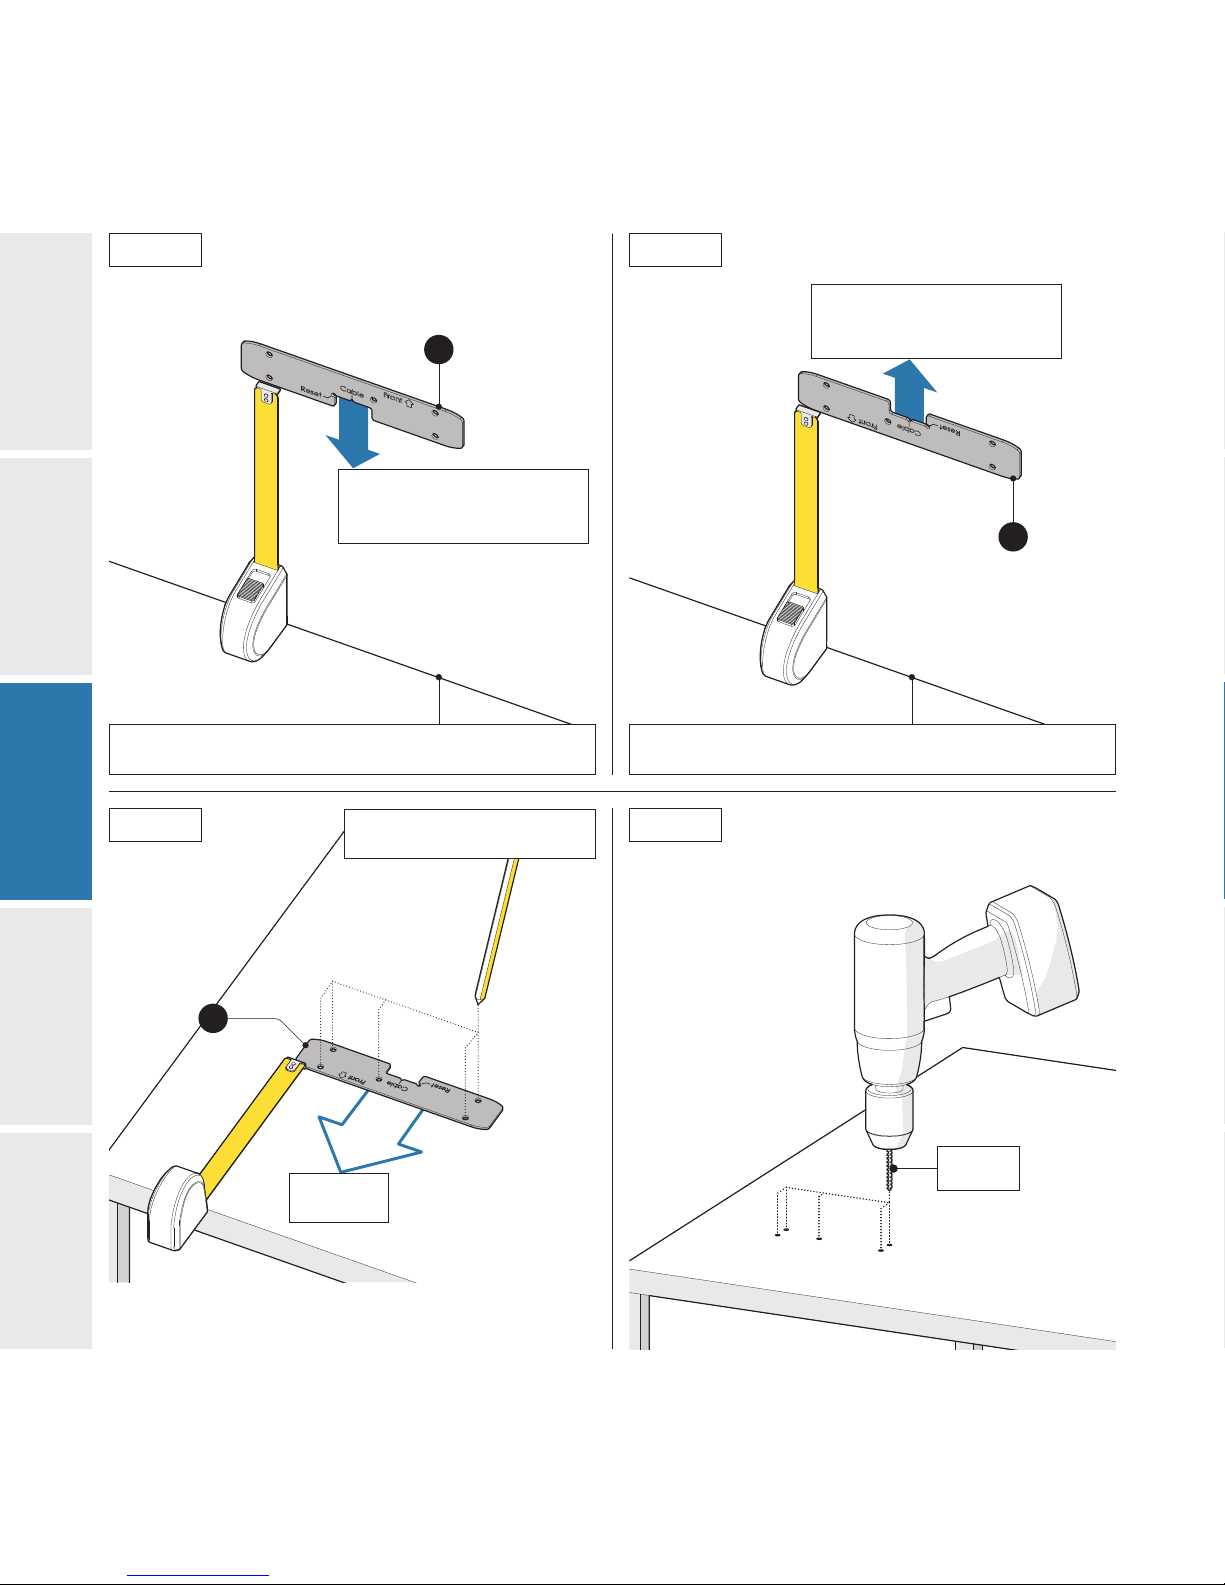
Using the Clamping plate as a template, mark the
position of the countersunk screw holes.
3.2.1
3.2.3
3.2.2
3.2.4
2
4
5
1
3
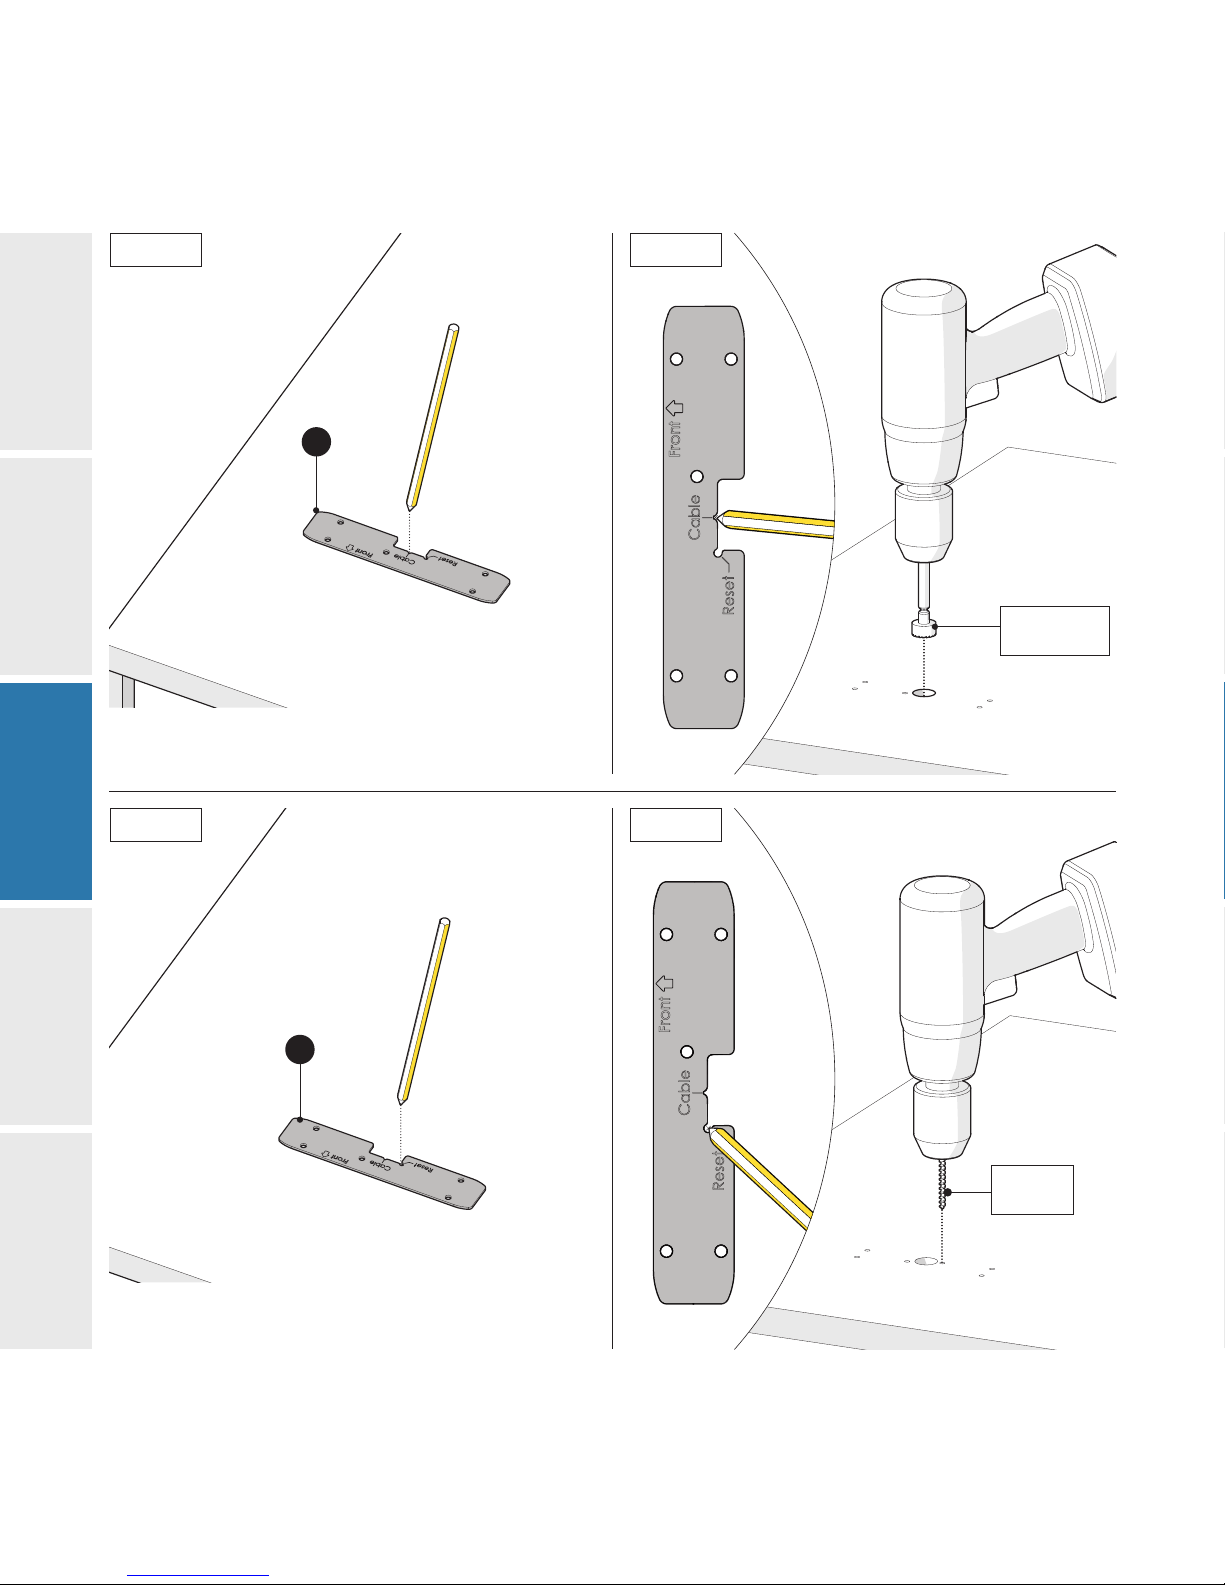
20mm
Drill bit
F
5mm
Drill bit
F
Using the Clamping plate as a template, mark the
position where the Dock cable will pass through your
surface.
Using the Clamping plate as a template, mark the
position of the Dock reset button hole.
3.2.5
3.2.7
3.2.6
3.2.8
2
4
5
1
3

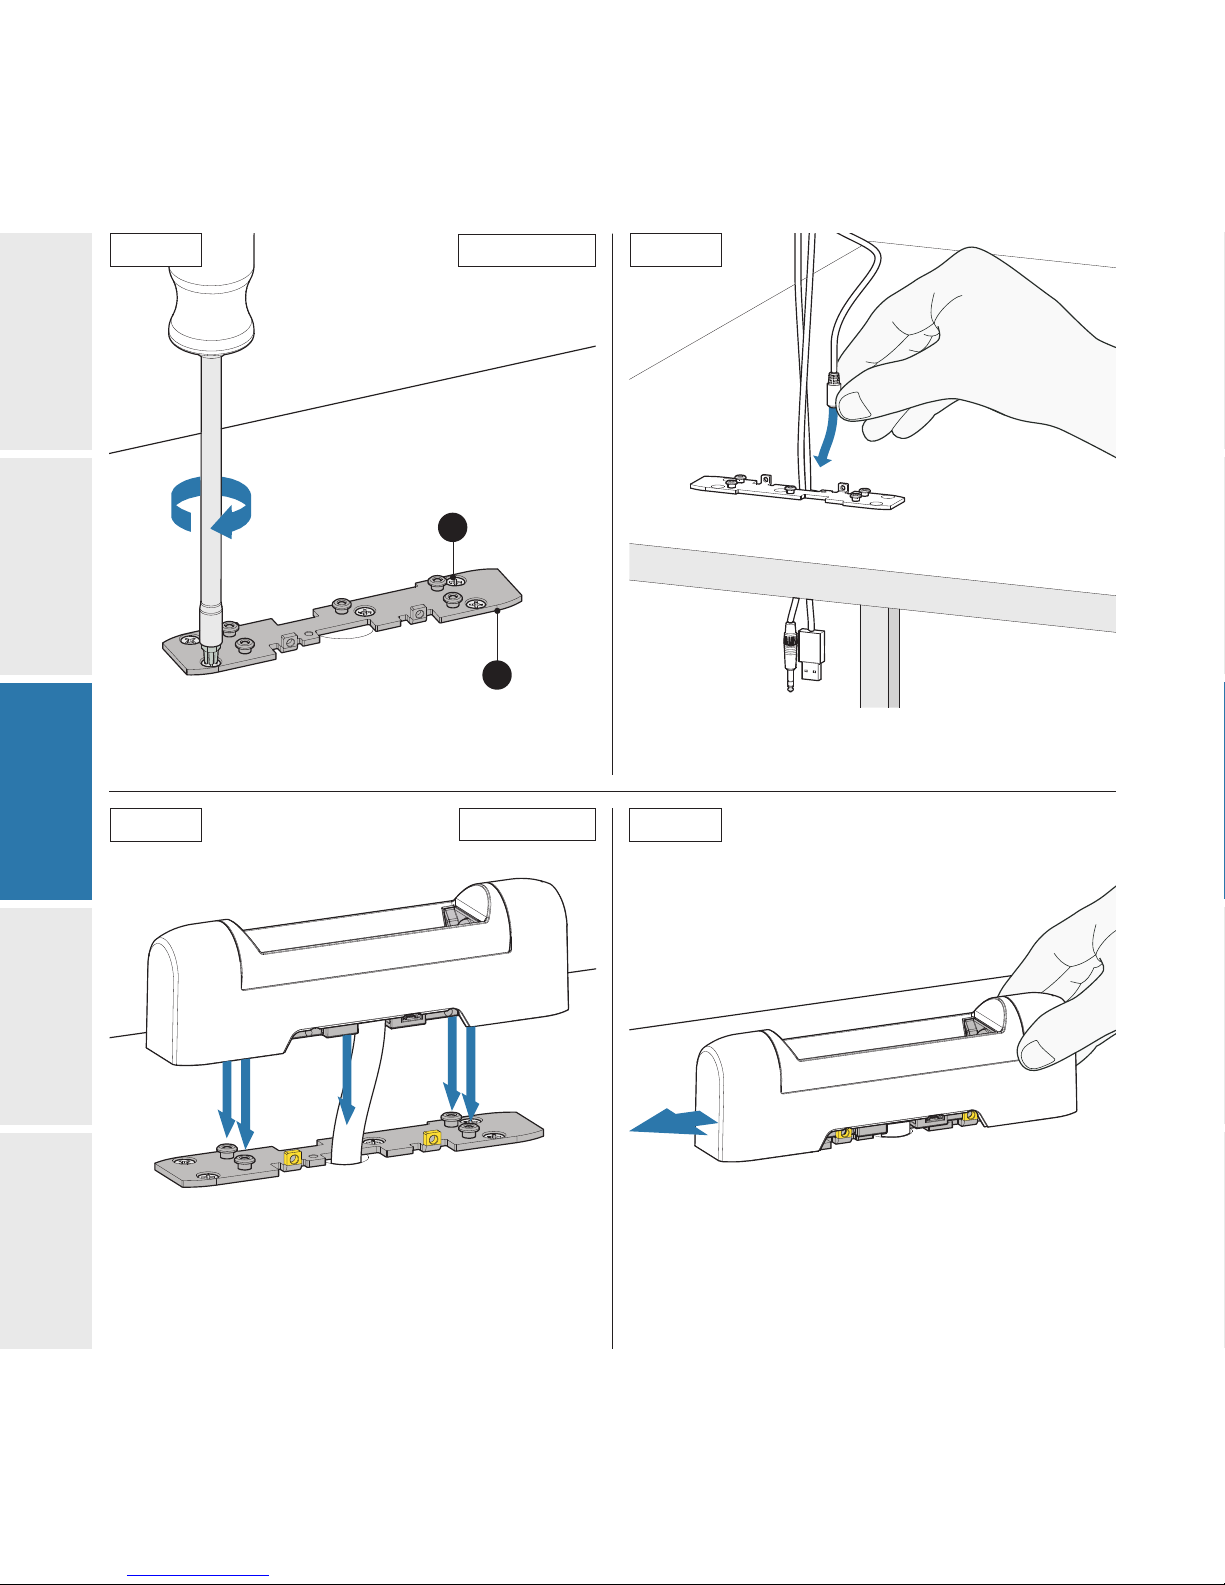
Locate your Luna Dock onto its Mounting Plate
Rear View
I
F
H
G
E
Tighten to: 1Nm
Individually feed the Luna Dock Cables through the
drilled hole in your mounting surface - USB cable first.
Ensure the Luna Dock is orientated correctly.
Please note, the Mounting Plate is attached to the
bottom of the Luna Dock for transportation.
3.2.9
3.2.11
3.2.10
3.2.12
2
4
5
1
3
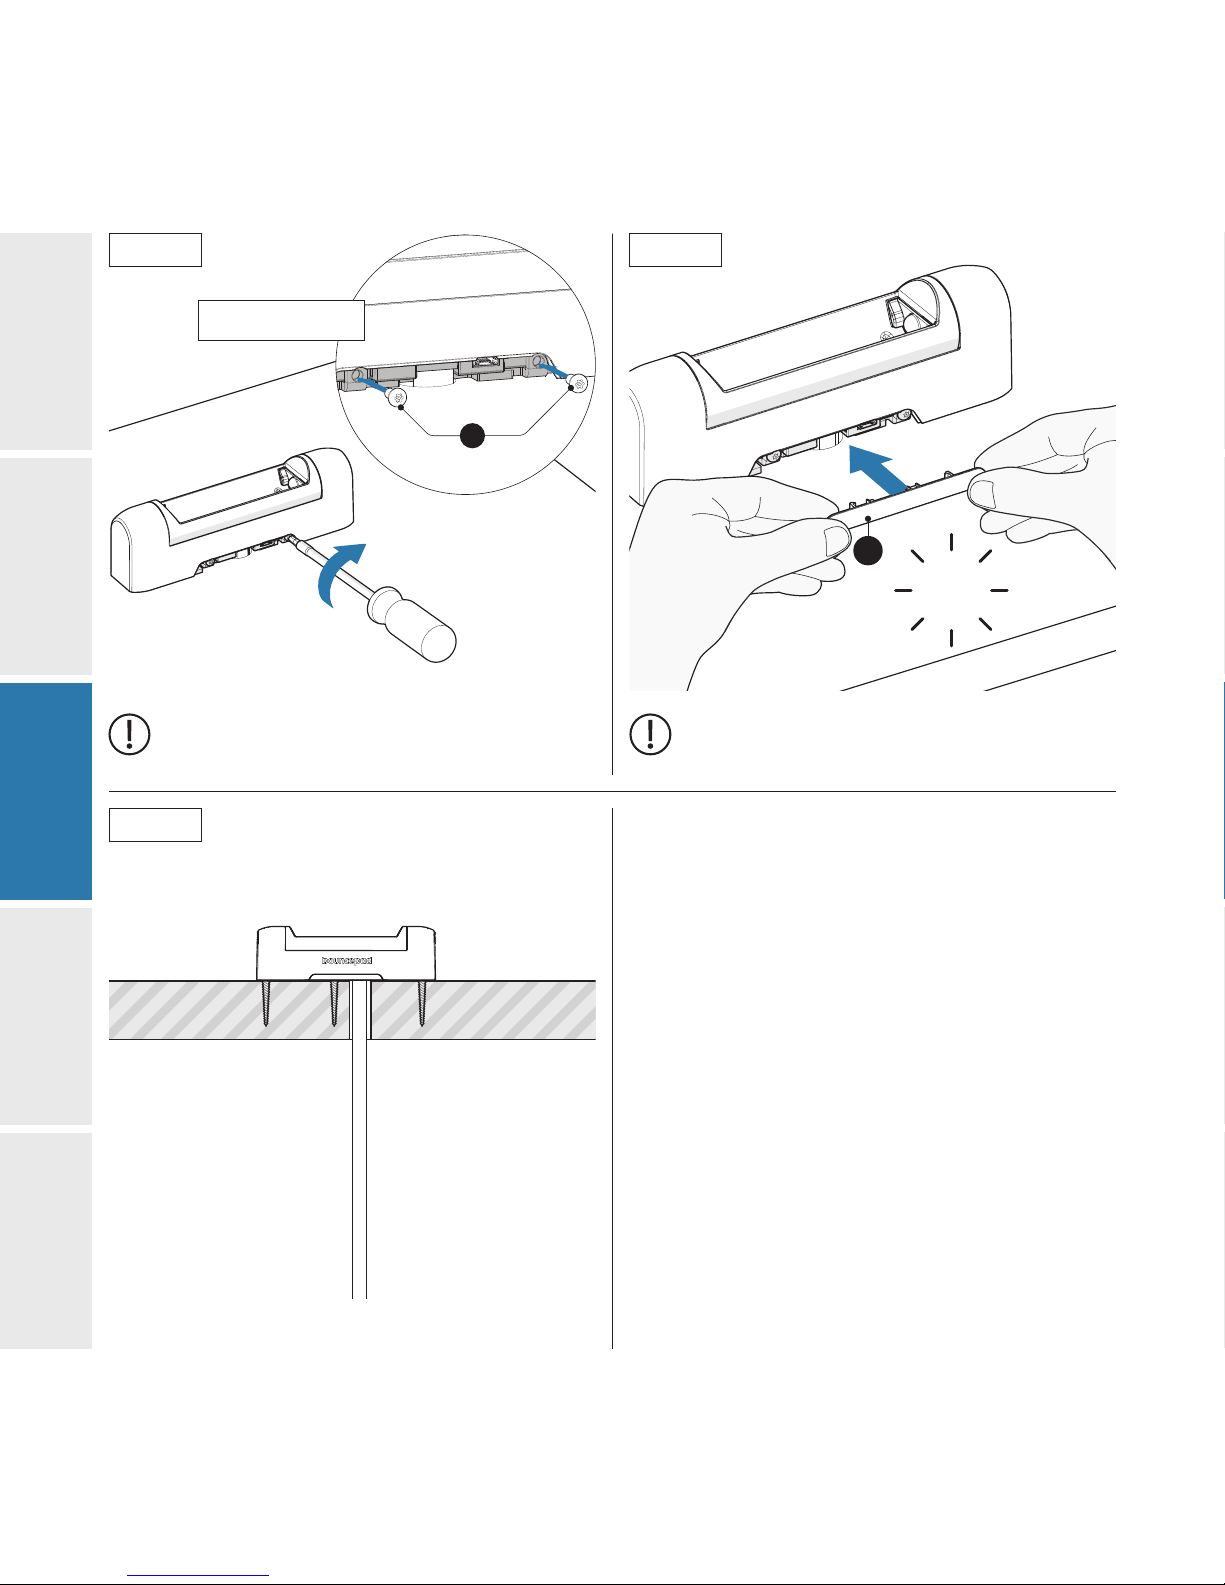
Slide the Luna Dock into its locked position.
Click
The Fixing from Below installation of your Luna Dock
is complete - proceed to section 3.4
L
M
Tighten to: 0.2Nm
The M3 6mm Torx Pin Security Screws must
be fully secured into the Luna Dock to ensure
correct functionality of the Luna.
Ensure both screws are fully secured into the
Luna Dock before attaching the Dock USB
Cover.
3.2.13
3.2.15
3.2.14
3.2.16
2
4
5
1
3

Minimum
30mm
Tape
Measure Pencil Drill
Phillips
#2
Driver bit
Socket
Driver
5mm
Drill bit
Luna Dock
B
J
Countersunk
Pozi screws
x5
Mounting
Plate
EClamping
Plate
F
T10
Security
Driver
Bit
K
L
x2
M3 6mm
Torx Pin
Security
Screws
20mm
Drill bit
M
Closed
Dock USB
Cover
Tools required
Parts required
Fixing from Above
3.3
2
4
5
1
3

If required, drill into your mounting surface
using the drill bit appropriate for the material
and screw requirements.
Countersunk Pozi screws are provided with
your Luna Dock.
*If mounting on vertical
surface and routing cable
downwards.
*If mounting on vertical
surface and routing cable
upwards.
Bottom Edge of Vertical Surface
*distance not representative of actual recommended measurement
F
F
Customer
Facing
F
Bottom Edge of Vertical Surface
*distance not representative of actual recommended measurement
*If mounting on horizontal
surface.
3.3.1
3.3.3
3.3.2
3.3.4
2
4
5
1
3
20mm
Drill bit
F
5mm
Drill bit
Using the Clamping plate as a template, mark the
position where the Dock cable will pass through your
surface.
F
Using the Clamping plate as a template, mark the
position of the Dock reset button hole.
3.3.5
3.3.7
3.3.6
3.3.8
2
4
5
1
3
E
J
Rear View
Screws must be flush in the countersunk holes
Locate your Luna Dock onto its Mounting Plate
Rear View
Slide the Luna Dock into its locked position.
Individually feed the Luna Dock Cables through the
drilled hole in your mounting surface - USB cable first.
Ensure the Luna Dock is orientated correctly.
3.3.9
3.3.11
3.3.10
3.3.12
2
4
5
1
3
Click
The Fixing from Above installation of your Luna Dock
is complete - proceed to section 3.4
M
L
Tighten to: 0.2Nm
The M3 6mm Torx Pin Security Screws must
be fully secured into the Luna Dock to ensure
correct functionality of the Luna.
Ensure both screws are fully secured into the
Luna Dock before attaching the Dock USB
Cover.
3.3.13 3.3.14
3.3.15
2
4
5
1
3
Table of contents
Other bouncepad Tablet manuals


