Estone MJ-80 User manual

User’s Manual
MJ-80

2
Version 1.0
01/2019
All rights reserved.
Copyright © ….
No part of this document may be reproduced, stored in a retrieval system, or transmitted in any form, by any means
(electronic, photocopying, recording, or otherwise) without the prior written permission of the publisher.
Copyright protection claimed includes all forms and matters of copyrightable material and information allowed by
statutory or judicial law or hereafter granted, including without limitation, material generated from the software
programs which are displayed on the screen such as screen displays, menus, etc.
Products that are referred to in this document may be either trademarks and/or registered trademarks of the
respective owners. The publisher and the author make no claim to these trademarks.
While every precaution has been taken in the preparation of this document, the publisher and the author assume no
responsibility for errors or omissions, or for damages resulting from the use of information contained in this
document or from the use of programs and source code that may accompany it. In no event shall the publisher and
the author be liable for any loss of profit or any other commercial damage caused or alleged to have been caused
directly or indirectly by this document.
Content subject to change without notice.

3
Table of Contents
Contents
Table of Contents.............................................................................................................................................................. 3
1. Introduction ......................................................................................................................................................... 5
Explanation of Advisements ................................................................................................................................ 5
Symbols andMarkings
........................................................................................................................................ 5
2. Exploring Your Device .......................................................................................................................................... 6
Package Contents................................................................................................................................................. 6
3. Device Layout....................................................................................................................................................... 7
Front, Top and Bottom View................................................................................................................................ 7
Left-side View....................................................................................................................................................... 8
Right-side View .................................................................................................................................................... 8
Rear View ............................................................................................................................................................. 9
4. Managing Device Power ....................................................................................................................................10
AC adapter ......................................................................................................................................................... 10
Optional Docking Station ...................................................................................................................................10
Power Supply and Battery .................................................................................................................................11
Checking the charging Level....................................................................................................................................12
Power LED Behavior ...............................................................................................................................................12
5. Using features.................................................................................................................................................... 12
Using the Fingerprint Reader (Option) ..............................................................................................................12
Using the Barcode Scanner (Option) ................................................................................................................. 13
USING GPS.......................................................................................................................................................... 13
6. eController App and its Applications .................................................................................................................14
System information............................................................................................................................................ 14
Fingerprint scanner............................................................................................................................................ 15
Barcode Scanner .............................................................................................................................................. 15
GPS..................................................................................................................................................................... 15
7. Product Care ......................................................................................................................................................17
Temperature & Humidity...................................................................................................................................17
General Use - Operating temperature................................................................................................................... 17
Transportation and Storage ...................................................................................................................................17
Transporting the MJ-80 Device.......................................................................................................................... 17
8. Safety .................................................................................................................................................................18
9. Trouble shooting.........................................................................................................................................................20

4
Appendix A Technical Specifications ..........................................................................................................................21
Appendix B Compliance Information .........................................................................................................................22
B1 FCC Statement ..............................................................................................................................................22
Part 15B Equipment ...............................................................................................................................................22
FCC RF Radiation Exposure Statement: ................................................................................................................. 23
B2 CE Statement ................................................................................................................................................23
B3 Directives and Standards ..............................................................................................................................23

5
1. Introduction
Welcome to your MJ-80 Tablet PC.
To ensure the optimal performance of this product, please take the time to read this manual carefully.
The MJ-80 is a rugged tablet intended for medical or commercial uses.
Explanation of Advisements
In this manual we use three (3) levels of Advisements as follows:
TheNotesymbolisusedfornotifyingtheuserofsomethingimportantorofsomethingthatneedsspecialattention.
TheCautionsymbolisusedtoinformofsomethingthatcouldcauseharmto,ormalfunctionof,theequipment.
TheWarningsymbolisusedtoinformofsomethinginwhichthereisaconceivableriskofharmtotheuserifthe Warning
isignored.
Symbols andMarkings
This section provides information about the symbols that are used on the MJ-80, its accessories, or packaging.
Symbol or Markings
Description
Power On/Off Indicator
Disposeofinaccordancewithyourcountry'srequirements.
CEistheabbreviationoftheEuropeanCommunitiesandthis
marktellscustomsofficialsintheEuropeanUnionthatthe
productcomplieswithoneormoreoftheECDirectives.
This is a certification mark employed on electronic
productsmanufacturedorsoldintheUnitedStateswhich
certifiesthattheelectromagneticinterferencefromthede-
viceisunderlimitsapprovedbytheFederalCommunications
Commission.
Consult User´s Manual
UL Marking
TheproductmeetUL’srequirementsforCanadaandthe
UnitedStates.
Conforms to relevant Australian EMC requirements

6
2. Exploring Your Device
Package Contents
In addition to the primary tablet unit, your product carton should contain all of the below items.
MJ-80 Tablet PC Packing Contents
AC Adapter
Documents
Packing Lists, etc..
Please inspect all items. If any items are missing or appear damaged, please inform your dealer
immediately.
This packing list applies to standard models. Select models may have different items.

7
3. Device Layout
Front, Top and Bottom View
Item
Component
Description
1
Power Button
Turn power On/Off –Hold 10s to Reset
2
Volume + Button
Increases the audio volume
3
Volume - Button
Decreases the audio volume
4
Barcode Scanner
(Optional)
Optically Scans 1D or 2D Barcodes, if Equipped
5
Front Camera
Records Photos/Video
6
Docking
Connector
Connects the tablet with the Tablet Docking Station

8
Left-side View
Item
Components
Description
7
Function Key 1
Programmable –Can be used for special functions
8
Function Key 2
Programmable –Can be used for special functions
9
USB 3.0
Connect any external USB device or storage volume.
10
HDMI
Connect a secondary display via HDMI
11
Audio
Connect headphones, speakers, or another external audio
device
Right-side View
Position
Components
Description
12
Fingerprint Reader
Provides Fingerprint Authentication and Security for your
device (if equipped).
13
MicroSD Slot
Accepts MicroSD Memory Cards
14
USB 2.0
Connect any external USB device or storage volume.
15
DC in
Direct current (DC) power for charging the tablet.

9
Rear View
Position
Components
Description
16
Speaker
Sends out Audio
17
Rear Camera
Records Photos/Video

10
4. Managing Device Power
AC adapter
The AC adapter accepts 100-240VAC Input
A standard US polarized, grounded two-pin plug adapter is included.
International plug AC adapters are available for certain regions, as it is shown below.
Use only the AC adapter included with your Tablet PC. Using other AC adapters may damage the
device.
Optional Docking Station
You can also charge the MJ-80 tablet using an optional, available Docking Station. The Docking Station
has DC input and USB ports, which connect to the tablet via the docking connector when the tablet is
docked. The docking connecter is shown in the layout view (Position 6) in chapter 2. The Docking
Station is also designed to hold the tablet for viewing and use while stationary.

11
Use only the docking station included with your Tablet PC. Using any other docking station may
damage the device.
Power Supply and Battery
Power is supplied to the MJ-80 tablet by one, internal, rechargeable battery. The Android OS will
provide warnings to recharge your device at certain power levels as battery power drops. If the MJ-80
device exhausts available battery power, it will shut down automatically until a charger is connected or
it is placed in a docking station connected to an AC power source. For more information about the
Power Supply and Battery, please see Appendix A –Technical Specifications.
To charge the Battery Pack:
1. Connect the power cable to the charging port on the device.
2. Connect the power adapter to an electrical outlet and charge the tablet until the battery is
fully charged.
3. After your device is fully charged, disconnect the charger from both the device and the
electrical outlet.
NOTE: To prevent damage to batteries, please see Section 8: Safety
You can’t overcharge the battery. It is fine to charge the battery overnight.
You can use the MJ-80 while the battery is charging.
Battery life naturally degrades over time. Failure to follow instructions for recommended
operating temperatures, charge and discharge rates, and other instructions may accelerate
battery decay rates. If your tablet battery will not accept or hold a satisfactory charge, it may need
to be replaced.
For battery storage and charging temperatures, see Section 8: Safety
12
Checking the charging Level
To check the battery charge level of the MJ-80, use the battery monitor within android system.
Power LED Indicators
ThePowerLEDwillonlylightwhentheACadapterispluggedin or the device is on the charging dock.
Green —Fully charged
Blue —Charging
5. Tablet Features
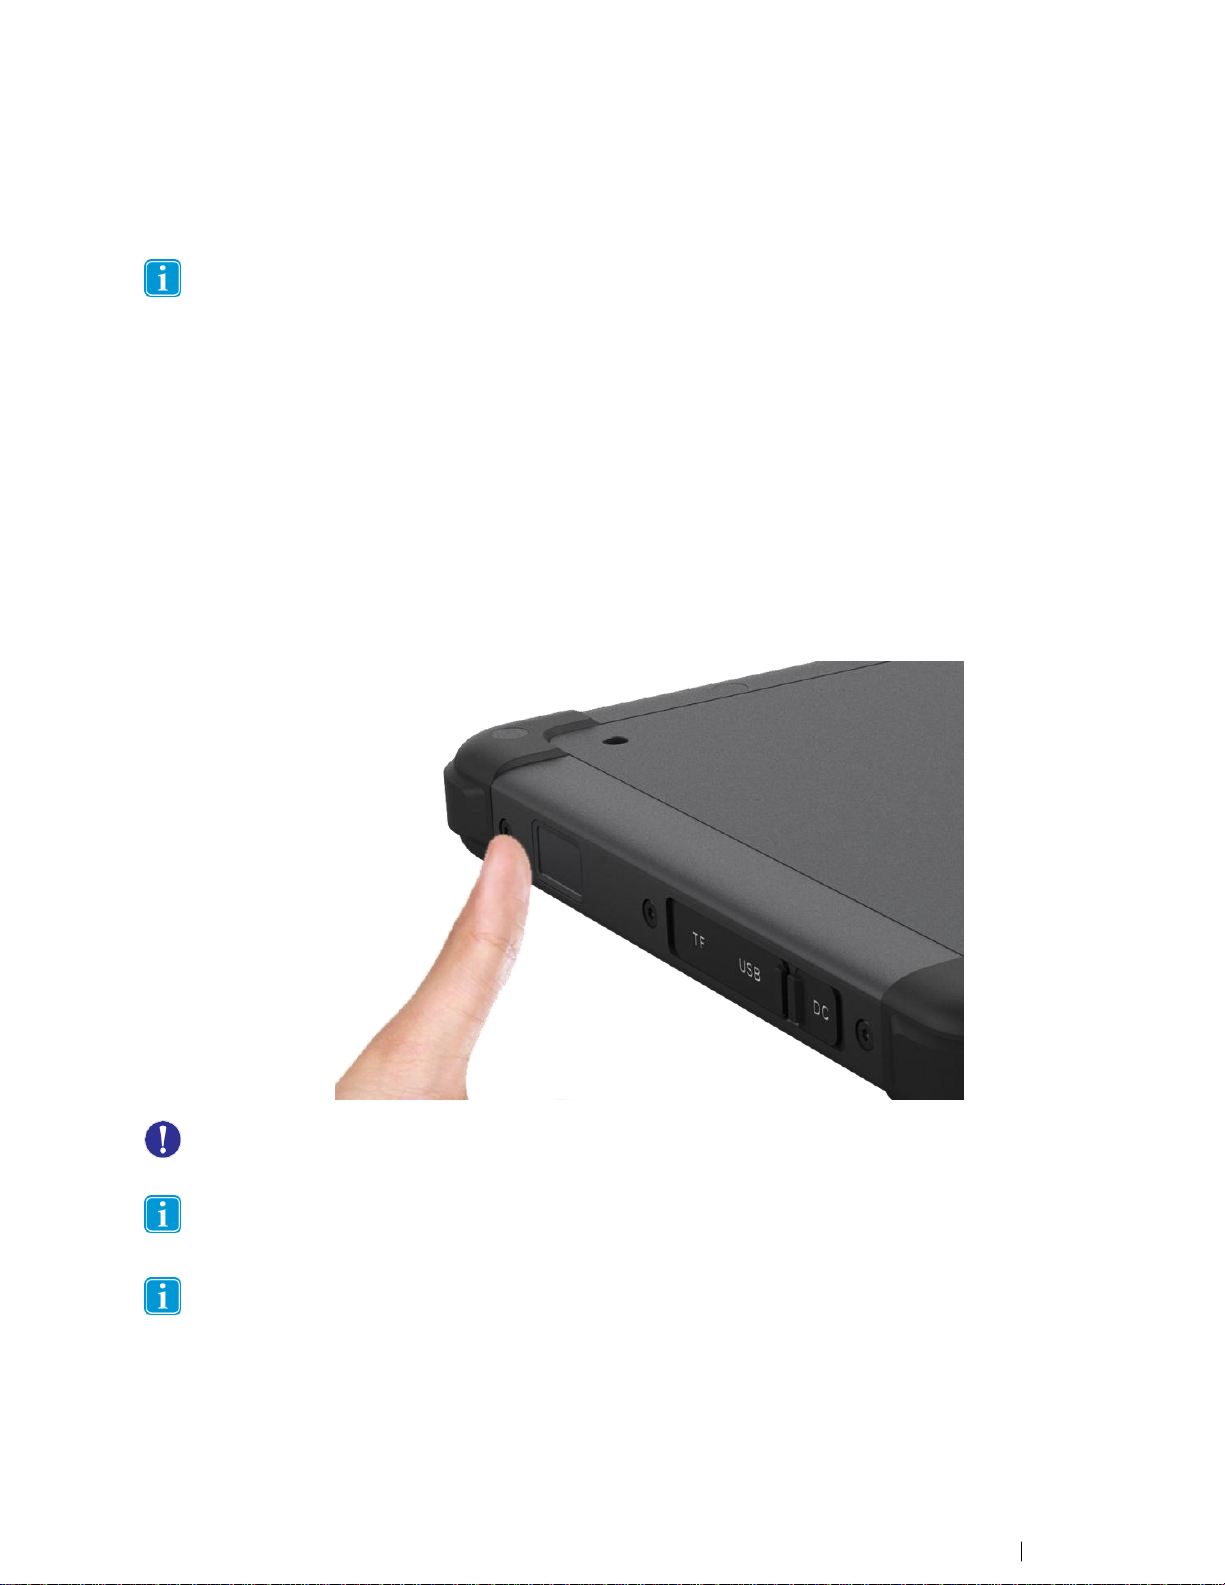
Using the Fingerprint Reader (Optional)
This device may include an internal Fingerprint Reader moduleto identify a person's fingerprint for
security purposes. Its location is shown in product layout in Chapter 2 (Position 12, page 8). For more
details, see Technical Specifications in Appendix A.
Place your finger on the scanner. Follow the instructions for the specific software being used to
scan to use Fingerprint reader function properly.
For optimal performance, both the scanning surface and the finger should be clean and dry. Clean the
scanning surface when needed.
Users must place the finger firmly on the Fingerprint Reader area, otherwise the internal Reader module
may not receive the signal from the finger.
If the Fingerprint Reader will not function properly, clean the reader area and try again. If it still does not
work properly, please contact your supplier for further instructions
You can use eController app to test the function of the Fingerprint Reader. See Chapter 6:
eController App and its Applications.

13
Using the Barcode Scanner (Optional)
This device may include an optional internal Barcode Scanner module. This is an optical input device
used to capture and read information contained in a barcode. Most common 1D and 2D barcode
formats can be read. The location of the reader is shown in the product layout in Chapter 2 (Position 4).
Press the physical scan button (see Position 7 or 8 in chapter 2, page 8) on the tablet to activate the
scanner).Any single barcode placed within the scanner field of view will be read. You can adjust settings
and enable or disable the Barcode Scanner in the appropriate software settings.
The maximum operating temperature for the Barcode Scanner is 50 °C (122 °F).
The Barcode Scanner only works at close range under appropriate ambient light conditions. A small beep
indicates that the barcode has been successfully read.
You can use the eController app to test the function of the Barcode Scanner. See Chapter 6:
eController App and its Applications.
USING GPS
This device includes an internal GPS module for navigation. Please follow the instructions in the specific
software for your GPS applications. For more details, see Technical Specifications in Appendix A.
You can use the eController app to test the function of the GPS unit. See Chapter 6: eController
App and its Applications.

14
6. eController App and its Applications
The eController App is designed to quickly check if device modules are working properly. It tests the
following modules:
1. Fingerprint Reader
2. Barcode Scanner
3. GPS
4. Assign function to programmable buttons F1 and F2
Many of the above the modules are optional items. If the eController top menu bars are greyed out or
unselectable on certain items, the related modules are not installed (or have been disabled).
The eController is not application software. You need install appropriate application software (App) to use
the modules for your desired functions.
System information
The System Information component of the eController App will automatically check the tablet’s
information.

15
Fingerprint scanner
When activated, the user may place a fingertip on the scanner, and the scanner will read the print and
display it in the indicated area of the screen, until removed.
The fingerprintscannerwill operate continuously once this test is selected until exited. To preserve battery
and enable all tablet functions, please exit the test when complete.
Barcode Scanner
To test the Barcode Scanner, select the barcode test, point the scanner at a barcode (or QR code), and
press the SCAN button on the screen or press the physical scan button on the body of the tablet. The
system will quickly scan and display the barcode information on screen.
Press the button again to read the barcode again. The displayed info will refresh and display the new
barcode information.
Please aim the laser at the center of barcode. Do not place the scanner too far from barcode.
The Barcode Scanner uses laser technology, do not point it toward anyone’s eyes.
GPS
The eController GPS test is based on Chart-cross Limited APP.
Turn on Location Services. The App willautomaticallyrunandchecktheGPSsignal, satellitepositions, your
current location, speed, heading and altitude.

16
In the graphic below, please see the following elements:
1. GPS signal bar chart, showing the signal strength for each satellite detected, as well as the accuracy
and status of the GNSS network.
2. Satellite positions in the sky, shown on a rotating compass.
3. Your current location on the earth shown as text and on a world map. The current position of the
sun and the day/night transition curve is also shown.
4. Compass
5. The current time read from the GPS and the local time in your current time zone, as well as the
sunrise and sunset times at your location.
6. Your current speed, heading and altitude shown as text.
Please test GPS in an open outdoor area. Otherwise, the GPS may not work properly.
Ifyou have any further questions about this help file, please contact the supplier.
Assign function to programmable buttons F1 and F2
Button configuration can program the P1 and P2 button on your tablet. Select the button you want to
program, choose the desired function and press the SAVE button to save settings, or you can select
cancel to discard the changes.

17
If you want to program the buttons to a function not on the list, please contact your supplier for
instruction.
7. Product Care
Temperature & Humidity
General Use - Operating temperature
The MJ-80 is best kept in dry conditions at room temperature. The recommended range for temperature
and the humidity value for the device is as follows:
Operation Temperature: 0-45℃(32 ℉to 113 ℉)
Relative humidity: 10% to 90% (no condensation on the device)
Atmospheric Pressure: 80 kPa to 106 kPa (600 mmHg to 795 mmHg)
Transportation and Storage
For transportation and storage, the recommended range for temperature and the humidity value for the
device is as follows:
Storage Temperature: -20℃to 60℃(–4℉to 140℉)
Relative humidity: 10% to 90% (no condensation on the device)
Transporting the MJ-80 Device
Disconnect all the cables from the MJ-80 while carrying the device.

18
When you transport the device for any reason, it is best to use the original casing and packaging
materials. It is recommended that you keep the original packaging materials for the MJ-80.
If the device needs to be returned to Device Manufacturer for Warranty related issues or repair, it is
beneficial that the original packaging or equivalent is used for shipping. Most shipping carriers require at
least 2 inches of packing material around the device.
Due to Joint Commission regulations, any shipping materials including boxes sent to the Device
Manufacturer must be discarded. The device will be returned to you in equivalent packaging.
8. Safety
The MJ-80 device has been tested and approved as compliant to all the Specifications and
Standards listed in Appendix B Compliance Information, and in the Appendix A Technical
Specifications. Nevertheless, in order to ensure safe operation of your MJ-80 device, there are a
few safety warnings to bear in mind:
Do not disassemble this product. You may receive an electric shock, or foreign matter may enter
and result in a fire. If a malfunction or trouble occurs, immediately turn the power off and unplug
the AC power source. Then contact your supplier’s technical support office for repair.
Do not service or perform maintenance on the device while the device is in use. Make sure to
shut the device down and unplug all cables before starting and service or maintenance work on
the device.
8.1 Power Supply and Batteries
The MJ-80 device contains one rechargeable battery. All rechargeable batteries degrade over
time. Thus, the possible usage times for the MJ-80 after a full charge can become shorter over
time than when the device was new.
The MJ-80 device uses a Li-ion Polymer battery.
If you are in a hot environment, be aware that it can affect the ability to charge the battery. The
internal temperature must be between 0 ℃/32 ℉and 45 ℃/113 ℉for the battery to charge. If
the internal battery temperature rises above 45 ℃/113 ℉the battery will not charge at all.
Avoid exposing the MJ-80 device to fire or to temperatures above 60 ℃/140 ℉. These conditions
may cause the battery to malfunction, generate heat, ignite or explode. Be aware that it is
possible, in a worst-case scenario, for temperatures to reach greater than those stated above in,
for example, the trunk of a car on a hot day.
Only charge the MJ-80 battery in an ambient temperature of 0 ℃/32 ℉to 45 ℃/113 ℉.
Use only the supplied power adapter to charge the MJ-80 device. Using unauthorized power
adapters may severely damage the MJ-80 device.
For safe operation of the MJ-80 device, use only charger and accessories approved by Device
Manufacturer.

19
If the Power Supply Cord is damaged it needs to be replaced by Service Personnel only. Do not
use the Power Sup- ply Cord until replaced.
Disconnect the AC power plug of the Power adapter from the wall socket when not charging the
device and disconnect the power cable from the device.
Special regulations apply to shipping devices containing Li-ion Polymer batteries. If dropped,
crushed, or short- circuited, these batteries can release dangerous amounts of heat, may ignite,
and may be dangerous near fires.
The plug/adapter plug pins insulate the device from the main supply. Do not position the device
in a position where it is difficult to disconnect the device from the supply mains to safely
terminate operation of the device.
8.2 Temperature
Due to use in direct sunshine or in any other hot environment the MJ-80 device may have hot
surfaces. There is a built-in temperature sensor that monitors the temperature. If the sensor
detects high internal temperature, the device will automatically trigger a Shut Down. It may take
a while before MJ-80 device can be restarted as the unit may first need time to cool down.

20
8.3 Electricity
The device contains no user serviceable parts. Do not open the case of the MJ-80 Tablet Device.
Doing so will void the product warranty and may expose you to electrical hazards.
8.4 Software
Using an antivirus program is strongly recommended.
Software other than that which is pre-installed on the MJ-80 is installed at the user's own risk.
External software could cause the MJ-80 to malfunction and might not be covered by the
warranty.
8.5 Magnetic Field
The MJ-80 device contains magnets. Magnetic fields may interfere with pacemakers,
defibrillators, or other medical devices. As a rule, maintain a minimum distance of 6 inches (15
centimeters) between any item with magnets and your heart device.
8.6 Third Party
Any use of the MJ-80 outside the intended use and together with any third-party software or
hardware that changes the intended use voids the responsibility of the device manufacturer
Being a medical device, parts connected for a SIGNAL INPUT/OUTPUT must be compliant to the Medical
IEC standard 60601-1.
9. Trouble shooting
In most cases, restarting your device will cure any problem. To restart your device, hold the power
button for 5 seconds, then select Shut down/Restart. If your device has crashed (and displays nothing on
the screen), hold down the power button for 10 seconds to hard shutdown. Press the power button
again to turn the MJ-80 back on.
If this does not fix the problem, contact your supplier.
Please have your serial number ready. This can be found on the back of your device.
Table of contents
Other Estone Tablet manuals


