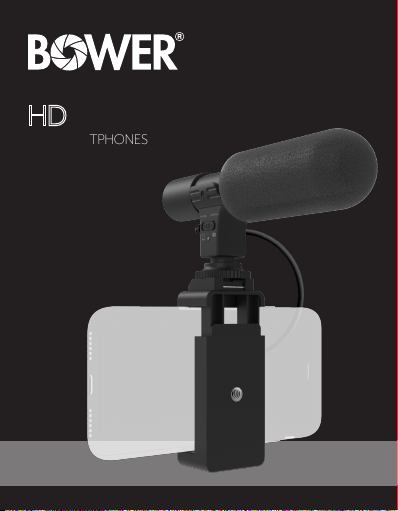
Bower WA-HDMIC User manual
USER
MANUAL
SMART PHOTOGRAPHY SERIES
HD MICROPHONE KIT
FOR SMARTPHONES
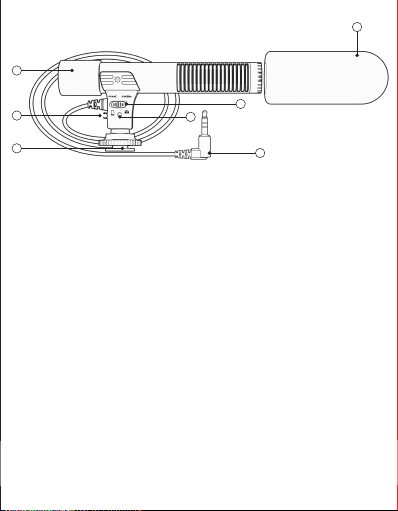
PRODUCT INTRODUCTION PARTS
PRODUCT INTRODUCTION:
The Bower Professional Microphone is specially designed for both smartphone and camera
use. The microphone is compact, lightweight, and connects to cameras and mobile devices
that have a standard 3.5mm auxiliary / audio input. The phone / camera microphone is a
high-quality shotgun condenser microphone designed to capture clear audio while
reducing background noise with built-in, high-quality electronic components, to enhance
sound while in use.
PRODUCT FEATURES:
1. The Bower Professional Microphone is an ultra-high sensitivity microphone with a wide
range of uses. Use the microphone for professional interviews, videos, etc. with an
enhanced high-performance super-cardioid pickup, alongside single-head mutual
complementary sound gathering technology. This microphone has a wide frequency
response, and high-definition sound resolution.
2. The Bower Professional Microphone is powered by a CR2 battery that will increase usage
time. Microphone should be kept in mobile mode, which is the off mode, in order to preserve
the life of the battery when not in use.
3. The Bower Professional Microphone in phone mode is perfect for interviews, ambient
audio, music, Live broadcasts, Social Media and so much more. The microphone in camera
mode is primarily designed for vlogging, interview and other professional fields.
1Wind cap
2Power light
3Power/pick up
of the indicator
4Battery cover
5Mini stereo
Connector
6Slide rail adapter
7Wire clip
3
2
7
4
65
1

BATTERY INSTALLATI ON:
USE:
1. Gently slide the shoe mount adapter into the mount on the top of the phone holder.
2. Expand phone mount and gently Insert your phone so, it is flush against the back support
of the phone holder.
3. Test by gently shaking to make sure phone is secured tightly.
4. If you are using for camera, connect the rail connector to
the camera attachment securely by twisting into place. Next connect the microphone mini
stereo plug to the camera’s microphone input port. Move the switch from left to right on
microphone or phone mode to camera mode on microphone and red battery light will
power on.
5. If you are using for smartphone, place microphone in phone mode and the power from
the mobile phone will activate the red battery light once you are connected to phone.
Connect microphone mini stereo cable into the mobile phone’s input port.
* If phone or camera does not have an 3.5mm aux/audio input you will need to purchase a
connector.
For Apple™ Inc, iPhone 7 model or later lightning to aux adapter required.
1. Remove the battery
cover
2. Insert the CR2 battery
matching the positive and
negative positions correctly
3. Close the battery cover
4. When the switch button
is towards the left
(phone mode) the product
is off and LED light is off
5. If you move the switch
from phone mode to
camera mode the red light
will turn on
6. Phone mode will receive
power and activate once
it is attached to smartphone.
Do not switch to camera mode
when attached to phone mode
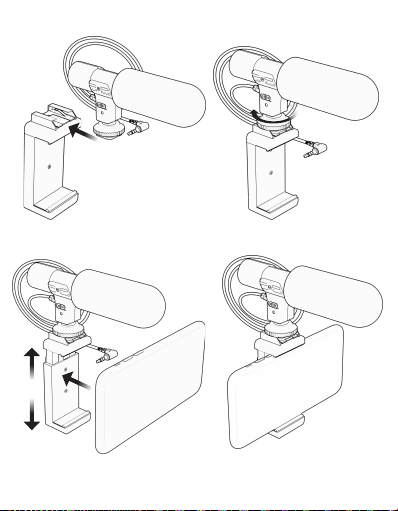
USE:
1. Gently slide the shoe mount adapter into the mount on the top of the phone holder.
2. Expand Phone Mount and gently Insert your phone
so it is flush against the back support of the phone holder.

INSTALL ATION
Handheld grip
With 1/4" Thread for Tripod mont
(Tripod not included)

PERFORMANCE PARAMETERS:
Frequency response: 100-16,000 HZ
Sensitivity: -40dB±2dB (0dB=1V/Pa 1K HZ)
Pointing to the features: single directional x 2
Output impedance: 200 Ω
Signal-to-noise ratio: 76 dB (1 KHZ at 1 PA)
The loudest level: 120dB (at 1K HZ harmonic distortion)
Power supply: CR2 Battery - 3V DC
PRODUCT SPECIFICATIONS:
Type: MS (Mid - Side) stereo wire
Length: About 28 cm
Power requirements: 3V CR2 battery
Battery life: Approximately 800 hours depending on usage and storage
Size: 30.5x61x132.5 mm (not including conductor)
Weight: About 45 g (not including battery)
ACCESSORIES:
3V CR2 lithium battery (1)
Operating instructions (1)
NOTICE:
1. The microphone is very sensitive, do not drop, knock, or shake aggressively.
2. Keep microphone away from extreme heat and humidity, especially
temperatures above 60°C.
3. If the microphone is placed next to a speaker, it may produce a whistler due to
acoustic feedback. Keep the microphone away from speakers or other devices that cause
acoustic feedback. You can also try to lower the volume of the speaker to eliminate acoustic
feedback.
4. If the Indicator light is off, check the battery to ensure that it was installed correctly.
6. When the battery is low, the brightness of the indicator light becomes very weak.
Please replace the battery at this time.
7. If wind cap is exposed to water, immediately put in the shade to dry, to prevent
insolate ageing. Do not put in drying machine.

LIMITED One (1) Year Limited Warranty
S. Bower Inc.™ One (1) Year Limited Warranty: This warranty gives you
specific legal rights and you may have other rights which vary from
state to state.
The S. Bower Inc.™ Limited Warranty is a voluntary manufacturer’s warranty provided to
the consumer. This warranty provides rights separate to rights provided by consumer law,
including but not limited to those relating to non-conforming goods. S. Bower Inc.™
One-Year Limited Warranty benefits are in addition to, and not instead of, rights provided
by consumer law and it does not exclude, limit or suspend a buyer’s rights arising from
consumer law. Consumers have the right to choose whether to claim service under the S.
Bower Inc.™ One-Year Limited Warranty or under their consumer law rights. The S. Bower
Inc.™ One-Year Limited Warranty terms and conditions shall not apply to consumer law
claims, contact your local consumer organization.
Please note: All claims made under the S. Bower Inc.™ One-Year Limited Warranty will be
governed by the terms set out in this warranty document.
S. Bower Inc.™ warrants to the product owner that this product will be free against defects
in materials and workmanship for a period of ONE (1) YEAR from the date of original retail
purchase when used in accordance with S. Bower Inc.™ ’s user manual. Under this
warranty, you will be able to send your claims and defective product to S. Bower Inc.™, via
freight prepaid, along with proof of purchase, and will be repaired or replaced, based on S.
Bower Inc.™ sole discretion. Repair and/or replacement may be made with new or
refurbished product components at S. Bower Inc.™ sole discretion. This limited warranty
does not cover failures due to abuse, accidental damage or when repairs have been made
or attempted by anyone other than S. Bower Inc.™ personnel. A defective product meeting
the warranty conditions set forth herein will be replaced or repaired at no charge in either of
two ways: The first, which will result in exchanges only, is to return the product to the retailer
from whom it was purchased (provided that the store is a participating retailer). Returns
should be made within the time period of the retailer's policy for exchanges. Proof of
purchase may be required. Please check with the retailer for its specific return policy
regarding time limits for returns or exchanges. The second option is to send the product
(prepaid freight) to S. Bower Inc.™ corporate offices located at S. Bower Inc. 46-24 28th
Street 3rd Floor Long Island City, NY 11101 for repair or replacement at S. Bower Inc.™ ’s
option. Proof of purchase is required. Include name, return address, and issues that you are
experiencing with S. Bower Inc.™ products. All other guarantees, express or implied, are
hereby disclaimed. This warranty does not apply to products sold in countries sold out of
the United States.
WARRANTY:
THE FUNCTIONS DESCRIBED IN THIS MANUAL ARE BASED ON TESTING
MADE BY OUR COMPANY. SPECIFICATIONS AND DESIGN MAY CHANGE
WITHOUT FURTHER NOTICE.

©2020 S. Bower, Inc. All rights reserved.
All brand names and trademarks belong to their respective owners
S. Bower, Inc. LIC, NY 11101 www.BowerUSA.com
USE:
1. Gently slide the shoe mount adapter into the mount on the top of the phone holder.
2. Expand Phone Mount and gently Insert your phone
so it is flush against the back support of the phone holder.
Table of contents


