Bowers & Wilkins Panorama User manual

Panorama
Connectivity Guide

Contents Topic Page
Introduction 3
Playing audio from a source with a 4
headphone jack
portable CD player
iPod®without the Apple
30-pin socket
non-iPod MP3 player
mobile phone
table radio
laptop computer
desktop computer sound card
Playing audio from a single 5
audio/video component
CD player
DVD player
Blu-ray Disc™ player
Squeezebox™
Playing audio via a stereo pre-amplifier 6
Playing audio from a TV/DVD
combination 7
Playing audio wirelessly 8
using Apple AirPort Express®
Playing audio from an Apple TV® 9
Playing audio from a PlayStation® 3
games console 10
Playing audio from an Xbox 360™
games console 11
Playing audio from alternative
games consoles 12
Using universal remote control
handsets 14
Controlling Panorama via RS232 15

3
Panorama offers three digital and two analogue
audio inputs. One or two of the inputs will
probably already be in use reproducing your TV/
DVD audio leaving three or four spare. In order
to use these inputs you will have to connect the
source component (iPod, Games Console, etc) to
one of them and select the input by pressing the
Panorama handset input key or front panel input
button.
Panorama’s two analogue inputs each comprise
pairs of RCA-phono sockets and its three digital
inputs comprise a single RCA-phono socket and
two TOSLINK™ optical sockets.
Panorama™ is far more than a one-box home
theatre system. Its five audio inputs mean you can
connect a wide range of products to expand and
enhance your listening experience.
Whether you want to share audio from a device
that you normally listen to on headphones, improve
the quality of sound from your games console,
or listen to iPod video soundtracks in sumptuous
surround sound, Panorama provides an effective,
simple and stylish solution.
In this guide, we show you some of the
options you may like to try – how to connect the
components and how to control them. The guide
also provides technical information for those
wishing to control Panorama using a universal
remote control handset or when integrated within a
RS232 home automation system.
Introduction

4
You will need a cable that has a stereo mini
jack at one end and two RCA-phono plugs at the
other end. Simply plug the mini jack end into the
headphone socket of the source device and the
RCA-phono plugs into one pair of the Panorama
analogue inputs. The headphone sockets of
computers are usually coloured green as well as
having the headphone icon.
The source device will have its own volume
control. To minimise noise, the level should be set
a little below that which might overload Panorama’s
input. Start at three-quarters full scale and then play
your loudest tracks. Listen for clipping overload – a
scratchy noise during the loudest parts, even when
Panorama’s own level is not very high – and reduce
the level until you don’t hear it.
Some source devices may have a relatively
low output signal level so it may be necessary
to set Panorama’s input gain to +6dB in order to
compensate.
Leave the source’s volume at this level and
thereafter vary the loudness using Panorama’s
controls.
Some mini jacks have wide bodies that prevent
them fully engaging with the headphone socket
in the source device, so check for this before
you buy your cable. You need to be able to feel
the soft click of the catch engaging fully round
the ball tip of the plug.
Playing audio from
a source with
headphone jack
This category includes any device that you normally
listen to through headphones and where the
headphone socket is the only way to output audio.
Examples are:
Most portable CD players
MP3 players (including iPod)
Mobile phones
Table radios
Laptop computers
Desktop computer sound cards (other than high-
end sound cards, where you should follow the
instructions for component audio/video equipment)
LINE OUT

5
An audio source, such as a CD, DVD player,
Blu-ray Disc™ player, radio tuner, Squeezebox™
Sonos Zone™ or Sky Box will most likely be fitted
with either a stereo pair of analogue outputs in the
form of RCA-Phono sockets (Option A) and/or a
digital audio output in the form of a TOSLINK™
optical™ socket (Option B). Use the digital option,
if available, in preference to the analogue option.
The digital audio output may be labelled either
Optical, TOSLINK™ or S/PDIF and may have a
blanking plug fitted. The blanking plug must be
removed before the socket is used and retained for
replacement should you subsequently disconnect
the cable. To connect a digital optical output to
Panorama you will need an optical cable with a
TOSLINK™ plug at both ends. Connect one end to
the source output socket and one end to one of the
Panorama digital optical inputs.
Playing audio from
a single audio/video
component
To use the analogue option you will need a
cable with a pair of RCA-phono plugs at both
ends. Plug one pair of RCA-phono plugs into the
source output sockets and one pair into one of the
Panorama analogue inputs. The RCA plugs should
be coded to identify left and right channels. This
may be by the letters L and R or colour coding,
where the convention is that red identifies the right
channel.
It is also possible that the audio source may
have a coaxial digital output (Option C) in the
form of a single RCA-phono socket. To connect a
coaxial optical output to Panorama you will need a
cable with a single RCA-phono plug at each end.
Connect one end to the source output socket and
one end to the Panorama digital coaxial input.
Source equipment of the type discussed here will
normally not have its own volume control, but if it
does, set the level to approximately 90% and use
Panorama’s controls to vary the loudness.
Some audio components may have a relatively
low output signal level so it may be necessary
to set Panorama’s input gain to +6dB in order to
compensate.
CD player
DVD player
Blu-ray Disc™ player
Tuner
Squeezebox™
A
B
Socket
layout will
vary

6
Playing audio via a
stereo pre-amplifier
If you have several stereo audio sources – CD
player, tuner etc. – you may want to use a stereo
pre-amplifier to control source selection and
connect an output from the pre-amplifier to a
Panorama input.
Pre-amplifiers generally offer only analogue
outputs, usually in the form of RCA-phono sockets,
so to connect to Panorama you will need a cable
with a pair of RCA Phono plugs at both ends. The
RCA plugs should be coded to identify left and
right channels. This may be by the letters L and R
or colour coding, where the convention is that red
identifies the right channel. Plug one pair of RCA-
phono plugs into the pre-amplifier output sockets
and one pair into one of the Panorama analogue
inputs.
The pre-amplifier’s volume control will affect
the signal level output to Panorama so the
system will effectively have two volume controls
(the preamplifier and Panorama itself). If this is
inconvenient, connecting the cable to a pre-
amplifier tape output (which most likely will not
be affected by the volume control) may be more
convenient.
Some pre-amplifiers may have a relatively low
output signal level so it may be necessary to
set Panorama’s input gain to +6dB in order to
compensate.
Socket layout will vary
OUTPUTS
1 2
LEFT
RIGHT

7
Playing audio
from a TV and DVD
combination.
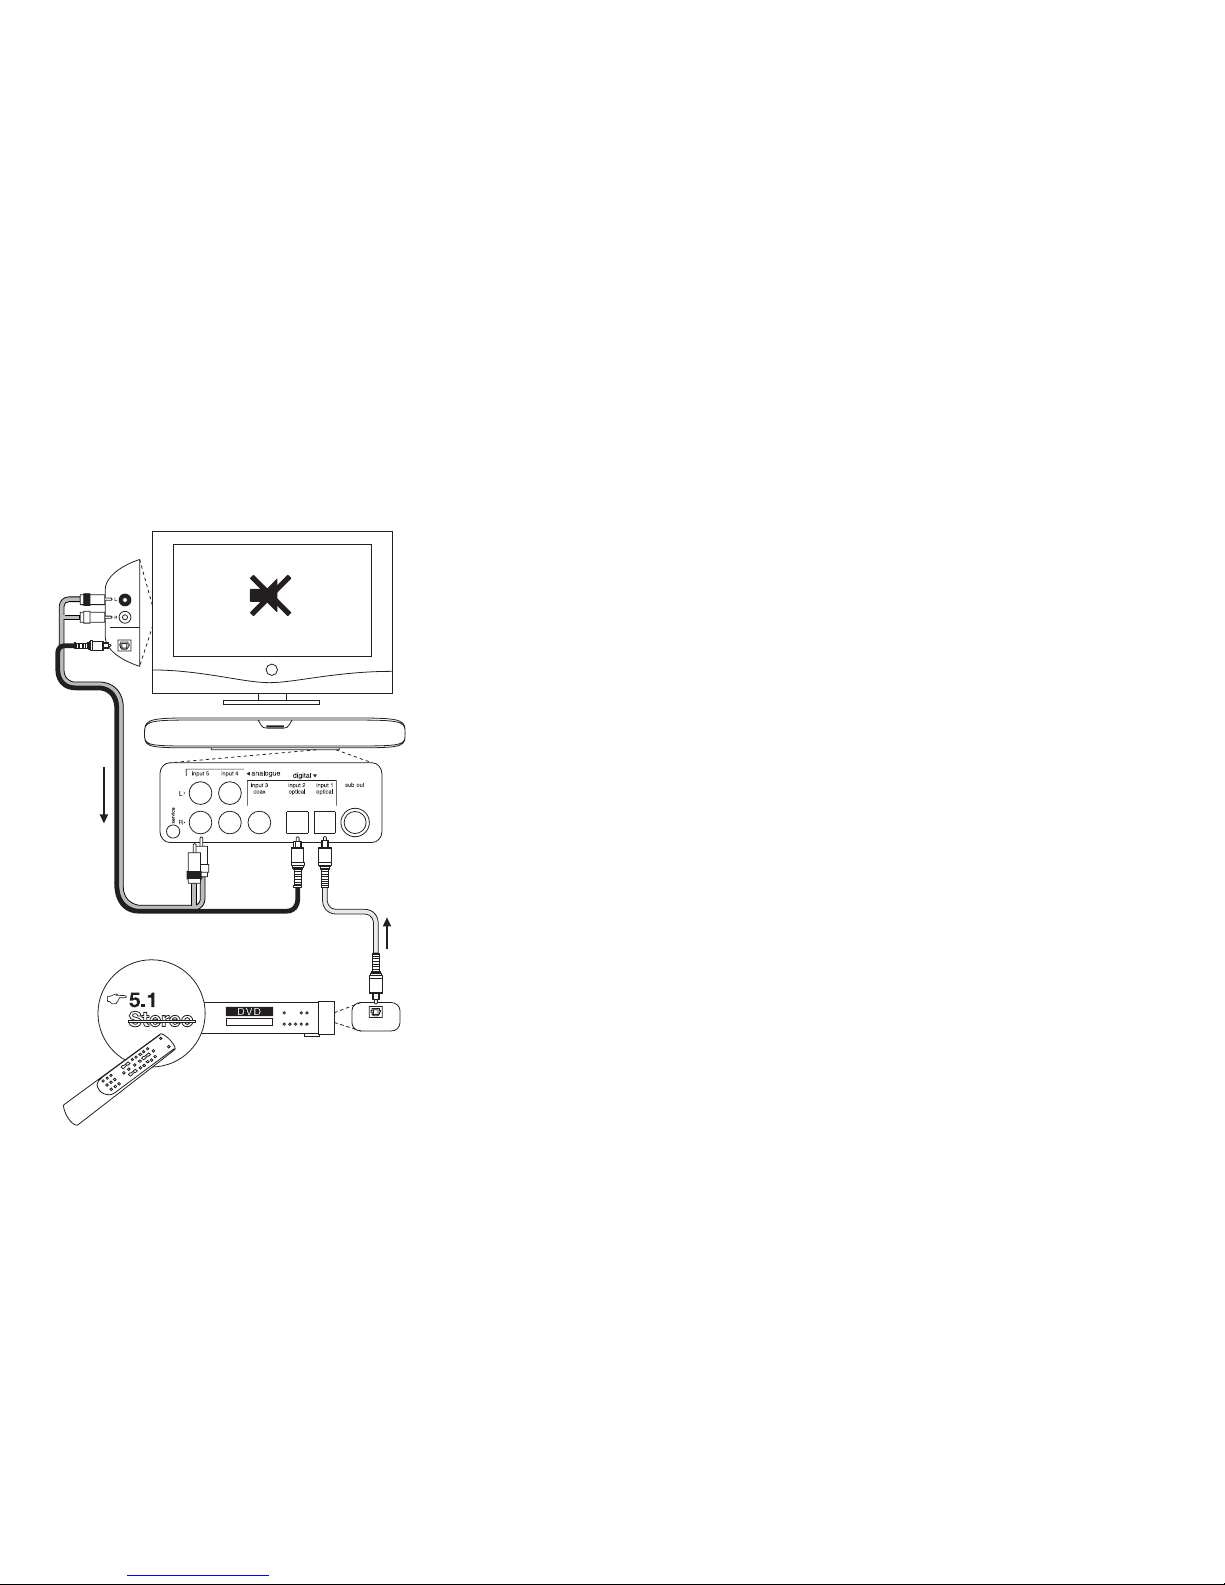
You will probably have already connected your TV
and DVD player to Panorama and the information
here repeats that provided in the Panorama
Owners Manual. The recommended TV connection
scheme is as follows:
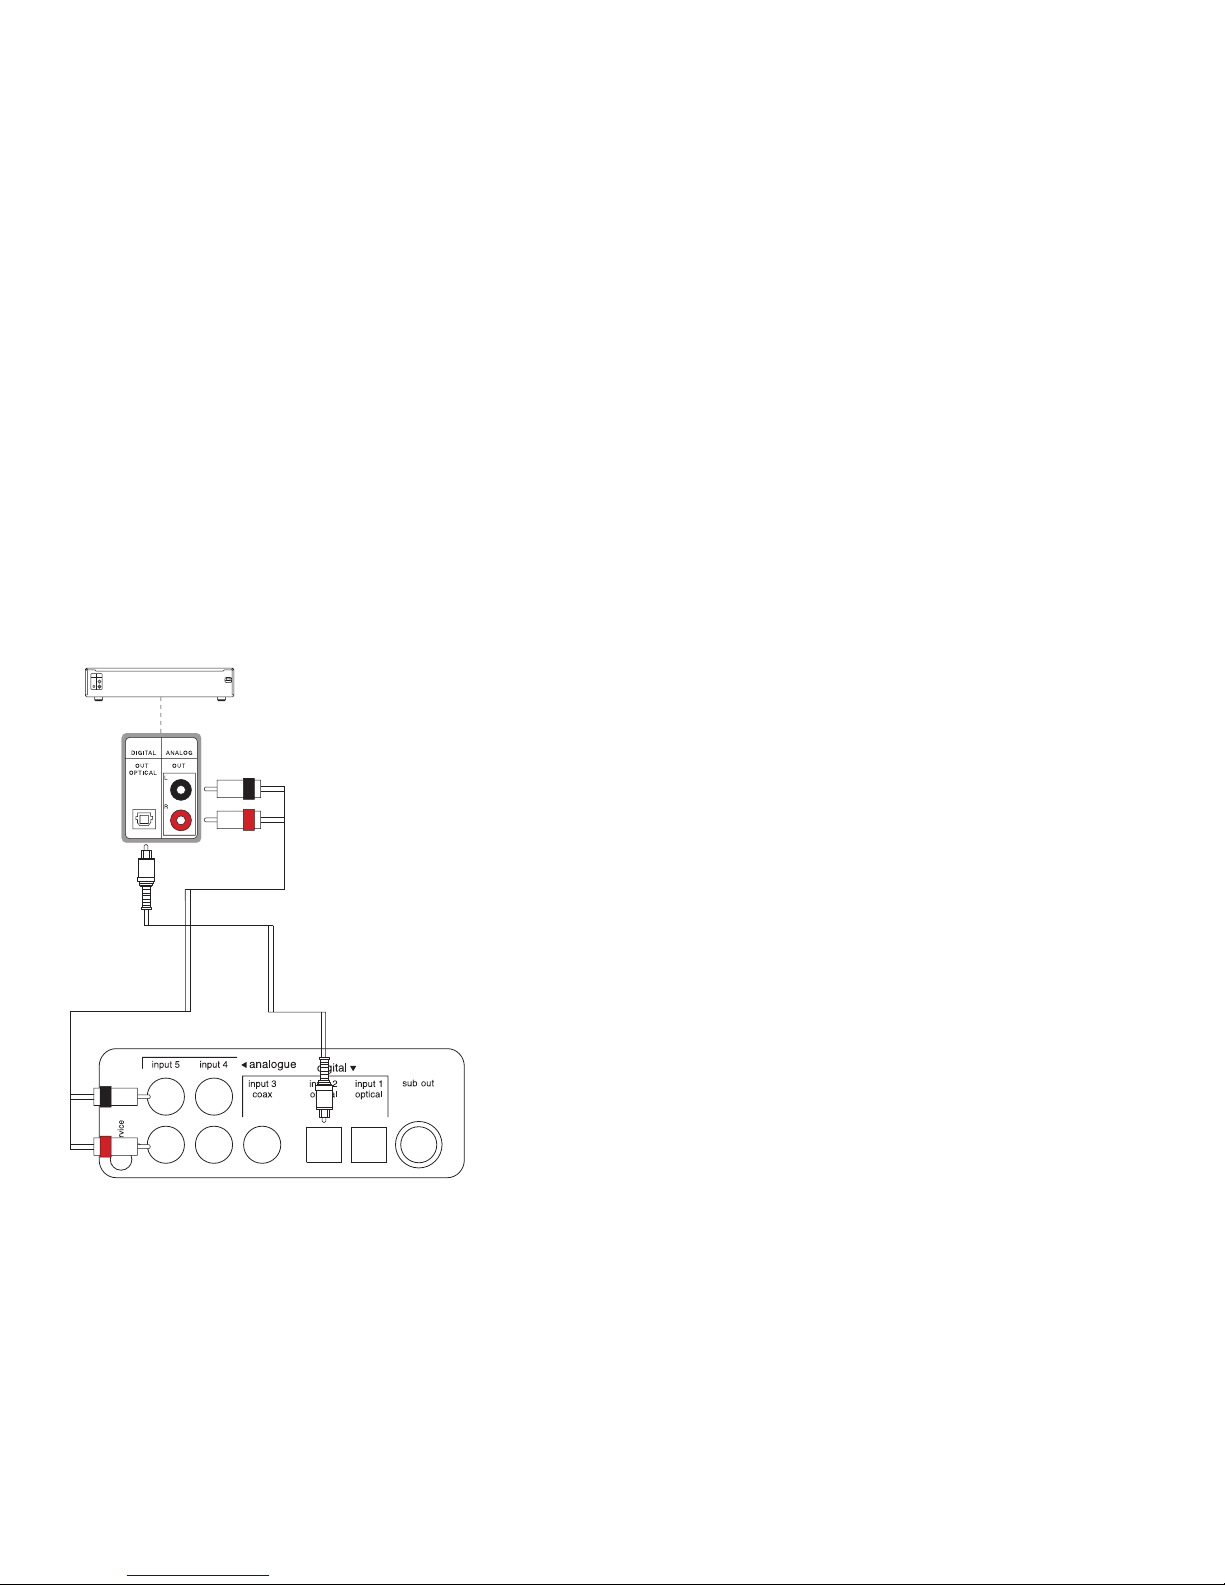
• Connectthedigitalaudiooutputfromthe
DVD player to either Panorama’s input 1
(digital optical) or input 3 (digital coaxial). Use
a cable with TOSLINK™ connectors at each
end or a cable with a single RCA-phono plug
at each end respectively.
• Connecttheopticaldigitalaudiooutputfrom
the TV (if fitted) to Panorama’s digital input 2
using a cable with TOSLINK™ connectors at
each end.
• Connecttheanalogueaudiooutputfromthe
TV to Panorama’s analogue input 5 using
a cable with a pair of RCA-phono plugs at
each end. The RCA plugs should be coded
to identify left and right channels. This may
be by the letters L and R or colour coding,
where the convention is that red identifies
the right channel.
Use the digital optical cables supplied with
Panorama to connect the DVD player and TV digital
audio outputs. The caps must be removed from
the ends of the digital optical cables before they
are used and retained for replacement should you
subsequently disconnect the cables.
With the recommended connection scheme
in place the majority of audio/visual programme
formats can be reproduced through selection of the
appropriate Panorama input. For example:
• Input1or3:Digital,5.1channel,DVD
soundtracks.
• Input2:Digitalaudiofrom,orroutedthrough,
the TV.
• Input5:Analoguestereoaudio(analogueTV
audio or Dolby Pro Logic surround encoded
audio for example).
Some televisions pass 5.1 channel digital audio
from their HDMI inputs to their digital audio outputs
(the remainder down-mix 5.1 signals to stereo). In
these cases, the direct connection between the
DVD player and Panorama will not be necessary.
Confirm however with the manufacturer of your TV
that it is capable of 5.1 channel digital audio output
from external inputs before dispensing with the
connection from DVD to Panorama.
When using Panorama it may be necessary
to mute the television’s internal speakers. Some
television screens will display a permanent on-screen
symbol when mute is selected. If this is the case the
television volume can alternatively be reduced to zero
using its remote handset volume controls.
Some televisions have a relatively low
output signal level so it may be necessary to
set Panorama’s input gain to +6dB in order to
compensate.
"6%*0
065
%*(*5"-
%*(*5"-

8
Playing audio wirelessly
from an Apple AirPort
Express®
Apple’s AirPort Express wireless base station can
be used to receive wirelessly streamed audio and
replay it via a locally connected audio system
such as Panorama. It incorporates a combined
analogue/optical digital mini jack output that can
be connected to either a Panorama digital (Option
A) or analogue (Option B) input. Digital connection
is preferable because any digital multi-channel
encoding carried by the signal will be preserved for
decoding and reproduction by Panorama.
The Apple AirPort Express does not ship with
any audio cables so to connect Panorama you will
need either a cable with a digital optical mini jack
at one and a TOSLINK™ plug at the other end, or
a cable with an analogue mini jack at one end and
a pair of RCA-phono plugs at the other end. The
RCA plugs should be coded to identify left and
right channels. This may be by the letters L and R
or colour coding, where the convention is that red
identifies the right channel.
For digital connection connect the digital mini-
jack to the AirPort Express and the TOSLINK™
plug to one of the Panorama optical digital inputs.
For analogue connection connect the analogue
mini-jack to the AirPort Express and the pair
of RCA-phono plugs to one of the Panorama
analogue inputs.
Depending on the source of the audio replayed
by the AirPort Express, there may or may not be a
preceding volume control. If there is, set the volume
level to 90% and use Panorama’s controls to vary
the loudness. If there is no preceding volume
control and the streamed audio is at a fixed level,
volume can be controlled by Panorama’s own
controls alone. In either case it may be necessary
to set Panorama’s input gain to +6dB in order to
compensate for the relatively low output signal level
of the Apple Airport Express.
A
A or B
B

9
The Apple TV is a dedicated audio-visual device
that connects wirelessly to the Internet to download
audio-visual material for storage and later playback
on your TV. It incorporates both analogue and
optical digital audio outputs that can be connected
to Panorama. Digital connection is preferable
because any digital multi-channel encoding carried
by the signal will be preserved for decoding and
reproduction by Panorama.
The Apple TV does not ship with any audio
cables, so to connect Panorama you will need
either a cable with TOSLINK™ plugs at each
(Option A), or a cable with a pair of RCA-phono
plugs at each end (Option B).
The Apple TV digital optical output socket may
have a blanking plug fitted. This must be removed
before connecting the cable but should be retained
to protect the end of the optical fibre should you
disconnect the cable. Connect the cable from
the Apple TV digital optical output to one of the
Panorama digital optical inputs.
Playing audio from
an Apple TV®
If you decide to use the Apple TV analogue audio
output, connect the cable from the Apple TV’s left
and right analogue audio outputs to one of the
Panorama analogue inputs. The RCA-phono plugs
should be coded to identify left and right channels.
This may be by the letters L and R or colour
coding, where the convention is that red identifies
the right channel.
If the Apple TV is also connected to your TV
via an HDMI cable you will need to switch off the
TV’s own speakers when Panorama is in use by
selecting “mute” from the TV remote handset.
Some televisions will display a permanent on-
screen symbol when mute is selected. If this is
the case the television volume can alternatively be
reduced to zero using its remote handset volume
controls.
The audio signal output from the Apple TV
to Panorama will be at a fixed volume level and
not controlled by the Apple TV’s remote handset
so volume is controlled by Panorama’s own
volume controls. It may also be necessary to
set Panorama’s input gain to +6dB in order to
compensate for the relatively low output signal level
of the Apple TV.
A
B
A
B

10
Playing audio from
a PlayStation®3
games console
The PS3 can output audio via either a TOSLINK™
digital optical socket or its combined analogue
audio-video socket and cable. Digital connection
is preferable because any digital multi-channel
encoding carried by the signal will be preserved for
decoding and reproduction by Panorama.
To connect Panorama to the PS3 digital optical
socket you will need a cable with a TOSLINK™
plug at each end. The two RCA audio plugs of the
PS3 AV cable (all types) should be left unused.
The PS3 TOSLINK™ socket may have a
blanking plug fitted. This must be removed before
connecting the cable but should be retained to
protect the end of the optical fibre should you
disconnect the cable. Connect the TOSLINK™
cable to the PS3 optical digital output and one of
the Panorama digital optical inputs. The PS3 output
will be at a fixed level so volume is managed by
Panorama’s controls.
If the PS3 is simultaneously connected to a TV
by an HDMI connector it may be necessary to
switch off the TV audio when Panorama is in use
by selecting “mute” from the TV remote handset.
Some televisions will display a permanent on-
screen symbol when mute is selected. If this is
the case the television volume can alternatively be
reduced to zero using its remote handset volume
controls.

11
Playing audio from
an Xbox 360™
games console
The Xbox 360™ can output analogue or digital
audio only via its AV port and one of the AV Cable
options. Digital connection is preferable because
any digital multi-channel encoding carried by
the signal will be preserved for decoding and
reproduction by Panorama. The proprietary console
plug of all the AV cable options incorporates an
optical digital TOSLINK™ optical digital output
socket. The two RCA audio plugs at the other
end of the AV cable (coloured red and white and
grouped separately) should be left unused.
To connect Panorama to the Xbox 360™
Component AV HD Cable digital optical socket you
will need a cable with a TOSLINK™ plug at each
end.
The AV Cable TOSLINK™ socket may have a
blanking plug fitted. This must be removed before
connecting the cable but should be retained to
protect the end of the optical fibre should you
disconnect the cable. Connect the TOSLINK™
cable to the Component AV HD Cable socket and
one of Panorama’s digital optical inputs. The Xbox
360™ output will be at a fixed level so volume is
managed by Panorama’s own controls.
If the Xbox 360™ is simultaneously connected
to a TV by an HDMI connector it may be necessary
to switch off the TV audio when Panorama is
in use by selecting “mute” from the TV remote
handset. Some televisions will display a permanent
on-screen symbol when mute is selected. If this is
the case the television volume can alternatively be
reduced to zero using its remote handset volume
controls.

12
Playing audio from
alternative
games consoles
Games consoles provide a variety of audio
output connections, some of which require non-
standard cables, so you may need to contact the
console manufacturer or retailer for advice on the
appropriate one. Whoever provides the advice will
need to know that Panorama can be connected
with either analogue RCA-phono plugs, a digital
optical TOSLINK™ plug or a digital coaxial RCA-
phono plug.
If your games console carries one of the
following audio output connectors you can connect
it to a Panorama input using a standard cable:
• Analogueminijack(possiblyaheadphone
output).
• AnalogueRCA-Phonosockets.
• TOSLINK™digitalopticalsocket.
• Digitalopticalmini-jacksocket.
• DigitalcoaxialRCA-phonosocket.
If both analogue and digital options are available,
a digital connection is preferable because any
digital multi-channel encoding carried by the signal
will be preserved for decoding and reproduction by
Panorama.
To connect digitally you will need either a cable
with a TOSLINK™ plug at each end, a cable with
a TOSLINK™ plug at one end and an optical
mini-jack at the other, or a cable with a single RCA-
phono plug at each end. The use of optical mini-
jack to TOSLINK™ convertors is not recommended
as these can be unreliable.
If a games console TOSLINK™ socket is to
be used it may have a blanking plug fitted. This
must be removed before connecting the cable but
should be retained to protect the end of the optical
fibre should you disconnect the cable. Connect the
TOSLINK™ end of the cable to the games console
optical digital output and to one of the Panorama
optical digital input sockets.
If the games console has a mini-jack optical
digital output socket connect it using a cable with
an optical mini-jack at one end and a TOSKINK™
plug at the other end to one of the Panorama
optical digital input sockets.
If a games console RCA-phono coaxial digital
output socket is to be used connect it using a
cable with a single RCA-phono plug at each end to
the Panorama coaxial digital input socket.
If the games console analogue audio output
is to be used you will need either a cable with a
pair of RCA-phono plugs at each end, or a cable
with a stereo mini jack plug at one end and two
RCA-phono plugs at the other end. The RCA-
phono plugs should be coded to identify left and
right channels. This may be by the letters L and R
or colour coding, where the convention is that red
identifies the right channel and white identifies the
left channel.

13
Playing audio from
alternative
games consoles
(continued)
If the games console has analogue RCA-phono
sockets connect them using a cable with a pair
of RCA-phono plugs at both ends to one of the
Panorama analogue inputs.
If the games console has a single analogue
mini-jack socket (possibly its headphone socket)
connect it using a cable with a mini-jack plug at
one end and a pair RCA-phono plugs at the other
end to one of the Panorama analogue inputs.
Unless you are using the games console’s
headphone output to connect to Panorama, its
audio signal output will most likely be at a fixed
volume. In this case, volume is controlled by
Panorama’s own volume controls. Alternatively, if
the games console’s headphone output is used to
connect to Panorama start by setting its volume
level at around three-quarters and then play your
loudest games. Listen for clipping overload - a
scratchy noise during the loudest parts, even when
Panorama’s own level is not very high - and reduce
the games console volume level until you don’t
hear it.
Some games consoles may have a relatively
low output signal level so it may be necessary
to set Panorama’s input gain to +6dB in order to
compensate.
If the games console is simultaneously
connected to a TV by an HDMI connector it may
be necessary to switch off the TV audio when
Panorama is in use by selecting “mute” from the
TV remote handset. Some televisions will display
a permanent on-screen symbol when mute is
selected. If this is the case the television volume
can alternatively be reduced to zero using its
remote handset volume controls.

14
Using universal
remote control
handsets
The remote control handset codes used by
Panorama are listed below. These codes can be
used to programme infra-red, RC6 (Mode 6A)
universal remote control handsets.
System Address Code Function Code Function Name Function Description
(Decimal) (Decimal)
016 012 Power Toggles between On and Standby
016 016 Volume Up Increases the volume setting
016 017 Volume Down Decreases the volume setting
016 013 Mute/Unmute Toggles between Mute On and Mute Off
016 130 Voice Mode On/Off Toggles between Voice Mode On and Off.
Hold down to enter/exit setup.
016 083 Sound Mode Toggles between Surround Mode, Stereo
Mode and Wide Mode
016 232 Input Selector Toggles between inputs 1, 2, 3, 4 and 5.
016 220 On Switches Panorama On.
016 221 Standby Switches Panorama to Standby
016 056 Input Select 1 Directly selects Input 1
016 057 Input Select 2 Directly selects Input 2
016 134 Input Select 3 Directly selects Input 3
016 135 Input Select 4 Directly selects Input 4
016 136 Input Select 5 Directly selects Input 5
016 226 Sound Mode – Directly selects Surround Mode
Surround
016 227 Sound Mode – Directly selects Wide Mode
Wide
016 228 Sound Mode – Directly selects Stereo Mode
Stereo
016 222 Mute On Engages Mute
016 223 Mute Off Disengages Mute
016 224 Voice On Engages Voice Mode
016 225 Mute Off Disengages Voice Mode

15
Controlling Panorama via RS232
Panorama can be integrated and controlled
within RS232 home automation systems using its
service socket: this is basically an RS232 interface
with a non-standard connector and voltage levels.
The service socket is located on the Panorama
connection panel. It is indicated by the word
“Service”. The socket accepts a 3.5mm stereo
jack plug as illustrated on the following page.
Interface for Panorama service port
A small interface is required to convert the
Panorama service port signals to standard
RS232 signals and physical DB-9 connector. Use
of the interface illustrated on the folowing page.
RS232 Communication Parameters
The RS232 parameters settings are:
• 19200baud
• 8databits
• Noparity
• 1stopbit
• nohandshaking
Command Protocol
Panorama can be controlled by sending strings
of characters via the service port.
Every string consists of:
• 1characterindicatingthecommand
• bodywithvariablenumberofcharacters
• <CR>
• <LF>(optional)
1.5 Command List
Each command strings should be terminated with
<CR>andoptionally<LF>.
(*) This setting is not remembered after mains
disconnect (not stored in permanent memory).
After poweron, the keys are always enabled.
(**) “x” is the ASCII character of (vol + 48)
(vol is a value between 0 and 34)
Example: set volume 18: vB<CR>
Following commands are used to request
information from Panorama:
Command Description Answer from
Panorama
N Ask for N2xx2yy
firmware xx = version of
version microcontroller
yy = version of DSP
>`
,£Ê
,ÓÊ
,ÎÊ
,xÊ
,È
,ÇÊ
,n
,\Ê
,ÆÊ
,Ê
,rÊ
,Ê
,¶Ê
,JÊ
,Ê
,Ê
,
,Ê
,Ê
,Ê
,
äÊ
£Ê
ÛÝÊI®Ê
iÃVÀ«Ì
"ÉÃÌ>`LÞÊÌ}}i
6ÕiÊÕ«Ê£ÊÃÌi«®
ÕÌiÊÌ}}i
`iÊÌ}}iÊÃÌiÀiÊqÊÜ`iÊqÊÃÕÀÀÕ`®Ê
6ÕiÊ`ÜÊ£ÊÃÌi«®
«ÕÌÊÌ}}iÊ Ê£]ÊÓ]ÊÎ]Ê{]Êx®
6ViÊÌ}}i
-iiVÌÊ x
-iiVÌÊ {
-iiVÌÊ £
-iiVÌÊ Ó
-iiVÌÊ Î
-Ì>`LÞ
"
-ÌiÀi
7`i
-ÕÀÀÕ`
ÕÌiÊvv
ÕÌiÊ
6ViÊvv
6ViÊ
iÞVÊ`Ã>LiÊV>Ê>`ÊÀiÌiÊiÞî
iÞVÊ>VÌÛ>Ìi`ÊV>Ê>`ÊÀiÌiÊiÞîÊI®
-iÌÊÛÕiÊ`ÀiVÌÞÊÌÊÝÊII®

16
Connecting Panorama
to RS232
Panorama Control Interface
RS232
service port

B&W Group Ltd
Dale Road
Worthing West Sussex
BN11 2BH England
T +44 (0) 1903 221800
F +44 (0) 1903 221801
www.bowers-wilkins.com
B&W Group (UK Sales)
T +44 (0) 1903 221 500
B&W Group North America
T +1 978 664 2870
B&W Group Asia
T +852 3 472 9300
Apple, AirPort Express, Apple TV, iPod, Made for iPod
logo are trademarks of Apple Inc., registered in the US
and other countries. iPhone is a trademark of Apple Inc.
TOSLINK is a trademark of Toshiba Corporation.
Squeezebox is a trademark of Logitech Inc.
PlayStation is a registered trademark of
Sony Computer Entertainment Inc.
Xbox 360 is a trademark of Microsoft Corporation.
Blu-ray Disc is a trademark of the Blu-ray Disc
Association. Panorama is a trademark of B&W Group Ltd.
Issue 2
Other manuals for Panorama
2
Table of contents
Other Bowers & Wilkins Home Theater System manuals