Bradley Quilt UltraQuilter User manual

The UltraQuilter Owner’s Manual
1
UltraQuilter™ Owner’s Manual
We have been listening to you—Bradley Quilt Company’s mission is to provide the most versatile and
easy-to-use items on the market. We provide a portable product that requires no tools for assembly,
and we believe it is the most unique frame on the market.
The UltraQuilter is a quilting system that lets you use your regular sewing machine in the same manner
as a longarm sewing machine. The UltraQuilter setup is quick and easy, and the UltraQuilter requires
very little maintenance.
If you have any questions or suggestions, please contact us.
Enjoy your UltraQuilter!
Copyright © 2005 Bradley Quilt Company. UltraQuilter™ is a trademark of Bradley Quilt Company. Patent pending.
Manual created by Visual Cue Productions.
Bradley Quilt Company Contact Information
Telephone: 530-347-4438
Address: 17075 Kirkland Dr.
Cottonwood, CA 96022
Email:
General information:
Sales:
Customer Support:
Technical Support:
Website:
www.bradleyquiltco.com

Table of Contents
The UltraQuilter Owner’s Manual
2
Table of Contents
TABLE OF CONTENTS....................................................................................................................................................... 2
1. THE ULTRAQUILTER SYSTEM................................................................................................................................... 3
2. SETTING UP THE ULTRAQUILTER........................................................................................................................... 4
ℵATTACHING THE RATCHET ASSEMBLY............................................................................................................................. 4
ℑLOADING THE SEWING MACHINE...................................................................................................................................... 4
ℜCOMPLETING THE FRAME ASSEMBLY............................................................................................................................... 5
3. LOADING A QUILT......................................................................................................................................................... 6
ℵPREPARING THE QUILT LAYERS ....................................................................................................................................... 6
ℑLOADING THE QUILT BACK .............................................................................................................................................. 7
ℜLOADING THE QUILT TOP................................................................................................................................................. 7
℘LOADING THE BATTING................................................................................................................................................... 8
gADJUSTING THE QUILT LAYERS....................................................................................................................................... 8
4. QUILTING A QUILT...................................................................................................................................................... 10
ℵQUILTING BY MACHINE.................................................................................................................................................. 10
ℑQUILTING BY MACHINE USING A PANTOGRAPH ............................................................................................................. 10
ℜQUILTING BY HAND ....................................................................................................................................................... 11
5. CONFIGURING A WORK AREA ................................................................................................................................ 12
6. MAINTAINING AND TROUBLESHOOTING............................................................................................................ 13
MAINTAINING..................................................................................................................................................................... 13
TROUBLESHOOTING............................................................................................................................................................ 13
7. ACCESSORIES AND PARTS LIST.............................................................................................................................. 14

The UltraQuilter System
The UltraQuilter Owner’s Manual
3
1. The UltraQuilter System
Figure 1.1 The UltraQuilter System

Setting Up the UltraQuilter
The UltraQuilter Owner’s Manual
4
2. Setting Up the UltraQuilter
When you set up your UltraQuilter, place it in a
location that allows access to the front and the
back of the table. You can easily assemble the
UltraQuilter in about 5 minutes.
ℵAttaching the Ratchet
Assembly
1. Open out the legs of the UltraQuilter
table, making sure the legs are locked,
and place the table upright.
2. Working from the front of the table,
place the Ratchet Assembly and poles
on the table. The Ratchet Assembly
should be at the left end of the table as
shown in Figure 2.1. Pole 3 is closest to
the front of the table.
3. Attach the Left Upright to the table and
tighten the wing nut so the upright is
perpendicular to the table.
4. Attach the Ratchet Assembly to the Left
Upright and loosely attach the wing nut.
ℑLoading the Sewing
Machine
1. Place the Top and Bottom Carriages
onto the tracks on the right side of the
table.
2. Lift up your sewing machine and hold it
next to the right side of the table.
3. Insert Pole 1 through the neck of the
sewing machine, as shown in Figure
2.2, and then place your sewing
machine on the carriage.
Warning. Place the sewing machine at
the back end of the Top Carriage, as
shown in Figure 2.3.
!
Figure 2.1 Ratchet Assembly and Left Upright
Figure 2.2 Pole 1 in machine neck area
Figure 2.3 Machine on carriages

Setting Up the UltraQuilter
The UltraQuilter Owner’s Manual
5
Figure 2.4 Assembled quilt frame
ℜCompleting the Frame
Assembly
Refer to Figure 2.4 for the following steps:
1. Insert Poles 1, 2, and 3 into each of the
three holes of the Right Horizontal Bar,
making sure that Pole 1 is inside of your
sewing machine neck area and Poles 2
and 3 are outside of the sewing machine
neck area.
2. Attach the Right Horizontal Bar to the
Right Upright using the wing nut.
3. Attach the Right Upright to the table,
and tighten the wing nut so the Right
Horizontal Bar is perpendicular to the
table.
4. Adjust the height of Right and Left
Horizontal bars so Pole 1 rests on the
sewing machine base.
You are now ready to load a quilt.

Loading a Quilt
The UltraQuilter Owner’s Manual
6
Figure 3.2 Quilt top centerpoint
Figure 3.1 Quilt back and batting larger
than quilt top
3. Loading a Quilt
ℵPreparing the Quilt Layers
Iron the quilt top and back and mark
your quilting pattern on the quilt top, if
necessary.
Make sure your quilt back and batting
measure at least 4 inches wider than the
quilt top on all sides, as shown in Figure
3.1.
Find the center of your quilt top and
back. An easy way to do this is to fold
the quilt in half lengthwise and mark the
center with a pin on each end of the
quilt top and back, as shown in Figure
3.2.
Place a small safety pin at the midpoint
of the canvas on Poles 1, 2, and 3. You
will use these marks to align the
centerpoints of your quilt top and back
when you pin them to the frame.

Loading a Quilt
The UltraQuilter Owner’s Manual
7
Figure 3.3 Quilt back pinned to Pole 3
Figure 3.4 Quilt back pinned to Poles 1
and 3
Figure 3.5 Quilt top pinned to Pole 2
ℑLoading the Quilt Back
1. Match the centerpoint that you
marked on the quilt back to the
centerpoint you marked on the
canvas. Using flathead pins, pin
your quilt back to Pole 3 with right
side down, pinning every 2 inches,
as shown in Figure 3.3.
2. Using the Pole 3 ratchet knob, wind
the quilt back counterclockwise
onto Pole 3, leaving 30 inches free.
3. Pull the free end of your quilt back
under Pole 2 and pin to Pole 1, as
shown in Figure 3.4. Be sure to
match the back and canvas
centerpoints.
ℜLoading the Quilt Top
1. Matching the top and canvas
centerpoints, pin the quilt top to
Pole 2 with right side up, as shown
in Figure 3.5.
2. Using the Pole 2 ratchet knob, wind
the quilt top clockwise onto Pole 2,
leaving about 4 inches of the free
end unwrapped.

Loading a Quilt
The UltraQuilter Owner’s Manual
8
Figure 3.6 Batting pinned to Pole 1
Figure 3.7 Quilt top centerpoint
Figure 3.8 Three layers on Pole 1
℘Loading the Batting
1. Insert the batting between the quilt top
and quilt back by placing it over Pole 3,
under Pole 2, and ending at Pole 1.
2. Pin the batting to the quilt back on Pole
1, as shown in Figure 3.6.
3. Using the Pole 1 ratchet knob, wind
Pole 1 clockwise 3/4 of a turn. Pin the
free end of the quilt top to the batting,
as shown in Figure 3.7.
4. Roll the excess batting and place it in
the space between Poles 2 and 3.
gAdjusting the Quilt Layers
1. Set the Pole 1 ratchet to lock. Using the
Pole 1 ratchet knob, wind the three quilt
layers 1/4 of a turn on Pole 1 clockwise,
as shown in Figure 3.8. Make sure that
the ratchet locks for Poles 2 and 3 are
unlocked.

Loading a Quilt
The UltraQuilter Owner’s Manual
9
Figure 3.9 Take up slack from quilt top
Figure 3.10 Take up slack from quilt back
Figure 3.11 Elastic tensioner removes slack
2. Set the Pole 2 ratchet to lock. Using the
Pole 2 ratchet knob, wind Pole 2
counterclockwise, removing all of the
slack from the quilt top, as shown in
Figure 3.9.
3. Set the Pole 3 ratchet to lock. Using the
Pole 3 ratchet knob, wind Pole 3
counterclockwise, removing all of the
slack from the quilt back, as shown in
Figure 3.10.
4. Clip the elastic tensioners to the quilt
back and batting to take up any slack in
the quilt, as shown in Figure 3.11. To
avoid stretching the quilt top, do not
clip the elastic tensioners to the quilt
top. You might need to pin the top to
the back and batting along the sides, if
necessary. Be sure to remove the pins
when you rotate the quilt layers.
∃
Quilter’s Tip: When you wind the quilt
top and back on the poles, apply just
enough tension to make the fabric taut. If
you see the poles bowing in the middle,
loosen the tension.

Quilting a Quilt
The UltraQuilter Owner’s Manual
10
Figure 4.1 Quilt by machine
Figure 4.2 Quilt by machine using a
pantograph
.
4. Quilting A Quilt
ℵQuilting by Machine
1. Make sure the tracks and table area
under the quilt are clear.
2. Slide the machine up to the quilt.
3. Carefully put the three quilt layers
under the machine presser foot.
4. Move the machine to the quilting
starting point and begin to sew, as
shown in Figure 4.1.
5. After you have quilted a section, roll the
quilted portion onto Pole 1. See the
Adjusting the Quilt Layers section on
Page 9 for instruction.
∃
Quilter’s Tip: Make sure the quilt frame
is positioned at the right height so the quilt
back rests 1/8” above the sewing
machine base.
ℑQuilting by Machine Using
a Pantograph
To use a pantograph, you need to work from
the back side of the table. Figure 4.2 shows the
pantograph setup.
1. Tape the pantograph design to the table
under the carriage between the carriage
tracks.
2. If you have the optional hand control,
move the control to the back end of the
carriage.
3. Adjust the stylus over the pantograph
design, and then begin to sew by tracing
the pantograph design.
∃
Quilter’s Tip: If you set up your
UltraQuilter in a carpeted room and you
use a chair with wheels, you can place a
large piece of masonite under your chair so
it rolls more easily as you quilt.

Quilting a Quilt
The UltraQuilter Owner’s Manual
11
Figure 4.3 Quilt by hand
ℜQuilting by Hand
1. Rotate the rack so the Ratchet
Assembly is attached to the Right
Upright, and the right end of the rack is
attached to the Left Upright. Pole 1 is
now closest to the front side of the
table, as shown in Figure 4.3.
2. Adjust the tilt of the rack so it leans
near the front of the table.
3. Loosen the wing nuts at the bottom of
each upright and tilt the rack over the
edge of the table.
4. Tighten the wing nuts once you have
the rack in the desired position.
5. If necessary, tighten the quilt top on the
rack.
∃
Quilter’s Tip: If you have the optional
carriage light, you can position the
carriage near your work area and use the
light while you hand quilt.

Configuring a Work Area
The UltraQuilter Owner’s Manual
12
Figure 5.1 Work area front view
Figure 5.2 Work area back view
5. Configuring a Work Area
When you are between quilting projects, you
can use your UltraQuilter as a sewing work
area. Simply drop the quilt rack over the front
of the table. The optional cutting board fits
directly over the tracks and creates a nice
cutting surface. Figures 5.1 and 5.2 show the
UltraQuilter used as a work area.
If you want to position the quilt rack over the
side of the table and you have a quilt loaded on
the rack, follow these steps to remove the
sewing machine from the quilt rack:
1. Move the machine and carriage to the
right end of the table.
2. Remove the Right Upright from the
table and carefully remove the poles
from the Right Horizontal Bar.
3. Remove Pole 1 from the neck area of
the sewing machine.
4. Move the sewing machine and carriage
away from the end of the table.
Warning. Do not store your sewing
machine on the carriage when the quilt
rack is dropped over the side unless you
have blocked the wheels. The carriage
could roll off the table.
5. Reinsert Poles 1, 2, and 3 into the Right
Horizontal Bar and attach the Right
Upright to the table.
!

Maintaining and Troubleshooting
The UltraQuilter Owner’s Manual
13
Figure 6.1 Cleaning the UltraQuilter’s
tracks
Figure 6.2 UltraQuilter at rest
6. Maintaining and Troubleshooting
Maintaining
The UltraQuilter requires little maintenance.
However, here are some tips for keeping your
UltraQuilter in top working order:
Keep the tracks clean by dusting them
with a cloth before and after use, as
shown in Figure 6.1.
Clean the table and frame pieces using a
standard wood cleaner or polish.
Do not store heavy objects on the
tracks.
Do not use your iron directly on the
tabletop surface.
Troubleshooting
Problem: The machine and carriage do not
move smoothly on the tracks.
Solution: Verify that nothing is caught in or
blocking the tracks. Dust the tracks to remove
any debris.
Problem: The tracks are clean, but the carriage
still does not run smoothly.
Solution: Check the height of the quilt rack.
The quilt back should rest 1/8” above the
sewing machine base. If any of the fabric is
sagging, it can catch on the machine or
carriage. Be sure to use an extension cord with
your machine, too, so you have enough slack to
move the machine the length of the table.
Accessories and Parts List
The UltraQuilter Owner’s Manual
14
7. Accessories and Parts List
Bradley Quilt Company offers Accessories and Parts to help you maintain and enhance your UltraQuilter
system. We do what we can to accommodate special requests, and we do provide adaptive devices. An
adaptive device is a modification to a feature based on your special needs. Please contact us by email at
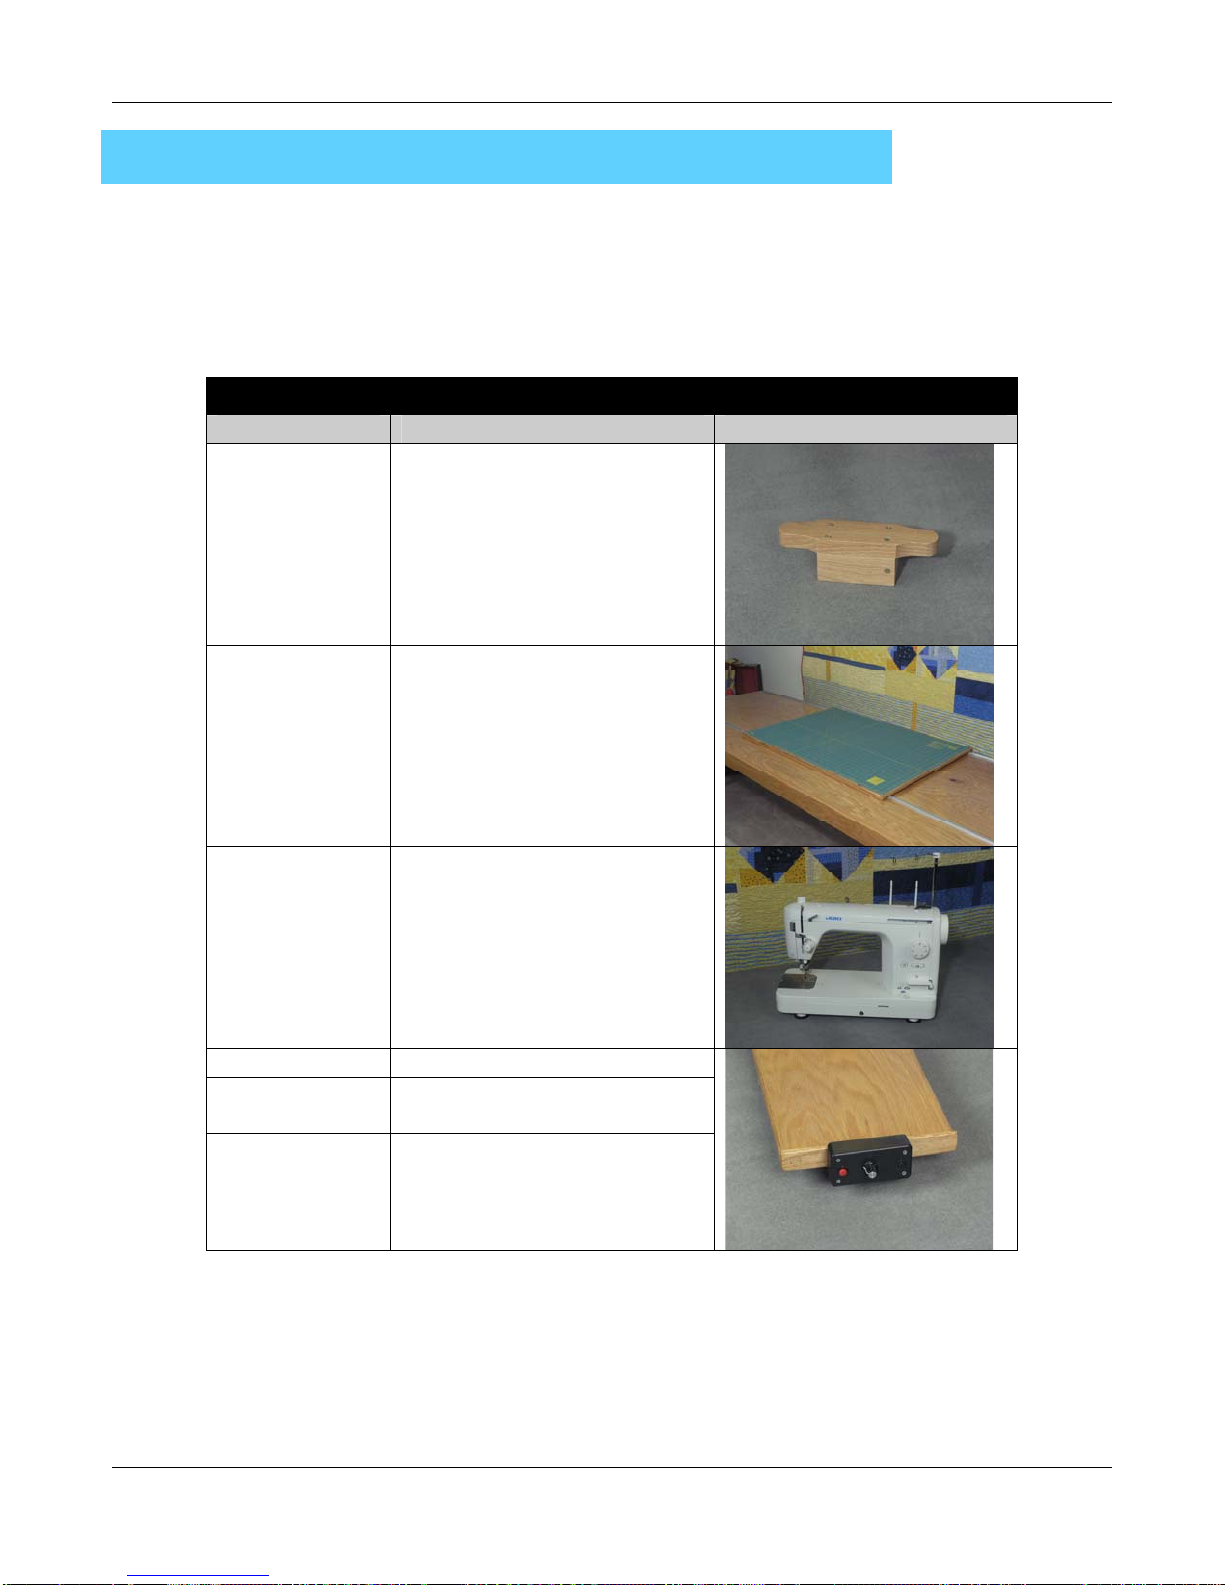
Accessories
Item Number Item Description Details
7 Wooden wrench for wing nuts
(adaptive device)
8 Cutting Board
(Cutting mat not included.)
21 Juki TL-98Q Sewing Machine
36 Speed Regulator for Juki
38 Speed Regulator for Brother
1500
42 Custom Speed Regulator

Accessories and Parts List
The UltraQuilter Owner’s Manual
15
Parts
Item Number Item Description Details
Table and tracks
1101 Table legs
1102 Table top
1103 8-foot Track, set of 2
1104 Custom-length track, set of 2
Carriage
1105 Carriage track,
23-1/4” x 2”

Accessories and Parts List
The UltraQuilter Owner’s Manual
16
Item Number Item Description Details
Carriage, continued
1106 Nylon Wheel with ball
bearings, set of 8
1107 Oak Bottom Carriage
1108 Oak Top Carriage
1109 Combination Oak Carriage set,
(made for up to 16” sewing
machine)
1110 Fixed stylus
1111 Light attachment

Accessories and Parts List
The UltraQuilter Owner’s Manual
17
Item Number Item Description Details
Optional Light
1112 Ott light
1113 Ott light bulb
Quilt Frame
1114 Oak uprights, set of 2, rotate
right
1115 Longer oak uprights, set of 2
(to lower the quilt rack on the
back side of table), rotate left
1116 Carriage bolts, set of 4
1117 Wing nut knobs, set of 4
1118 Fender washers, set of 4

Accessories and Parts List
The UltraQuilter Owner’s Manual
18
Item Number Item Description Details
1119 Right Horizontal Bar
1120 Left Horizontal Bar
1121 Right Horizontal Bar, combo
16” machine
1122 Left Horizontal Bar, combo
16” machine
Ratchet Assembly
1123 Latch for ratchet, set of 3
1124 Bolts, 1/4” x 1”
1125 Ratchets
1126 Knobs, set of 3
1127 Bolts, 1/2” x 8/32” 1-1/2”
long, set of 3
Tensioner
1128 Tensioner, set of 2
1129 Tensioner holder, set of 2
Poles and Canvas Leaders
1130 8-foot poles
1131 Custom-length poles
1132 8-foot canvas leader
1133 Custom-length leader
Miscellaneous Parts
1134 1/2” x 8/32” bolt for knobs
1135 #10 screws, package of 3, for
ratchet mechanism
1136 Glue kit for canvas
1137 UltraQuilter Owner’s Manual
Table of contents


