BRADY Worldwide BradyPrinter i5300 User manual

User Manual

BradyPrinter™ i5300 User Manual ii
Copyright and Trademarks
Disclaimer
This manual is proprietary to Brady Worldwide, Inc. (hereafter “Brady”), and may be revised from time
to time without notice. Brady disclaims any understanding to provide you with such revisions, if any.
This manual is copyrighted with all rights reserved. No portion of this manual may be copied or
reproduced by any means without the prior written consent of Brady.
While every precaution has been taken in the preparation of this document, Brady assumes no liability
to any party for any loss or damage caused by errors or omissions or by statements resulting from
negligence, accident, or any other cause. Brady further assumes no liability arising out of the
application or use of any product or system described, herein; nor any liability for incidental or
consequential damages arising from the use of this document. Brady disclaims all warranties of
merchantability of fitness for a particular purpose.
Brady reserves the right to make changes without further notice to any product or system described
herein to improve reliability, function, or design.
Trademarks
BradyPrinter™ i5300 is a trademark of Brady Worldwide, Inc.
Microsoft, Windows, Excel, Access and SQL Server are registered trademarks of Microsoft
Corporation.
All brand or product names referenced in this manual are trademarks (™) or registered trademarks (®)
of their respective companies or organizations.
© 2021 Brady Worldwide, Inc. All Rights Reserved.
Y4950335
Revision A
Brady Worldwide, Inc.
6555 West Good Hope Road
Milwaukee, WI 53223
bradyid.com

BradyPrinter™ i5300 User Manual iii
Brady Warranty
Our products are sold with the understanding that the buyer will test them in actual use and determine
for themself the adaptability to their intended uses. Brady warrants to the buyer that its products are
free from defects in material and workmanship, but limits its obligation under this warranty to
replacement of the product shown to Brady’s satisfaction to have been defective at the time Brady sold
it. This warranty does not extend to any persons obtaining the product from the buyer.
THIS WARRANTY IS IN LIEU OF ANY OTHER WARRANTY, EXPRESS OR IMPLIED, INCLUDING,
BUT NOT LIMITED TO, ANY IMPLIED WARRANTY OF MERCHANTABILITY OR FITNESS FOR A
PARTICULAR PURPOSE, AND OF ANY OTHER OBLIGATIONS OR LIABILITY ON BRADY’S PART.
UNDER NO CIRCUMSTANCES WILL BRADY BE LIABLE FOR ANY LOSS, DAMAGE, EXPENSE
OR CONSEQUENTIAL DAMAGES OF ANY KIND ARISING IN CONNECTION WITH THE USE, OR
INABILITY TO USE, BRADY’S PRODUCTS.
Safety and Environment
Please read and understand this manual before using the BradyPrinter™ i5300 printer for the first
time. This manual describes all of the main functions of the BradyPrinter™ i5300 printer.
Precautions
Before using the
BradyPrinter™ i5300 printer
, please note the following precautions:
• Read all instructions carefully before operating the printer and prior to performing any procedure.
• Do not place the unit on an unstable surface or stand.
• Do not place anything on top of the unit.
• Keep the top clear of obstructions.
• Always use the printer in a well ventilated area. Do not block the slots and opening on the unit, which
are provided for ventilation.
• Only use the power source indicated on the rating label.
• Use only the power cord that comes with the unit.
• Do not place anything on the power cord.

BradyPrinter™ i5300 User Manual iv
Technical Support and Registration
Contact Information
For repair or technical assistance, locate your regional Brady Technical Support office by going to:
•
United States:
bradyid.com/techsupport
• Canada:
bradycanada.ca/contact-us
•
Mexico:
bradyid.com.mx/es-mx/contacto
• Latin America:
bradylatinamerica.com/es-mx/soporte-técnico
•
Europe
:
bradyeurope.com/services
•
Australia:
bradyid.com.au/technical-support
•
Asia Pacific
:
brady.co.uk/landing-pages/global-landing-page
Registration Information
To register your printer go to:
•
bradycorp.com/register
Repair and Return
If for any reason you need to return the product for repair, please contact Brady Technical Support for
repair and replacement information.
Document Conventions
When using this document, it is important that you understand the conventions used throughout the
manual.
• All user actions are indicated by
Bold
text.
• References to menus, windows, buttons and screens are indicated by
Italicized
text.

BradyPrinter™ i5300 User Manual v
Contents
1 • Introduction
Features and Functions ............................................................................................ 1
Compatible Software ................................................................................................. 2
System Specifications............................................................................................... 2
2 • Setup
Unpacking the Printer ............................................................................................... 3
What’s in the Box ..................................................................................................3
Registration ...........................................................................................................3
Printer Components .................................................................................................. 4
Exterior ..................................................................................................................4
Interior ...................................................................................................................5
Power .......................................................................................................................... 6
Setup .....................................................................................................................6
Power Save Mode .................................................................................................6
Put the Printer into Sleep Mode ............................................................................7
Wake the Printer from Sleep Mode .......................................................................7
Reboot the Printer .................................................................................................7
Software for Creating Labels.................................................................................... 8
Connecting the Printer .............................................................................................. 8
Ethernet Network ..................................................................................................8
Wi-Fi ......................................................................................................................9
Search to Connect .........................................................................................9
Manually Enter Settings ...............................................................................10
USB .....................................................................................................................10
Installing the Windows Driver (Optional) .............................................................. 11
Install or Change Supplies...................................................................................... 11
Compatible Label Supplies and Ribbons ............................................................11
Ribbon .................................................................................................................11
Label Supplies ....................................................................................................13
Printer Settings ........................................................................................................ 16
Language ............................................................................................................16
Keyboards ...........................................................................................................17
Units of Measure .................................................................................................17
Date and Time ....................................................................................................18
Storage Location .................................................................................................18
Print on Demand .................................................................................................18
Printer Name .......................................................................................................19
Recycling the Label and Ribbon Cartridges ......................................................... 20
Dismantling the Ribbon Cartridge .......................................................................21
Recycling Components ................................................................................22
Dismantling the Label Cartridge ..........................................................................23

BradyPrinter™ i5300 User Manual vi
Recycling Components ................................................................................24
3 • General Operation
Using the Touchscreen ........................................................................................... 25
Navigation and Status Bar ..................................................................................26
Material Details ...................................................................................................26
Creating Labels........................................................................................................ 26
Storing Files on the Printer..................................................................................... 27
Printing Labels......................................................................................................... 27
Printing from Software ........................................................................................27
Printing from the Printer ......................................................................................28
Feeding and Cutting Labels ................................................................................28
Printing Double-Sided Sleeves ...........................................................................28
Using the Print Screen ............................................................................................ 30
Using the File List.................................................................................................... 31
Searching, Sorting, and Filtering .........................................................................32
Using the Print Queue............................................................................................. 33
Adding Files to the Queue ..................................................................................33
Removing Files From the Queue ........................................................................33
Change the Print Order .......................................................................................34
Adjusting Print Settings.......................................................................................... 34
Print Speed .........................................................................................................34
Print Energy ........................................................................................................34
Print Position .......................................................................................................35
Cutting Options ...................................................................................................35
BPL Scripts .........................................................................................................35
Print Orientation ...........................................................................................35
Mirror Print ...................................................................................................36
Print on Demand .................................................................................................36
External Hardware ................................................................................................... 36
4 • Using Scripts
Graphics & Fonts..................................................................................................... 37
Import ..................................................................................................................37
Delete ..................................................................................................................38
Running a Script ...................................................................................................... 38
5 • Maintenance
Displaying System Information .............................................................................. 39
Installing Firmware Upgrades ................................................................................ 39
Updating Y and B Values ........................................................................................ 40
Cleaning the Printer................................................................................................. 40
Cleaning Dust and Debris from Printer ...............................................................40
Cleaning the Printhead .......................................................................................41
Cleaning the Print Roller .....................................................................................42
Cleaning the Sensors ..........................................................................................43

BradyPrinter™ i5300 User Manual vii
Cleaning the Cutter Blade ...................................................................................45
Cleaning the Cutter Blade Exit Area ...................................................................47
Cleaning the Display ...........................................................................................48
Clearing Jams .......................................................................................................... 48
Printer Jam ..........................................................................................................48
Cutter Jam ..........................................................................................................49
Replacing the Supply Wiper ................................................................................... 51
Replacing the Printhead.......................................................................................... 52
Replacing the Print Roller....................................................................................... 54
6 • Troubleshooting
A • Regulatory Compliance
Agency Compliance and Approvals ...................................................................... 60
United States ......................................................................................................60
FCC Notice ...................................................................................................60
Canada ...............................................................................................................60
Mexico .................................................................................................................60
Europe ..............................................................................................................61
RoHS Directive 2011/65/EU, 2015/863/EU ..................................................61
Batteries Directive 2006/66/EC ....................................................................61
Turkey .................................................................................................................61
China ...................................................................................................................62
Taiwan ................................................................................................................62
Wireless Regulatory Information ........................................................................... 62
United States ......................................................................................................63
Canada ...............................................................................................................63
Mexico .................................................................................................................64
Brazil ...................................................................................................................64
European Union ..................................................................................................64
International ........................................................................................................64
Japan ..................................................................................................................64
B • Licensing
End User License Agreement for Microsoft Windows CE© ................................ 65

BradyPrinter™ i5300 User Manual 1
1 Introduction
Use the BradyPrinter™ i5300 Sign and Label Printer to create and print professional-looking industrial
labels and signs. All you have to do is:
• Insert a ribbon cartridge. You can choose from a wide range of single-color ribbons.
• Insert a label cartridge.
• Send labels for printing from your labeling software.
Labels and ribbons from Brady Corporation communicate with Brady software. This saves time and
label waste by eliminating the need for calibration and for trial and error speed and energy
adjustments.
Features and Functions
The following are just some of the features that make this system so easy to use and ready to meet
your label-making requirements:
• Fast, high volume printing.
• No wasted labels because no calibration is required.
• Complete supply changeover in less than 20 seconds.
• Built-in automatic cutter.
• Sturdy and rugged desktop construction (29.8 pounds)
• Color touchscreen LCD display input.
• Single-color job printing on 300 dpi or 600 dpi models, up to 4 in. (101.6 mm) wide and up to
60 in. (1.5 m) long.
• Continuous and die-cut label supplies in a variety of high-performance materials.
• Transfer graphics from PC or USB flash drive. Supported graphic formats are bitmap (*.bmp), JPG
file (*.jpg), Graphic Interchange Format (*.gif) and Portable Network Graphics (*.png).
• Print labels from PC.
• Run scripts directly from a USB drive.
BradyPrinter™ i5300 supports ZPL, jScript, DPL and BPL. For the list of supported commands, please
visit www.BradyID.com/i5300.

BradyPrinter™ i5300 User Manual 2
Introduction
Compatible Software
Compatible Software
The BradyPrinter™ i5300 printer is compatible with Brady®Workstation desktop label creation
software and other Windows-based label creation software.
When used with Brady Workstation software, no driver installation is required and the software
automatically recognizes the installed label supply and ribbon making label creation easier and faster.
The printer driver is required if using third-party software. See “Installing the Windows Driver
(Optional)” on page 11 and the documentation for your software.
System Specifications
•
Weight
: 29.8 lbs (13.5 kg)
•
Dimensions
(stored): 15.7 in. x 11.1 in. x 11.2 in. (40 cm x 28.2 cm x 28.5 cm)
•
Operating Temperature
: 50 - 104°F (10-40°C)
•
Relative Humidity
: 10% to 80% RH non-condensing
•
Storage
: -4 to 122°F (-20 to 50°C) at 15% to 90% RH non-condensing
•
Voltage
: 100-240 VAC 50/60 Hz, 3.5A
•
Print Resolution
: 11.8 dots/mm for 300 dpi models, 23.6 dots/mm for 600 dpi models.
•
Output label size
: 0.25 in. to 4.015 in. (6.4 mm to 102 mm)
•
Maximum label length
(continuous): 60 in. (1.5 m)
•
Print speed
:
• 300 dpi model: 1-10 ips depending on label supply
• 600 dpi model: 1-5 ips depending on label supply

BradyPrinter™ i5300 User Manual 3
2Setup
Unpacking the Printer
Carefully unpack and inspect the printer surfaces (interior and exterior) and the labeling system for
possible damage during shipping.
Note: Be sure to remove any transportation protection from around the printhead and inside the
enclosure cover.
What’s in the Box
• BradyPrinter™ i5300 printer
• Free Brady Workstation label creation software (booklet includes download instructions and license
key)
• USB drive including: Quick Start Guide, User Manual, driver, and video tutorial.
•PowerCord
• USB Type B Cable
• Printed “Quick Start Guide”
• Cleaning Kit
Note: Please keep the original packaging, including the box, in case the printer must be returned.
Registration
Register your printer online at www.bradycorp.com/register and receive free product support and
updates!
CAUTION! If shipping the printer, consult with your transportation carrier for
state, federal, municipal, and international shipping regulations
regarding the lithium ion battery contained in the printer.

BradyPrinter™ i5300 User Manual 4
Setup
Printer Components
Printer Components
Exterior
Note: The printer is equipped with a universal power supply and can be operated with a voltage of
100 to 240 V~, 50- to 60 Hz. The printer senses the voltage type and automatically adjusts
for the power source.
1 Roller access hatch (for print
roller replacement)
9 Exit chute (with label catcher)
2 Rear cover 10 Ethernet port
3 Latch for ribbon door 11 USB-B port (to computer)
4 Ribbon door 12 USB-A ports
5 Touchscreen 13 Power switch
6 Sleep button 14 AC power cord port
7 USB-A port 15 IO port
8 Stylus storage slot
1
3
4
2
10
5
8
11
9
6
12
13
15
714
BradyPrinter™ i5300 User Manual 5
Setup
Printer Components
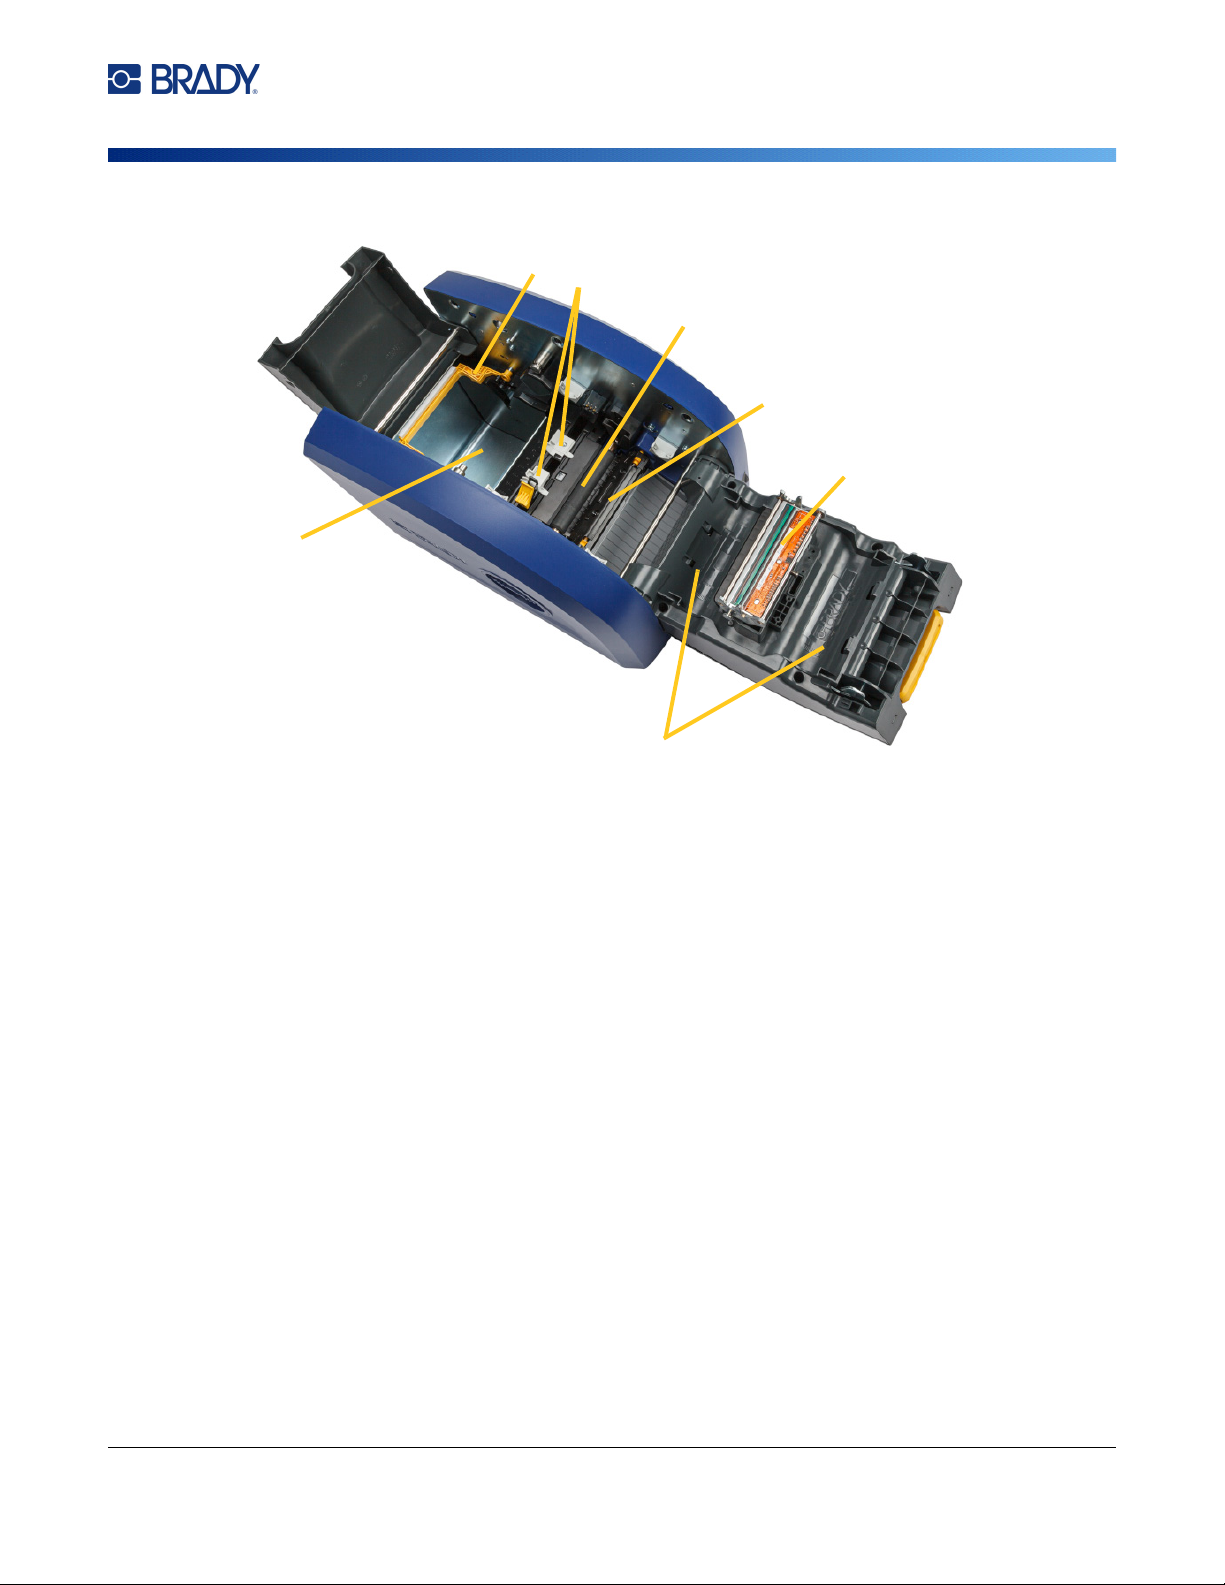
Interior
1 Supply wiper arm (shown raised) 5 Printhead
2 Label supply guides 6 Ribbon holder
3 Rubber print roller 7 Label well
4Cutter
12
5
3
4
6
7
BradyPrinter™ i5300 User Manual 6
Setup
Power
Power
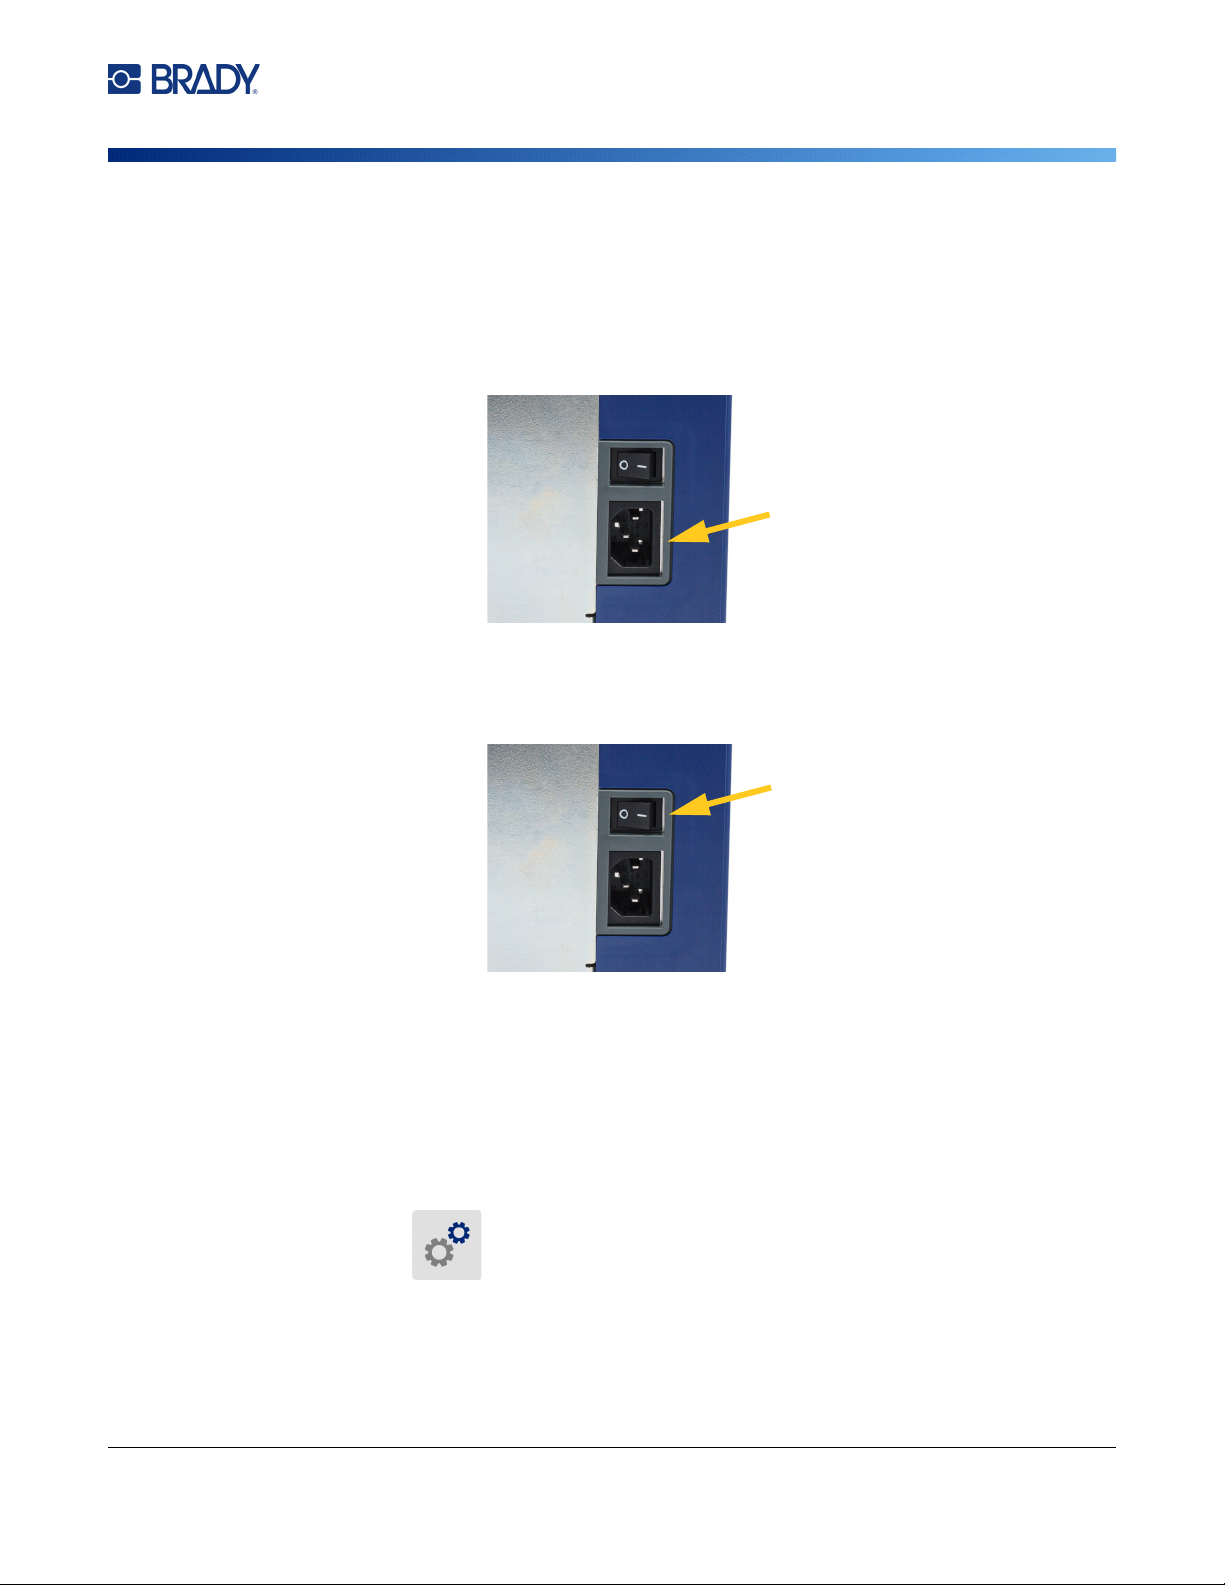
Setup
To connect power and turn on the printer:
1. Plug the power cord into the printer at the location shown.
2. Plug the other end of the power cord into an AC power outlet.
3. Turn the power switch on. The printer turns on and displays the home screen. The first time
you turn on the printer it walks you through configuring the settings. Follow the instructions on
the touchscreen.
Power Save Mode
When the printer is plugged in, you can leave it in a state of readiness all the time so that software can
find the printer. Or you can choose to conserve power so that the printer automatically goes to sleep
after a period of inactivity.
To set the inactive period:
1. Make sure the printer is turned on.
2. Tap Settings .
3. Press System Configuration > Power Save Mode.
4. Choose AC Power.

BradyPrinter™ i5300 User Manual 7
Setup
Power
5. Slide the time indicator dot left (decrease) or right (increase) for the amount of inactive time
that can elapse before the printer automatically shuts down. Alternatively you can press the
minus (-) button to decrease or the plus (+) button to increase the time.
6. Tap to return to the home screen.
Put the Printer into Sleep Mode
When the system is asleep the display turns off and the system goes into a low power consumption
state but does not require a cold start to turn back on. In this state, you can either touch the screen or
press the power button to return the system to the same state it was in before going into lower power
consumption mode. When the printer is in sleep mode the power button is lit green.
Note: To fully shut down the printer, use the power switch on the back.
To put the printer to sleep:
With the printer on, press the sleep button.
Wake the Printer from Sleep Mode
If you do not touch the screen or keypad for a defined period of time, the system turns off the display
and goes into a low-power consumption mode. When in Sleep Mode, the power button is lit green. The
current label and settings are retained.
To wake the printer:
1. Press the sleep button or touch the screen.
2. Continue with your label activities.
Reboot the Printer
To reboot the printer:
1. Press and hold the sleep button for at least 5 seconds. The system performs the initialization
process and starts the printer.
2. When the home screen displays, you can continue with your label activities.

BradyPrinter™ i5300 User Manual 8
Setup
Software for Creating Labels
Software for Creating Labels
Install labeling software on your computer, set up the connection to the printer, then use the software
to design labels and send them to the printer.
Brady Workstation software provides a variety of apps to simplify label creation for specific purposes. It
also provides easy-to-use apps for custom label design. The printer comes with a license for the Brady
Workstation
Product & Wire Identification Suite.
To install the Product & Wire Identification Suite:
1. Make sure your computer is connected to the internet.
2. Go to workstation.bradyid.com/PWID.
3. Follow the instructions on the screen to download and install the software.
4. When you run the software and open an app that requires activation, follow the instructions on
the screen to activate the software. Use the license ID and password on the printed insert that
came with the printer.
For other Brady Workstation software or additional licenses, go to www.workstation.bradyid.com or
contact your Brady representative.
Connecting the Printer
Connect to a computer in one or more of the following ways:
• Ethernet® network. This method allows multiple computers to send label files to the printer. See
below.
• Wi-Fi® wireless network (depending on your printer model). See
“Wi-Fi” on page 9
.
• Directly with a USB cable. See
“USB” on page 10
.
Ethernet Network
This section describes how to configure the printer to communicate via an Ethernet (TCP/IP)
connection.
Note: If using a Windows driver (see “Installing the Windows Driver (Optional)” on page 11) it is best
to configure the Ethernet connection before installing the driver. If the driver is already
installed before configuring the Ethernet connection, you may need to edit the port settings
for the printer in Windows to update the IP address.
To configure Ethernet network settings:
1. On the home screen tap Settings.
2. Tap Connection.
3. Tap Advanced Network Settings.

BradyPrinter™ i5300 User Manual 9
Setup
Connecting the Printer
4. Tap Ethernet.
5. Tap IP Settings, and then choose either DHCP or Static.
•
DHCP:
DHCP addressing is dynamic and the system uses a DNS server in the printer IP
address for you.
No additional fields need to be entered.
•
Static:
For static addressing, you must supply the printer’s IP address. First, tap the back button
to return to the
Ethernet
screen, then fill in the following information. You may need to get
assistance from your network administrator.
•
IP Address:
Enter the printer’s IP address.
•
Subnet Mask:
Enter a subnet mask if you are using one.
•
Default Gateway:
Enter the IP address of the default gateway.
•
DNS Server (Primary):
Enter the IP address of the primary DNS server.
•
DNS Server (Secondary):
Enter the IP address of the secondary DNS server.
IMPORTANT! If no DNS server is being used, enter 0.0.0.0 for both the primary and
secondary DNS servers.
6.
Tap the back button to return to
the Advanced Network Settings screen in order for the
fields entered to take effect.
Wi-Fi
Connect to a Wi-Fi network either by searching for and selecting a network or by manually entering the
network settings. Once connected, the printer can communicate with computers on that network.
Note: Wi-Fi capability is not available on all printers or in all countries.
IMPORTANT! Before configuring the Wi-Fi connection on an enterprise network, be sure the
printer is set to the current date and time. The printer may not be able to establish
the connection if the date and time is not current. See “Date and Time” on page 18.
Search to Connect
To connect to a Wi-Fi wireless network:
1. Make sure the printer is turned on.
2. Tap Settings.
3. Tap Connection.
4. Tap Wi-Fi Network to turn on Wi-Fi. The printer searches for Wi-Fi networks and displays a
list of networks found. Touch and drag to scroll the list. (If you need to identify the network by
static IP address or DHCP, see “Manually Enter Settings” on page 10.)
Tap the network that you want to use.
• If the network is not locked, simply tap it and the printer connects to it.

BradyPrinter™ i5300 User Manual 10
Setup
Connecting the Printer
• If the network is locked, as indicated by a lock symbol, tap the network and a key pad opens.
Enter the password and tap .
Note: If your network uses WEP authentication, a menu displays instead so that you can
enter both the password and the WEP index (key).
• If the network you need is not in the list, it may not be discoverable. Scroll to the bottom of the
list and tap
Other
. Choose either
Personal Network
or
Enterprise Network
. The system
displays settings appropriate to your selection. You may need information from your IT
department to complete the settings.
Manually Enter Settings
Use this method for networks that are hidden.
To connect to a Wi-Fi wireless network:
1. Make sure the printer is turned on.
2. Tap Settings.
3. On the Settings screen, select Connection.
4. Tap Advanced Network Settings.
5. Select Wi-Fi from the list.
6. Tap IP Settings and then tap one of the following.
•
DHCP:
DHCP addressing is dynamic and the system uses a DNS server to obtain the printer
IP address for you.
•
Static:
Select static addressing to manually enter the printer’s IP address.
7.
Tap the back button to return to the
Wi-Fi
screen.
8. Fill in the remaining available settings with help from your network administrator.
9. Tap to return to the home screen.
USB
To connect to a computer via USB 2.0, plug the provided USB cable into the printer and the computer.
Brady Workstation software automatically detects the printer when connected via USB cable.
Note: If you are not using Brady Workstation software, you need to install the printer driver. See the
Driver Installation Guide PDF file on the USB drive that came with the printer.
To printer
To computer

BradyPrinter™ i5300 User Manual 11
Setup
Installing the Windows Driver (Optional)
Installing the Windows Driver (Optional)
If you are using Brady Workstation software, you do not need to install the windows driver.
You must install the Windows driver if you are using any of the following.
• Older Brady software such as LabelMark.
• Third-party software.
• The Data Automation app in Brady Workstation software.
See the Driver Installation Guide PDF file on the USB drive that came with the printer.
Install or Change Supplies
Compatible Label Supplies and Ribbons
The BradyPrinter™ i5300 printer accepts only B30- and B33- series label supplies and B30- series
ribbon cartridges of version 2 or higher. Compatible parts prominently display on the part number
label located on both the roll and the box.
Brady label supplies and ribbon cartridges have a smart cell so the printer can automatically recognize
the installed label supply and ribbon.
Note: The printer can be either on or off when changing supplies.
Ribbon
To change or load the ribbon cartridge:
1. To remove the ribbon, lift the latch to open the ribbon door and swing it open.

BradyPrinter™ i5300 User Manual 12
Setup
Install or Change Supplies
2. Press the tab to release the ribbon cartridge, and lift the cartridge up and out.
3. Place the ribbon cartridge so that the ribbon is over the printhead and the embossed Brady
logo is facing upward. Snap the cartridge into place. You’ll hear a click when it is seated
properly.
4. Close the ribbon door and press down so that the latch snaps into place.
5. If the printer was asleep, press . The system detects the installed supplies, sets label
and ribbon colors, and indicates the label dimensions and the amount of remaining supplies.

BradyPrinter™ i5300 User Manual 13
Setup
Install or Change Supplies
Label Supplies
For information on compatible supplies see “Compatible Label Supplies and Ribbons” on page 11.
To change or load the label roll:
1. Lift the latch to open the ribbon door and swing it open.
2. Open the rear cover.
3. Swing yellow supply wiper to the back as show above.
Table of contents


