BrainCube Aeromodels Fugly User manual

BrainCube Aeromodels
Fugly
BrainCube Aeromodels Ltd.

Specications
Wingspan: 905mm / 35.6”
Flying Weight: 1.2kg / 2.6lb
Power: 300 - 400W
Baery Packs 2200mAh 3S recommended
Introduction
Tools & Materials
Thank you very much for buying BrainCube Aeromodels’ Fugly, our rst design in a range of easy to build, fun to y model
aircra kits. Fugly is a fun-y style model, designed to reuse the motor, speed controller, servos and baeries from popular
electric ARTFs like the Ripmax WOT4 Foam-E and Acro Wot Mk2 Foam-E.
By combining careful 3D CAD design with high quality materials and high precision laser cung, we have created a builders kit
that can be built in a weekend even by the total beginner. The nished Fugly is small enough to t into most cars in one piece,
light enough for extreme aerobacs yet sturdy enough to be your regular “Sunday hack”. Whilst the model will loop in it’s own
length and roll too fast to count with the controls at full deecon, dial them down and Fugly becomes docile enough for any
competent model pilot to handle.
Fugly is easy to build, but you will require some tools and materials on top of the parts included in the kit.
Building board - A at sheet of wood (20mm thick MDF is ideal) at least 900mm / 36” by 300mm / 12”, topped with a layer of
cork les for pins to securely sck into.
Hobby knife or scalpel - A sharp knife for cung and carving balsa wood into shape before sanding.
Sanding block and sand paper - 200-400 grit sandpaper is ne for shaping balsa wood.
Drill - Most holes are pre-cut by our laser cuer but there are a couple of occasions where this isn’t possible.
Wood glue - This can be PVA, aliphac, “super aliphac”. This will be used for the majority of the construcon.
Thin super-glue - Also know as Cyanoacrylate or CA glue, it comes in a variety of thickness’s and speeds. Thin CA is thinner than
water, and will wick into wood very quickly. Be careful using this glue, it will sck skin in a second given a chance.
10 Minute Epoxy - A strong, thick, two part, adhesive that you have to mix before use. It oen comes in a twin syringe pack
making it easy to measure out, and a 10 minute cure me gives a good balance between speed and strength.
Hobby Pins - The best ones to use are the “T” shaped pins. These are used to hold balsa parts together while glue dries.
Masking Tape - It’s not always possible to use pins to hold parts together, so masking tape can be used instead.
Covering Film - Fugly is designed to be covered with heat sensive lm like Oracover, Solarlm, etc.
Covering Iron - Covering lm can be applied using a domesc clothes iron, but a dedicated covering iron is much easier to use.
Diagram Key
Masking tape
Wood glue
Super glue
Epoxy
Pins
Clamp
Informaon / instrucon
Noce / cauon
Support
We hope that you will nd Fugly easy to build and fun to y, however if you have any problems, quesons, comments or queries
please get in touch:
BrainCube Aeromodels Ltd, Unit 3 Ballingall Industrial Estate, Brewery Lane, Dundee, DD1 5QW
Telephone: 01382 690 151 Email: support@www.braincube-aero.com
BrainCube Aeromodels - Fugly Construcon Manual 3
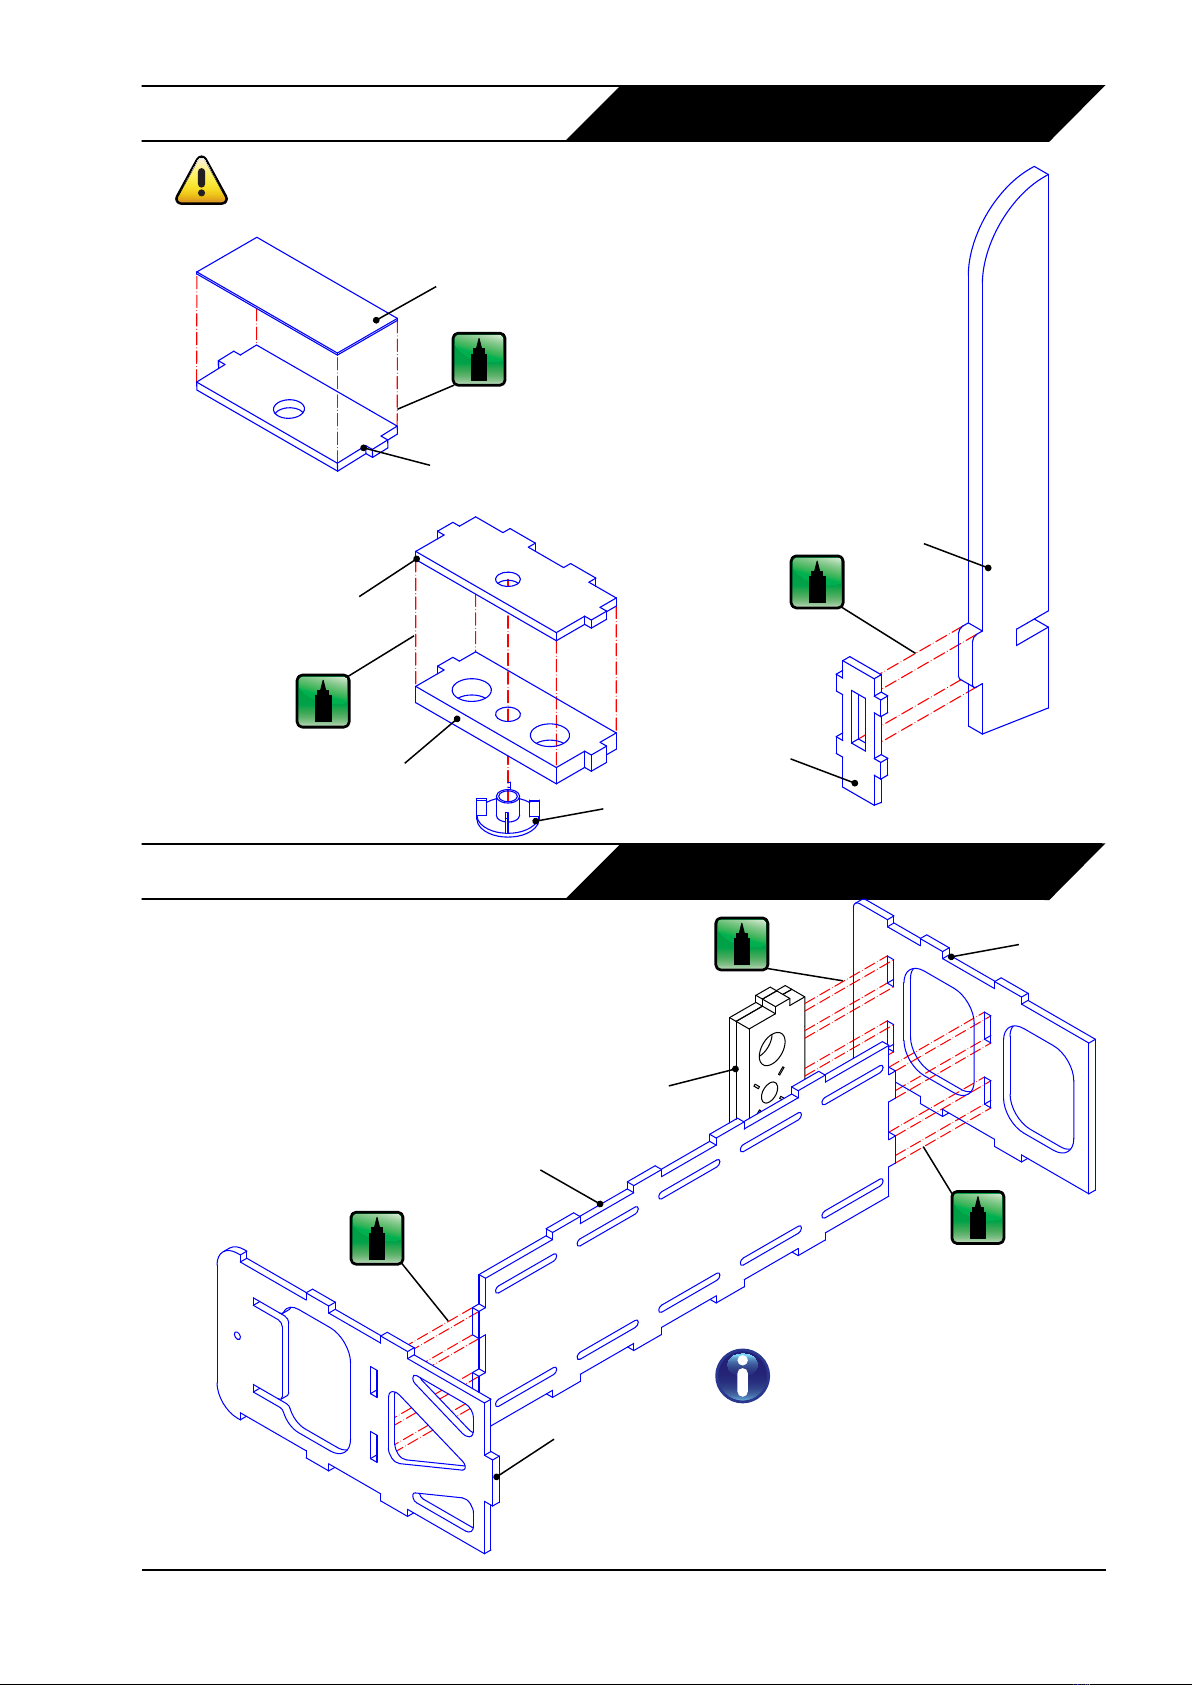
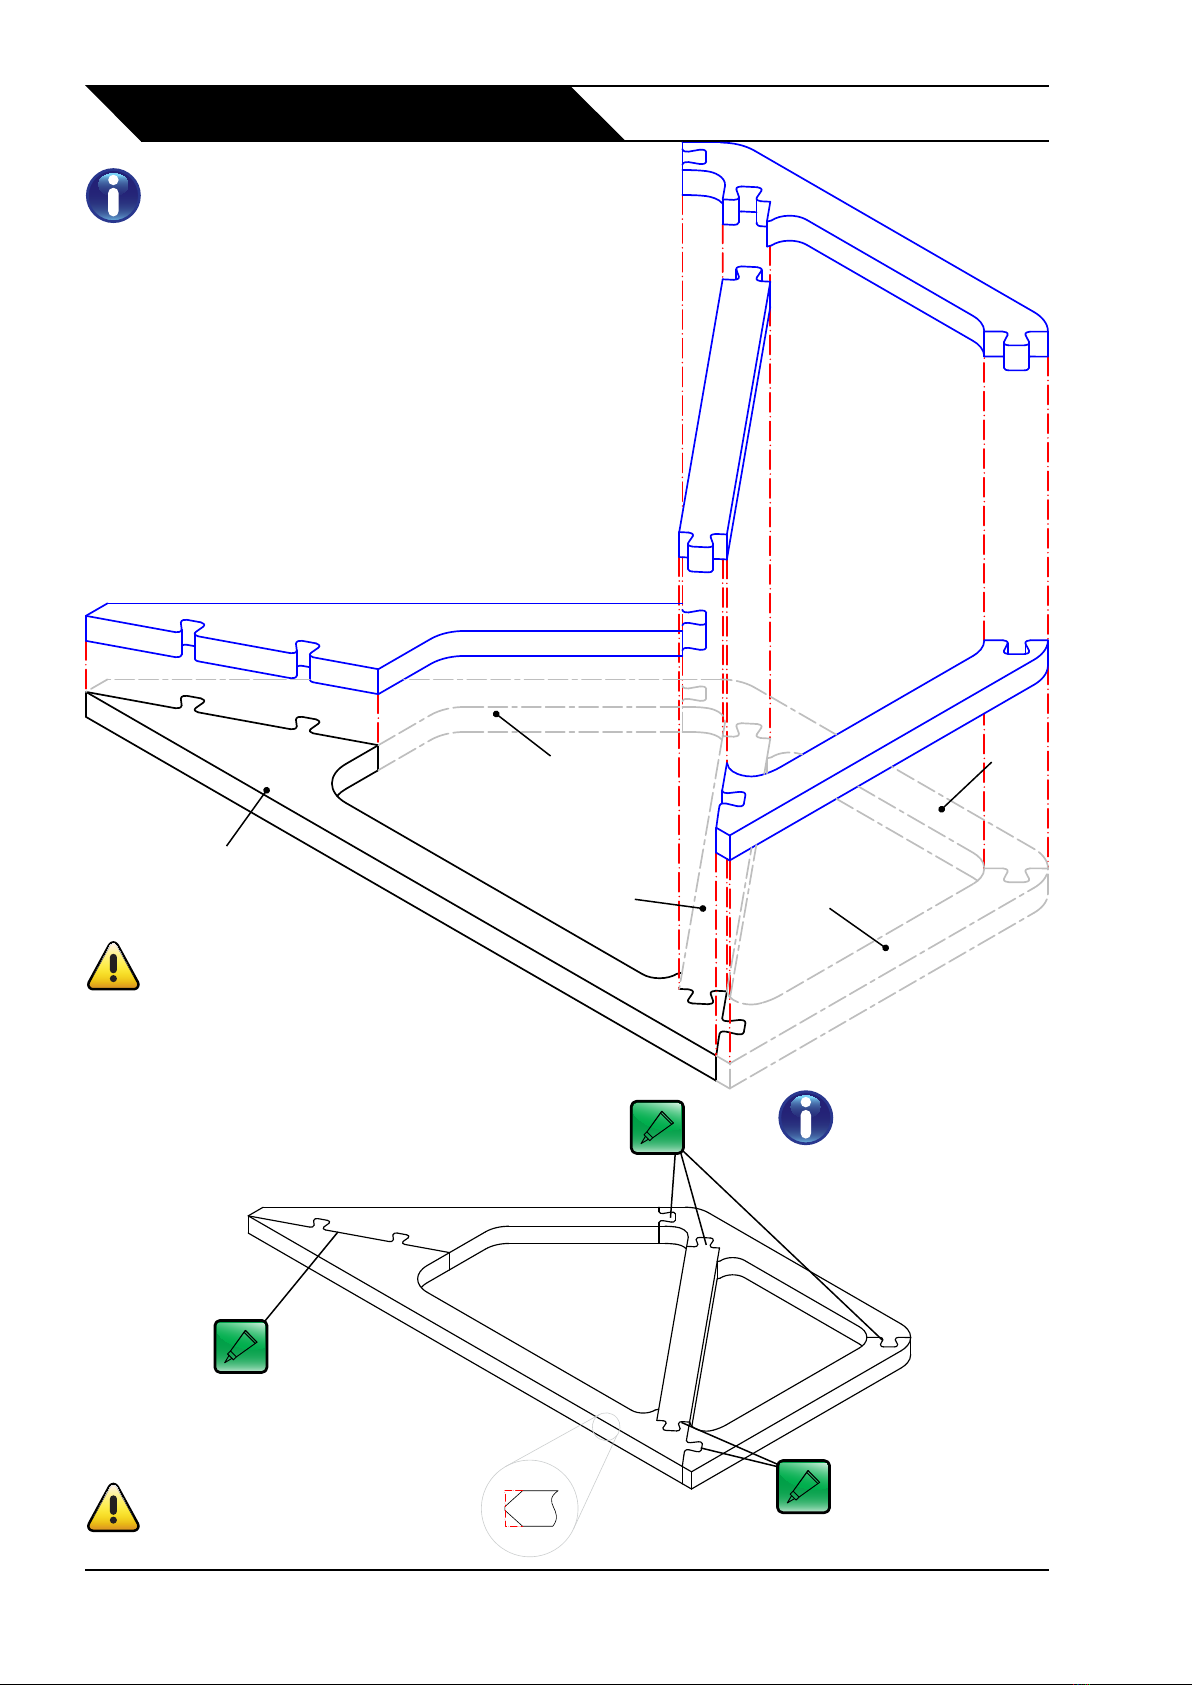
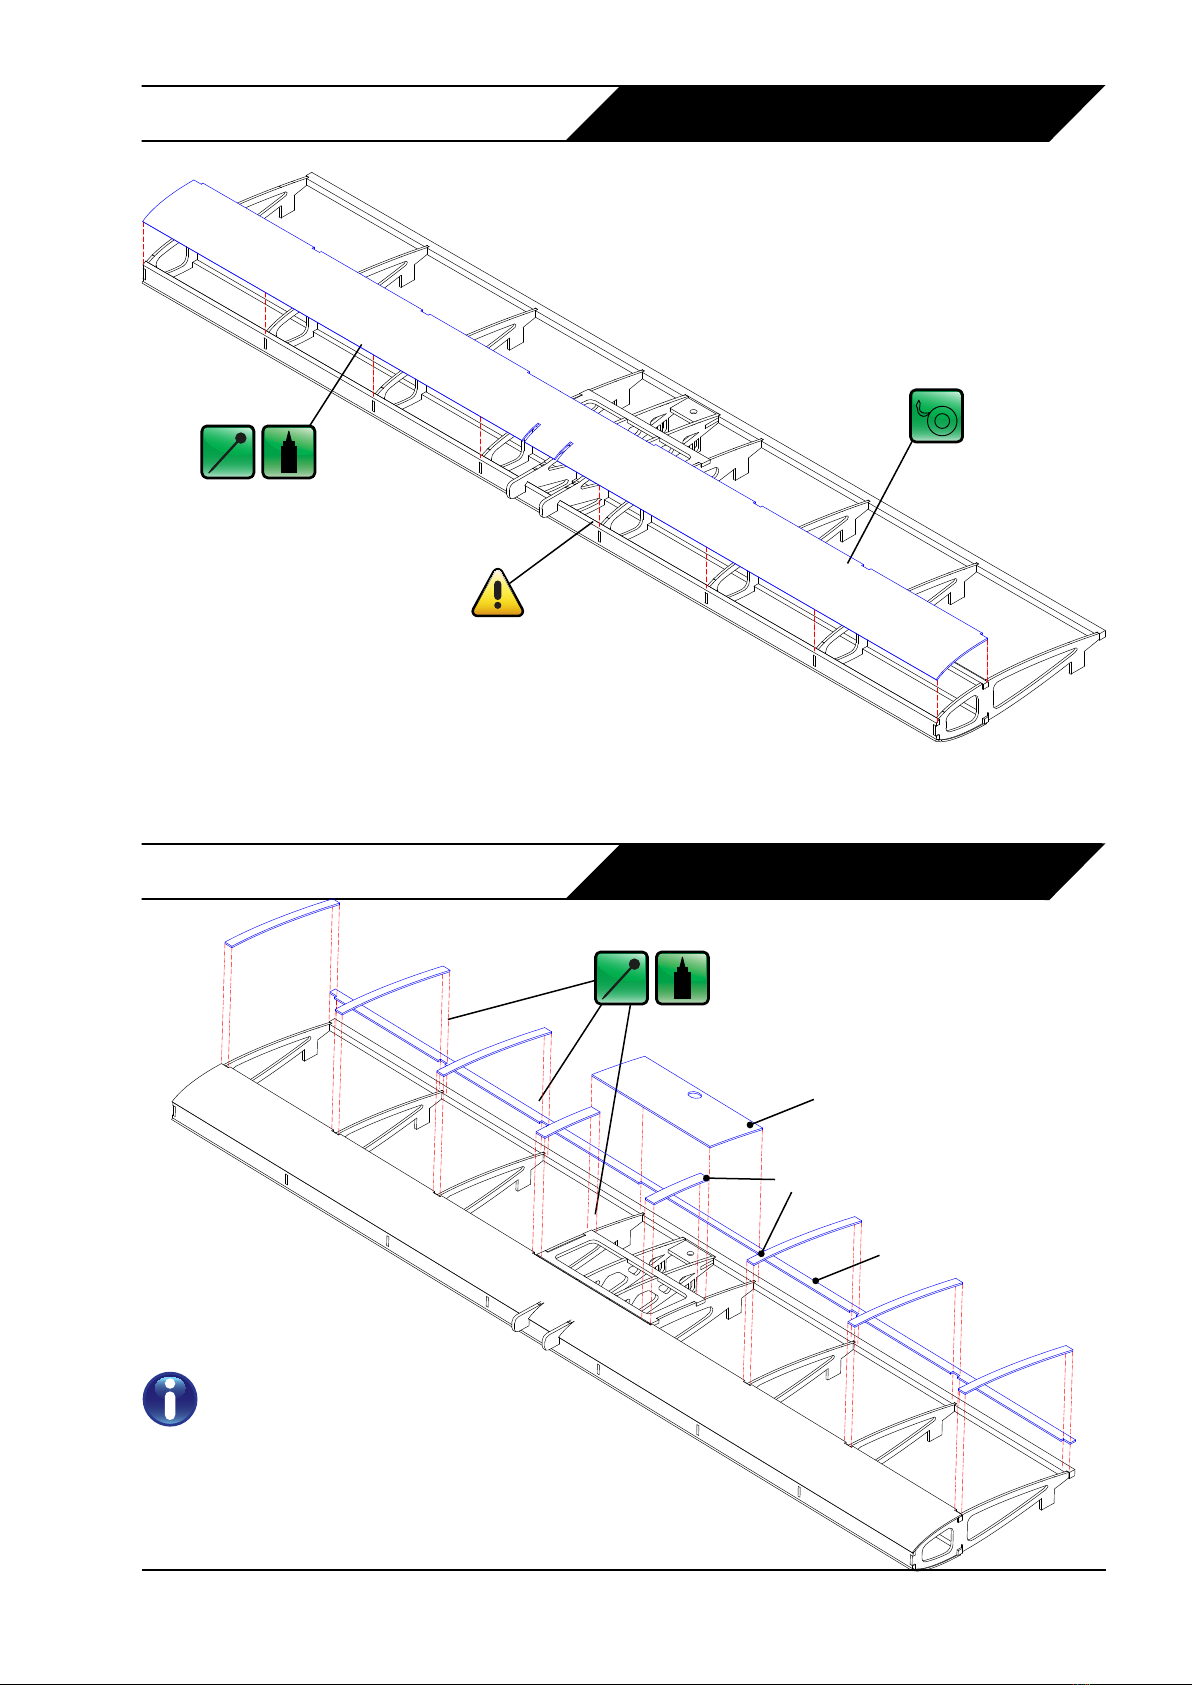
Fuselage - 1
Fuselage - 2
Fin
F5
FB1
FB2
Fin, F5, F4, F4a, FB1, FB2, T-nut
Baery Tray
F2
F3
Baery Tray, F2, F3, FB1 + FB2
Steps 2, 3 and 4 should all be
performed at the same me to ensure
the fuselage core structure is square.
In these three steps, ensure that
glue is applied to all the edges which
touch.
FB1 + FB2
F4
F4a
T-nut
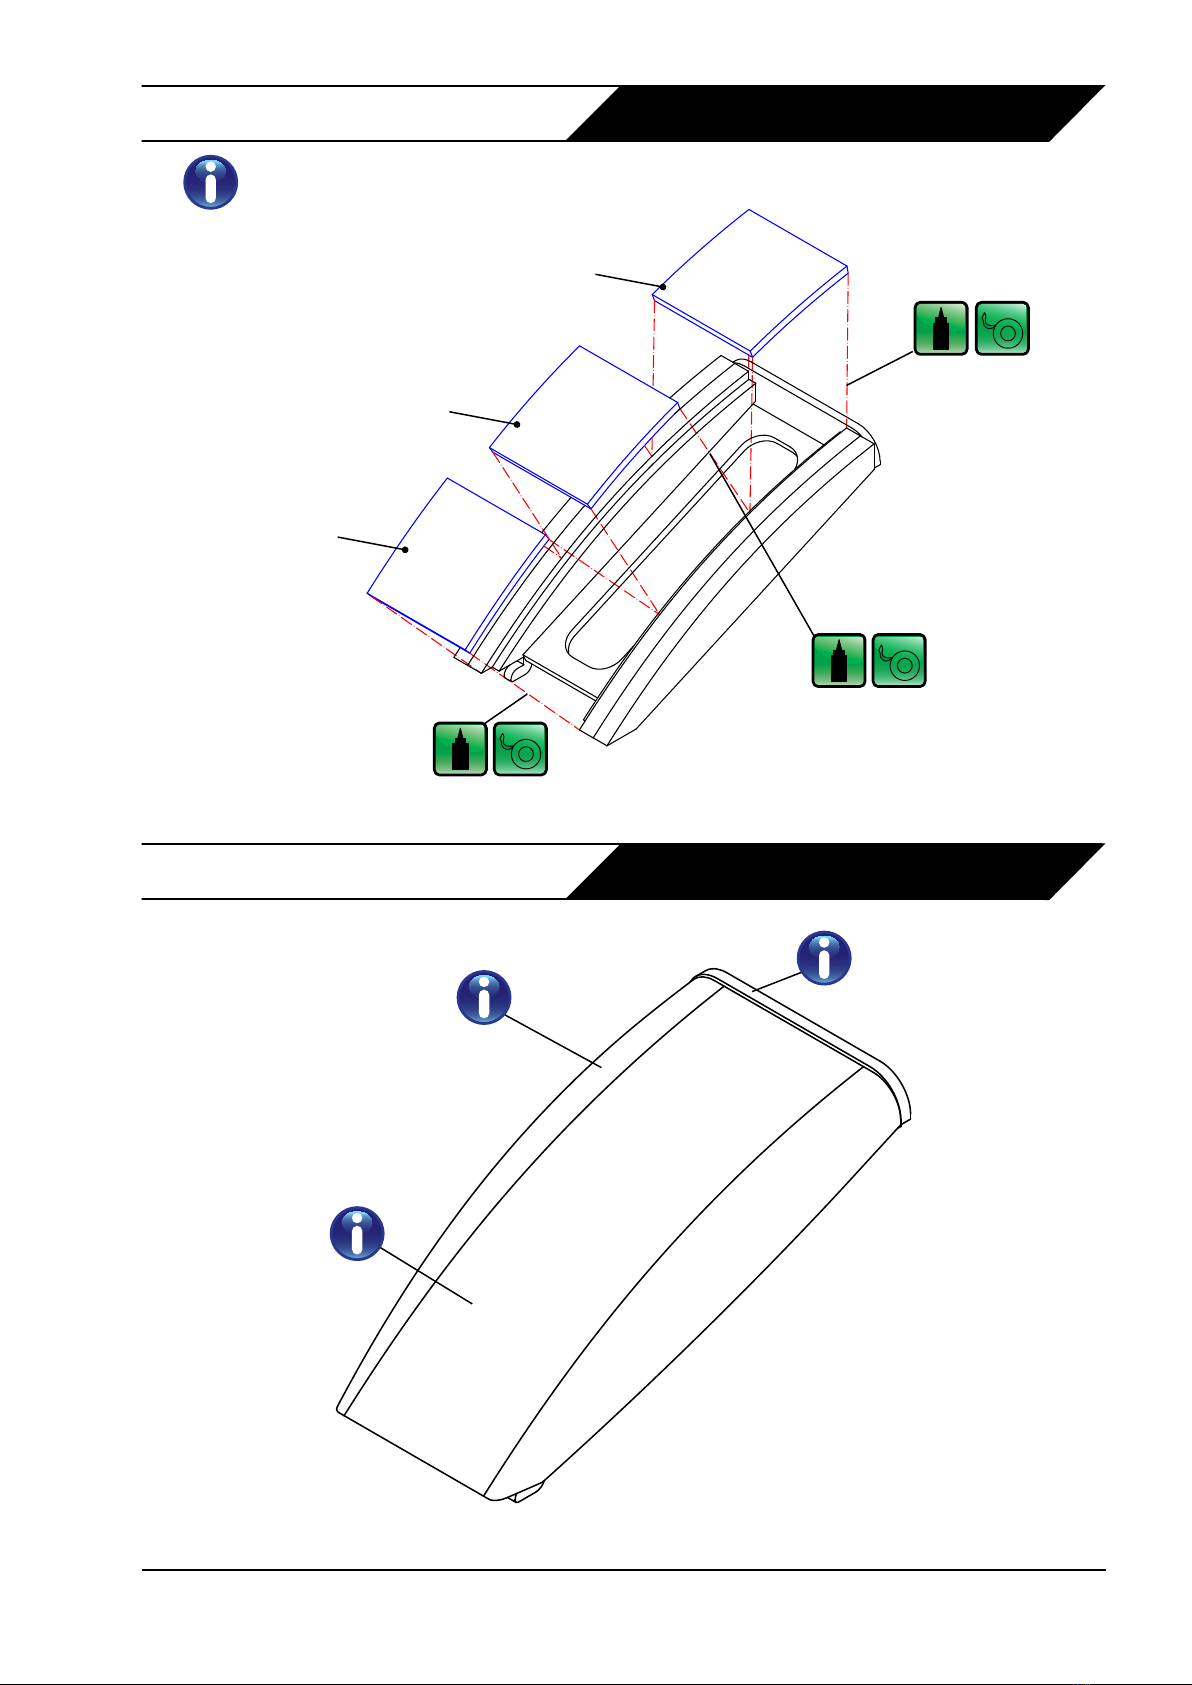
Before you begin construcon make sure you cover your building board with polythene
or cling lm (plasc food wrap) to make sure you don’t accidentally sck parts to the
board.

4 BrainCube Aeromodels - Fugly Construcon Manual
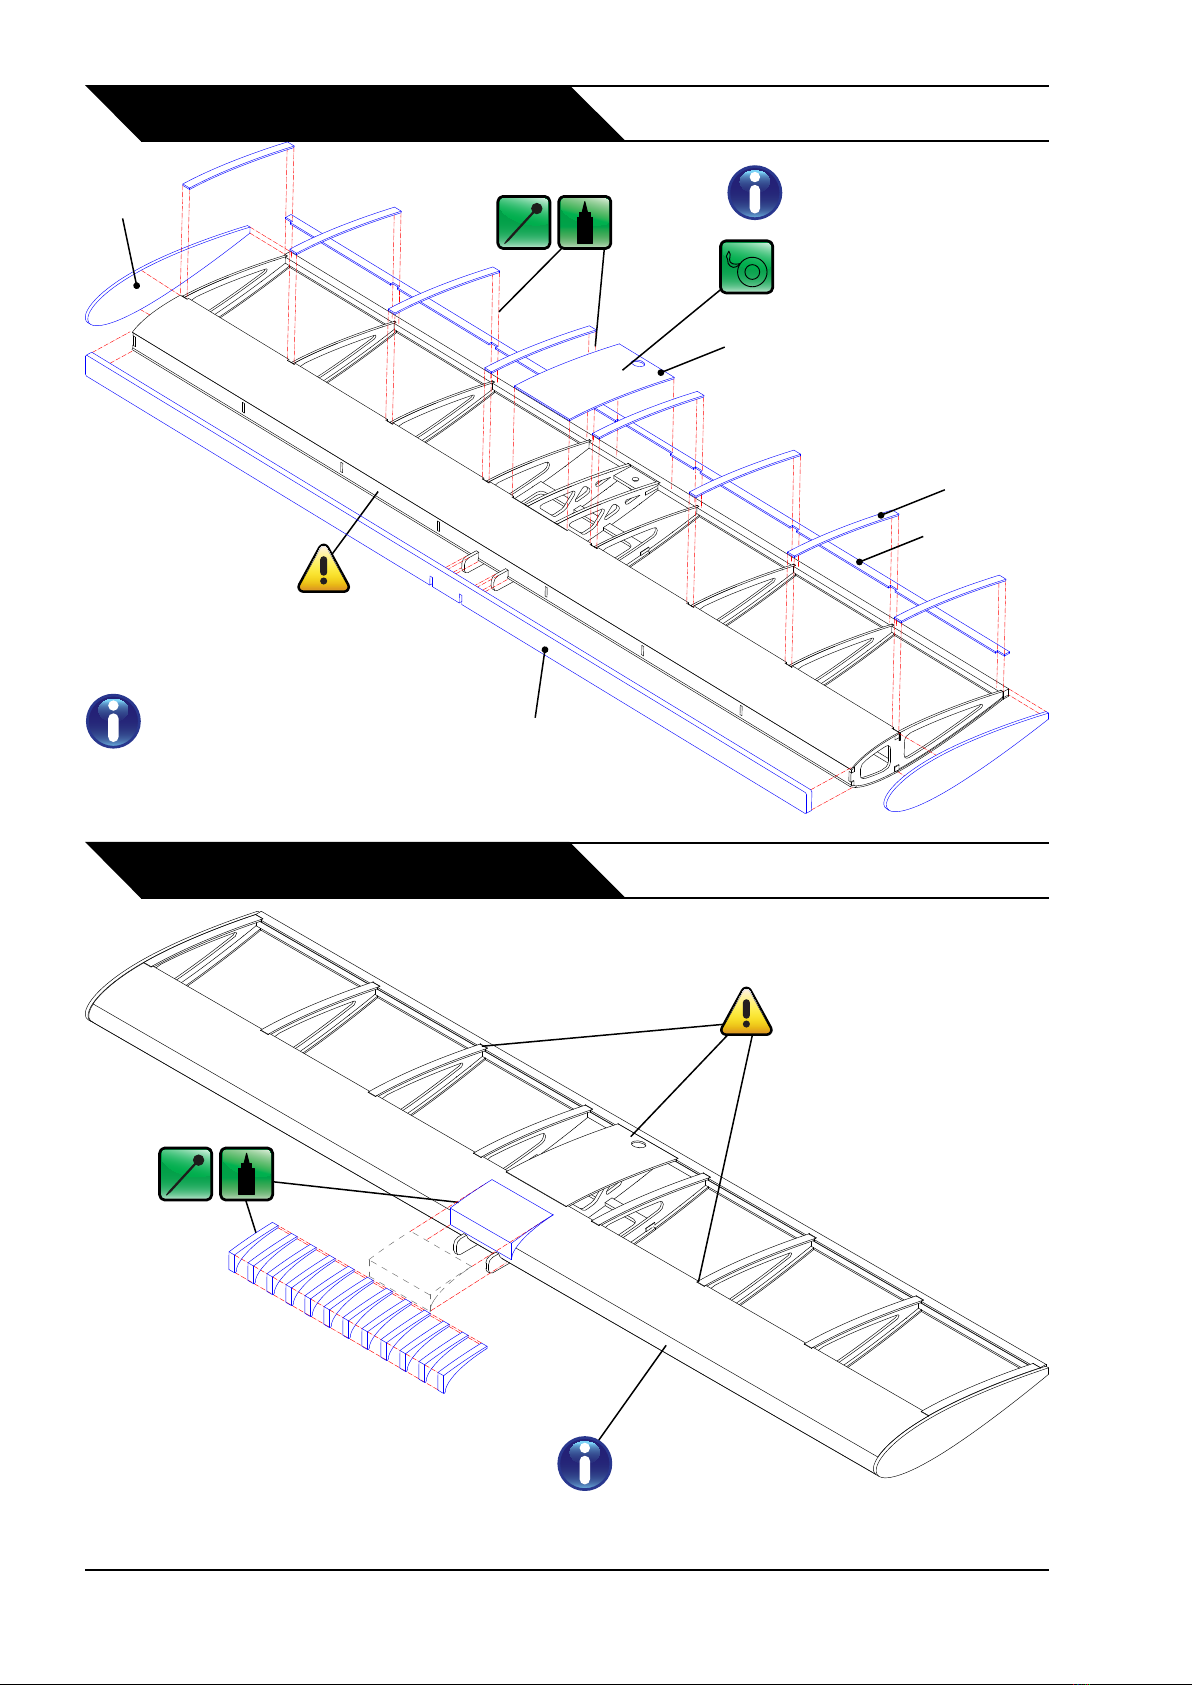
Fuselage - 3 Fuselage Side, F4+F4a
Fuselage Side
F4 + F4a
Fuselage - 2 Assembly
Fuselage - 4 Fuselage Side
Apply weights on top of the
central structure to ensure the
joints are square and solid.
Allow to dry completely before
connuing.
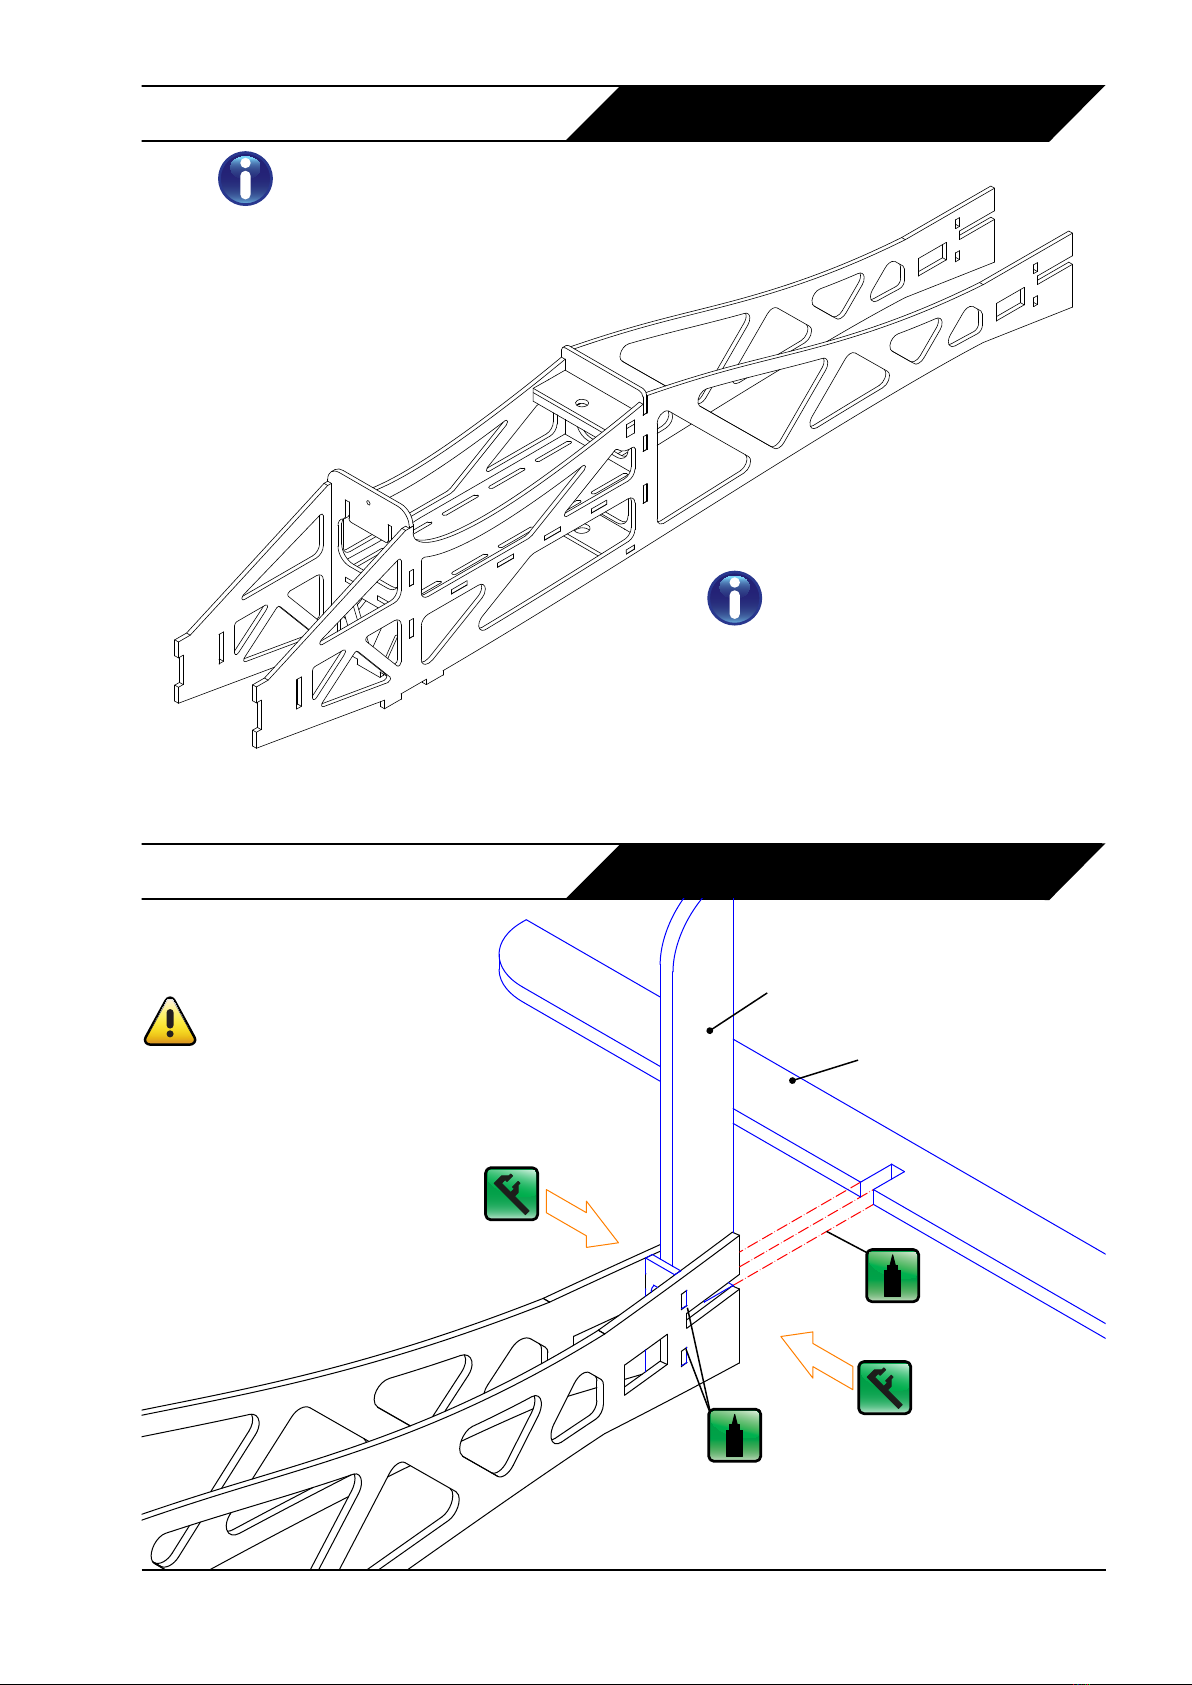
BrainCube Aeromodels - Fugly Construcon Manual 5
Fuselage - 5
Your fuselage assembly should
look like this once the glue has
fully set.
Fuselage - 6
Tail, Fin + F5
It is crucial that the tail is straight,
and the n vercal. Do a dry
run before glueing to familiarise
yourself with the procedure, and
make sure everything is straight
once clamped.
Tail
Fin + F5
Before connuing, use a sanding block
and carefully round o the front edges
of the n and tail. Although you can
wait unl the fuselage is nished before
you do this, it is much easier before the
n and tail are glued into posion.

6 BrainCube Aeromodels - Fugly Construcon Manual
Fuselage - 7
Fuselage - 7 Alt.
F1, UC Plate
Fugly can mount the electric
motor either from the back, with
the propeller aached directly
to the motor, or from the front,
with the prop aached to the
sha via a prop adapter. This
step shows the front mounng.
This step shows the rear mounng
opon for the electric motor.
Tape the UC Plate into posion before
clamping the nose together.
F1 UC Plate
Tape the UC Plate into posion
before clamping the nose
together.
F1
UC Plate
F1b
F1 Alt, F1b, UC Plate
F1
F1 Alt.
F1b

BrainCube Aeromodels - Fugly Construcon Manual 7
Fuselage - 8
Fuselage - 9
CH x11
Clamp together on a at
surface aer glueing to form a
solid balsa block.
BS1 - 3, F7, CH block
BS1
BS2
BS3
F7
CH Block
(Fuselage - 8)
Tape all parts in posion to
ensure they conform to the
tail’s curvature while the glue
sets.
Be careful to ensure that the front
edge of BS1 lines up with the front
edge of the F3 former. If these aren’t
ush, the belly hatch won’t t.
8 BrainCube Aeromodels - Fugly Construcon Manual
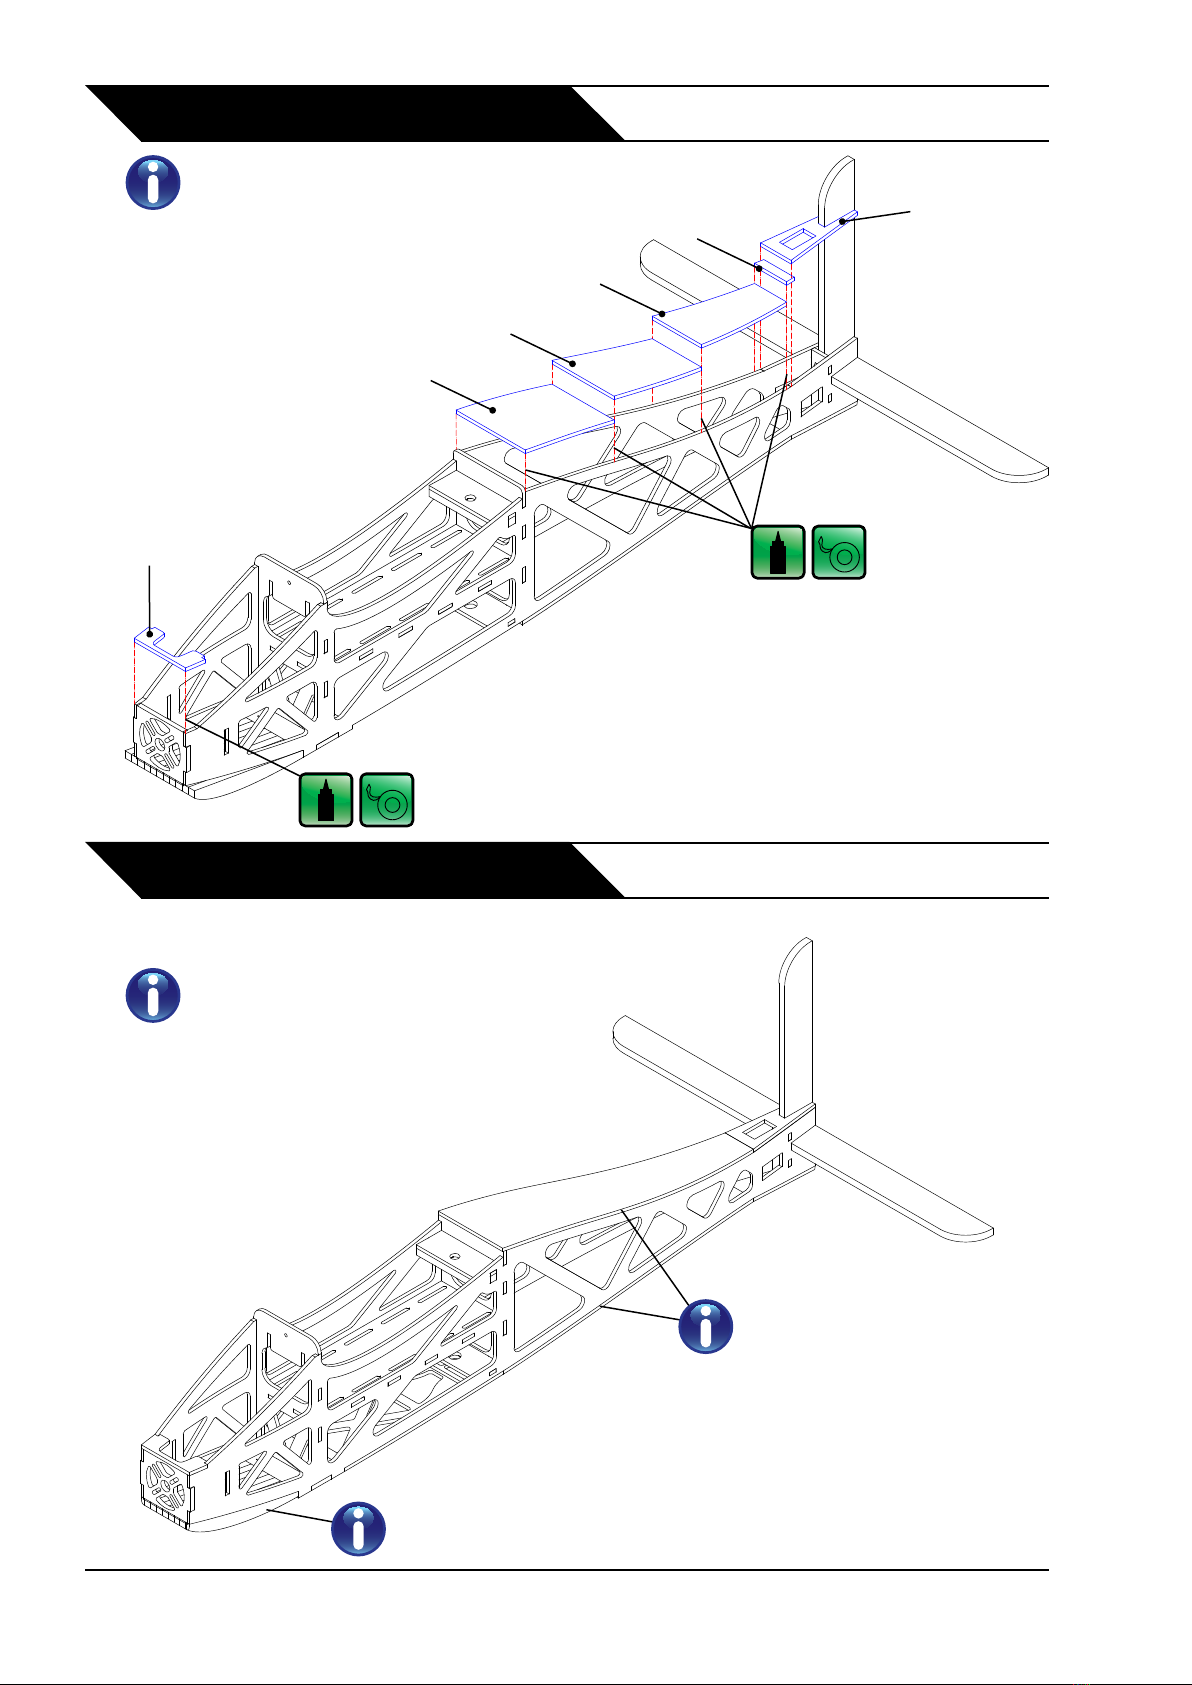
Fuselage - 10
Fuselage - 11
F1a, TS1-4, F6
Glue F6 in place rst. Then glue and tape
TS1 in posion so that it is hard up against
F3. Glue and tape TS2 then TS3. The
remaining gap between TS3 and F6 will be
smaller than TS4, so trim TS4 to the correct
length before glueing in posion.
F1a
TS1
TS2
TS3
TS4
F6
Carefully carve and sand the chin block into a smooth,
rounded prole
Lightly sand the edges of the tail
sheeng to round them o. Also
sand the joins to remove excess
glue.
The primary structure of Fugly’s fuselage is
now complete and can be carved and sanded
to smooth out the corners.
BrainCube Aeromodels - Fugly Construcon Manual 9
Nose Hatch - 1
Nose Hatch - 2
H3 x4
Clamp together on a at surface aer
glueing to form two solid balsa blocks.
H1, H2 x2
H2
H2
H1

10 BrainCube Aeromodels - Fugly Construcon Manual
Nose Hatch - 3
Nose Hatch - 4
Nose Hatch 1, Nose Hatch 2
H3, Nose Hatch 3
H3
BrainCube Aeromodels - Fugly Construcon Manual 11
Nose Hatch - 5
Nose Hatch - 6
H4 x3
H4
H4
H4
Glue the H4 pieces into place from the
H3 former forwards, taping them down
as you go.
Sand H3 so that it blends
into the rest of the hatch
shape.
Carve and sand the side
pieces into a smooth,
rounded shape.
Sand the H4 sheets
to remove excess
glue and blend in the
seams.

12 BrainCube Aeromodels - Fugly Construcon Manual
Belly Hatch - 1
Belly Hatch - 2
BH1, BH2 x2
BH3, Magnet x1
The belly hatch is slightly curved to
match the fuselage contours. The
BH2 rails need to be clamped aer
glueing to ensure BH1 conforms to
this curvature.
The magnets supplied are very strong, mind
your ngers! Do not allow the magnets to
snap together as they may crack. You will
also need to ensure the polarity of the
magnets are correct otherwise the hatch
will not close. Epoxy the magnet in posion,
and ensure the glue has fully cured before
allowing the other magnet anywhere near it
- it may be pulled out of the glue otherwise.
BH1
BH2
BH2
BH3
Magnet
When covering, note that the
rear hole is an air vent and
should be le open for proper
cooling of the motor, baery
and speed controller.

BrainCube Aeromodels - Fugly Construcon Manual 13
Wing Hatch - 1
Control Surfaces
All of the control surfaces - the rudder, elevators, and ailerons - use an interlocking “jigsaw”
design.
Due to the precision of our laser cung facilies, the parts are a ght t ensuring the nished
control surfaces are square and rigid.
Although construcon is a lile unorthodox, it is very quick - you can build all of the control
surfaces in less than an hour - and the nished parts are very strong.
When inserng each part, ensure you follow the text etched into the balsa regarding
orientaon.
Carefully line-up the jigsaw ends with the matching sockets, and apply rm pressure equally
to slide the parts together. Be careful not to crush the balsa wood.
Make sure you cover your building board with polythene sheet or “cling-lm” (plasc food
wrap) before you begin each control surface to ensure your parts do not sck to the board
when glue is applied.
Each control surface is assembled on the building board DRY - with no glue.
Once fully assembled, thin superglue (Cryo Acrolate or CA) is wicked into each joint for almost
instant results.
SM1
SM1
Servo Plate
Servo Plate, SM1 x2
This is where your aileron
servos will mount once you
have covered the plane. They
are shown here so you can
see how they will install.
14 BrainCube Aeromodels - Fugly Construcon Manual
When applying the super-glue, start
at one end of the joint and run to the
other end so that a “bead” of glue gets
drawn along the joint.
Ensure glue is applied along the whole
length, the glue will soak into the balsa
wood almost instantly.
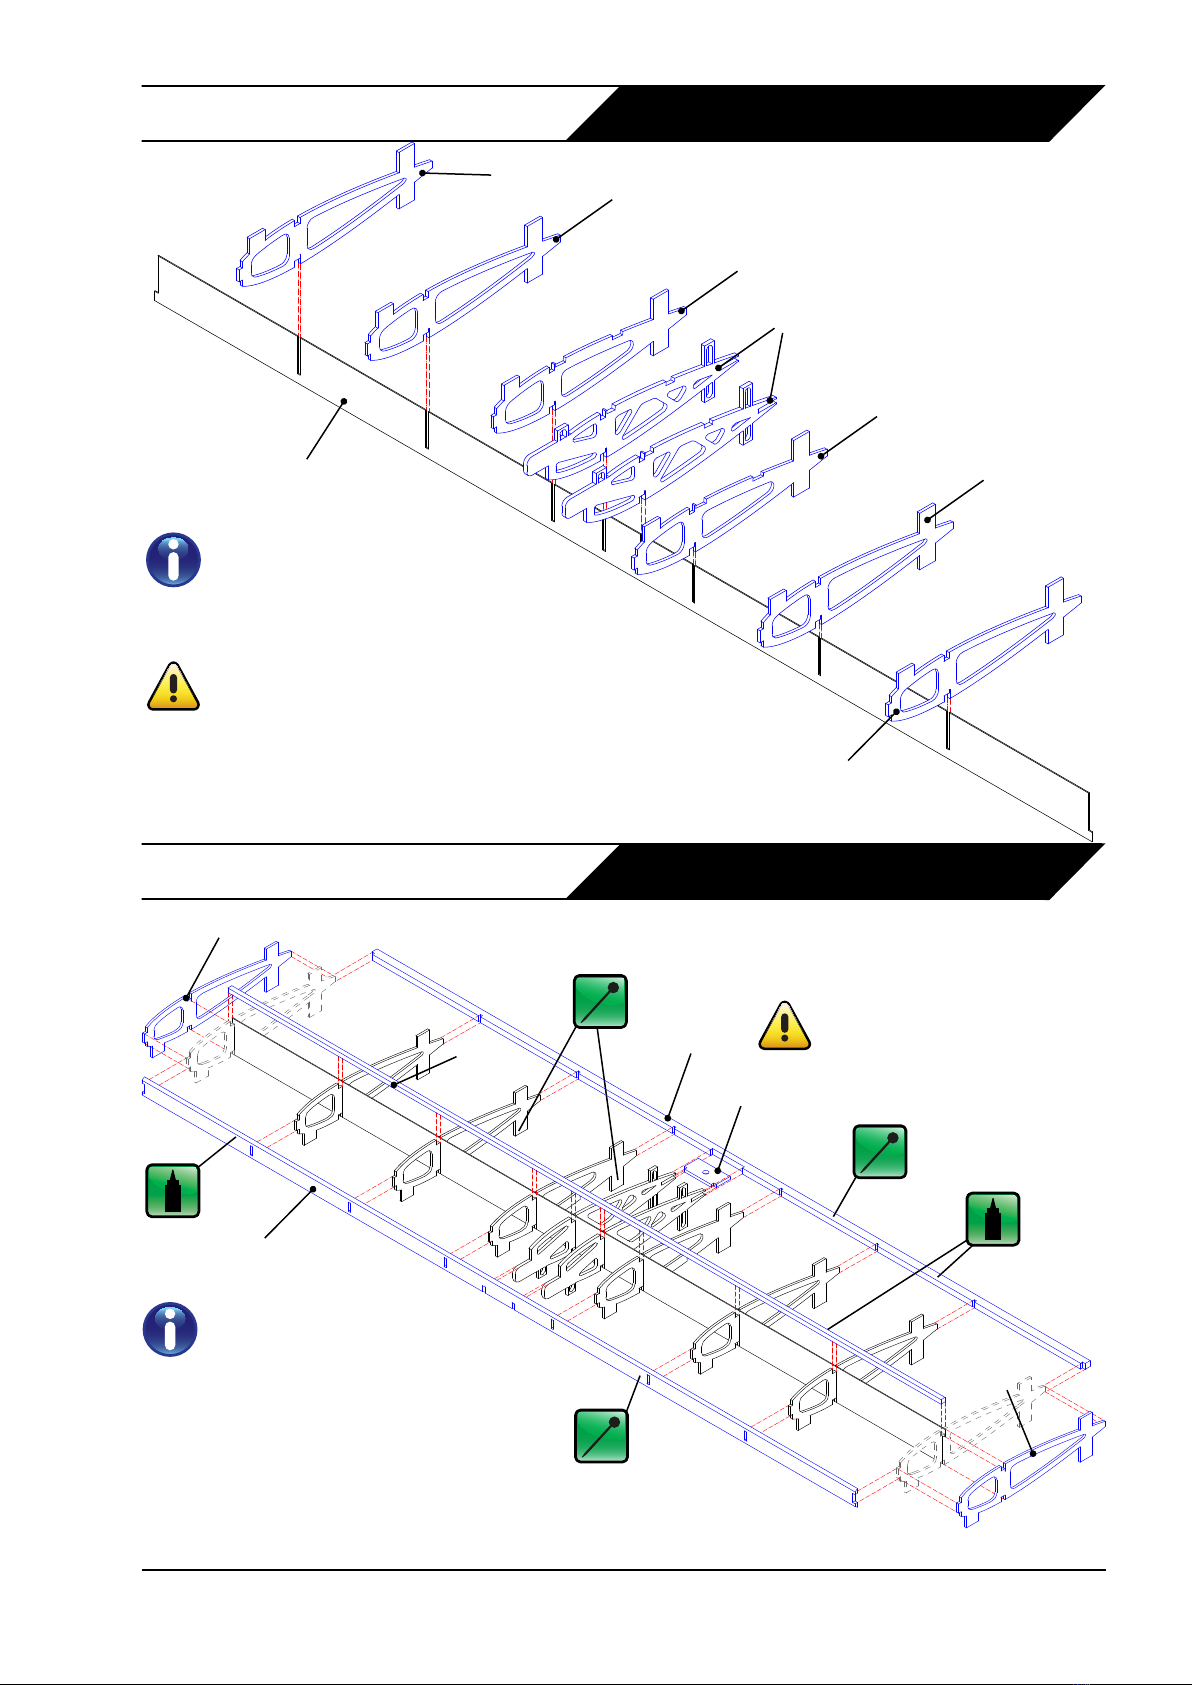
Elevators E1 - E5
E3
E5 E2
E4
E1
Fugly uses a pair of elevators, linked by
a wire joiner. The construcon of both
elevators is the same, and can be either
built at the same me or one aer the
other.
Mind your ngers - super-glue will
sck skin in seconds!
Once the glue has set,
use a sanding block to
sand down all the joints
to give a smooth surface
for covering later.
Aer sanding, use a scalpel and sanding
block to carefully bevel this edge so it
can move freely once hinged.

BrainCube Aeromodels - Fugly Construcon Manual 15
Rudder
Replace the plasc lm covering the building board to ensure there are no holes or tears for excess glue
to soak through.
Ru1
Ru2
Ru3
Ru5
Ru4
Ru6
Ru7
Ru1 - Ru7
Once the glue has set,
use a sanding block to
sand down all the joints
to give a smooth surface
for covering later.
Aer sanding, use a
scalpel and sanding
block to carefully bevel
this edge so it can move
freely once hinged.

16 BrainCube Aeromodels - Fugly Construcon Manual
A4
A5
A6
A7
A1 - A8
Ailerons
A3
A2
A1
A8
Fugly uses a pair of ailerons. They are
idencal, and can be built at the same
me or one aer the other.
Once the glue has set, use a
sanding block to sand down all the
joints to give a smooth surface for
covering later.
Aer sanding, use a scalpel and sanding
block to carefully bevel this edge so it can
move freely once hinged.
BrainCube Aeromodels - Fugly Construcon Manual 17
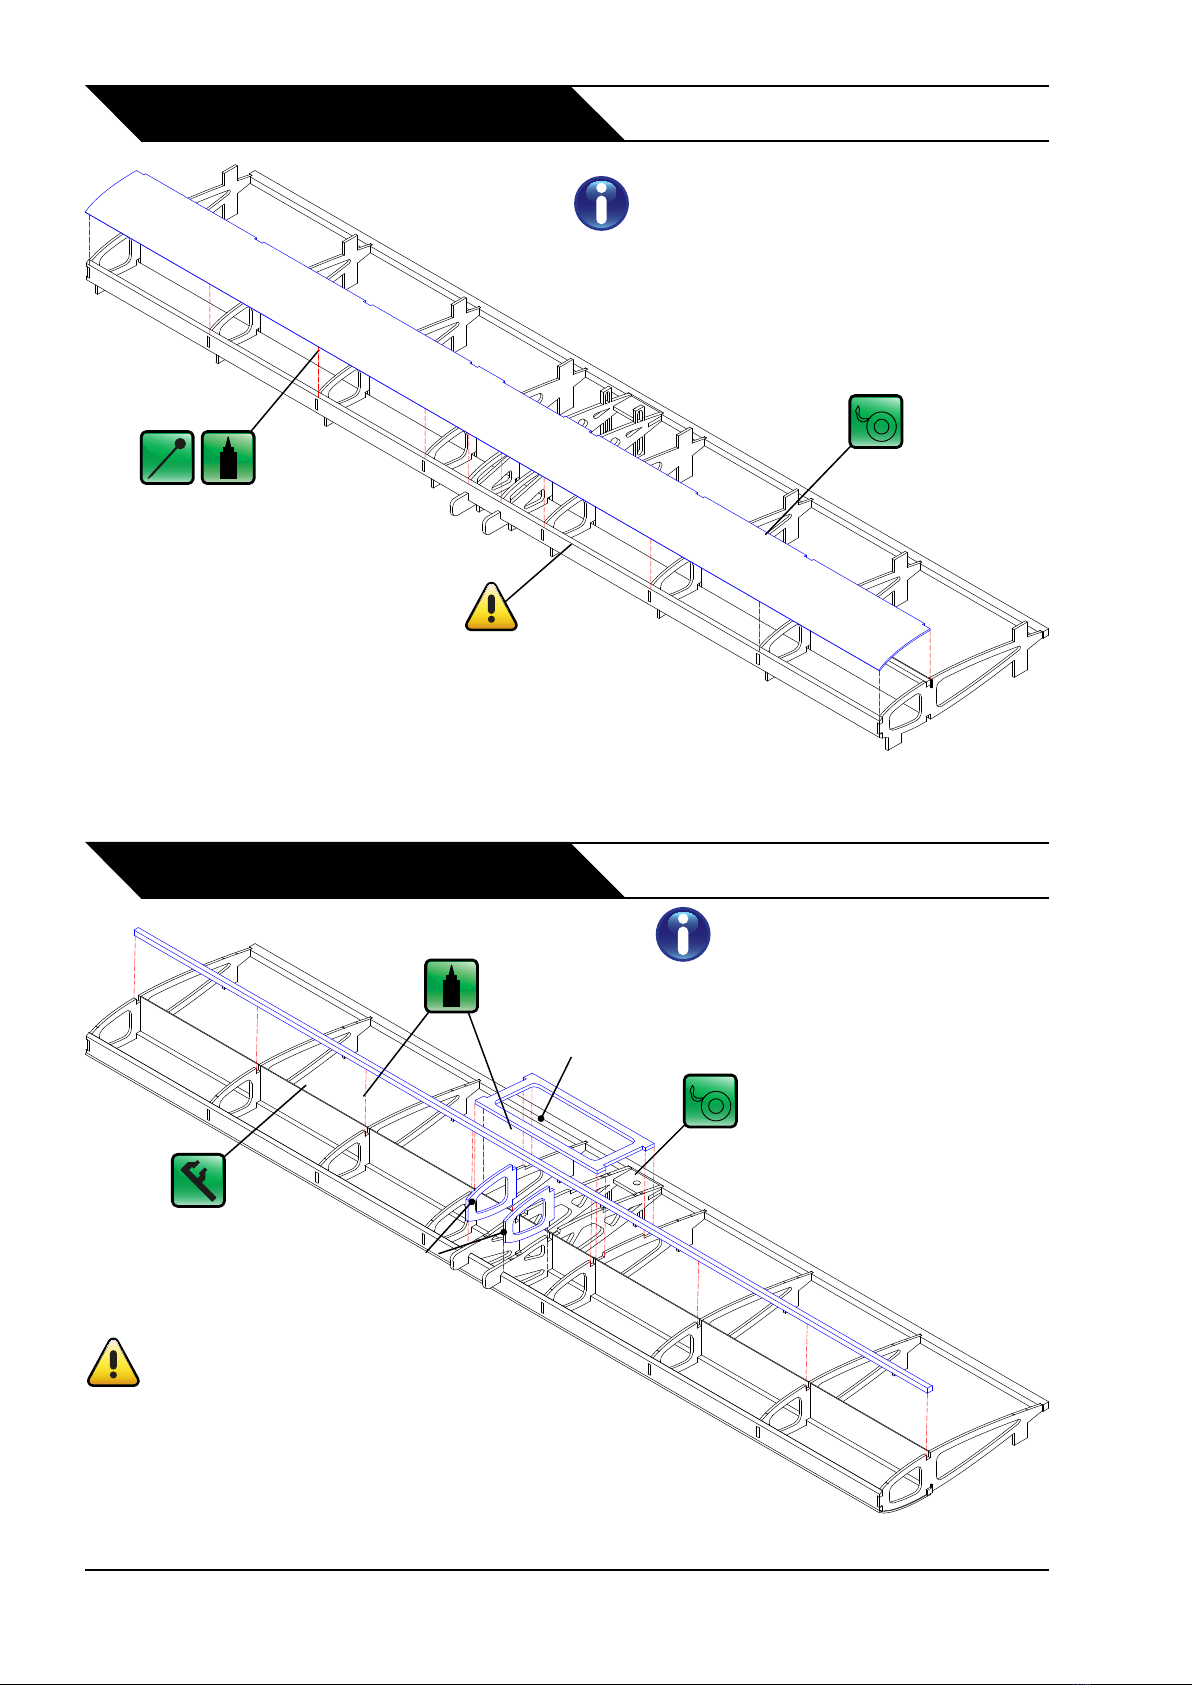
Wing - 1
Wing - 2
R1 - R4 x 2, Spar Web
Spar Web
R4 R3
R2
R1
R2
R3
R4
The balsa wing ribs are very fragile unl the wing is fully
constructed. When sliding them onto the spar web, hold
them on either side of the slot, and do not force them!
Do NOT aempt to remove them once inserted, the
balsa WILL snap!
The wing ribs are slid onto the spar
web with both upside-down. Be
careful to ensure the spar web is
fully inserted into the slot on each
rib.
False LE
TE
Spar
R5
R5
R5 x 2, Spar, TE, False LE, Bolt Plate
Bolt Plate
Turn the ribs and spar web over. Pin
the balsa ribs to the board by the
rear tab, using the False LE and TE
to keep them all square. Make sure
they are at to the board.
Once pinned, glue the False LE, TE,
Bolt plate, spar and both R5 ribs
into posion. Make sure that the
spar is glued to each wing rib as
well as to the spar web along its
enre length.
Make sure you glue the bolt
plate before the TE!
18 BrainCube Aeromodels - Fugly Construcon Manual
Wing - 3
Wing - 4
Top Wing Skin
Make sure the wing is totally at to the board
before glueing on the wing skin, otherwise the
wing will end up twisted.
The skin should be held down with pins through
the skin into the balsa ribs and false LE while it
dries. Use tape to hold the rear of the skin down
to the spar.
Carefully sand the top of the False
LE to match the curvature of the
ribs. Ensure that the skin is glued
to every rib, the top of the False LE
and the top of the spar.
Spar, Wing hatch frame, R1a x 2
Once the top skin has been glued on and
fully dried, unpin the wing and ip over.
Carefully trim the tabs o the boom
of the ribs, then pin back down to the
board upside-down, again through the
balsa building tabs ensuring it is at to
the board.
Glue both R1a parts against the
plywood R1 ribs rst. These parts
help support the wing skin.
When you glue the spar into place,
ensure that it is glued along it’s
enre length to the spar-web using
clamps.
Hatch
Frame
R1a
BrainCube Aeromodels - Fugly Construcon Manual 19
Wing - 5
Wing - 6
Boom Wing Skin
Rib Caps, Boom TE Cap, WS3
WS3
Boom TE Cap
Rib Caps
The rib caps strengthen the wing ribs
and provide a larger surface area for the
covering to aach to.
Carefully sand the top of the False
LE to match the curvature of the
ribs. Ensure that the skin is glued
to every rib, the top of the False LE
and the top of the spar.
20 BrainCube Aeromodels - Fugly Construcon Manual
Wing - 7
Wing - 8
Rib Caps, Top TE Cap, WS2, WS1, LE,
Wing Tips
Top TE Cap
Rib Caps
WS1 & 2
LE
Wing Tip
Once the glue has fully dried from the
previous stage, unpin the wing and ip over
again. Carefully trim the tabs o the top of
the ribs. You should noce now s and
strong the structure has become.
Because WS1 & 2 aach
to the plywood central
ribs, they need to be taped
down while the glue dries.
Use a sanding block
to make sure the wing
skins and false LE are at
before glueing the LE part
into place.
Once the glue has fully dried from the
previous stage, carefully carve and sand the
leading edge unl it matches the curvature of
the wing ps.
Use a sanding block to smooth
out all the glue joints between
the various secons of
sheeng.
WF x 12
Table of contents
Popular Toy manuals by other brands


LEGO
LEGO 7498 Building instructions

Fisher-Price
Fisher-Price Sweet Streets Village H7236 instructions

SR
SR X250 Assembly instructions

MGA Entertainment
MGA Entertainment little tikes BIG ADVENTURES 662164 quick start guide
Mattel
Mattel Pixel Chix Roomies Friend Diva Queen instructions

Century Helicopter Products
Century Helicopter Products Twinstar CN1075 user manual


