Brand-Gaus 4705 User manual

Brand-Gaus Model 4705
Oxygen Analyzer
User’s Manual
Manual P/N: 1000-0400
September 2004
Brand
Gaus
www.brandgaus.com

2Important Precautions Brand-Gaus Oxygen Analyzer User’s Manual
Important Precautions
Safety Notice
This instrument operates from potentially lethal line voltage. In addition, some internal
components operate at high temperature and can cause serious burns. Observe all
precautions when using this device, and particularly be sure that all devices connected to
the instrument are safely wired and properly grounded. Always disconnect power to the
instrument before opening the enclosure or making any adjustments.
Where to Get More Information
We can be reached for further assistance at:
Brand-Gaus, LLC
15603 Delahunty Lane
Pflugerville, TX, 78660
Phone: 512-989-0149
www.brandgaus.com
Email: info@brandgaus.com
Brand-Gaus Oxygen Analyzer User’s Manual Specifications 3
Specifications
Measurement technology Zirconium oxide cell
Measurement range 0 to 25 % O2
Full scale range 25.0 % O2
Zero noise < 0.02 %O2
Zero calibration drift Better than ± 0.1 %O2
Span noise < 0.02 %O2
Span calibration drift Better than ± 0.1 %O2
Linearity error < 1% of high calibration gas value
Interference (sum of all
interferences)
< 1% of measured value for typical applications
Response time T95 < 10 seconds
Sample Flow rate 0.2 to 10 SLPM
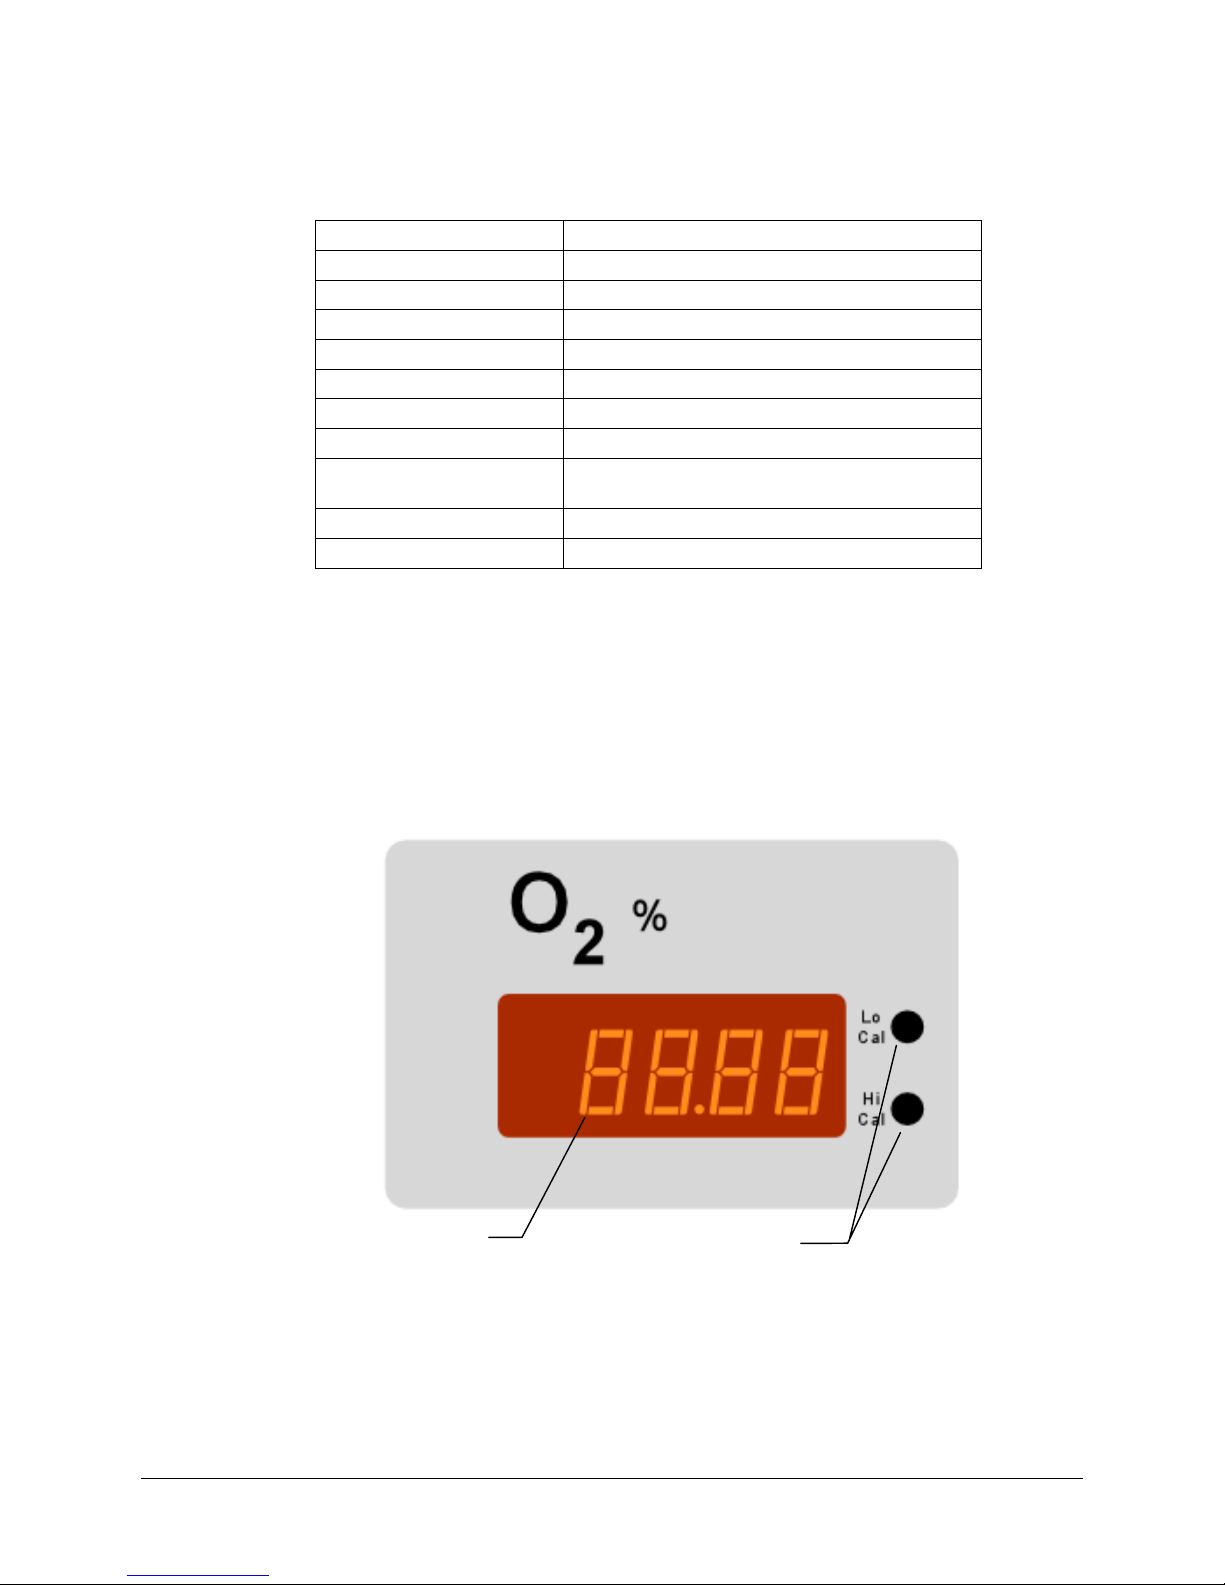
Front Panel Controls
Calibration Pots:
Used to adjust high-cal
and low-cal values
O2 Display:
Indicates oxygen
concentration
4Analyzer Setup Brand-Gaus Oxygen Analyzer User’s Manual
Analyzer Setup
To ensure the quickest and most reliable startup, please follow the steps below in the
order shown.
1. Apply power and sample to analyzer
1. Connect sensor (if external), analog signals, and AC wiring to the analyzer as
depicted in the accompanying wiring diagram.
2. Supply a metered amount of sample to the analyzer and verify the Sample flow
meter should be between 0.2 and 10 SLPM.
3. Apply power to the instrument (85 to 250 VAC, 50-60 Hz).
Warning: This instrument is designed for use with 85 to 250 AC
input power only. Serious equipment damage and/or
injury will occur if it is connected to improper power.
4. After a few seconds, the oxygen concentration display will illuminate. The
display will move from zero up to the approximate sample value in about one
minute. It will fully warm-up in approximately 30 to 60 minutes.
2. Calibrate the analyzer
After installation and at least a 1-hour warm up period, the instrument can be calibrated
via the following procedure.
Note: The Brand-Gaus oxygen analyzer calibrations are generally very
stable. If the calibration appears to have drifted significantly, or
requires frequent adjustment, do not recalibrate the unit. Check
for analyzer malfunction and/or check the sample delivery
system for leaks or other problems.
1. Low calibration:
a. Flow low calibration gas (typically zero) through the sample handling system
and analyzer. Dry nitrogen or EPA protocol gas is recommended as a low
calibration gas.
b. Wait approximately two minutes or until reading settles
c. Adjust the “low cal” potentiometer on the front panel until the display reads
the desired concentration (typically zero).
2. High calibration:
a. Flow High calibration gas through the sample handling system and analyzer.
b. Wait approximately two minutes or until reading settles
c. Adjust the “high cal” potentiometer on the front panel until the display reads
the desired concentration.

Brand-Gaus Oxygen Analyzer User’s Manual Theory of Operation 5
3. Calibrate the voltage outputs
Warning: This operation should only be performed by qualified
service personnel. Some internal analyzer components
are at high temperature and/or at lethal line voltage.
If accuracy of the voltage outputs is critical, calibration may be performed. There are
trim potentiometers and the back of the large blue output module on the display board,
accessible by removing the top cover. Flow zero and span concentrations to the analyzer,
verify the display reads the proper value, and adjust the zero and span pots to calibrate
the analog output to correspond with the display values.
Theory of Operation
Zirconium Oxide Measurement of O2
The oxygen measurement makes use of the fact that zirconium oxide conducts oxygen
ions when heated above 600 °C. Platinum electrodes on the interior and exterior of a
zirconium oxide tube provide a catalytic surface for the exchange of oxygen molecules
and oxygen ions. As molecules encounter the platinum electrodes, they become ionized
and are transported through the body of the zirconium oxide. This charge transport
ultimately sets up an electric potential across the electrodes that is proportional to the log
of the ratio of oxygen concentrations on each side of the oxide. Thus, if a reference gas
(usually instrument air at 20.9 %O2) flows across the inner electrode, the concentration
of sample gas flowing across the outer electrode can be determined. In a conventional
zirconium-oxide oxygen analyzer, this voltage is exponentiated to determine the
concentration.
In the Brand-Gaus Model 4705, a second zirconium-oxide cell is ganged together to
pump oxygen into the first cell, which is maintained at a constant voltage. The amount of
oxygen needed to maintain the primary cell at the operating point is a more sensitive
measurement of sample concentration, and allows for measurement at zero oxygen. This
pump signal is carefully measured and related back to the sample concentration.
6Wiring Diagram Brand-Gaus Oxygen Analyzer User’s Manual
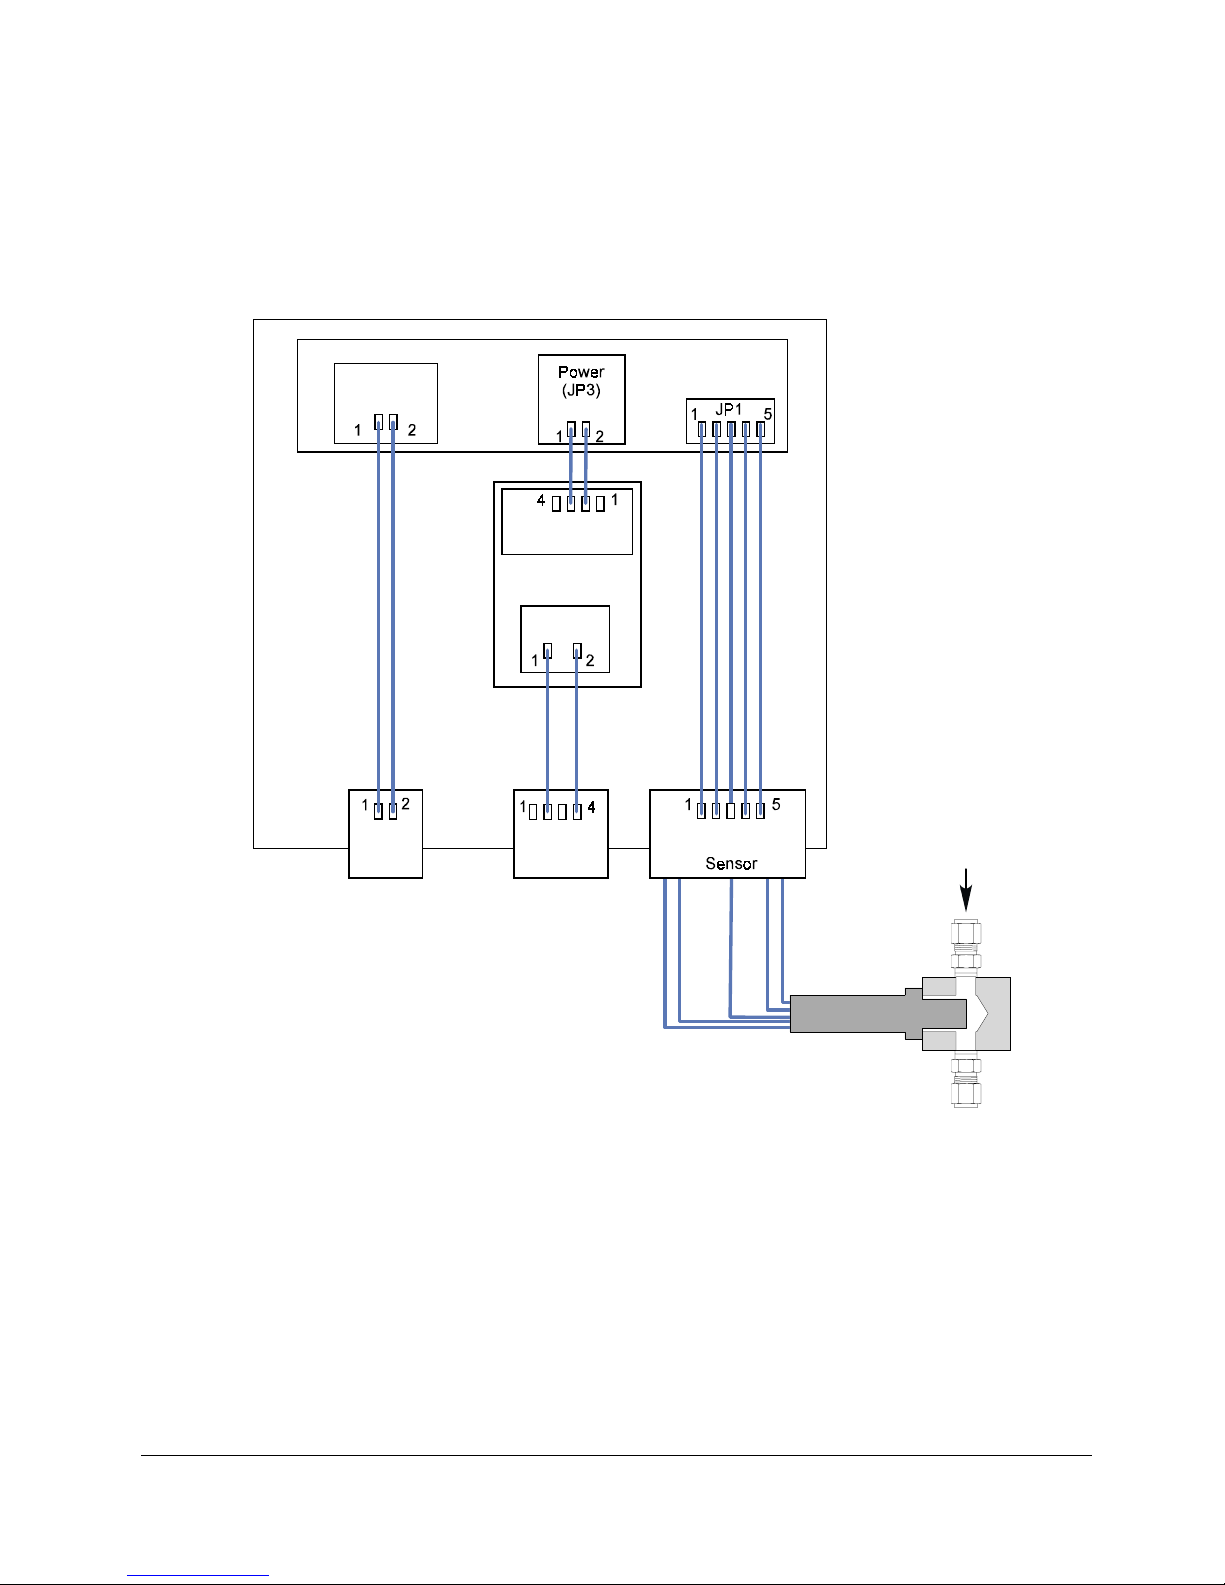
Wiring Diagram
-+
Output (J2)
Gnd 24V
AC In (J1)
NH
Power Supply
O2 Signal
Board
Analog output (0-10VDC)
1: Output low
2: Output high
Scaling:
0V = 0% O2
10V = full scale %O2
85-250
VAC
NH
Output (JP2)
white
grey
red
black
Gnd 12V
Supply
-+
Signal
Output
O2 Sensor
Sample flow rate
between .2 and 10 SLPM
Avoid pressurizing sample.
yel
Table of contents
Popular Analytical Instrument manuals by other brands


ADA INSTRUMENTS
ADA INSTRUMENTS ZVE 150SD operating manual

RIDGID
RIDGID SeeSnake Compact C40 Operator's manual

Zibra Corporation
Zibra Corporation CoreView 2.7 user manual

Teledyne
Teledyne 3010MB operating instructions

LaserLiner
LaserLiner VideoScope operating instructions

VOLTCRAFT
VOLTCRAFT PHT-600 operating instructions


