Brandt B4302UHD LED User manual

INSTRUCTION MANUAL
FR MANUEL D’UTILISATION
NL HANDLEIDING
EN
ϰϯϬϮUHDLED
ES
PT
MANUEL DE INSTRCCIONES
INSTRU ES DE FUNCIONAMENTO
ÇÕ
ϰϱϬϮUHDLED
ϰϵϬϮUHDLED ϱϱϬϮUHDLED
Downloaded from www.vandenborre.be

Downloaded from www.vandenborre.be

Contents EN
Main Unit Control…………………………….…………………..……..……………. 10
Front Panel…..……………….…………………………………………….……...10
.11
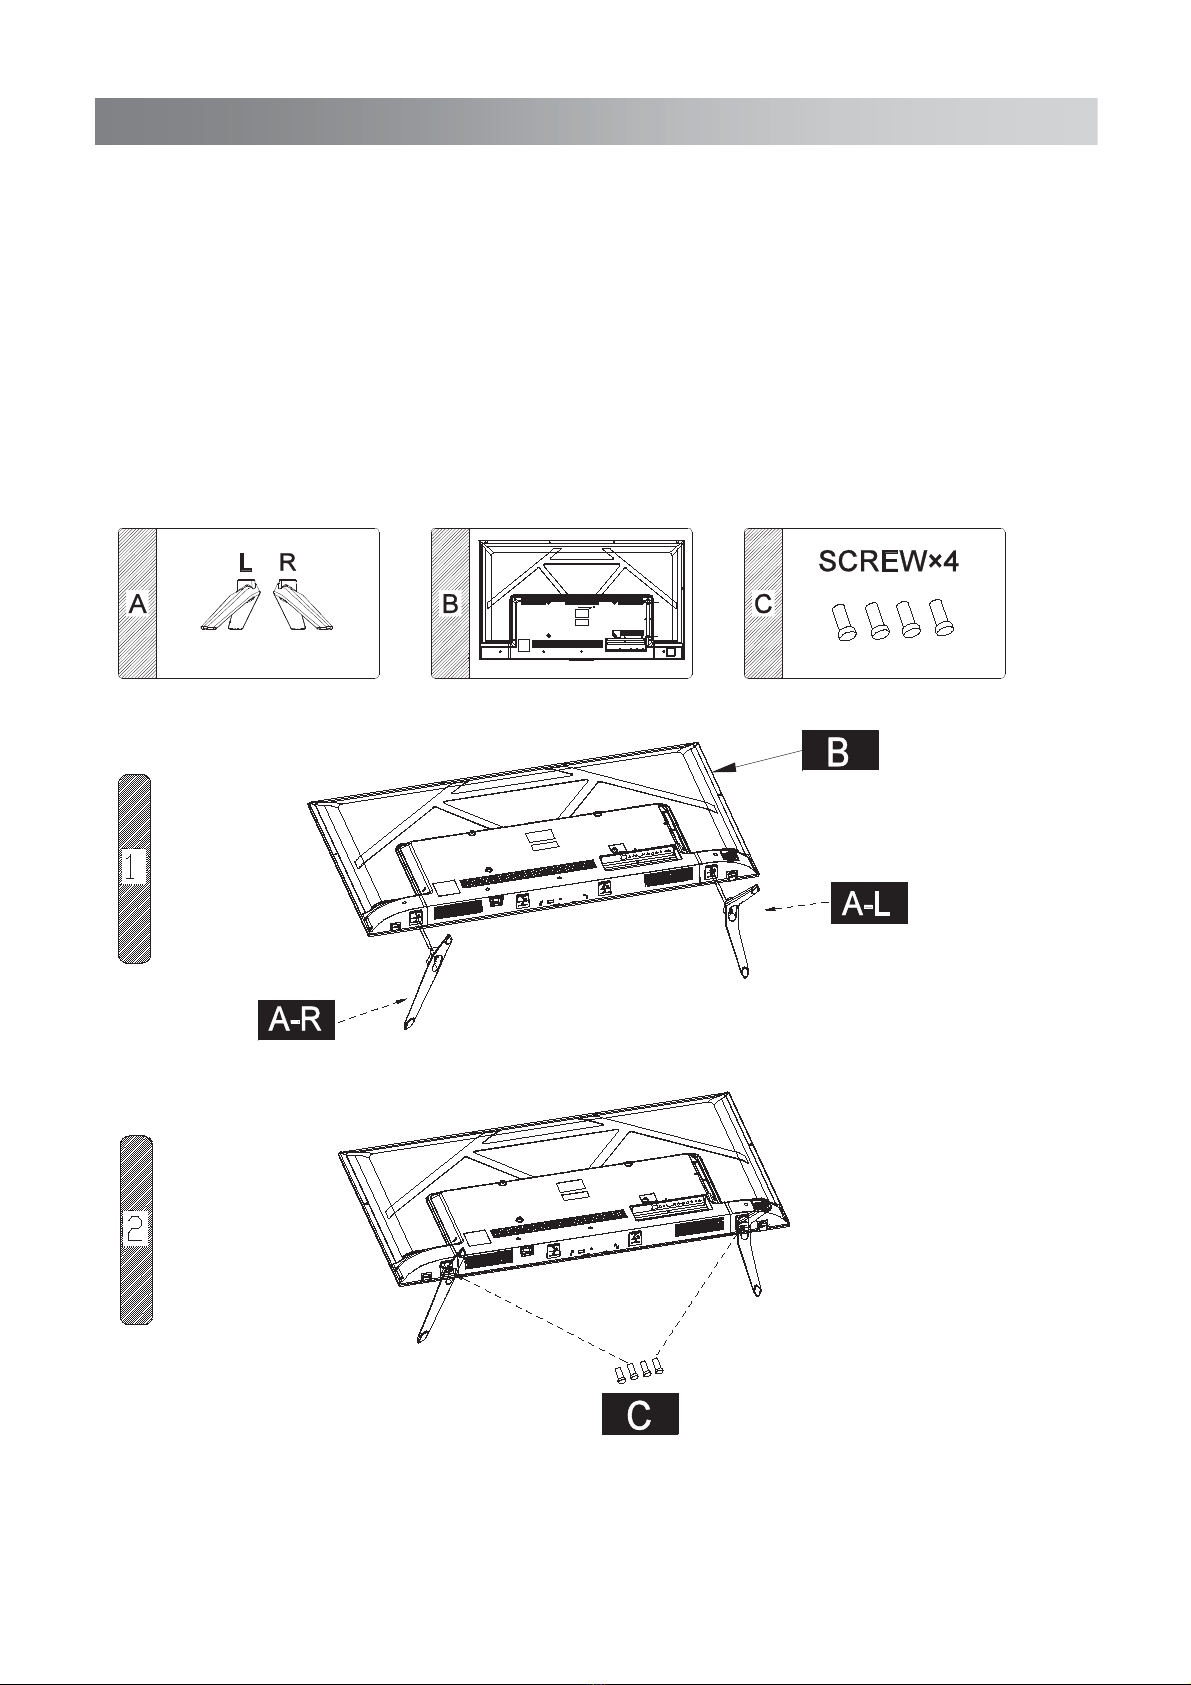
Assembling the stand.…………………………………………....……………....... 6
Getting Started…………………………...………………………..……..………....14
Using the remote control……………………………………………………....... .
Installing Batteries in the Remote Control………………………………..…....
Battery replacement……………………………..………...................................1
Connection and setup…………………...…………….........................................1
Cable Installation…………................................................................................1
Remote Control…………………………..……………………………………....…1
Teletext………………………………………………………………………………....
Using the teletext feature…………………........................................................
Troubleshooting Guide………………………………………………………….......
Troubleshooting…………….………………………………………………….......
Maintenance……………………………………………………………………....…
Product fiche...…………………………………………………..…………...............
Warnings…………………………………………………………….………..…..……..1
Basic Operation................................................................................................. .17
Turning on and off the TV.................................................................................17
Volume adjustment...........................................................................................18
Menu Operation...................................................................................................19
Configuring the Picture menu...........................................................................24
Configuring the Sound menu............................................................................25
Configuring the Channel menu.........................................................................20
Configuring the Option menu………………………………………………………29
Channel List / Favorite List..............................................................................35
....14
....14
.42
Back view control and sockets..……………………….…………....………...….
3
3
4
5
First Time Setup...............................................................................................17
Programme Selection.......................................................................................18
Changing the input source………………………………………………………….18
How to Navigate Menus....................................................................................19
Configuring the Sound menu............................................................................25
Network Function Operation Instruction………………………………....……....26
Configuring the Lock menu………………………………………………..……… 33
Configuring the Timer menu………………………………………………..….. …34
Programme Guide............................................................................................34
Q.MENU.........………………………………………………………………………..35
Home Page..........................................................................................................36
Media Playback................................................................................................36
Applications......................................................................................................40
41
42
46
47
41
Downloaded from www.vandenborre.be

REGULATORY INFORMATION
not installed and used in accordance with the instructions, may cause harmful
interference will not occur in a particular installation. If this equipment does cause
turning the equipment off and on, the user is encouraged to try to correct the
interference by one or more of the following measures:
- Increase the separation between the equipment and receiver.
- Connect the equipment into an outlet on a circuit different from that to which the
receiver is connected.
- Consult the dealer or experienced radio/TV technician for help.
Any changes or modifications not expressly approved by the party responsible
for compliance could void the user's authority to operate the equipment.
CAUTION
from supplier. Unauthorised modification could void the user's authority to operate
this product.
It is not recommended to keep a still image displayed on the screen for a long time
or to display extremely bright images on screen.
Figures and illustrations in this User Manual are provided for reference only
specifications may be changed without notice.
Operating Humidity: İ80% Storage Humidity: İ90%
and other objects (walls, cabinet sides, etc.) to ensure proper ventilation. F
y an increase in its internal temperature.
ailing
to maintain proper ventilation may result in a fire or a problem with the product
caused b
Operating Temperature: 5°C to 35°C Storage Temperature: -15°C to 45°C
Warnings
harmful interference with radio or television reception, which can be determined by
- Reorient the receiving antenna.
This equipment generates, uses and can radiate radio frequency energy and, if
interference with radio and television reception. However,there is no guarantee that
When you install your TV, maintain a distance of at least 10 cm between the TV
Do notattempt to modify this product in any way without written authorisation
and may differ from actual product appearance. Product design and
1
Downloaded from www.vandenborre.be

Mains Supply
This television is designed to operate from a 100-240 Volts 50/60Hz AC mains
supply. Other power sources may damage it. Check that the rating plate (on the
time. The manufacturer accepts NO liability for damage or injury caused by using
the product with the wrong mains voltage.
Dangerous voltage
constituting a risk of electric
shock is present inside this
equipment.
This equipment is double
insulated and an earth
connection is not required.
This mark is applied to show
the equipment conforms to
European
There are important
operating and maintenance
instructions in the literature
accompanying this
equipment.
Safe use and care of your television
We have designed and made this television to meet European Safety Standards, but
as with any electronic equipment you must take care to stay safe and get the best
results. Here is some good advice to help you do this. Read these instructions
carefully before you try to use the television.
Protect the mains lead. You must ensure the mains lead cannot be walked on,
crushed, chafed, cut or trapped.
Switch off the mains power or pull out the mains plug when you leave the television
unattended, unless the function of the television requires a continuous power supply.
Do not continue to use your television if you have spilt liquids in it, if it is damaged in
any way or if it does not work normally. Immediately unplug the television and get
expert advice.
back cover of the television) states 100-240V~ before you plug it in for the first
Warnings
radio equipment
directive.
2
Downloaded from www.vandenborre.be

Never fit makeshift stands or legs to the television.
Never push objects into holes and ventilation slots.
To prevent electric shock do not remove any cover.
Do not touch the LED display as it gets warm when in use, this is normal and is
not a fault.
If anything goes wrong do not try to fix it yourself, get a qualified service agent to
look at it.
Cleaning
Eye Fatigue
Avoid harsh conditions such as wet or damp places, high humidity, strong vibration,
extremely high or low temperatures, strong sunlight and places that are very dusty.
Switch off the television and disconnect the mains plug from the mains socket during
thunder storms.
Disconnect the mains supply and use only a lightly dampened soft cloth. Do not use
chemical solvents or strong detergents as these may damage the cabinet or screen.
Never allow water droplets to remain on the screen as moisture can cause
permanent discolouration.
Greasy marks must only be removed with a commercial cleaner specifically
recommended for LED screens.
When using this product as a computer monitor, health and safety experts
recommend short frequent breaks rather than occasional longer breaks. For
example a 5-10 minute break after an hour of continuous screen work is considered
bright background or where sunlight or other
bright light sources will shine directly onto the screen.
to be better than a 15 min break every 2 hours.
Do not use the monitor against a
Warnings
3
Downloaded from www.vandenborre.be

Connecting the Power Cord
Disconnecting the Device
The mains plug is used as the disconnect device, therefore it shall remain readily
operable.
WARNINGS
CAUTION:
Battery handling and usage
Only adults should handle batteries. Do not allow a child to use this remote control
unless the battery cover is securely attached to the remote control.
The battery type used in the remote control is 2 x 1.5V AAA size batteries (not
included) which are accessible and can be replaced.
Remove the battery cover located at the bottom of the remote control to remove the
batteries.
Most appliances are recommended to be placed upon a dedicated circuit; that is, a
single outlet circuit which powers only that appliance and has no additional outlet or
branch circuit.
Do not overload wall outlets. Overloaded wall outlets, loose or damaged wall
dangerous.
Any of these conditions could result in electric shock or fire. Periodically
deterioration
outlets,
extension cords, frayed power cords, or damaged or insulations are
examine the
cord of your appliance, and if its appearance indicates damage or ,
unplug it, stop using the appliance and have the cord replaced by an
authorised
This appliance is intended for domestic household use only and should not be
If the supply cord is damaged it must be replaced by the manufacturer, its service
agent or similarly qualified persons in order to avoid a hazard.
This apparatus shall not be exposed to dripping or splashing and no objects filled
with liquids, such as vases, shall be placed on the apparatus.
No naked flame sources, such as lighted candles, should be placed on the
apparatus.
The ventilation should not be impeded by covering the ventilation openings with
items, such as newspapers, table-cloths, curtains, etc.
WARNING: To prevent injury, this apparatus must be securely attached to the
floor/wall in accordance with the installation instructions.
This apparatus is not suitable for use in a tropical climate.
Allow at least a 10 cm gap all around the product.
To protect the environment, use local recycling facilities for battery disposal.
Where the MAINS plug or an appliance coupler is used as the disconnect device,
service
.
To prevent possible hearing damage, do not listen at high volume levels for
long periods
Warnings
the disconnect device shall remain readily operable.
use or use in a commercial environment
used for any other purpose or on any other application, such as for non-domestic
9HQWLODWLRQ
4
Downloaded from www.vandenborre.be

GENERAL SAFETY INSTRUCTIONS
x
x
To reduce the risk of fire or electric shock, do not expose this apparatus to rain
or moisture.
xProtect the power cord from being walked on or pinched particularly at plugs,
convenience receptacles, and the point where they exit from the apparatus.
x
Use only the attachments/accessories specified by the manufacturer.
x
ON DISPOSAL
- Do not dispose of this product with general household waste.
NOTE
- If the TV feels cold to the touch, there may be a small "flicker" when it is turned
on. This is normal; there is nothing wrong with the TV.
- Occasionally, some inactive pixels may appear on the screen as a fixed point of
blue, green or red. Please note that it does not affect your device’s capacity.
- Avoid touching the screen or holding your finger(s) against it for long periods of
time. Doing so may produce some temporary distortion effect on the screen.
- Disposal of this product must be carried out in accordance with the regulations
Do not install the appliance near any heat source such as radiators, heat registers,
stoves, or other apparatus (including amplifiers) that produce heat.
Refer all servicing to qualified service personnel. Servicing is required when the
apparatus has been damaged in any way, such as power supply cord or plug is
damaged, liquid has been spilled or objects have fallen into the apparatus, the
apparatus has been exposed to rain or moisture, does not operate normally, or
Warnings
WARNING
Never place a television set in an unstable location. A television set may fall, causing
serious personal injury or death. Many injuries, particularly to children, can be
avoided by taking simple precautions such as:
Using cabinets or stands recommended by the manufacturer of the television
set.
Only using furniture that can safely support the television set.
Ensuring the television set is not overhanging the edge of the supporting
furniture.
Not placing the television set on tall furniture (for example, cupboards or
bookcases) without anchoring both the furniture and the television set to a
suitable support.
Not placing the television set on cloth or other materials that may be located
between the television set and supporting furniture.
Educating children about the dangers of climbing on furniture or reach the
television set or its controls.
If your existing television set is being retained and relocated, the same considerations
as above should be applied.
has been dropped.
of your local authority.
5
Downloaded from www.vandenborre.be

Assembling the stand
Stand Installation
NOTE:
Assure the AC cord is not connected to an AC outlet.
Before beginning this process, make sure that you have a clean, safe, and cushioned
space to work at to avoid any damage to the unit.
Do not touch or press the TV screen, the glass might break under pressure.
1. Carefully place the TV screen face-down on a clean, cushioned surface.
2. Insert and secure the stands (R and L) with 2 screws (supplied) each side as shown.
3. be sure to follow the above instructions. Insufficient tightening or incorrect installation
of the stand will not support your TV correctly, and could result in damage or injury from
tip-over.
(Model: B4302UHD LED, B4502UHD LED, B4902UHD LED)
6
Downloaded from www.vandenborre.be

Assembling the stand
Stand Installation
NOTE:
Assure the AC cord is not connected to an AC outlet.
Before beginning this process, make sure that you have a clean, safe, and cushioned
space to work at to avoid any damage to the unit.
Do not touch or press the TV screen, the glass might break under pressure.
1. Carefully place the TV screen face-down on a clean, cushioned surface.
2. Insert and secure the stands (R and L) with 2 screws (supplied) each side as shown.
3. be sure to follow the above instructions. Insufficient tightening or incorrect installation
of the stand will not support your TV correctly, and could result in damage or injury from
tip-over.
(Model: B5502UHD LED)
7
Downloaded from www.vandenborre.be

Wall Mounting the TV
cables, gas and water pipes in the wall. In case of any doubt, please contact a qualified
installer.
Contact the store where you purchased the product for information on where to
purchase the VESA kit.
Assembling the stand
Mount the TV according to the instructions supplied with the kit. Beware of electrical
The TV can be mounted on a wall using a 300mm x300mm VESA kit sold separately.
(Model: B4302UHD LED)
Wall Mounting the TV
cables, gas and water pipes in the wall. In case of any doubt, please contact a qualified
installer.
Contact the store where you purchased the product for information on where to
purchase the VESA kit.
Mount the TV according to the instructions supplied with the kit. Beware of electrical
The TV can be mounted on a wall using a 300mm x400mm VESA kit sold separately.
(Model: B4502UHD LED)
8
Downloaded from www.vandenborre.be

Wall Mounting the TV
cables, gas and water pipes in the wall. In case of any doubt, please contact a qualified
installer.
Contact the store where you purchased the product for information on where to
purchase the VESA kit.
Assembling the stand
Mount the TV according to the instructions supplied with the kit. Beware of electrical
The TV can be mounted on a wall using a 300mm x400mm VESA kit sold separately.
(Model: B4902UHD LED)
Wall Mounting the TV
cables, gas and water pipes in the wall. In case of any doubt, please contact a qualified
installer.
Contact the store where you purchased the product for information on where to
purchase the VESA kit.
Mount the TV according to the instructions supplied with the kit. Beware of electrical
The TV can be mounted on a wall using a 400mm x 200mm VESA kit sold separately.
(Model: B5502UHD LED)
9
Downloaded from www.vandenborre.be

Main Unit Control
32:E50EN8Button:
&+$NNE/¸ËÊÊÅÄÉƓ ƭ
(CURSOR buttons:
ϳƭϴ
in menu mode)
92/80Ebuttons:
+
/
-
(CURSOR buttons:
϶ƭϵ
in menu mode)
Opens and closes the menu.
Turns on and off the TV.
Control Key
NOTE: Keypad may change model to model.
Front Panel
Remote sensor
Power Indicator
10
(Model: B4302UHD LED, B4502UHD LED, B4902UHD LED)
Remote sensor
Power Indicator
(Model: B5502UHD LED)
1
23
5
5
44
No. Name Description
1
CH+/CH- Changes the channels.
2
VOL+/VOL- Adjust the volume.
3MENU Open the menu.
4
To switch among the signal source.
5
Turns the unit on and off.
Control Key
Downloaded from www.vandenborre.be

Main Unit Control
2
134
5
6
7
8
9
7
No. Name Description
1 LAN Local area network (LAN) port. Connect a LAN
cable to this port to connect to the Network.
2HDMI1/2/3 HDMI (High-Definition Multimedia Interface) input.
3 SCART SCART connector.
4 ANT1/2 Connection of the external antenna.
5 COAXIAL Connect to an external digital audio device.
6 Earphones/headphones jack.
7 USB2.0 USB port. Connector a USB Storage device for
multimedia file playback.
8 AV IN AV audio/video signal input.
9 COMMON INTERFACE COMMON INTERFACE slot.
NOTE: Input / Output connectivity options may change from model to model.
Back view controls and sockets
(Model: B4302UHD LED, B4502UHD LED, B4902UHD LED)
11
Downloaded from www.vandenborre.be

Main Unit Control
No. Name Description
1 LAN Local area network (LAN) port. Connect a LAN
cable to this port to connect to the Network.
2HDMI1/2/3 HDMI (High-Definition Multimedia Interface) input.
3 SCART SCART connector.
4 ANT1/2 Connection of the external antenna.
5 COAXIAL Connect to an external digital audio device.
6 Earphones/headphones jack.
7 USB2.0 USB port. Connector a USB Storage device for
multimedia file playback.
8 AV IN AV audio/video signal input.
9 COMMON INTERFACE COMMON INTERFACE slot.
NOTE: Input / Output connectivity options may change from model to model.
Back view controls and sockets
(Model: B5502UHD LED)
LAN HDMI3 HDMI2 HDMI1 SCART ANT1 ANT2(SATELLITE)
(13/18V 400mA)
USB2.0
(5V 500mA)
COAXIAL USB2.0
(5V 500mA) AV IN
COMMON INTERFACE
2
1345
6
7
8
9
7
12
Downloaded from www.vandenborre.be

Connection and setup
CableInstallation
Before the installation and use, please read carefully the relevant content in “Warning
and Safety instructions”.
Take out the TV from the wrapping package and put it in a drafty and flat place.
NOTE:
When unplugging the power cable or signal cable, please hold the plug (the insulated
part); do not draw the body of the cable.
•LAN: Use a network cable to connect the interface and the broadband network
interface.
•HDMI1/2/3: (High-Definition Multimedia Interface) it provides an uncompressed digital
connection that carries both video and audio data by way of an integrated mini-plug
cable.
NOTE:
While connecting the HDMI, please aim at carefully, do not insert overexerted, for
fear the pin might be broken.
•SCART: Connect the TV set with an external device using the SCART socket.
•ANT: Connect the antenna to TV via coaxial cable on ANT jack of the back panel.
•COAXIAL: Send the TV's audio signal to external audio equipment via the Digital
Audio Output port.
•HEAD PHONE ( ): Connect a 3.5mm headphone for personal audio.
•USB2.0: Connect a USB Storage device and multimedia file playback.
•AV IN: The output AV terminal of DVD can be connected with the AV input port of the
TV through AV cable.
NOTE:
If AV works as mini terminal, please choose to use a one-to-three audio & video
cable.
•COMMON INTERFACE: Please insert CI card into the CI slot according to the arrow
on the CI card.
NOTE:
The range of power input for the TV is 100-240V~ 50/60Hz; do not connect the TV
power input port with the power cable out of the above range.
Please hold the insulated part of the plug when you are unplugging the power cable,
do not touch directly the metallic part of the cable.
Before connecting to an external device, please firstly make sure that the TV set and
the external device have been turned off. When connecting, please make reference to
the interface name and the interface color to connect the signal cable.
The unit has a built-in wireless network card, and can directly receive network
signals from wireless router through WIFI antenna.
When you plug or unplug the power cable, you must make sure that the TV, computer
or other equipment have been already shut down.
13
Downloaded from www.vandenborre.be

Getting Started
Using the Remote Control
When using the remote control, aim it at remote sensor on the television. If there is an
object between the remote control and the remote sensor on the unit, the unit may not
operate.
•Point the remote control at the REMOTE SENSOR located on the television.
•When using this television in a very brightly lit area, the infrared REMOTE CONTROL
SENSOR may not work properly.
•The recommended effective distance for using the remote control is about 7 metres.
Installing Batteries in the Remote Control
1. Open the cover at the back of the 2. Install two AAA size batteries. Make sure to
remote control. match the “+” and “-” ends of the batteries
with the diagram inside the compartment.
3. Replace the cover.
Battery Replacement
You will need to install the batteries into the remote control to make it operate following
the instruction below.
When the batteries become weak, the operating distance of the remote control will be
greatly reduced and you will need to replace the batteries.
Notes on Using Batteries:
The use of the wrong type of batteries may cause chemical leakage and/or explosion.
Please note the following:
•Always ensure that the batteries are inserted with the + and - terminals in the correct
direction as shown in the battery compartment.
•Different types of batteries have different characteristics. Do not mix different types.
•Do not mix old and new batteries. Mixing old and new batteries will shorten battery life
and/or cause chemical leakage.
• Replace batteries as soon as they do not work.
•Chemicals which leak from batteries may cause skin irritation. If any chemical matter
seeps out of the batteries, wipe it up immediately with a dry cloth.
• The batteries may have a shorter life expectancy due to storage conditions. Remove
the batteries whenever you anticipate that the remote control will not be used for an
extended period.
•The batteries (battery pack or batteries installed) shall not be exposed to excessive
heat such as sunshine, fire or the like.
CAUTION:
•It may result in an explosion if batteries are replaced incorrectly.
•Only replace batteries with the same or equivalent type.
14
Downloaded from www.vandenborre.be

Remote Control
The buttons of the original remote control are as following:
27
4
40(18
AUDIO
EPG LIST
INFO
INFO
1. : Power, Press to enter or exit the standby
mode.
2. : Press to mute or restore sound.
3. II: Pause (in Media/PVR mode).
Press to start time shift function (in DTV
mode).
4. : Stop the playback (in Media /PVR mode).
: Hold the teletext page on display, press
again to release.
5. : Start playback (in media mode).
6. : Press button to start recording (In DTV
mode).
7. : Skip to the beginning of the previous. (in
media mode).
i
: Go to the index page.
8. : Skip to the beginning of the next. (in
media mode).
?
: Reveal the hidden information of some
teletext pages.
9. : Reverse playback rapidly. (in media
mode).
: Enter subtitle mode or subpage.
10. : Advance playback rapidly. (in media
mode).
: Cancel the teletext but not to exit
teletext, press again to exit.
11. AUDIO(I/II): Press to select the NICAM
modes in Analog TV mode.
Press to select desired audio language in
Digital TV Mode.
12. : Enter the Teletext, and press this button
again to exit.
13. INFO: display the current program
information on the screen.
14. :Return to the previous menu.
: Delete button.
15. NUMBER BUTTONS: Choose channels or
password importation.
16. MENU( ): Press to enter the menu screen
for various optional adjustable settings.
15
Downloaded from www.vandenborre.be

Remote Control
NOTE:
The colour and shape may vary depending on the model.
The buttons not mentioned here are not used.
17. EXIT( ): Quit the current interface.
18. Ÿ/ź/Ż/Ź: Press the direction buttons to
select menu options or settings.
19. OK: Select the current item or enter into the
function of the menu of the next level.
20. : Goes to NETFLIX homepage.
21. : Goes to YouTube homepage.
22. + -: Press to adjust the volume level up
or down.
23. SOURCE( ): Select signal source, and
accesses the main scene interface.
24. : Press to select channels in
ascending or descending order.
25. COLOR BUTTONS: Red/ green/ yellow/
blue key navigation link. Use in accordance
with the operation interface instructions.
26. LIST: Press to call up the channel list.
Press again to exit it.
27. EPG: Electronic Program Guide, use in the
DTV mode.
28. QMENU: Press to enter quick menu.
27
4
40(18
AUDIO
EPG LIST
INFO
INFO
16
Downloaded from www.vandenborre.be

Basic Operation
Turning on and off the TV
ŶTurn on the TV
Plug the power cord into a suitable power point, then press the POWER ( ) button,
on the lower side of the back panel (or on the remote control, making sure to aim it at
the sensor at the front of the TV);
ŶTurn off the TV
Press the button on the remote control to enter standby mode. To power down the
TV completely, unplugs the power cord from the mains socket.
Do not leave your set in standby mode for long periods of time. If you will not use the
TV for a long time, it is recommended to unplug the set from the mains and aerial.
First Time Setup
If this is the first time you run the TV, the Initial Setup Menu will appear in the picture,
and the items of this menu also exist in other menus, so you are able to change the
values after you set them up.
Tips: Make sure that the antenna or cable TV system connection is made.
ŶSelect you desired language
Press the Ż/Źbuttons to select the language to be used for menus and message
and then press the OK button to go to the next step.
ŶSelect your country
Press the Ÿ/ź/Ż/Źbuttons to select the country you are living in and then press
the OK button to go to the next step.
Press the Żbutton to select “< Back” to go to previous step.
ŶSelect your time zone.
Press the Ÿ/ź/Ż/Źbuttons to select a time zone and then press the OK button to
go to the next step.
Press the Żbutton to select “< Back” to go to previous step.
ŶSelect the antenna type (Air, Cable and Satellite).
Press the Ż/Źbuttons to select the tuning modes and then press the OK button.
(For more detailed information, please refer to Channel menu ĺAuto Tuning).
Ŷ$XWR7XQLQJ
The TV starts Auto Tuning.
If you press the MENU( )button in TV searching, the Auto Tuning will skip to DTV
searching as the suggestive picture shows.
NOTE:
If the TV doesn't receive any channels, please check your aerial connection or the
country you selected, and then try an auto search again.
If the TV just receives some of the channels, it means the aerial's reception isn't good
enough and an antenna service is recommended.
17
Downloaded from www.vandenborre.be
This manual suits for next models
3
Table of contents
Languages:
Other Brandt LED TV manuals