Brandt B3225HD LED User manual

GB INSTRUCTION MANUAL
FR MANUEL D’UTILISATION
NL HANDLEIDING
ES MANUAL DE INSTRUCCIONES
CZ NÁVOD K OBSLUZE
SK NÁVOD NA POUŽITIE
B3225HD LED
B4025FHD LED
Downloaded from www.vandenborre.be

Contents
Main Unit Control…………………………….…………………..……..……………..9
Front Panel…..……………….…………………………………………….………..9
Side&RearPanel..……………………….……………………………..………….10
Warning…………………………………………………………….………..…..…….…1
Assembling the stand…………………………………………....……………....…6
Getting Started…………………………...………………………..……..………....12
Using the remote control…………………………………………………….........12
Installing Batteries in the Remote Control………………………………..….......12
Battery replacement……………………………..………...................................12
Connection and setup…………………...……………........................................13
Cable Installation…………................................................................................13
Remote Control…………………………..……………………………………....…14
Basic Operation…………………………………………………………..................16
QUICK START GUIDE……………….………………………………………......16
Turning on and off the TV…..............................................................................16
Programme Selection…………….…………………………………………....…17
Changing the Input Source…..………………………………………………........17
Volume adjustment……………………………………………………………........ 17
How to Navigate Menus……………………………………………………........…17
Menu Operation…………………………………………………………………........ 18
Configuring the Picture Menu………………………………………………….....18
Configuring the Sound Menu……………………………………………………... 19
Configuring the Channel Menu…………………………………………………....20
Configuring the Lock System Menu……………………………………………....22
Configuring the Setup Menu…………………………………………………….... 22
Using USB mode…………………………………………………………………....25
Important Unique Buttons................................................................................. 29
Channel List……………………………………………………………………….....29
Favorite List…………………………………………………………………….........29
Teletext……………………………………………………………………………….... 30
Using the teletext feature…………………........................................................30
Troubleshooting Guide………………………………………………………….......31
Troubleshooting…………….…………………………………………………........ 31
Maintenance……………………………………………………………………....…35
Product fiche...…………………………………………………..…………............... 36
GB
PROGRAM GUIDE…….....…………………………….………………………..... 29
Downloaded from www.vandenborre.be

Warning
REGULATORY INFORMATION
This equipment generates, uses and can radiate radio frequency energy and, if
not installed and used in accordance with the instructions, may cause harmful
interference to radio communication. However, there is no guarantee that
interference will not occur in a particular installation. If this equipment does cause
harmful interference to radio or television reception, which can be determined by
turning the equipment off and on, the user is encouraged to try to correct the
interference by one or more of the following measures:
- Relocate the receiving antenna.
- Increase the separation between the equipment and receiver.
- Connect the equipment into an outlet on a circuit different from that to which the
receiver is connected.
- Consult the dealer or experienced radio/TV technician for help.
Any changes or modifications not expressly approved by the party responsible
for compliance could void the user's authority to operate the equipment.
CAUTION
from supplier. Unauthorised modification could void the user's authority to operate
this product.
It is not recommended to keep a still image displayed on the screen for a long time
or to display extremely bright images on screen.
Figures and illustrations in this User Manual are provided for reference only
and may differ from actual product appearance. Product design and
specifications may be changed without notice.
Do not attempt to modify this product in any way without written authorisation
Operating Humidity: ≤80% Storage Temperature: -20°C to 60°C
Storage Humidity: ≤90%
Operating Temperature: 0°C to 40°C
When you install your TV, maintain a distance of at least 4 inches between the TV
and other objects (walls, cabinet sides, etc.) to ensure proper ventilation. F
y an increase in its internal temperature.
ailing
to maintain proper ventilation may result in a fire or a problem with the product
caused b
1
Downloaded from www.vandenborre.be

Warning
Mains Supply
This television is designed to operate from a 100-240 Volts 50/60Hz AC mains
supply. Other power sources may damage it. Check that the rating plate (on the
back cover of the television) states 100-240V AC before you plug it in for the first
time. The manufacturer accepts NO liability for damage or injury caused by using
the product with the wrong mains voltage.
Mains Plug
- We have fitted this television with a standard mains plug.
- If the mains lead is damaged it must be replaced with a mains lead of the
same type and rating to avoid a hazard.
- If for any reason you cut off the mains plug, please destroy the old plug as it
would be dangerous if inserted into a live power outlet. Carefully follow the
wiring instructions supplied with the new plug.
- If a fuse is fitted to the plug, remove the fuse before throwing the plug away.
- Never use a fused mains plug without the fuse cover.
- The mains plug shall be the main disconnect device and should be accessible
at all times.
Dangerous voltage
constituting a risk of electric
shock is present inside this
equipment.
This equipment is double
insulated and an earth
connection is not required.
This mark is applied to show
the equipment conforms to
European safety and
electro-magnetic
compatibility standards.
There are important
operating and maintenance
instructions in the literature
accompanying this
equipment.
Safe use and care of your television
We have designed and made this television to meet European Safety Standards,
but as with any electronic equipment you must take care to stay safe and get the
best results. Here is some good advice to help you do this. Read these
instructions carefully before you try to use the television.
Protect the mains lead. You must ensure the mains lead cannot be walked on,
crushed, chafed, cut or trapped.
Switch off the mains power or pull out the mains plug when you leave the
television unattended, unless the function of the television requires a continuous
power supply.
Do not continue to use your television if you have spilt liquids in it, if it is damaged
in any way or if it does not work normally. Immediately unplug the television and
get expert advice.
2
Downloaded from www.vandenborre.be

Warning
Avoid harsh conditions such as wet or damp places, high humidity, strong
vibration, extremely high or low temperatures, strong sunlight and places that are
very dusty.
Never fit makeshift stands or legs to the television.
Never push objects into holes and ventilation slots.
To prevent electric shock do not remove any cover.
Do not touch the LED display as it gets warm when in use, this is normal and is
not a fault.
If anything goes wrong do not try to fix it yourself, get a qualified service agent to
look at it.
Pull out the mains plug and disconnect the aerial lead during thunder storms.
Ventilation
Place the television on a hard flat surface away from direct sunlight or heat
sources. If it is in a cabinet allow at least a 10cm gap all around. Do not obstruct
the ventilation slots, including those underneath with soft furnishings.
Overheating will shorten the life of the television and increase the risk of fire.
Cleaning
Disconnect the mains supply and use only a lightly dampened soft cloth. Do not
use chemical solvents or strong detergents as these may damage the cabinet or
screen.
Never allow water droplets to remain on the screen as moisture can cause
permanent discolouration.
Greasy marks must only be removed with a commercial cleaner specifically
recommended for LED screens.
Eye Fatigue
When using this product as a computer monitor, health and safety experts
recommend short frequent breaks rather than occasional longer breaks. For
example a 5-10 minute break after an hour of continuous screen work is
considered to be better than a 15 min break every 2 hours.
Do not use the monitor against a bright background or where sunlight or other
bright light sources will shine directly onto the screen.
3
Downloaded from www.vandenborre.be

Warning
Batteries
Remove batteries when the remote control is not to be used for a long time.
Batteries left in equipment may cause damage through deterioration and corrosive
leakage, invalidating the guarantee.
To protect the environment, use local recycling facilities for battery disposal.
Dispose of used batteries according to the instructions.
CAUTION: Danger of explosion if battery is incorrectly replaced. Replace only
with the same or equivalent type.
Connecting the Power Cord
Most appliances are recommended to be placed upon a dedicated circuit; that is,
a single outlet circuit which powers only that appliance and has no additional
outlet or branch circuit.
Do not overload wall outlets. Overloaded wall outlets, loose or damaged wall
outlets, extension cords, frayed power cords, or damaged or cracked wire
insulations are dangerous. Any of these conditions could result in electric shock or
fire. Periodically examine the cord of your appliance, and if its appearance
indicates damage or deterioration, unplug it, stop using the appliance and have
the cord replaced by an authorised service.
Disconnecting the Device
The mains plug is used as the disconnect device, therefore it shall remain readily
operable.
WARNINGS
This appliance is intended for domestic household use only and should
not be used for any other purpose or on any other application, such as
for non-domestic use or use in a commercial environment
If the supply cord is damaged it must be replaced by the manufacturer,
its service agent or similarly qualified persons in order to avoid a hazard.
This apparatus shall not be exposed to dripping or splashing and no
objects filled with liquids, such as vases, shall be placed on the
apparatus.
No naked flame sources, such as lighted candles, should be placed on
the apparatus.
The ventilation should not be impeded by covering the ventilation
openings with items, such as newspapers, table-cloths, curtains, etc.
WARNING: To prevent injury, this apparatus must be securely attached
to the floor/wall in accordance with the installation instructions.
This apparatus is not suitable for use in a tropical climate.
CAUTION: Connect headphones with the volume set low nd increase if required.
Prolonged listening through headphones at high volume settings can result in
damage.
4
Downloaded from www.vandenborre.be

Warning
GENERAL SAFETY INSTRUCTIONS
•Do not install the appliance near any heat source such as radiators, heat
registers, stoves, or other apparatus (including amplifiers) that produce heat.
•To reduce the risk of fire or electric shock, do not expose this apparatus to rain
or moisture.
•Do not defeat the safety purpose of the polarized or grounding type plug. A
polarized plug has two blades with one wider than other. A grounding type
plug has two blades and a third grounding prong. The wide blade or the third
prong is provided for your safety. When the provided plug does not fit into your
outlet, consult an electrician for replacement of the obsolete outlet.
•Protect the power cord from being walked on or pinched particularly at plugs,
convenience receptacles, and the point where they exit from the apparatus.
•Use only the attachments/accessories specified by the manufacturer.
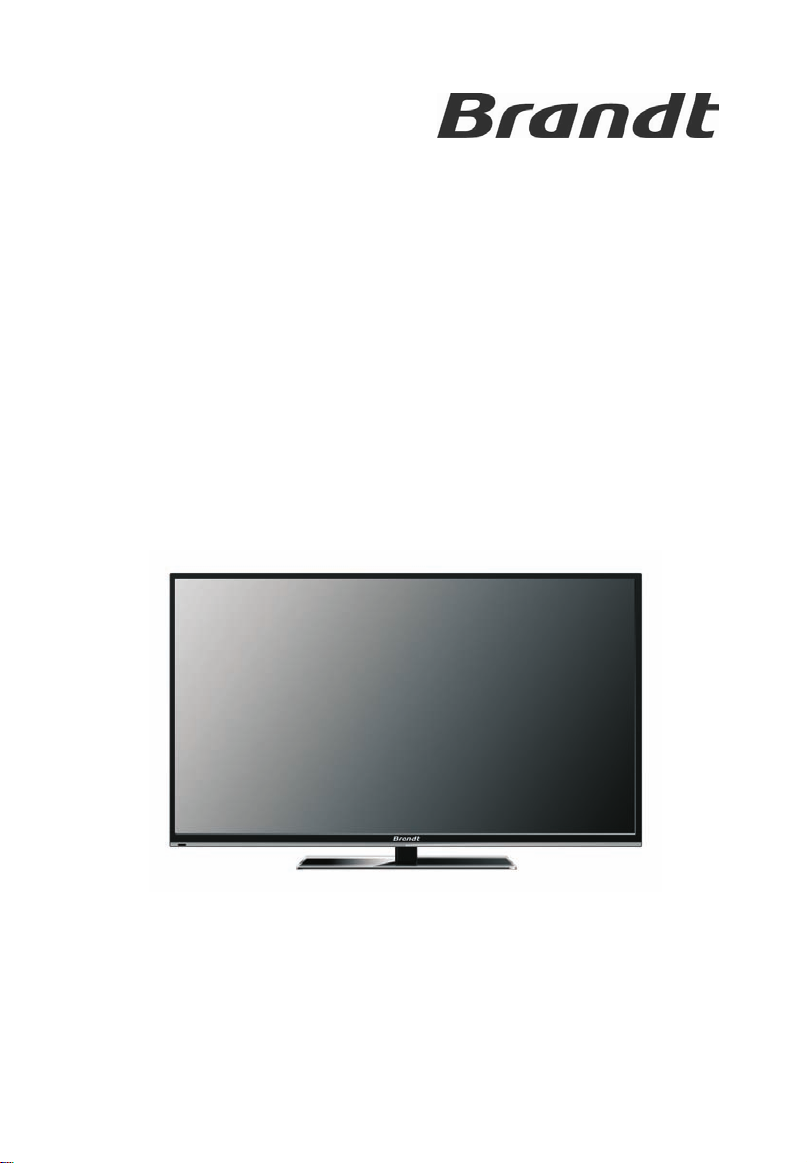
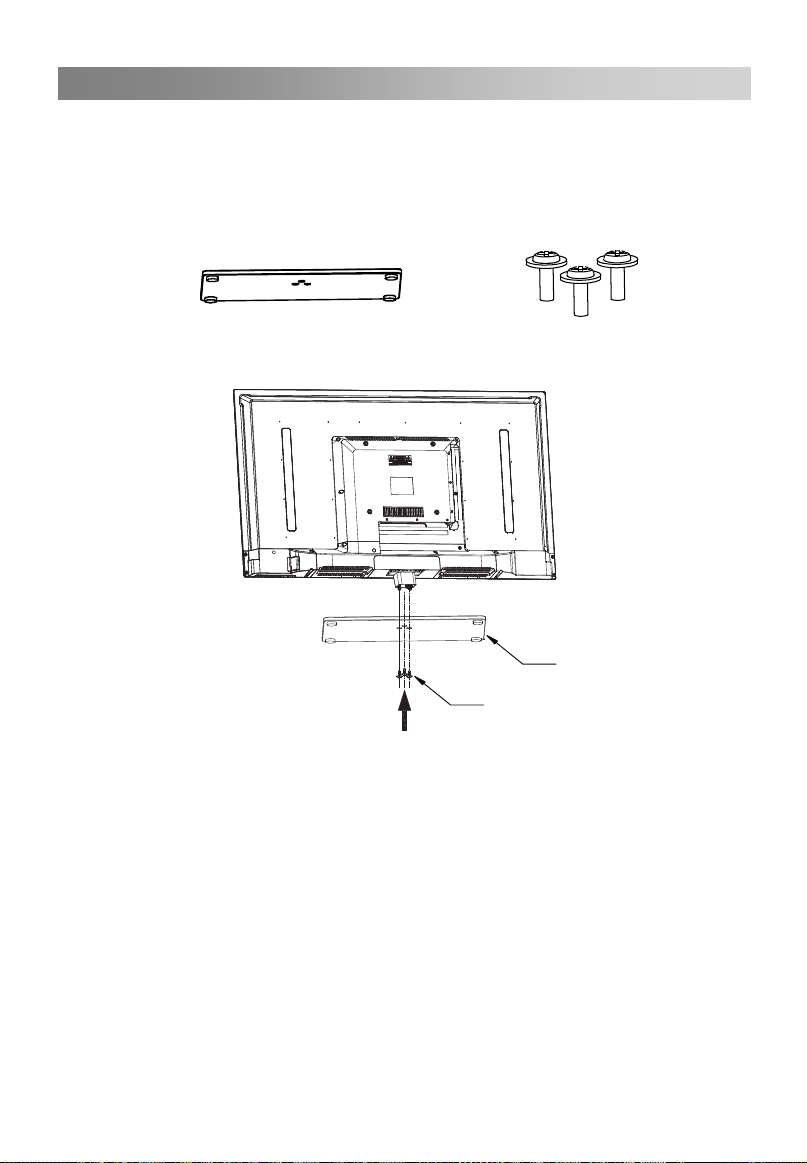
•Use only with a cart, stand, tripod, bracket, or table specified by the
manufacturer, or sold with the apparatus. When a cart is used, use caution
when moving the cart/apparatus combination to avoid injury from tip-over.
•Unplug this apparatus during lightning storms or when unused for long periods
of time (when going on holiday, for example).
•Refer all servicing to qualified service personnel. Servicing is required when
the apparatus has been damaged in any way, such as power supply cord or
plug is damaged, liquid has been spilled or objects have fallen into the
apparatus, the apparatus has been exposed to rain or moisture, does not
operate normally, or has been dropped.
•This apparatus has been designed to operate in an ambient temperature
between 0 and 45°C.
•The device may be malfunctioning when under electrostatic discharge. You
ON DISPOSAL
- Do not dispose of this product with general household waste.
your local authority.
NOTE
- If the TV feels cold to the touch, there may be a small "flicker" when it is turned
on. This is normal; there is nothing wrong with the TV.
- Occasionally, some inactive pixels may appear on the screen as a fixed point of
blue, green or red. Please note that it does not affect your device’s capacity.
- Avoid touching the screen or holding your finger(s) against it for long periods of
time. Doing so may produce some temporary distortion effect on the screen.
can resume it manually by powering it off and on again.
- Disposal of this product must be carried out in accordance with the regulations of
5
Downloaded from www.vandenborre.be

Assembling the stand
1. Place a soft, cushioned material on top of a flat surface to prevent damaging the LED
screen.
Then place the TV monitor flat on top, with the screen side facing down, and fix the
stand to the support column as illustrated below.
ab
2. Use the three supplied screws(4x12mm) to fasten the stand to the support
column, as illustrated above.
(Model: B3225HD LED, B4025FHD LED)
6
a
b
Downloaded from www.vandenborre.be

Wall Mounting the TV
The TV can be mounted on a wall using a 200mm x 100mm VESA kit supplied
separately.
Mount the TV according to the instructions supplied with the kit. Beware of electrical
cables, gas and water pipes in the wall. In case of any doubt, please contact a qualified
installer.
The screw thread length must not exceed 8mm (lower screws) or 10mm (upper screws)
into the TV.
Contact the store where you purchased the product for information on where to
purchase the VESA kit.
Assembling the stand
(Model: B3225HD LED)
7
Downloaded from www.vandenborre.be

Wall Mounting the TV
The TV can be mounted on a wall using a 200mm x 200mm VESA kit supplied
separately.
Mount the TV according to the instructions supplied with the kit. Beware of electrical
cables, gas and water pipes in the wall. In case of any doubt, please contact a qualified
installer.
The screw thread length must not exceed 10mm (lower screws) or 13mm (upper screws)
into the TV.
Contact the store where you purchased the product for information on where to
purchase the VESA kit.
Assembling the stand
(Model: B4025FHD LED)
8
Downloaded from www.vandenborre.be

Main Unit Control
Front Panel
1. CH+/CH-: Change channel
2. VOL-/VOL+: Change the volume
3. MENU:Access the menu
4. : Select the input source
5. : Power button
3
1
24
5
6.
7. Power Indicator
Infrared sensor
67
(Model: B3225HD LED, B4025FHD LED)
9
Downloaded from www.vandenborre.be

Main Unit Control
Side&Rear Panel:
1. AV audio/video signal input
2. SCART input
3. PC / DVI audio
4. Antenna input
5. Coaxial
6. USB device
7. CI slot
8. HDMI 1,2 and 3
9. Earphone output
10. Component input(mini YPbPr cable)
5
6
7
8
8
8
9
10
1
2
3
4
(Model: B3225HD LED)
10
Downloaded from www.vandenborre.be

Main Unit Control
Side&Rear Panel:
5
6
7
8
8
8
9
10
1
2
3
4
1. AV audio/video signal input
2. SCART input
3. PC / DVI audio
4. Antenna input
5. Coaxial
6. USB device
7. CI slot
8. HDMI 1,2 and 3
9. Earphone output
10. Component input(mini YPbPr cable)
(Model: B4025FHD LED)
11
Downloaded from www.vandenborre.be

Getting Started
Usingtheremotecontrol
When using the remote control, aim it at the remote sensor on the television. If there is
an object between the remote control and the remote sensor on the unit, the unit may
no operate.
Point the remote control at the REMOTE SENSOR located on the television.
When using this television in a very brightly lit area, the infrared REMOTE CONTROL
SENSOR may not work properly.
The maximum effective distance for using the remote control is about 7 metres.
Installing Batteries in the Remote Control
1. Slide back the battery cover of the remote control.
2. Install two AAA size batteries(not supplied). Observe
the correct polarity (+/-) when inserting the batteries.
3. Replace the cover.
Batteryreplacement
When the batteries become weak, the operating distance of the remote control will be
greatly reduced and you will need to replace the batteries.
Notes on Using Batteries:
The use of the wrong type of batteries may cause chemical leakage and/or explosion.
Please note the following:
Always ensure that the batteries are inserted with the + and - terminals in the correct
direction as shown in the battery compartment.
Different types of batteries have different characteristics. Do not mix different types.
Do not mix old and new batteries. Mixing old and new batteries will shorten battery
life and/or cause chemical leakage.
Replace batteries as soon as they do not work.
Chemicals which leak from batteries may cause skin irritation. If any chemical matter
seeps out of the batteries, wipe it up immediately with a dry cloth.
The batteries may have a shorter life expectancy due to storage conditions. Remove
the batteries whenever you anticipate that the remote control will not be used for a
long time.
The batteries (battery pack or batteries installed) shall not be exposed to excessive
heat such as sunshine, fire or the like.
12
Downloaded from www.vandenborre.be

Connection and setup
CableInstallation
Please read this section carefully before installation and use.
1. Take out the TV from the package and put it on a stable surface. Allow the TV set to
reach the ambient room temperature before you connect it to the mains.
NOTE:
When you plug or unplug the TV, computer or other equipments, you must make
sure that the AC power has been already shut down; when unplugging the power
cable or signal cable, please hold the plug (the insulated part), do not pull the cable.
2. The RF output terminal can be connected with the RF input port of the TV.
3. The output AV terminal of DVD can be connected with the AV input port of the TV
through AV cable.
NOTE:
Component and AV inputs cannot be used at the same time since they share one
single audio input.
4. The output COMPONENT (YPbPr) terminal of DVD can be connected with the
COMPONENT (YPbPr) input port of the TV through AV cable.
5. Connect one end of the VGA cable with the VGA port on computer, connect the other
end of the VGA cable with the VGA port (PC) on the TV, and tighten the bolts
NOTE:
Please do not force to connect the 15-pin VGA.
6. Connect one end of the HDMI cable with HDMI output port, connect the other end of
the HDMI cable with the HDMI port on the TV.
NOTE:
Please do not force to connect the HDMI.
7. Connect the TV set with an external device using the SCART socket.
9. Check and make sure that all AV cables are connected with the corresponding ports
correctly.
10. Connect the AC power cable with 100-240V~ power supply.
NOTE:
The range of power input for the TV is 100-240V~ 50/60Hz, do not connect the TV
power input port with the AC power out of the above range.
Please hold the insulated part of the plug when you are unplugging the power
cable, do not touch directly the metallic part of the cable.
clockwise on each end of VGA cable.
8. Send the TV's audio signal to external audio equipment via the Digital Audio
Output port.
13
When you connect a HDMI cable through a VGAor DVI/HDMI adaptor,
you have to connect a PC/DVI audio cable to get sound.
Downloaded from www.vandenborre.be

Remote Control
The buttons of the original remote control are as follows:
14
0
25
26
27
1. : Power, switch on or off TV set.
2. INFO: Press to display the current
programme information on the screen
i
: Go to the index page.
3. : Press to mute or restore sound.
4. NUMERIC BUTTONS: Choose channels
or enter password.
5. SOURCE: Press to select signal source.
?
: Reveal the hidden information of
some teletext pages.
language in DTV mode.
(in DTV mode), or press to display
information on a picture you are viewing
(in USB mode).
6. AUDIO (∞I/II): Press to switch Audio
7.MENU: Press to enter the menu screen
for various optional adjustable settings.
8.EXIT: Exit OSD Menu.
9. ▲/▼/◄/►:Press the desired navigation
button to select the direction.
10.ENTER: Press to execute the selected
item in the menu screen.
(In USB mode) Press to enter the PVR
Settings (in DTV mode).
11. INDEX: Press to enter the quick menu.
12.LIST: Press to call up the channel list.
Press again to exit.
13.CH+/CH-: Press to select preceding or
following channel.
14.VOL+/VOL-: Press to increase or reduce
volume.
15. SLEEP: Press to set the sleep timer.
When the preset length of time has
passed, the TV set enters standby
mode.
16. : Switch on/off the favourite
programmes list.
Downloaded from www.vandenborre.be

Remote Control
Footnote:
Red, green, yellow and blue buttons are multifunction; please follow on-screen prompts
and section instructions.
15
0
25
26
27
17. EPG: Electronic Programme Guide (in
DTV mode). Press again to exit.
18.
: Return to last viewed programme.
19. COLOURED BUTTONS: Red/ green/
yellow/ blue buttons (See footnote).
: Fast reverse (in USB mode).
: Fast forward (in USB mode).
: Previous (in USB mode).
: Next (in USB mode).
20. STILL: Press to hold the picture.
: Press to hold the teletext page on
display, press again to release.
: Stop (in USB /PVR mode).
21. : Press to enter the Teletext, press
again for MIX mode, press once more to
exit.
: Play / Pause (in USB mode).
22. RADIO: Press to interchange Radio and
DTV programmes when there is Radio
programme (In DTV mode).
23. : Press to select different image
sizes.
: Press to zoom in the teletext screen.
24. : Enter subtitle mode or subpage.
25. : Hide the teletext page from the
screen. Press once more to enable
again, press again to exit.
26. DMP: Press to switch to the USB source.
27. : Press to start recording (in DTV
mode).
Downloaded from www.vandenborre.be

Basic Operation
QUICK START GUIDE
• Connection
1. Connect the TV set to the mains.
2. Connect the “aerial” or “cable TV” plug to the AERIAL INPUT (ANT) socket located
on the back of the TV.
• First Time Setup
When the TV is initially powered on, a sequence of on-screen prompts will assist you
in configuring the basic settings.
OSD Language
Press the ▲/▼button to highlight OSD Language, and then press the ◄/►button to
select the desired OSD (On Screen Display) language.
Mode Setting
Press the ▲/▼button to highlight Mode Setting, and then press the ◄/►button to
select Home Mode or Store Mode.
If Home Mode is selected, Store mode will be disabled after the First Time Setup.
Home is the recommended setting to produce the best energy efficiency.
If you want to set Store Mode, a message appears asking you to confirm your choice.
Country
Press the ▲/▼button to highlight Country, and then press the ◄/►button to select
the correct country.
Tuner Type
Press the ▲/▼button to highlight Tuner Type, and then press the ◄/►button to
select Antenna or Cable.
Auto Scan
Press the ▲/▼button to highlight Auto Scan, then press the ◄/►button to select
scan mode: DTV+ATV, DTV, ATV.
TurningonandofftheTV
• Turn on the TV
Connect the TV set to the mains. To switch on the TV from standby mode, you must
press the button on the remote control.
• Turn off the TV
Press the button on the remote control to enter standby mode. To power down the
TV completely, unplug the power cord from the mains socket.
Do not leave your set in standby mode for long periods of time. If you will not use the
TV for a long time, it is recommended to unplug the set from the mains and aerial.
• No signal
The message "No Signal" appears on screen when there is no input signal. In
ATV/DTV mode, the TV set will turn off automatically if there has been no signal for 15
minutes.
In PC mode, the TV set will turn off automatically if there has been no signal for 5
minutes.
16
Downloaded from www.vandenborre.be

Basic Operation
ProgrammeSelection
• Using the CH+/CH- on the panel of TV or on the remote control.
Press CH+ to go to the following channel.
• Using 0- 9 numeric buttons.
You can select the channel number by pressing 0 to 9. (In ATV, DTV mode)
• Example
To select a one-digit channel (e.g. Channel 5): Press 5.
Volumeadjustment
• Press the VOL+/- button to adjust the volume.
• If you want to switch the sound OFF, press the .
• You can release mute by pressing the again or by increasing the volume.
ChangingtheInputSource
You can select the input source by pressing the SOURCE button on the remote control.
Press the▲/▼button to cycle through the input sources, and press the ENTER button
to confirm your choice.
HowtoNavigateMenus
Before using the TV follow the steps below to learn how to navigate the menus in order
to select and adjust different functions. The access step may differ depending on the
selected menu.
1. Press the MENU button to display the main menu.
2. Press the ◄/►button to cycle through the main menu. You can choose between
Picture, Sound, Channel, Lock System and Setup.
3. Press the ▲/▼button to highlight the desired sub item.
4. Press the ENTER button to access the submenu.
5. Press the ▲/▼/◄/►button to select the desired value. The adjustment in the
OSD may differ depending on the selected menu.
6. Press the MENU button to return to the previous menu.
7. Press the EXIT button to exit the menu.
NOTE:
When a menu item is greyed out, it means that the item is not available or cannot be
adjusted.
Buttons on the TV have the same function as corresponding buttons on the remote
control. If you lost your remote control or if it is not working, you may use the buttons
Some items in the menus may be hidden depending on modes or signal sources
used.
on the TV to select menus. This manual focuses on operation with the remote control.
However, please note the following when navigating via the buttons on the TV control ,
panel: CH+ can be used to go up, CH- to go down, VOL+ to go right and VOL- to go
left.
Press CH- to go to the preceding channel.
To select a two-digit channel (e.g. Channel 20): Press 2 and 0 in a short time.
17
Downloaded from www.vandenborre.be

Menu Operation
ConfiguringthePictureMenu
• Picture Mode
You can select the type of picture which
best corresponds to your viewing
You can choose from Standard, Mild,
Personal, and Dynamic.
• Brightness
You can adjust the brightness value of
the picture.
• Contrast
You can adjust the lightness and
darkness values of the picture.
• Sharpness
You can adjust the sharpness value for the objects displayed on the picture.
• Saturation
You can adjust intensity of all colours.
• Hue (Only in the NTSC mode)
You can adjust the balance between red and green levels.
You can adjust the colour temperature of the picture.
You can choose from Standard, Cool and Warm.
• Aspect Ratio
You can select the picture size which best corresponds to your viewing requirements.
• PC Setting (In PC mode)
Auto Adjust: Adjust the image automatically.
H Position: Centre the image by moving it left or right.
V Position: Centre the image by moving it up or down.
Phase: Minimise horizontal distortion.
Clock: Minimise vertical stripes in the screen image.
• Screen Mode (In HDMI mode)
Press the▲/▼button to highlight Screen Mode, then press the◄/►button to select
Auto, Video or PC.
• Advanced Settings
NR: Set options to reduce video noise.
MPEG NR: Set options to reduce MPEG noise.
Dynamic Contrast: Automatically adjust picture detail and brightness
• Color Temp
requirements.
You can choose from Full, Zoom1, Zoom2, 4:3and 16:9.
18
Downloaded from www.vandenborre.be
This manual suits for next models
1
Table of contents
Languages:
Other Brandt LED TV manuals