Brateck PLB-M0544 User manual
15
INSTALLATION MANUAL
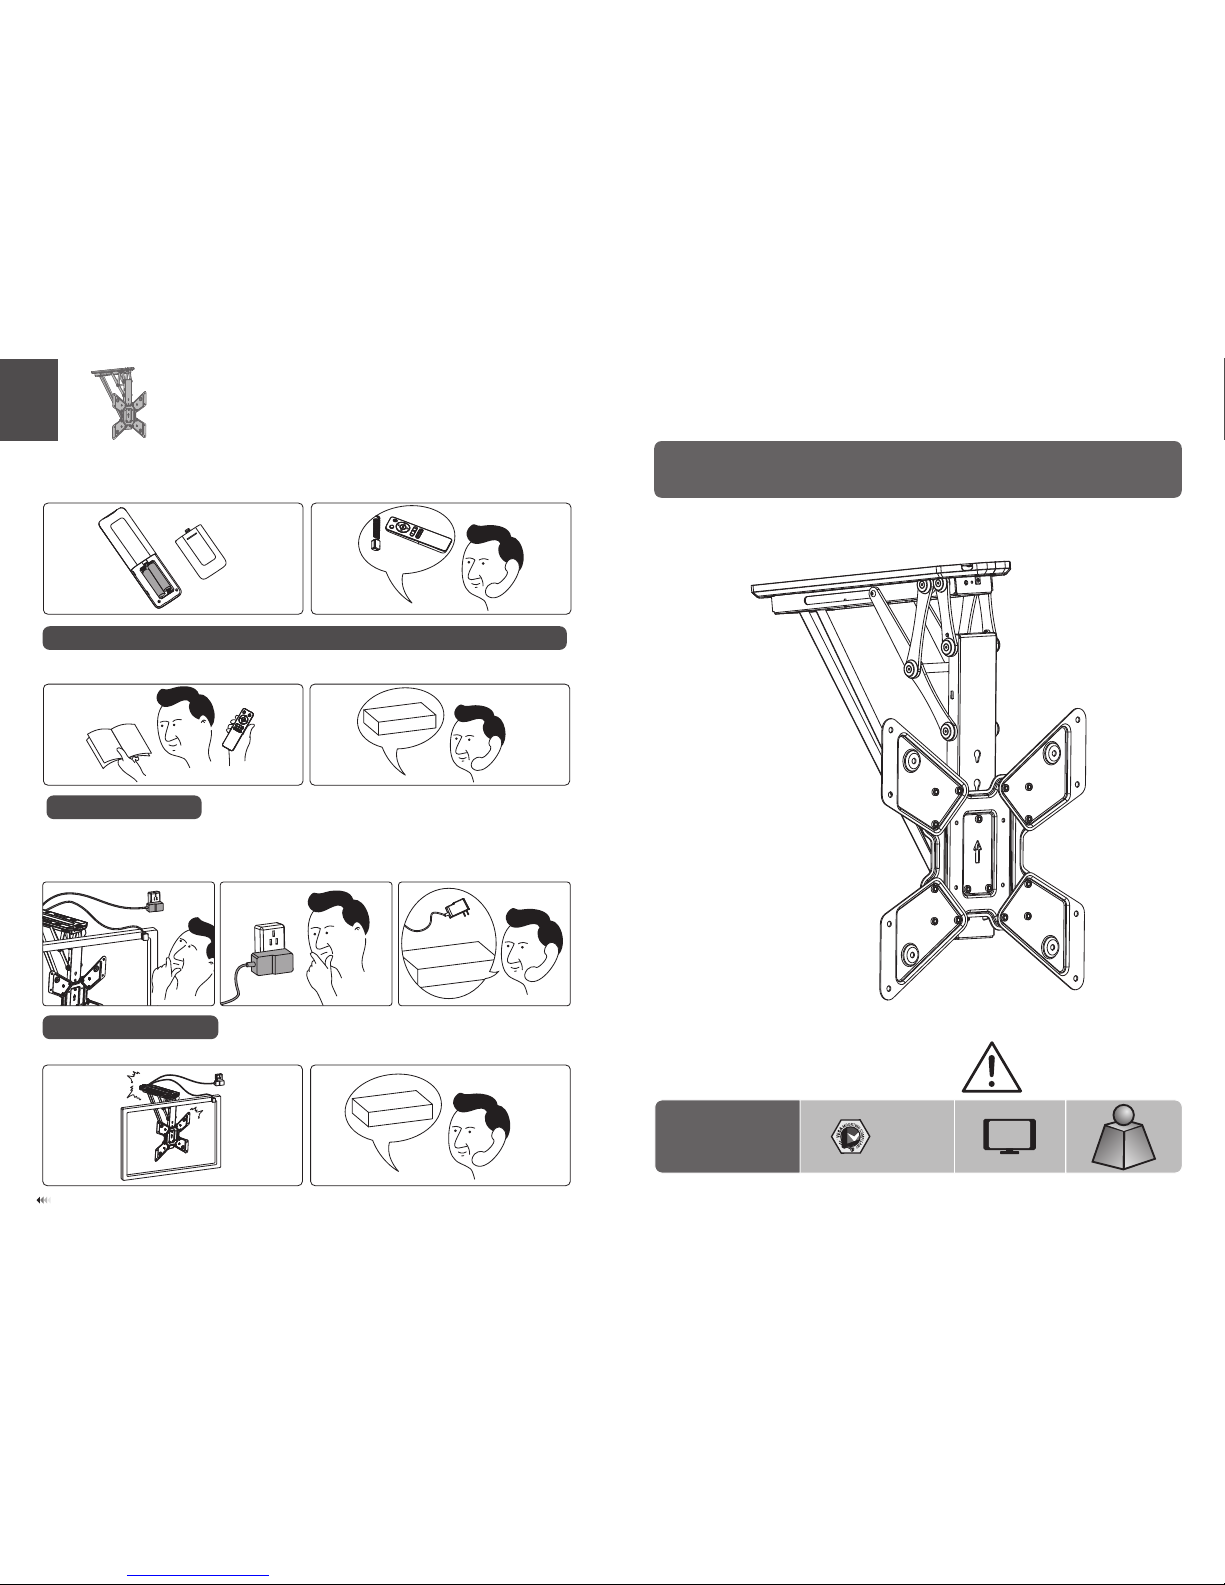
CAUTION: DO NOT EXCEED
RATED LISTED WEIGHT. SERIOUS
INJURY OR PROPERTY DAMAGE
MAY OCCUR!
PLB-M0544
55"
MAX
200x200
300x300
400x200
400x400
30kg
(66lbs)
RATED
30kg
(66lbs)
RATED
Remote Control Motorized TV Ceiling Mount
Please reset the system by following the instruction manual. If the problem is still not solved, please contact us to
replace the product.
Please check if the power adaptor is properly connected to the product. If so, please turn the power on. If there is no
buzzer sound or red light power indication, please check if the power adaptor works properly. If the power adaptor
doesn’t work please contact us to replace the power adaptor. If the power adaptor works properly, but the TV mount
doesn’t work, please contact us to replace the product.
Please contact us to replace the product.
Can’t Operate
3. The Insensitivity Of Remote Control (The Functional Distance Is Less Than 3m.)
Please replace the batteries. If the problem is still not solved, please contact us to replace remote control and infrared
ray receiver.
21
Abnormal Operation: The TV Mount Can’t Be Adjusted To 0° Or 75°
21
product
2 3
product
or
Abnormal Noise
2
product
1
11
21
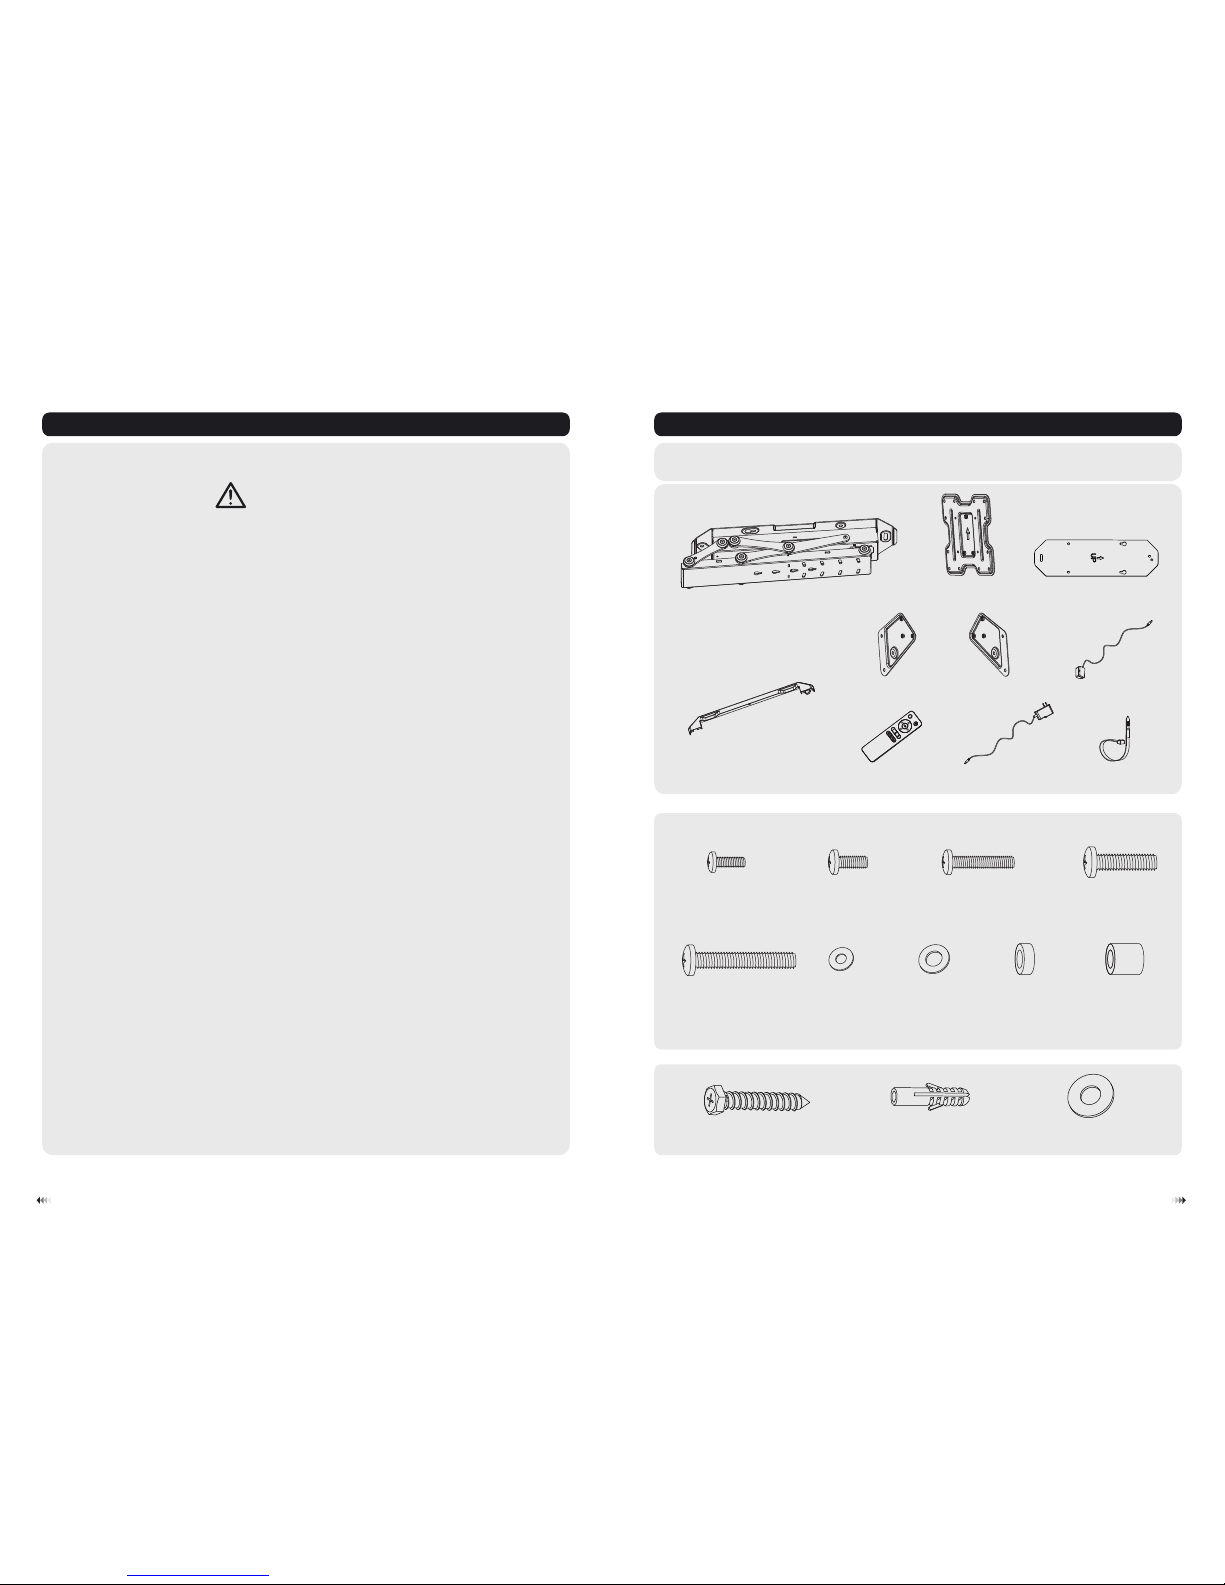
NOTE: Read the entire instruction manual before you start installation and assembly.
WARNING
• Do not begin the installation until you have read and understood all the instructions
and warnings contained in this installation sheet. If you have any questions
regarding any of the instructions or warnings, please contact your local distributor.
• This mounting bracket was designed to be installed and utilised ONLY as
specified in this manual. Improper installation of this product may cause damage
or serious injury.
• This product should only be installed by someone with good mechanical ability
who has basic building experience and fully understands this manual.
• Make sure that the supporting surface will safely support the combined weight of
the equipment and all attached hardware and components.
• Always use an assistant or mechanical lifting equipment to safely lift and position
the equipment.
• Tighten screws firmly, but do not over tighten. Over tightening can cause damage
to the items, This greatly reduces their holding power.
• This product is intended for indoor use only. Using this product outdoors could
lead to product failure and personal injury.
• Please do not disassemble or change the electronic components of the product
without authorization.
Component Checklist
IMPORTANT: Ensure that you have received all parts according to the component checklist prior to installation.
If any parts are missing or faulty, telephone your local distributor for a replacement.
Package M
Package W
ST6.3x55 (x6)
W-A
concrete anchor
W-B
(x6) D6 washer (x4)
W-C
motorized wall mount (x1)
A
VESA plate (x1)
B
remote control (x1)
H
VESA adapter (x2)
E
VESA adapter (x2)
F
decorative cover (x2)
D
ceiling template (x1)
C
power supply (x1)
I
IR receiver (x1)
G
cable tie (x4)
J
M8x30
M-D
(x4)
M6x30
M-C
(x4)
M5x14
M-A
(x4) M6x14
M-B
(x4)
M8x50
M-E
(x4) D8 (x4)
M-G
washer
D5 (x4)
M-F
washer big
M-I
spacer (x8)small spacer (x8)
M-H

WARNING
• Installers are responsible to provide hardware for other types of mounting situations.
• Installers must verify that the supporting surface will safely support the combined weight of the
equipment and all attached hardware and components.
1a. For Wooden Ceiling Mounting
Drill pilot holes
Mark the exact
location of
mounting holes
34
Screw the ceiling
mount onto
the ceiling
W-A
W-C
W-A
1
2
Tighten two screws leaving a 5mm
space from the ceiling.
Hang the ceiling mount so that the screws
fit into the keyhole openings. Slide slightly
the ceiling mount into place and then
tighten the screws.
ø 4.5mm
(ø 3/16”)
55mm
(2.2")
55mm
(2.2”)
5mm
C
X
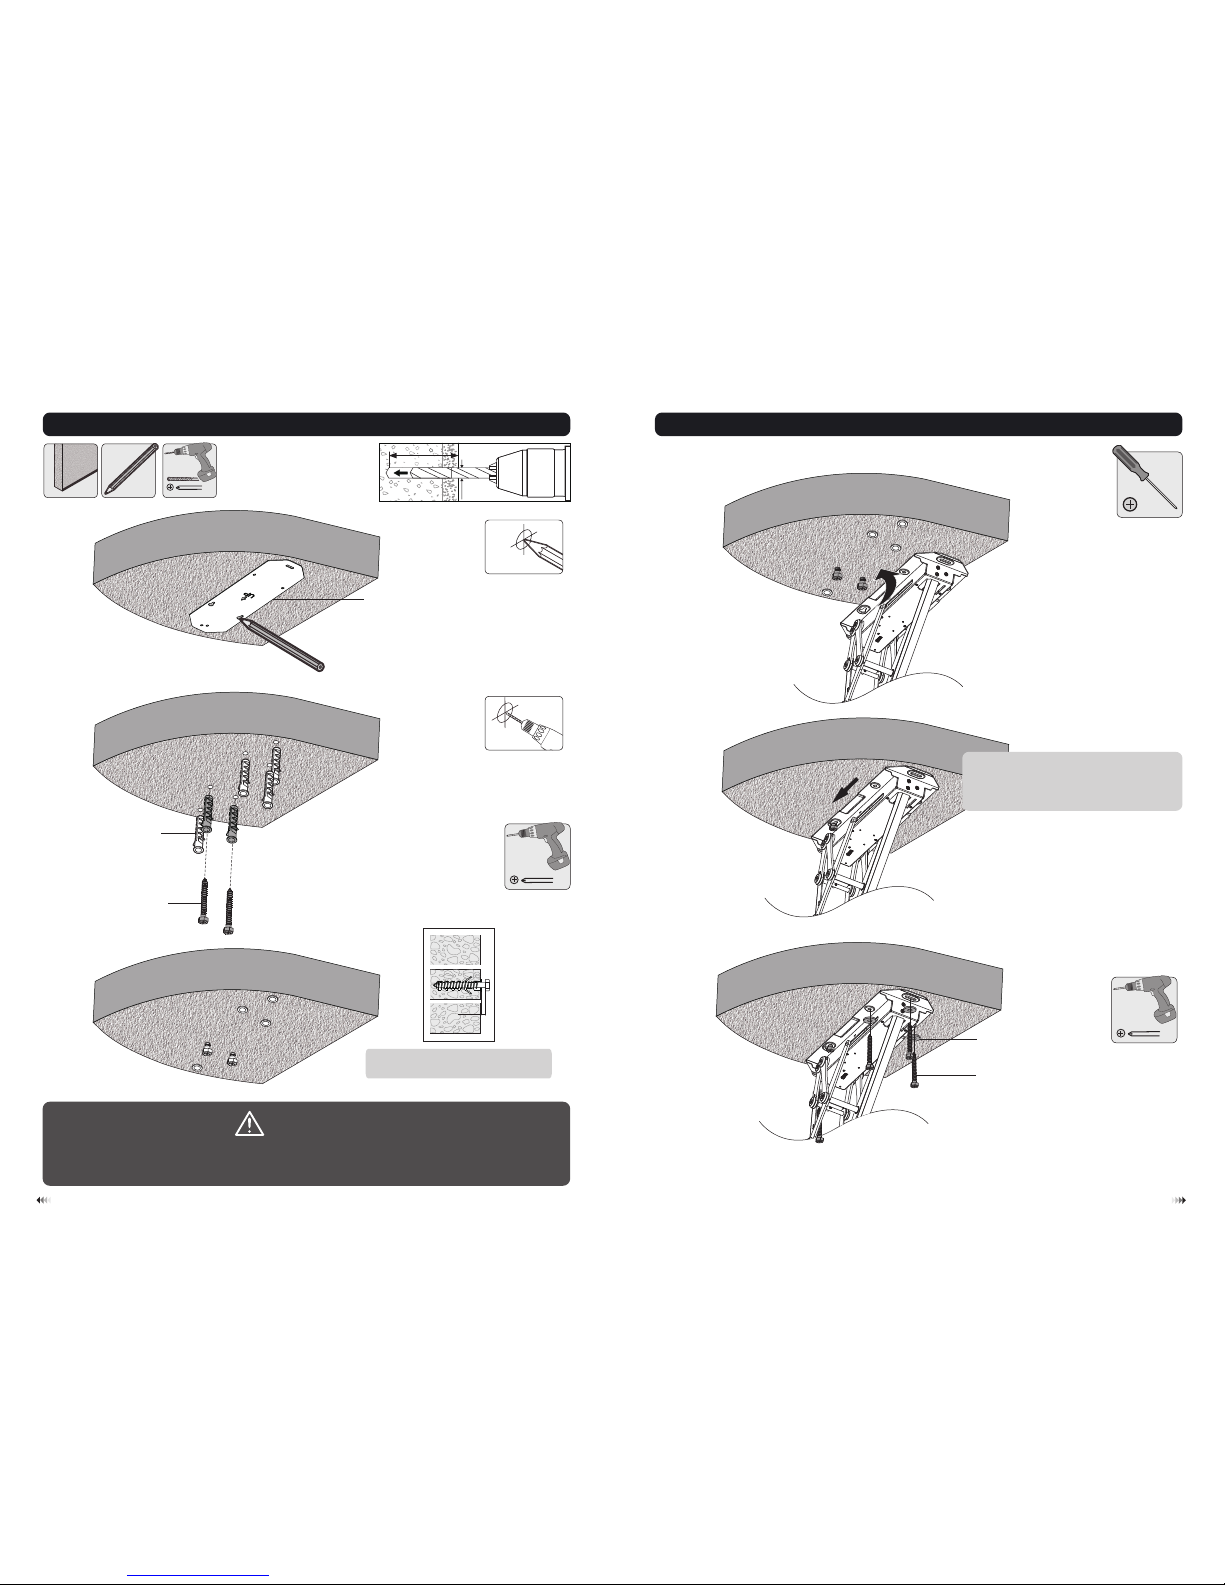
Installers must verify that the supporting surface will safely support the combined weight of
the equipment and all attached hardware and components.
WARNING
1b. For Solid Brick and Concrete Ceiling Mounting
Drill pilot holes
60mm
(2.4")
60mm
(2.4")
ø 10mm
(ø 3/8")
Mark the exact
location of
mounting holes
56
Screw the ceiling
mount onto
the ceiling
W-B
W-A
W-C
W-A
1
2
Tighten two screws leaving a 5mm
space from the ceiling.
Hang the ceiling mount so that the screws
fit into the keyhole openings. Slide slightly
the ceiling mount into place and then
tighten the screws.
5mm
C

87
M-A
M-B M-F
M-G
2. Installing the VESA Plate
Remove the bottom screws from the
VESA plate and keep the two
screws for use later.
2-1 For Flat Back Screens
2-2 For Recessed Back Screens or to Access A/V Inputs
Tighten all screws but do not over tighten.
· Screw the VESA plate onto the TV.
· Position the VESA plate as close as possible to the middle of the screen.
Note: Choose the appropriate screws, washers and spacers (if necessary) according to the type of screen.
or
TV
TV
TV
TV
TV
TV M-H
M-G
M-C
M-D
M-H
M-G
M-E
M-I
M-H
M-H
M-G
M-C
M-D
M-I
M-H
M-G
M-E
M-H
M-I
M-G
M-E
M-I
M-H
M-G
M-C
M-D
M-I
or
or
or

109
3. Hooking the TV onto the Ceiling Mount
≥15mm
4. Installing the Decorative Covers and Running the Cables
D
J
Anything is not allowed to pass
through the mount motion space.
Use the cable ties to hold the cables in place.
Note: Leave slack in the cables for arm movement.

5. Placing the IR Receiver
Peel the backing paper. Place the IR receiver
into desired position.
Make sure nothing will obstruct the transmission
from where the TV will be viewed.
Do not plug into the power outlet until
it is ready to be operated.
11
Do not open the electrical cover please.
12
6. The Remote Control Operating Instructions
Remote control operation instructions
remote control
Buttons function instructions
Stop button
OK
Memory button1.Press and hold for 5 seconds, the buzzer will sound twice beep beep, The memory
is saved as location 1.
Memory button2.Press and hold for 5 seconds, the buzzer will sound twice beep beep, The memory
is saved as location 2.
OUT button, downward movement
IN button, upward movement
+To recall the button(location 1). Press and release button, and then press button,
The TV ceiling mount will automatically swivel to the location1 after the buzzer sounds once.
+To recall the button(location 2). Press and release button, and then press button,
The TV ceiling mount will automatically swivel to the location2 after the buzzer sounds once.
Follow the Key function instructions below to operate.
STEP 1:When powered, the buzzer sounds once beep, the TV
ceiling mount will be in standby state. The TV ceiling mount is
installed on a flat surface by default, and has a 0°~75°
continuous adjustable tilt.
STEP 2: Press and release OK to return the TV ceiling mount
flat against the ceiling surface and hear one beep from the
buzzer, the system will then enter a working condition.
(Please reset the tilt angle if you install the TV ceiling mount on
a pitched surface. Press and hold for 5 seconds and
repeat four times. The system will automatically find the
position without human intervention. Once this is done, the
system will automatically stop at the maximum position. Please
ignore this step if this mount is not intended for
installation on a pitched surface.)
NOTE : No-load running prohibited.
I
G
Manual mode
•
•
In any position (but the minimum position against the ceiling), when manually push up the TV ceiling mount
over a distance. The TV ceiling mount will automatically return back to the minimum position against the
ceiling.
In the minimum position, when manually push up the TV ceiling mount over a little distance. The TV ceiling
mount will automatically unfold at the maximum position.

Maintenance
• Check that the bracket is secure and safe to use at regular intervals(at least every three months).
• Please contact your distributor if you have any questions.
LEARN MODE operation instructions
The loss of matched remote control would result in TV ceiling mount being unusable. The LEARN MODE
is used to learn how to use TV remote (ONLY suitable for the TV remote of popular brands.) to control TV
ceiling mount.
Note:
• TV remote can’t replace the all functions of matched remote control. Only LEARNING the three buttons
functions. With , and respectively.
• The user must follow the rules below when using the TV remote to control TV ceiling mount.
Select the alternate buttons from the TV remote, and the button that can't direct control the TV.
• If you need to erase all the button functions LEARNED, press and hold for 4 seconds and repeat
five times.
If you don't erase them, the new button functions LEARNED every time will overwrite the last button
functions LEARNED.
OK
OK
OK
LEARN MODE instructions as shown below:
STEP1: Press and hold for 5 seconds until LED light on the matched remote control stays on, and
then press . The buzzer will sound once, the red LED light on the IR receiver will stay on, then the
LEARN MODE will be entered.
STEP2: If LEARN , please press on the matched remote control until the buzzer sounds twice,
the red LED light on the IR receiver will change from being steady to a slow flash.
STEP3: Aim the TV remote at the IR receiver, and press the button on the TV remote that you need to set as
the function of button until the buzzer sounds three times. the red LED light on the IR receiver will
change from slow flash to a fast flash.
STEP4: Press button on the matched remote control until the buzzer sounds four times. The
red LED light on the IR receiver will turn off. button will be LEARNED successfully. If the buzzer only
sounds once, then a LEARN failure.(The TV remote won’t support the LEARNING function).
(Please follow step1 through step4 in turn if the user need to LEARN more buttons.)
14
13
Learn “Power” button on the TV remote:
Press and hold for 5 seconds until LED light on the matched remote control stays on , and then press .
The buzzer will sound once, the red LED light on the IR receiver will stay on, then press and hold button
on the matched remote control until the buzzer sounds twice, then release the button. The red LED
light on the IR receiver will change from being steady to a slow flash.
Aim the TV remote at the IR receiver, and press “Power” button. The buzzer will sound three times. The red
LED light on the IR receiver will change from slow flash to a fast flash. Press button on the matched
remote control until the buzzer sounds four times. The red LED light on the IR receiver will turn off. “Power”
button will be LEARNED successfully. If press “power” button, the TV wall mount will automatically reset.
Note: When there is no activity for over 20 seconds in any step .TV remote will automatically exit from the
LEARN MODE.
OK
OK
Remote Control Problems
2. Buttons On Remote Control Don’t Work.
1. Please check if the infrared ray receiver is properly connected to the product.
2. Please check if the batteries have power. If the problem isn’t solved, please contact us to replace the remote control
and infrared ray receiver. If the problem is still not solved after the replacement, please contact us to replace the product.
2 3
product
or
1. Abnormal Loss Of Power
(Batteries Are Out Of Power After 24hrs Without Using The Remote Control.)
Please contact us to replace remote control.
2
1
24hrs
1. The Buzzer Constantly Gives Out Alarm Sound:
The Error Of Positioning Signal
Reset the system by following the instruction manual. If the alarm sound continues, please contact us to replace the
product.
7. Repair
In Front
Error Indication
This repair guide intents to help you identify and solve the minor problems caused by unusual operation of the
electric system of our electric TV mounts. The simple procedures in this manual are easy to follow and capable of
solving the most problems happened in everyday use.
21
product
11
Table of contents
Popular TV Mount manuals by other brands


Kanto
Kanto TTS150 user manual

BRKT Brand
BRKT Brand BRKT TLT3790MAX instruction manual

Black Diamond Equipment
Black Diamond Equipment HELIO 350 INSTALLATION, USE AND MAINTENANCE GUIDEBOOK

Mounting Dream
Mounting Dream MD2268-32 Installation instruction

Rosewill
Rosewill RMS-MA2740 instruction manual

KSL
KSL WM113T quick start guide