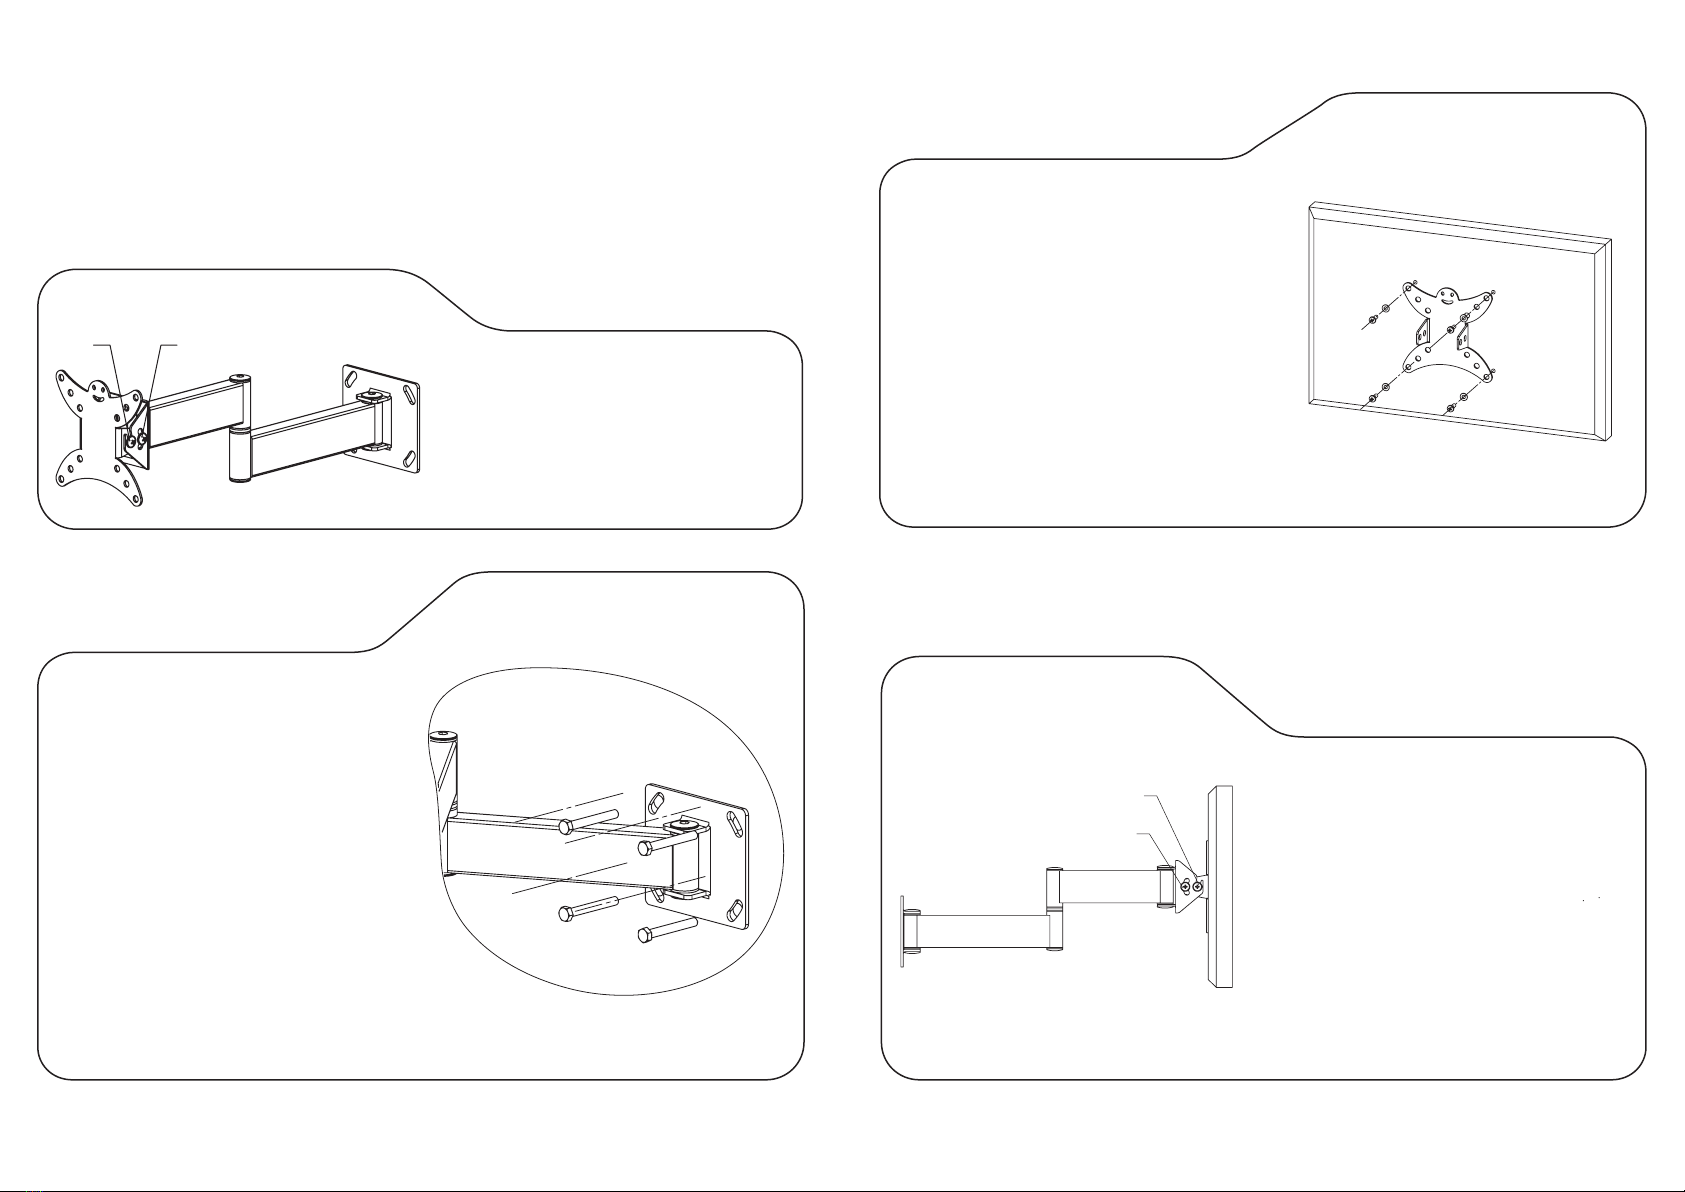
manuals.online logo
Brands
  1. Home
  2. •
  3. Brands
  4. •
  5. KSL
  6. •
  7. TV Mount
  8. •
  9. KSL WM113T User manual

KSL WM113T User manual

KSL WM113T
Деталі кронштейна
Details of the wall mount
Комплект кріплення
Set fasteners
Настінний кронштейн
Wall plate
Позначення
Marking
Кількість
Quantity
Кількість
Количество
Позначення
Marking
Позначення
Marking
Кількість
Quantity
Кронштейн кріплення
Mounting bracket
Комплектація
Components
1
1
Для кріплення пластини А до стіни
For mounting the plate Ato the wall
Для кріплення кронштейна Б до панелі
For fastening the bracket Bto the panel
Installation Instructions
Інструкція з встановлення
Дякуємо за вибір продукції KSL!
Вся продукція KSL виробляється в Україні і на неї надається довічна гарантія!
Будь ласка, уважно ознайомтесь з даною інструкцією перед початком встановлення кронштейну!
Монтаж повинен проводитись у суворій відповідності до інструкції!
Необхідний для встановлення інструмент:
– олівець (для розмітки місць свердління)
– рівень (для правильного горизонтального встановлення кронштейна)
– перфоратор і бур діаметром 8 і довжиною не менше 65 мм
– викрутка хрестова (для прикручування гвинтів до панелі)
– молоток (для забивання анкерів або дюбелів)
– ключ гайковий №10 (для закручування гвинтів або анкерів)
KSL WM113T
Thank you for choosing KSL! All KSL products are made in Ukraine.
Please read these instructions before installing the wall mount! Installation should be carried out in
strict accordance to the instructions!
Tools required for installation:
– Pencil (to mark the drilling locations)
– The level (for proper horizontal mounting bracket)
– Punch and drill diameter of 10 and a minimum length of 60 mm
– Phillips screwdriver (to tighten the screws to the panel)
– Hammer (for driving anchors or dowels)
– Wrench №10 (for tightening the screws or anchors)
D
Кількість
Quantity
Позначення
Marking
Дюбель 10х50 4 шт.
Шуруп 6х50 4 шт.
Шайба М8 4 шт
Пласт. хомут 4 шт.
Dowel 10х50 4 pcs
Screw 6х50 4 pcs
Washer М8 4 pcs
Plastic clamp 4 pcs
C
B
A
Винт М4х12 4 шт.
Винт М6х12 4 шт.
Ключ шестигран. 1 шт
Screw М4х12 4 pcs
Screw М6х12 4 pcs
Allen key 1 pcs
ENG
UKR
Настінний кронштейн з регульованим кутом нахилу та
поворотом для РК (LCD/LED) телевізорів і моніторів
Wall mount with adjustable tilt and turn
for LCD (LCD / LED) TVs and monitors
Призначений для панелей з кріпильним блоком VESA 50х50, 75х75,
100х100 мм і максимальною вагою 15 кг.
Designed for TVs with the mounting unit VESA 50x50, 75x75, 100x100
mm and a maximum weight of 15 kg.
Крок 1
Step 1
Крок 2
Step 2
Загальні вимоги безпеки. Кронштейн призначений для встановлення у внутрішніх приміщеннях. Перш ніж
монтувати кронштейн, переконайтеся у відсутності проходження на місці кріплення електричного кабелю,
газопроводу, сантехнічних розводок і інших комунікацій. Ніколи не встановлюйте частини, що мають дефекти.
Кріплення, що входить в комплект, призначене для бетонних або цегельних стін, товщина штукатурки не
повинна перевищувати 3 мм. Для інших видів стін знадобиться інше кріплення.
General safety requirements. The wall mount is designed for installation indoors. Before mounting bracket, make sure
no passing in place of mounting electrical cables, gas, plumbing and other communications interconnections. Never
install parts with defects. The included fasteners are designed for concrete or brick walls, plaster thickness should not
exceed 3 mm. For other types of walls need other fasteners.
Увага! Після встановлення кронштейну перевірити надійність його кріплення до стіни.
Caution! After installation the plate check the reliability of the bracket to the wall.
Крок 4
Шаг 4
Навісити телевізор з кронштейном B на пластину А
(зафіксувати на гвинтах в отворах 1). Вкрутити гвинти
в отвори 2. Встановити бажаний кут нахилу, після
чого зафіксувати, затягнувши гвинти в отворах 2.
Відрегулювати бажаний кут повороту екрану в 3-х
поворотому вузлах кронштейна А і зафіксувати його,
затиснувши фіксуючий гвинт ключем з комплекту D.
Hang the TV with the bracket Bto plate A( fix the screws
into the holes 1). Screw the screws into the holes 2. Set
the desired tilt angle, then fix it by tightening the screws
in the holes 2. Adjust the desired screen’s turn angle at 3
rotary nodes bracket Aand fix it, holding the locking
screw with the supplied key D.
Крок 3
Шаг 3
Увага! Після встановлення кронштейну перевірити надійність його кріплення до панелі телевізору.
Attention! After installation, test the reliability of mounting bracket to the TV.
Вибрати з комплекту кріплення D гвинти
відповідної довжини і діаметру. Використовуйте
лише розмір гвинтів, вказаний в інструкції до
телевізора! Закріпити на панелі телевізора
кронштейн B, використовуючи гвинти з комплекту
кріплення D. Якщо необхідного розміру гвинтів не
передбачено в комплекті, вам необхідно придбати
їх самостійно.
Choose from a set of fasteners Dscrews of an
appropriate length and diameter. Use only the size of
screws specified in the instructions to your TV! Fasten
the bracket Bto the TV using the included screws from
the set D. If required size of screws is not provided in
the kit, you will need to purchase them by yourself.
Використовуючи кронштейн А як шаблон, а
також рівень з комплекту інструментів,
розмітити місце майбутньої установки
кріплення відповідно до 4 отворів в
кронштейні А; отвори повинні
розташовуватися горизонтально.
Використовуючи перфоратор, просвердли-
ти у стіні 4 отвори діаметром 10 мм і
глибиною не менше 60 мм. Вставити дюбелі
C в отвори. Закріпити пластину А на стіні,
використовуючи шурупи з комплекту C.
Using Aplate as a template and the level of the
sets, mark the place of the installation
according to the mounting holes in the plate A;
holes should be placed horizontally. Using a
hammer, drill 4 holes in the wall with a
diameter of 10 mm and a depth of at least 60
mm. Put the dowels Cinto the holes. Fix the
plate Aon the wall using the supplied screws C.
Відкрутити гвинти з отворів 2, послабити
гвинти в отворах 1. Після чого роз’єднати
кронштейн B і кронштейн А.
Remove the screws from the holes 2, loosen the
screws in the holes 1. Then disconnect the
bracket Band the bracket A.
12
2
1
Виробник може змінювати комплектацію та характеристики виробу.
The manufacturer may change the fasteners set and specification the product.

Other KSL TV Mount manuals

KSL UKR2EP228 User manual

KSL

KSL UKR2EP228 User manual

KSL UKR2ET226 User manual

KSL

KSL UKR2ET226 User manual

KSL DM31T User manual

KSL

KSL DM31T User manual

KSL Simpler 11ET User manual

KSL

KSL Simpler 11ET User manual

KSL WM448N User manual

KSL

KSL WM448N User manual

KSL UKR2ET448 User manual

KSL

KSL UKR2ET448 User manual

KSL WM111N User manual

KSL

KSL WM111N User manual

KSL UKR2EP448 User manual

KSL

KSL UKR2EP448 User manual

KSL UKR2EN448 User manual

KSL

KSL UKR2EN448 User manual

KSL UKR2EN228 User manual

KSL

KSL UKR2EN228 User manual

KSL DM11T User manual

KSL

KSL DM11T User manual

KSL Simpler 12ET User manual

KSL

KSL Simpler 12ET User manual

KSL WM227N User manual

KSL

KSL WM227N User manual

KSL UKR2ET225 User manual

KSL

KSL UKR2ET225 User manual

KSL UKR2EN449 User manual

KSL

KSL UKR2EN449 User manual

KSL UKR2ET449 User manual

KSL

KSL UKR2ET449 User manual

KSL UKR2EN227 User manual

KSL

KSL UKR2EN227 User manual

KSL WMO-3013T User manual

KSL

KSL WMO-3013T User manual

KSL PK100 User manual

KSL

KSL PK100 User manual

KSL WM111T User manual

KSL

KSL WM111T User manual

KSL WMO-4023T User manual

KSL

KSL WMO-4023T User manual

Popular TV Mount manuals by other brands

VUEPOINT F18 manual

VUEPOINT

VUEPOINT F18 manual

Sanus XF228 instruction manual

Sanus

Sanus XF228 instruction manual

Philips SF007521/10 Assembly instruction

Philips

Philips SF007521/10 Assembly instruction

Bose WB-3 owner's guide

Bose

Bose WB-3 owner's guide

tau 800ABTSE manual

tau

tau 800ABTSE manual

Wilko WL11 manual

Wilko

Wilko WL11 manual

DMP Electronics TV Trolley Stand Assembly instructions

DMP Electronics

DMP Electronics TV Trolley Stand Assembly instructions

AVF CNL665K-F manual

AVF

AVF CNL665K-F manual

Sony SU-W210 instructions

Sony

Sony SU-W210 instructions

Sony SU-WL850 Installation information

Sony

Sony SU-WL850 Installation information

Mustang MPT-X85UA instruction manual

Mustang

Mustang MPT-X85UA instruction manual

Mounting Dream MD2617-03 installation instructions

Mounting Dream

Mounting Dream MD2617-03 installation instructions

USX-MOUNT XMS008-01 instruction manual

USX-MOUNT

USX-MOUNT XMS008-01 instruction manual

Gianni Industries GEM EM-10001L Specification sheet

Gianni Industries

Gianni Industries GEM EM-10001L Specification sheet

VCM B-NS600 instruction manual

VCM

VCM B-NS600 instruction manual

ricoo SQ4965 quick start guide

ricoo

ricoo SQ4965 quick start guide

Acadia AC/W/XL600/WH Assembly instructions

Acadia

Acadia AC/W/XL600/WH Assembly instructions

Vivotek AM-102 user manual

Vivotek

Vivotek AM-102 user manual

manuals.online logo
manuals.online logoBrands
  • About & Mission
  • Contact us
  • Privacy Policy
  • Terms and Conditions

Copyright 2025 Manuals.Online. All Rights Reserved.