Bravat B25712W-6 User manual
75
40
(575)
(1700)
(1650)
(850)
(900)
Ø55
Ø55
Model: B25712W-6
Description:1.7m Bubble Massage Bathtub
A
Unit
:mm
PRODUCTS INSTALLATION INSTRUCTIONS
1.
.
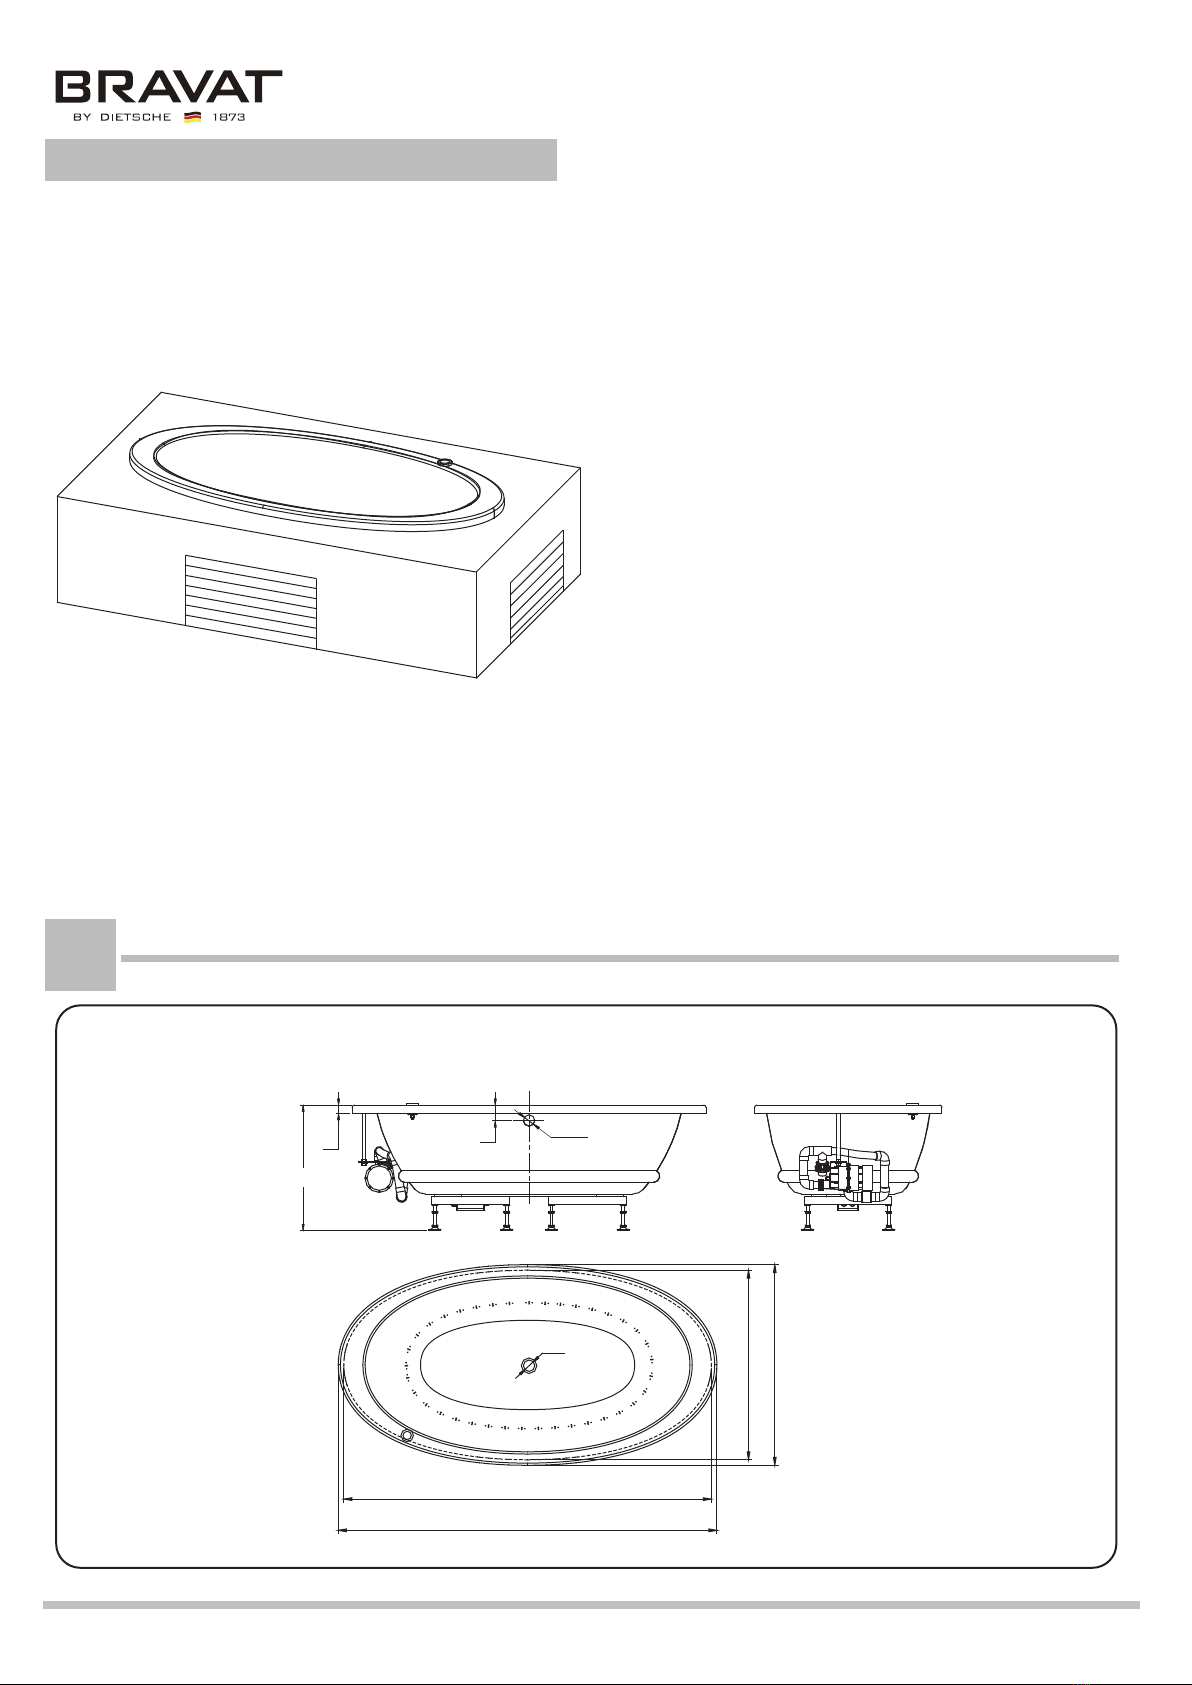
Dimensions: 1700×900×575mm
2. Material: Acrylic
3.Innovative155 intensive airjets, all-encompassing balanced
body massage experience.
4.Adjustable airflow,free massage intensity setting.
5.BODY-CONTOUR airjet design, aesthetic outline, comfortable
and ideal for lying bath.
6.Smart cleaning system, ensure hygienic and healthy.
7.Air pump installation is optional via either left side or right side,
bathtub weighs 45kg.
8.Full water volume is 204L(up to overflow outlet)
Guangzhou BRAVAT Industrial Co., Ltd.
Service Hot Line: 800-820-5330
Web:www.bravat.com
1
INSTALLATION DIMENSIONS

B
HELPFUL TOOLS
CONFIGURATION AND PARAMETERS
Adjustable Wrench Marking Gauge and Pencil Tape Measure Neutral Mildew Resistant
Silicone Sealant
C
D
Level Safety Glasses
POINTS FOR ATTENTION BEFORE INSTALLATION
AC220V~AC240V
Load configuration parameters
50HZ
600W
30MA
15mA
12A
>20MΩ
IPX5
Type of Load
Rated Loading Voltage Rated Loading Power Others
Operating Conditions and Properties
Rated voltage
Rated Amperage
Insulation resistance
Rated Frequency
Rated Wattage
Leakage Current
Leakage current protection
Air Pump
Water-Resistant Grade
600W
300W
AC230V
AC230V
Optional
Heater
1. To facilitate transportation and protect product from damage that may occur in delivery,each bathtub is packed in cartons. In order to avoid
quality dispute,please kindly check product before installation. Or Bravat should not be liable for any quality issue raised after installation.
2. Please read the instruction carefully before beginning to install.
3. Please follow steps in the instruction to install this product or may result in costly mistake. Bravat shall not be responsible for any loss from
that mistake.
4.
Professional help is required for installation of this product.
5. Shut off power supply before installation.
6.Keep the area around the Air Pump clean and free of debris,to prevent air duct clog of pump and restriction of air flow through Air Pump.
Inspection
(1) Check and ensure all switch and accessories are in good condition.
(2) Check and ensure bathtub surface is free of hit and damage.
(3) Check and ensure pipe connection is firm and compact.
(4) Before starting installation, check and ensure bathtub,all connections and accessorie are free of leaks that may occur during delivery.
Attention points at Installation
(1) To facilitate maintenance and clean, we recommend to install bathtub on finished floor with ceramic tile or terrace with ground tile.
(2) To facilitate install and maintenance bathtub’s key parts like drainage system, control system and air pump, DON’T wall up bathtub with
cement or tiles.
(3) DON’T lift pipes or use pipes as lift when transport bathtub.
(4) DON’T remove bathtub protecting film during installation.
(5) DON’T take bathtub out of package for installation until wall and floor preparation finished.
Guangzhou BRAVAT Industrial Co., Ltd.
Service Hot Line: 800-820-5330
Web:www.bravat.com
2

E
OPERATING INSTRUCTIONS
(6) NO bulbs and open fires are allowed to place in bathtub during installation.
(7) NO stuff like sand, cement or other sundries are allowed to place in bathtub as that would likely damage bathtub surface.
(8) NO solvent like paint or glue are allowed to contact with bathtub.
Attentions at installation of electrical appliances
(1) Professional help from electrician is required to connect power cord of air pump with reference to standards.
(2) Exclusive power source for bathtub must have protective device of creepage,overload and short circuit installed and checked
frequently.
(3) Earth wire must be earthed.
(4) Power source must close to electric motors, NO temporary extended socket is allowed to use.
Automatic drainage: Turn the system off, the orange backlight of the air pump icon will be lit by touching and keeping the icon for one second,
the air pump will work at its maximum power for three minutes.
Switch the power on, touch the icon on the panel to turn the system on. Then the orange backlight of the power icon and the white backlight
of the lamp icon will be lit. The light of the nozzle is shining white. Touching the icon again or Runinng time out, all the functions and button
backlight will be turned off. Operation timing: The default setting time of the system is 20 minutes. The system turns off, by touching and keeping
the icon for one second, the backlight of the air pump icon and lamp icon will be lit simultaneously and the timing will be cancelled; touch
the icon again, the orange backlight will be lit simultaneously, and the timing is set. The settings become valid when you restart the machine.
(1) Power On/Off
(2) Backup Heating Function
Turn the system on, touch the icon to start the function of backup heating, then the orange backlight of the icon will be lit; touch the icon again,
the function of backup heating and the backlight of the icon will be turned off.
(3) Air Bubble Massage
Turn the system on, touch the icon to turn on the function of keeping the speed of the air pump; the air pump will run at its maximum power
and the white backlight of the icon will be lit; touch the icon again to turn on the function of regulating the speed of the air pump and the orange
backlight of the icon will be lit; touch the icon for the third time to turn off the function of air pump, then the backlight of the icon will be turned
off. During the process of turning the air pump on, the function of air pump can be shifted between speed maintaining and regulating, by touching
and keeping the icon for one second.
(4) Lamp
Turn the system on, touch the icon to turn on the manual function of 12-color lamp conversion. Touch the icon each time, the lamp will be
changed into a different color and the white light of lamp icon will be lit. Touch and keep the icon
for one second to turn on the lamp function
of automatic color conversion
and the orange backlight of the lamp icon will be lit.
Guangzhou BRAVAT Industrial Co., Ltd.
Service Hot Line: 800-820-5330
Web:www.bravat.com
3
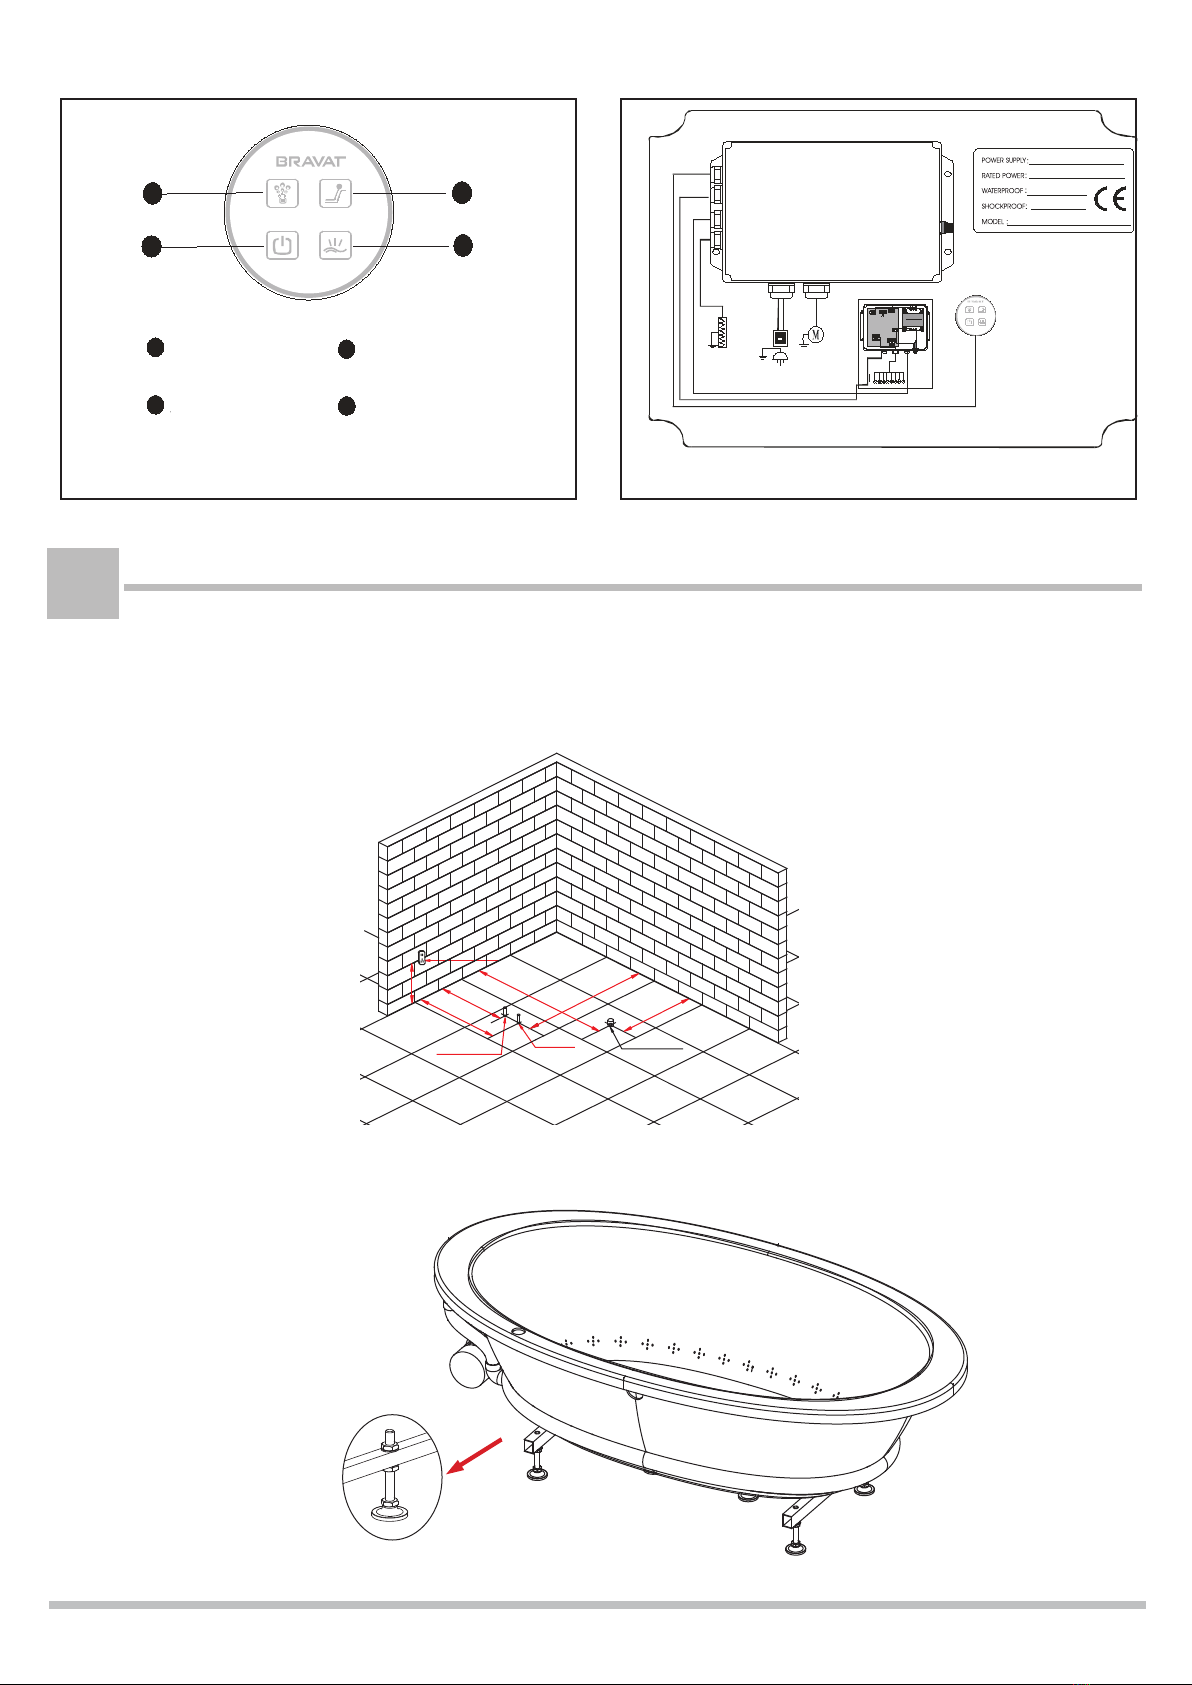
Please embed supply lines,drainage lines, and power socket according to distance from bathtub rim to finished wall. Power socket should be
located above 20cm from finished floor and close to bathtub motor.(Drainage outlet should be 30mm protruding from finised floor)
Adjust leveling feet to keep top rims at horizon, and ensure all feet firmly seat on floor at the same time.
F
INSTALLATION STEP
Hot Supply
Power Socket
Cold Supply Drainage outlet
1
2
3
4
1
23
4
NL
220- 240V~ 50Hz/60Hz
910W
IPX5
I TYPE
BTU1.0
Connection Blueprint Of Massage Tub
MAIN CONTROL BOX
Control Panel
Techniques and parameters are subject to change without notice.
GN-YE
Heat Part
GND
BN BU
GN-YE
GND
Blower
Electric Panel Connection Blueprint
Function Key of Air Pump Function Key of Lighting
Power On/Off Function Key of Backup Heating
Guangzhou BRAVAT Industrial Co., Ltd.
Service Hot Line: 800-820-5330
Web:www.bravat.com
4
Before installation,please refer to the installation diagram.Lay water pipes
on the floor,position the power outlet and hot/cold water inlet pipes.Please
ask a professional plumber to complete the actual construction.
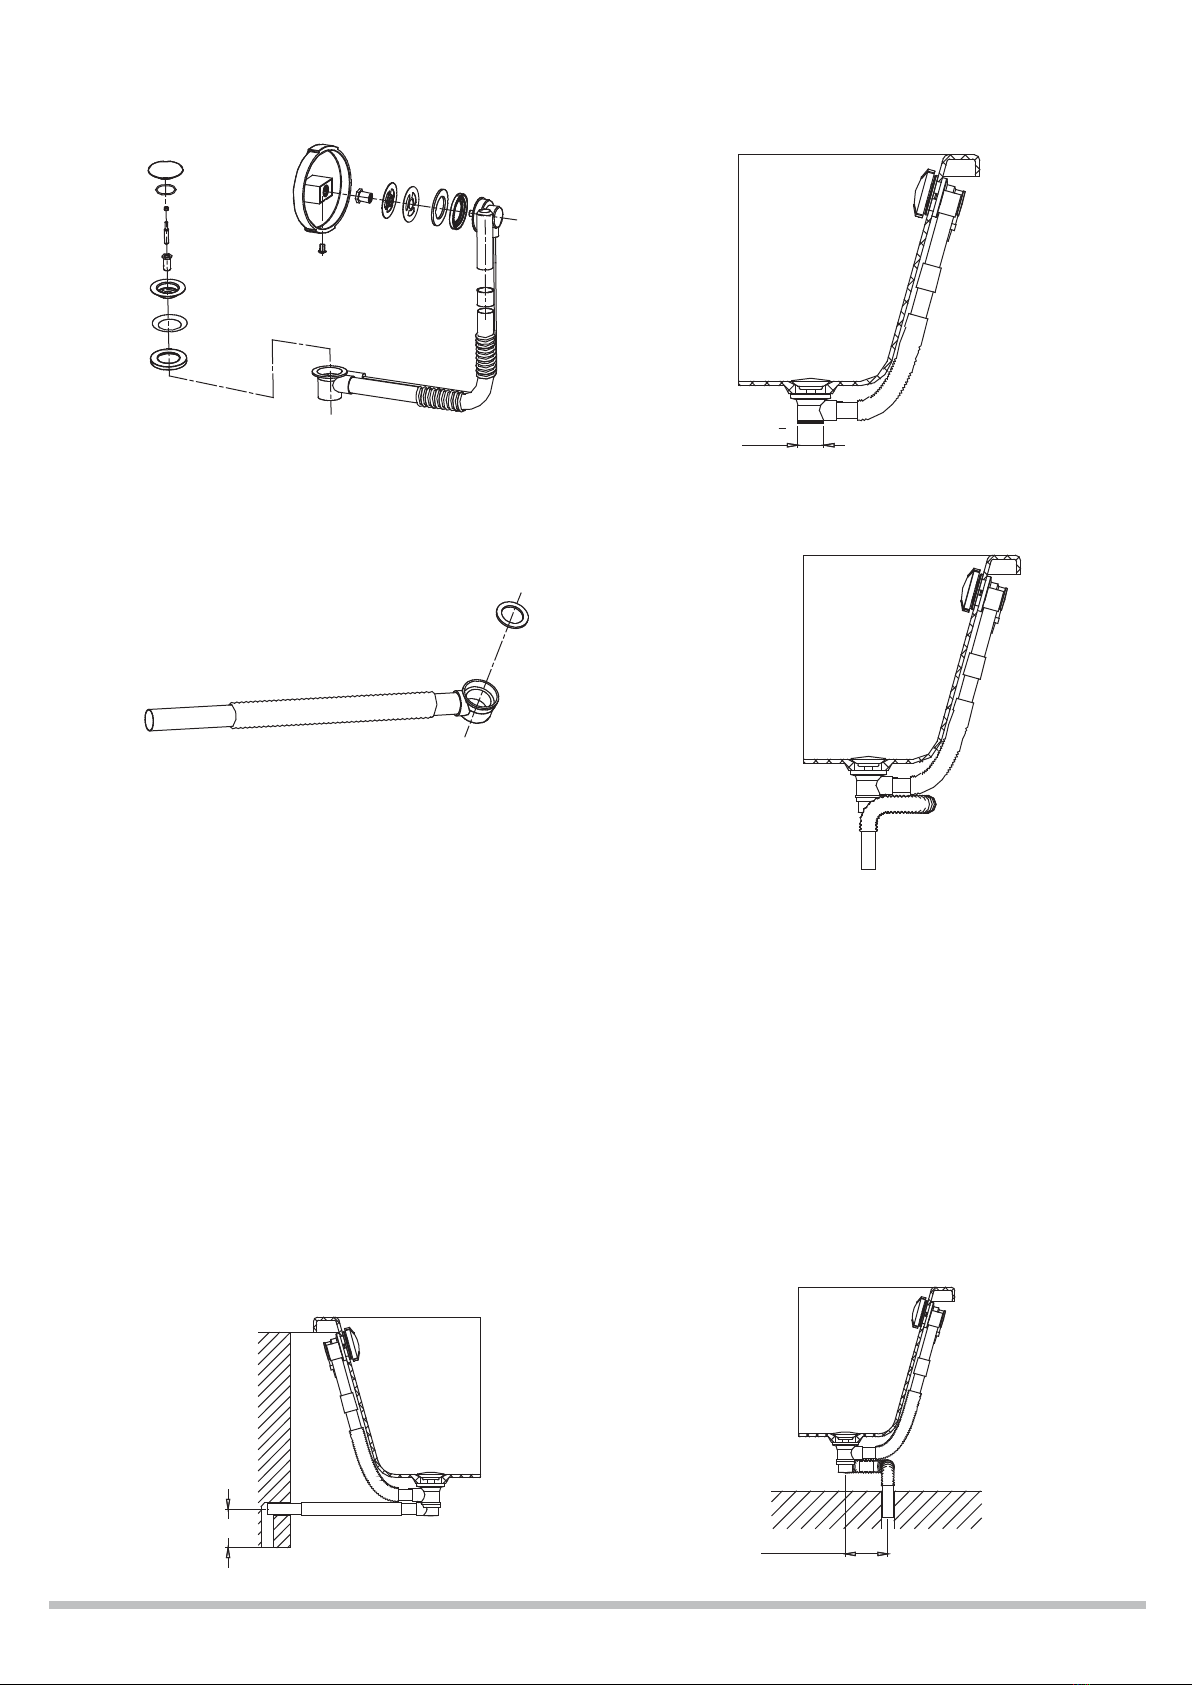
Installation of the drainers:Install the drainers to the bathtub according to the installation instructions of the drainers. The figure below is
the installationillustration recommended by our company specificlly for the Drainer D409 series.
Installation of drain pipes:Install the drain pipes to the bathtub according
to the installation instructions of the drain pipes .The figure below is the
installation illustration recommended by our company for the Drain Pipe P9098N series.
Switch off the water drainage,pour water into the bathtub,and then check
whether there is water leakage.Make sure that the overflow adapter is
leak-proof.
There are two kinds of drainage:drainage through the wall and drainage through the floor. If the drainage through the wall is used,the height of the
drainer pipes must be lower than that of the internal drain outlet of the
bathtub. The height is generally recommended to be 50 mm. If the drainage
through the floor is used, the height of the drain outlet is recommended to
be 120 mm above from the drain outlet. (Drainage through the floor is
recommended.)
G11
2
120mm
50mm
Drainage through the wall Drainage through the floor
Guangzhou BRAVAT Industrial Co., Ltd.
Service Hot Line: 800-820-5330
Web:www.bravat.com
5
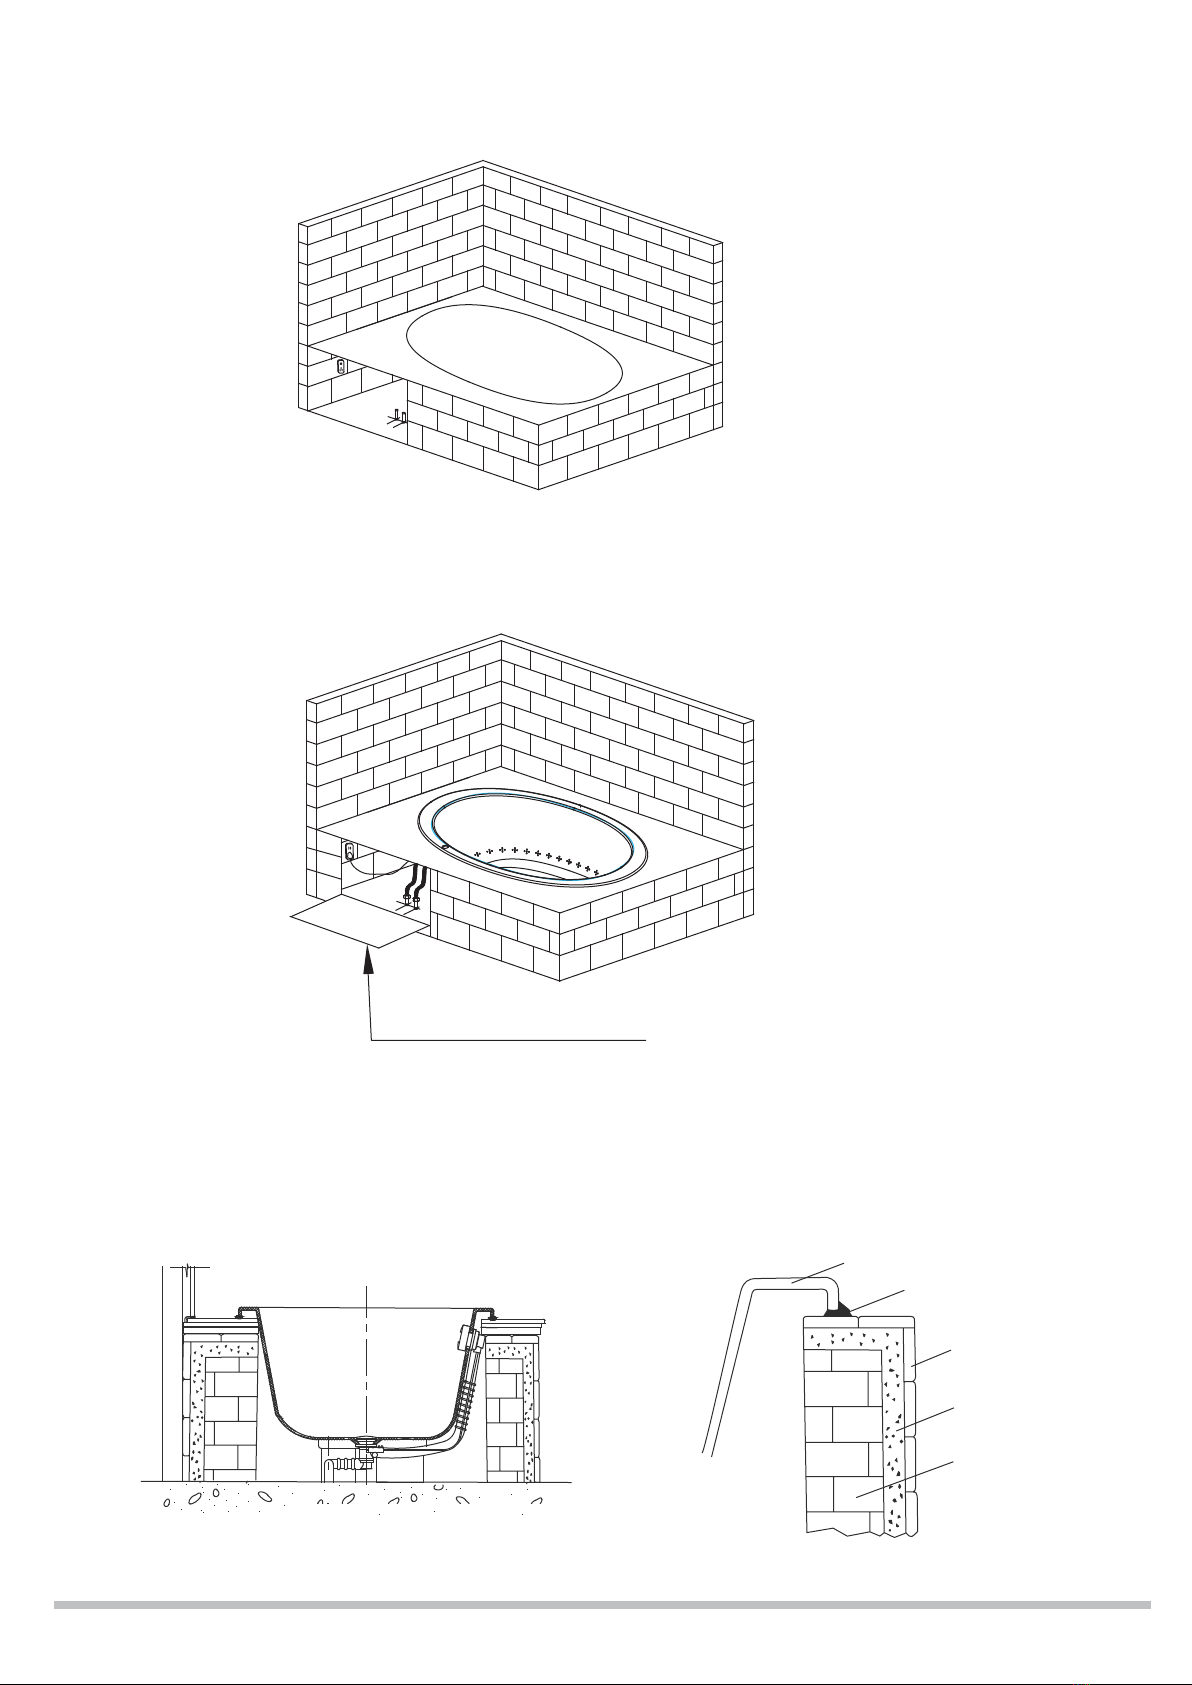
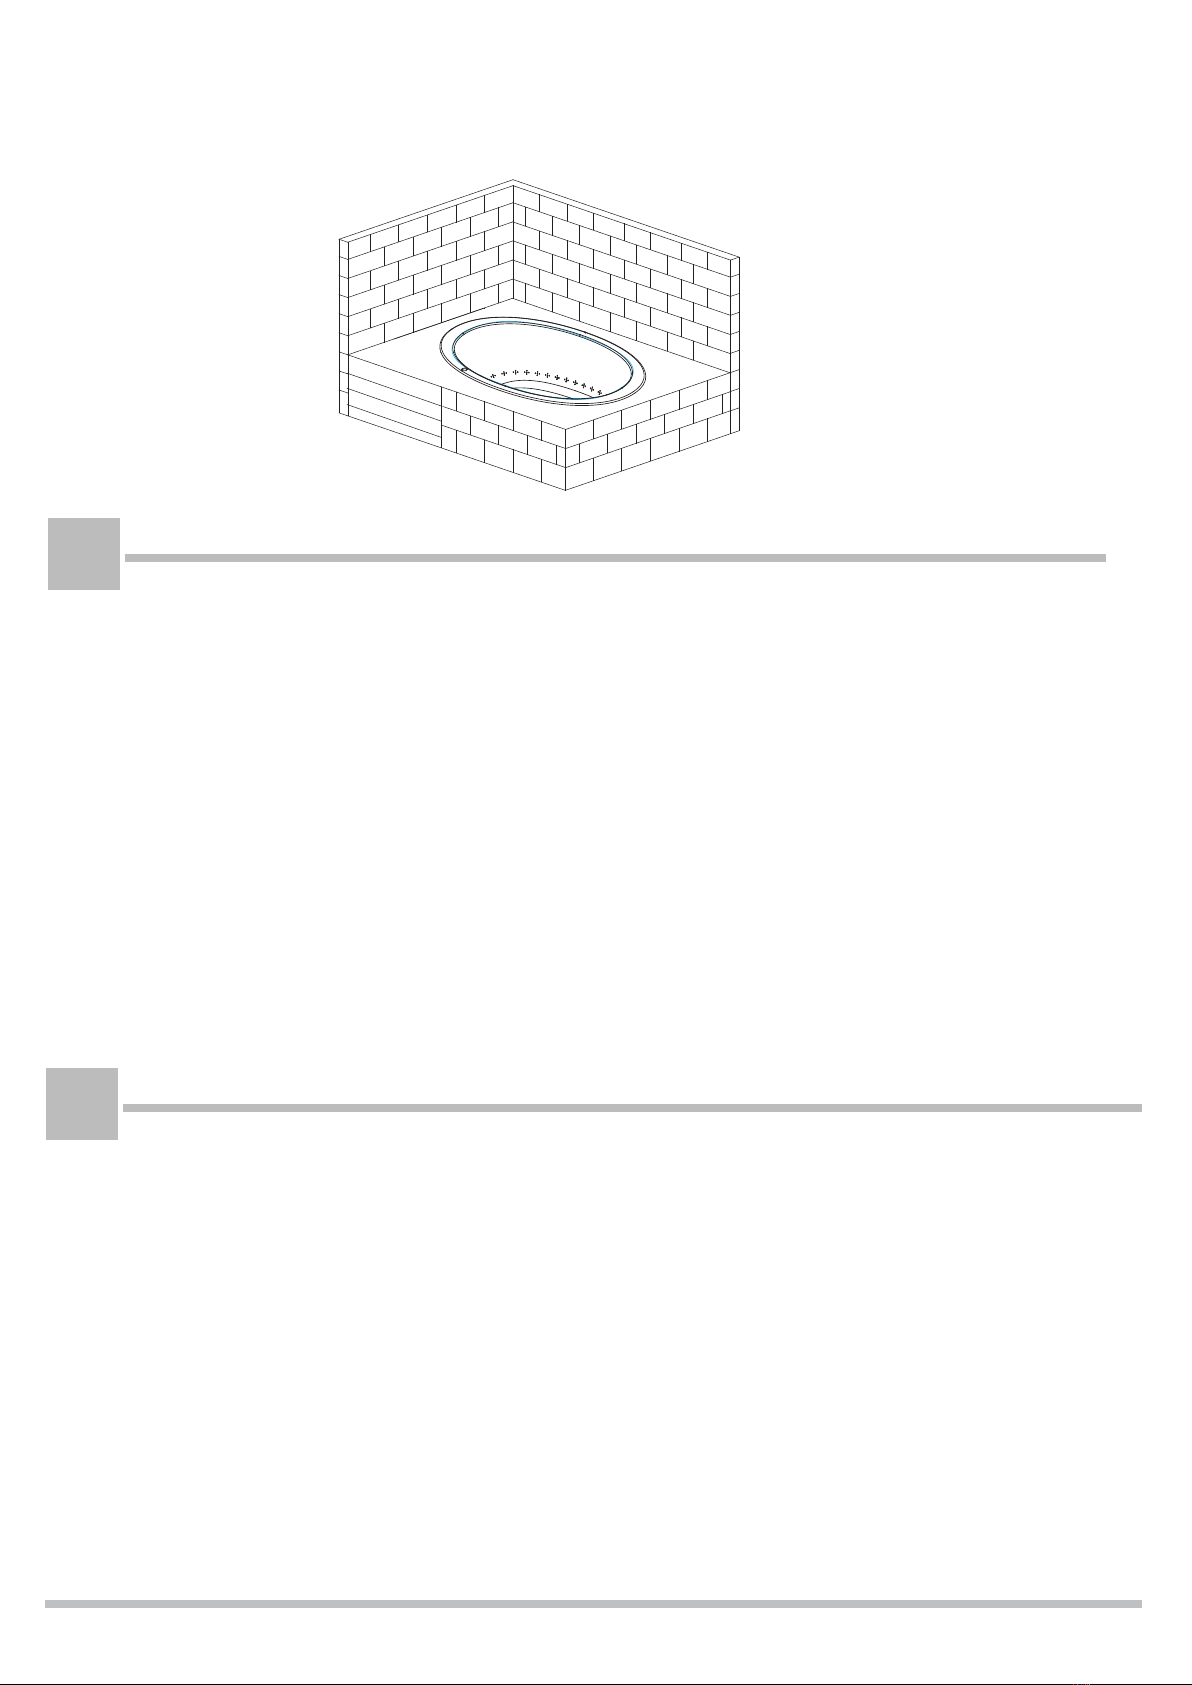
Lay bricks well according to rough-in dimensions of bathtub, finish the wall.
Place bathtub into brick well. Check thoroughly to ensure bathtub rim fit close to deck consistently and all its feet firmly seat on floor.
Note:Recommend to build a removable structure like shutter or similar at side of motor to facilitate future maintenance.
Follow the drainage accessory installation instruction and connect drainage lines and supply lines with bathtub, using silicon sealant
or other soft sealants to seal the joints between the bath rim edges and deck.
Recommend to build a movable structure at side
of motor to facilitate future maintenance.
Finished tiled Wall
Brick or
Concrete Wall
Bath
Silicone Filler
Paste Mortar
Guangzhou BRAVAT Industrial Co., Ltd.
Service Hot Line: 800-820-5330
Web:www.bravat.com
6
Clean after Installation completed.
Note: Risk of property damage. Do not support the bathtub by the rim.
Carefully remove the protective film from the bath rim.Never use an
abrasive material to clean surface.
G
MAINTENANCE
SPECIAL STATEMENT
H
The products installation instruction is written in accordance with the latest product information,
following the sustainable development strategy of the Company, to improve continually the produce's
specification, performance etc.,subject to change without notice. (The Company reserves the right to
interpret)
Guangzhou BRAVAT Industrial Co., Ltd.
Service Hot Line: 800-820-5330
Web:www.bravat.com
7
20130715V02
1. Suggest to clean bathtub immediately after drainage complete, as soap, body fat and dirt are easy to be removed at the time before
bathtub dry.
2.Suggest to clean bathtub frequently if using in high hard water area,where high calcium content in water would leave yellow spot after dirt
attaching on bathtub surface.
3.Please use soft cloth with neutral cleaner or soap to clean bathtub, and then wipe its surface to dry.
4.No hard stuff or abrasive stuff like cleaning powder are allowed to clean bathtub, as that would corrode, scratch and dull bathtub surface.
5. Do not allow paint, paint remover like chloroform or any strong organic solvent like acetone in contact with any bath surfaces,or bathtub
surface would be softened, melted or crackle.
6. Do not place flaming cigarette on bath or it would burn bathtub surface.
7.NO bulbs and open fires are allowed to place in bathtub lest bathtub surface is damaged.
Suggestion to remove scratch:
(1)If scratch is slight, spray metal polish or car polish on scratch at first,and then use electric polishing machine to resume glossy surface.
(2)If scratch is deep, use 2000# abrasive paper to remove scratch at first, and then use same method as (1) to resume glossy surface.
Table of contents
Popular Bathtub manuals by other brands

Jacuzzi
Jacuzzi Energy 160 Use & maintenance

American Standard
American Standard Colony 5-1/2' x 32" Specification sheet

Kohler
Kohler Jacob Delafon E6D034-00 installation guide

CLEOPATRA
CLEOPATRA 90179003 installation manual

DURAVIT
DURAVIT Paiova 700264 Mounting instructions

Clou
Clou InBe IB/05.40302 installation instructions


BATO
BATO RENO1500 installation guide

Reliance
Reliance R6636OFSXVS Owner's manual & installation guide

JASON Hydrotherapy
JASON Hydrotherapy Designer AN-P Series owner's manual

Kohler
Kohler K-1209-CB Roughing-In Guide

A&E
A&E Italia Owner's manual and installation guide

Kohler
Kohler Sunstruck K-24008-GHW quick start guide