Bravo GLAM 93003112 User manual

GLAM Wi-Fi Thermostat
Mod. 93003112
Read carefully and keep the manual.
Description of monitor and stationary unit keys
Menù
Date/Time
ON/OFF
Key +
Key- Backlight
Stand by wake up
Red led on:
xed unit on
Green led on:
Heating on
Green led ashing fast:
waiting for connection
Blue led slow ashing:
Wi-Fi connection problem
Blue led on:
connected to Wi-Fi
ON/OFF
NB: In order to maximize energy savings, the display if no key is pressed, will go into standby,
highlighted by turning off the backlight.
In order to access the controls again, press the key located on the side of the device (Backlight/
Stand by wake up).
When installing, keep in mind that in order for the thermostat to work in Wi-Fi and be controlled
by a smart phone, it must receive a good signal from the Wi-Fi network (metal walls or very thick
walls can reduce the signal). The stationary unit needs 220V power supply.
1) Separate the back docking plate from the thermostat and insert 2 alkaline batteries (1.5V AAA)
into one of the slots, paying attention to polarity. NB: It is possible to insert 2 more batteries in the
second slot to double the operating time of the device.
2) Reposition the docking plate and make sure the thermostat is turned off. Press and hold the ON/
OFF button until the display shows OFF.

2
Installation of the device must be carried out by qualied personnel in accordance with applicable
standards and laws.
- Disconnect the power supply.
- Cover or insulate any energized components.
- Ensure that no power is re-energized until installation is completed.
A-Type installation
If the wires coming from the boiler arrive in a room
where there is a good Wi-Fi signal, proceed as shown
below.
This installation involves positioning the xed unit
where the wires coming from the boiler are located
and allows the monitor to be placed in a particular
room or to be moved, as needed, to the room that is
deemed most suitable for temperature control.
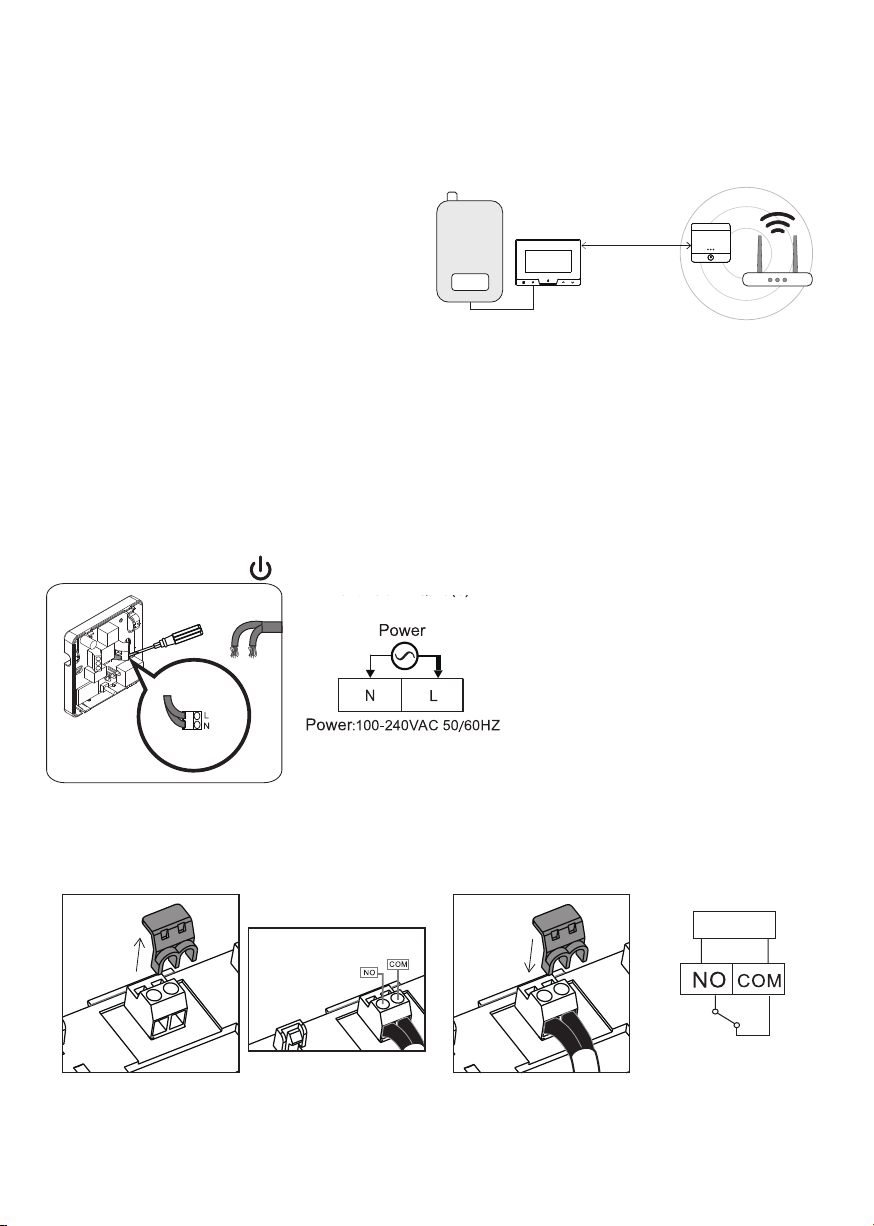
1) Proceed with the positioning of the xed unit, keeping in mind that it needs 220V power supply and
connection to the wires coming from the boiler and a good Wi-Fi signal.
2) Remove the receiver cover with the help of a screwdriver.
3) Route the power wires and the wires coming from the boiler inside the hole at the back, connect the 2
wires coming from the boiler to the COM and NO terminals and the 2 wires from the power supply
to the POWER N and L terminals as shown in the gure.
4) Attach the base to the wall with the screw kit provided.
5) Replace the cover on the base
6) Supply power to the stationary unit and make sure the unit is turned o. Only the fast ashing GREEN
LED should be present. If not, press button until you have the situation described.
Power supply
Boiler
Boiler
Imax: 250 VAC/10(6)A
≤50m
(open space)
Boiler wires Modem
≤100m
(open space)
Boiler wires Modem
A-Type installation
B-Type installation
3
B-Type installation
In case the wires of the boiler arrive in a room where the Wi-Fi signal is not available, a reverse installation
can be used.
In this case, the monitor will be installed on the
wall and connected to the wires of the boiler while
the xed unit should be installed in a room where
the Wi-Fi signal is present.
Obviously, the temperature to which the thermo-
stat will refer will be the temperature measured in
the room where you installed the thermostat.
1) Proceed with the positioning of the xed unit,
keeping in mind that it needs 220V power supply and a good Wi-Fi signal
2) Remove the cover of the receiver with the help of a screwdriver.
3) Pass the power wires inside the hole on the back, connect the 2 power wires to the POWER N and L
terminals as shown in the gure.
4) Secure the base with the supplied screw kit.
5) Replace the cover on the base
6) Power up the stationary unit and make sure the unit turns o. Only the fast ashing GREEN LED should
be present. If not, press button until you have the situation described.
Power supply
Caldaia
Imax: 250 VAC/10(6)A
7) Then proceed with the installation of the thermostat. Separate the rear attachment plate from the ther-
mostat and remove the contact protection
8) Pass the wires coming from the boiler inside the hole on the back of the plate and connect them to the
COM and NO terminals, re-insert the contact protection
Boiler
9) Attach the base to the wall with the screw kit provided.
10) Align the 2 upper holes on the back of the thermostat with the 2 upper hooks on the coupling plate,
then gently press the lower edge of the thermostat until the catches click into place and lock.
≤50m
(open space)
Boiler wires Modem
≤100m
(open space)
Boiler wires Modem
A-Type installation
B-Type installation
4
Pairing the 2 Units
Make sure that both 2 units are turned o.
1) Press and hold the button on the stationary unit until the YELLOW LED lights up (about 5 sec.)
2) Press and hold the button on the thermostat until the display shows RF2
3) Release the button and press it again, the display will show ---
If the association was successful after a few moments, the number “01” will appear. Press button on
the thermostat again to exit the association procedure. The symbol will stop ashing on the display,
and on the stationary unit, the YELLOW LED will turn o.
Date/Time
Press and hold the clock key until “y” appears, then enter the correct year using the arrow keys.
Press and release the clock key, the minutes will ash“t”, adjust with the arrow keys.
Press the clock key again and adjust the time.
Press the clock key again and adjust the day “d”.
Press the clock key again and adjust the month “m”.
Press to exit and save.
NB: The device is equipped with a power saving system, to reactivate it press the backlight button (6).
Once reactivated make adjustments, if no key is pressed within about 5 sec. the device will return to standby.
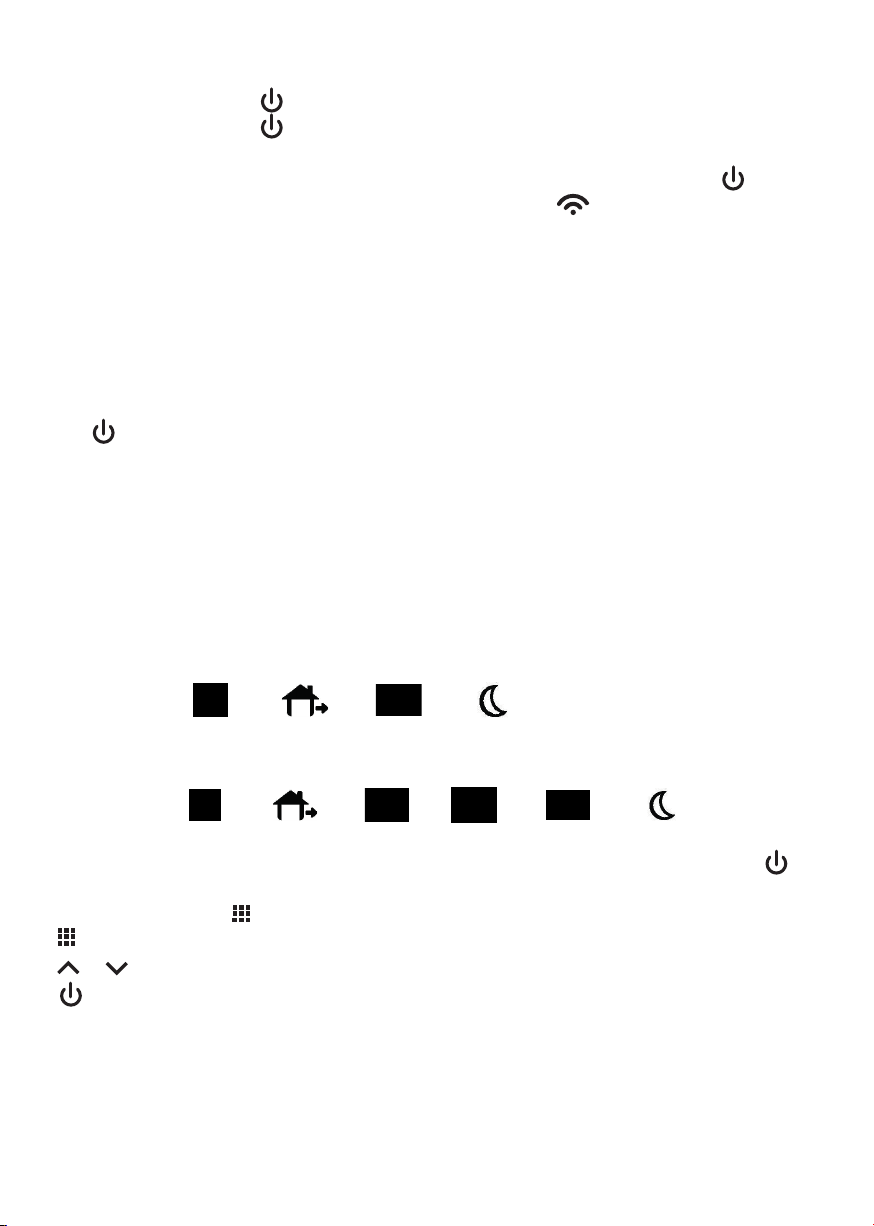
Menu Conguration
For the rst use, it is recommended to change only the value of menu 7 by selecting how many on/o
steps you need during the day:
If, for example, you need heating only in the morning and in the evening, select:
4 daily phases:
Wake up Out door Back home Sleep
If, on the other hand, heating is also needed at lunchtime select:
6 daily phases:
Wake up Out door Back home SleepOut door Back home
1) To enter Menu conguration, turn o the thermostat by pressing the key for about 5 sec, OFF
will appear on the display.
2) Press and hold Menu button for about 5 sec to enter the conguration menu.
-: to move to the next menu item
- or : to change the value
- : to save and exit the menu
If no key is pressed for 10 sec, the device will automatically exit the conguration menu without saving
the changes made.

5
Menu
Menu Key Display or Description
1cl (0) -4 --- +4 Detected temperature calibration*
2ah (35.0) 20°C- 35°CMax. value of detectable room tem-
perature **
3AL (5.0) 5°c - 20°cMin. value of detectable room tem-
perature **
4bl (10) 05/10/15 Backlight duration 5/10/15 sec.
5db (0.5) 0.5-3.0 °cThermal dierential (thermostat
tolerance range for on/o )
6Pro (ON) On/OFF Programming type:
ON: Programmable
OFF: Manual
7SE9 (6) 4/6 4 daily phases
4 daily phases
8ES (OFF) On/OFF Smart Ignition (On/O )
9PP (off) on/off Anti-Freeze: On/O
10 PS1 000Keypad lock code (First digit)
11 PS2 000Keypad lock code (Second digit)
12 PS3 000 Keypad lock code (Third digit)
* If deemed appropriate, the temperature detected by the thermostat can be calibrated.
ES:
Temperature detected by the thermostat: 20 C°
Temperature deemed correct: 21 C°
Increase the value of CL by raising it from 0 to +1
Temperature detected by the thermostat: 20 C°
Temperature deemed correct: 19 C°
Decrease the value of CL by taking it from 0 to -1.
** DO NOT CHANGETHESE VALUES: MAX and MIN temperatures shown are those that the thermostat can
detect and NOT the temperatures you want to use in programming.

6
Wi-Fi CONNECTION
In order to control the thermostat from a smart phone, make sure that the thermostat is powered by
electricity as described on page 2 and that it is placed where it can receive a good Wi-Fi signal.
1) Download the Smart Life-Smart Living app for iOS or Android , create a new account by following
the directions provided or log in if you already have your own account.
2) Click on “Add Device,” click on “Small Appliance,” scroll down the page until you see the “Thermostat
(Wi-Fi)” icon and select it.
3) Check that the Wi- Fi network name and password displayed on the screen are correct and press “Next.”
4) Make sure that on the stationary unit the LED is ashing fast then conrm the message on the app and
continue. Conrm the xed unit is blinking fast again by clicking “Blink fast” and wait for the device to
be paired.
5) When the pairing procedure is completed, the new thermostat will be displayed in the app. Conrm by
clicking “Finish”
Scheduling via app
1) Click on “Program” to access the daily programming screen.
2) On this screen you can set the desired temperatures for each time slot of the selected day (Ex. MON).
There will be 4 or 6 time slots depending on how previously set via menu 7 described on page 5.
Wake up Out door Back home Sleep
o
Wake up Out door Back home SleepOut door Back home
It is possible to have a dierent schedule for each day or the same schedule for multiple days.
Click on the individual day (MON, MAR...) to set the daily schedule or click on the “7DAY” button to be able to select
multiple days at the same time.
- Select for each time slot Time and Temperature chosen and press “Enter” to conrm.
- Wait about 5 sec. before moving on to the next programming to give the application time to send the information
to the device.
“ECO”function, if activated will automatically set the temperature to 16°C regardless of day and time.
This temperature will be maintained until deactivated by the app or until any button is pressed on the device, after
which the thermostat will return to the previously set programming.
Clicking on“History”will display a graph with the history of recorded temperatures.

7
The device is compatible with Alexa and Google Home so, after pairing it with your device, you will also
be able to change the temperature setting or turn the thermostat on and o using the virtual assistant.
RF or Wi-Fi connection problems ( )
If there are any operating problems or ashing symbol appears on the display, turn o the wireless
unit (monitor) and check that the stationary unit is properly powered (RED LED on) and that the distance
between the two units is not too great.
Turn the wireless unit back on and increase the temperature with button until the set temperature
exceeds the ambient temperature and symbol appears
Check that the device sends the power command to the stationary unit (green LED lit) and that
symbol remains lit steadily.
If it is, however, necessary to change the Wi-Fi network on which the thermostat was connected it will be
possible to carry out 2 procedures: delete the device from the app or press and hold the button on the
xed unit for about 10 sec.
In both cases it will, subsequently, be necessary to repeat the association between device and app
as described above.
Weekly programming and temperatures will still be maintained as previously set.

8
Programming via wireless unit (Display)
In case it is not possible to use the app for programming, proceed as follows for direct programming on
the device. Choose from dierent types of automatic programming:
1) 7 identical days:
2) 5 weekdays:
1) 7 identical days:
3) Week end:
4) 7 different days:
...
- Programming 1 (7 identical days) is, of course, the fastest.
The chosen schedule will be repeated every day throughout the week.
- If you prefer to have two types of programming for weekdays and weekends, use Programming 2 and 3
by deciding on appropriate times and temperatures for both sets of days.
- Programming 4 is the one that allows for greater variability, so as to meet particular time and tempera-
ture requirements for each individual day of the week.
Once you have decided on the type of program that best suits your needs proceed with the selection of
times and temperatures for the various time slots.
By default in the thermostat the temperatures of 20°C and 16°C are set, which can be changed as desired
in the programming phase.
- : to move to the next menu item
- or : to change the value
- : to save and exit the menu
If no key is pressed for 10 sec, the device will automatically exit without storing the changes made.
Programming 1 (7 identical days)
1) Turn on the thermostat
2) Press and hold button for about 5 sec to enter programming.
3)The7daysoftheweekwillashonthedisplay.
button for about 5 sec to enter programming.
4) Press and release button
5) Use the arrows to change the boiler start time (Set) in the rst step (Morning
Mattino Uscita Pranzo Uscita Rientro Notte
) and conrm with
key
6) Set the desired Max. Temperature and conrm with key
7) Use the arrows to change the boiler o time in the phase (Exit
Mattino Uscita Pranzo Uscita Rientro Notte
) and conrm with key
8) Set the desired Min. Temperature and conrm with key
9) Repeat the procedure for the following phases (lunch, return, night....)

9
10) After completing the Night programming (
Mattino Uscita Pranzo Uscita Rientro Notte
) the next time key is pressed, the 7 days of the
week will ash again
11) Press button to save and exit
The thermostat is now set and ready for use.
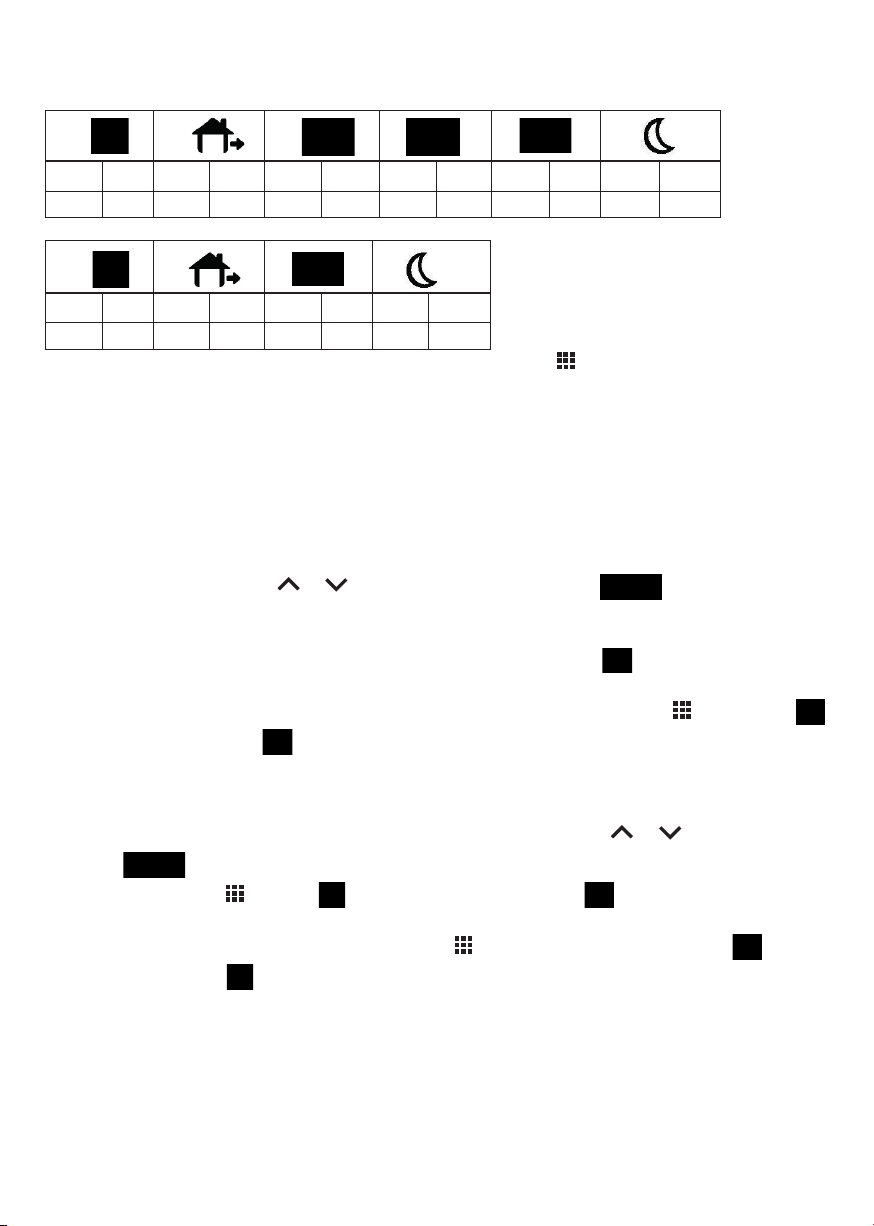
The patterns shown below are customizable for both times and temperatures
6 daily phases:
Wake up Out door Back home SleepOut door Back home
Time °C Time °C Time °C Time °C Time °C Time °C
Monday 6:00 21°C 8:00 16,5°C 12:00 20°C 14:00 16°C 18:00 21°C 22:00 16°C
Tuesday 6:00 21°C 8:00 16,5°C 12:00 20°C 14:00 16°C 18:00 21°C 22:00 16°C
Wednesday 6:00 21°C 8:00 16,5°C 12:00 20°C 14:00 16°C 18:00 21°C 22:00 16°C
Thursday 6:00 21°C 8:00 16,5°C 12:00 20°C 14:00 16°C 18:00 21°C 22:00 16°C
Friday 6:00 21°C 8:00 16,5°C 12:00 20°C 14:00 16°C 18:00 21°C 22:00 16°C
Saturday 6:00 21°C 8:00 16,5°C 12:00 20°C 14:00 16°C 18:00 21°C 22:00 16°C
Sunday 6:00 21°C 8:00 16,5°C 12:00 20°C 14:00 16°C 18:00 21°C 22:00 16°C
4 daily phases:
Wake up Out door Back home Sleep
Time °C Time °C Time °C Time °C
Monday 6:00 21°C 8:00 16,5°C 18:00 22°C 22:00 16,5°C
Tuesday 6:00 21°C 8:00 16,5°C 18:00 22°C 22:00 16,5°C
Wednesday 6:00 21°C 8:00 16,5°C 18:00 22°C 22:00 16,5°C
Thursday 6:00 21°C 8:00 16,5°C 18:00 22°C 22:00 16,5°C
Friday 6:00 21°C 8:00 16,5°C 18:00 22°C 22:00 16,5°C
Saturday 6:00 21°C 8:00 16,5°C 18:00 22°C 22:00 16,5°C
Sunday 6:00 21°C 8:00 16,5°C 18:00 22°C 22:00 16,5°C

10
Programming 2-3 (5 weekdays - Week End)
1) Turn on the thermostat
2) Press and hold button for about 5 sec to enter programming.
3) The 7 days of the week will ash on the display.
Press buttontoswitchtotheprogrammingofthe5weekdays
4) Press and release button
5) Use the arrows to change the boiler start time (Set) in the rst step (Morning
Mattino Uscita Pranzo Uscita Rientro Notte
) and conrm with
key
6) Set the desired Max. Temperature and conrm with key
7) Use the arrows to change the boiler o time in the phase (Exit
Mattino Uscita Pranzo Uscita Rientro Notte
) and conrm with key
8) Set the desired Min. Temperature and conrm with key
9) Repeat the procedure for the following phases (lunch, return, night....)
10) After completing the Night programming (
Mattino Uscita Pranzo Uscita Rientro Notte
) the next time key is pressed, the 5 days of the
week will ash again
11)Press button to switch to Week end programming (Progr.3)
12) Change hours and temperatures for the various Week end bands as done previously for weekdays
13) When the Night programming is nished (
Mattino Uscita Pranzo Uscita Rientro Notte
) the next time key is pressed, the two days of
the Week end will ash again
14) Press button to save and exit
The thermostat is now set and ready for use.
Programming 4 (7 different days)
1) Turn on the thermostat
2) Press and hold button for about 5 sec to enter programming.
3) The 7 days of the week will ash on the display. Press button to switch to Monday pro-
gramming
4) Press and release key
5) Use the arrows to change the boiler on time (Set) in the rst step (Morning
Mattino Uscita Pranzo Uscita Rientro Notte
) and conrm with
key
6) Set the desired Max. Temperature and conrm with key
7) Use the arrows to change the boiler o time in the phase (Exit
Mattino Uscita Pranzo Uscita Rientro Notte
) and conrm with key
8) Set the desired Min. Temperature and conrm with key
9) Repeat the procedure for the following phases (lunch, return, night....)
10) After completing the Night (
Mattino Uscita Pranzo Uscita Rientro Notte
) programming, the next time button is pressed, the day of
the week will ash again
11) Press button to switch to the next day programming and repeat the procedure for all
days of the week
12) After completing the Night (
Mattino Uscita Pranzo Uscita Rientro Notte
) programming of Sunday (Sun), press button to save and exit.
The thermostat is now set and ready for use.
11
RESET Automatic programming
At any time during programming it is possible to reset all entered values and return temperatures and times to
the factory settings.
Wake up Out door Back home SleepOut door Back home
Time °C Time °C Time °C Time °C Time °C Time °C
6:00 20°C 8:00 16°C 11:00 20°C 14:00 16°C 18:00 20°C 22:00 16°C
Wake up Out door Back home Sleep
Time °C Time °C Time °C Time °C
6:00 20°C 8:00 16°C 18:00 20°C 22:00 16°C
To perform Programming Reset: while in programming press and hold key for about 5 secs , ashing DEF
will appear on the display. All previously set times and temperatures will be cleared and you will return to the
default.
It is possible to manually change the pre-set programming in 2 ways:
TEMPORARY mode:
If you want to change the temperature momentarily, without changing the weekly programming, select
the desired temperature using or buttons or the display will show .
The thermostat will maintain the new temperature until the next daily phase change (exit, lunch, return...),
after which it will automatically return to the pre-set program by showing symbol on the display.
To exit the temporary mode before the daily phase has changed, press and release button until
symbol disappears and only symbol remains.
PERMANENT mode:
If you want to set a xed temperature that is to be maintained, for example, during a vacation period
when no heating is needed (Ex. 16°C) select the desired temperature using or keys or the display
will show .
Then press and release button. symbol will disappear and only symbol will remain.
The thermostat will hold the new temperature until button is pressed again causing symbol
to disappear, and only symbol will be displayed again.

12
MANUAL Programming
If in Menu 6 (see Page 5) you had decided to use the thermostat in EXCLUSIVELY MANUAL mode, any
temperature change will have to be made manually using or keys.
In this case, the device will maintain the set temperature (Ex. 20 °C) regardless of the time of day until you
intervene on or keys to raise, lower or turn o the device.
Smart power on
If the value in Menu 8 (see Page 5) has been set to ON, the thermostat will check the temperature when
the boiler is turned on, and if after a period of 3 days the temperature at the time of ignition is too low, it
will automatically advance the ignition by a few minutes.
Anti-freezing
If the value in menu 9 (see Page 5) has been set to ON, in case the thermostat is turned o and the tem-
perature drops and falls below 5°C, the anti-freezing function will be activated , which will activate the
boiler until the room temperature is brought down to 8°C.
Sudden temperature drop protection (Open Window)
In case the thermostat detects a drop in temperature of more than 4.5°C in a period of time of 4 min. (e.g.,
due to an open window), in order to prevent unnecessary heat loss, the device will send a shutdown signal
to the boiler, and instead of the room temperature the display will show
due to an open window), in order to prevent unnecessary heat loss, the device will send a shutdown signal
symbol .
The moment the temperature begins to rise again, or after a period of time of about 50 min, the heating
will automatically reactivate.
This lockout can, however, be deactivated, at any time, by pressing any key.
Keypad lock
To prevent any unauthorized changes, with the thermostat on, it is possible to lock the keypad by pressing
the backlight button located on the left side of the device for about 5 sec; symbol will ash on the
display.
Once locked, each time a key is pressed, you will be asked to enter the 3 digits that make up the unlock
code PS1, PS2, PS3 (default 000).
Using or keys enter the rst digit (PS1) and conrm with , key , proceed in the same way with
the second and third digits (PS2 and 3) conrm with key .
If you had previously changed the default code to a custom one and the latter was entered correctly the
keypad lock will be deactivated and it will be possible to make the necessary changes.
The keypad lock can also be activated/deactivated remotely using the “Key” button on
the main screen of the app.
NB: The lock will also be eective on the cell phone, so in order to make any changes it
will rst be necessary to deactivate the lock via the “Key” button.
ERR
If ERR appears on the display carry out the Reset procedure, if the problem persists consult service.
Batteries
If symbol appears on the display, it is necessary to replace thermostat batteries as soon as possible,
paying attention to the polarity.

13
WARNINGS AND SAFETY PRECAUTIONS
Keep batteries out of reach of children; if swallowed, call a doctor immediately.
- Damaged batteries or batteries with leaking liquid may cause skin damage, in which case use gloves.
- Batteries must not be short-circuited, disassembled or set on re; danger of explosion.
- Conventional batteries may not be recharged; explosion hazard.
- Dispose of damaged or spent batteries at the appropriate collection centers, NOT in household waste.
- The device must be installed by trained personnel
- Installation must be done according to the instructions in the manual
- Not suitable for outdoor use
- This device should be intended only for the‘use for which it was expressly designed. Any other use is to
be considered improper and therefore dangerous.
- This appliance is not suitable for use by children or persons with reduced physical sensory or mental
capabilities, or lack of experience and knowledge, unless supervised or instructed regarding the use of
the appliance by persons responsible for their safety.
- Europe net s.r.l. cannot be held responsible for any damage resulting from improper, erroneous and
unreasonable use.
- Any tampering or intervention will void any warranty rights.
- In the event of a fault and/or malfunction, turn o the appliance immediately and contact the dealer
or service department.- It is absolutely forbidden to disassemble or repair the appliance, if necessary
contact the dealer or service department. The use of any electrical appliance implies the observance of
certain fundamental rules.
In particular:
- Do not touch the appliance with wet or damp hands;
- Do not use the appliance with bare feet;- do not use the appliance near explosive and/or ammable
products;
- Do not use the appliance near a bathtub, shower, swimming pool.
- Do not leave the appliance exposed to the weather (rain, sun, etc.).
- Do not place objects on the appliance due to re hazards.
- All packaging material should be kept out of the reach of children due to potential hazard (e.g., choking)
- Do not use any kind of cleaning agents or solvents.
Warranty
Warranty 2 years from the date of purchase.
The sales receipt or purchase invoice are the only documents entitling to the services in question and
must be presented at the time of the request for service.
Warranty lapses:
- In case of improper assembly or use- In case the product has been disassembled or modications have
been made to the product.
- The defect is attributable to external causes (weather, too low or too high temperatures, solvents, chem-
icals, scratching)
14
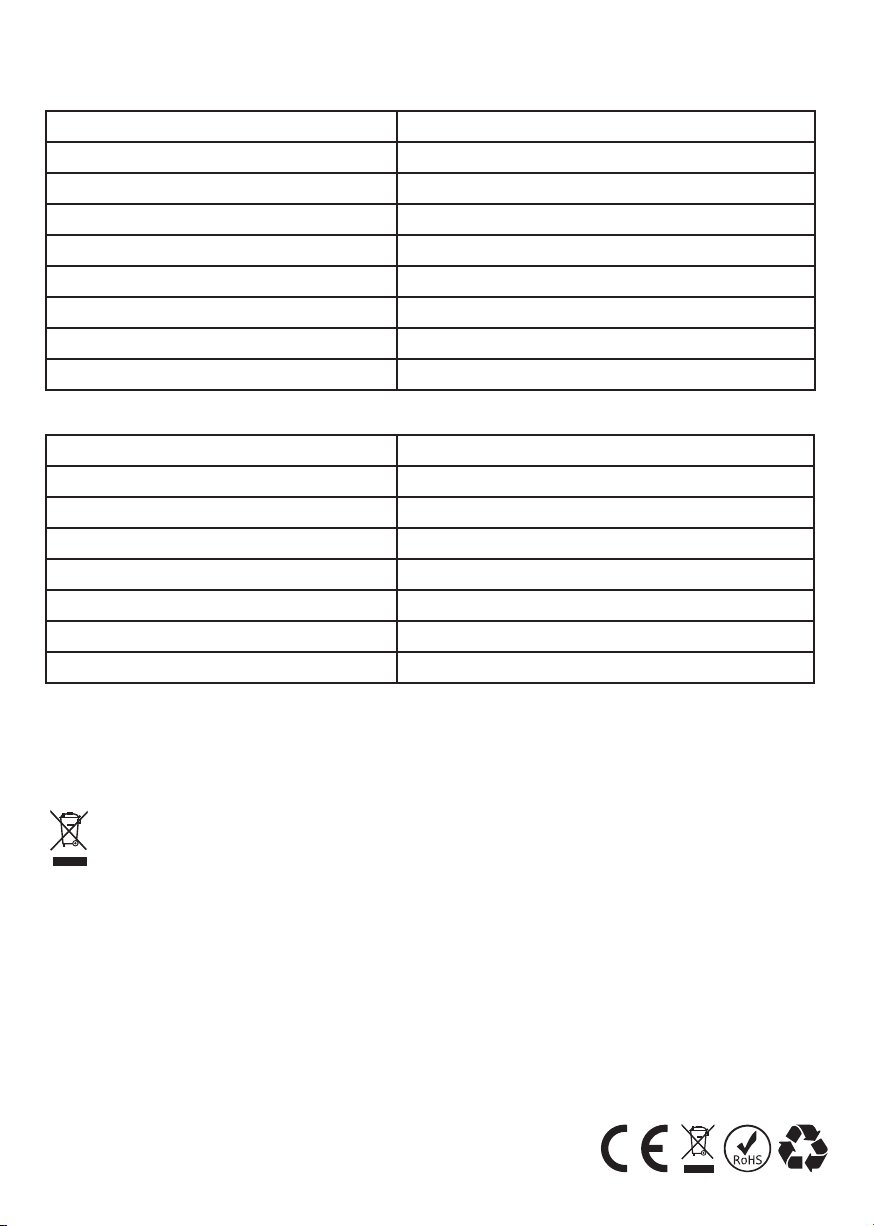
Technical Characteristics
Fixed unit
Power supply 100-240 VAC - 50/60Hz
Output Power free relay output 10A
Wireless Frequency 868 MHz (FSK)
Wireless transmission distance 100 m in open space
Wi-Fi frequency 2,4 GHz
Communication protocol TCO/IP, MQTT
Operating temperature range 0 °C ~ 50 °C
Storage temperature range -10 °C ~ 60 °C
Dimensions 86 x 86 x 24 mm
Wireless unit
Power supply 2/4 x 1,5 V LR03 AAA alkaline
Display accuracy 0,1 °C
Temperature setting range 5°C ~ 35°C
Wireless frequency 868 MHz (FSK)
Wireless transmission distance 100 m in open space
Operating temperature range 0°C ~ 50°C
Storage temperature range -10°C ~ 60°C
Dimensions 124 x 88 x 24 mm
Declaration of Conformity:
Complies with the provisions set forth in LVD 2014/35/EU, RED 2014/53/EU, RoHS and REACH directives,
for a copy of the declaration contact Europe net.
Disposal:
The presence of this symbol indicates that, in accordance with applicable laws and local regula-
tions, this product should not be disposed of in household waste.
At the end of its useful life, the product and any accessories should be disposed of at one of the collection
points designated by local authorities. Product packaging should be recycled in the manner prescribed
by your municipality.
Europe net s.r.l.
Via della Palmarola, 64
00135 - Roma - Italy
www.europenet.it


Table of contents


