BREMA CB 246 Product manual

AUTOMATIC ICE-CUBE MAKER
MACHINE AUTOMATIQUE A GLAÇONS
PRODUCTOR AUTOMATICO DE HIELO EN CUBITOS
INSTRUCTIONS
AND
WARNINGS
INSTRUCTIONS
ET
REMARQUES
INSTRUCCIONES Y
ADVERTENCIAS


E
E
n
n
g
g
l
l
i
i
s
s
h
h
Dear Customer, Congratulations on having chosen a quality product which will certainly fully
meet your expectations. Thank you for having purchased one of our products. Please read
this instruction manual carefully before using your new automatic ice-cu e maker.
TABLE OF CONTENTS
1 I PORTANT ADVICE AND RECO ENDATIONS
2 TECHNICAL SPECIFICATIONS
3 ADVICE ABOUT TRANSPORTATION
4 UNPACKING
5 INSTALLATION
5.1 CONNECTION DIAGRAM
5.2 POSITIONING
5.3 CONNECTION TO WATER MAINS
5.3.a WATER SUPPLY
5.3. DRAIN
5.4 CONNECTION TO THE ELECTRICITY MAINS
5.5 IMPROPER USE OF APPLIANCE
6 START-UP
6.1 CLEANING INTERNAL PARTS
6.2 START-UP
7 AIN CAUSES OF OPERATING FAILURE
8 OPERATION
9 AINTENANCE
9.1 CLEANING THE FILTER OF WATER SUPPLY SOLENOID VALVE
9.2 AIR-COOLED MODELS
9.3 CLEANING AND SANITIZING OPERATIONS
9.3.a CLEANING
9.3. SANITIZING
10 PERIODS AT A STANDSTILL
The figures in this manual are of a general nature. Some details may therefore differ
depending on the specific model.
The Manufacturer declines all liability for any inaccuracies in this Instruction Manual due to
printing or transcription errors. The Manufacturer also reserves the right to make any
modifications to the products that may be necessary or useful, also in the interests of the
user, without impairing the products’ essential features of functionality and safety.

1 I PORTANT ADVICE AND RECO ENDATIONS
This instruction manual forms an integral part of the automatic ice-cube maker (also more
simply called “appliance” in the text) and must be kept for possible future consultation.
In the event of the appliance eing sold or transferred to another person, this Manual must e handed
over to the new user, in order to ena le him to ecome familiar with the operation of the equipment and
the corresponding advice and recommendations.
‼
Before installing and using the appliance, read the advice and recommendations contained
in this instruction manual very carefully. They are given in order to ensure safe installation, use
and maintenance of the appliance.
• always remove the plug from the power socket efore proceeding with any cleaning or maintenance
operations
• to ensure the appliance operates efficiently and correctly, it is essential to comply with the
Manufacturer’s instructions and to make sure that maintenance is performed y specially qualified
personnel
• always lift the appliance to move it, even slightly. Do not push or pull it
• any use of the appliance other than for the production of ice cu es using cold drinking water is to e
considered as improper use
• in the event of a defect and/or malfunction of the appliance, switch off with the switch fitted at the
installation stage, unplug the appliance and turn off the water supply tap. Do not make any attempt
to repair or modify the appliance; only contact one of the Authorized Service Centers
• in addition to rendering any form of warranty null and void, modifying (or attempting to modify) this
appliance is extremely dangerous
• any specific information or diagrams regarding particular models will e attached to this Instruction
Manual
‼
Use of this electrical appliance requires compliance with certain fundamental rules; in particular:
• do not touch the appliance with wet or damp hands or feet
• do not use the appliance when you are arefoot
• do not use extensions in premises such as athrooms or shower rooms
• do not tug on the power supply ca le to disconnect it from the mains
• do not allow the appliance to e used y children or y incapa le persons
• supervise children to ensure that they do not play with the appliance
• do not insert anything etween the moving parts and the guards
Should you decide to scrap appliance, first disconnect the power ca le from the mains, and then cut the
ca le off.
In addition, proceed as follows:
• reak off and remove the door in order to prevent the possi le danger of a child getting trapped inside
• do not allow the coolant gas and oil in the compressor to disperse into the environment
• dispose of or recover the various materials according to the terms of the local regulations in force in
your State
This appliance does not contain coolant that damages the ozone layer.
‼
The anufacturer shall not be liable for any damage to the environment, animals, persons
or objects caused by incorrect installation.
2 TECHNICAL DATA (Fig. 1)
The voltage and frequency are given on the data plate on the appliance. Refer to this data plate to
check compliance.
Voltage (1), power (2), model (3), serial No. (4), Manufacturer (5).

E
E
n
n
g
g
l
l
i
i
s
s
h
h
The weighted equivalent continuous sound level A of this appliance is less than 70 dB (A). The
measurements were made over an entire production cycle, at a distance of 1 m from the surface of the
appliance and at a height of 1.60 m from the floor.
During normal operation the appliance does not generate vi rations which can cause actual or potential
danger situations.
The wiring diagram is stuck on the front counterpanel of the appliance.
In order to gain access thereto, unplug the appliance from the power source, loosen screws holding the
front panel, and slide it away after first opening the door (Fig. 4).
3 ADVICE ABOUT TRANSPORTATION
The net weight and the weight including packaging of the appliance are given on the cover of this
Instruction Manual. Please refer to the instructions on the packaging in order to correctly transport and
lift the appliance.
To prevent the oil in the compressor from flowing ack into the coolant circuit, always make sure that
the appliance is kept upright during transport, storage, and handling. Follow the instructions given on
the packaging.
4 UNPACKING
The appliance must be installed by authorized personnel, in compliance with the local laws in
force and the anufacturer’s instructions.
Once you have removed the packaging according to the instructions on the ox, MAKE SURE THAT
THE APPLIANCE IS IN A PERFECTLY GOOD CONDITION. IF IN DOUBT DO NOT USE IT AND
IMMEDIATELY CONTACT THE DEALER who sold it to you.
All the packaging items (plastic bags, cardboard, polystyrene foam, nails, etc.) must be removed
and put out of the reach of children, as they are potential sources of danger.
Rest the wooden pallet on the floor and, using a hex socket wrench, loosen and remove the olts
(Fig. 2) that fix the appliance to the pallet.
Lift the appliance using equipment fit to ear its weight. Separate the appliance from the wooden pallet
and fit the supplied legs into the housings on the ase plate provided for the purpose (6 in Fig. 3).
Use a spirit level to ensure that the appliance is standing perfectly level. If necessary, adjust the legs.
5 INSTALLATION
It is the user’s responsi ility to provide everything necessary for the correct installation of the appliance,
in particular:
• preparation of an installation area which is sufficiently ventilated and accessi le for maintenance
operations
• connection to the mains power supply, mains water supply and sewage network, including any
masonry work or pipes which may e required, in compliance with local regulations
5.1 CONNECTION DIAGRA (Fig. 5)
7. electrical connection controlled y omnipolar circuit- reaker with residual current device
8. water tap
9. water supply pipe
10. water drainage pipe
5.2 POSITIONING
‼
The appliance must be installed in a hygienically clean location; it is advisable to avoid
rooms like cellars and store-rooms, because failure to meet hygiene requirements is likely to
lead to the formation and proliferation of bacteria in the appliance.

It is advisable to install the appliance in a room where the temperature is between 50°F (10°C)
and 95°F (35°C), and with a water supply temperature of between 38°F (3°C) and 77°F (25°C).
Avoid installing the appliance where it may be exposed to direct sunlight or near heat sources
such as radiators, stoves, dishwashers, etc.
‼
This appliance:
• must not e used outdoors
• must not e installed in damp places or where it is lia le to e sprayed with water
• must not e cleaned with jets of water
• must e positioned at a distance of at least 2 inches (5 cm) from the side walls
5.3 CONNECTION TO THE WATER AINS
‼
I PORTANT:
• the appliance must e connected to the water mains y professionally qualified personnel in
accordance with the Manufacturer’s instructions
• this appliance must e only e supplied with cold water for human consumption (drinking water)
• the operating pressure must e etween 14.5 and 87 PSI (0.1 and 0.6 MPa)
• a tap must e installed etween the water mains and the feed pipe of the appliance, so that the
water supply may e shut off if necessary
• where the feed water is particularly hard, you are advised to install a softener. Any solid particles
(e.g. sand) may e eliminated y installing a mechanical filter, which must e periodically inspected
and cleaned. These devices must comply with local standards
• never turn the water supply tap off when the appliance is working
5.3.a WATER SUPPLY (Fig. 6)
Connect water supply solenoid valve (11) located at the ack of the appliance to the mains water
supply in accordance with local regulations.
5.3.b DRAIN (Fig. 6)
Connect drainage connector (12) located at the ack of the appliance to the sewer network in
accordance with local regulations. Check that:
• the water drain hose is not throttled at any point throughout its length
• the drain hose slopes downwards y at least 15%
5.4 CONNECTION TO THE ELECTRICITY AINS
‼
I PORTANT:
• the appliance must be connected to the electricity mains by professionally qualified
personnel in accordance with the local laws in force
• efore connecting the appliance to the electricity mains, make sure that the mains voltage rating
corresponds to the value indicated on the rating plate
• make sure that the appliance is connected to an efficient earthing system
• make sure that the capacity of the power supply system suits the maximum power value indicated
on the rating plate of the appliance
• the appliance is supplied with a plug; prepare a specific socket controlled y an omnipolar
thermomagnetic circuit reaker (7 in Fig. 5) conforming to local safety regulations, fitted with fuses,
with associated differential, positioned in such a way that it can easily e reached. Insert plug into
socket controlled y switch (7 in Fig. 5)
• the plug must only e replaced y professionally qualified and authorized personnel, and the
new plug must comply with current local safety standards
• make sure that you fully uncoil the power supply ca le and check that it is not crushed in any way
• if the power supply ca le is damaged, it must e replaced y qualified, authorized personnel using
the special ca le availa le from one of the Authorized Service Centers

E
E
n
n
g
g
l
l
i
i
s
s
h
h
5.5 I PROPER USE OF APPLIANCE
This appliance is designed to make ice cu es from cold drinking water. Any other use shall be
deemed improper. In particular:
• do not use the ice in to cool or store food or drinks, ecause these operations could contaminate the
ice contained in it or o struct the drainage outlet, causing the in to fill with water and overflow.
• do not remove ice from the container with the hands or equipment other than that supplied with the
appliance, which must e stored in a suita le place to prevent contamination and e cleaned and
sanitized daily
• do not o struct the ventilation and heat-dissipation grilles, since poor aeration - in addition to reducing
efficiency and causing poor operation - may also cause serious damage to the appliance
• do not rest o jects on the appliance or in front of the ventilation grilles
• open and close the door carefully without slamming it
• do not remove any of the panels or grilles
6 START-UP
6.1 CLEANING INTERNAL PARTS
The appliance will have already een cleaned in the factory. However, you are advised to wash the
internal parts again efore using the appliance. Make sure that the power supply ca le is unplugged
efore carrying out the a ove cleaning operation.
For information about cleaning and sanitizing operations, see chapter 9.3 of this manual.
A cleaning and sanitizing kit specifically designed for this appliance is availa le from Authorized Service
Centers.
It is advisa le to avoid using a rasive detergents or powders, since these might damage the finish.
6.2 START-UP
When you start up the appliance the first time, or when you start it up again after a long period at
a standstill, fill the basin manually with water (Fig. 7).
This filling operation must e carried out y opening the door, raising the flaps and pouring the water
directly into the internal asin.
In the cycles su sequent to the initial one, the appliance will e filled with water in a fully automatic way.
Once the appliance has een correctly connected to the electricity mains, water mains and water drain
system, it can e started up as follows:
a) turn on the water supply tap (8 in Fig. 5)
b) insert the plug in the socket and switch on the power supply y means of the relative switch fitted
during the installation phase (7 in Fig. 5)
Switch on appliance y pressing the luminous switch (13 in Fig. 3).
7 AIN CAUSES OF OPERATING FAILURE
If the appliance fails to produce ice, efore contacting the Authorized Service Center check that:
• the water supply tap (8 Fig. 5), fitted during the installation phase, has een turned on
• electric power is reaching the appliance; the plug is properly inserted in the socket, the switch
(7 in Fig. 5) is in the “ON” position, and the push utton (13 in Fig. 3) is lighted up
Furthermore:
• if there is excessive noise, make sure that the appliance is not touching furniture or sheet metal which
can give rise to noise or vi rations
• should any trace of water appear, check the drain hole of the container to ensure that it is not clogged,
that the water fill and drain pipes are correctly connected and are not throttled or damaged
• make sure that the temperature of the air or water does not exceed the installation limit values
(see paragraph 5.2)
• make sure that the water inlet filter is not clogged (see paragraph 9.1)
• make sure that the spray nozzles are not clogged with scaly deposits

If the fault still persists after the a ove checks have een made, switch off the appliance with the switch
fitted during the installation stage, unplug the appliance, turn off the water supply tap and contact one of
the Authorized Service Centers.
To o tain a faster and more efficient reply when you call the Center, state the model of the appliance
precisely, together with its serial num er or manufacturing num er. This information is given on the
serial N° plate (Fig. 1) affixed to the rear of the appliance and on the cover of this Instruction Manual.
8 OPERATION
The appliance has a thermostat pro e in the ice in, which stops ice production when the ice
accumulated in the in reaches the pro e connected to the thermostat. When ice is taken from the in,
the thermostat will automatically reactivate ice-cu e production, thus creating a new supply of ice.
9 AINTENANCE
9.1 CLEANING THE FILTER OF WATER SUPPLY SOLENOID VALVE (Fig. 8)
!!
At least every two months, clean the filter (14) located on the water inlet solenoid valve, proceeding
as follows:
• switch off the electric power supply y means of the switch (7 Fig. 5), fitted during installation, and
disconnect the plug of the appliance from its socket
• shut off the water supply y turning the tap (8 Fig. 5) fitted during installation
• disconnect the water supply pipe from solenoid valve (11) at the ack of the appliance
• using a pair of pliers, remove the filter (14) from its seat without damaging the water feed pipe
connector
• remove any residues y placing the filter under a jet of water; if it is too dirty, replace it with a new filter
identical to the one removed
After having carried out the cleaning operations, refit the filter and hose pipe
When the operations have terminated, turn on both the electricity supply and water supply.
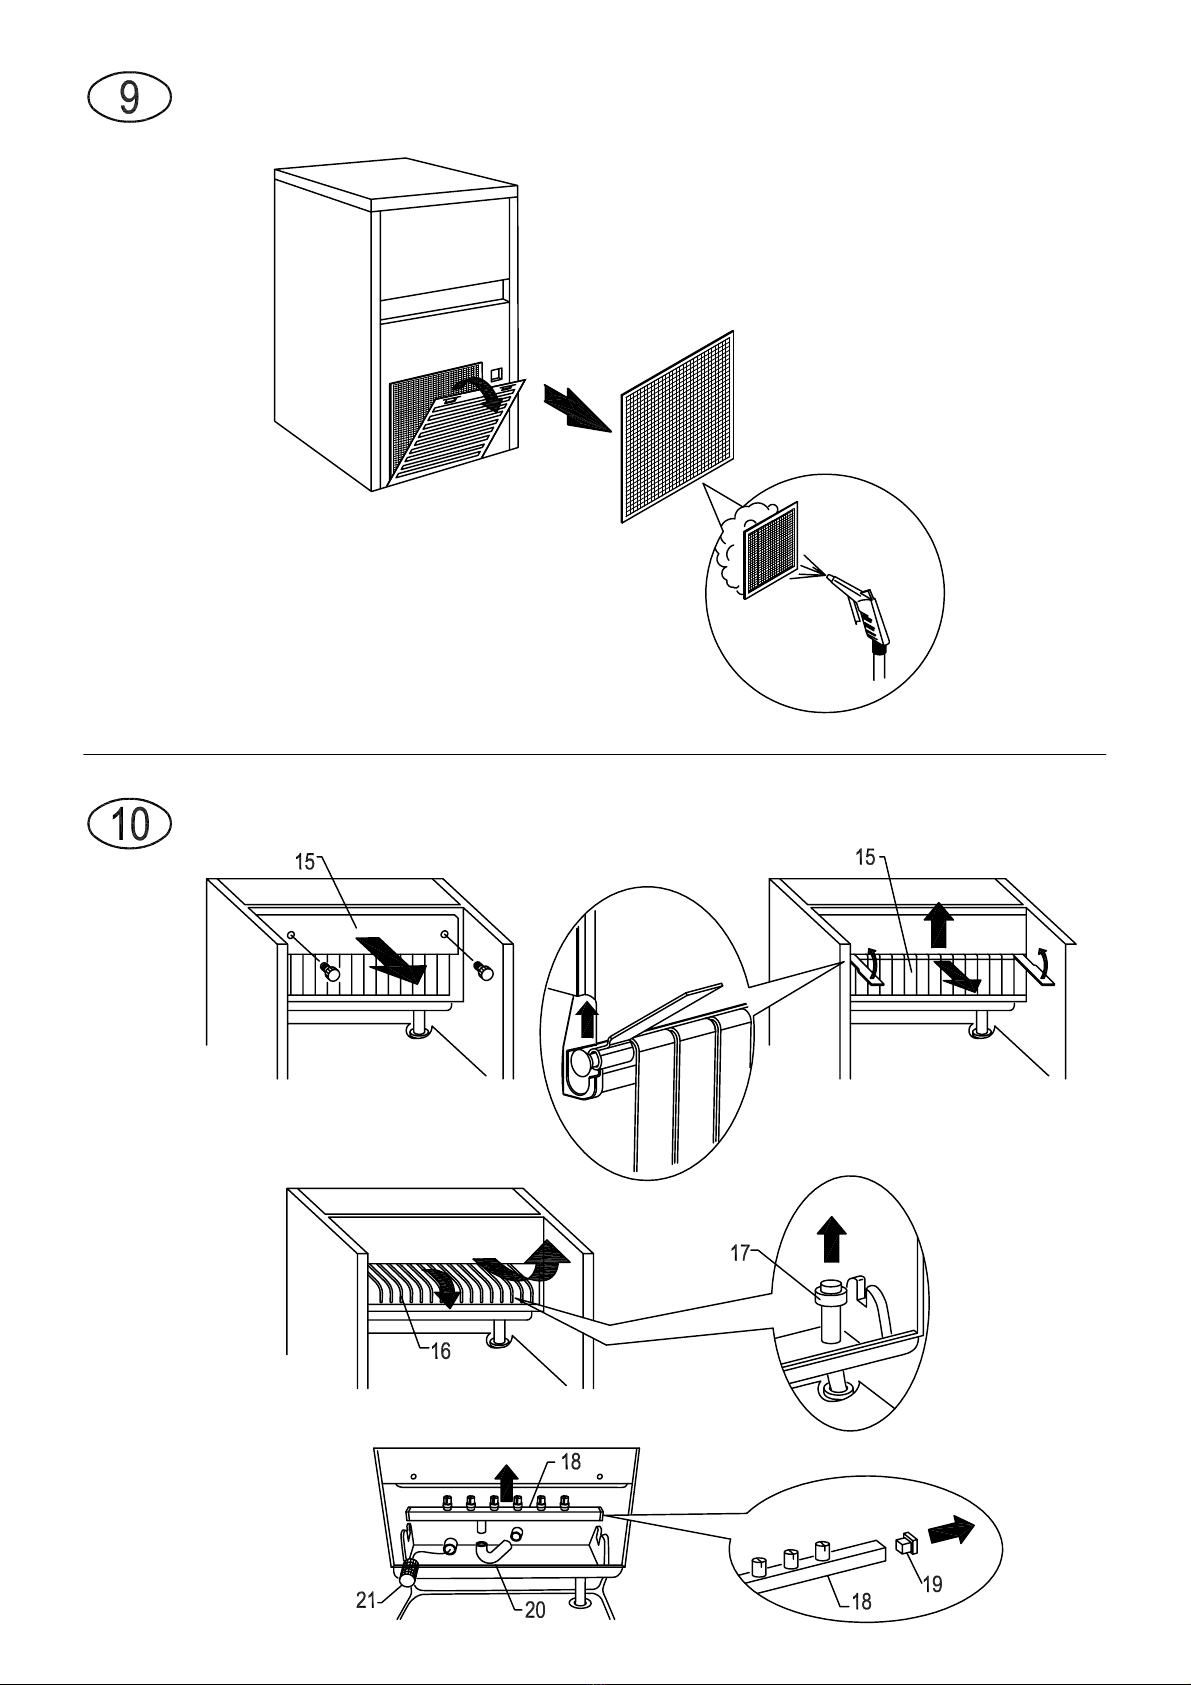
9.2 AIR-COOLED ODELS (Fig. 9)
For air-cooled models, it is very important to keep the finned condenser and its external filter clean.
Have the finned condenser cleaned at least every 2 months y an Authorized Service Center, which can
include the operation in maintenance programs.
The external filter must e cleaned at least once a month, as follows:
• switch off appliance and cut off power supply with the switch (7 in Fig. 5) fitted at the installation
stage
• open plastic grille
• remove filter and keep it at a distance form the appliance
• remove dust from filter y lowing with compressed air
• replace filter in its seat and close plastic grille
9.3 CLEANING AND SANITIZING OPERATIONS
‼
All cleaning operations must be carried out only after the electric power and water supplies
have been disconnected.
The frequency of cleaning and sanitizing operations can vary, depending on:
• temperature and environmental conditions
• temperature and quality of water (hardness, presence of grit, etc.)
• quantity of ice produced, or time of use of ice-cu e maker
• periods of non-use of ice-cu e maker
TO ENSURE CORRECT CLEANING AND SANITIZING OF THE ICE-CUBE MAKER, PERFORM THE
OPERATIONS DESCRIBED IN THIS MANUAL AT LEAST ONCE A MONTH.

E
E
n
n
g
g
l
l
i
i
s
s
h
h
‼
I PORTANT:
• we recommend that the operations descri ed in this manual should e performed y qualified,
authorized personnel.
• do not use corrosive su stances to remove limestone from the appliance, ecause this will invalidate
the guarantee, and may cause serious damage to the materials and components of the appliance
• gloves suita le to protect against cuts must e worn when performing all operations involving handling
of sheet metal parts in particular
• gloves suita le to protect the skin against the su stances used must e worn when performing all
cleaning and sanitizing operations
• wear suita le goggles during cleaning and sanitizing operations to protect the eyes against splashes
of the su stances used
• take care not to spill water or solutions on the electric wiring of the appliance or the power supply
ca le
9.3.a CLEANING
1. wait for ice cu es to drop, switch off appliance, disconnect from the electricity mains supply
and open door
2. remove all ice from container
3. remove flag support assem ly (15 in Fig. 10) and ice-cu e slide (16 in Fig 10) and extract
overflow pipe (17 in Fig 10) to drain water present in asin
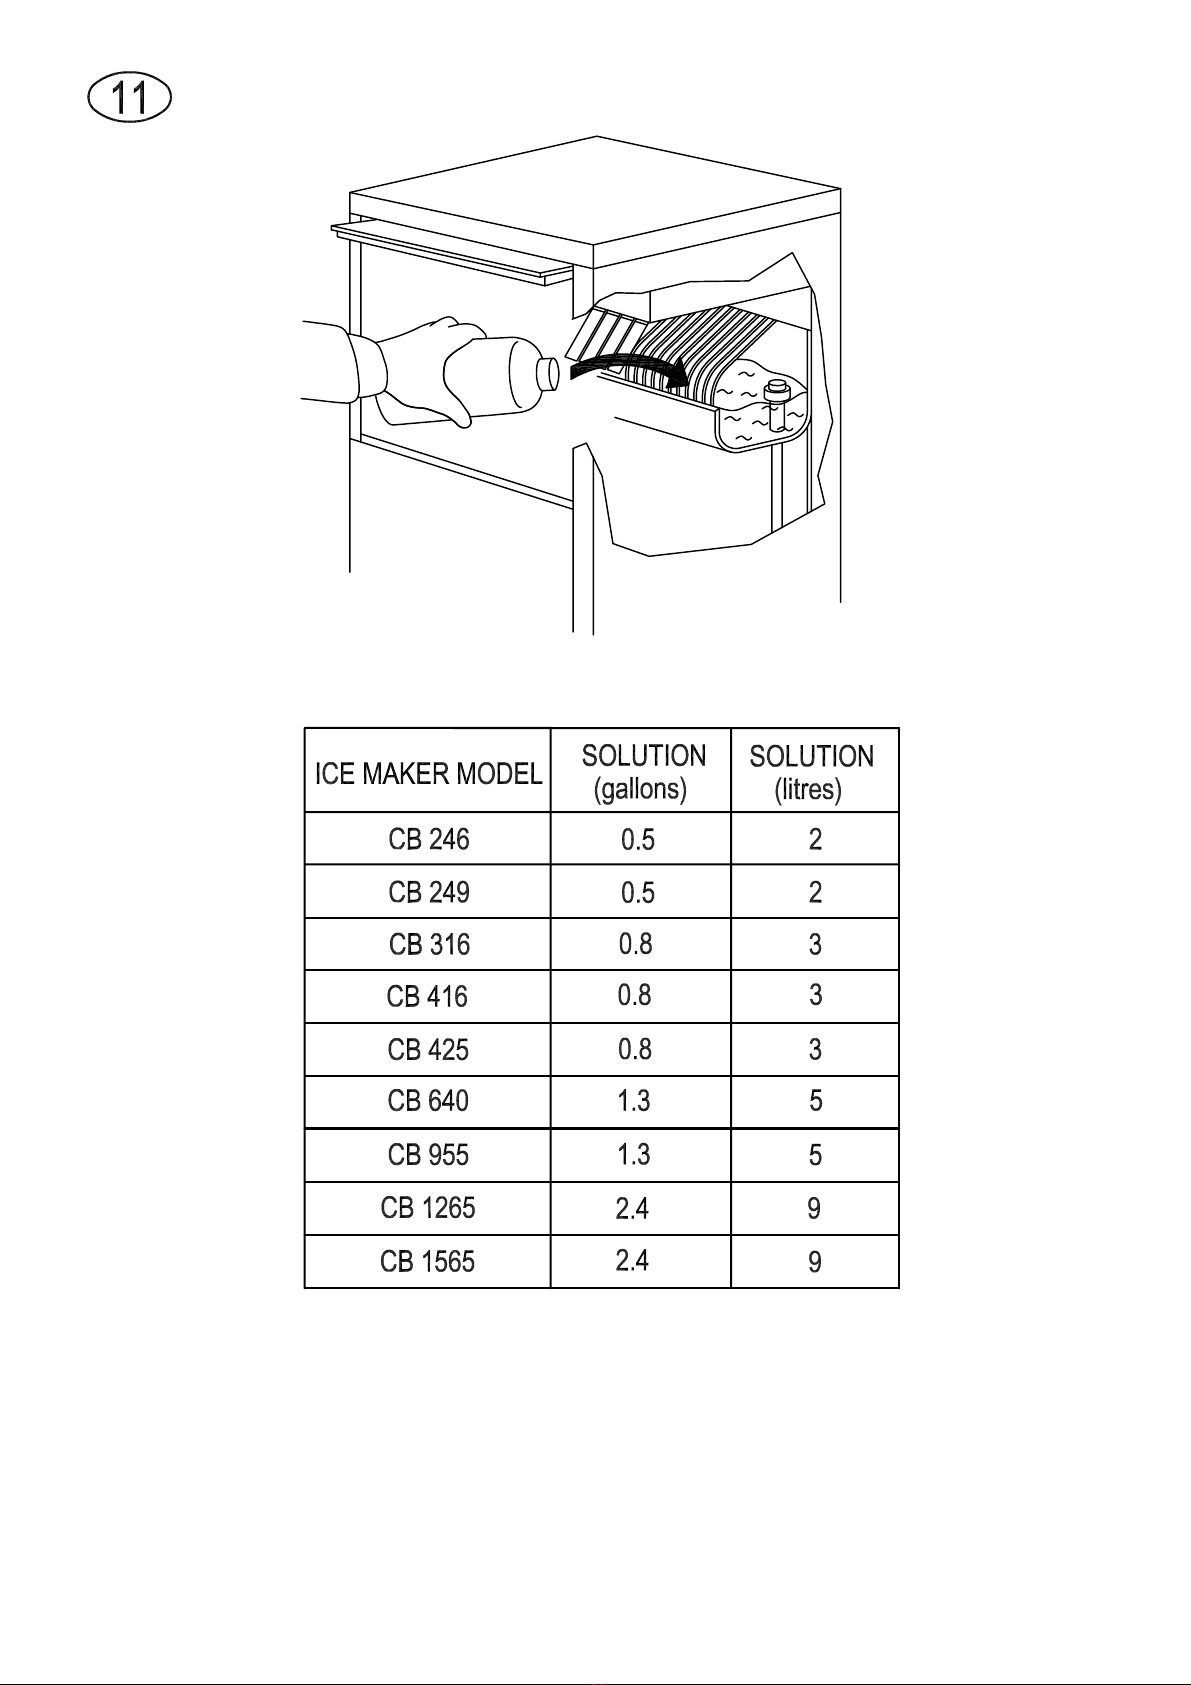
4. refit the overflow pipe and fill the asin with a 25% solution of water and white vinegar, referring
to the ta le in Fig. 11
5. reposition ice-cu e slide and flag support assem ly
6. close door and operate appliance for five one-minute periods, with a five-minute interval
etween each
‼
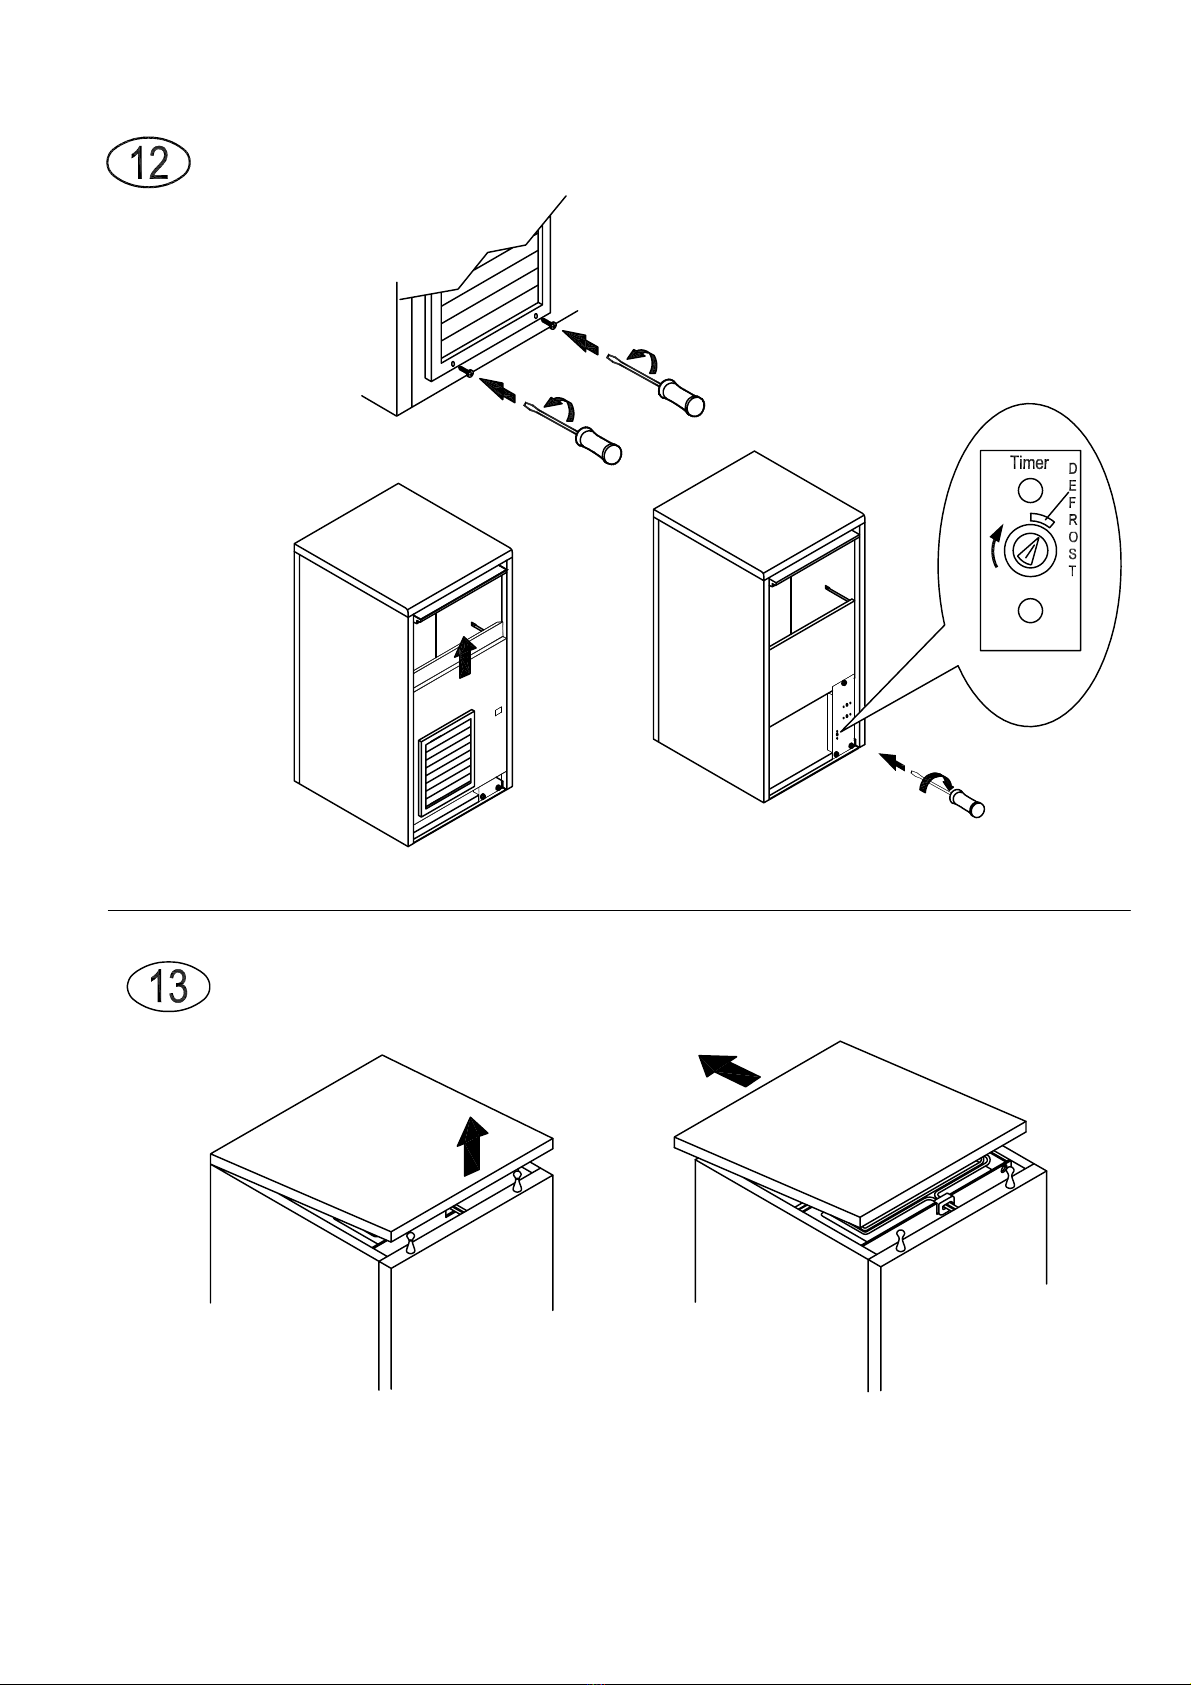
I PORTANT: The pump must be in operation during cleaning cycles (check that water is
sprayed). If it is not, immediately adjust the timer regulation screw by turning it clockwise
until the indicator on the pin exits from the zone marked DEFROST.
To reach timer, loosen screws in front panel with a Phillips screwdriver, remove front panel y
pulling it upwards, and regulate timer with a flat-head screwdriver (Fig. 12).
7. switch off machine and disconnect it from electricity mains and water supply
8. remove top of appliance y lifting rear part and releasing it from front hooks (Fig. 13)
9. remove evaporator cover panel (Fig. 14) and clean top part of evaporator, in, evaporator cover
panel and door with water and vinegar solution
10. remove any sediment from evaporator and evaporator cover panel using a rush with soft
ristles and a non-a rasive sponge
11. pour plenty of cold water onto the evaporator and with the aid of the rush, direct the sediment
removed into the asin eneath, taking care not to o struct the holes in the ase of the
evaporator. During cleaning of evaporator, take care:
• not to end coils
• not to detach water supply pipes
• not to remove evaporator thermostat
12. remove (Fig. 10) and clean with ordinary washing-up liquid:
• flag support assem ly (15)
• ice-cu e slide (16)
• overflow pipe (17)
• sprayer ank (18), taking care to remove side caps (19)
• sprayer ank feed pipe (20)
• pump filter (21)
13. clean with the same washing-up liquid:
• evaporator cover panel
• inner asin
• in
• door
14. thoroughly rinse previously cleaned parts with cold water

15. rinse and refit (Fig. 10):
• pump filter (21)
• sprayer ank feed pipe (20)
• sprayer ank (18), after repositioning side caps (19)
• overflow pipe (17)
• evaporator cover panel (Fig. 14)
16. prepare to perform the sanitizing operations descri ed in the next chapter
‼
I PORTANT:
All the ice produced during the first 5 cycles after cleaning operations, and any ice already in
the container, must be discarded.
9.3.b SANITIZING
Use a solution of 200 mg/l of sodium hypochlorite and water (or a solution of ½ oz. of leach per
gallon of water) or a solution that conforms to 40 C.F.R. 180.940.
1. fill asin with sanitizing solution, referring to the ta le in Fig. 11
2. refit ice-cu e slide (16 in Fig. 10) and flag support assem ly (15 in Fig. 10)
‼
Before connecting the appliance to the mains electricity supply, ensure that all cables
and electrical wiring are perfectly dry.
3. operate ice maker for five one-minute periods, with a five-minute reak etween them
‼
I PORTANT: The pump must be in operation during sanitizing cycles (check that water
is sprayed). If it is not, immediately adjust timer regulation screw by turning it clockwise until
the indicator on the pin exits from the zone marked DEFROST.
To reach timer, loosen screws in front panel with a Phillips screwdriver, remove front panel y
pulling it upwards, and regulate timer with a flat-head screwdriver (Fig. 12).
4. switch off machine and disconnect it from the mains electricity and water supply
5. remove evaporator cover panel (Fig. 14)
6. pour sanitizing solution onto top part of evaporator, distri ute with a rush, and rinse thoroughly
with cold water
7. remove (Fig. 10) and immerse in sanitizing solution for 30 minutes:
• flag support assem ly (15)
• ice-cu e slide (16)
• overflow pipe (17)
• sprayer ank (18) and side caps (19), after removing them from the ank
• sprayer ank feed pipe (20)
• pump filter (21)
• evaporator cover panel (Fig. 14)
8. wipe container walls and door with sanitizing solution using a sponge and rush
9. drain sanitizing solution remaining in pump ody y introducing pressurized water into the
suction pipe and checking that the water exits from the delivery pipe (Fig. 15)
10. thoroughly rinse inner asin, door and container with cold water
11. thoroughly rinse ice-cu e slide, evaporator cover panel, sprayer ank and the corresponding
side caps, flag support assem ly, overflow pipe, pump filter and sprayer ank feed pipe under
running water
12. refit parts previously removed
13. reposition top
The ice maker can now e reactivated as specified in the previous chapters.
‼
I PORTANT:
All the ice produced during the first 5 cycles after sanitizing operations, and any ice already in
the container, must be discarded.

E
E
n
n
g
g
l
l
i
i
s
s
h
h
We recommend asking one of the Authorized Service Centers for a periodic maintenance contract
which includes:
• cleaning the condenser
• cleaning the filter located on the water supply solenoid valve
• checking the charge of coolant gas
• checking the operating cycle
• sanitizing the appliance
10 PERIODS AT A STANDSTILL
If you do not intend to use the appliance for a certain period of time, proceed as follows:
• switch off the electric power source y means of the switch (7 in Fig. 5), and remove the plug of the
appliance from its socket
• shut off the water supply y turning off the water supply tap (8 in Fig. 5)
• empty the inner asin, removing the flap panel and extracting the ice-cu e slide and the overflow pipe
(Fig. 10)
• empty out the pump ody lowing compressed air into the pipe that supplies water to the sprayer
ank (Fig. 15)
• clean water supply solenoid valve filter as descri ed in chapter 9.1
• clean air condenser filter (air-cooled models) as descri ed in chapter 9.2

F
F
r
r
a
a
n
n
ç
ç
a
a
i
i
s
s
Cher Client, nous sommes heureux que vous ayez choisi un produit de qualité qui saura
certainement répondre à vos attentes. Nous vous remercions de la confiance que vous avez
bien voulu nous accorder et nous vous invitons à consulter attentivement ce manuel
d’instructions avant d’utiliser votre nouvelle machine automatique à gla ons.
SOMMAIRE
1 AVERTISSEMENTS ET CONSEILS IM ORTANTS
2 DONNEES TECHNIQUES
3 INDICATIONS UTILES OUR LE TRANS ORT
4 DEBALLAGE
5 INSTALLATION
5.1 SCHEMA DES CONNEXIONS
5.2 MISE EN PLACE
5.3 RACCORDEMENT AU RESEAU HYDRIQUE
5.3.a CHARGEMENT
5.3.b DECHARGEMENT
5.4 RACCORDEMENT AU SECTEUR ELECTRIQUE
5.5 UTILISATION IMPROPRE DE L’APPAREIL
6 MISE EN SERVICE
6.1 NETTOYAGE DES PARTIES INTERNES
6.2 MISE EN MARCHE
7 RINCI ALES CAUSES DE MAUVAIS FONCTIONNEMENT
8 FONCTIONNEMENT
9 ENTRETIEN
9.1 NETTOYAGE FILTRE ELECTROVANNE D’ARRIVEE D’EAU
9.2 MODELES A CONDENSATION A AIR
9.3 OPERATIONS DE NETTOYAGE ET DESINFECTION
9.3.a NETTOYAGE
9.3.b DESINFECTION
10 ERIODES D’INACTIVITE
Les schémas de ce manuel ont un caractère général et peuvent donc présenter des
différences par rapport au modèle livré.
Le Fabricant décline toute responsabilité dans le cas d’imprécisions imputables à des
erreurs d’impression ou de transcription figurant dans ce manuel. Il se réserve le droit
d’apporter à ses produits toutes modifications qu’il jugera utiles ou nécessaires, m me dans
l’intér t de l’utilisateur, sans compromettre leurs caractéristiques de fonctionnement et de
sécurité.

1 AVERTISSEMENTS ET CONSEILS IM ORTANTS
Ce manuel fait partie intégrante de la machine automatique à glaçons (ci-après dénommée
appareil) et devra être conservé afin de pouvoir être consulté à tout moment.
En cas de vente ou de transfert de l’appareil, ce manuel devra être remis au nouvel utilisateur de fa on
à ce que celui-ci puisse le consulter et prendre connaissance du mode de fonctionnement et des
avertissements correspondants.
‼
Lisez attentivement les avertissements contenus dans ce manuel d’instructions avant
d’installer et d’utiliser l’appareil. Ces avertissements sont fournis afin d’assurer la sécurité des
utilisateurs en phase d’installation, d’utilisation et d’entretien.
• débranchez toujours l’appareil avant de procéder à toute opération de nettoyage et d’entretien
• pour garantir le bon fonctionnement de l’appareil, il est indispensable de respecter les instructions
du Fabricant et de confier l’entretien à un technicien qualifié
• soulevez toujours l’appareil, même pour de petits déplacements, évitez toujours de le pousser ou le
tirer
• tout usage de l’appareil autre que la fabrication de gla ons en cubes à partir d’eau froide potable,
doit être considéré comme impropre
• en cas de panne et/ou de mauvais fonctionnement de l’appareil, arrêtez-le en appuyant sur
l’interrupteur prévu à cet effet en phase d’installation, débranchez la prise de courant et fermez le
robinet d’arrivée d’eau. Evitez toute tentative de réparation ou toute intervention directe et
adressez-vous directement à un des Centres Agréés
• modifier ou tenter de modifier cet appareil est extrêmement dangereux et annule toute forme de
garantie
• toute remarque éventuelle ou schéma relatif à des modèles particuliers seront joints au présent
manuel d’instructions
‼
L’utilisation de cet appareil électrique implique le respect d’un certain nombre de règles
fondamentales, et notamment:
• évitez de toucher l’appareil avec les mains ou les pieds mouillés ou humides
• évitez d’utiliser l’appareil pieds nus
• évitez d’utiliser des rallonges dans les salles de bain ou les douches
• évitez de tirer le câble d’alimentation pour débrancher l’appareil
• évitez que des enfants ou des personnes incapables utilisent l’appareil
• veillez à ce que les enfants ne jouent pas avec l’appareil
• veillez à ce qu’aucun objet ne se glisse dans les pièces en mouvement et les protections
Si vous décidez de ne plus utiliser l’appareil, nous vous conseillons de le mettre hors d’usage en
coupant le câble d’alimentation (après l’avoir débranché du secteur électrique).
Nous vous recommandons également:
• de casser et d’enlever le panneau d’ouverture afin d’éviter qu’un enfant risque de se coincer en
voulant jouer avec l’appareil
• d’éviter d’abandonner dans la nature le gaz frigorigène et l’huile qui se trouvent dans le compresseur
• d’éliminer et de recycler les matériaux en fonction des dispositions locales en vigueur en la matière
Cet appareil ne contient aucun réfrigérant pouvant endommager la couche d’ozone.
‼
Une mauvaise installation peut provoquer des dommages à l’environnement, aux
personnes, aux animaux et aux choses dont le Fabricant ne saurait être retenu responsable.
2 DONNEES TECHNIQUES (Fig. 1)
La tension et la fréquence sont indiquées sur la plaquette d’immatriculation. Veuillez les consulter pour
toute vérification ou contrôle.
Tension (1), puissance (2), modèle (3), n° de matricule (4), Fabricant (5).

F
F
r
r
a
a
n
n
ç
ç
a
a
i
i
s
s
Le niveau de pression sonore continue équivalent pondéré A de cet appareil est inférieur à 70 dB(A).
Les relevés ont été effectués à 1 mètre de la surface de l’appareil et à 1.60 mètres de hauteur du sol
pendant toute la durée d’un cycle de production.
Lorsqu’il fonctionnement correctement, l’appareil n’émet aucune vibration susceptible d’engendrer un
quelconque danger, y compris potentiel.
Le schéma électrique est appliqué sur le panneau avant de l’appareil.
Pour y accéder, coupez le courant à l’appareil, dévissez les vis qui fixent le panneau avant et enlevez-le
après avoir ouvert la porte (Fig. 4).
3 INDICATIONS UTILES OUR LE TRANS ORT
Le poids net et le poids brut de cet appareil sont indiqués sur la couverture de ce manuel. Sur
l’emballage vous trouverez les instructions pour effectuer correctement le transport et le soulèvement
de l’appareil.
Afin d’éviter que l’huile qui se trouve dans le compresseur coule dans le circuit réfrigérant, l’appareil doit
toujours être transporté, stocké et déplacé en position verticale et conformément aux instructions
figurant sur l’emballage.
4 DEBALLAGE
L’installation doit être effectuée conformément aux normes locales en vigueur, suivant les
instructions du Fabricant et par des techniciens qualifiés et autorisés.
Après avoir déballé l’appareil, en suivant les instructions imprimées sur la boîte, VERIFIEZ SI
L’APPAREIL EST INTACT. EN CAS DE DOUTE, NE L’UTILISEZ PAS ET ADRESSEZ-VOUS AU
DISTRIBUTEUR qui vous l’a vendu.
Evitez de laisser les éléments d’emballage (sacs en plastique, carton, polystyrène expansé,
clous, etc.) à la portée des enfants car ils représentent un danger potentiel.
A l’aide d’une clé hexagonale fixe, dévissez les vis (Fig. 2) qui servent à fixer l’appareil au socle en bois.
Cette opération doit être effectuée une fois que le socle en bois repose parfaitement sur le sol.
Soulevez l’appareil à l’aide d’un moyen de levage approprié et séparez-le du socle en bois; vissez
ensuite les pieds fournis dans les trous prévus à cet effet sur la base de l’appareil (6 - Fig. 3).
A l’aide d’une nivelle, vérifiez si l’appareil est parfaitement horizontal. Dans le cas contraire, réglez les
pieds jusqu’à ce qu’il soit horizontal.
5 INSTALLATION
L’utilisateur se doit de faire le nécessaire pour installer correctement l’appareil, et notamment:
• aménager une zone d’installation suffisamment aérée et accessible pour permettre d’effectuer les
opérations d’entretien
• veiller au branchement électrique, au branchement hydrique et aux égouts, travaux de ma onnerie et
de canalisation éventuellement nécessaires compris, conformément aux normes locales en vigueur
5.1 SCHEMA DES CONNEXIONS (Fig. 5)
7. branchement électrique commandé par un interrupteur omnipolaire à différentiel
8. robinet d’arrivée d’eau
9. tuyau d’arrivée d’eau
10. tuyau d’évacuation d’eau
5.2 MISE EN LACE
‼
L’appareil doit être installé dans des lieux bénéficiant de bonnes conditions d’hygiène;
éviter donc de l’installer dans des caves ou des débarras au risque de favoriser l’apparition et la
prolifération de bactéries à l’intérieur même de l’appareil.

Il est conseillé d’installer l’appareil dans un endroit où la température ambiante est comprise
entre 50°F (10°C) et 95°F (35°C) et celle de l’eau d’alimentation entre 38°F (3°C) et 77°F (25°C).
Evitez de laisser l’appareil directement exposé aux rayons du soleil et près d’une source de
chaleur (ex. radiateurs, machines lave tasses, etc.)
‼
Cet appareil:
• ne doit pas être utilisé à l’extérieur
• ne doit pas être placé dans un local humide et en présence de jets d’eau
• ne doit pas être nettoyé au jet d’eau
• doit être mis à une distance de 2 in (5 cm) au moins des parois
5.3 RACCORDEMENT AU RESEAU HYDRIQUE
‼
IM ORTANT:
• le raccordement au réseau hydrique devra être effectué conformément aux instructions du
Fabricant et par un technicien qualifié
• cet appareil a spécialement et uniquement été con u pour être alimenté avec de l’eau froide potable
• la pression de service devra être comprise entre 14.5 et 87 PSI (0.1 et 0.6 MPa)
• entre le réseau hydrique et le tuyau de remplissage de l’appareil, vous devrez installer un robinet de
fa on à pouvoir interrompre le passage de l’eau en cas de besoin
• si l’eau est particulièrement calcaire, l’installation d’un adoucisseur est recommandée. La présence
de substances solides (sable, etc.) peut être éliminée moyennant la mise en place d’un filtre
mécanique qui devra être contrôlé et nettoyé périodiquement. Ces dispositifs devront être
conformes aux normes locales en vigueur en la matière
• ne fermez jamais le robinet d’arrivée de l’eau quand l’appareil est en marche
5.3.a CHARGEMENT (Fig. 6)
Reliez l’électrovanne d’arrivée d’eau (11) située à l’arrière de l’appareil au réseau hydrique,
conformément aux normes locales en vigueur.
5.3.b DECHARGEMENT (Fig. 6)
Reliez le raccord d’évacuation (12) situé à l’arrière de l’appareil au réseau d’évacuation d’eau
conformément aux normes locales en vigueur. Vérifiez:
• l’absence d’étranglements sur toute la longueur du tuyau d’évacuation
• si le tuyau d’évacuation est incliné de 15% au moins
5.4 RACCORDEMENT AU SECTEUR ELECTRIQUE
‼
IM ORTANT:
• le raccordement au secteur électrique doit être conforme aux normes locales en vigueur et
effectué par du personnel agréé hautement qualifié
• avant de brancher l’appareil au secteur électrique, assurez-vous que la tension correspond à celle
indiquée sur la plaquette d’immatriculation
• assurez-vous que l’appareil est mis à la terre correctement
• vérifiez que la portée électrique de l’installation correspond à la puissance maximum de l’appareil
indiquée sur la plaquette d’immatriculation
• l’appareil est doté d’une fiche électrique; prévoir une prise spéciale commandée par un interrupteur
magnétothermique omnipolaire (7 - Fig. 5) conforme aux normes locales de sécurité en vigueur,
doté de fusibles, à différentiel associé et placé de fa on à être facile d’accès. Insérez la fiche
électrique dans la prise commandée par l’interrupteur (7 - Fig. 5)
• iI est possible de faire remplacer la prise par un technicien qualifié et agréé, à condition que la
nouvelle prise soit conforme aux normes locales de sécurité en vigueur
• nous vous conseillons de dérouler le câble d’alimentation sur toute la longueur et de vérifier s’il
n’est pas écrasé à certains endroits
• tout câble d’alimentation endommagé doit être remplacé par du personnel qualifié sur le plan
professionnel par un câble spécial disponible chez un des Centres Agréés
This manual suits for next models
8
Table of contents
Languages:
Other BREMA Ice Maker manuals


