Brentwood Select AF-32MBK User manual

AIR FRYER 3.2 L / 3.4 QT. CAPACITY
Model No. AF-32MBK
Operating and Safety Instructions
-FOR INDOOR HOUSEHOLD USE ONLY-

2
IMPORTANT SAFEGUARDS
When using this or any other electrical appliance, always follow these basic safety precautions,
especially when children are present.
READ ALL INSTRUCTIONS BEFORE USE
WARNING-- To reduce the risk of fire, electric shock, serious personal injury and property
damage please note the following:
•Never immerse the housing, which contains electrical components and the heating
elements, in water or rinsing under the tap
•Avoid any liquid enter the appliance to prevent electric shock or short circuit.
•Keep all ingredients in the basket or prevent any contact from heating elements.
•Do not cover the air inlet and the air outlet when the appliance is working.
•Fill the pan with oil may cause a fire hazard.
•Don't touch the inside of the appliance while it is operating.
•Check if the voltage indicated on the appliance fits the local mains voltage.
•o not use the appliance if there is any damage on plug, mains cord or other parts.
•Do not go to any unauthorized person to replace or fix damaged main cord.
•Keep the mains cord away from hot surfaces.
•Do not plug in the appliance or operate the control panel with wet hands.
•Do not place the appliance against a wall or against other appliances. Leave at least 6 in.
free space on the back and sides and 6 in. free space above the appliance.
•Do not place anything on top of the appliance.
•Do not use the appliance for any other purpose than described in this manual.
•Do not let the appliance operate unattended.
•During hot air frying, hot steam is released through the air outlet openings, Keep your
hands and face at a safe distance from the steam and from the air outlet openings.
•Be careful of hot steam and air when you remove the pan from the appliance.
•Any accessible surfaces may become hot during use
•Immediately unplug the appliance if you see dark smoke coming out of the appliance. Wait
for the smoke emission to stop before you remove the pay from the appliance.
•Ensure the appliance in placed on a horizontal, even and stable surface.
•This appliance is designed for household use only. It may not suitable to be safely used in
environments such as staff kitchens, farms, motels, and other non-residential
environments. Nor is it intended to be used by clients in hotels, motels, bed and breakfasts
and other residential environments.
•If the appliance is used improperly or for professional or semi-professional purposes or it is
not used according to the instructions in the user manual, the guarantee becomes invalid
and we could refuse any liability for damage caused.
•Always unplug the appliance while not using.
•The appliance needs approximately 30 minutes to cool down for handle or cleaning safely.
3
SPECIAL INSTRUCTIONS:
A short power supply cord is provided to reduce the risk of becoming entangled in or tripping
over a longer cord. An extension cord is not recommended for use with this product, but if
one must be used:
The marked electrical rating must be at least as great as that of the product;
If the product is of a 3-prong grounding type, the extension cord must be a grounding-
type 3-wire cord.
Arrange the extension cord so that it will not drape over the countertop or tabletop
where it can be tripped over or pulled.
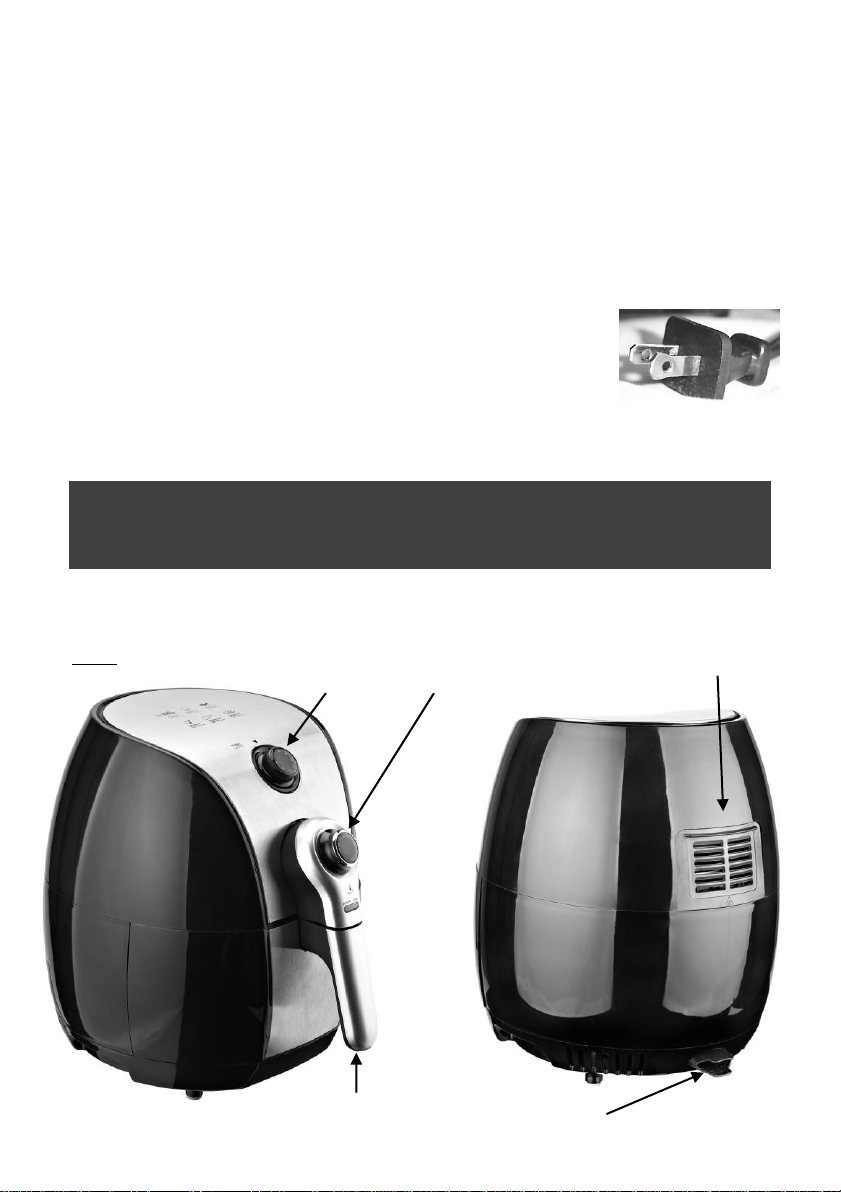
WARNING: This product is equipped with a polarized plug (one blade
is wider than the other blade) to reduce the risk of electrical shock.
This is a safety feature. The plug will fit into a polarized outlet only one
way. If you are unable to insert the plug into the electrical outlet, try
reversing the plug. If the plug still does not fit, contact a qualified electrician. Never use the
plug with an extension cord unless you can fully insert the plug into the extension cord. Do
not alter the plug. Do not attempt to defeat the safety purpose of the polarized plug.
SAVE THESE INSTRUCTIONS
FOR FUTURE REFERENCE
Parts:
Handle
Front Back
Timer
Temperature Control Knob
Cord Storage
Exhaust
4
Before First Use
IMPORTANT: Please check all packaging material carefully before discarding as there may be
accessory parts contained within the packaging material.
WARNING: Do not place any part of the product in a dishwasher.
1. Make sure the Fryer is unplugged.
2. To remove any dust that may have accumulated, wash the Fryer Basket with warm soapy
water and dry thoroughly. Wipe the interior and exterior of the Fryer with a damp towel.
Dry thoroughly.
Note: NEVER immerse the fryer body, cord or plug in water.
3. Unlock by pressing the Release Button.
4. Remove the Frying Basket by pushing the Handle release button and pulling the Fryer
Basket out.
Using Your Fryer:
Attention: First use may cause a slight odor or small smoking upon heating, it is normal. This
is a result of the heating element chemical reaction. It quickly goes away.
1. Carefully pull the pan out of the fryer and Put the ingredients in the basket.
2. Slide the pan back into the fryer, carefully align with the guides in the body of the fryer.
WARNING: Never use the pan without the basket in it.
3. To switch on the appliance, turn the timer knob to the required preparation time
4. Turn the temperature control knob to the required temperature.
Note: If you want, you can also let the appliance preheat without any ingredients inside. In
that case, turn the timer knob to more than 3 minutes and wait until the heating-up
light goes out (after approx. 3 minutes). Then fill the basket and turn the timer knob to
the required preparation time.
5. Some ingredients require shaking halfway through the preparation time. To shake the
ingredients, pull the pan out of the appliance by the handle and shake it. Then slide the
pan back into the fryer.
Caution: Do not press the button the handle during shaking.
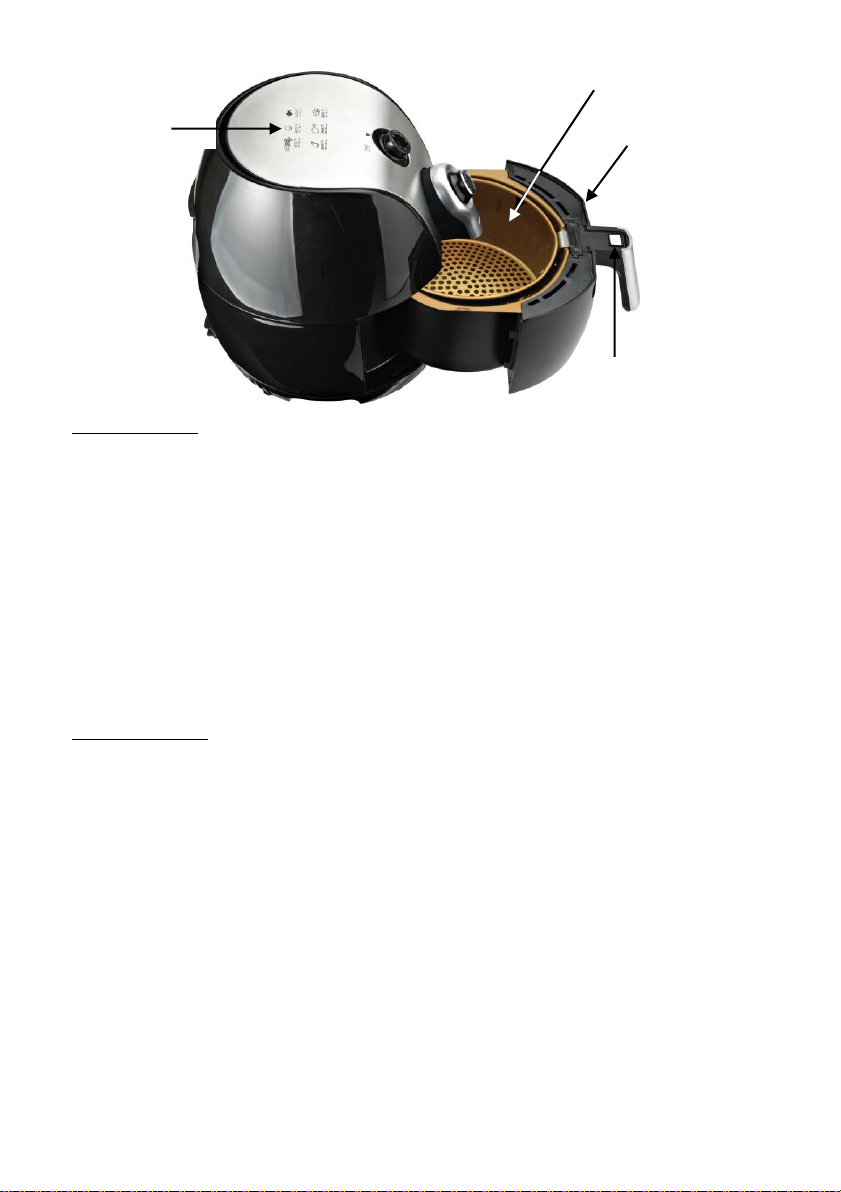
Frying basket
Handle and Basket
Release Button
Quick Temp./
Time Guide
Frying pan

5
Tip: To reduce the weight, you can remove the basket from the pan and shake the basket
only. To do so, pull the pan out of the appliance, place it on a heat-resistant surface and press
the button of handle. and lift the basket out of the pan
6. When you hear the timer bell, the set preparation time has elapsed. Pull the pan out of
the appliance. Check if the ingredients are ready.
7. To remove ingredients, pull the pan out of the fryer and press the basket release button
and lift the basket out of the pan.
Cleaning Your Fryer:
WARNING: Always turn the appliance to “Off” and unplug the product, allow it to cool before
cleaning or storing it.
1. Wipe the outside of the appliance with a moist cloth.
2. Clean the pan and basket with hot water, dish soap and a non-abrasive sponge.
3. You can use degreasing liquid to remove any remaining food.
Tip: If food is stuck to the basket or the bottom of the pan, fill the pan with hot water with
some washing-up liquid. Put the basket in the pan and let the pan and the basket soak
for approximately 10 minutes.
4. Clean the inside of the appliance with hot water and non-abrasive sponge.
IMPORTANT: Never submerge the base or clean under running water.
Temperature Guide:
Min-max
Amount (oz)
Time
(min.)
Temperature
(°F)
Shake
Extra information
Potato & Fries
Thin frozen fries
300-400
18-20
400
shake
Thick frozen fries
300-400
20-25
400
shake
Potato gratin
500
20-25
400
shake
Meat & Poultry
Steak
100-500
10-15
355
Pork chops
100-500
10-15
355
Hamburger
100-500
10-15
355
Sausage roll
100-500
13-15
400
Drumsticks
100-500
25-30
355
Chicken breast
100-500
15-20
355
Snacks
Spring rolls
100-400
8-10
400
shake
Use oven-ready
Frozen chicken
nuggets
100-500
6-10
400
shake
Use oven-ready
Frozen fish fingers
100-400
6-10
400
Use oven-ready
Frozen bread crumbed
cheese snacks
100-400
8-10
355
Use oven-ready
Stuffed vegetables
100-400
10
320
Baking
Cake
300
20-25
320
Use baking tin
Quiche
400
20-22
355
Use baking tin/oven dish
Muffins
300
15-18
400
Use baking tin
Sweet snacks
400
20
320
Use baking tin/oven dish

6
Recipes
Tip: A variety of pre-made packaged foods can be cooked in the Air fryer. As a guide, lower the conventional
oven temperature by 70 degrees and reduce the cooking time by half. Exact times and temperatures will
vary by food.
“Bloomin’ Onion”
Serves 4
Ingredients
•1 Large white onion
•1 Large white onion
•1/4 cup Milk, nonfat
•1/4 cup Milk, nonfat
•2 Large eggs
•2 Large eggs
•3/4 cup Panko Bread Crumps
•3/4 cup Panko Bread Crumps
•1 1/2 teaspoon Paprika
•1 1/2 teaspoon Paprika
Directions
1. To slice onion: slice 1 inch off the top and bottom of the onion and remove the papery skin. Use a thin
knife to cut a 1 inch diameter core out of the middle of the onion. Now use a very sharp, large knife to
slice the onion several times down the center to create 'petals': First slice through the center of the
onion to about three-fourths of the way down. Turn the onion 90 degrees and slice it again in an X
across the first slice. Keep slicing the sections in half, very carefully until the onion has been cut 8-16
times. Do not cut down to the bottom of the onion. (The last 8 slices will be difficult, be careful).
2. Place sliced onion in ice water for at least 2 hours / overnight. Remove from water, pat dry. Open
onion so “Petals” are exposed.
3. Place onion on a tray or in a bowl.
4. Mix breadcrumbs with olive oil & Cajun seasoning.
5. In a dish, mix the milk and egg.
6. In a separate dish mix remaining seasonings with Panko.
7. Sprinkle onion generously with egg mixture. Make sure to get in between all petals. Turn onion upside
down to remove excess
8. Using a ladle, ladle the egg mixture into every crevice. Lift up onion and turn to make sure excess egg
drips off.
9. Sprinkle onion very generously with Panko mixture. Press into place.
10. Place the blooming onion into the Fry Basket of the Power Air Fryer XL. Cover the top with aluminum
foil like a tent. Place the Fry Basket into the Fryer
12. Set cooking time to 10 minutes at 360°. Leave foil on.
13. When timer is done, check crispness of the onion. Cook 5-10 more minutes to desired crispness.
When done, remove carefully and serve with Ranch dressing.
French Fries
Serves 4
Ingredients
•2 Russet potatoes
•2 Russet potatoes
•1 tablespoon olive oil
•1 tablespoon olive oil
Directions
1. Blanch the potatoes in water until tender.
2. Let cool. Cut into fries.
3. Toss with olive oil and salt and pepper.
4. Place the potatoes into the Fry Basket and then into the Power Air Fryer XL. Press the M Button.
5. Scroll to the French Fries Icon.
6. Press the Power Button & adjust cooking time to 18 minutes at 400 degrees.
7. Half way through cooking, toss the fries. Shake periodically.

7
Turkey Breast with Maple Glaze
Serves 4
Ingredients
•1.5 teaspoons olive oil
•1.5 teaspoons olive oil
•3 lbs turkey breast cup pure maple syrup, or
more as needed
•3 lbs turkey breast cup pure maple syrup, or
more as needed
•1 teaspoon liquid smoke flavoring (optional)
•1 teaspoon liquid smoke flavoring (optional)
•1 teaspoon ground paprika
•1 teaspoon ground paprika
•1/2 teaspoon salt
•1/2 teaspoon salt
Directions
1. Pre-heat air fryer to 350°F.
2. Brush the olive oil all over the turkey breast.
3. Mix together the maple syrup, smoke flavoring, paprika, salt, pepper, garlic powder, onion powder,
thyme, and cayenne pepper in a bowl, stirring to combine well. Brush the syrup mixture all over the
turkey roast.
4. Transfer the seasoned turkey breast to the air fryer basket and air-fry at 350°F for 20 minutes. Turn
the turkey breast on its side and air-fry for another 10 minutes. Turn the turkey breast on the opposite
side and air-fry for another 10 minutes. The internal temperature of the turkey breast should reach
165ºF when fully cooked.
5. While the turkey is air-frying, combine the maple syrup, mustard and butter in a small saucepan.
When the cooking time is up, return the turkey breast to an upright position and brush the glaze all
over the turkey. Air-fry for a final 5 minutes, until the skin is nicely browned and crispy. Let the turkey
rest, loosely tented with foil, for at least 5 minutes before slicing and serving.
Doughnuts
Serves 4
Ingredients
•1 cup Self Raising Flour
•1Tsp Baking Powder
•3.5 Tbsp Butter
•1/8 Cup +1.5 Tbsp White Sugar
•2.5 Tbsp Butter
•½ Cup Icing Sugar
•1/8 Cup +1.5 Tbsp Brown Sugar
•1 Large Egg
•½ Tsp Pink Food Coloring
• 1 cup Whole Milk
•Strawberry Icing
•1Tbsp Whipped Cream
•¼ Cup Fresh Strawberries (blended)
Directions:
1. Preheat the air fryer to 180c.
2. In a medium sized mixing bowl whisk together your butter, self-rising flour,
3. In another bowl mix together your milk, butter and egg.
4. Gently mix in the second bowl into the first and make sure you don’t over mix as you just want the
ingredients to be combined.
5. Using a cutter remove the center from the doughnut shapes so that they look like a pre-cooked
doughnut.
6. Grease a baking sheet inside the air fryer and add your doughnuts. Cook for 15 minutes at 180c or
until they spring back when lightly pressed.
7. Allow to cool for 5 minutes while you make your icing. Cream the butter and gradually add the icing
sugar until you have a creamy mixture. Add the food coloring, whipped cream and blended
strawberries and mix well.
8. When the doughnuts have cooled place the icing over the top and serve.
Note: This recipe is for making four doughnuts. You can place four in the bottom of your air fryer easily
and if you want more double your recipe and do two rounds in it.
Table of contents
Popular Fryer manuals by other brands

GILES
GILES GGF Series Operation & service manual

MaxxHome
MaxxHome SMART FRYER 21956 user manual

Miele
Miele CS 1411 Operating and installation instructions

B+K precision
B+K precision FORTALIT Instructions for the Safe Use

Silvercrest
Silvercrest SKF 2800 A1 operating instructions

Goldmedal
Goldmedal 5099NS instruction manual


