Breville BMC800 User manual

BREVILLE RECOMMENDS SAFETY FIRST
At Breville we are very safety conscious. We design and manufacture consumer products with the safety of you, our
valued customer, foremost in mind. In addition, we ask that you exercise a degree of care when using any electrical
appliance and adhere to the following precautions.
IMPORTANT SAFEGUARDS
READ ALL INSTRUCTIONS BEFORE USE AND SAVE FOR FUTURE
REFERENCE
When using electrical appliances, basic safety precautions should always be followed including:
•Remove and safely discard any packing materials and promotional labels before using the Prodigy™
induction cooker for the first time.
•Always ensure the induction cooker is properly assembled before use. Follow the instructions provided in this
book.
•This appliance is for household use only. Do not use in any type of moving vehicles. Do not use the
appliance outdoors, or for anything other than its intended use. Misuse can cause injury.
ELECTRICAL / POWER SAFETY
•Position the appliance at a minimum distance of 8 inches (20cm) away from walls, curtains and other heat or
steam sensitive materials and provide adequate space above and on all sides for air circulation.
•Do not place the appliance near the edge of a bench top, counter or table during operation. Ensure the surface
is stable, level, heat-resistant, clean and free of water and other substances.
•Do not use on a cloth-covered surface, near curtains or other flammable materials. A fire may occur if the
appliance is covered or touches flammable materials, including curtains, draperies, walls, and the like, when in
operation.
•Do not use the appliance on (or close to) a hot gas or electric burner, or where it could touch a heated oven or
surface.
•Do not place the appliance on or near a hot gas or electric burner, or in a heated oven.
•Do not use this appliance on a sink drain board.
•Do not move the appliance during cooking or while a saucepan remains on the induction cooker.
CAUTION:
Extreme caution must be used when moving an appliance containing hot oil or other hot liquids.
•The use of accessory attachments which are not recommended by the appliance manufacturer may cause
injuries.
•If the appliance is not in use for an extended period, disconnect the appliance from the power outlet.
•Use only cooking saucepans and pots suitable for use with an induction cooker.
•Extreme caution must be used when the appliance is in use with an induction safe cooking saucepan.
•Do not operate appliance in the vicinity of magnetically sensitive objects (e.g. magnetic cards).
•The appliance is not intended to be operated by means of an external timer or separate remote-control system.
•The temperature of accessible surfaces will be high when the appliance is operating for some time after use.
•Do not place anything on top of the appliance surface (except induction compatible cookware) when in use and
when stored.
•Do not place metallic utensils, non-compatible induction cookware, lids, knives, forks, spoons or other metallic
objects on the induction cooker glass ceramic plate, as these may be heated and may become hot when the
appliance is switched on.
•Take care when operating the appliance as rings, watches and similar objects worn by user could get hot when
near the hob surface.
•Do not insert sharp objects into the ventilation system.
•To avoid overheating, do not place any aluminum foil or metal plates on the appliance.
•Do not touch the hot surface of the glass ceramic plate. The induction cooker does not heat up itself during
cooking, but the temperature of the cookware heats up the glass ceramic plate.
•Do not heat any opened or unopened cans on the induction cooker.
•Do not cook on broken cook-top. If cook-top should break, cleaning solutions and spillovers may penetrate the
cook-top and create a risk of electric shock.
•Clean cook-top with caution. If a wet sponge or cloth is used to wipe spills on a hot cooking area, be careful to
avoid steam burn, some cleaners can produce noxious fumes if applied to a hot surface.
1

•Always use the power button to switch the appliance off. Turn-off the switch at the power outlet, then unplug the
power cord and cool the appliance completely before cleaning, before attempting to move the appliance, and
when storing the appliance.
•We recommend use of Breville induction compatible cookware to obtain best cooking results.
•Maximum weight of pot and content should not exceed 13 pounds (6 kg).
•Only use pans and pots that are made of induction cooking compatible materials, minimum pan diameter of pot
should not be smaller than 5.5 inches (14cm).
•Keep the appliance clean.
•After use, switch the hob element off. Do not rely on the pan detector.
SAFETY WITH CHILDREN
•To avoid choking hazard for young children, remove and safely dispose the protective cover fitted on the power
plug.
•This appliance can be used by children aged from 8 years and above and persons with reduced physical,
sensory or mental capabilities or lack of experience and knowledge if they have been given supervision or
instruction concerning use of the appliance in a safe way and understand the hazards involved.
•Children shall not play with the appliance.
•Cleaning and user maintenance shall not be made by children without supervision.
•Keep the appliance and its cord out of reach of children less than 8 years.
•Close supervision is necessary when the appliance is used by or near children.
IMPORTANT SAFEGUARDS FOR ALL ELECTRICAL APPLIANCES
When using electrical appliances, basic safety precautions should always be followed including:
•Fully unwind the power cord before use.
•To protect against electric shock, do not immerse the cord, plug or appliance in water or any other liquid.
•Do not let the power cord hang over the edge of a table or counter, touch hot surfaces or become knotted.
•It is recommended to regularly inspect the appliance. To avoid a hazard do not use the appliance if the power
cord, power plug or appliance becomes damaged in any way. Immediately cease use and call Breville
Consumer Support for examination, repair or adjustment.
•For any maintenance other than cleaning, contact Breville Consumer Support.
•Do not use harsh abrasives, caustic cleaners or oven cleaners when cleaning this appliance.
•Do not clean with metal scouring pads. Pieces can break off the pad and touch electrical parts, creating a risk of
electric shock.
•The installation of a residual current device (safety switch) is recommended to provide additional safety
protection when using electrical appliances. It is advisable that a safety switch with a rated residual operating
current not exceeding 30mA be installed in the electrical circuit supplying the appliance. See your electrician for
professional advice.
•The appliance must be used on a properly grounded outlet. If you are not sure if the power outlets are properly
grounded, please consult your electrician.
•Do not, under any circumstances, modify the power plug or use an adapter.
•A 120-volt, 60 Hz, AC only,15-20-amp electrical supply with a fuse or circuit breaker is required in accordance
with all Federal, State and Local governing codes and ordinances.
•We also recommend a separate circuit dedicated to serving only this appliance.
WARNING
To prevent electric shock, unplug before cleaning.
WARNING
•Before use, people with electronic implants such as pacemakers, etc., and or other health issues should consult
their doctor, as the induction cooker generates a magnetic field.
•If the glass ceramic plate surface is cracked, switch off the appliance to avoid the possibility of electric shock.
•Return the appliance to the nearest authorized Breville service center for repair.
•The induction cooker, after being switched-off, will continue to radiate residual heat on the glass ceramic plate
heating surface.
•Do not use this induction cooker within reach of young children.
DISPOSAL (caring for the environment)
[crossed bin icon] The symbol shown indicates that this appliance should not be disposed of in normal household
waste. It should be taken to a local authority waste collection center designated for this purpose or to a dealer
providing this service. For more information, please contact your local council office.
2

SHORT CORD INSTRUCTIONS
Your Breville appliance is fitted with a short power supply cord to reduce personal injury or property damage
resulting from pulling, tripping or becoming entangled with a longer cord.
•Longer detachable power supply cords or extension cords should not be used; long cords may drape over the
countertop or table-top or hang by the edge where it can be pulled on by children or tripped over unintentionally,
causing injuries.
•Do not use an extension cord. If the power supply cord is too short, have a qualified electrician or serviceman
install an outlet near the appliance.
•A short power-supply cord is supplied to reduce the risks resulting from becoming entangled in or tripping over a
longer cord.
FEDERAL COMMUNICATION COMMISSION (FCC) STATEMENT
Any changes or modifications not expressly approved by the party responsible for compliance could void the user’s
authority to operate the equipment.
This device complies with Part 15 of the FCC Rules. Operation is subject to the following two conditions:
(1) this device may not cause harmful interference, and
(2) this device must accept any interference received, including interference that may cause undesired operation.
This equipment has been tested and found to comply with the limits for a Class B digital device, pursuant to Part 15
of the FCC Rules. These limits are designed to provide reasonable protection against harmful interference in a
residential installation. This equipment generates, uses, and can radiate radio frequency energy, and if not installed
and used in accordance with the instructions, may cause harmful interference to radio communications. However,
there is no guarantee that interference will not occur in a particular installation. If this equipment does cause harmful
interference to radio or television reception, which can be determined by turning the equipment off and on, the user
is encouraged to try to correct the interference by one or more of the following measures:
•Reorient or relocate the receiving antenna.
•Increase the separation between the equipment and receiver.
•Connect the equipment into an outlet on a circuit different from that to which the receiver is connected.
•Consult the dealer or an experienced radio/TV technician for help.
This equipment complies with FCC radiation exposure limits set forth for an uncontrolled environment. This
equipment should be installed and operated with a minimum distance of 8 inches (20cm) between the radiator &
your body. This transmitter must not be co-located or operating in conjunction with any other antenna or transmitter.
Innovation, Science and Economic Development (ISED) Canada Statement
This device contains licence-exempt transmitter(s)/receiver(s) that comply with Innovation, Science and Economic
Development Canada’s licence-exempt RSS(s). Operation is subject to the following conditions:
Operation is subject to the following two conditions:
(1) this device may not cause interference, and
(2) this device must accept any interference, including interference that may cause undesired operation of the
device.
L'émetteur/récepteur exempt de licence contenu dans le présent appareil est conforme aux CNR d'Innovation,
Sciences et Développement économique Canada applicables aux appareils radio exempts de licence. L'exploitation
est autorisée aux deux conditions suivantes :
1) L'appareil ne doit pas produire de brouillage ;
2) L'appareil doit accepter tout brouillage radioélectrique subi, même si le brouillage est susceptible d'en
compromettre le fonctionnement
The device meets the exemption from the routine evaluation limits in section 2.5 of RSS 102 and compliance with
RSS-102 RF exposure, users can obtain Canadian information on RF exposure and compliance.
3

Le dispositif rencontre l'exemption des limites courantes d'évaluation dans la section 2.5 de RSS 102 etla conformité
à l'exposition de RSS-102 rf, utilisateurs peut obtenir l'information canadienne surl'exposition et la conformité de rf.
This transmitter must not be co-located or operating in conjunction with any other antenna or transmitter. This
equipment should be installed and operated with a minimum distance of 8 inches (20cm) between the radiator and
your body.
Cet émetteur ne doit pas être Co-placé ou ne fonctionnant en même temps qu'aucune autre antenne ouémetteur.
Cet équipement devrait être installé et actionné avec une distance minimum de 20 centimètres entre le radiateur et
votre corps.
BREVILLE ASSIST®PLUG
Your Breville appliance comes with a unique Breville Assist®Plug, conveniently designed with a finger hole to ease
removal from the power outlet.
FOR HOUSEHOLD USE ONLY
SAVE THESE INSTRUCTIONS
4
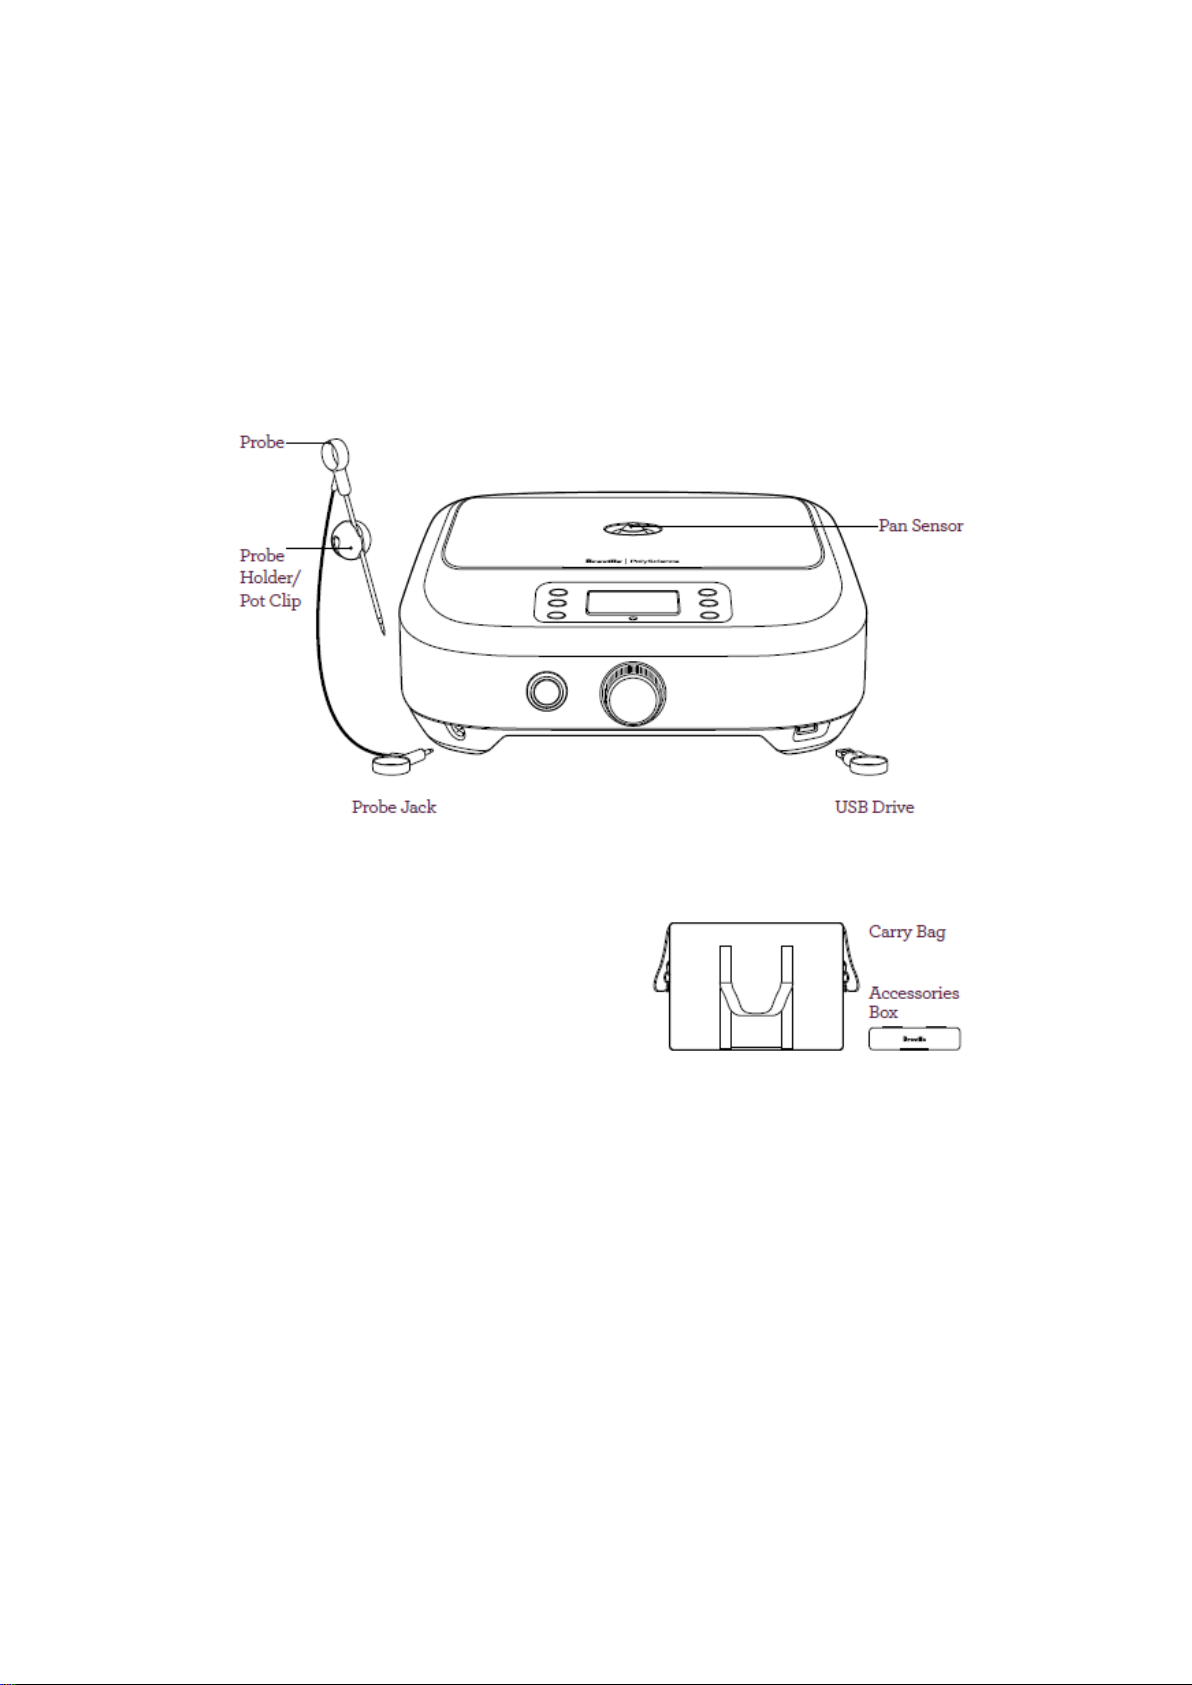
Components
A. Probe
B. Probe Holder / Pot Clip
C. Probe Jack
D. Pan Sensor
E. Carry Bag
F. Accessories
NOTE
Only use induction compatible cookware. Aluminum and copper pans will not work with the product.
TIP
It is recommended to use Breville induction compatible cookware to obtain best cooking results.
A
B
C
D
E
F
5
Table of contents
Other Breville Cooker manuals


