Brew Bomb ACE User manual

1 |P a g e w w w . b r e w b o m b . c o m
Operator’s Manual Brew Bomb ACE

2 |P a g e w w w . b r e w b o m b . c o m
Table of Contents
Welcome to the Brew Bomb Family! ..............................................................................................4
About the ACE Brewer.........................................................................................................................4
What’s Included......................................................................................................................................5
Videos Online...........................................................................................................................................6
Initial Set Up ............................................................................................................................................7
Brewer Set Up .....................................................................................................................................7
Step 1… Unbox and assemble unit on countertop. ............................................................7
Step 2… Provide power to unit and connect water source (Rear of Brewer) ..........7
Step 3… Connect to WiFi..............................................................................................................8
Web Portal Set Up ............................................................................................................................. 9
Step 1… Log into Portal .................................................................................................................9
Step 2… Change Password..........................................................................................................9
Step 3… Log In - Using new Password....................................................................................9
Step 4… Verify Location (s) on the Dashboard Map and Brewer is Active ................9
Step 5… Set up Organization and Users...............................................................................10
Step 5… Advanced Settings – Setting up Grinder & Coffee Origin.............................10
Building a Brew Profile - Web Portal............................................................................................11
Basic Settings....................................................................................................................................11
Brew Intervals ...................................................................................................................................14
Saving and Uploading - Brew Profiles .....................................................................................15
Brewing with the ACE Brewer.........................................................................................................16
Select the Brew Profile using Wizard.......................................................................................16
Prepare Coffee Bean and Grind –Brew Profile.....................................................................17
Pre-Infusion .......................................................................................................................................18
Step 1… Pre-Infuse Coffee Grinds and Water.....................................................................18
Step 2… Mix Coffee Grounds and Water..............................................................................19
Step 3… Shape the Coffee Grinds in Brewing Glass Cylinder.......................................19
Start Brew Cycle...............................................................................................................................20
Flow Nozzle Set Up .........................................................................................................................21
Brewing................................................................................................................................................22
Brew Complete.................................................................................................................................22

3 |P a g e w w w . b r e w b o m b . c o m
Verify Concentrate TDS.................................................................................................................22
Convert to Ready to Drink (RTD) ...............................................................................................23
Step 1… Dispense required water dilute to RTD................................................................23
Step 2… Mix concentrate with dispensed dilution amount..........................................23
Step 3… Transfer RTD to dispensing solution (i.e. Keg, etc.) for serving. ................23
Reporting –Web Portal .....................................................................................................................24
Real Time Reporting - Dashboard .............................................................................................24
Dashboard View ...........................................................................................................................24
Brews in Progress.........................................................................................................................24
Performance Stats - Dashboard.................................................................................................25
By Location:....................................................................................................................................25
By Brew Profile: ............................................................................................................................25
Brew History - Reports ..................................................................................................................26
Subscription Services.........................................................................................................................26
Calibrating Flow Meter ......................................................................................................................27
Frequently Asked Questions (FAQ)...............................................................................................28
Support ....................................................................................................................................................29
Glossary ...................................................................................................................................................29
Warranty..................................................................................................................................................30

4 |P a g e w w w . b r e w b o m b . c o m
Welcome to the Brew Bomb Family!
Congratulations on your decision to purchase a Brew Bomb ACE Brewer. The
Brewer is designed to provide a simple way to consistently craft Specialty
Cold Brew Coffee to precise cup standards.
The ACE Brewer simplifies the brewing process, and utilizes Active Cold
Extraction with Pulse Brewing, crafting 5 gallons of tantalizing delicious Cold
Brew Coffee in 2 hours or less.
We are excited to offer this technology to the passionate people who work
so hard to craft excellence into their coffee and look forward to sharing the
journey with you as partners.
Happy Brewing,
Ray Buerger
Founder, Designer
About the ACE Brewer
The Active Cold Extraction with Pulse Brewing Technology utilized by the
Brew Bomb ACE Brewer brings fundamental advantages to the brewing
process by creating controlled motion at the contact point between the
grinds and the water. While gravity creates the movement for Active Cold
Extraction, the Ace Brewer provides the control with precise systems and
recallable brew profiles.
The Ace Brewer is Web Connected for brewing control across multiple
locations. Delivering standardized specialty brewing across multiple
locations has always been troublesome, until now. Each ACE Brewer
interfaces with a centralized platform for brew profile distribution and brew
reporting. With standardized brew profiles, a precision brewing system and
an easy to follow Brew Wizard, delivering specialty crafted cold brew, that is
consistently produced across multiple locations is now within reach.

5 |P a g e w w w . b r e w b o m b . c o m
What’s Included
Base Structure
1
Flow Controller
3951-01-1115
2
Encoder
3951-01-1112
3
Base Wear Plate
3951-01-1103
4
Mid Wear Plate
3951-01-1202
5
Nozzle Adjustment Screw
92558A220
6
Extraction Nozzle
3951-01-1306
Brew Cylinder Assembly
7
Cylinder Base
3951-01-1520
8
Perforated Grate
3951-01-1508
9
Nylon Filter
3951-01-1529
10
Cylinder Seal
3951-01-1526
11
Glass Cylinder
3951-01-1506
12
Cylinder Lid
3951-01-1509
Catch Tank Assembly
13
Catch Tank
3951-01-1600
14
Catch Tank Lid
3951-01-1602
Power Supply
15
24v Power Supply
3951-01-1910
6 |P a g e w w w . b r e w b o m b . c o m
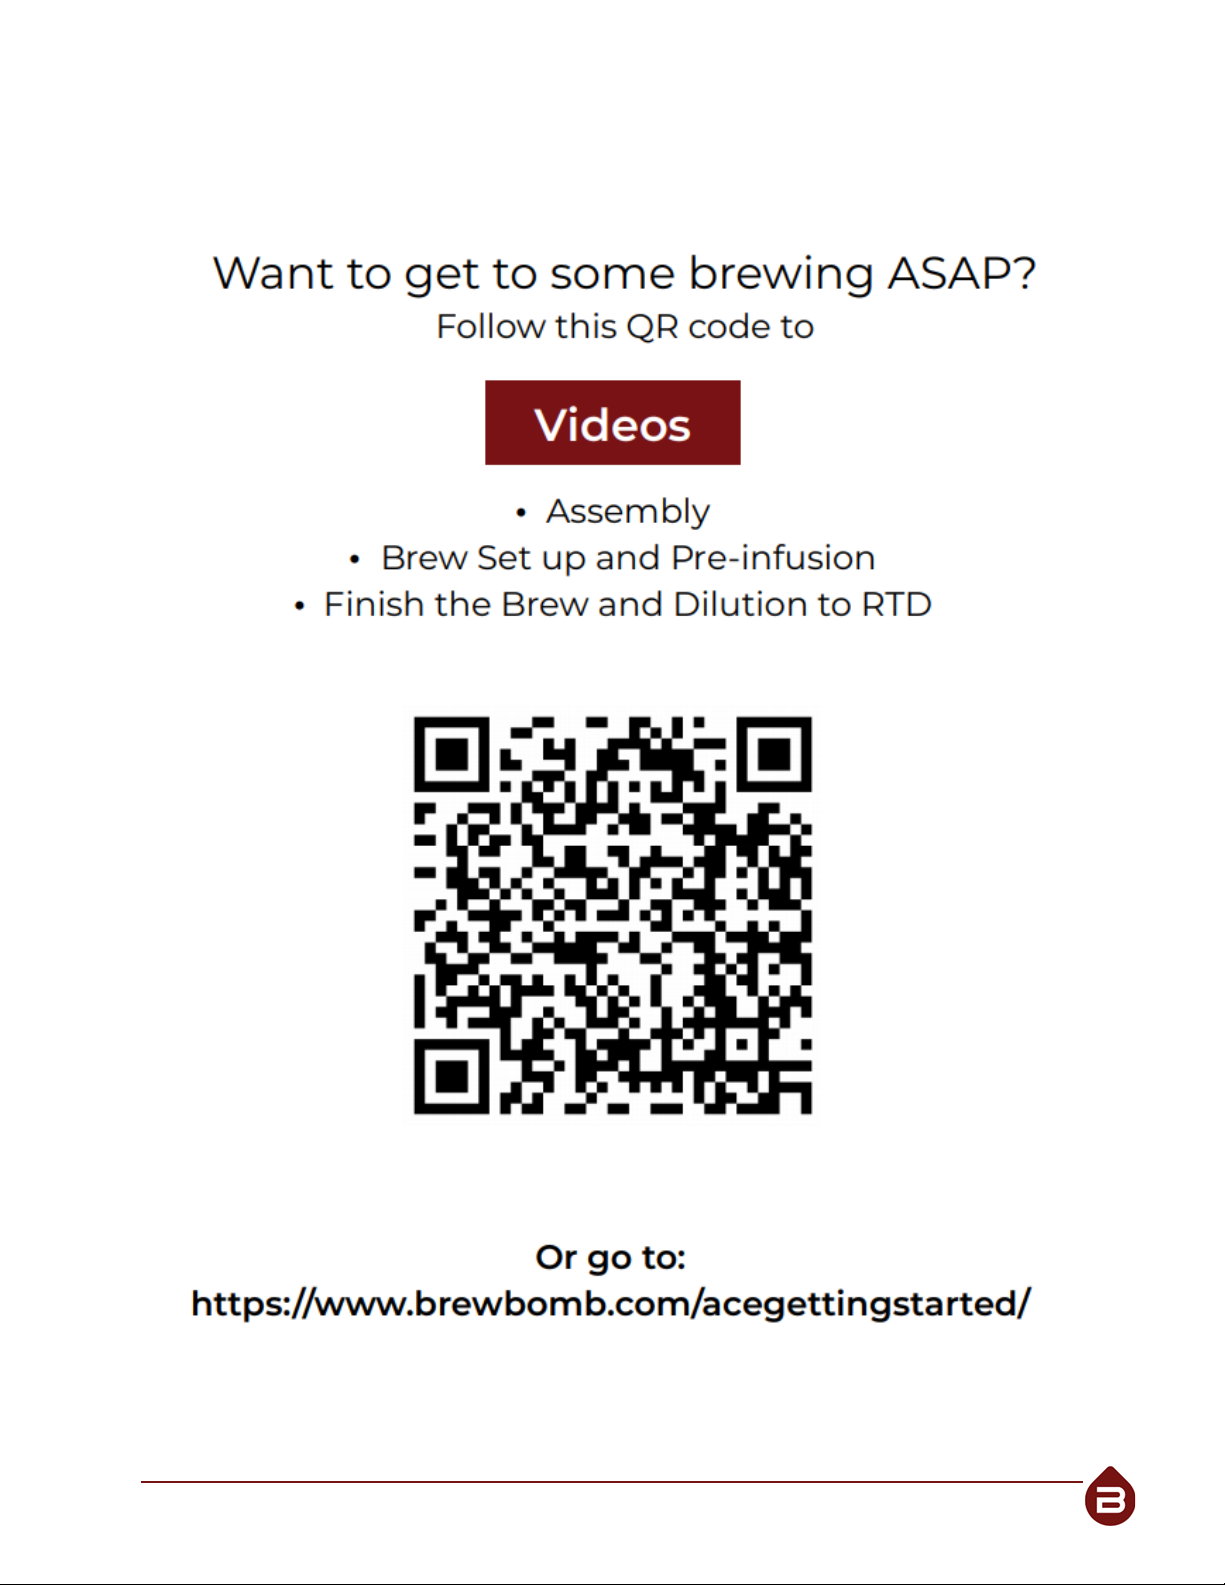
Videos Online

7 |P a g e w w w . b r e w b o m b . c o m
Initial Set Up
Brewer Set Up
Step 1… Unbox and assemble unit on countertop.
-Open Box and remove all items
oInventory and place them separately
-Remove Brewer frame and place on countertop
-Place the Base Wear Plate (3) on the Brewer Base (Bottom)
-Place Catch Tank (13) on Base Wear Plate and place Catch Tank Lid (14) on top
-Place Mid Wear Plate (4) on Mid Platform
-Cylinder Base Assembly
oWith the Cylinder Base (7) on a countertop, place the Perforated Grate
(8) in the Cylinder Base
oPlace the Filter (9) on top of grate
oInsert Cylinder Seal (10) facing up around the outside of the Cylinder
Base.
oSlowly insert the Glass Cylinder (11) into the Cylinder Base ensuring the
seal is fully in place.
▪NOTE –If seal is not in place this might cause the Cylinder Base
to leak.
oPlace Cylinder Lid (12) on top
Step 2… Provide power to unit and connect water source (Rear of Brewer)
oConnect 1/4 PE Water Line (Not Supplied) to Water Source via 1/4 connection
(50 PSI Constant Water Pressure Required –During the Brew Cycle)
oConnect Power Supply (Supplied) to Electrical Source via standard 110/240V
wall outlet. We suggest a location within 4 feet from machine.
Electrical Source
Water Source
8 |P a g e w w w . b r e w b o m b . c o m
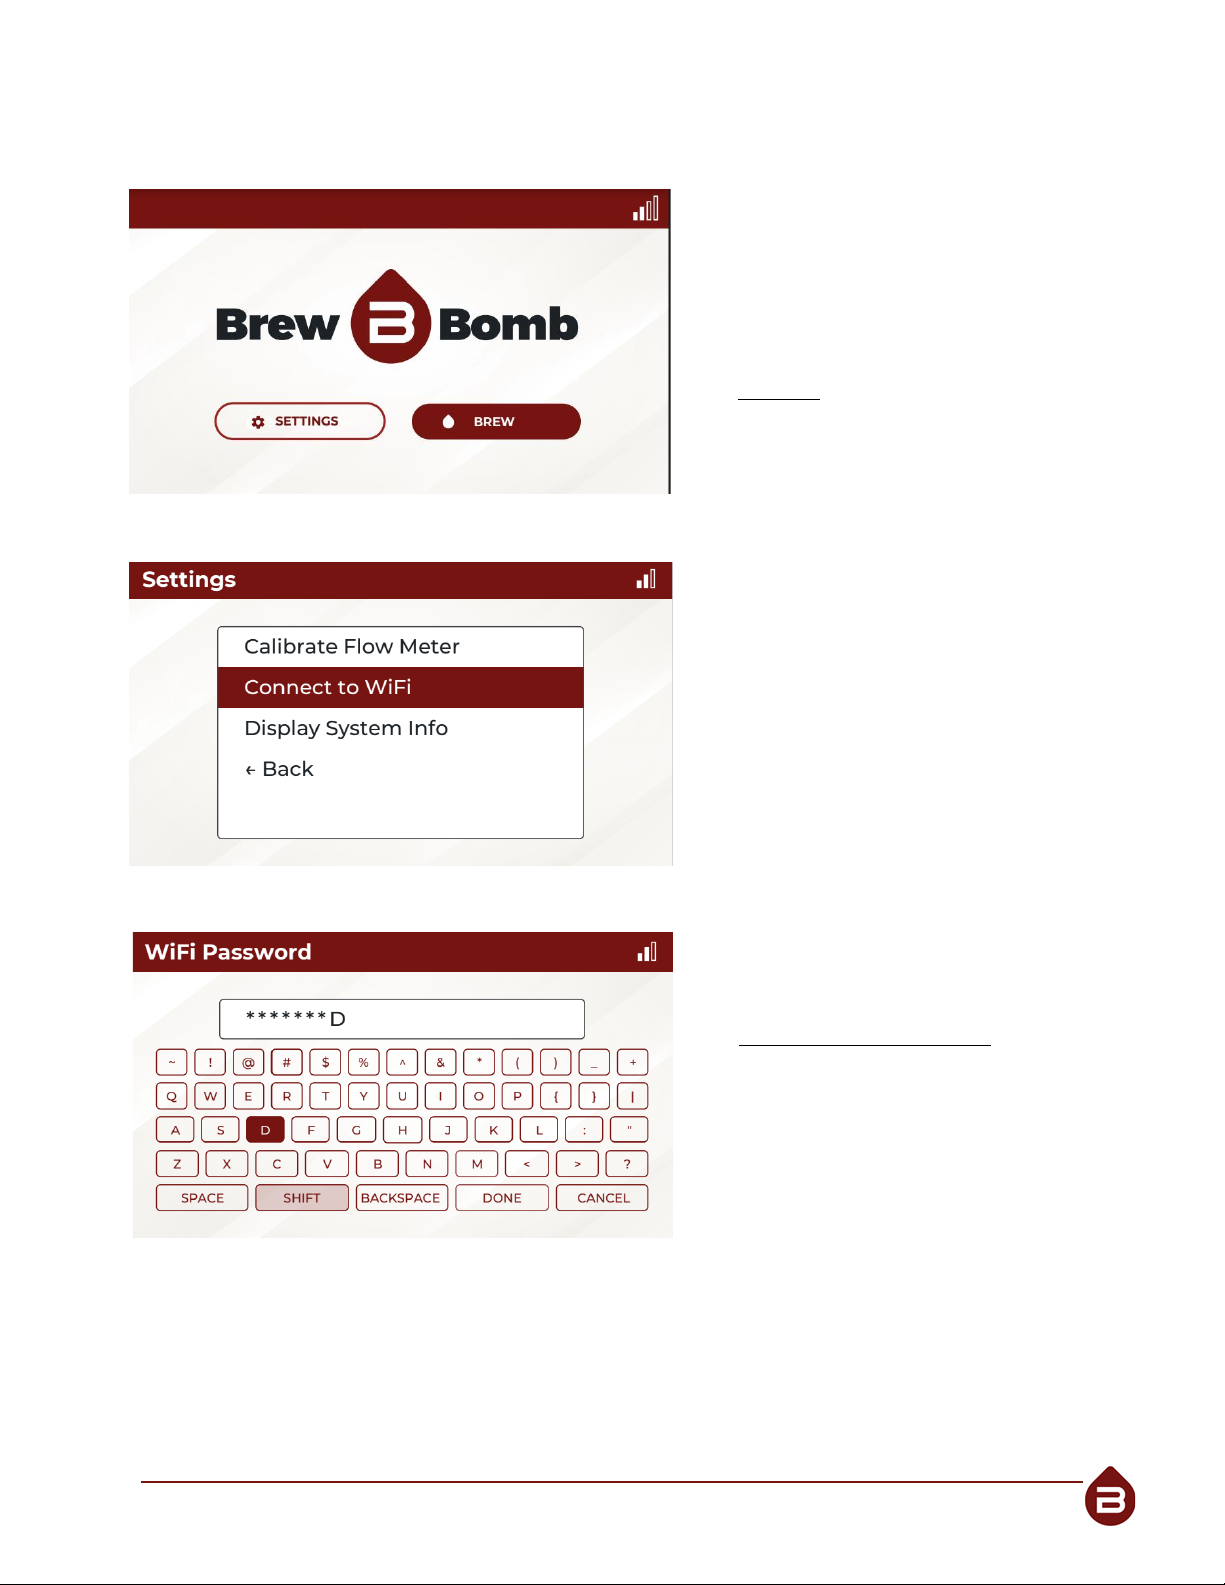
Step 3… Connect to WiFi
Main Screen on Front Panel
1. Using the ENCODER Knob (2) on
LEFT of the front panel turn until
SETTINGS is highlighted in Red
and Push In to select
2. Connect to WiFi:
oLocate WiFi Network using
ENCODER Knob and Push in to
select.
3. Using the ENCODER Knob scroll
through and enter your password.
Use SHIFT for UPPER CASE and
non shift for lower case letters.
When finished select DONE
Device Info –Confirm Network
Select - CONTINUE
Your Brew Bomb ACE is Ready to Brew!
oNext step is to verify your account information on-line with Web Portal!

9 |P a g e w w w . b r e w b o m b . c o m
Web Portal Set Up
Step 1… Log into Portal
ohttps://portal.brewbomb.com/
oEnter Default Password
oUser Name = email address (From Welcome Letter)
oPassword = email address (all lower case)
Step 2… Change Password
oUnder Organization –User –Edit
oChange Password (+)
oUpdate Password
oLOG OUT for Password to Update
oUpper Right Hand Corner –Click Name
o
Step 3… Log In - Using new Password
oUser Name = email address
oPassword = new password
Step 4… Verify Location (s) on the Dashboard Map and Brewer is Active
oDashboard –Locations –Hover over Brew Bomb Logo
oData should reflect –Location Name, Company Name, Brewer: On
Brewer Status Icons:
Brewer Icon
Status
Brewer Active, Connected and Operational
Brewer Off
Brewer Active, Connected and Brewing
Brewer Off and Not Connected
Brewer Latent

10 |P a g e w w w . b r e w b o m b . c o m
Step 5… Set up Organization and Users
oAdministered by Company Admin Only (See below)
oUnder Organization –Company –Edit
oVerify Company Name
oUnit of Measure (Imperial –Metric)
oSubscription Level (Basic –Artisan)
oUpdate
oUnder Organization –User
oAdd Users (+ Insert New)
oEmail Address (Log In and Initial PW)
oFirst/Last Name
oRole
oInsert
oSet up at least one Brew Master and Barista
oRole Definition and Entitlements
User
Role
Permissions
Company Admin
ALL - Manages Account and
Organization
Full Access
Brew Master
Create Brew Profiles, Run Reports,
And Brew Coffee
All things Coffee - Edit
Organization - View
Barista
Brew Coffee
All things Coffee - View
Step 5… Advanced Settings –Setting up Grinder & Coffee Origin
oCoffee Grinders: Under Coffee –Coffee Grinder
oChange Default Grinder - Edit
oCoffee Grinder Name –i.e. Mahlkonig EK43
oUpdate
o+ Insert New –To add additional Grinders in Shop
oCoffee Origin: Under Coffee –Coffee Origin
oChange Default Grinder - Edit
oCoffee Origin Name –i.e. Ethiopian
oCoffee Origin Description –i.e.
oUpdate
o+ Insert New –To add additional Coffee Origins in Shop
11 |P a g e w w w . b r e w b o m b . c o m
Building a Brew Profile - Web Portal
Step 1… Log into Portal
ohttps://portal.brewbomb.com/
Step 2… Brew Profile
oUnder - Coffee
oBrew Profile
o+ Insert New
Step 3… Name Brew Profile
oInsert the name of the brew profile
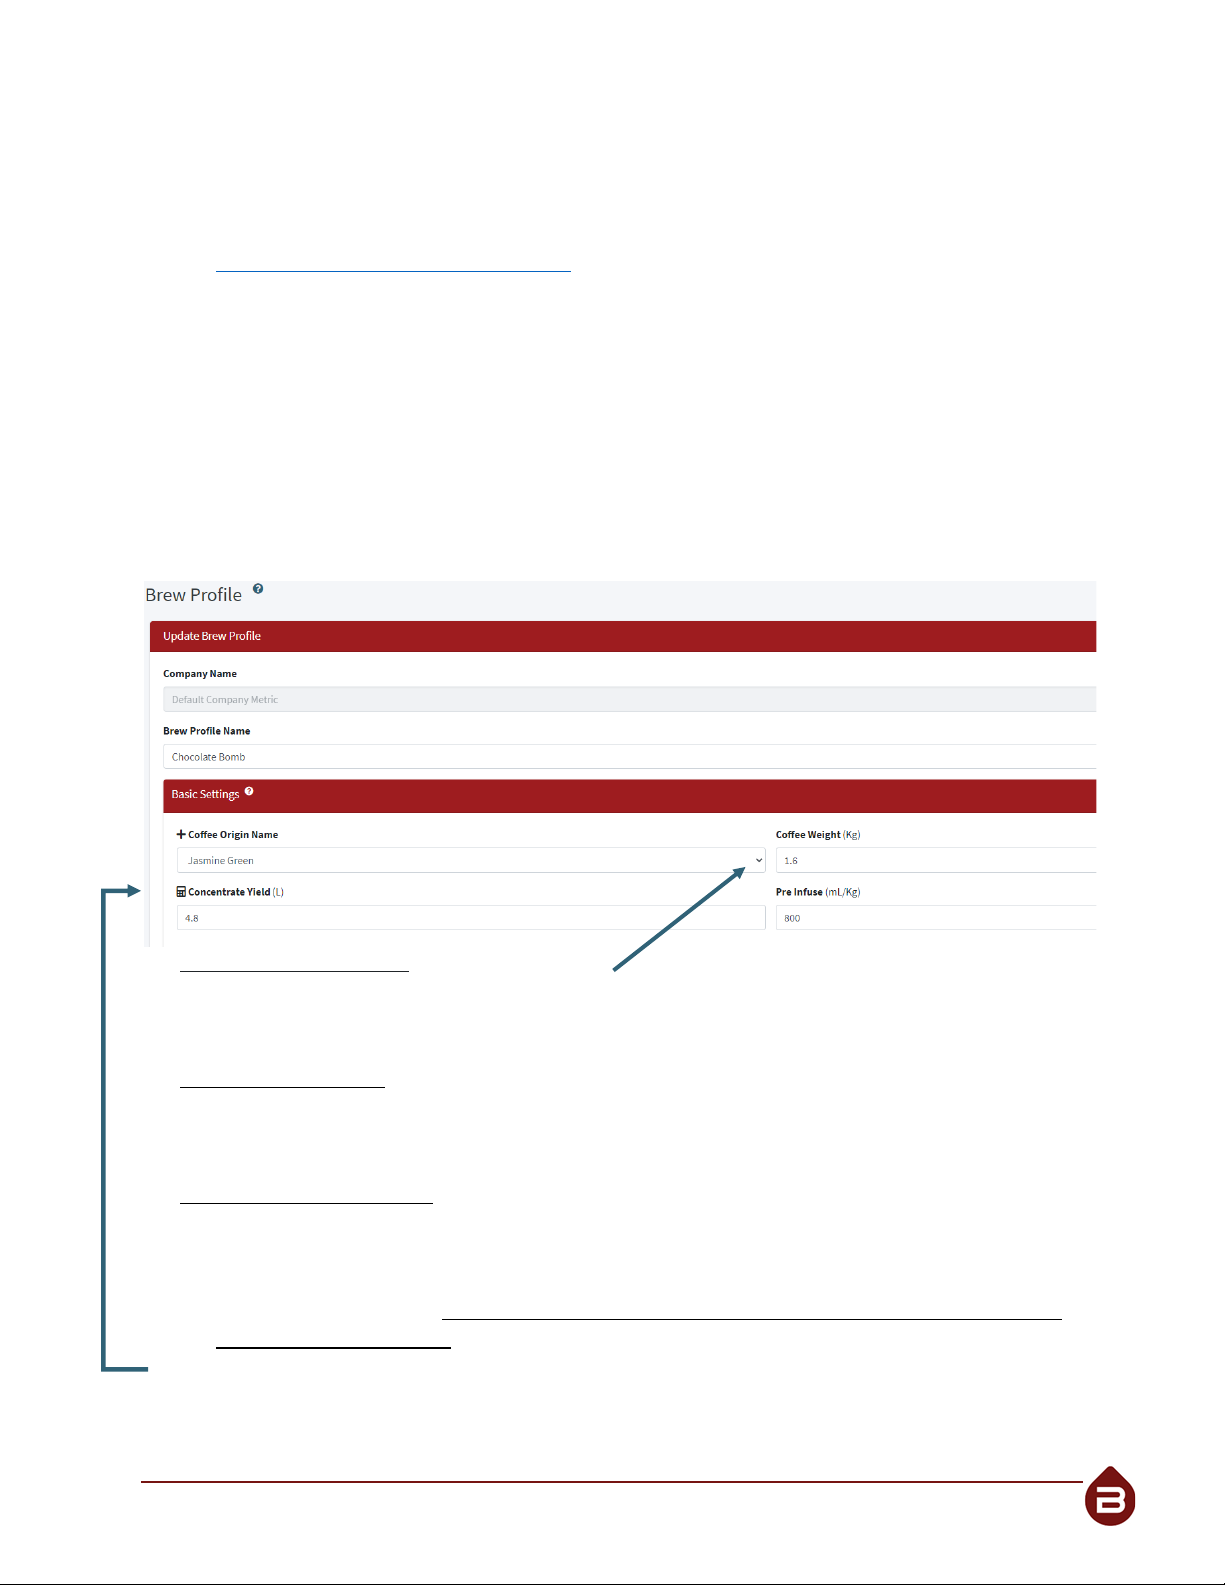
Basic Settings
a. Coffee Origin Name:
oSelect the Coffee Origin using the (V)
oNote –Origins are set up in advance (Coffee –Coffee Origin)
b. Coffee Weight (Kg)
oInput weight required for brew profile
oWe recommend 1.6 Kg for first brew
c. Concentrate Yield (gal)
oThe Ace Brewer crafts concentrated cold brew which is then diluted to a
ready to drink (RTD) product.
oThe Yield Ratio is the ratio of coffee to yield with both variables being
measure by weight. For fine grounds, use a ratio of 3 and for courser ground
sizes, use a ratio of 4.
oClick on the calculator and select the yield ratio
oThe field will be automatically populated when you select the ratio from the
calculator
12 |P a g e w w w . b r e w b o m b . c o m
d. Pre Infusion:
oMixing in water with the grounds prior to brewing enhances the extraction
process resulting in greater yield and adaptability to fine grind brewing.
oFor fine ground brewing, use 800ml/kg and for courser grounds use 1300
ml/kg.
oFor fine grind brewing the grounds should only be slightly moist on the
outside, for courser grounds the mix can be much wetter but NEVER A
SLURRY.
oIf the grounds have standing water wait a few minutes for the water to
absorb into the grounds.
oImproper pre infusion can result in the brew clogging.
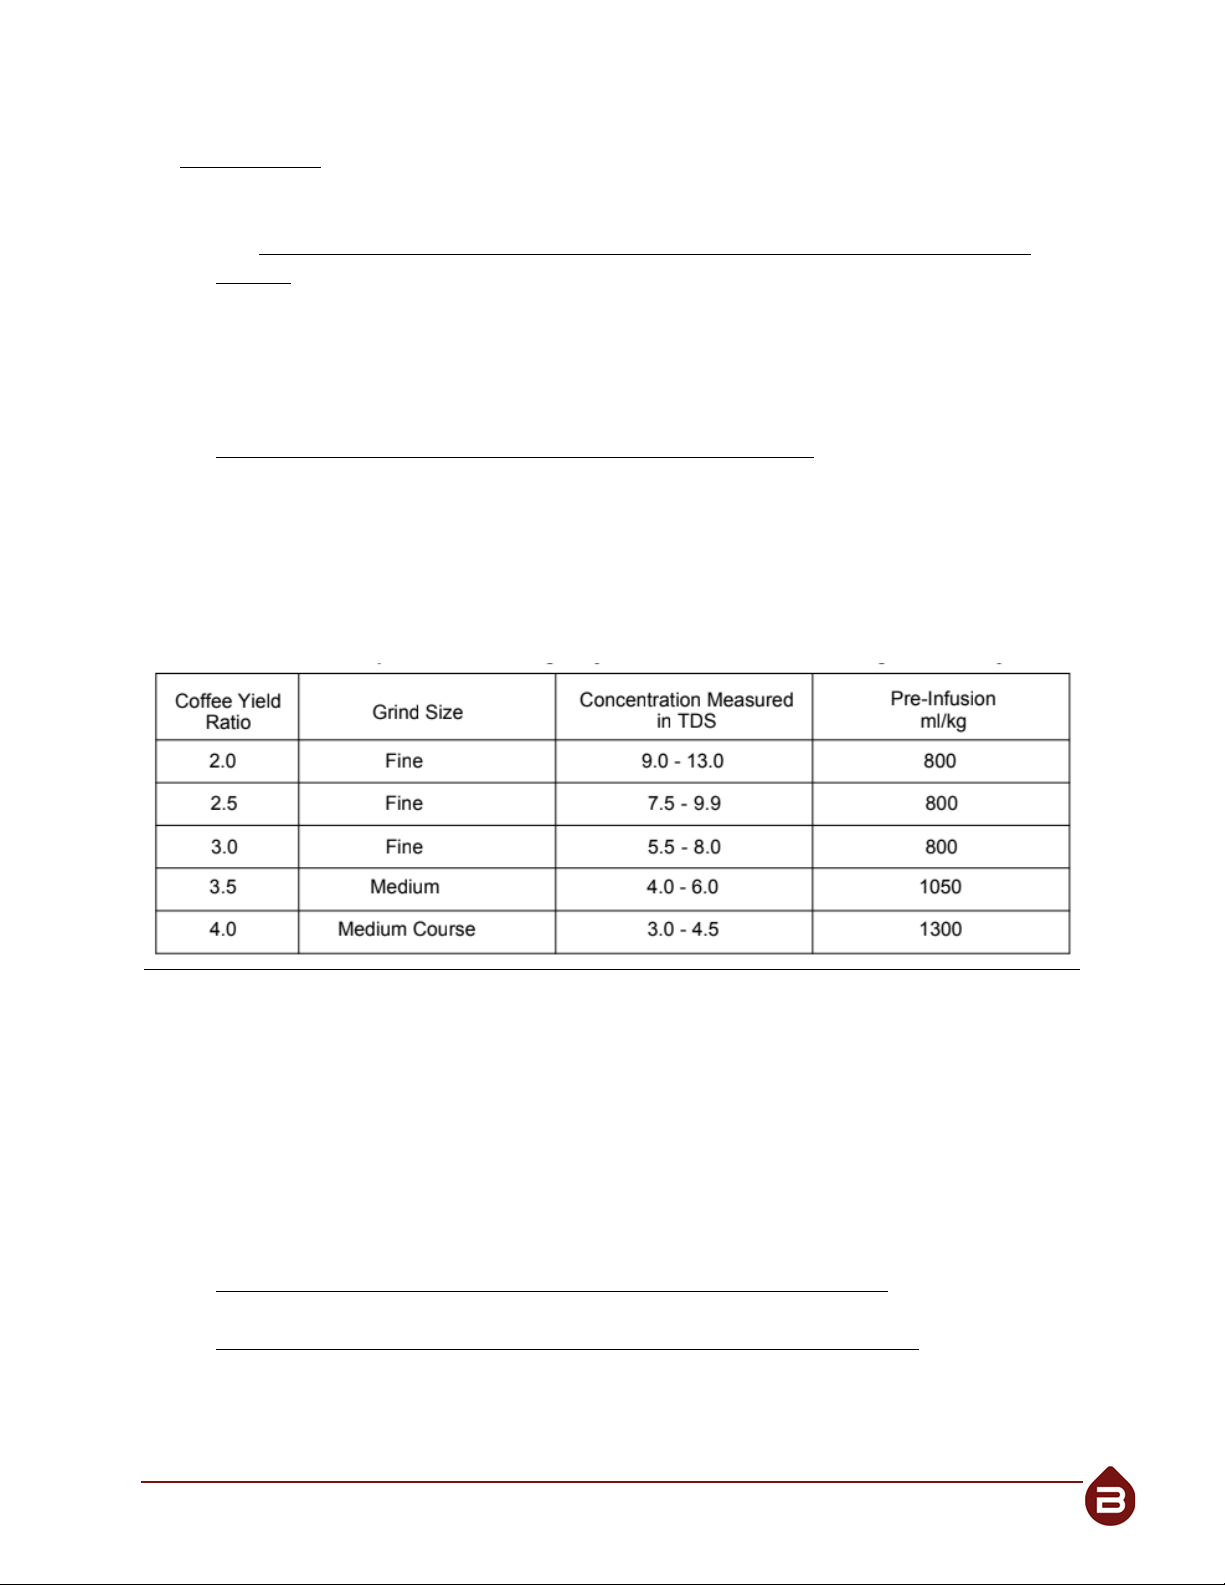
e. Use the table below as a general guide for pairing yield ratio, grind size,
expected concentration and pre infusion quantities.
**Coffee is a natural product that varies greatly thus use these criteria as basic
guidelines only**
Advanced Settings
Brewing to Concentrate-Diluting to Ready to Drink
With cup quality being a top priority, the Ace Brewer is designed to brew a
concentrated product which is then diluted to a final Ready to Drink concentration.
The Ace Brewer closely parallels the concepts of brewing on an espresso machine
and diluting to an Americano.
The following generally holds true.
oFine grind = more concentrated = less volume = shorter time
oCourser grind = less concentrated = more volume = longer time

13 |P a g e w w w . b r e w b o m b . c o m
Advanced Settings
a. Concentrate Total Dissolved Solids:
oThis refers to the expected TDS of the brew yield, which is a result of the
ground size and yield ratio.
oThe number in this field is only a target for the brew and not a recipe
variable.
oThe value in this field is used for the TDS dilution calculations although it can
be overwritten with an actual measurement.
oBrew concentrations in the 3-12 TDS range are well within the potential of
what the ACE brewer can achieve.
oFor fine grind brews, at a 1 to 3 ratio, the expected TDS is 7.0
oFor courser grind brews, at a 1 to 4 ratio, the expected TDS is 4.0
b. Ready to Drink Total Dissolved Solids:
oThis field refers to the concentration of the Ready to Drink product that will
be crafted from this brew and is only used in the TDS dilution process at the
end of the brew cycle.
oThe value can be anything less than the concentration value.
c. Coffee Grinder Name and Setting:
oSelect the Coffee Grinder using the (V)
oNote –Origins are set up in advance (Coffee –Coffee Grinder)
oSetting - Define the setting that will be used on the grinding machine

14 |P a g e w w w . b r e w b o m b . c o m
Brew Intervals
Brew intervals are periods when the brewer is either spraying water (brewing) or
not spraying water (resting). The theory behind interval brewing is to separate
extraction time from contact time. This separation allows for dissolving desirable
compounds during rest periods and extracting during brew periods.
By example, some acidity, fruits, florals and sweetness are only extractable with
cold water over time. Continuous extraction however can “over-extract”some less
desired compounds.
Brew intervals can be utilized to keep the grounds saturated and separated by rest
intervals to dissolve desired compounds. When the desired compounds are
adequately dissolved, simply apply additional brew intervals to extract these
desired compounds.
The programming allows the user to totally customize the sequence and time for
brewing and resting.
The interval brewing system tracks and accumulates 3 different times:
oBrew Time- The total of all of the brewing intervals
oRest Time- The total of all the resting intervals
oTotal Time- The total of brewing and resting intervals which equals the total
time it will take to execute the brew profile.

15 |P a g e w w w . b r e w b o m b . c o m
Saving and Uploading - Brew Profiles
Once you have completed the Brew Profile and there are no error messages, than
you will need to INSERT and UPLOAD to your Brewer.
•First –Save Profile
•Select Insert (To Save)
•Assign Brew Profile to Location (Brewer)
•Select the Brewer to receive the Brew Profile and SELECT DONE
•The Brew Profile will be instantly recalled on the Brewer!
16 |P a g e w w w . b r e w b o m b . c o m
Brewing with the ACE Brewer
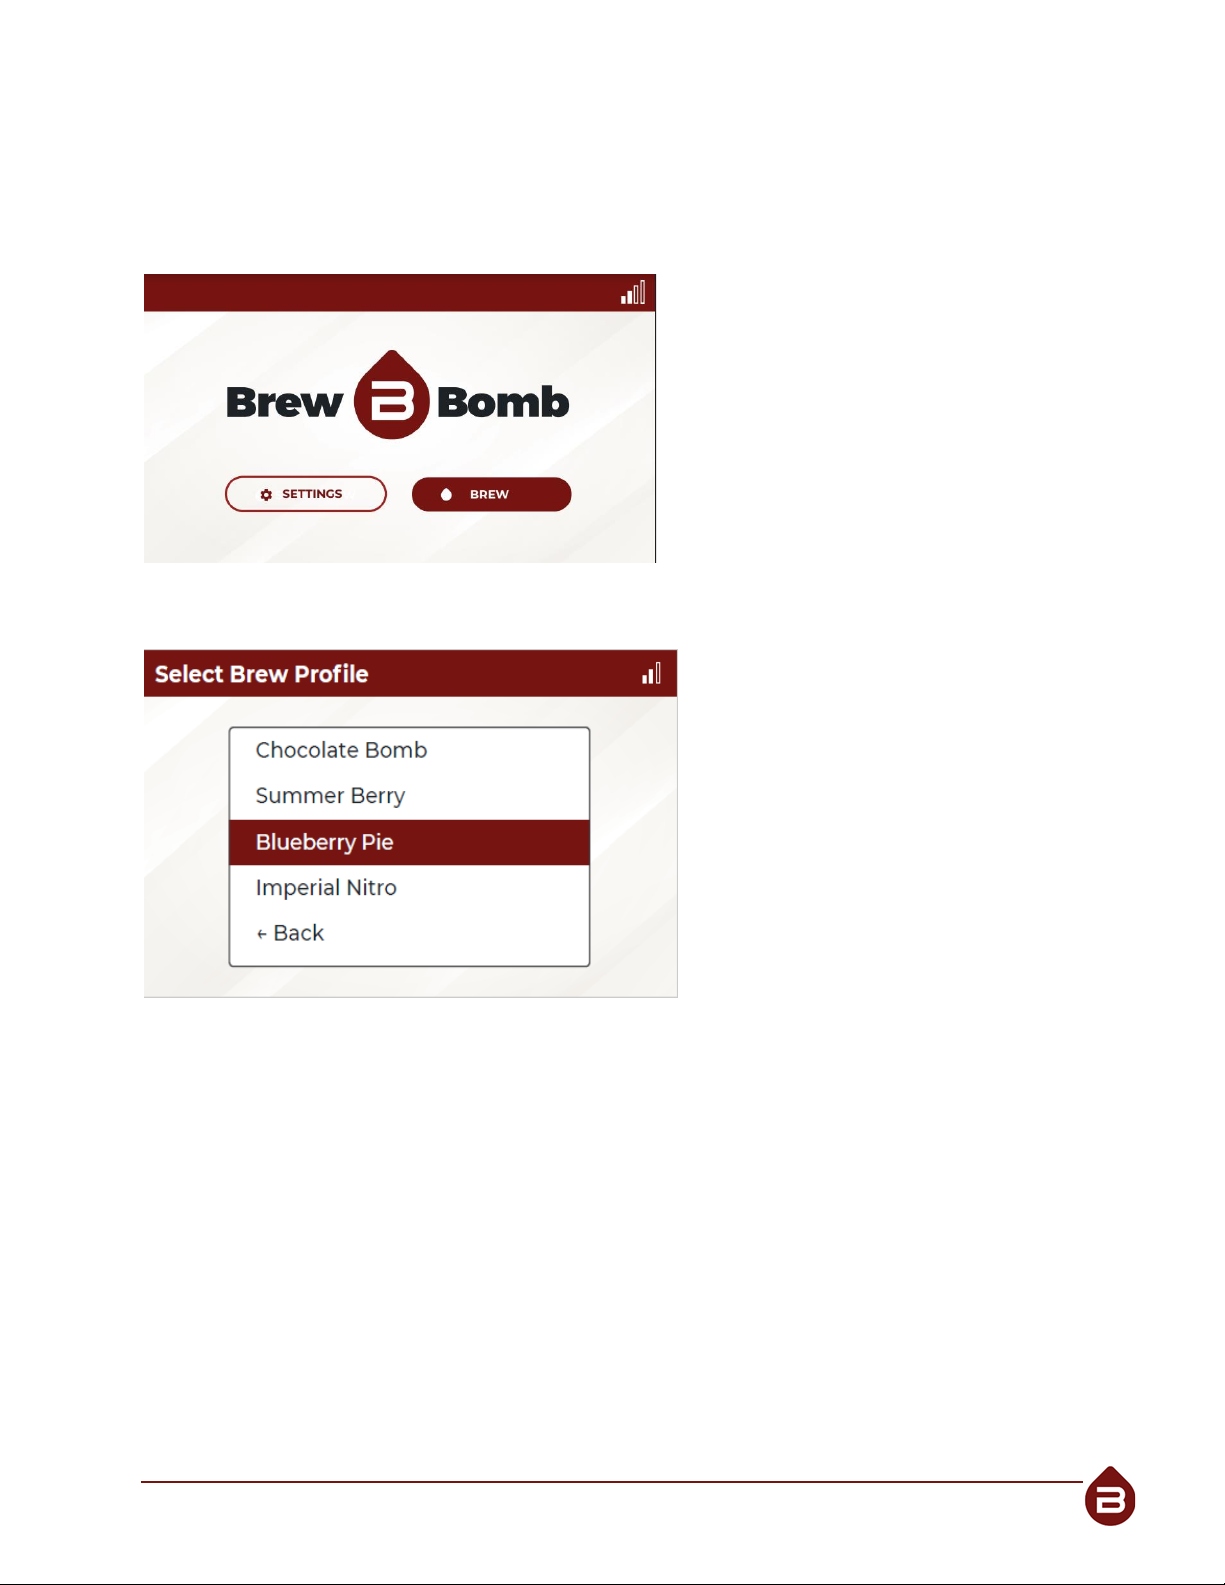
Select the Brew Profile using Wizard
Using the ENCODER Knob (Left) on
the front panel make sure BREW is
highlighted in Red and push in
ENCODER Knob to Enter
The ACE Brewer comes
configured with Two Standard
Brew Profiles
-Chocolate Bomb (Fine/Short)
-Long and Sweet (Coarse/Long)
To Create your own Brew Profiles,
you will need to access the Web
Portal which is accessed through
your PC, Phone or Tablet.
oSelect appropriate Brew Profile
and push ENCODER Knob to Enter

17 |P a g e w w w . b r e w b o m b . c o m
Prepare Coffee Bean and Grind –Brew Profile
The Brew Profile has been pre-defined and will populate the specific Coffee Bean
and Weight required to support this Profile. In this step you will need the following:
1. Coffee Beans (Not provided)
2. Pre-Infusion Vessel (Not provided)
3. Coffee Grinder (Not provided)
Source the required coffee bean
and measure the weight to ensure it
equals the required amount for this
recipe.
oHit Continue
Once you have the correct coffee bean and weight. Go to specified Coffee Grinder
and complete the following:
1. Change the setting to match
the # identified in the Brew Profile
(ie 12).
2. Grind ALL the coffee into the
Pre-infusion vessel (not provided)
from the profile.
3. Once complete. Hit Continue
18 |P a g e w w w . b r e w b o m b . c o m
Pre-Infusion
A critical step in the brewing process is to pre-infuse the coffee to activate the
extraction process. Please note this is not required in all Brew Profiles so if Pre-
Infusion does not appear in the wizard please skip this step.
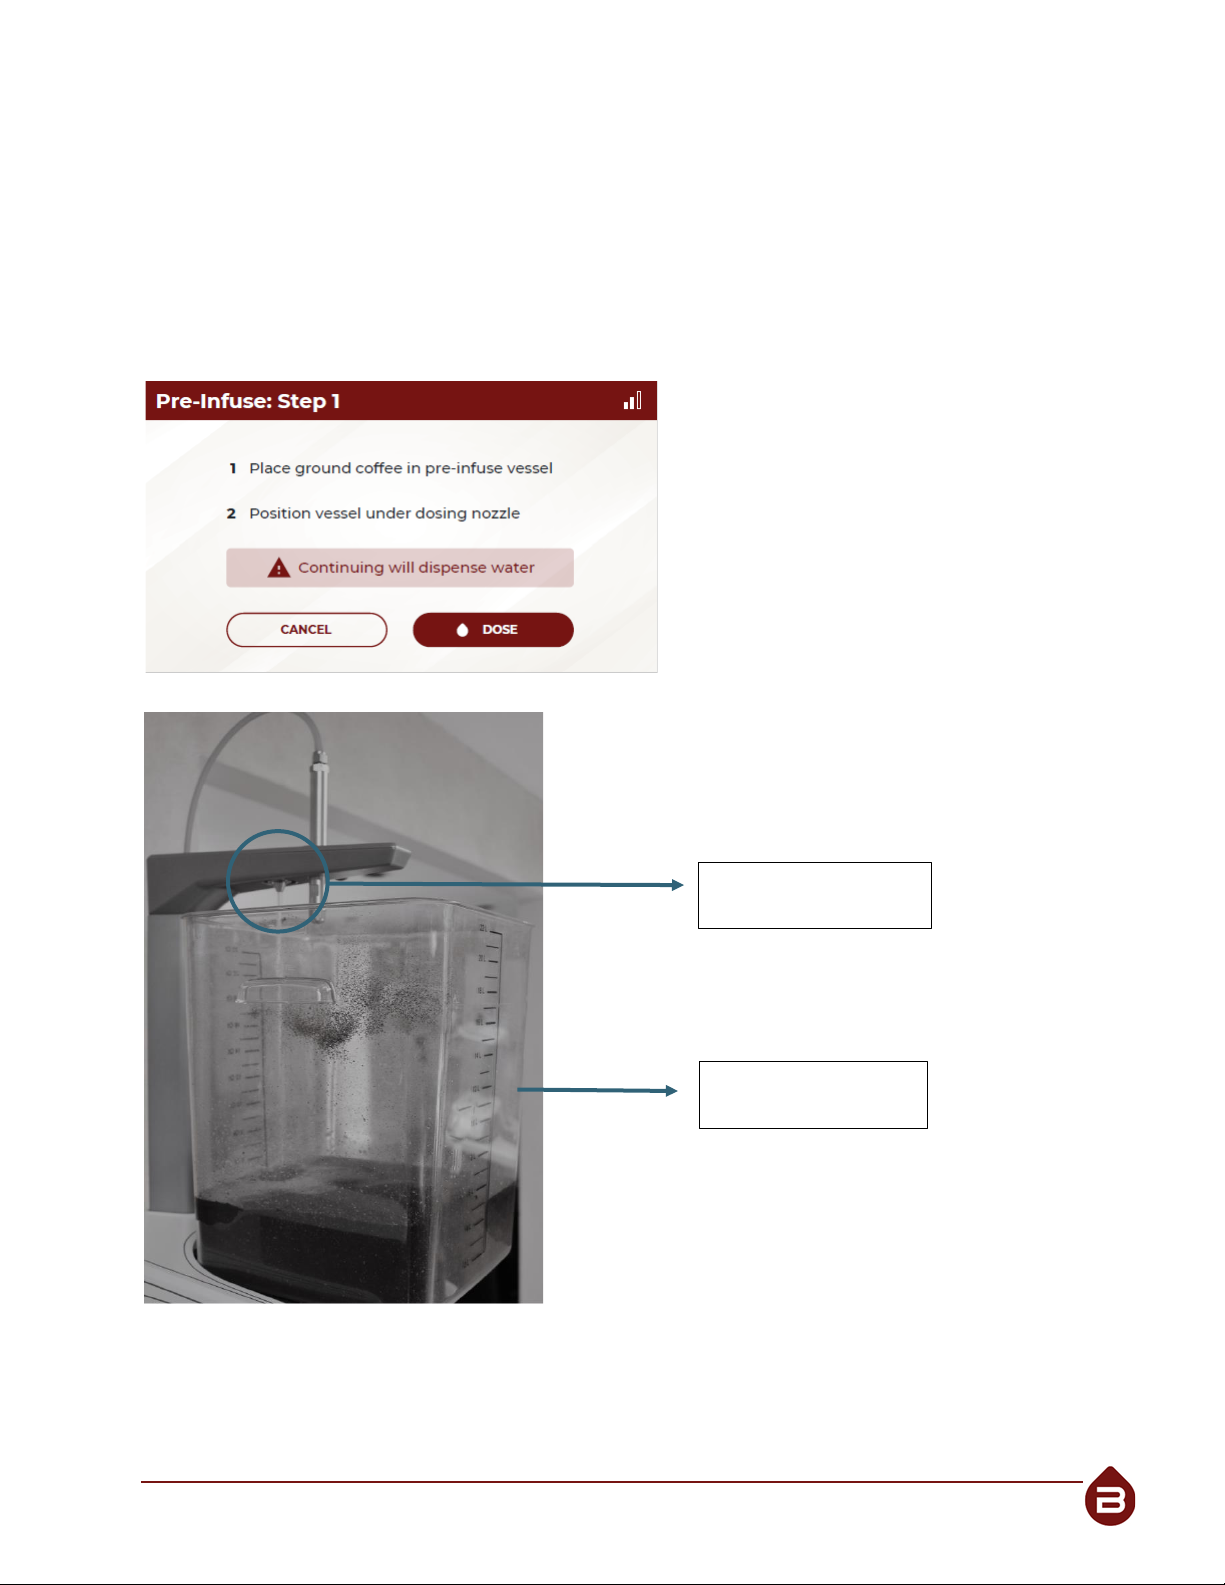
Step 1… Pre-Infuse Coffee Grinds and Water
1. Place the Pre-Infusion vessel
with the ground coffee under the
pre-infusion dosing nozzle.
2. Hit DOSE and water will begin
to flow out of the nozzle and will
dispense the proper amount per the
brew profile.
Once the proper amount of water has been dispensed into the pre-infusion vessel
REMOVE from the Mid Platform of the brewer and follow these steps.
Pre-Infusion dosing
nozzle
Pre-Infusion vessel
(Not Provided)

19 |P a g e w w w . b r e w b o m b . c o m
Step 2… Mix Coffee Grounds and Water
1. Mix coffee and water using a
large spoon or object to ensure
coffee is saturated thoroughly.
This is a critical step, so it is
important the coffee is moist
and not dry in any area of the
pre-infusion vessel.
2. Once complete, transfer the
coffee into the Glass Cylinder.
Step 3… Shape the Coffee Grinds in Brewing Glass Cylinder
1. Shape top of ground bed into a
bowl, with the center of the bed 2.5
cm below the edges.
2.5 cm Bowl
Depression in top
of ground bed
Important tips:
oDo not press or compact the
coffee grinds.
oEnsure the height of coffee bed is
consistent all around the vessel.
oEnsure there is a funnel in the
middle of the vessel to ensure
consistent water flow
2. Hit CONTINUE
20 |P a g e w w w . b r e w b o m b . c o m
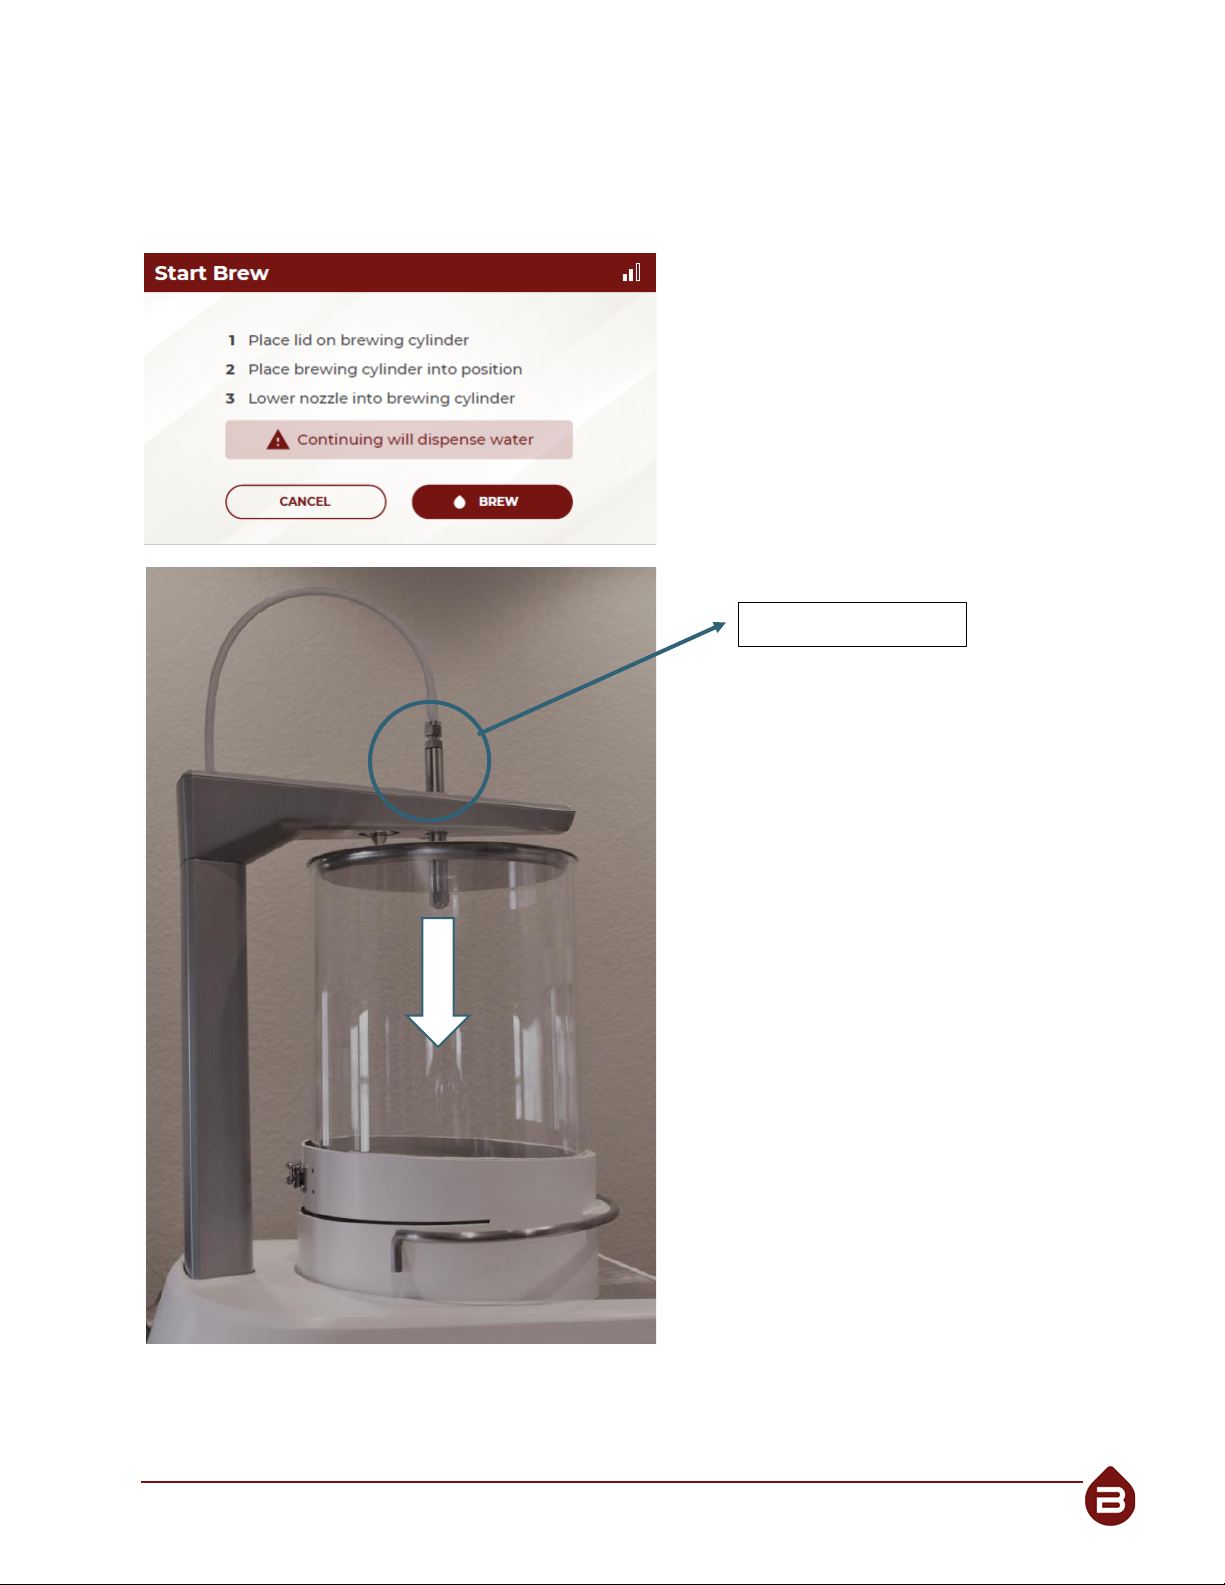
Start Brew Cycle
Now that the pre-infusion is complete, you are ready to BREW!
1. Place lid on Glass Cylinder and
place into position on the Mid
Platform.
2. Place the Brew Tank into
position on the Brewer Base (Lower)
section of the brewer.
3. Untighten Nozzle Adjustment
Screw (5) and lower flow nozzle into
the brewing cylinder.
4. Tighten screw once complete.
5. Hit BREW
Flow Nozzle
Table of contents


