Continental Refrigerator CM43905 User manual

User Manual
Model: CM43905
Coffee
Maker
Manual de Uso
Modelo: CM43905
Cafetera

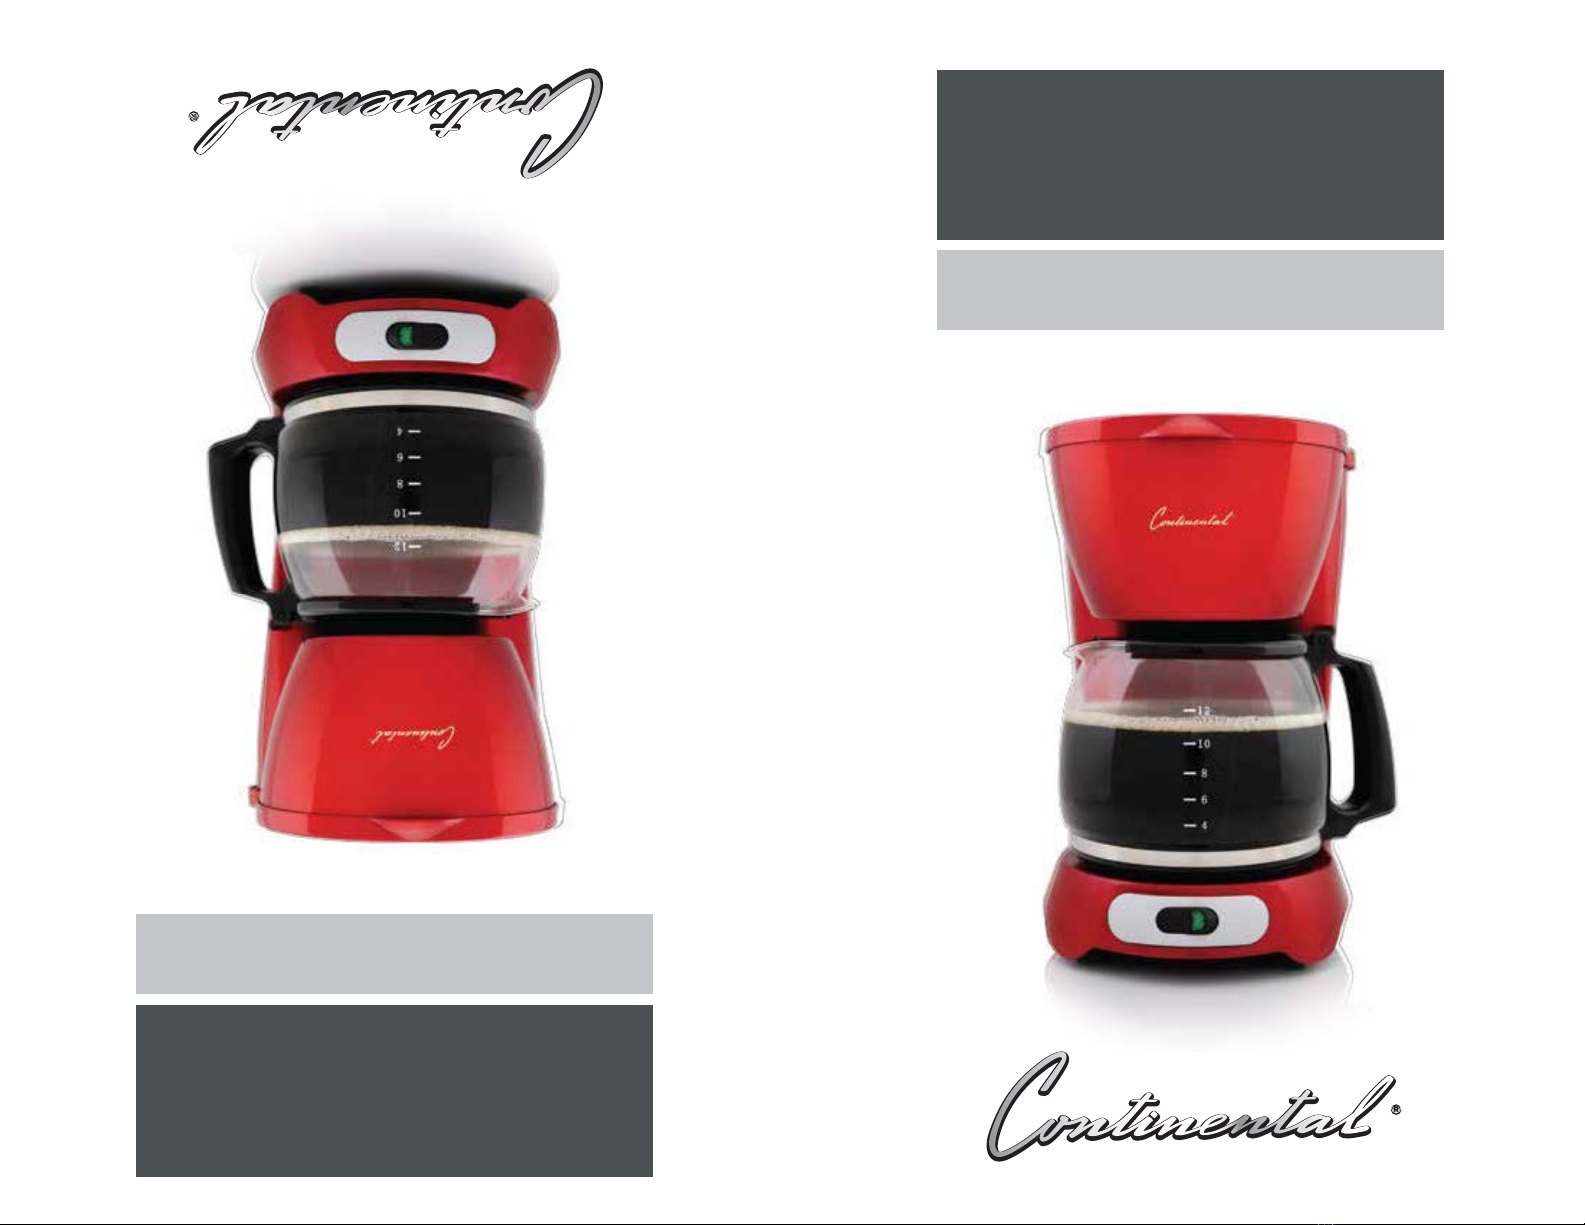
IMPORTANT SAFEGUARDS
When using electrical appliances, basic safety precautions should always be followed
1. Read all instructions.
2. Do not touch hot surfaces. Use handles or knobs.
3.
appliance in water or other liquid.
4. Close supervision is necessary when the appliance is used by or near children.
5. Unplug from outlet when not in use and before cleaning. Allow to cool before
putting on or taking off parts, and before cleaning the appliance.
6. Do not operate any appliance with a damaged cord or plug or after the appliance
malfunctions, or has been damaged in any manner. Return appliance to an
authorized service facility for examination, repair or adjustment.
7. The use of accessory attachments not recommended by the appliance
manufacturer as they may cause injuries
8. Do not use outdoors. Household use only.
9. Do not let cord hang over edge of table or counter, or touch hot surfaces.
10. Do not place on or near a hot gas or electric burner, or in a heated oven.
11. To disconnect, turn control to “off’, then remove plug from wall outlet.
12. Do not use appliance for other than intended use.
13. Do not open the lid when operating. Scalding may occur if the lid is opened or
removed during the brewing cycles.
14. Any other servicing should be performed by an authorized services representative.
15. Any other power supply parts are forbidden to apply to this coffee maker except
the original power base from its manufacturer.
16. For the glass container:
a). The container is designed for use with this appliance. It must never be used on
a range top.
b). Do not set a hot container on a wet or cold surface.
c). Do not use a cracked container or a container having a loose or weakened
handle.
d). Do not clean container with cleansers, steel wool pads, or other abrasive
material.
17. This appliance is not intended for use by persons (including children) with reduced
physical, sensory or mental capabilities, or lack of experience and knowledge,
unless they have been given supervision or instruction concerning use of the
appliance by a person responsible for their safety.
SAVE THESE INSTRUCTIONS
POLARIZED PLUG
This appliance has a polarized plug (one blade is wider than the other): To reduce the
ay.
MEDIDAS IMPORTANTES
DE SEGURIDAD
Al momento de usar cualquier equipo, deber seguirse las siguientes precauciones de
descarga eléctrica y/o lesiones:
1. Lea todas las instrucciones.
2. erillas.
3. Para evitar un corto circuito, una descarga eléctrica o daños personales, no
sumerja el equipo, el enchufe ni el cordón en agua u otro líquido.
4. Si un niño va a emplear un equipo o si se utiliza en su presencia, debe supervisárselo
constantemente.
5. Desenchufe la cafetera si no la está usando o si la va a limpiar. Deje que el equipo
se enfríe antes de retirar o colocar piezas o de proceder a limpiarlo.
6. No utilice ningún equipo con el cordón o enchufe dañados, o después de que el
aparato haya presentado algún desperfecto o se haya dañado. Lleve el equipo al
centro de servicios autorizado para que se lo examine, repare o arregle.
7. El uso de aditamentos o accesorios que no sean recomendados por el fabricante
puede causar un incendio, una descarga eléctrica o daños personales.
8. No lo utilice al aire libre. Solo para uso doméstico.
9. No deje que el cordón cuelgue del borde de la mesa o repostero de cocina ni que
10. No lo coloque encima o cerca de un quemador a gas o eléctrico, o dentro de un
horno caliente.
11. Para desconectarlo, coloque en OFF (apagar). Desenchufe del tomacorriente.
12.
13. No abra la tapa durante el funcionamiento. Podría ocurrir quemaduras si se abre
o se retira la tapa durante el proceso de destilación de café.
14. Cualquier otro servicio técnico debe ser llevado a cabo por personal autorizado.
15. No deberá utilizarse otras piezas de suministro de energía con esta cafetera a
excepción de la base original incluida por parte de fabricante.
16. Uso de la jarra de vidrio:
a). Esta jarra está diseñada para usarse con esta cafetera. Nunca debe usarse
sobre un quemador de cocina.
ría.
c). No utilice la jarra si está rajada o si tiene el mango suelto o deteriorado.
d). No lave la jarra con limpiadores, esponjas de metal u otros materiales
abrasivos.
17. Ese equipo no ha sido diseñado para ser utilizado por personas
(incluyendo niños) con capacidades físicas, sensoriales o mentales
reducidas, o con falta de experiencia y conocimientos correspondientes
a menos que cuenten con supervisión o instrucciones con
respecto al uso del equipo por parte de una persona responsable de su seguridad.
GUARDE ESTAS INSTRUCCIONES
ENCHUFE POLARIZADO
Este aparato tiene un enchufe polarizado (una pata es más ancha que la otra). Para
reducir el riesgo de descarga eléctrica, este enchufe está diseñado para encajar en un
tomacorriente polarizado de una sola manera. Si el enchufe no encaja completamente
en el tomacorriente, invierta el enchufe. Si aún así no entra, llame a un electricista

SHORT CORD INSTRUCTIONS
A short power- supply cord is provided to reduce the risk of becoming entangled in or
tripping over a long cord.
Longer detachable power- supply cords or extension cords are available and may be
used if care is exercised in their use.
If a longer detachable power- supply cord or extension cord is used, (1) the marked
electrical rating of the extension cord should be at least as great as the electrical rating of
the appliance, and (2) the longer cord should be arranged so that it will not drape over the
countertop or table top where it can be pulled on by children or tripped over unintentionally.
GETTING STARTED
1. Remove all stickers, packing material, and literature.
2. Wash the carafe, carafe lid and brew basket in warm sudsy water— rinse thoroughly.
These parts are also top rack, dishwasher safe.
CLEANING B EFORE FIRST USE
Cycle the unit once with water to help remove any sediment.
1. Open lid and pour cold water into water reservoir up to the 12- cup level mark on the
2. Close the reservoir lid.
3. Insert brew basket pivoting hinge into brew basket holder.
4. offee grounds).
5. G rasp brew basket by small handle and use it to swing the brew basket closed.
6. Plug in the coffeemaker.
7. Place the carafe with carafe lid into coffeemaker and push the “ON” switch/ button.
8.
water from the carafe.
B REW ING COFFEE
1. Open water reservoir lid.
2.
desired level. Close the reservoir lid.
3.
heaping tablespoon for every two cups).
4. G rasp small handle and swing the brew basket closed.
5. Place the carafe into the coffeemaker.
6. Plug in the coffeemaker.
7. Push switch/button to “ON” and the light comes on.
8. Replace the carafe on the “Hot Plate” when not serving to keep coffee hot.
Important: Do not swing open brew basket while brewing.
9.
CLEANING INSTRUCTIONS
1. B e sure the unit is unplugged and cooled.
2. G rasp the small handle on the brew basket and swing basket completely open.
3. Remove the brew basket by lifting the basket straight up and off of pivot hinge.
4.
5. Clean parts as follows:
• B rew basket, carafe and lid are all top rack dishwasher safe; or they may be hand
washed in warm, sudsy water.
• Wipe the exterior and the “Hot Plate” with a soft damp cloth. Do not use
abrasive cleansers or scouring pads. Never immerse the coffeemaker in water.
6. Insert brew basket onto pivot hinge and swing closed.
INSTRUCCIONES DEL CAB LE CORTO
Se proporciona un cable de alimentación corto para reducir el riesgo de enredarse o
tropezarse con un cable largo.
Se puede usar otros cables de alimentación o extensión si se tiene cuidado en su uso.
Si utiliza un cable de alimentación desmontable o una extensión eléctrica, (1) la capacidad
el cable más largo ser colocado de manera que no cuelgue sobre la parte superior del
mostrador donde pueda ser jalado por niños o se tropiecen accidentalmente.
PASOS PRELIMINARES
1. Retire toda calcomanía, material de empaque y literatura.
2. Lave la jarra, la tapa de la jarra y el recipiente de colar con agua tibia jabonada.
Enjuague bien. Estas piezas también se pueden lavar en la bandeja superior del
lavaplatos.
LIMPIEZA ANTES DEL PRIMER USO
La cafetera debe de completar un ciclo de colado con agua solamente, para eliminar
cualquier sedimento.
1. Abra la tapa del tanque y vierta agua hasta el nivel de llenado de 12 tazas. No
sobrellenar.
2. Cierre la tapa del tanque.
3. Inserte la barra giratoria del recipiente de colar en el soporte del mismo.
4. r café molido).
5. Sujete el recipiente de colar por el mango pequeño para cerrar bien el recipiente.
6. Enchufe la cafetera.
7. Coloque la jarra con la tapa en la cafetera y presione el botón de encendido (ON).
8. do y vacíe el agua.
PREPARACIÓ N DEL CAFÉ
1. Abra la tapa del tanque.
2. Utilice la jarra para llenar el tanque con agua hasta el nivel deseado. Cierre la tapa.
3. Sujete el mango pequeño del recipiente de colar y abra bien el recipiente. Instale el
.
4. Sujete el mango pequeño y cierre bien el recipiente de colar.
5. Coloque la jarra en la cafetera.
6. Enchufe la cafetera.
7. Presione el interruptor de encendido (ON) y observe que se enciende una luz.
8. Después de servir el café, mantenga la jarra sobre la placa calefactora para conservar
el café caliente. Importante: El recipiente de colar no debe abrirse a medio ciclo de
funcionamiento.
9. Cuando termine de servir el café, ajuste el control a la posición de apagado (OFF).
LIMPIEZA DE LA CAFETERA
1. Asegúrese de que el aparato esté desconectado y que se haya enfriado.
2. Sujete el mango pequeño del recipiente de colar y abra bien el recipiente.
3. Para quitar el recipiente de colar, alce para arriba y retire de la barra giratoria.
4.
5. Para limpiar las piezas, siga las siguientes instrucciones:
• El recipiente de colar, la jarra y la tapa se pueden lavar en la bandeja superior del
lavaplatos o uno las puede lavar a mano con agua tibia jabonada.
• Limpie el exterior del aparato y la placa calefactora con un paño suave humedecido.
No utilice limpiadores abrasivos ni almohadillas de fregado.
6. Inserte el recipiente de colar en la bisagra del pivote y cierre.

CARING FOR Y OUR CARAFE
A damaged Carafe may result in possible burns from a hot liquid. To avoid breaking:
• Do not allow all liquid to evaporate from the carafe while on the “Hot Plate” or
heat the carafe when empty.
• Discard the carafe if damaged in any manner. A chip or crack could result in
breakage.
• Never use abrasive scouring pads or cleansers, they will scratch and weaken the
glass.
• Do not place the carafe on or near a hot gas or electric burner, in a heated oven, or in a
microwave oven.
• Avoid rough handling and sharp blows.
CUIDADO DE LA J ARRA
Una jarra dañada puede resultar en posibles quemaduras debido al líquido caliente. A
• Cuando la jarra está sobre la placa calefactora, no se debe permitir la evaporación
de toda el agua, como tampoco debe de calentar la jarra estando vacía.
• Deseche la jarra si está dañada. Una astilla o rajadura puede hacer que la jarra se
rompa.
•
rallar o debilitar el vidrio.
• No coloque la jarra sobre ni cerca de una hornilla de gas o eléctrica, adentro de un
horno caliente, ni adentro de un horno de microondas.
• Evite el manejo brusco y los golpes.
MINERAL DEPOSITS AND CLOGGING
M ineral deposits left by hard water can clog your coffeemaker. Excessive steaming or a
prolonged brewing cycle are signs that a cleaning is needed. Cleaning is recommended
at least once a month.
1. Pour white vinegar into the water reservoir up to the 6- cup level on the water
window.
Add fresh water up to the 12- cup line, and close the reservoir lid.
2. G rasp brew basket by small handle and swing open.
3.
latches. Set the empty carafe on the “Hot Plate” .
4. Turn the coffeemaker on and let half the cleaning solution brew into the carafe. Turn the
coffeemaker off and let it soak for at least 15 minutes to soften the deposits.
5. Turn the coffeemaker on and brew the remaining cleaning solution into the carafe.
6.
carafe and rinse with clean water.
7.
8. Wash the brew basket and carafe and carafe lid as instructed in “Care and Cleaning.”
PART LIST
Please check the construction
drawing as above:
1. Water tank cover
2. Funnel cover
3. Water tank
4. Funnel
5. B ase
6. Cup cover
7. Carafe
8. Handle
9. On/Off switch
10. Warming plate
11 B ottom cover
1
2
3
5
7
1 0
1 1
9
8
6
4
1
2
3
5
7
1 0
1 1
9
8
6
4
DEPÓ SITOS MINERALES Y OB STRUCCIONES
Los depósitos minerales que provienen del agua dura pueden obstruir la cafetera. La
emisión excesiva de vapor o los ciclos de colado prologados indican que la cafetera
requiere una limpieza. Se recomienda realizar este tipo de limpieza por lo menos una
vez al mes.
1. V ierta vinagre blanco adentro del tanque de agua hasta la marca del nivel de
llenado que indica 6 tazas. Agregue agua limpia hasta alcanzar la marca de 12
tazas y cierre la tapa del tanque.
2. Sujete el recipiente de colar por el mango pequeño y abra bien el recipiente.
3.
asegúrese de que enganche. Coloque la jarra vacía sobre la placa calefactora.
4. Encienda la cafetera y permita que se cuele mitad de la solución de limpieza adentro
de la jarra. Apague la cafetera y deje reposar un mínimo de 15 minutos hasta que
se ablanden los depósitos minerales.
5. Encienda la cafetera nuevamente y permita que se cuele el resto de la solución
adentro de la jarra.
6.
la jarra y enjuague con agua limpia.
7. Llene el tanque con agua fría hasta el nivel que indica 12 tazas, coloque la jarra
otro ciclo de colado para enjuagar toda solución de vinagre sobrante.
8.
cuidado y limpieza en este manual.
LISTA DE PARTES
que se muestra:
1. Tapa del tanque de agua
2. Cubierta del embudo
3. Tanque de agua
4. Embudo
5. B ase
6. Tapa de la jarra
7. J arra de vidrio
8. Asa
9. B otón de encendido y apagado
10. Plataforma de calentamiento
11. Cubierta inferior
Table of contents
Other Continental Refrigerator Coffee Maker manuals

Continental Refrigerator
Continental Refrigerator CE-CM219 User manual

Continental Refrigerator
Continental Refrigerator CP-CE009 User manual

Continental Refrigerator
Continental Refrigerator CE-CM249 User manual

Continental Refrigerator
Continental Refrigerator CE-CM389 User manual

Continental Refrigerator
Continental Refrigerator CE-CM241 User manual

Continental Refrigerator
Continental Refrigerator CP43929 User manual

Continental Refrigerator
Continental Refrigerator Elite CELT-CE005 User manual

Continental Refrigerator
Continental Refrigerator CP-CP019 User manual

Continental Refrigerator
Continental Refrigerator CM43655 User manual