Brickhouse Security Eon 3.0 User manual

Eon 3.0 GPS Tracker
User’s Guide

What’s Inside
1. Eon 3.0
2. Wall Charger
3. Screwdriver Kit

1. Charging Port
2. LED Light Indicator
3. Built-In Magnetic Mounts
3
1
2

LED Lighting Guide
At initial plugin, the LED will glow blue-green for a few seconds. The LED will
blink red to indicate that the tracker is charging and will blink green when the
device is fully charged. The LED blinks blue to indicate that the device has
received GPS signal and blinks green indicating that the device is connecting to
the cellular network.
Getting Started
The rst step in using your Eon 3.0 GPS Tracker is to charge it for 24-48 hours
by plugging it in using the included wall adapter. To access the USB charging
socket, unscrew the two screws holding down the waterproong ap with the
included screwdriver. Once the device has been fully charged, unplug the device
from the charger, and reattach the waterproof ap.
You should have received an email containing your default login information
before the device arrived. Make sure that the above steps are taken before trying
to log in and begin tracking.

Take the device out for a 20-30 minute drive; this will help the device calibrate to
the platform. The Eon 3.0 is motion activated only and will track once a minute
when it senses motion for an extended period.
Placing Your Device
The Placement of the Eon 3.0 is important and dependant on the type of object
you’re tracking.
The device will always give the most
accurate location data when it has a
clear view of the sky. It is capable of
transmitting and receiving through
materials like glass, plastic, and
cloth, but it’s not able to transmit
through metals or concrete; keep
this in mind when placing the
device. Avoid placing the device in
the trunk of a vehicle. The Eon 3.0
also may not report from a glove
compartment or underneath a seat. *Place in green zones for best results.

This interference can vary from vehicle to vehicle, so we recommend trying
dierent locations on your particular vehicle and seeing which placement yields
the most accurate reporting.
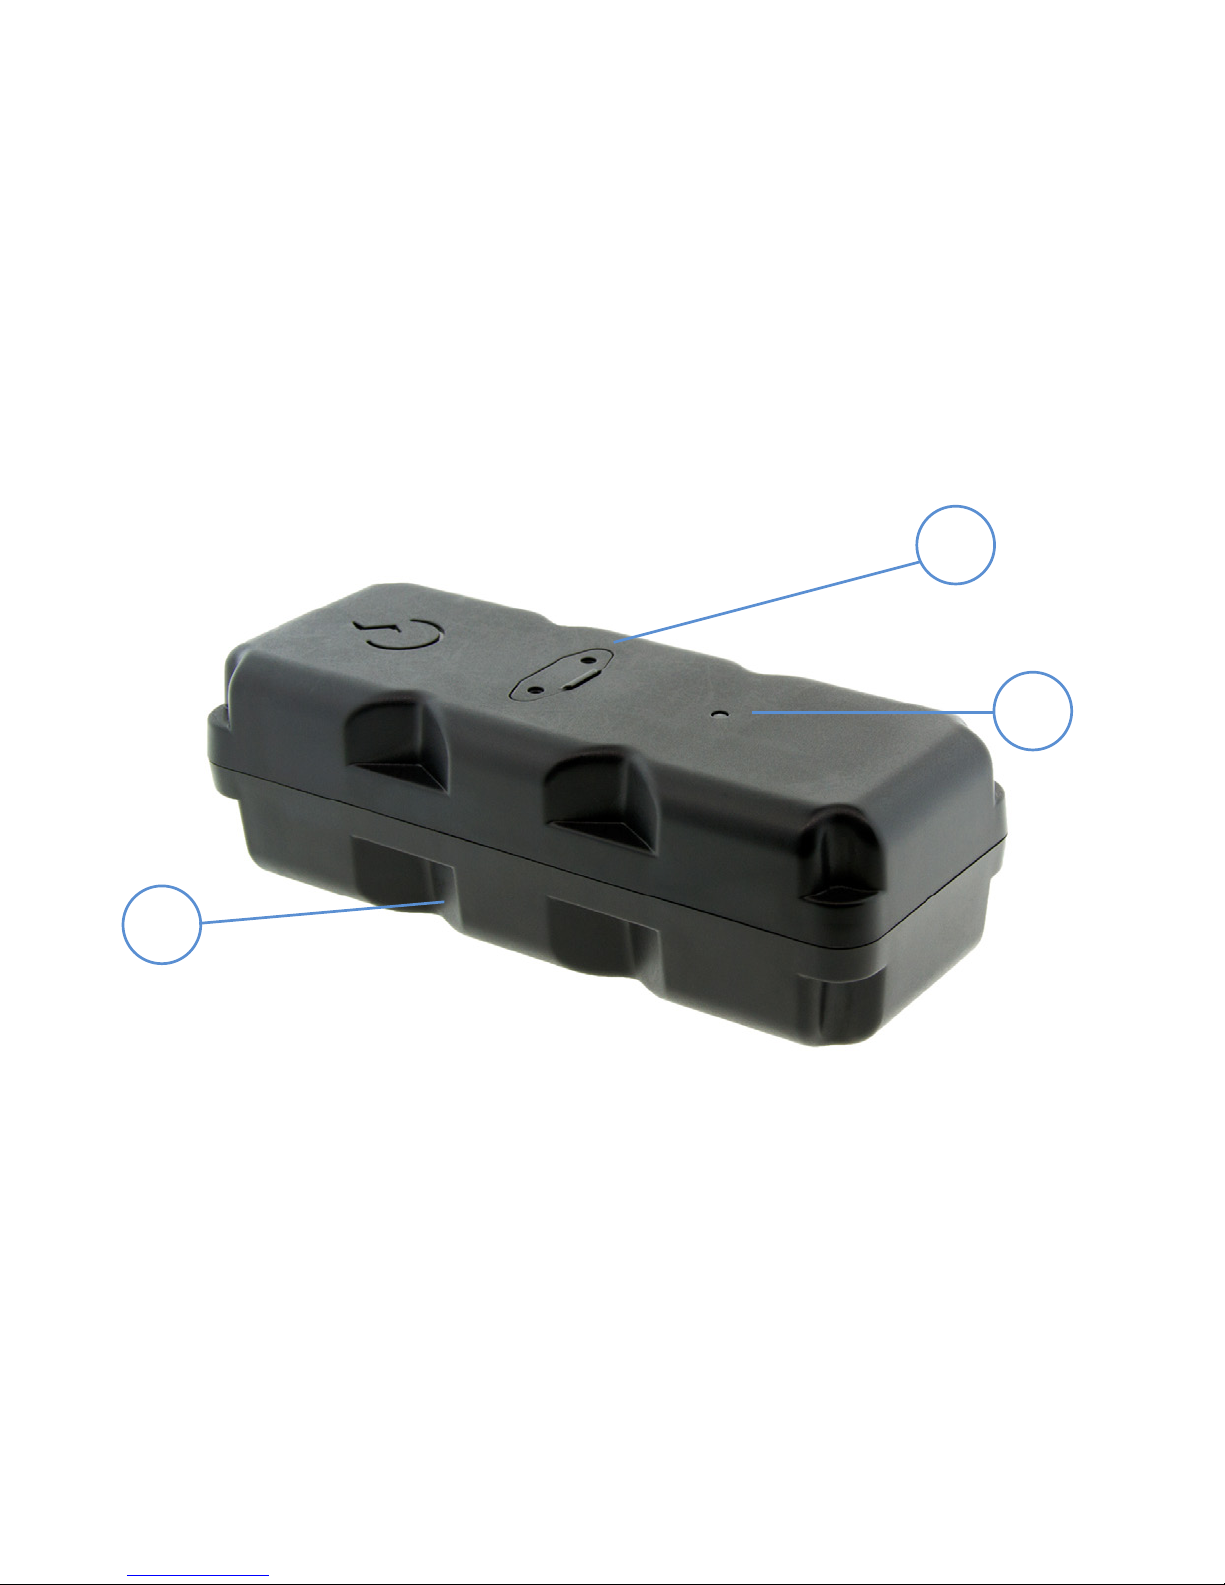
If you’re looking to track covertly, the device is weather resistant and contains
built-in magnets. When placing the device beneath a vehicle, be sure that the
BHS sticker is facing down, towards the ground, and that it is as near the edge
of the vehicle as possible.
If you are tracking an asset such as a large container, you will need to mount the
device with the magnets facing down towards the metal surface and the sticker
facing the sky.
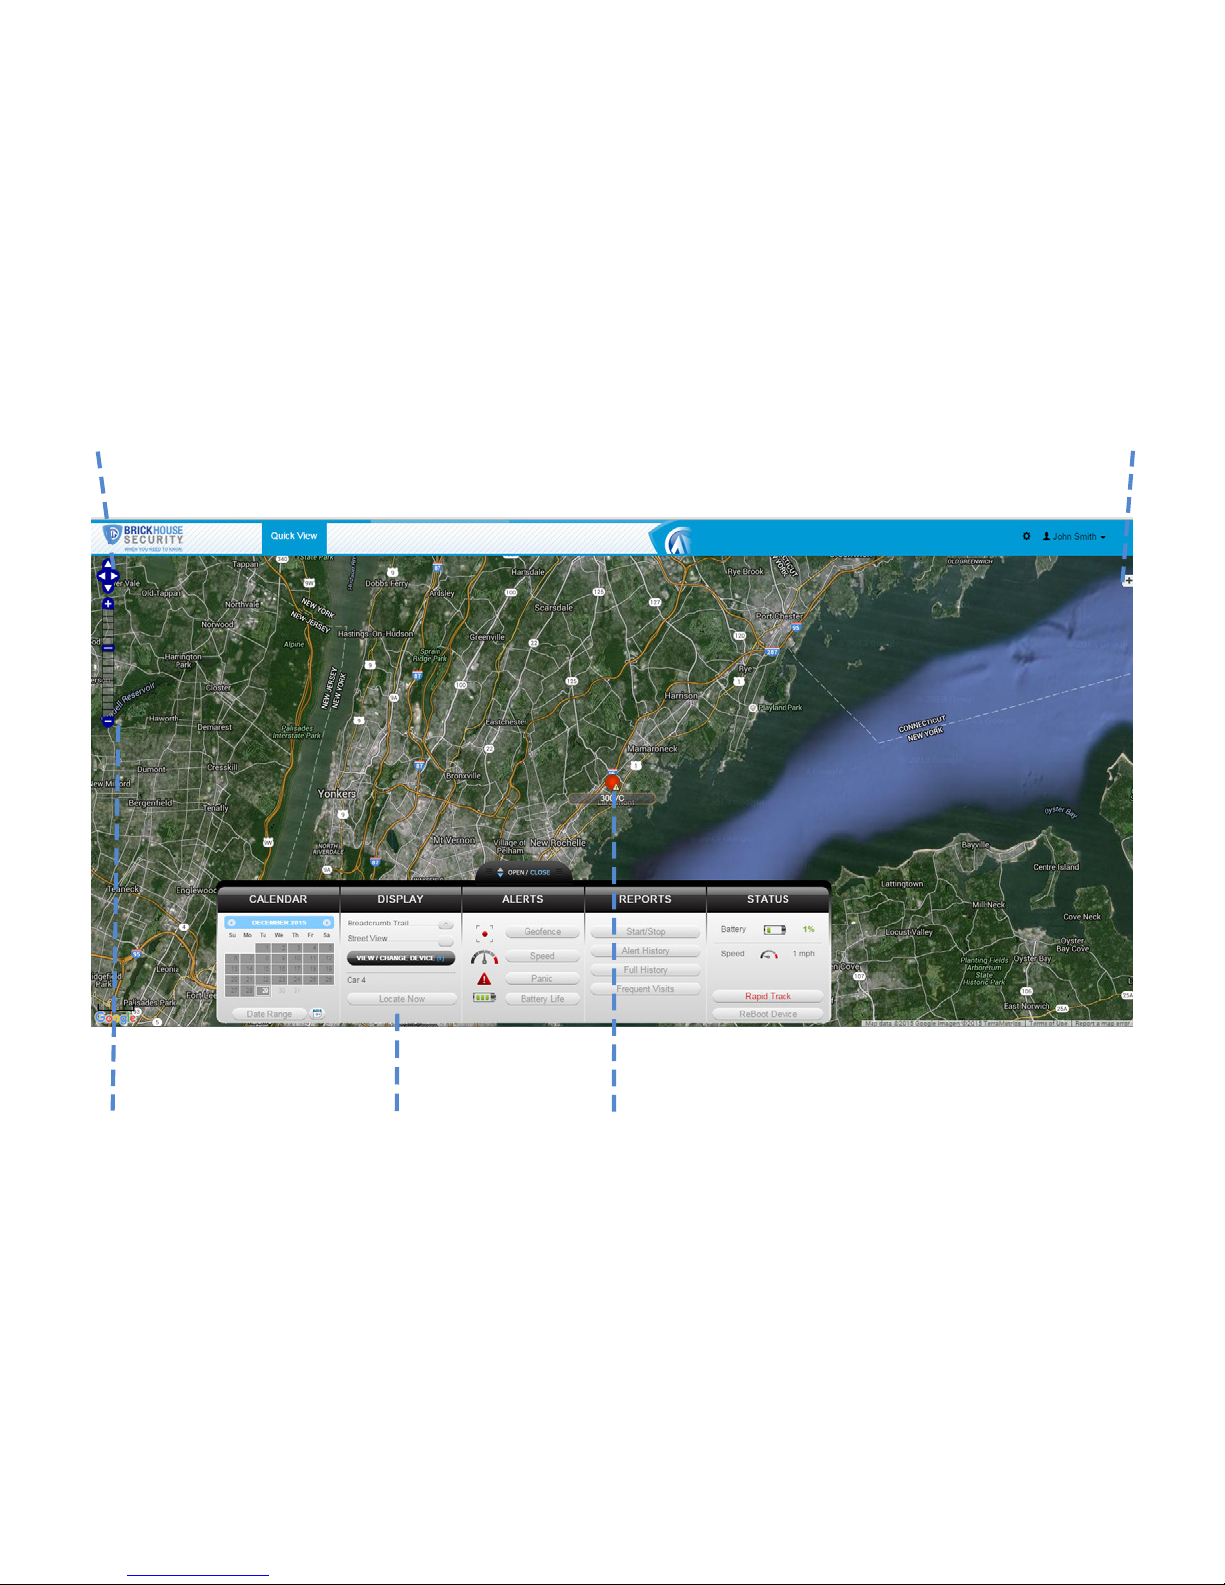
Tracking Your Device
To track your Eon 3.0, enter www.BrickhouseSecurity.com in your browser
window. Hover your cursor over the Login tab on the top right of the website
and click on GPS. Enter your login information and press the Login button. The
tracking page will appear, and the device’s last reported location will be centered
on the map. If you have multiple devices on your account, the rst 3 that were
registered will be automatically selected and appear on the map.

Navigation Arrows Change Map View
Zoom Bar Dashboard Last Known Location

Along the bottom of your screen will be your dashboard.
Tracking information is displayed using Google Earth Maps, so navigation is
similar to what most people have grown used to in using internet-based mapping
solutions. You can use the Navigation arrows and Zoom Bar to move around the
map, or drag the map using your mouse and zoom using a click-wheel mouse.
At the bottom of the pop-up window are the Zoom, Street View, and Live Tracker
buttons.
• Zoom will perform the same task as using the Zoom bar on the left side of the
map; zooming in on the icon you have selected.
• Street View will open up a separate window displaying Google’s Street View,
if available.
The BrickHouse shield icon will appear where a tracker transmitted most
recently. Click on an icon to bring up a pop-up box. This will show your tracker’s
name, the distance it has traveled on this trip, what direction it was moving
in, speed, battery information, and start and stop locations. Start will display


the beginning location of the current trip, and the time it was recorded. Stop
will display the most recent location from the device, as well as the time it was
reported.
The More tab is not currently active. Future updates to the platform will utilize
this tab.
The GeoFence tab allows you to create quick geofences, based on the location
you are currently viewing and route the device was following. Use the Circular
GeoFence radio button to create a perimeter around the location you are
clicked on. Use the Route GeoFence radio button to create a boundary that
will follow the entire trip your device was on.
Give the GeoFence a name in the GeoFence Name window, and add a short
description in the Description box (optional).
Use the Action dropdown box to choose if you would like an alert created
when the device enters the chosen area, exits the area, or both. Use the Radius
box to choose how large the area will be. You can enter values below a mile
as decimals. For example: A half-mile radius geofence would be entered as .5.

When you’re done, press the Create Geofence button to save.
The Alerts tab will display the most recent Geofence, Speed, Panic, or Power
alerts that have been triggered.
Live Tracker will open up a separate window displaying your devices’ locations,
and allows you to see past locations. Using the drop-down boxes on the bottom
right of the window, you can adjust how often your screen refreshes and how
many locations will appear on the screen. The counter on the bottom left of the
window displays how long it will be until your screen refreshes. You can email a
link to this page, allowing other users to view your tracker’s location by click on
the Share This icon in the upper right hand corner of the window. When doing
so, you may choose how long the link will be active before expiring using the Link
Expiration dropdown.


Using the Dashboard
The Calendar allows a user to choose from which dates information can display.
Any date that has tracking information will be highlighted. Simply click on that
date to display information. To choose multiple days, click on the Date Range
button, input a start and end date, and press Search. Press the Current Date
button to return to viewing the current day’s information. When searching by
date, all locates generated in the chosen timeframe will display as breadcrumbs.
Under the Display section you can see a list of all devices currently displaying
information on the map. Click on the View/Change Device button to choose
which of your devices will display on the map. This button only serves a purpose
if there are multiple devices on your account.

Breadcrumb Trail will display all locates, or breadcrumbs, generated on the
date you currently have displayed, connected by a line. Click on any individual
breadcrumb to see detailed information. The BrickHouse shield icon represents
the start and stop of a trip, green circles mean the device was moving with the
arrow indicating direction, and red octagons indicate stops.
Click on the Street View button to open a Google Street View window from the
most recent location of the device. This function will only work if Google Street
View is available in that location.
The Alerts section lets you manage what kinds of alerts your device will create
and how you will be notied.
Click the Geofence button to manage your geofences. The Geofence Alert
Conguration tab lets you choose when and where alerts will be sent. Select the
device you would like to edit by checking the box next to it.
• Highlight which days you would like to congure by clicking on each. You may
choose to enter certain hours during which alerts will be active, or leave these
elds blank to have them sent all the time.

• Choose if duplicate alerts will not be created if the device stays inside or
outside a geofence for a certain period of time using the slider bar.
• Choose what icon will appear where a geofence alert was created using the
Alert Image dropdown box.
• Enter Email Address allows you to choose where alert notications will be
sent. Click on the + icon to add phone numbers you want to have texted.
• In the Create New Geofence tab you can create geofences around any area
in dierent shapes. Navigate to the area on the map you would like to create
a geofence. Click on the Circle, Polygon, or Route button. It is suggested that
all geofences be in at least a .2 mile radius, or at least 1 city block around an
area to allow for GPS drift.
To create a circular geofence around an area, click on Circle and then click on
the spot on the map you want to create your geofence around. Hold down the
left mouse button and drag the cursor until your geofence is the size you want,
and release the mouse button.

The Polygon button allows you to create geofences in dierent shapes.
Each point you click on will be a corner of your perimeter.
A Route geofence will be straight lines. You must choose how far a device will
need to be away from the route before a report is generated.
Once you have created a geofence, assign it a name in the Geofence eld and hit
Save. You may also choose to enter a short description for your geofence.
The Assign Geofence tab allows you to activate and deactivate geofences.
Select a device from the dropdown menu to see what geofences are currently
active. Click on an Assigned Geofence to view and edit its conguration. Click
the Remove link to deactivate a geofence. Hit Save once you have nished
making changes.
Click on the check box for any Available geofence to edit its conguration and
press the Save button to implement it.
The View Geofence tab allows you to view your geofences.

Click the Speed button on the dashboard to set up speed alerts. Simply select
your device and enter a speed which, when exceeded, will generate an alert.
Choose the days and times you would like the alert to be active, if you would
like duplicate alerts to be ignored, and enter an email address where you wish to
receive your notications. If you would prefer to receive alert notications via text
message, click on the + button and enter your phone information.
Hit Save once you have nished conguring your alerts.
The Panic feature of the tracking platform is not available for the Eon 3.0 GPS
tracker.
Click the Battery Life button to set up low power alerts. Low power alerts will
send you an email or text message when the device’s power drops below a
certain level. Choose to receive alerts when your device’s battery drops below
10%, 25%, or 50% of its maximum capacity.
You can run 4 dierent types of report, listed below. To run one, click on one
of the buttons, choose the device you would like to run a report on from the
dropdown box, choose the dates you would like to run your report on in the
upper right corner, and press the magnifying glass search icon. You can export

any generated reports to Microsoft Excel by clicking on the export button in the
upper right corner of the window.
Start/Stop reports will list trips between stopping points, with starting and
ending locations, as well as speed information, trip duration, stop time, and the
distance traveled.
The Alert History button will show you all alerts generated during the specied
time and where they occurred.
The Full History button includes individual locate information such as: location,
time of transmission, battery life, speed, and distance from its previous locate.
The Frequent Visits button will create a list of addresses that the device has
reported from and show how many times the device reported from that spot.
Changing Your Password
To change your password, click on the account name, which should appear in
the upper right corner of the browser window. Once complete, click on Quick
View to return to your tracking page.

Search Export to Excel

Support
To access FAQs, as well as other support materials for your device and the
BrickHouse Security Tracking platform, go to:
http://help.brickhousesecurity.com/
Live support is available Monday through Friday between the hours of 9
am and 8 pm EST and Saturday and Sunday between 9 am and 6 pm
EST at 1-800-654-7966.
Table of contents
Other Brickhouse Security GPS manuals

Brickhouse Security
Brickhouse Security Spark Nano 6.0 User manual

Brickhouse Security
Brickhouse Security Trackport 4 User manual

Brickhouse Security
Brickhouse Security Livewire 4 User manual

Brickhouse Security
Brickhouse Security EON4 User manual

Brickhouse Security
Brickhouse Security LiveWire VOLT User manual

Brickhouse Security
Brickhouse Security Livewire User manual

Brickhouse Security
Brickhouse Security Spark Nano 6 User manual