Britton HACKNEY 500 User manual

V10523
HACKNEY
IMPORTANT INFORMATION BEFORE YOU START
Please read carefully and keep this information for further reference.
Furnniture Range
i
1
Thank you for buying a Britton Product. To ensure that it
works to its full potential, it needs to be tted correctly.
Check the contents of the pack carefully before installation.
Britton will not be held responsible for any de-t/re-t costs
where faulty product has been tted. If any fault is found with
materials or workmanship, it must be reported immediately
to the manufacturer. Remedial action will be taken, based on
information received, on condition that:
1. Full details are supplied to the manufacturer.
2. The product has not been modied or tampered with;
3. The manufacturer is informed of any damage/shortages
prior to installation.
4. The product has not been installed, or attempts have been
made to install.
We do not accept responsibility for any problems that may
occur through incorrect installation. This product should
only be installed by a suitably qualied plumber/installer.
Should the installation be completed by a non-qualied
person any product guarantee maybe considered invalid. For
a claim made under our warranty, written certication of your
installer’s qualications may be required.
2
BEFORE YOU START
2
Important Pre-Installation Notes
Please check for any hidden pipes or electrical cables before drilling holes in the oor or walls. When using power tools always
follow the manufacturer’s user instructions. This installation guide details tting to a solid wall. If your bathroom has studded/
plasterboard walls, please use appropriate xings.
Make sure that the wall can take the weight of the products before undertaking the installation.
Waste ttings should be carefully bedded in silicone and the back nut hand tightened; an additional quarter turn using a
suitable spanner is suicient to create the required watertight seal.
It is advised that all doors and drawers are removed prior to tting to avoid unnecessary damage occurring.
It is recommended that the furniture and accessories are installed aer tiling, ensuring that the product is installed at to the
tile face and allows product to be easily removed if required in the future.
This document has been prepared for your guidance, you must exercise due care at all times.
Please note that some units are heavy. Always take care when liing, and follow health and safety guidelines. It is
recommended that 2 people carry out the installation of larger basin/vanity units over 30Kgs gross weight.
If any maintenance is required then it must be carried out by a qualied Plumber. The manufacturer reserves the right to make
technical modications without prior notice.
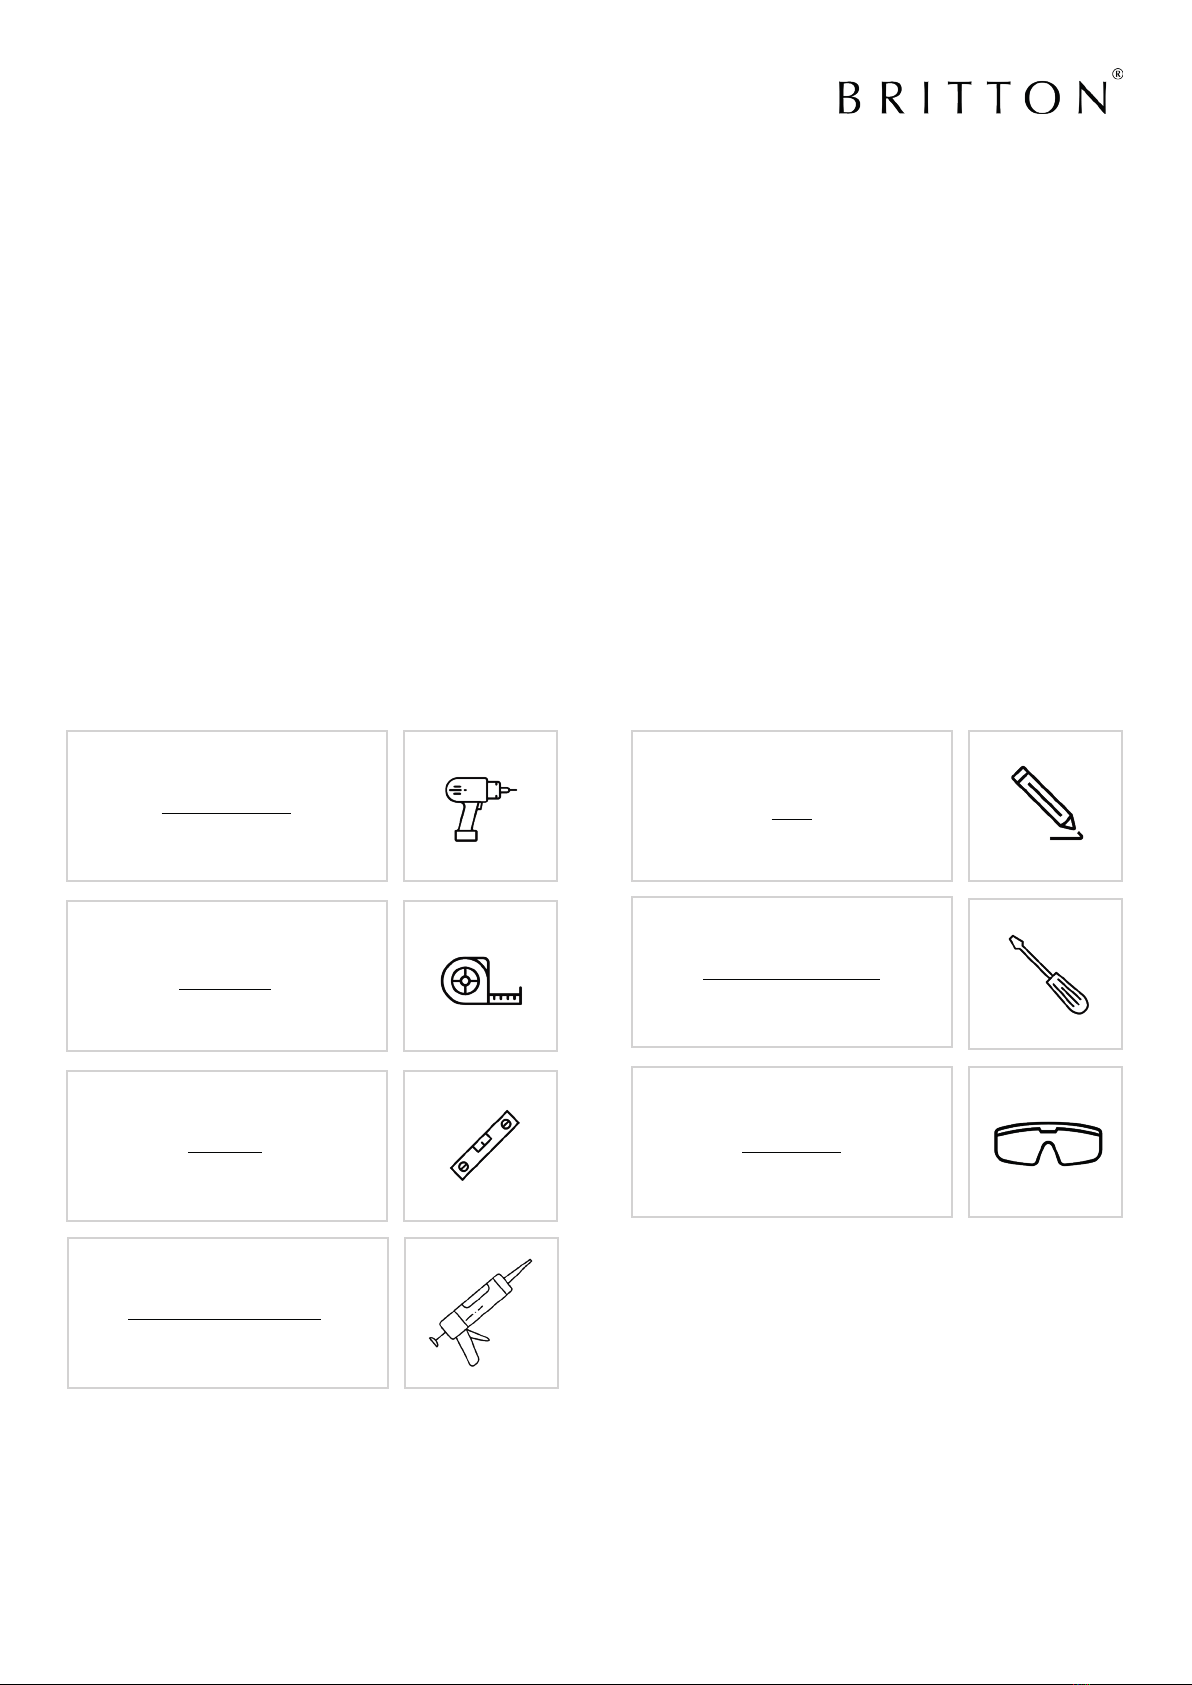
Tools Required (not supplied):
Drill + 6mm Drill Bit Pencil
Screw Driver (Phillips No2)
Tape Measure
Spirit Level Safety Goggles
Water Based Silicone Sealant
3
COMPATIBILITY
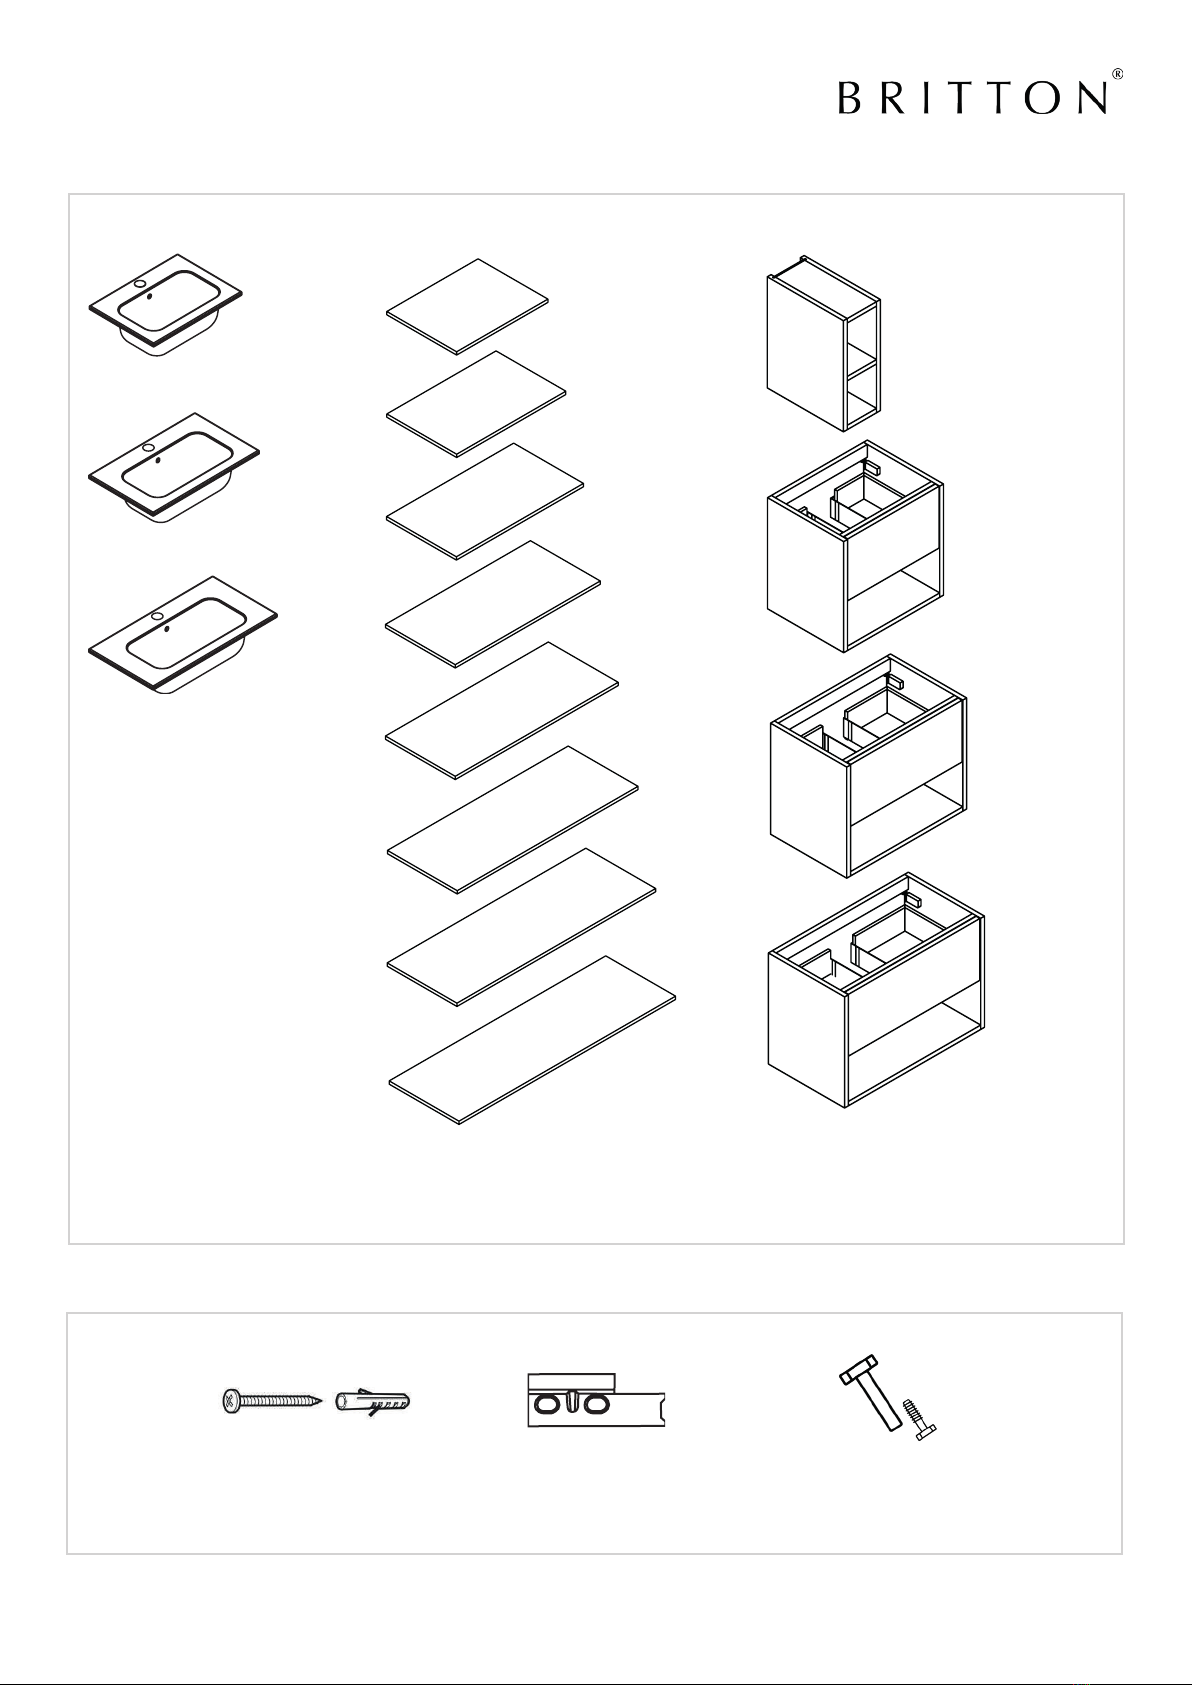
FIXINGS
x4 Screws x2 Brackets x4 Connecting Screw Bolts
V1XXXX
V1XXXX
HK0510SCW 15.8kg
HK0511SCW 15.8kg
HK0610SCW 16.8kg
HK0611SCW 16.8kg
HK0710SCW 17.8kg
HK0711SCW 17.8kg
HK5100Txx 3.8kg
HK6100Txx 4.8kg
HK7100Txx 5.8kg
HK8100Txx 6.8kg
HK9100Txx 7.8kg
HK1010Txx 8.8kg
HK1110Txx 9.8kg
HK1210Txx 10.8kg
HK2056xx 9.8kg
HK5000Dxx 15.8kg
HK6000Dxx 16.8kg
HK7000Dxx 17.8kg

4
INSTALLATION
12
3
Determine the position and height of the unit, ensuring
the recommended heights are followed according to the
combination of basin and tap selected.
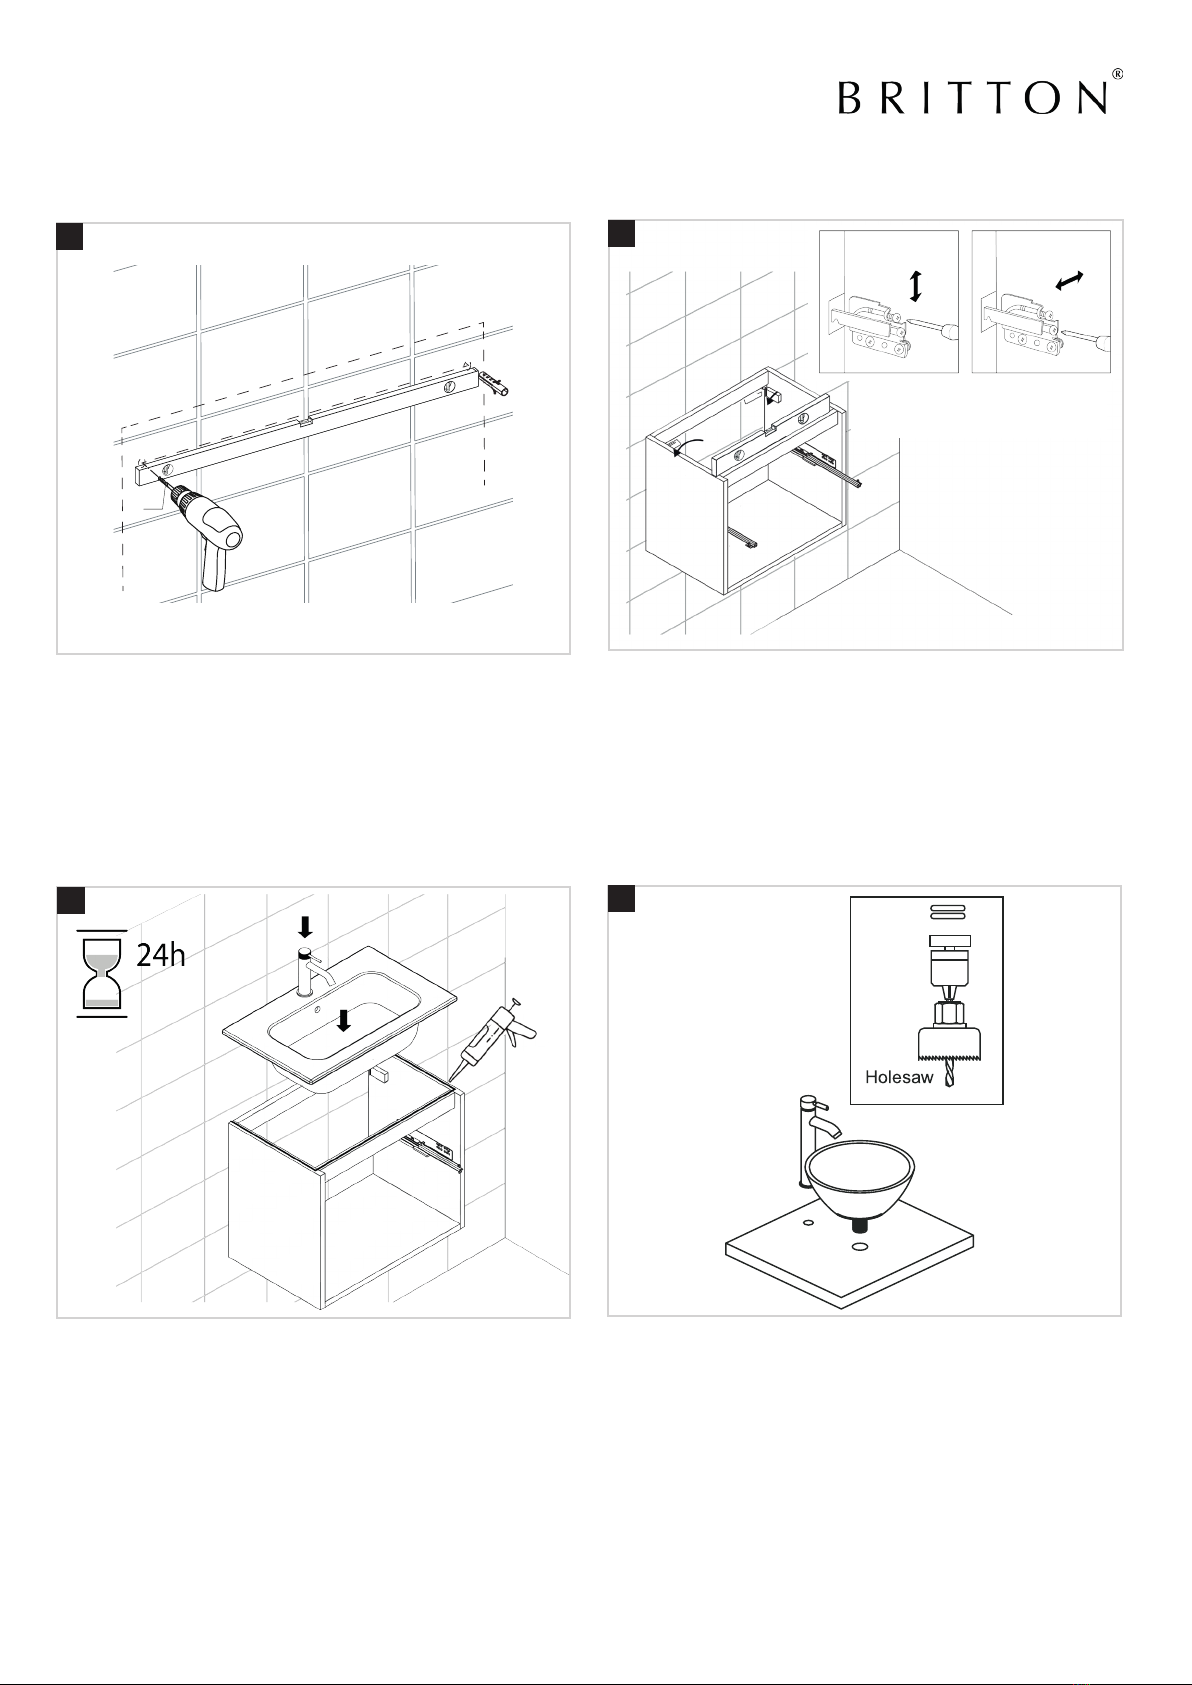
Measure the width and height of the xing brackets - Distances B and C. Mark the wall and prepare to drill.
860/8
7
0
mm
860/870mm
Remove the drawer before installation. Pull the drawer fully
out, li the front, pull out again, lower and fully remove.
A
B
C
4
5
INSTALLATION
5
67
Drill the marks using an 8mm drill bit and ensuring there are
no hidden pipes or cables in the wall. Make sure the correct
drill bit is used for the surface being drilled and check that the
holes are level.
B
A
Ø6
Install the wall brackets using the xings provided. The
unit carcass can now be mounted on the wall brackets and
adjusted to ensure it is ush with the wall and level.
The tap and waste ttings may now be installed, following the
manufacturer’s instructions.
Connect water and waste pipework and turn on the water
supply to check for any leaks.
Important: Apply silicone sealant on the top of the basin unit
to keep watertight. Check the manufacturer’s instructions for
drying times.
Prepare worktop for taps and basin waste. Cut holes where
required using a suitable sized “holesaw’ at a slow speed.

8
6
INSTALLATION
9
The tap and waste ttings may now be installed, following the
manufacturer’s instructions.
Connect water and waste pipework and turn on the water
supply to check for any leaks.
Important: Apply silicone sealant on the top of the basin unit
to keep watertight.
Apply silicone sealant to the joins between the basin and unit
on all sides to keep watertight. Check the manufacturer’s
instructions for drying times.
10
Re-t the drawer: Pull both
drawer runners fully out and
test to make sure the drawer
operates correctly.
11
7
INSTALLATION
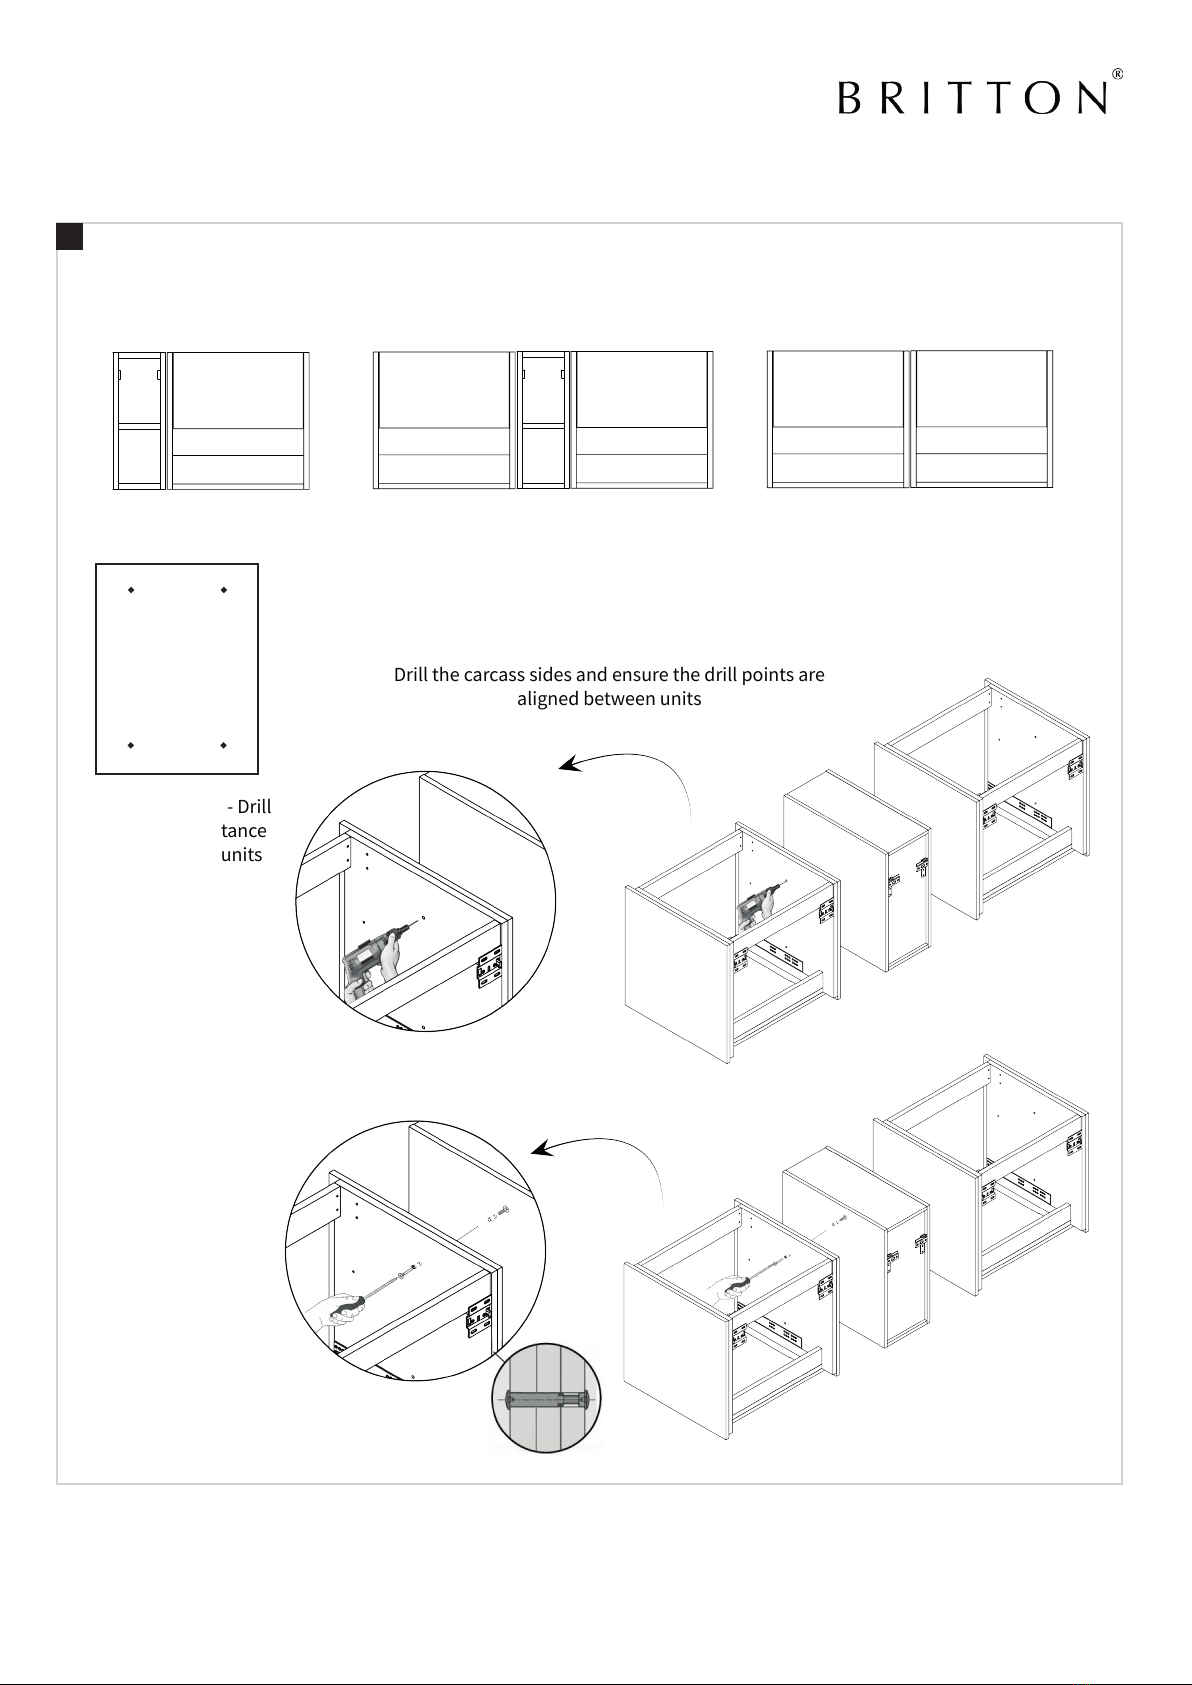
When installing two or more units, ensure the units are correctly positioned side by side, front and back and in height - the
base of each unit should be level as shown in examples below.
V1XXXX
V1XXXX
V1XXXX
HK2056 + HK5000 HK5000 + HK2056 + HK5000 HK5000 + HK5000
Side View of Unit - Drill
holes a good distance
apart to secure units
together
Drill the carcass sides and ensure the drill points are
aligned between units
Use connector bolts provided to secure the adjoining
units

Part of the
Bathroom Brands Group
Lake View House
Rennie Drive, Dartford
Kent DA1 5FU
United Kingdom
0345 873 8840
www.brittonbathrooms.com
We reserve the right to make technical modications without prior notice.
Clean regularly using with warm soapy water and polish with only a so cloth.
Any residues from soap, toiletries etc. should be rinsed o straight aer use.
Household bleaches and cleaners containing harsh chemicals may damage the surface nish.
Avoid using abrasive cloths, scouring pads, scrub sponges, steel wool or anything similar.
Lime-scale marks can be cleaned using a diluted lime-scale remover used in accordance with manufacturers instructions.
Ceramic, glass and cast mineral marble basin products should be cleaned regularly with warm soapy water, then rinsed with
clean water and, if desired, dried and polished with a so cloth. Lime scale deposits can be removed using a 50:50 solution of
warm water and lime scale remover and so clean cloth.
We recommend regular cleaning with MINERALPOLISH cream, specially formulated to clean and help protect the surface of
glass and cast mineral marble basins. Please also take care not to damage the lacquered surface on the underside of the glass
washbasin that gives the washbasin its colour. Damage to the underside of the washbasin may be visible through the glass.
Take care how you handle the washbasin prior to installation and place it on a so surface to avoid damage. Regularly clean
worktop, carcass and drawer using a micro-bre cloth. Do not use abrasive cleaners or bleach as this will permanently damage
the lacquered surfaces. If any maintenance is required then it must be carried out by a qualied Plumber.
CARE & MAINTENANCE
8
This manual suits for next models
7
Table of contents
Popular Indoor Furnishing manuals by other brands

Regency
Regency LWMS3015 Assembly instructions

Furniture of America
Furniture of America CM7751C Assembly instructions

Safavieh Furniture
Safavieh Furniture Estella CNS5731 manual

PLACES OF STYLE
PLACES OF STYLE Ovalfuss Assembly instruction

Trasman
Trasman 1138 Bo1 Assembly manual

Costway
Costway JV10856 manual


