Broadcastvision Entertainment BVE CAB User manual

BroadcastVision Entertainment : www.broadcastvision.com
Page 1
CAB –Console Adapter Box
CAB’s for use with attachable personal viewing Screens
from BVE, Life Fitness, Precor, Mye, Freemotion, Matrix,
Octane, Startrac and others operated from cardio
equipment console controls
The dynamic Broadcastvision Entertainment AXSCAB accommodates many
varied applications to allow console control of Personal Viewing Screens and
to facilitate operation of cable/satellite/IPTV set top boxes (STB). The CAB
product should operate in a “plug-and-play” manner. Just note the side
labeled TV above and connect appropriately with the cable provided.
Your CAB is enabled for an application as follows:
Proposal Number:
Console Description:
PVS:
Set-top Box (if Applicable):
If your scenario differs from the information above please call BVE
customer service at 1(888)330-4283 ext.3 for additional support.
Online Service Manuals available at: www.broadcastvision.com

BroadcastVision Entertainment : www.broadcastvision.com
Page 2
Installation Instructions
Note: The Broadcastvision CAB should always be installed after the cable/satellite
service has already been installed, and you have a picture on the screen. If the set top
box is not available at the time of installation you can still run all of the wires and hook up
the CAB, but you will not be able to test the CAB to make sure that it is changing channels
on the STB.
1. Before attempting to install the CAB start by making sure that the cable/satellite box
is properly hooked up to the screen and you have a picture on the screen. If you do
not have picture make sure that you are on the appropriate input or channel
(usually 3 or 4) before proceeding to the next step.
2. The CAB translates the console commands to the personal viewing screen and
cable or satellite box if applicable. Plug the cable from the console (provided from
the cardio equipment manufacturer) into the console side of the CAB.
3. Next connect the TV side of the CAB to the back of the personal viewing screen,
and secure the CAB to the back of the screen with the suppliedVelcro.
Note: On newer Precor 15” screens the CAB will not fit behind the plastic shroud.
Because of this a 2’ flat cable extension is included with these Precor CAB’s to
allow you to mount the CAB on the back of or inside the Precor console.

BroadcastVision Entertainment : www.broadcastvision.com
Page 3
4. Once the CAB is hooked up you will need to run the IR emitter cable down the
machine to the base of the cardio. There it will connect to either the set top box or
a cat5/6 cable for sending the signal to an AV closet.
Tip: since the IR wire is very thin and easily damaged it is better to run the emitter
wire through the machine (see page 5 for a wire management example).
5. After the IR cable has been run through the machine the IR emitter should be
placed over the infrared eye on the front of the set top box. If you cannot see
where the IR eye is on the front of the STB, shining a flashlight at the front of the
box will usually help you to see the IR eye. Please see the IR eye locations of
some of the most common STB’s below:

BroadcastVision Entertainment : www.broadcastvision.com
Page 4
6. If the set top boxes are located in another room, the supplied cat5 adapters will
allow you to use a standard cat5/6 wire from each cardio machine to pass the IR
signal back to the AV closet.
7. IR emitter shields are included with each CAB in order to help protect the emitter
and keep it in place. Do not install the emitter shields until you are sure that the
CAB is working properly.
Once installed if the CAB does not work for any
reason check the Troubleshooting Guide below
or if necessary call technical support at
1(888)330- 4283 ext.3 before leaving the facility.

Troubleshooting Guide:
1. Double button presses –Some set top boxes respond to more than one of the
IR codes that we send out. If you notice that pressing a channel button on the
console results in multiple presses, simply remove the 2 screws that hold the lid
on the CAB and turn on dip switch 2 and 4. If this does not solve the problem,
call (888)330-4283 ext.3 for further assistance.
2. No control over set top box
a. Check if CAB is getting power and channel commands from the
console –CAB contains internal LED power lights. Two indicator LEDs
are located on either side of the console-side connector inside the
enclosure.
· GREEN - Power LED, on whenever the CAB is powered
· RED - Activity LED, flashes whenever the CAB receives and processes
commands
The location of the LEDs is such that they should be visible through the
enclosure around the CAB connector to the console.
b. Incorrect IR emitter placement –If the IR emitter is not in the correct
location on the front of the box you may need to move it around until you
find the location that works.
Tip:Try initially holding the IR emitter away from the front of the STB
initially then continue pressing the channel button while “zeroing in” on the
correct IR emitter placement.
c. Set top box is in RF mode –change to IR mode –Many set top boxes
can operate with a hand-held remote in RF or IR mode. For the CAB to
function, it is critical that the STB accepts IR channel commands. To test
if the STB is in RF mode, place your hand over the hand-held remote
control IR transmitter and see if the STB receives channel change
commands. If the answer is yes, the STB is in RF mode. Check online for
instructions to change the STB remote control mode from RF to IR.
d. IR signal strength issue –In rare circumstances, the CAB may output
too strong of an IR signal for the set top box IR receiver. To test if the IR
emitter is over-driving the set top box receiver, pull the emitter away from
the front of the set top box, and press the channel button to see if the set
top box now receives the channel command. Opening up the CAB and
turning on dip switch #8 will reduce the IR current by 50% and solve this
issue.

e. No Continuity between CAB and IR emitter –In some circumstances
utilizing the “Far” set top box scenario, the CAT5/6 cable between the set
top box and the CAB may not provide full continuity through wall plates
etc. It may be helpful to re-locate the STB at the base of the cardio and
re-test. Or, it may be helpful to temporarily run an alternate CAT5/6 cable
from the CAB to the set top box then re-test.
f. CAB not programed for the correct set top box - Your CAB is
defaulted for Broadcastvision’s popular “Unicode” setting which provides
control of the most popular cable and IPTV set top boxes including, but
not limited to:
•AT&T Uverse, Brighthouse, Comcast, Time Warner, and Verizon
The CAB can be quickly configured on site to operate other popular set top boxes by
flipping dip switches inside the CAB enclosure as pictured below. CAB operates with
many other set top boxes not included in the list below. Please call BroadcastVision
support at 8883304283 x3 to determine the dip switch settings for your cable, satellite,
or IPTV provider.
1 2 3 4 5 = Dip Switch settings for the following set top boxes:
0 0 0 1 1 - CAB will output commands for Amino set top boxes
1 1 1 0 1 - CAB will output commands for Enseo set top boxes
0 0 1 0 1 - CAB will output commands for LG set top boxes
0 1 0 0 1 - CAB will output commands for Rogers set top boxes
1 0 0 0 1 - CAB will output commands for Cox set top boxes
0 1 0 1 0 - CAB will output commands for Charter set top boxes
1 0 0 1 0 - CAB will output commands for Unicode-Satellite for DirecTV and Dish set
top boxes

BroadcastVision Entertainment : www.b
Tel (888) 330-4283, Email: support@br
roadcastvision.com
oadcastvision.com Page 5
WIRE MANAGEMENT
“B”
3. Pull through AUXIR cable taped to pull
tape and reinstall cap, secure CAB at screen, and
adhere emitter on face of cable/satellite box
“C”
“A”
Sample Path to route IR cable Through Treadmill
(In this case, Life Fitness Integrity). Call for AUXIR
cable routing suggestions if needed.
2. Push pull tape through path
“A”, “B”, and “C” in pictures
1. Remove cap at base of
Treadmill leg

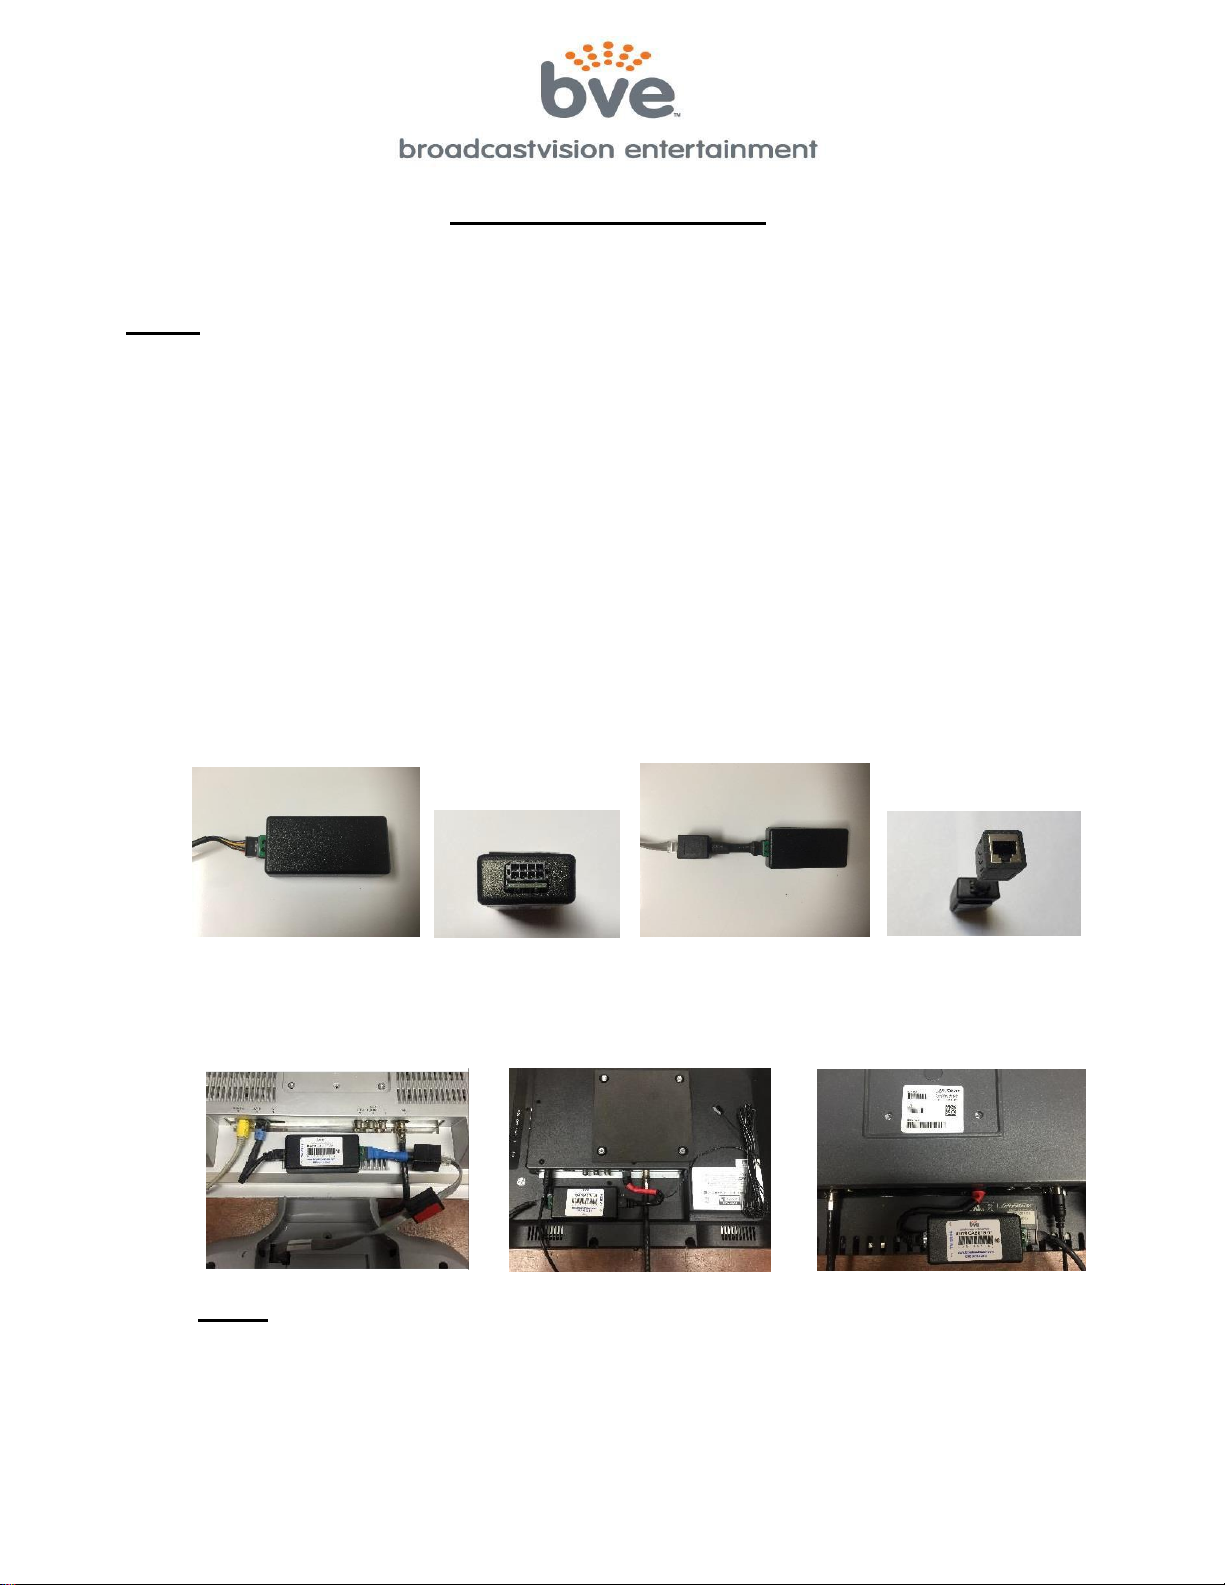
Broadcastvision Entertainment Terms and Conditions
BVE Stock Items Returned for Credit
BVE manufactured products may only be returned for credit with written authorization from BVE
within 30 days of the original invoice date. A 25% restocking fee will be charged for all returns. All
products being returned to BVE require a Return Authorization number. Products must be returned
in original condition with the original packaging, components and support material. Credit is
contingent upon inspection of returned items.
Return Authorizations
A Return Authorization number must be issued from BVE prior to any item being returned for
credit, repair or exchange. Items returned without approval will be refused and returned to the
sender. Requests for a Return Authorization number may be made to our Customer Service
Department at 1-888-330-4283.
Repairs and Replacements
A warranty repair of BVE manufactured product includes parts, labor and the return GROUND
shipping to the customer. Repairs made while under warranty are covered for the duration of the
valid warranty period. Non-Warranty repairs receive a “Repair Warranty” of 90 days parts and labor
only. Warranties do not include on-site service. Advance Replacements of items in question may
be arranged if the product is within 30 days of invoice date and is subject to product availability.
Advance Replacements must be secured by the customer with a valid Credit Card or Net30 terms
of an account in good standing.
Shipping
Shipping dates are estimates only. Products will be shipped per the designated Shipping Method.
Paying for an accelerated Shipping Method only indicates the product will ship by that method
when the product or repair is available. BVE will not be held responsible to accelerate shipping,
discount invoices or compensate customers for loss of profits, business or goodwill due to back
orders, shortages, shipping complications, damages, product malfunction, labor, construction,
nature or delays.
Warranties
All products sold by BVE carry the original manufacturers’ warranty. Warranty begins on the
invoice date of purchase from BVE or an authorized BVE Dealer / Distributor. Warranty may
alternately begin on the date of installation with a valid Installation Completion Form from an
authorized BVE Dealer, Distributor or Installer. Warranties do not cover damage due to abuse,
misuse, modification or the result of any third party. Warranties are not transferable and cover only
the original purchaser with a valid invoice. Manufacturers will, at their option repair or replace
equipment, as they deem necessary. Warranties do not include “on-site” service.
BroadcastVision Entertainment : www.broadcastvision.com
Tel (888) 330-4283, Email: support@broadcastvision.com
Page 6
Table of contents