BROOKING INDUSTRIES BLINKCAST Mounting instructions

BLINKCAST PROGRAMMER
SOFTWARE MANUAL
Rev.1.0_211101

2
Table of Contents
Chapter 1: BlinkCast Programmer Overview
1-1 Introduction …….……………….…………………….……….…………………………….…………………….….3
1-2 Wiring .………….……………….…………………….……….…………………………….…………………….….3
Chapter 2: Software Installation & Main User Interface
2-1 Software Installation……..……..…………………….……….…………………………….…………………….4
2-2 Overview: Main User Interface….……..……………….……….…………………………….…………………….4
2-3 File Center …....…………….…….…………………….……….…………………………….…………………….5
Chapter 3: Setting Item Pool
3-1 Overview: Setting Item Pool………..…………………………….……………………………….………………....5
Chapter 4: Setting Page
4-1 Overview: Setting Page……..…………..……..…………………………………..………………………………..6
4-2 Express ……….…...……..…………..……..………………………………………..………………………………..6
Chapter 5: Programmer Page
5-1 Overview: Programmer Page...….………………………………………………………………………….....……..7
5-2 Export Settings from Programmer……….…………………………………………………………………………...8
5-3 Import Settings to Programmer………….……………………………………………………………………....……8
Chapter 6: Example
6-1 Scenario 1: How to Save Settings to My BlinkCast Programmer?…….............…………………………..…….9
6-2 Scenario 2: How to Configure Lightheads with My PC Directly (Express Mode)? ………....…………..….…10
6-3 Scenario 3: How to Configure Lightheads by BlinkCast Programmer without a Host PC? (mobile) ....….…11
Chapter 7: Trouble Shooting
7-1 FAQ………………………...……….…………………..………………………………………………….….....…....12

3
Chapter 1: BlinkCast Programmer Overview
1-1. Introduction
Efficient Programming & Decreased Installation Time
Brooking's new BlinkCast programming software (User Interface) allows for express programming of the new
M series lightheads. Setting files are created on any PC, then saved / stored on a portable module, allowing
uploading of user-defined settings on the fly (Save & Burn), OR remain connected to a PC (Express) and
upload the setting directly to the lightheads with the module in-line. Settings can also be saved to the PC.
Setting flash patterns, color modes & groups/phases without the tedious wire tapping methods of previous
models will significantly improve installer efficiency, saving both time and money.
The BlinkCast Programmer has two programming modes, “Express” and “Save & Burn”:
Express Mode: Configure your lightheads directly from PC:
Through a host PC, where the Blinkcast UI / software resides, burn user-defined settings into lightheads
directly. See 6-1 (p.9) for detailed instructions.
Save & Burn Mode: Export your settings to the BlinkCast Module:
Through a host PC, export user-defined settings to the BlinkCast Programmer, allowing mobile / "on the
fly" programming. See 6-2 (p.10) for detailed instructions.
1-2. Wiring
Express / PC Mode: Program lighthead(s) with Programmer & lightheads connected to PC.
* Note: Power Source for BlinkCast Programmer and lightheads must be the same.
Save & Burn Mode: Export settings to BlinkCast Programmer for mobile / "on the fly"
programming
*Note: PC supplies power to your BlinkCast Programmer via a USB-C cable (w/ data transfer capability), allowing
export of settings to the module itself. To upload settings to the lighthead(s), both the BlinkCast Programmer and the
lightheads must be connected to the same12V power source.
*Hint: Strip back / remove a portion of the vinyl jacketing on the red (+) and black (-) BlinkCast wires in locations a
few inches apart to prevent a reverse / combined polarity event. Connect alligator clips from power source to these
stripped areas, allowing power up of the module and lightheads, leaving the BlinkCast's alligator clips free for
connection to lighthead.
*Any 12Vdc power source can be used

4
Chapter 2: Software Installation & Main Interface
2-1. Software Installation
Step 1. Download software from the support utility via this link: Blink Cast software Download Link
Step 2. Double-click the file named “Setup.exe”.
Step 3. Follow the instructions presented by the installation wizard.
Note: Some security / anti-virus programs and or operating systems (Windows10) may not allow download
of .exe file types. Contact your system administrator to temporarily disable the block, or use the .bat file
provided by a Brooking Industries representative. Running this .bat program will automatically perform the
necessary steps to temporarily disable the PC's security during the .exe download, ultimately re-enabling it
upon completion.
2-2. Overview: Main Interface
Click and run the “BlinkCast Programmer Configuration Utility”. The Main Interface will open up.
File Center
Create/Open/Save a BlinkCast setting file(.bc)
and Update the software version of your
BlinkCast. See 2-3 (p.5) for detailed instructions.
Setting Page
Set Flash Pattern / Group (Phase) / Color for
the selected lighthead and designate its wire
functions. See Chapter 3 (p.5) for detailed
instructions.
Setting Item Pool
Sort/Create/Delete a setting item.
See Chapter 4 (p.6) for detailed instructions.
Programmer Page
Import / Export selected setting items from /
to your BlinkCast Programmer.
See Chapter 5 (p.7) for detailed instructions.

5
2-3. File Center
New (Create a New Configuration File)
Click to create a new setting file.
Open (Open an Existing Configuration File)
Click to select an existing setting file (.bc) from your PC.
Save
Click to save the current / in progress setting file to your PC.
About / Info
Click to show the current version of BlinkCast Programmer Configuration Utility & the firmware version
of connected BlinkCast Programmer.
Click on [Update Software] to ensure you're working with the latest software version.
Click on [User Manual] to download User Manual.
⑤Language
Click to select the language of BlinkCast Programmer Configuration Utility.
Chapter 3: Setting Item Pool
3-1. Overview: Setting Item Pool
Sort by Entering a Keyword
Enter a keyword here to search for certain setting item(s),
Ex: Product model, Dual Color, RB, AW. etc.
Sort↑/Sort↓/Create /Delete
: Sort all setting items from Z to A.
: Sort all setting items from A to Z.
: Create: Create a new setting item.
: Delete: Remove selected setting item(s).
①
②
③
④
⑤
Setting Item Pool
Shows all settings that have been created during the active session.
Tip: Use “Control + A” as a shortcut to select all items.

6
Chapter 4: Setting Page
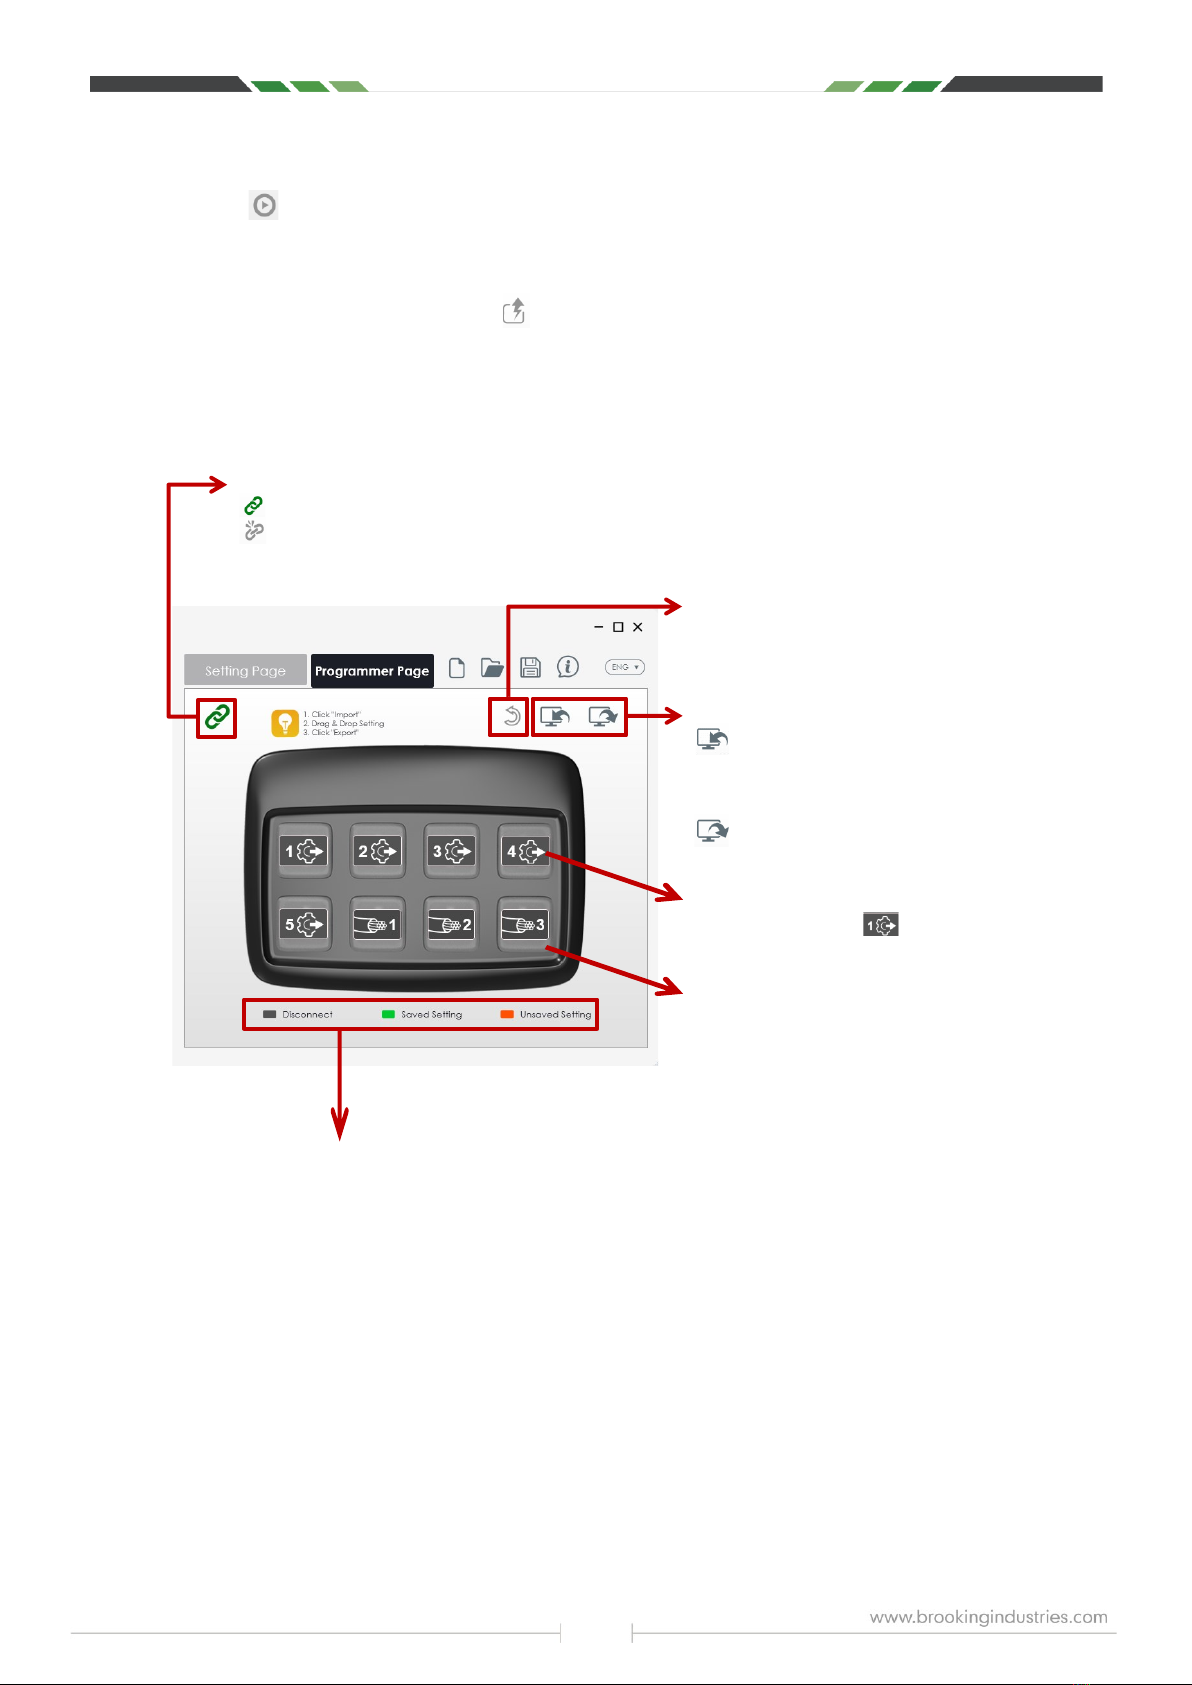
4-1. Overview: Setting Page
IMPORTANT: Always Check Connection Status First! THE USB-C CORD MUST BE CAPABLE OF DATA TRANSFER!
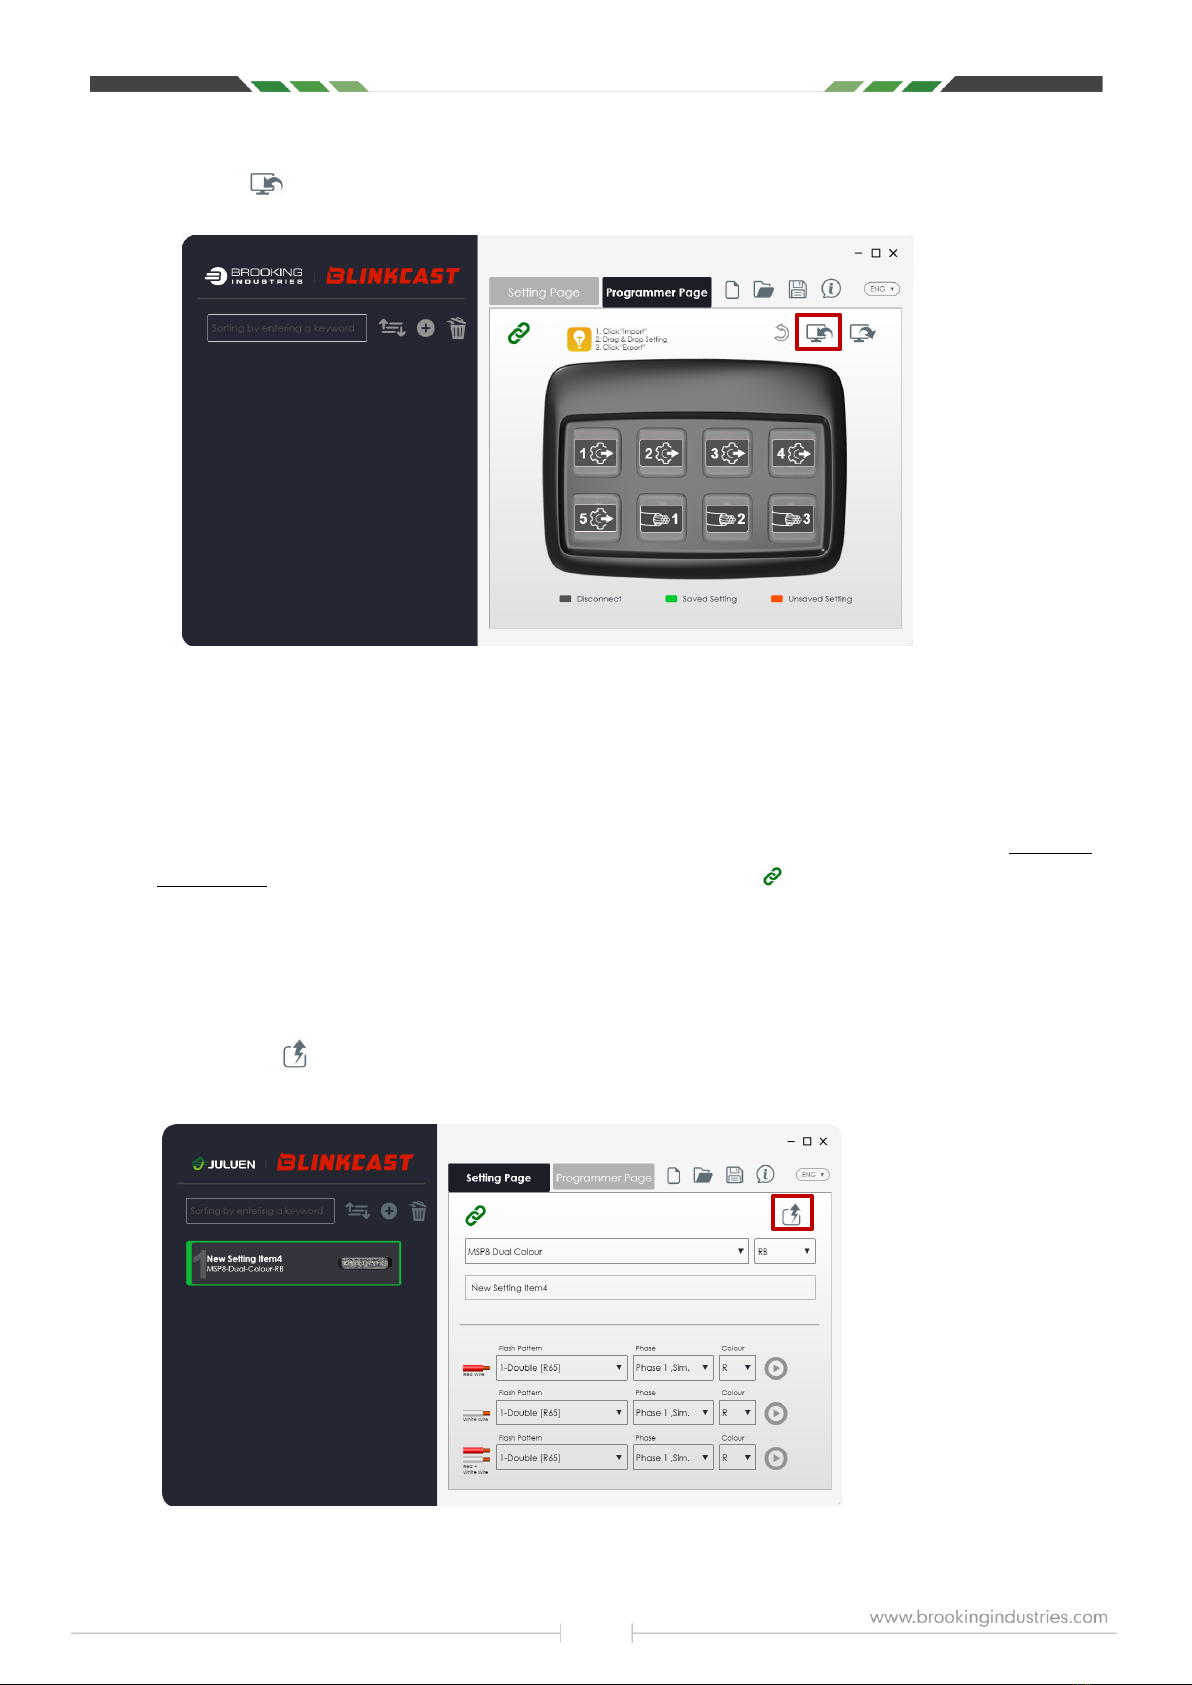
4-2. Express
The EXPRESS button allows for quick, efficient programming, while also providing the option to view
your newly created settings (via the lighthead itself). Don't like the effect you've created? Make changes and
click the icon again, then press play. Repeat until goal is achieved.
Configure Your Lighthead Directly (Express)
IMPORTANT: See 1-2 (p.3) for proper wiring first. (HINT: Strip back a small portion of the jacketing of the RED (+) and
BLACK (-) wires that exit the BlinkCast module, stripping one a few inches higher / lower than the other to avoid contact with
each other. Use these notches / stripped sections to connect small alligator clips from 12V power source, freeing up the BC
module's alligator clips for easier connection to lighthead.
Create a new setting file, configuring product profile and wire functions.
Click to burn the settings to your lighthead directly via BlinkCast Programmer.
The lighthead(s) will display a quick flash to indicate all settings have been burned successfully.
Note: This method bypasses saving of files to the BlinkCast Programmer. File(s) can be saved to PC for future
use.
Play Button: Click for a visual preview of created settings.
Note: This button is enabled only after using Express Mode to
configure your lighthead(s).
LIGHTHEAD MUST BE CONNECTED TO BLINKCAST
MODULE, THAT IS CONNECTED TO THE PC, WITH BOTH
POWERED BY THE COMMON 12V SOURCE.
Wire Functions:
Flash pattern / Phase* / Color
*Up to 8 phases! Set up multiple lightheads to perform arrow
patterns!
Express Burn:
Click to burn the current setting to your lighthead(s)
directly (straight from PC, bypassing upload to portable
module). See 4-2 (this page) for detailed instructions.
Lighthead Profile
Select Product Model and LED Color of lighthead being
programmed.
Setting ID:
Name your setting.
(Ex: product name + installation position + dept. / customer)
Connection Status
indicates your BlinkCast Programmer is connected and ready for action.
indicates your BlinkCast Programmer is not connected, check its connection to the host PC.
See 7-1 (p.12) for detailed instructions. When / if this happens, the cord is most likely to blame. nsure it is capable of
data transfer (most cords are usually "charge only".

7
②Demo / Preview Your Setting of Each Function Wire
Click to view the current settings for each function wire. The lighthead will display the action,
not the software / computer screen.
Note: Play Buttons will be disabled by clicking another setting item, any drop-down list, or button on Programmer
Page. Remember to Click the Express button to enable the Play Buttons.
Chapter 5: Programmer Page
5-1. Overview: Programmer Page
Connection Status
indicates your BlinkCast Programmer is connected and ready for action.
indicates your BlinkCast Programmer is not connected, please check its connection to the host PC.
See 7-1 (p.12) for detailed instructions.
Button Status
Disconnect: Button is inactive & available for new setting storage. Programmer will be in this state out of the box.
Saved Setting: Indicates previously exported, or already saved settings.
Unsaved Setting: Indicates import of setting item that has yet to be saved. Once saved, the new setting will
overwrite the existing setting, turning the button green.
Undo Button
Click to undo the last / most recent action.
Import / Export
Import: Click to import previously saved setting
items from the BlinkCast Programmer to the BlinkCast
Software.
See 5-3 (p.8) for detailed instructions.
Export: Click to export newly created setting
items to the BlinkCast Programmer. See 5-2 (p.8)
for detailed instructions.
Program Save / Memory Buttons: There are five
memory / save buttons
Wire Play Buttons: (#3 reserved future use)
Press to play settings of each wire(s).
#1: Red wire
#2: White wire
#1 + #2: Red & White combined
#3: Reserved for future use (tri-color)

8
5-2. Export Settings to Programmer
IMPORTANT: See 1-2 (p.3) for proper wiring.
Buttons in the programmer page will be gray / disabled until settings are manually dragged from the
setting item pool, to the desired memory buttons #1 ~ #5 in programmer rendering.
Drag and drop one setting file to any memory button on the module rendering. The button status will
change to orange if reload of new setting is successful.
Note: Module buttons in UI will be gray / black when connected for the first time (out of the box), indicating they
are open for loading new settings. Buttons will turn orange / green as files are loaded & saved.
Click to export new settings to your BlinkCast Programmer. The new setting items will overwrite the
existing settings saved in BlinkCast module. The button status will change from orange to green, signifying
successful export.
5-3. Import Settings from Programmer (relocate settings from module back to PC for saving / modification)
IMPORTANT: See 1-2 (p.3) for proper wiring first.
Click to import all saved settings from the BlinkCast Programmer.
The button(s) will turn green, indicating all settings have been imported successfully.

9
Chapter 6: Examples / Scenarios
6-1. Scenario 1: How to Save a Setting Item to My BlinkCast Programmer?
Step1. Wiring and connection.
Follow the wiring instructions in 1-2 to connect BlinkCast Programmer to your PC (p.3, ②Save & Burn
Mode: Save). Make sure to check the connection status, green linked chain indicates success.
Step 2. Create and edit your setting item.
Return to Setting Page.
Click to create new setting.
Select your product model & LED color(s)
Name the setting and set wire functions.
Step 3. Save and export settings to BlinkCast Programmer
Return to Programmer Page. Drag and drop your new setting item to any memory button on the
Programmer Panel rendering.
Click to overwrite existing settings (if any) saved in BlinkCast Programmer.
The button status will change to from orange to green, signifying successful export.

10
Tips. Import current settings.
Click to import current setting from your BlinkCast Programmer.
Note: If the module is being used for the first time, there will be no files to import.
The button(s) will turn green if importing is successful.
6-2. Scenario 2: How to Configure Lightheads with My PC Directly (Express)?
Note: Via Express, there is no need to export the setting items to your BlinkCast Programmer for burning.
Step 1. Wiring and connection.
Follow the instructions in 1-2 (p.3, ①Express) to connect a lighthead, 12V power source and the BlinkCast
Programmer to your PC. Ensure the connection status is connected
Step 2. Create and edit your setting item.
- In the setting page, create a new setting item in Setting Item Pool.
- Select product model & LED colors.
- Name the item and define the wire functions.
Step 3. Click to burn the new setting directly to the connected lighthead.
The lighthead will display a short flash to indicate all settings have been burned successfully

11
Don't like what you've created? Make changes, click again, play them again, repeat until satisfied.
6-3. Scenario 3: How to Configure Lightheads by BlinkCast Programmer
without a Host PC? (mobile / portable mode)
Step 1. Make sure to save the settings to your BlinkCast Programmer, following the instructions in section
6-2 (p.9-10) to export the setting item to the desired button on your BlinkCast Programmer.
Step 2. Wiring and connection.
Follow the instructions in 1-2 (p.3, ②Save & Burn Mode: Burn) to connect a lighthead, 12V power source and
the BlinkCast Programmer.
Step 3. Press desired button on BlinkCast Programmer to start burning / saving the setting to said button.
The lighthead will display a short flash to indicate all settings have been burned successfully.
Step 4. Check setting of each function wire.
Click to activate the lighthead, providing a visual of the current settings for each function wire.

12
Chapter 7: Trouble Shooting
7-1. FAQ
Trouble
Possible Causes
Solution
Failed to get started
Lacking power supply
Inadequate power supply
Wrong connection
See 1-2 (p.3) for proper wiring to power source.
Check the input voltage range of your lightheads &
BlinkCast Programmer before supplying power.
Software out of date
Download the latest software from the support utility
via this link: Blinkcast software Download Link
Connection failure
USB connection failure
Check the connection of USB-C cable. The cable
must allow for data transfer.
Old software version
Follow the instructions in 2-3 About (p.5) to
update your software version.
Failed to import/export the
setting item(s) from/to
BlinkCast Programmer
Programmer is busy
Make sure you have turned off demo (play) buttons
on your programmer and / or Software .
Old software version
Follow the instructions in 2-3 About (p.5) to
update your software version.
Unexpected result
Wrong product model is
selected
Check the product model you have selected. If
the wrong one is selected, choose the correct
product model.
Table of contents