Bryton Rider 15 neo User manual

Rider 15 neo
User Manual

WARNING
Always consult your physican before you begin any training. Please read the details in Warranty
and Safety information guide in the package.
Australian Consumer Law
Our goods come with guarantees that can not be excluded under the New Zealand and Australian
Consumer Laws. You are entitled to a replacement or refund for a majory failure and for
compensation for any other reasonably forseeable loss or damage. You are also entitled to have the
goods repaired or replaced if the goods fail to be of acceptable quality and the failure does not
amount to a majoy failure.
Video Tutorial
For a step-by-step demonstration of device and Bryton Active app, please scan the QR code below
to check out Bryton Tutorial Videos.
http://www.youtube.com/c/BrytonActive

3 Table of Contents
Getting
Started
Table of
Contents Settings Bryton App Appendix
Table of Contents
Getting Started ......................4
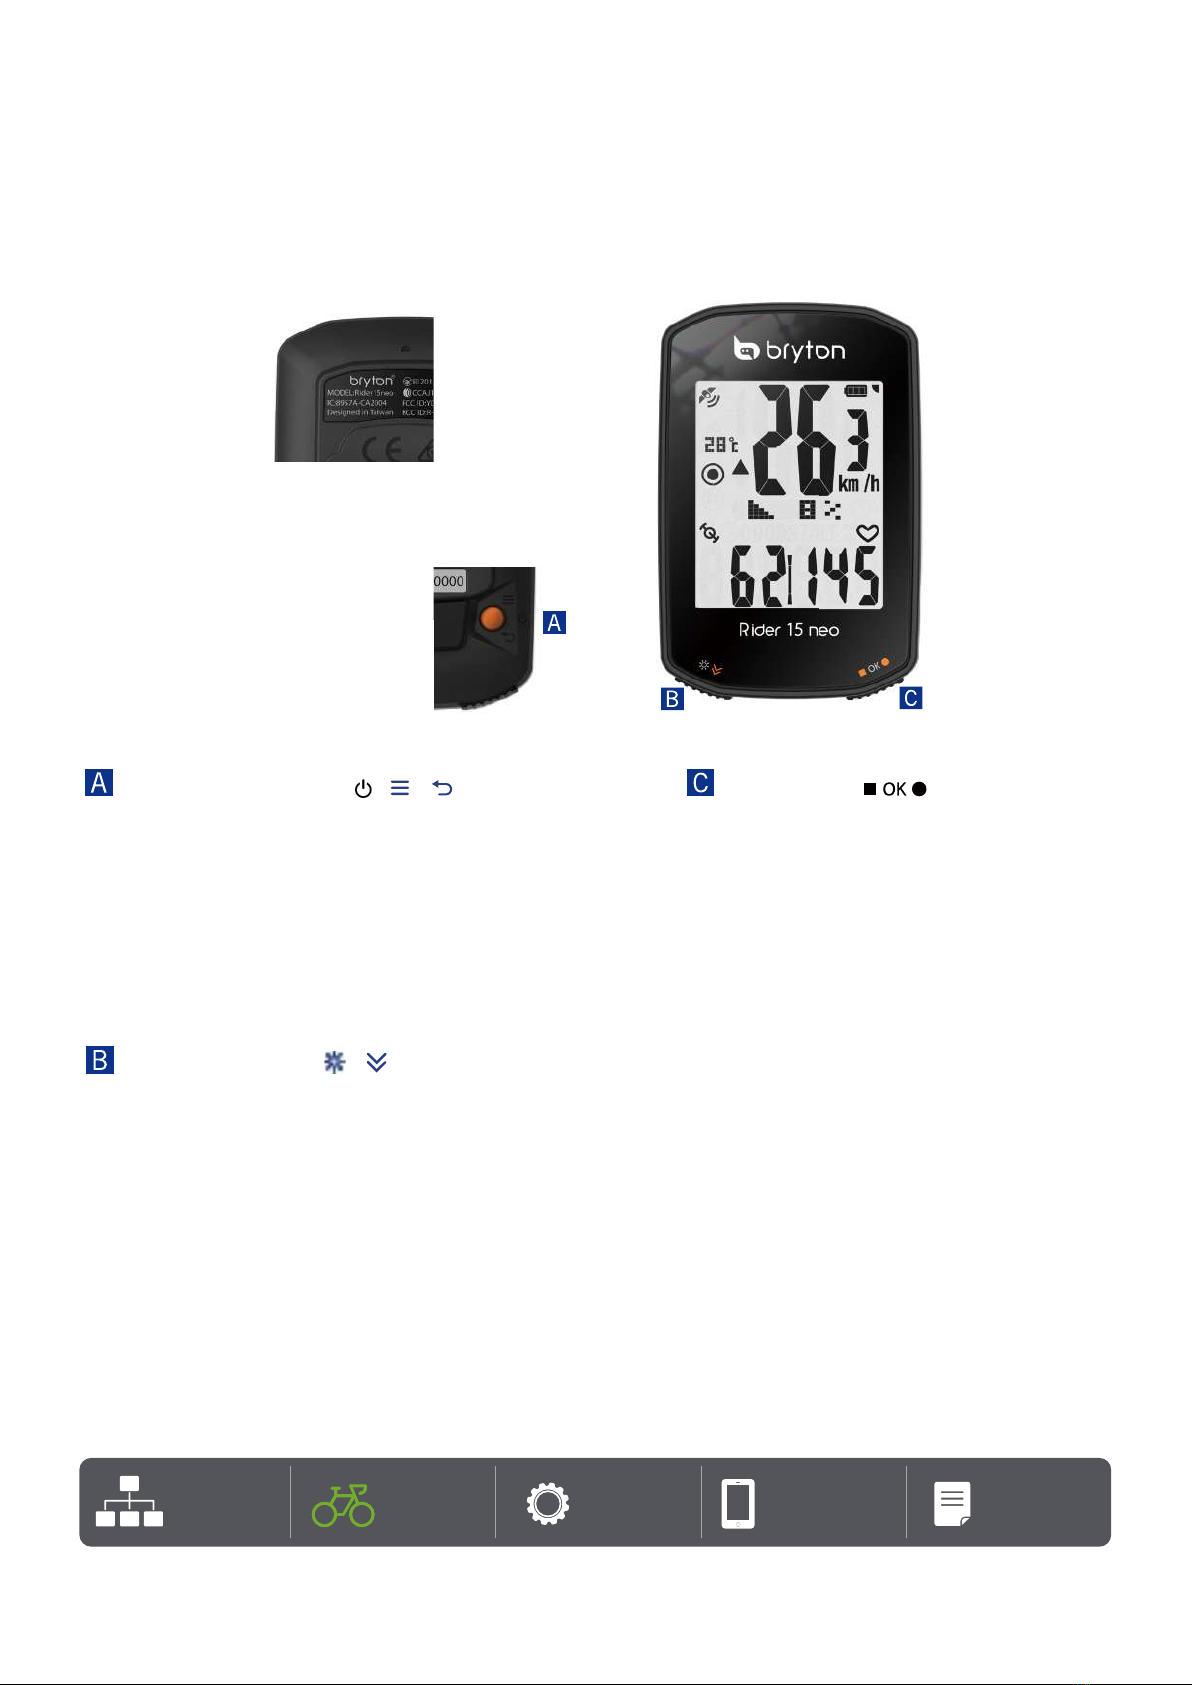
Rider 15 neo Key Functions ......... 4
Reboot Rider 15 neo ................... 5
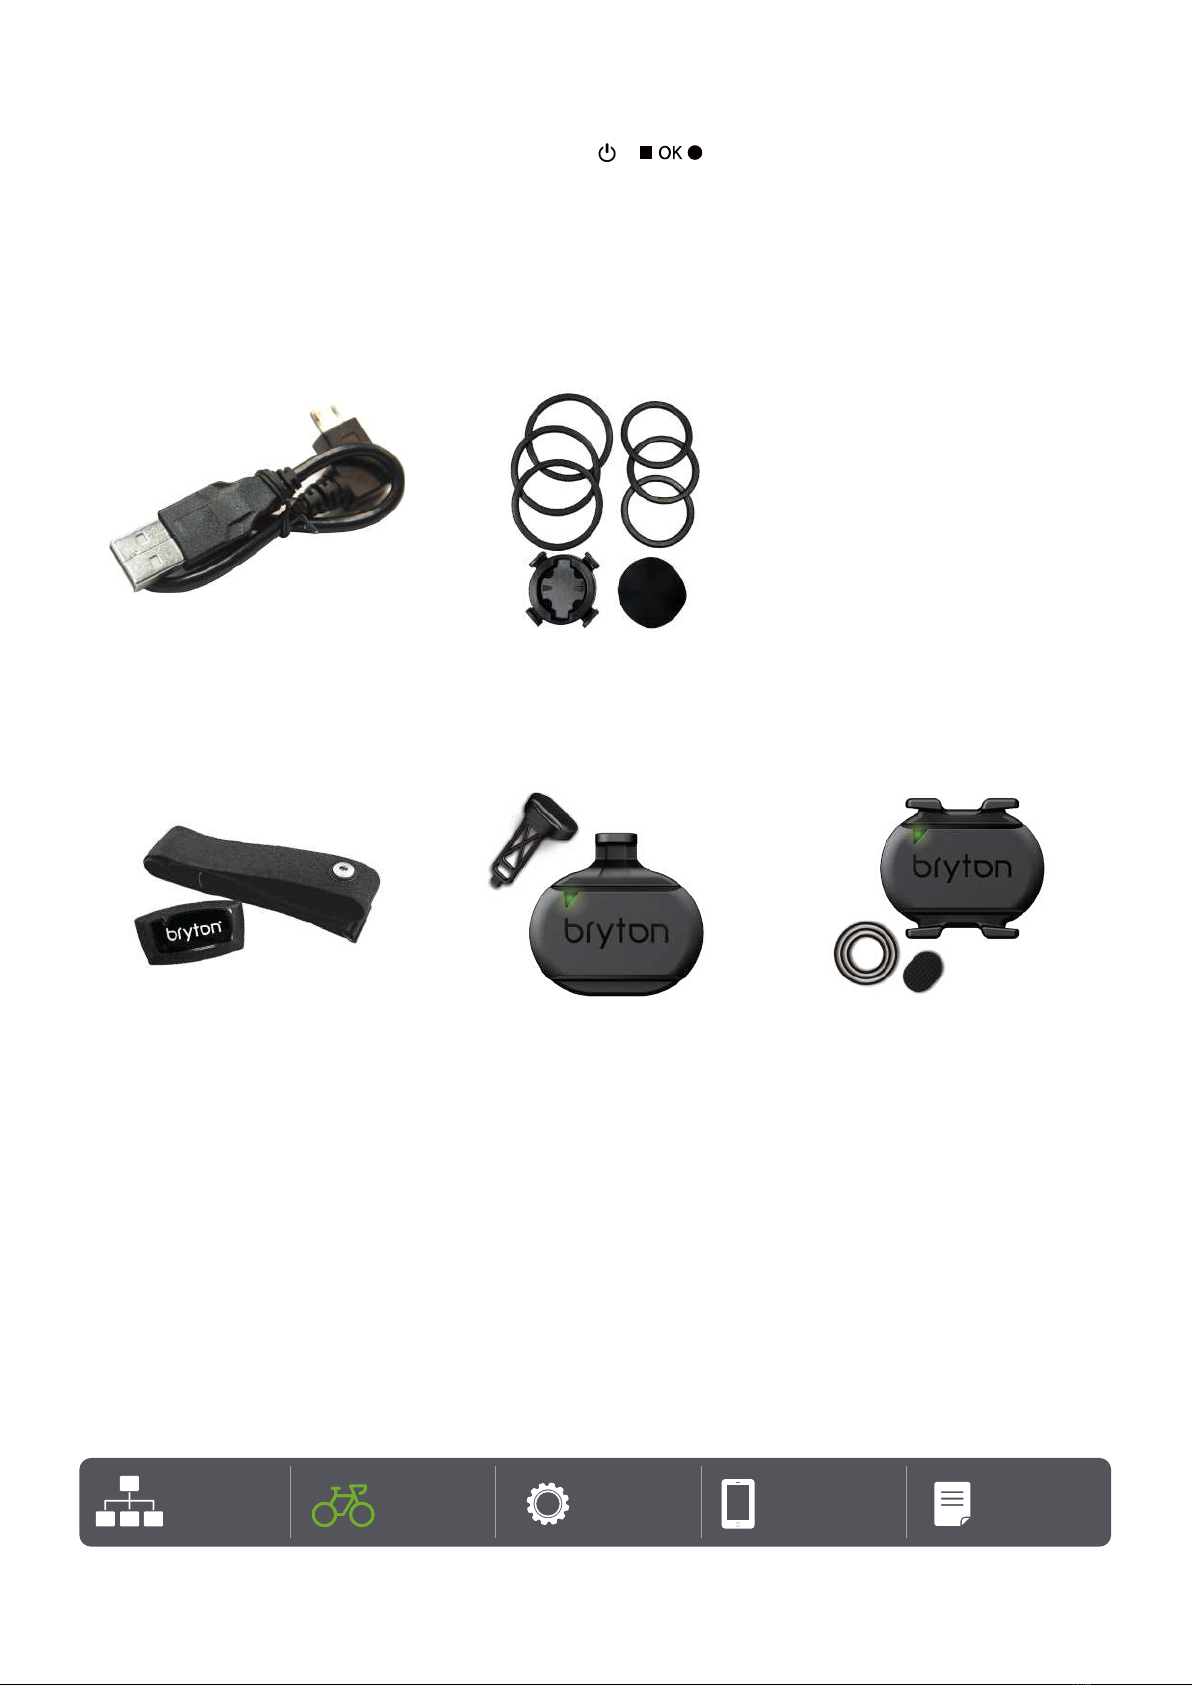
Accessories ................................ 5
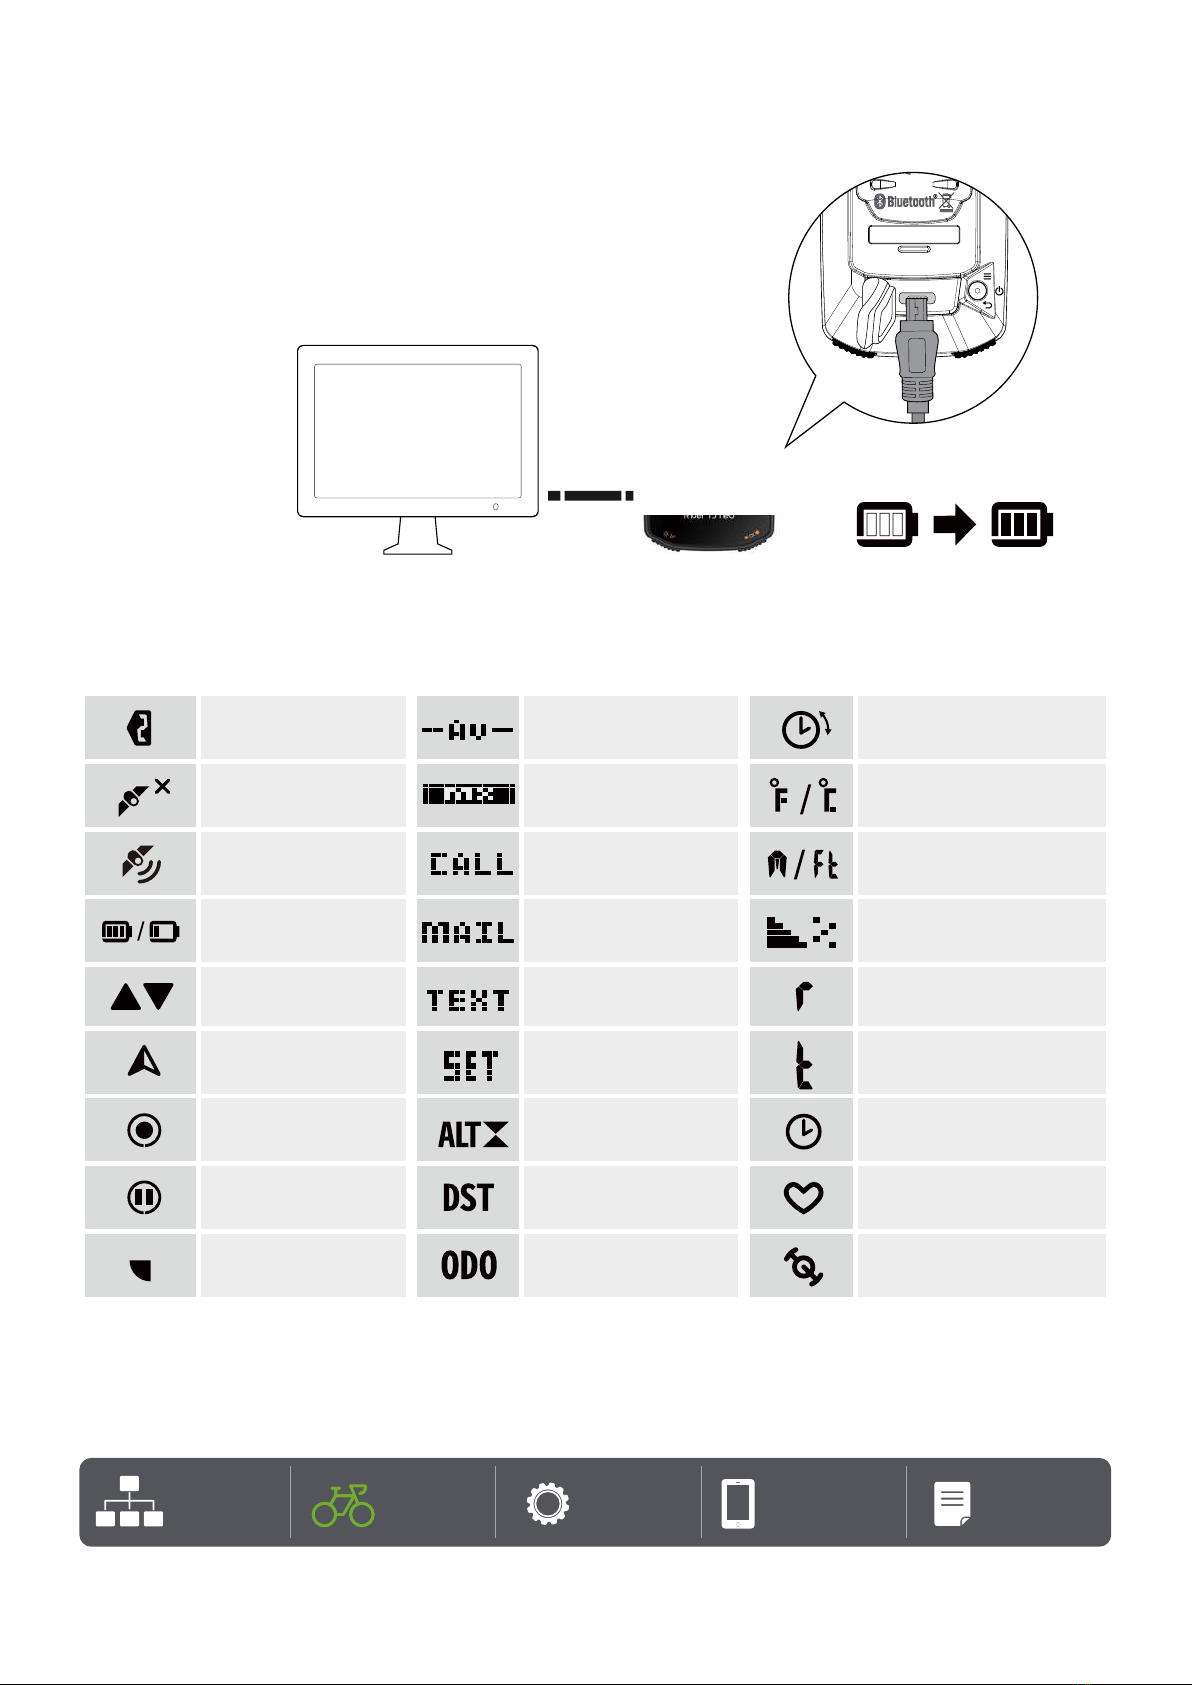
Charge Rider 15 neo ................... 6
Icon Description .......................... 6
Initial Setup ............................... 7
Step 1: Power On Rider 15 neo .... 7
Step 2: Select Unit ..................... 7
Step 3: Acquire GPS Signal ......... 7
Step 4: Ride with Rider 15 neo .... 8
Step 5: Install on Bikes ............... 9
Share Your Records . .................. 10
Bryton Update Tool .................... 12
Settings ........................... 13
Bike Profiles ............................. 13
Calibrate Altitude ....................... 13
Sensor Pairing ........................... 14
Delete Data ............................... 15
Select Unit ................................ 15
Set the Time .............................. 16
Odometer .................................. 16
Reset Data ................................ 16
Bryton App Advanced Settings ..17
Notifications ............................. 17
Change Data Field ...................... 17
Altitude Calibration ...................... 18
Appendix ........................ ..19
Specification ............................ 20
Battery Information ................... 21
Wheel Size Chart ....................... 23
Install Speed/Cadence Sensor ..... 24
Install Heart Rate Belt ............... 25
Basic Care For Your Rider 15 neo... 26

4 Getting Started
Getting
Started
Table of
Contents Settings Bryton App Appendix
Getting Started
This section will guide you on the basic preparations before you start using your Rider 15 neo.
Rider 15 neo Key Functions
POWER/MENU/BACK ( / / )
Power:
xPress to turn the device on.
xLong press to turn the device off.
Menu:
xPress to enter/exit menu.
Back:
xPress to go back to main menu.
BACKLIGHT/PAGE ( / )
Backlight:
xLong press to turn on/off backlight.
Page:
xIn Menu, press to move down to scroll through
menu options.
xIn Meter mode, press to switch data page.
OK/RECORD ( )
OK:
xIn Menu, press to confirm a
selection.
Record:
xIn free cycling, press to start
recording.
xWhen recording, press to stop
recording.

5 Getting Started
Getting
Started
Table of
Contents Settings Bryton App Appendix
Reboot Rider 15 neo
To reboot the Rider 15 neo, press the two keys ( / ) at the same time.
Accessories
The Rider 15 neo comes with the following accessories:
USB Cable Bike Mount
Optional items:
Smart Heart Rate Monitor Smart Speed Sensor Smart Cadence Sensor

6 Getting Started
Getting
Started
Table of
Contents Settings Bryton App Appendix
Charge your Rider 15 neo
Icon Description
Before start using the device, connect Rider 15 neo to a PC
with Bryton USB cable to charge the battery for at least 4
hours.
The temperature suitable for charging battery is 0°C ~ 40°C.
PC
At least 4 Hours
Power Status
Above/Below
Average Speed
Heading
Strong GPS Signal
Bike 2
No GPS Signal
(Not fixed)
Backlight
Recording
Pause
Gradient
Ride Time
Trip Time
Ride Time / Trip Time /
Current Time
Cadence Sensor
Afternoon
Unit of Temperature
Unit of Length
Heart Rate Sensor
Distance
Altitude Gain
Altitude Loss
Odometer
Call Notification
Maximum
Average
Email Notification
Text Notification
Setting Mode

7 Getting Started
Getting
Started
Table of
Contents Settings Bryton App Appendix
Initial Setup
When turning on Rider 15 neo for the first time, the setup wizard appears on the
screen. Follow the instruction to complete setup.
Step1. Turn on Rider 15 neo
Press to turn on Rider 15 neo.
Step2. Select Unit
Select "km/h, ˚C" or "mi/h, ˚F".
Step3. Acquire GPS Signal
xOnce the Rider 15 neo is powered on, it
will automatically search for GPS signal.
xIt may take 30 to 60 seconds to acquire
signal for the first time.
km/h, ˚C
mi/h, ˚F
Confirm

8 Getting Started
Getting
Started
Table of
Contents Settings Bryton App Appendix
Note: Please avoid the obstructed environments since they might affect the GPS reception.
Tunnels
Inside rooms,
building, or
underground
Underwater High-voltage
wires or television
towers
Construction
sites and heavy
traffic
4. Ride with Rider 15 neo
After acuired GPS signal, you can enjoy
your ride with Rider 15 neo.
xFree ride:
xMeasurement starts and stops
automatically in sync with the
movement of the bicycle.
xStart riding and recording your ride:
xPress to start recording, press
again to pause recording.
xTo see if you’re recording, check if
the Record and Pause icon show in
recording mode. If the icons don’t
show on the screen, it means the ride
is not recording. Press to start
recording.
xStop recording:
xPress to pause recording before
you stop recording.
xThen press again to stop
recording. If you’d like to continue
recording, press to switch option
and press to confirm to keep
recording.
Note: To see if you’re recording, check with the Record and Pause icon show in recording mode.

10 Getting Started
Getting
Started
Table of
Contents Settings Bryton App Appendix
Share Your Records
Sync Tracks to Bryton Active App
Manually upload tracks to Bryton Active App after riding.
Sync via BLE
a. Scan QR code below to download Bryton Active App
or go to Google Play/App Store to search Bryton Active
App. Then, log in or create an account.
b. Go to Settings > Device Manager > + > Rider 15 neo
to add your GPS device.
c. Check if the UUID shown on app is as same as your
device. Select “Yes” to confirm adding this device. If
the UUID does not match, press NO and try again.
d. Successfully added! Now click BT Sync to upload
new tracks to Bryton Active App.
Note: Bryton Active App syncs with Brytonactive.com. If you already have a brytonactive.com
account, please use the same account to log in to Bryton Active App and vice versa.
e
o
R
ider 1
5
n
e

11 Getting Started
Getting
Started
Table of
Contents Settings Bryton App Appendix
Share Your Tracks to Brytonactive.com
1. Sign up on Brytonactive.com
a. Go to https://active.brytonsport.com
b. Register for a new account.
c. Turn on your Rider 15 neo and connect it to a computer by USB cable.
3. Share Your Records
a. Click “+” in the right upper corner.
b. Drop FIT, BDX, GPX file(s) here or Click “Select files” to upload tracks.
c. Click “Activities” to check uploaded tracks.
Auto Sync with 3rd Party Platforms
It is super easy to sync activities from the Bryton Active App to Komoot/ Strava/ RideWithGPS/
Relive/ TrainingPeaks by pairing accounts on your phone.
1. Enable auto sync on your phone
a. Open the Bryton Active App and click on the “Profile” tab.
b. Select “3rd Party Account Link”.
c. Select a 3rd party platform such as “Strava”, and enable auto sync.
d. You will be prompted to login to your account. Input your login information to proceed or
choose “Create Account”. After logging in, select “Allow” or “Authorize".
2. Upload records via your PC
a. Sign up / log in on the website
i. Go to https://www.strava.com or www.trainingpeaks.com
ii. Register for a new account or use your current account to log in.
iii. Turn on your Rider 15 neo and connect it to your computer by USB cable. Then find the
“Bryton” disk in the computer.
c. Share Your Records to Strava
a. Click “+” on the top right corner of the Strava page and then click “File”.
b. Click “Select Files” and select FIT files from Bryton device.
c. Enter information about your activities and then click “Save & View”.
d. Share Your Records to TrainingPeaks
i. Click on the planned workout on your TrainingPeaks calendar that you’d like to upload your
workout file to. (Or click the “+” button on the calendar day to create a new workout to
upload to.)
ii. Within this workout quick view window, click the “Upload” button at the top right.
iii. A finder/browser window will open. Browse your computer for the desired workout file.

12 Getting Started
Getting
Started
Table of
Contents Settings Bryton App Appendix
Bryton Update Tool
Bryton Update Tool is the tool for you to update GPS data, firmware and download Bryton Test.
1. Go to http://www.brytonsport.com/#/supportResult?tag=BrytonTool and download
Bryton Update Tool.
2. Follow the on-screen instructions to install Bryton Update Tool.
Update GPS Data
The newer GPS data can speed up the GPS acquisition. We higly recommend you to update GPS
data for every 1-2 weeks.
Update Firmware
Bryton releases a new firmware version with new functions or on irregular basis to add new
functions or fix bugs. We highly recommend that you update firmware once the latest version is
available. It usually takes a while to download and install firmware for updating. Do not remove
USB cable during updating.

13 Settings
Getting
Started
Table of
Contents Settings Bryton App Appendix
Settings
1. Select Bike Profile
xYou can customize 2 bike profiles.
Set up the wheel size to finish
pairing. Refer to the wheel size
chart.
xOnce the profile is set up, bike
infomation will be stored. Make the
ride more easier.
Enter Menu Select Item
or
Edit Numbers
Confirm
Confirm and move
to the next digit.
Bike 1
Bike 2
Confirm and move
to the next digit.
Increase numbers

14 Settings
Getting
Started
Table of
Contents Settings Bryton App Appendix
2. Calibrate Altitude
xYou can calibrate altitude for
current location. The value in the
meter mode will change once you
set up the Altitude.
Note: Bryton Active App provides altitude information for you to calibrate altitude manually. Go to
Page 18 to see more information.
Increase numbers
Confirm and move
to the next digit.
The first digit can be set as "-" or "0".

15 Settings
Getting
Started
Table of
Contents Settings Bryton App Appendix
3. Sensor Pairing (Optional)
You can pair Heart Rate Monitor, Speed Sensor, Cadence Sensor or Combo Sensor with Rider 15
neo. However, pairing a sensor with Rider 15 neo is not mendatory, the divice will analyze your
distance and speed data with the GPS signal.
xTo pair sensors with Rider 15 neo, please have Bryton Smart Sensors installed on the bike
first, then wear heart rate monitor or rotate crank and wheel for a few times to wake Bryton
Smart Sensors up while scanning.
xSelect "Sync" in the menu, then choose a sensor type to start scanning.
xIf the sensors are successfully connected, the numbers will show on the screen.
Select to “YES” and press to confirm.
xIf the device cannot detect the sensors, choose to rescan or cancel pairing.
Combo Sensor
(Spd+ Cad)
Sensor Types Connection Status
Cadence Sensor
Heart Rate Monitor
Speed Sensor
Cadence Sensor
Heart Rate Monitor
Speed Sensor: Numbers on the right without a icon.
Combo Sensor:
• Spd:Numbers on the right without an icon.
• Cad:Numbers on the left with icon .

16 Settings
Getting
Started
Table of
Contents Settings Bryton App Appendix
4. Delete Data
xYou can delete all the records or
delete records to make space for
8h, 16h or 24h recording.
5. Select Unit
xYou can set km/h,°C or mi/h,°F as the
unit of measurement.
6. Set the Time
xYou can set time format as 12-hour
clock or 24-hour clock.
xAfter selecting time format, you can
continue setting up Daylight Saving
Time.
xThe first digit can be set as “-” or
“0”. The last 2 digits can only be
set as “30” or “00”.
xIdentify time format by the clock
icon.
Confirm.
Confirm.
Select
8h /16h /24h /All
km/h, ˚C
mi/h, ˚F
Confirm and move
to the next step.
Confirm and move
to the next digit.
Select numbers.
5:25 pm
5:25 am
12h 24h

18 Bryton App Advanced Settings
Getting
Started
Table of
Contents Settings Bryton App Appendix
Bryton App Advanced Settings
Notifications
After pairing your compatible smartphone using Bluetooth Smart wireless technology with Rider
15 neo, you can receive phone calls, texts and email notifications on your Rider 15 neo.
1. iOS Phone Pairing
a. Go to your phone “Settings>Bluetooth” and enable Bluetooth.
b. Go to Bryton Mobile App and Tap on “Settings>Device Manager>+”.
c. Select and add your device by pressing “+”.
d. Tap on “Pair” to pair your device with your phone. (For iOS phone only)
e. Tap on “Finish” to complete pairing.
1. Android Phone Pairing
a. Go to your phone “Settings>Bluetooth” and enable Bluetooth.
b. Go to Bryton Mobile App and Tap on “Settings>Device Manager>+”.
c. Select and add your device by pressing “+”.
e. Tap on “Finish” to complete pairing.
2. Allow Notification Access
a. Tap on “Settings > Notification”.
b. Tap on “OK” to enter setting to allow Notification Access for Bryton app.
c. Tap on “Active” and select “OK” to allow notification access for Bryton.
d. Go back to Notification settings.
e. Select and enable In-coming Calls, Text Messages and Emails by Tapping on each item.
Change Data Field
Open Bryton Active App
a. Go to Settings > Grid Setting > Select a Page Number and turn the status on.
b. Select a display formate. Tap on a grid to edit the data.
NOTE: If notifications do not work properly, in your phone, please go to “Settings>Notifications”
and check if you have allowed notifications in compatible messaging and email apps or go
to social applications settings.

19 Bryton App Advanced Settings
Getting
Started
Table of
Contents Settings Bryton App Appendix
Altitude Calibration
With connection to Internet, Bryton Active App provides altitude information for you to
calibrate directly. You can also change altitude manually.
1. Pair Rider 15 neo with Bryton Active App
a. Turn on Rider 15 neo.
b. Go to your phone “Settings>Bluetooth” and enable Bluetooth.
c. Go to Bryton Active App and tap “Settings>Device Manager”.
d. Tap “+”.
e. Select and add your device by pressing “+”.
f. Tap “Pair” to pair your device with your phone. (For iOS phone only)
2. Calibrate Your Altitude
a. Tap “Alt. Cal” in Bryton Active App.
b. Tap ”Allow” to enable Bryton Active App to use current location for altitude information.
(For iOS phone only)
c. Bryton Active App shows altitude of your current location. You can also make manual
changes by pressing or tap on the number to input manually.
d. Tap “Calibrate” to make change as suggested.
e. “Calibration Successful” shows up. Tap “OK” to confirm.

20 Appendix
Getting
Started
Table of
Contents Settings Bryton App Appendix
Appendix
Category Data Field Description of Data Fields
Time
Time Current GPS Time.
Ride Time The time spent on riding for current activity.
Trip Time Total time spent for current activity.
Altitude
Altitude The height of your current location above or below sea level.
Max Altitude The highest height of your current location above or below sea
level which the rider achieved for the current activity.
Alt. Gain The total altitude distance gained during this current activity.
Alt. Loss The total altitude lost during this current activity.
Grade The calculation of altitude over distance.
Distance Distance The distance travelled for current activity.
ODO The accumulated total distance until you reset it.
Speed
Speed The current rate of change in distance.
Avg Speed The average speed for current activity.
Max Speed The maximum speed for current activity.
HR
Heart Rate The number of times your heart beats per minute. It requires
compatible HR sensor pairing connection to your device.
Avg HR The average heart rate for current activity.
Max HR The maximum heart rate for current activity.
Cadence
Cadence The current rate at which rider is pedalling the pedals.
Avg CAD The accumulated power output in kilojoules for the current
activity.
Max CAD The maximum cadence for current activity.
Heading Heading Heading function informs you which direction you are
currently heading.
Temperature Temp The current temperature.
Table of contents
Other Bryton Cyclometer manuals