Bush BTVD91186B Manual

For any help concerning set up and use of your TV please call the Customer Helpline: 0845 604 0105 1
529/6015 BTVD91186B
529/6022 BTVD91186P
529/6974 BTVD91216B
529/8185 BTVD91216P
529/6981 BTVD91216W
Important - Please read these instructions fully before installing or operating
These instructions contain important information which will help you get the best from your
television and ensure safe and correct installation and operation.
For any help concerning set up and use of your TV please call the
Customer Helpline: 0845 604 0105
Lines open: 9am - 8pm Monday to Saturday and 10am - 4pm Sunday
Issue 1 - 7/3/11
Installation & Operating Instructions
- Please keep for future reference
19”/22” HD Ready Digital LCD TV with built-in DVD Player
BTVD9xxx6_IB_BUSH 2011_Rev3.indd 1 6/1/2011 16:27:32

For any help concerning set up and use of your TV please call the Customer Helpline: 0845 604 0105
2
Contents
Safety Information 3 - 4
Getting Started 5 - 12
Support 5
TV / DVD Features 6
Accessories included 6
Viewing remote control - TV 7
Viewing remote control - DVD 8
TV/DVD - control buttons (top view) 9
TV/DVD - jacks (left view) 9
TV/DVD - (right view) 9
Connecting a TV antenna 1 0
Connecting a power cord 1 0
Common interface 1 0
Remote control 1 1
Initial set up 1 2
Connections 13 - 14
Connecting a high definition (HD)
source 1 3
Connecting HDMI 1 3
Connecting to sources with scart 1 4
Connecting to devices with a
composite 1 4
Using Headphones 1 4
Basic Features 15 - 26
Electronic Programme Guide (EPG) for
DTV 1 5
Audio Language for DTV 1 5
Analogue TV / DVD setup 16 - 20
TV Setting 16 - 17
Picture Menu 17
Sound Menu 1 8
Time Menu 1 8
Setup Menu 1 9
Lock Menu 2 0
Teletext 2 1
CD / DVD operation 22 - 25
Playing a disc 2 2
Playing a picture file disc 2 2
Pausing playback (still mode) 2 3
Stopping playback 2 3
Skipping to a different track 2 3
Fast forward/fast reverse 2 3
Slow-motion play (DVD) 2 3
Audio selection (DVD) 2 3
Subtitle selection (DVD) 2 3
Angle selection (DVD) 2 4
Display function 2 4
Locating a specific title (DVD) 2 4
Locating a specific chapter/track 2 4
Locating a specific time 2 4
Repeat Playback 2 5
Repeating a chapter/title (DVD) 2 5
Repeating a single track/whole disc
(CD) 25
Repeating a specific section (DVD/
CD) 2 5
CD/DVD programmable playback 2 6
Programmable photo file playback 2 6
Advanced Features 27 - 29
Customising the Function Settings 27 - 29
Language setup 2 7
Video setup 2 8
System setup 2 9
Other Information 3 0
Installation 3 0
Specifications 3 0
Product Support 31 - 35
Support 3 1
Disc formats 3 2
Maintenance 3 3
Sound system 3 3
Troubleshooting Guide 3 4
Guarantee 3 5
BTVD9xxx6_IB_BUSH 2011_Rev3.indd 2 6/1/2011 16:27:32

For any help concerning set up and use of your TV please call the Customer Helpline: 0845 604 0105 3
• Theapparatusshouldnotbeexposedtodrippingor
splashingandthatnoobjectslledwithliquids,such
asvases,shouldbeplacedonapparatus.
• No naked ame sources such as lighted candles
should be placed on the apparatus;
• Leaveaminimumof100mmaroundtheapparatus
for ventilation, and 200mm beside the DVD
mechanism;
Condensation information
• Whenleftinaheatedroomwhere itiswarmand
damp, water droplets or condensation may form
insidetheunit.Whenthereiscondensationinside
theunit,theunitmaynotfunctionnormally.Letthe
unitstandfor1-2hoursbeforeturningthepoweron,
or gradually heat the room and let the unit dry before
use.
Rating plate location
• Theratingplateisontherearofproduct.
Safety Information
Important - Please read these instructions fully before installing or operating
CAUTION
INVISIBLELASERRADIATIONWHEN
OPEN AND INTERLOCKS DEFEATED.
AVOID EXPOSURE TO BEAM
The symbol for Class II
(Double lnsulation)
This product contains a
low power laser device.
CAUTION:DANGEROFEXPLOSIONIFBATTERYISINCORRECTLYREPLACED.REPLACEONLYWITH
THESAMEOR EQUIVALENT TYPE. DONOT MIX OLD ANDNEW OR DIFFERENT TYPES
OF BATTERY. IF THE PRODUCT IS NOT TO BE USED FOR A PROLONGED TIME; REMOVE
THE BATTERIES AS ELECTROLYTE LEAKAGE WILL DAMAGE THE PRODUCT AND WILL
INVALIDATETHEWARRANTY.
The exclamation point within a triangle
alerts you to the presence of important
operating, maintenance and servicing
instructions in this user’s manual.
The lightning flash with an arrowhead
within a triangle alerts you to uninsulated
dangerous voltage within the product’s
enclosure that could cause an electric
shock.
WARNING: TO REDUCE THE RISK OF
ELECTRICSHOCK,DONOTREMOVECOVER
(OR BACK). NO USER-SERVICEABLE PARTS
INSIDE. REFER SERVICING TO QUALIFIED
PERSONNEL.
This symbol means that the unit
complies with European safely and
electrical interference directives.
RISK OF ELECTRIC SHOCK
DO NOT OPEN
CAUTION
Safety information
• Whenconnectingordisconnectingthecord,gripthe
plug and not the AC cord itself. Pulling the cord may
damage it and create a hazard.
•Whenyouarenotgoingtousetheunitforalong
periodoftime,disconnecttheACcord.
• Themainsplugisusedasthedisconnectingdevice.
It shall remain readily operable and should not be
obstructed during intended use. To be completely
disconnectedfromthesupplymains,themainsplug
of the apparatus should be disconnected from the
mains socket outlet completely.
• Tobe completelydisconnectthe powerinput,the
mains plug of apparatus shall be disconnected from
the mains.
•The mains plug of apparatus should not be
obstructed OR should be easily accessed during
intended use.
• Attention should be drawn to the environmental
aspects of battery disposal;
• Theuseofapparatusinmoderateclimates.
• Undertheinuenceofelectrostaticphenomenon,the
productmaymalfunctionandrequireusertopower
reset.
•Attention should be drawn to environmental aspects
of battery disposal;
•The use of apparatus in moderate climate.
WARNING: Should any problems occur, disconnect the AC cord and refer servicing to a qualied
technician.
10cm
10cm
20cm
BTVD9xxx6_IB_BUSH 2011_Rev3.indd 3 6/1/2011 16:27:32

For any help concerning set up and use of your TV please call the Customer Helpline: 0845 604 0105
4
Safety Information
Important - Please read these instructions fully before installing or operating
The wires in this mains lead are
coloured in accordance with the
following code.
BLUE-NEUTRAL
BROWN-LIVE
Mains plug
Units Supplied with Moulded Mains Plug
1.IfthemainsplugttedtotheACcordsuppliedisnot
suitable for your mains outlet it may be necessary
to cut it off. Carefully dispose of the severed plug.
Under no circumstances must it be inserted into a
mainssocket,otherwiseadangerouselectricshock
could result.
2.Ifthefuseinthettedmainsplugshouldfail,replace
it with a BS1362 approved fuse rated at 3A Never
usetheplugwithoutthefusecovertted.
Wiringamainsplug
As the wires in the mains lead may not correspond
with the coloured markings identifying the terminals
in your plug proceed as follows:
• The wire which is coloured
blue must be connected to
the terminal which is marked
with the letter Nor coloured
black.
• The wire which is coloured
brown must be connected to
the terminal which is marked
with the letter Lor coloured
red.
• No connection is to be made
to the earth terminal of the plug which is marked
with the letter Eor coloured green or green and
yellow or marked by the safety earth symbol.
Thestandard(BS1363)mainsplugmustbettedwith
a 3 Amp fuse approved to BS1362. If any other plug
orconnectionisuseda3Ampfusemustbettedin
the plug or adaptor or in the distribution board.
Caution: Moisture Condensation
Iftheequipmentismovedfromacoldplacetoawarm
one,waterintheairwillcondenseonsomepartsand
maycausedamageormalfunctioniftheequipment
is operated.
Allowatleasttwohoursfortheequipmenttoacclimatise
before switching it on.
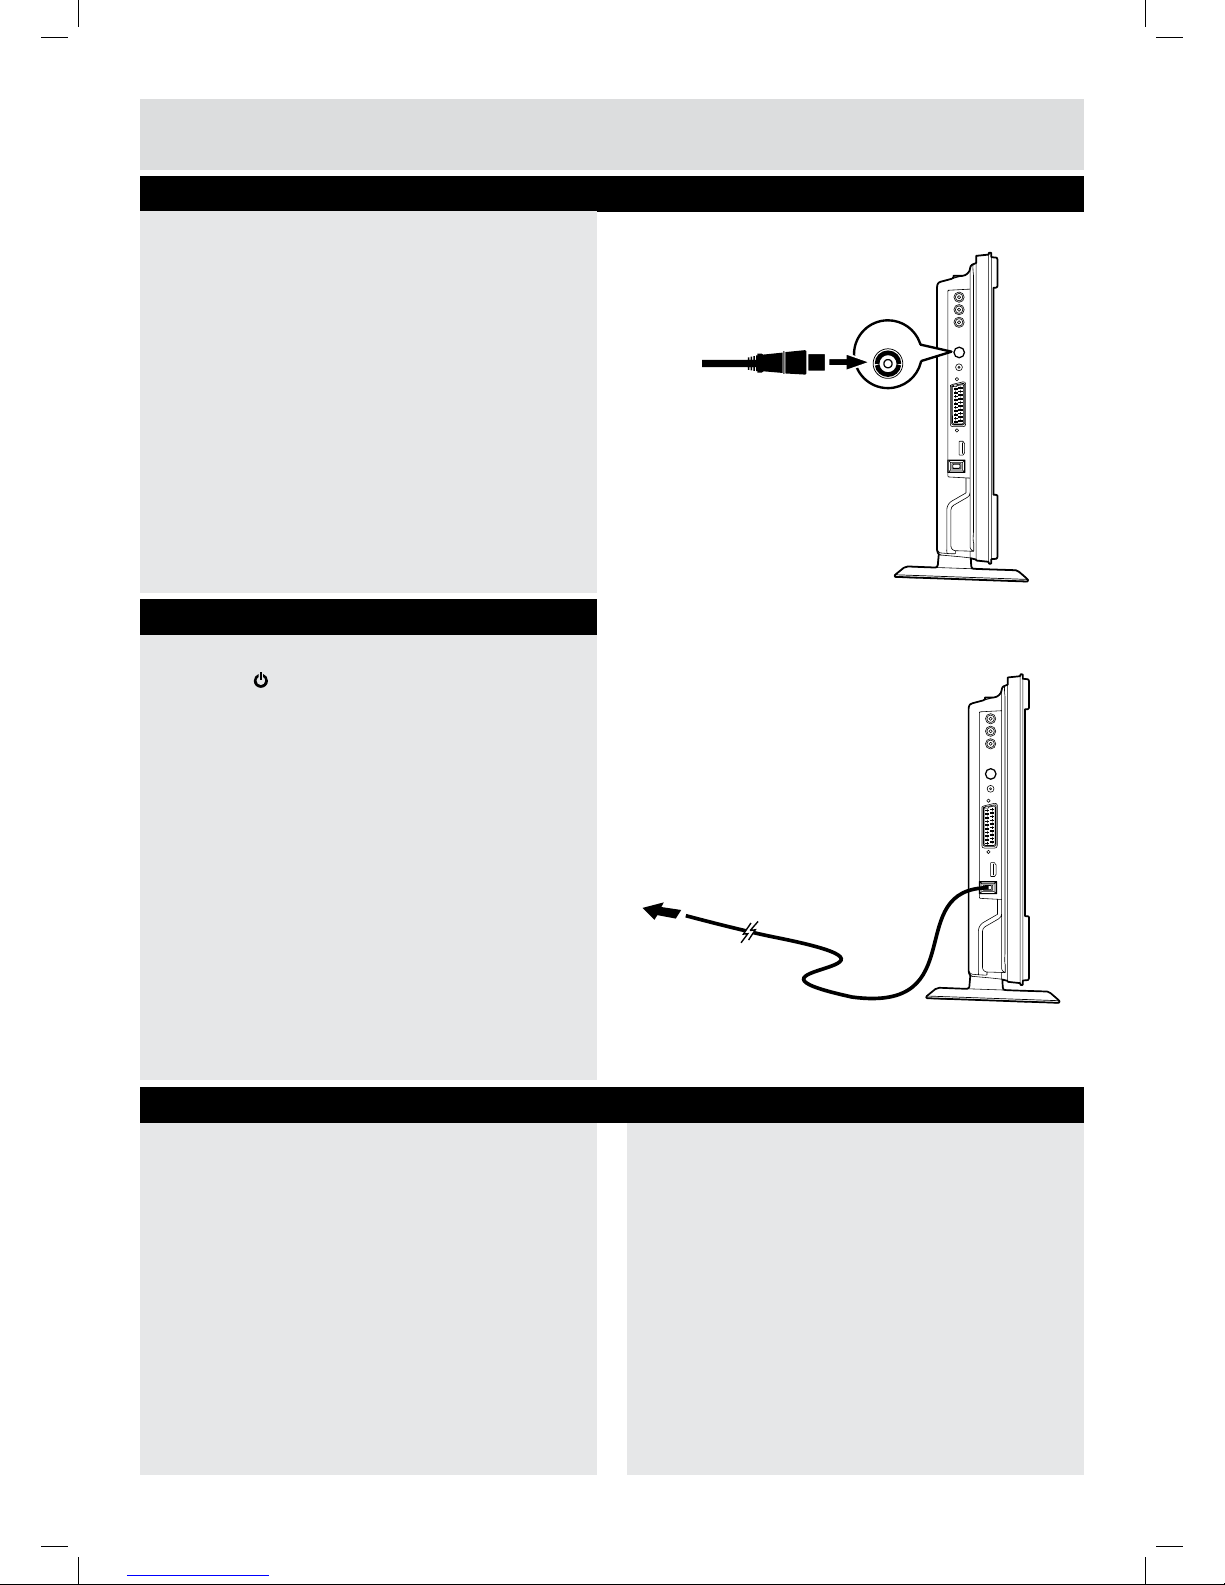
This unit is designed to operate from a 230V AC ~
50Hz mains supply.
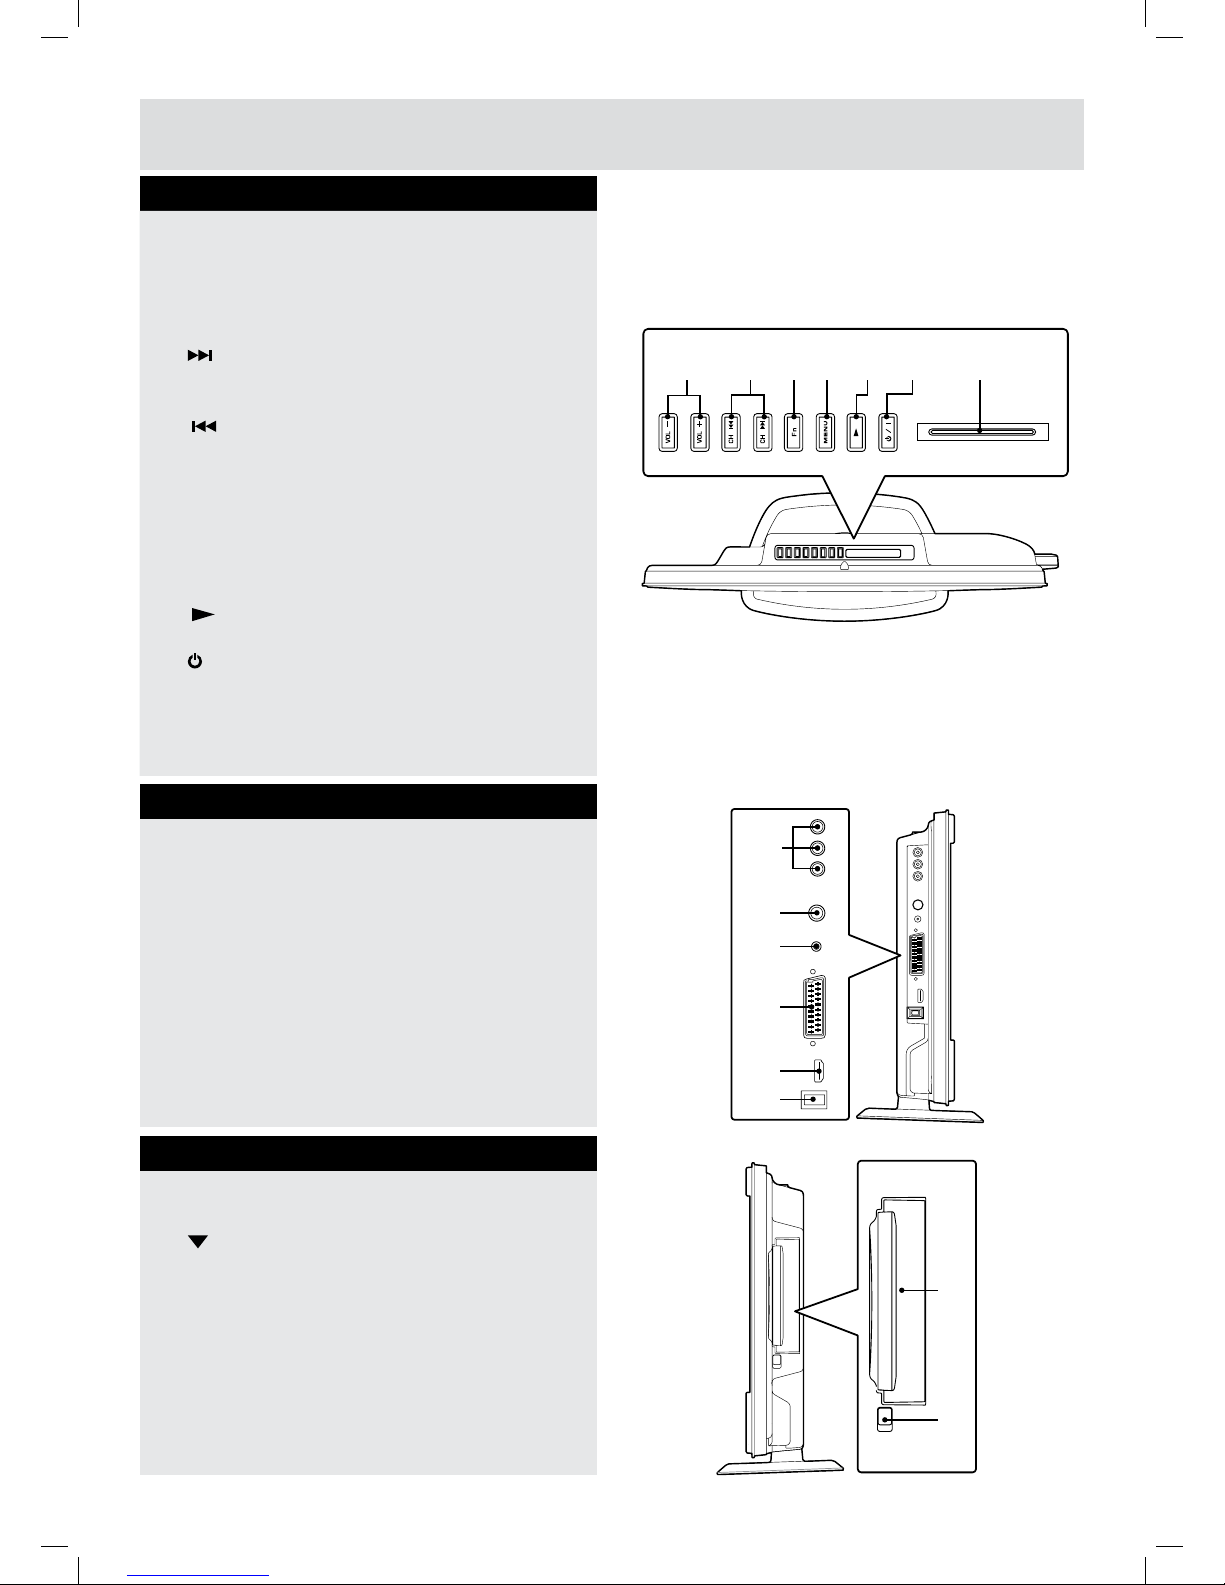
Please note that when the STANDBY/ON switch
is in the standby position this does not completely
disconnect the unit from the mains supply. If the
equipment is not to be used for a day or more,
disconnect it at the wall outlet.
This symbol means that the unit is double
insulated. No connection to earth is
necessary.
Safeuseofyourequipment
Thisequipmenthasbeendesignedandmanufactured
to meet UK safety standards but like any electrical
equipment care must be taken to obtain the best
results from the equipment and assure your own
safety. Here are a few tips to help you do this:
READ this instruction manual before you attempt to
usetheequipment.
NEVERtmakeshiftstandsorlegswithwoodscrews.
Use only approved supports and fasteners specially
designedfortheequipment.
NEVERletanyone,especiallychildren,pushobjects
intoholes,ventilationslotsoranyotheropening;this
could result in fatal electric shock!
ALWAYS disconnect the AC power cord when you are
not going to use the unit for a long period of time.
ENSURE adequate ventilation of the equipment is
notobstructed,forexamplebycurtainsaboveorsoft
furnishings underneath it.
ENSURE that all electrical connections (including the
mains plug, extension leads and interconnections
betweenpiecesofequipment)areproperlymadein
accordance with the instructions given. Switch off the
main supply when making or changing connections.
CONSULT your dealer if you are ever in doubt
about the installation, operation or safety of your
equipment.
DON’T continue to operate the equipment if it
is damaged in any way or if it does not function
normally.
Withdrawthemainsplugandconsultyourdealer.
DON’T leave equipment switched on when it is
unattended unless it is part of it’s normal function to
operateinyourabsence,forexampleavideocassette
recorder with timed recording facility.
LISTEN to headphones at moderate volume levels;
high volume levels can permanently damage your
hearing.
BTVD9xxx6_IB_BUSH 2011_Rev3.indd 4 6/1/2011 16:27:32

For any help concerning set up and use of your TV please call the Customer Helpline: 0845 604 0105 5
The Argos Technical Helpline is here to help
• Simple help and advice on setting up your digital
equipment (image).
• Guidance on connecting other devices to your
television such as a DVD player, Sky, home cinema
system or a games console.
• Order spare parts, including that lost remote
control.
• Any other technical issues you may need
assistance with.
Technical experts are available 7 days a week
Lines open 9am-8pm Monday to Saturday and 10am-4pm Sunday.
*CallstoArgosenquirylinesmayattractachargeandsetupfeefromresidential
linesdependingonyourcallplan/tariff.Mobileandotherproviderscostsmayvary,
see www.bt.com/pricing for details.
ForSecurityandtrainingpurposes,telephonecallstoandfromcustomerservice
centres maybe recorded and monitored. Calls from Republic of Ireland will attract
international call charges.
Call us today: 0845 604 0105
Local call rates applies*
Getting Started
BTVD9xxx6_IB_BUSH 2011_Rev3.indd 5 6/1/2011 16:27:32

For any help concerning set up and use of your TV please call the Customer Helpline: 0845 604 0105
6
Getting Started
TV - Features DVD - Features
Remote Control
Batteries : AAA x 2
Instruction Book
Scart Adapter
Screws x 2
Accessories included
•RemotecontrolledcolourLCDTV.
•FullyintegrateddigitalTV(DVB-T).
•HDMI connectors for digital video and audio.
This connection is also designed to accept high
denitionsignals.
•100programmesfromVHF,UHF(analogue).
•500programmesfordigitalmode(IDTV).
•OSDmenusystem.
•Scartsocketforexternaldevices(suchasvideo,
videogames,audioset,etc.).
•Stereosoundsystem.
•Teletext,fastext,TOPtext.
•Headphoneconnection.
•Automaticprogrammingsystem.
•Forwardorbackwardmanualtuning.
•Sleeptimer.
•Childlock.
•NTSC / PAL playback (according to disc
content).
•LPCMaudioviacoaxialandopticaldigitalaudio
outputs (optional).
•Multi-Audio(upto8)support(accordingtodisc
content).
•Multi-Subtitle (up to 32) support (according to
disc content).
•Multi-Angle(upto9)support(accordingtodisc
content).
•8levelparentalcontrol.
•Fast forward and rewind - 5 different speeds:
2x,4x,8x,16x,32x.
•Slow motion playback - 5 different speeds:
1/2x,1/4x,1/8x,1/16x,1/32xforward.
•SearchMode
•Repeat
•DVD / CD / CD-R / CD-RW / MP3 / JPEG /
MPEG playback.
JPEG/
BTVD9xxx6_IB_BUSH 2011_Rev3.indd 6 6/1/2011 16:27:32

For any help concerning set up and use of your TV please call the Customer Helpline: 0845 604 0105 7
1
2
3
4
5
6
7
8
9
10
11
12
13
14
24
23
22
21
20
19
18
17
16
15
25
26
27
Getting Started
Viewing remote control - TV
1. Standby/On button
2. TV/DTV button
3. Number (0 - 9) buttons
4. Reveal button (in Teletext)
5. Mute button
6. Volume (–/+) buttons
7. Cursor ( , , , ) buttons
Enter / OK button
8. Hold button (in Teletext)
Mix button (in Teletext)
9. List button
Guide button
Information button
10. Size button (in Teletext)
11. Audio Language button
12. Text button (in Teletext)
13. Time button
14. Sleep button
15.Functionbutton(DTV,ATV,AV1,AV2/SCART,
YUV/SCART,DVDorHDMI)
16. Radio button
17. AV button
18. Last Ch button
19. TV Menu button
20. Channels/Page / buttons
21. FAV (Favourite programme) button
Exit button
22. Index button (in Teletext)
23. Cancel button (in Teletext)
24. Sound button
25. Picture button
26. LCD Mode button
27. Red/Green/Yellow/Blue button
Sky remote code : 0 2 0 6
BTVD9xxx6_IB_BUSH 2011_Rev3.indd 7 6/1/2011 16:27:33

For any help concerning set up and use of your TV please call the Customer Helpline: 0845 604 0105
8
Getting Started
Viewing remote control - DVD
1. DVD button
2. Number (0 - 9) buttons
3. Cursor ( , , , ) buttons
Enter / OK button
4. Fast reverse button
Fast forward button
5. Previou button
6. Stop button
7. Angle button
8. Subtitle button
9. Title button
10. Goto button
11. Memory button
12. Clear button
13. Next button
14. Play button
15. Pause button
16. Slow button
17. Audio button
18. DVD Menu button
19. Setup button
20. Display button
21. Repeat button
1
2
3
4
5
6
7
8
9
10
11
12
14
13
18
19
20
21
15
16
17
BTVD9xxx6_IB_BUSH 2011_Rev3.indd 8 6/1/2011 16:27:33

For any help concerning set up and use of your TV please call the Customer Helpline: 0845 604 0105 9
Getting Started
TV / DVD - control buttons (top view)
1. – Volume + controls
Adjust the volume level.
2. CH buttons
Press to change the TV channels and highlight
selections (Up & Down) on the menu screen.
button
Presstoselectnexttitle,chapterortrackona
disc and fast forward playback.
button
Press to select previous titles, chapters or
tracks on a disc and fast reverse playback.
3. Function button
Select DTV, ATV, AV1, AV2/SCART, YUV/
SCART,DVDorHDMI.
4. Menu button
Press to display the on-screen TV menu.
5. Play button
Press to start or resume playback of a disc.
6. / I button
Turns the unit on and off.
7. Common Interface slot
(For optional Conditional Access Module)
TV / DVD - jacks (left view)
TV / DVD - (right view)
8. Audio in jacks (Left/Right) / Video in jack (AV
IN 1)
9. TV Aerial - Coaxial TV antenna input
10. Headphone jack
11. Scart jack (AV IN 2)
12. HDMI jack
13. Power Cord
14. Disc Door
Push gently to close the disc door.
15. Push Open knob
Push down to open the disc door.
123456 7
14
15
9
12
11
10
8
13
BTVD9xxx6_IB_BUSH 2011_Rev3.indd 9 6/1/2011 16:27:33

For any help concerning set up and use of your TV please call the Customer Helpline: 0845 604 0105
10
TV
AERIAL
Getting Started
Toviewtelevisionchannelscorrectly,asignalmust
be received from one of the following sources:
- An indoor or outdoor aerial antenna
- RF output of a cable system
- RF output of a satellite system
Note:
For receiving over-the-air TV broadcasts, we
recommend that you use an external roof antenna.
Should you require the use of an indoor antenna,
please ensure that you purchase an antenna
with sufcient ability to receive in weak signal
areas. Only when you are in close proximity to
a transmitter will an indoor antenna reproduce a
signal as strongly as a roof antenna.
Connecting a TV antenna
To wall outlet
Connecting a power cord
• ConnecttheACpowercordintoawalloutlet.
• Pressthe /Ibutton on the unit or remote control
to turn the TV on.
Note:
• Be sure the AC power cord is disconnected
and the TV is switched off before making
connections.
• Make sure that all the components are connected
correctly.
• When you are not going to use the unit for a long
period of time, disconnect the power cord.
• The mains plug is used as the disconnecting
device. It should remain readily accessible and
should not be obstructed during use. To be
completely disconnected from the supply mains,
the mains plug of the TV should be disconnected
from the mains socket outlet completely.
Satellite / Cable RF Out or
TV antenna cable to
TV AERIAL CABLE Terminal
(cable not included)
There is a CI slot at top center of the cabinet which
allows you to insert a CAM (Conditional Access
Module) with an appropriate viewing card for some
subscription TV services..
You need to subscribe to a pay channel company who
administer the payments and viewing card distribution
for these services.
Fully insert the CAM (Conditional Access Module) into
the CI (Common Interface) slot on the top of the unit
with the service provider’s label facing backward.
Common interface
Important notes:
• Switch off the TV and unplug from the AC power
mains before insert or remove the CAM.
• The CAM should be correctly inserted, it is
impossible to insert fully if reversed. The CAM or
the TV terminal may be damaged if the CAM is
forcefully inserted.
• Some CAMs may require setting up. Refer to
the module instruction manual for details of the
settings.
• If your viewing card subscription is not valid for the
received service you will see a message such as
‘SCRAMBLED PROGRAM’...’You are not entitled
to watch this program’.
BTVD9xxx6_IB_BUSH 2011_Rev3.indd 10 6/1/2011 16:27:33

For any help concerning set up and use of your TV please call the Customer Helpline: 0845 604 0105 11
Using the Remote Control
• Point the remote control at the REMOTE
SENSOR located on the unit.
• Whenusingthisunitinaverybrightlylitarea,
the infrared REMOTE CONTROL SENSOR may
not work properly.
• Therecommendedeffectivedistanceforusing
the remote control is about 16 feet (5 metres).
To Change the Remote Control Batteries
• Open the battery door. (g.1a)
• Insert two “AAA” batteries. (g.1b)
Battery Replacement
Whenthebatteriesbecomeweak,theoperating
distance of the remote control will be greatly reduced
and you will need to replace the batteries.
Note:
• If the Remote Control is not to be used for a
long time, remove the batteries to avoid damage
caused by battery leakage corrosion.
• Do not mix old and new batteries. Do not mix
ALKALINE, standard (CARBON-ZINC) or
rechargeable (NICKEL-CADMIUM) batteries.
• Corrosion, oxidation, battery-leakage and any
other gradually acidic defect of this nature will
invalidate the guarantee.
• When discarding batteries, environmental
problems must be considered and local rules or
laws governing the disposal of these batteries
must be strictly followed.
CAUTION:
Danger of explosion if batteries are incorrectly
replaced. Replace only with the same or
equivalent type.
WARNING:
• Do not dispose of batteries in a re or
they may leak and/or explode.
• The battery shall not be exposed to
excessive heat such as sunshine, re or
the like.
Remote control
Getting Started
g.1a
g.2b
BTVD9xxx6_IB_BUSH 2011_Rev3.indd 11 6/1/2011 16:27:34

For any help concerning set up and use of your TV please call the Customer Helpline: 0845 604 0105
12
Initial set up
Thersttimeyouturntheuniton,itwillgostraight
into start-up screen. Simply follow the screen
prompts as below to tune in the channels.
1.Intheinitialstart-upscreen,pressENTER/OK
toenternextscreen.(g.2)
2. Use the , , , button to select a desired
language,thenpresstheENTER/OK button to
conrm.(g.3)
3. Use the , , , buttontoselectCountry,then
press the ENTER/OKbuttontoconrm.(g.4)
4. The system will automatically scan and store
all available programs which may take ve
minutesormore.(g.5)
Ifthe digital TV region choice menu appears,
press ENTER/OK to conrm your digital TV
regions.(g.6)
Note:
If tuning fails, a screen will appear as shown.
(g.7)
DTV region menu
Please press OK to continue
Choose preferred country and regional options
You may receive signals from more than one area
Use </> to choose, then “OK” to select each option in turn
Getting Started
g.2
g.3
g.4
g.6
g.7
g.5
BTVD9xxx6_IB_BUSH 2011_Rev3.indd 12 6/1/2011 16:27:34

For any help concerning set up and use of your TV please call the Customer Helpline: 0845 604 0105 13
Connections
High-Denition (HD) Devices with component
video output must be connected to the YUV
input.
Connect the component video cable and audio
cable (not included) as shown.
Make sure you connect the YUV Scart adaptor
to this unit, then connect component video
cableandaudiocablefromtheotherequipment
(COMPONENT VIDEO OUT and AUDIO OUT) to
this unit (SCART and AUDIO IN).
To operate the connected device and play the
source,rstpresstheFUNCTION button to select
the YUV/SCART mode.
Note:
When connecting a DVD player to the television,
the picture resolution is dependent upon the
resolution of both the DVD player and the TV. For
best results, select the highest resolution of the
DVD up to the TV maximum of 1080i.
* May require a subscription for receiving HD
channels. Check with your cable/satellite
service provider for details.
To AUDIO
IN jacks
To AUDIO
OUT jacks
YUV SCART adaptor
(included)
To COMPONENT
VIDEO OUT
jacks
To SCART jacks
Connectingahigh-denition(HD)source
HD SOURCE
with HDMI output
To HDMI IN jack
Connecting HDMI
HDMI (High Definition Multimedia Interface)
supports both video and audio on a single digital
connectionforusewithDVDplayers,DTV,set-
top boxes and other digital AV devices. HDMI was
developed to provide the technologies of High
Bandwidth Digital Content Protection (HDCP)
as well as Digital Visual Interface (DVI) in one
specication. HDCP is used to protect digital
content transmitted and received by DVI-compliant
or HDMI-compliant displays.
HDMI has the capability to support standard,
enhancedorhigh-denitionvideoplusstandardto
multi-channel surround-sound audio. HDMI feature
includeuncompresseddigitalvideo,abandwidth
of up to 2.2 gigabytes per second (with HDTV
signals),oneconnector(insteadofseveralcables
andconnectors),andcommunicationbetweenthe
AV source and AV devices such as DTVs.
HDMI,theHDMIlogo andHigh-Denition
Multimedia Interface are trademarks or registered
trademarks of HDMI licensing LLC.
Connect the HDMI cable (not included) as shown.
Make sure you connect the cable from the
equipment(HDMI OUT) to this unit (HDMI IN).
To operate the connected device and play the
source,rstpresstheFUNCTION button to select
the HDMI mode.
Note:
It is not recommended to use HDMI cables
longer than 2 m as this may affect the HDMI
performance.
BTVD9xxx6_IB_BUSH 2011_Rev3.indd 13 6/1/2011 16:27:35

For any help concerning set up and use of your TV please call the Customer Helpline: 0845 604 0105
14
Connections
Using headphones
•Turn down the volume before connecting
headphonestotheunit,thenadjustthevolume
to your desired level.
•Whenheadphonesareconnected,nosoundwill
come from the front speakers.
Earphones /
Headphones
(1/8” [3.5mm]
diameter plug)
Maximum output
voltage≤150mV
CAUTION:
Excessive sound pressure from earphones and
headphones can cause hearing loss.
SCART
CABLE
IfyourVCRpermits,thenconnectyourantenna
to your VCR and VCR RF to your TV
TV
AERIAL
Connecting to sources with scart
Devices with RGB output must be connected to
the SCART input:
Connects the SCART from the source to the
corresponding SCART on this unit (SCART cable
not included) as shown.
Make sure you connect both to SCART to
SCART.
To operate the connected device and play the
source,rstpresstheFUNCTION or AV button
to select the AV2/SCART mode.
To AUDIO /
VIDEO IN jacks
(AV IN 1)
To AUDIO / VIDEO OUT jacks
To connect to A/V devices such as a VCR,
camcorder or video game system.
Connect the AUDIO / VIDEO cable (not included)
as shown.
Make sure you connect the cable from the other
equipment(AUDIO and VIDEO OUT) to this unit
(AUDIO and VIDEO IN). Press the FUNCTION or
AV button to select AV1 mode.
Note:
Please refer to the user manual for the other
equipment for more information.
Connecting to devices with a composite
BTVD9xxx6_IB_BUSH 2011_Rev3.indd 14 6/1/2011 16:27:35

For any help concerning set up and use of your TV please call the Customer Helpline: 0845 604 0105 15
Basic Features
Audio language for DTV
Electronic programme guide (EPG) for DTV
WhilewatchingaDTVprogramme,youcanpress
the button to display the Audio Language
menu (g.2), and select audio language, audio
format and sound track.
• Usethe or button to select an audio language
or audio format if available, press the or
button to select sound track between L/R
(Stereo),L/L(MonoLeft)andR/R(MonoRight).
Press the ENTER/OKbuttontoconrm.
• Pressthe or EXIT button to exit the Audio
Language menu.
Note:
For analogue TV, press the button
repeatedly to select STEREO/MONO/Dual I/
Dual II/Dual I+II directly.
sound track
audio format
audio language
•Pressthe or to scroll through the programmes
of different channels. Press the or to skip to the
programmes of different periods.
(Note: Programme names in GREEN indicates
that these programmes are now broadcasting
on different channels.)
•Use the , , or or button to select a
programme,presstheINFO button to display
detailed information if available. Press the
INFO button again to return.
•PresstheYELLOW button to view the programme
list of the next date; press the GREEN button to
view the programme list of the previous date.
•PresstheENTER/OK button to watch the selected
channel.
•PresstheEXIT button to exit the PROGRAMME
GUIDE menu.
Note:
Guide information display may be different
according to the DTV programmes.
WhilewatchingaDTVprogramme,youcanpress
the GUIDE button to display the PROGRAMME
GUIDEmenu.(g.1)
current channel no.
and name
current programme
and time
programme date
programme time
programme name
current date
and time
currently
broadcasting
channel on TV
channel no.
channel name
g.1
g.2
BTVD9xxx6_IB_BUSH 2011_Rev3.indd 15 6/1/2011 16:27:36

For any help concerning set up and use of your TV please call the Customer Helpline: 0845 604 0105
16
Basic Features
Analogue TV / DTV setup
1. Use the or button to select a channel. (Press
the CH/PAGE / button to skip to previous/
next page.)
2. Press the RED / GREEN / YELLOW / BLUE
button or the FAV button to edit the channel.
- DELETE
Press the RED button to delete the selected
channel. Press the TV MENU button to stop
delete.
- RENAME (for ATV mode only)
Press the GREEN button to rename the
selected channel. Use the or button to
select the characters to represent the station
name,use the or button to move to the
nextcharacter,presstheTV MENU button to
conrm.
- MOVE (for ATV mode only)
Press the YELLOW button and use the or
button to move theselectedchannel,then
press the TV MENUbuttontoconrm.
- SKIP
Press the BLUE button to skip or not skip the
selected channel.
TV Setting (only in ATV or DTV mode)
1.Press the TV MENU button.
2.Use the or button to select . (g.3)
3.Use the or button to select the options (Auto
Tuning, DTV Manual Tuning, ATV Manual
Tuning, Programme Edit),adjustthemusing
the or button. Common Interface and Signal
information are only available in DTV mode.
4. Press the TV MENU button to return to previous
menu,repeatstep2toadjustothersettings.
5. To exit the setup menu and return to the normal
screen,presstheEXIT button.
• Auto Tuning :
Automaticallyscan,sortandstoreallavailable
programmes . Press to choose DTV+ATV,
DTV or ATV only.
• DTV Manual Tuning :
Perform manual search for DTV (Digital TV)
programmes.
• ATV Manual Tuning :
PerformmanualsearchandnetuneforATV
(Analog TV) programmes.
• Programme Edit :
All channels stored are listed in the Programme
Edit menu (g.4),youcaneditthechannelsby
the following steps:
DTV setup menu
g.3
g.4
BTVD9xxx6_IB_BUSH 2011_Rev3.indd 16 6/1/2011 16:27:36

For any help concerning set up and use of your TV please call the Customer Helpline: 0845 604 0105 17
Basic Features
Analogue TV / DTV setup
Picture menu
1.Press the TV MENU button.
2.Use the or button to select the options (g.5)
(Picture Mode, Contrast, Brightness, Colour,
Sharpness, Tint, Colour Temperature),adjust
them using the or button. The adjustments
only work in 'personal' mode. Tint only works for
NTSC video.
3.Press the TV MENU button to return to previous
menu.
4.To exit the setup menu and return to the normal
screen,presstheEXIT button.
• Picture Mode :
Select from four preset screen display settings
(Standard, Soft, Dynamic and Movie), or
select Personal in which your own settings of
Contrast, Brightness, Colour and Sharpness
are stored.
• Contrast :
Adjust the contrast of the picture. The black
portions of the picture become richer in
darkness and the white become brighter.
• Brightness :
Adjust the brightness of the picture.
• Colour :
Adjust the colour of the picture.
• Sharpness :
Adjust the sharpness level to improve detail in
the picture.
• Tint (only for AV mode with NTSC signal) :
Adjust the tint of the picture.
• Colour Temperature :
Select the colour temperature of the picture.
Select Normal (balanced)/ Warm (red white)/
Cool (blue white) mode.
- FAV (Favourite)
Press the FAV button to set or cancel the
selected channel as one of the favourite
programmes. A “heart” will appear alongside
the program set as a favourite.
• Signal Information
Displaythesignalinformation,suchaschannel
name, network, modulation, quality and
strength.
• CI Information
Display CAM and Smart card information; select
the language if available.
Note:
You can also select Picture Mode simply by
pressing the PICTURE button on the remote
control.
g.5
BTVD9xxx6_IB_BUSH 2011_Rev3.indd 17 6/1/2011 16:27:36

For any help concerning set up and use of your TV please call the Customer Helpline: 0845 604 0105
18
Basic Features
Analogue TV / DTV setup
Time menu
1.Press the TV MENU button.
2.Use the or button to select the . (g.7)
3. Use the or button to select the options
(Clock, Sleep Timer, Time Zone), adjust
them using the or button.
4. Press the TV MENU button to return to
previous menu.
5. To exit the setup menu and return to the
normalscreen,presstheEXIT button.
• Clock :
The clock is set automatically when receiving
a digital signal.
• Sleep Timer :
Select the time to turn the unit to Standby
mode automatically: Off -> 5min - - -> 90min
-> 120min.
• Time Zone :
Select your time zone.
Sound memu
1.Press the TV MENU button.
2.Use the or button to select the . (g.6)
3.Use the or button to select the options
(Sound Mode, Treble, Bass, Balance),
adjust them using the or button.
4.Press the TV MENU button to return to
previous menu.
5. To exit the setup menu and return to the
normalscreen,presstheEXIT button.
Experiment with different sound settings
until you nd the settings you prefer.
• Sound Mode :
Select from four preset sound settings
(Standard, Music, Theatre and Voice), or
select Personal in which your own settings of
Treble,BassandBalancearestored.
• Treble :
Adjust the treble range.
• Bass :
Adjust the bass range.
• Balance :
Adjust the balance level toward the left or right
speakers.
Note:
You can also select Sound Mode simply by
pressing the SOUND button on the remote
control.
g.6
g.7
BTVD9xxx6_IB_BUSH 2011_Rev3.indd 18 6/1/2011 16:27:37

For any help concerning set up and use of your TV please call the Customer Helpline: 0845 604 0105 19
Setup menu
1. Press the TV MENU button.
2. Use the or button to select the . (g.8)
3. Use the or button to select the options
(OSD Language, Audio Language, Subtitle
Language, Restore Setting, OAD),adjust
them using the or button.
4. Press the TV MENU button to return to
previous menu.
5. To exit the setup menu and return to the
normalscreen,presstheEXIT button.
• OSD Language :
Select your preferred On Screen Display
language.
• Audio Language :
Select your preferred audio language. (Available
for digital channels if multiple audio languages
are broadcasted.)
• Subtitle Language :
Select your preferred subtitle language or turn off
subtitle. (Available for digital channels if multiple
subtitle languages are broadcasted.)
• Restore Setting :
Press the ENTER/OK button to restore the
system settings to the factory default.
• OAD (Over Air Download) :
Select to enable/disable OAD (Over Air
Download) feature. This should normally be
Set to ON to allow the TV to be automatically
updgraded if this is needed from time to time.
Basic Features
Analogue TV / DTV setup
g.8
BTVD9xxx6_IB_BUSH 2011_Rev3.indd 19 6/1/2011 16:27:37

For any help concerning set up and use of your TV please call the Customer Helpline: 0845 604 0105
20
Basic Features
Analogue TV / DTV setup
• Lock System :
Select to lock or unlock the programmes.
• Change Password :
If you change the password, remember your
password.
• Block Programme :
Enterthe BlockProgrammemenu,pressthe
or button to select a channel, press the
GREEN button to Lock or Unlock the channel.
• Parental Guidance :
Select a censorship level to censor and block
the programmes.
Note:
This system will only work if the correct information
is transmitted by the TV channel.
If you forget the password, enter " 8888 "
to unlock parental control.
Lock menu
1. Press the TV MENU button.
2. Use the or button to select the . (g.9)
3. Press the button to highlight Lock System
then press ENTER/OK or or to enter,enter
password to proceed.
(The default password is 0000.)
4. Use the or button to select the options
(Lock System, Change Password, Block
Programme, Parental Guidance),pressthe
ENTER/OK or / button to adjust.
5.Press the TV MENU button to return to
previous menu.
6. To exit the setup menu and return to the
normalscreen,presstheEXIT button.
g.9
BTVD9xxx6_IB_BUSH 2011_Rev3.indd 20 6/1/2011 16:27:37
This manual suits for next models
4
Table of contents
Other Bush TV DVD Combo manuals

Bush
Bush LED24127FHDDVDW Manual

Bush
Bush LED28167HDDVDS Manual

Bush
Bush LED24127DVDCNTD Manual

Bush
Bush DVD154TVX User manual

Bush
Bush IDLED2202DVD User manual

Bush
Bush 14 DVD-TV COMBI User manual

Bush
Bush LED20265HDDVD Manual

Bush
Bush LED19134HDDVD Manual

Bush
Bush DLED32265HDDVDW Manual

Bush
Bush LED24127FHDDVD Manual