Butts of Bawtry 9903 User manual

Air Operated
Spring Compressor
9903 9905
Please read and fully understand the instructions in this manual before operation.
Keep this manual safe for future reference.

Contents
Page No. Description
3 Safety Symbols Used Throughout This Manual
4/5 Safety Instructions
5 Contents & Accessories
5 Technical Specications
6 Guarantee
7 Getting to Know Your Spring compressor
8/9 Assembly Instructions
10/11/12 Operating Instructions
13 Maintenance
14 Exploded Drawing
15 Parts List
2

Safety symbols used throughout this manual
Safety Instructions
3
Danger/Caution: Indicates risk of personal
injury and/or the possibility of damage.
Note: Supplementary Information.
IMPORTANT: Please read the following instructions carefully, failure to do so
could lead to serious personal injury and / or damage to the spring compressor.
When using your spring compressor,
basic safety precautions should always
be followed to reduce the risk of personal
injury and / or damage to the spring
compressor or load.
Read all of these instructions before
operating the spring compressor and save
this user manual for future reference.
The spring compressor should not be
modied or used for any application other
than that for which it was designed.
The spring compressor is designed to
remove the tension from a strut assembly
so that it can be safely disassembled for
service and then reassembled afterwards
where necessary.
If you are unsure of its relative applications
do not hesitate to contact us and we will be
more than happy to advise you.
Before operating the spring compressor
always check no parts are broken and that
no parts are missing.
Always operate the spring compressor
safely and correctly.
KNOW YOUR SPRING COMPRESSOR:
Read and understand the owner’s
manual and labels axed to the spring
compressor. Learn its applications and
limitations, as well as the potential hazards
specic to it.
KEEP CHILDREN AND UNTRAINED
PERSONNEL AWAY FROM THE WORK
AREA: All visitorsshould be kept at a safe
distance from the work area; never allow
untrained persons to operate the spring
compressor.
STAY ALERT: Always watch what you are
doing and use common sense.
NEVER LEAVE THE SPRING
COMPRESSOR UNATTENDED: When in
use / under load.
HAVE YOUR SPRING COMPRESSOR
REPAIRED BY A QUALIFIED PERSON:
The spring com-pressor is in accordance
with the relevant safety requirements.
Repairs should only be carried out by
qualied persons using original spare
parts, otherwise this may result in
considerable danger to the user and void
the warranty.

4
Safety Instructions
DANGER! Check that the spring
compressor is in sound condition and
good workingorder before each use; Take
immediate action to repair or replace
damaged parts.
WARNING! Only operate on a level and
stable surface and never use on soft
ground where the spring compressor is
likely to “sink” whilst in operation.
NEVER STAND ON THE SPRING
COMPRESSOR: The spring compressor is
not designed for this purpose.
DO NOT dismantle or tamper with the
spring compressor, as this may be
dangerous and will invalidate the warranty.
•If a problem with the spring compressor
is experienced or suspected stop using
the spring compressor immediately and
contact your distributor for repair.
•Do not attempt to compress a load that
exceeds the rated capacity of the spring
compressor.
•Regularly inspect and lubricate the spring
compressor, ensuring that it is in good
working order and condition.
•Always ensure that the work area
is clean and tidy, free from unrelated
materials and has adequate lighting.
•Keep hands, limbs etc. clear of moving
parts during operation; Never place
any-thing inside the safety cage during
operation
•Clean and stow the spring compressor
correctly, with the ram in the down position,
DO NOT leave it extended; ensure storage
area is dry.
•Failure to follow the warnings in this
manual, may result in personal injury and/
or property damage.
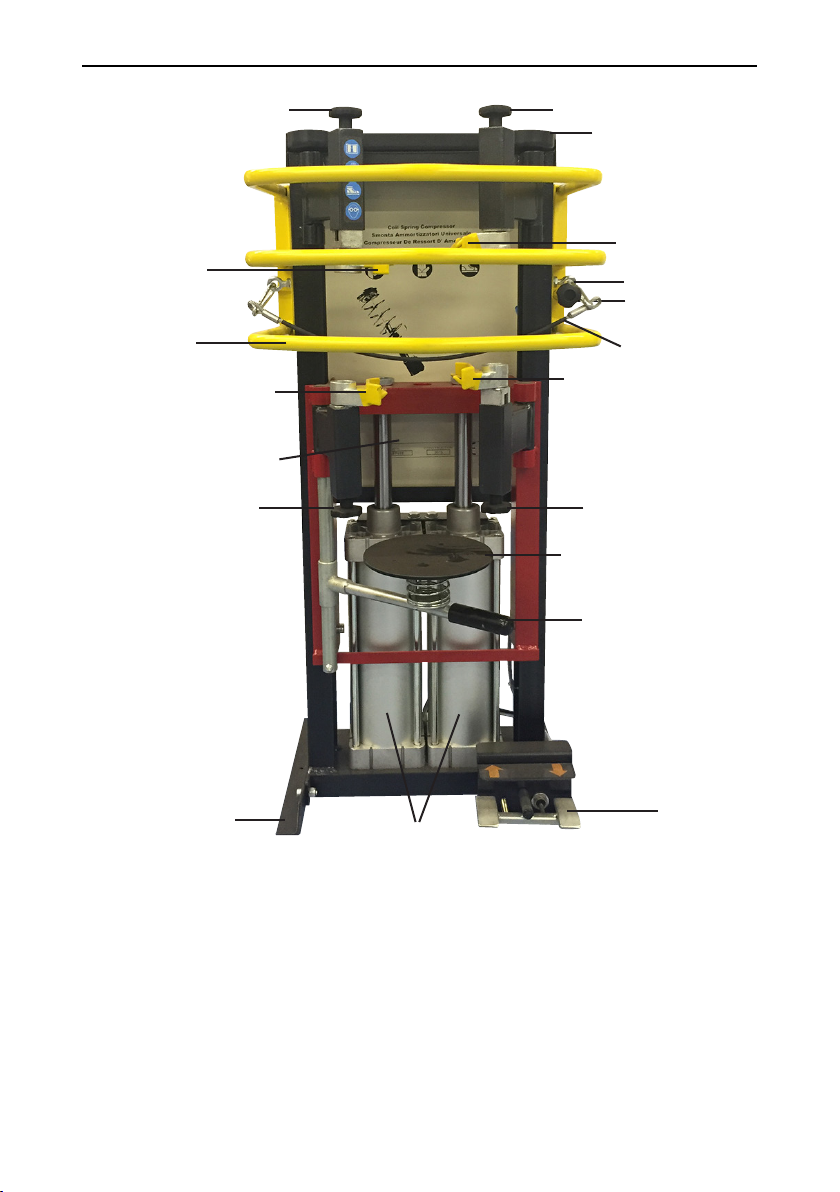
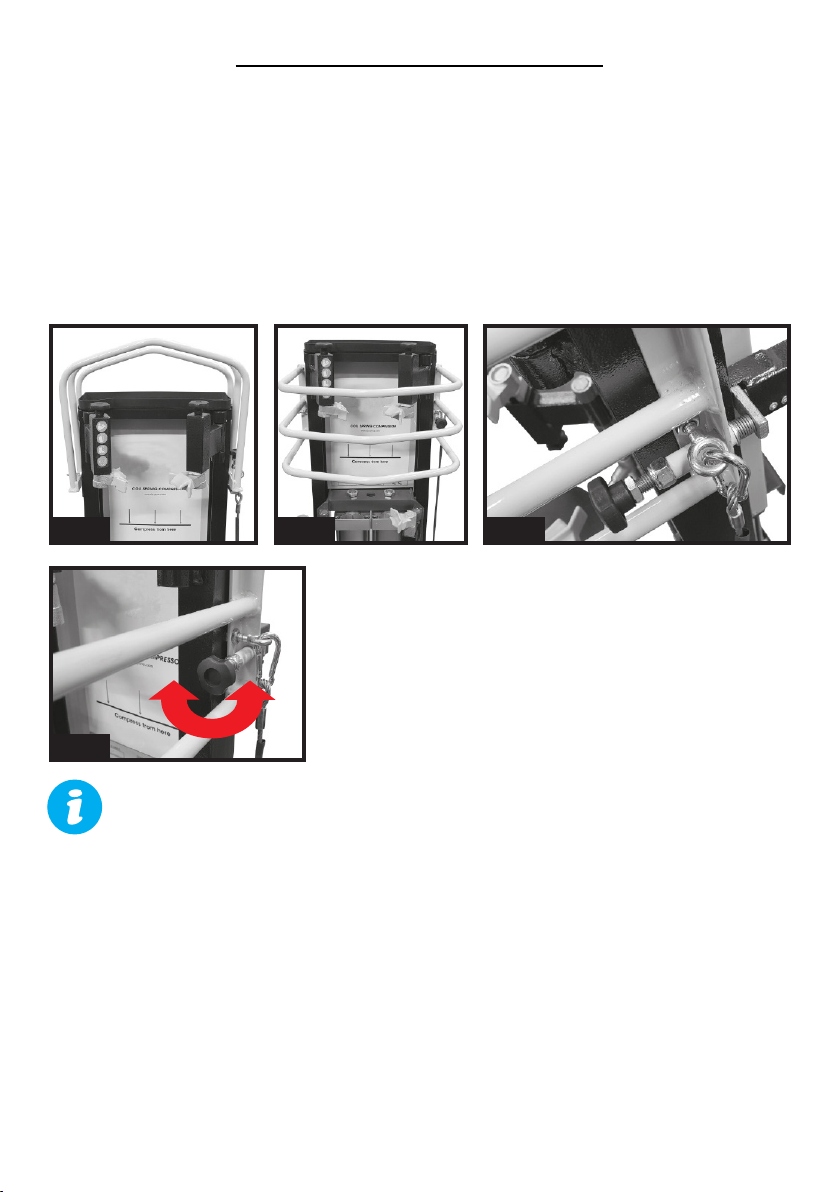
•Always ensure that the clamps are
correctly supporting the spring; Oset
loads can damage the machine and the
spring, and may cause it to ‘eject’ from the
spring compressor.
•Before each operation, check for signs
of cracked welds, loose or missing bolts
or any other structural damage; Do not
operate if any of these conditions exist.
Have repairs made only by authorised
service centre.
•Components of this spring compressor
are specially designed to withstand the
rated capacity. Do not substitute bolts,
pins, or any other components.
•DO NOT remove the safety cable or
safety cage during operation.
• In extreme circumstances, parts being
compressed may shatter or eject from
the compressor; It is the operators
responsibility to always use the safety
cable, safety cage and adequate personal
protective equipment such as eye
protection, safety boots / shoes, gloves
and heavy protective clothing, when
operating this spring compressor.
•If the spring compressor appears to be
damaged in any way, is found to be badly
worn, or operates abnormally IT SHOULD
BE REMOVED FROM SERVICE until
necessary repairs are made by an
authorised service centre.
•Prior to applying the load, be sure
that the damper and spring are aligned
correctly.

5
Safety Instructions
Contents & Accessories
Technical Specications
Understand the operating environment; Before each use the operator should
as-sess, understand and where possible reduce the specic risks and dangers
associ-ated with the operating environment. Bystanders should also be made
aware of any risks associated with the operating environment.
When using the spring compressor always ensure the
operator wears adequate PPE
CAUTION: The warnings and cautions mentioned in this user manual can
not cover all possible conditions and situations that may occur. It must be
understood by the operator that common sense and caution are factors
which cannot be built into this product, but must be applied.
nSpring Compressor (Main Frame)
n Clamps x 4 (tted)
nFoot Bracket x 1 & Foot Bracket inc. Foot Pedal x 1
n Cap head bolts and nuts (tted to frame)
n Strut Support plate inc. xings
nInstruction Manual
Part No. 9903 9905
Air Inlet Pressure 5-10 bar 5-10 bar
Max. Force @ 10 bar 1200 Kg 2400 Kg
Air inlet size ¼” bsp Female ¼” bsp Female
Unit Dimensions (HxWxD) 1200 x 500 x 400mm 1200 x 500 x 400mm
Net. Weight 65 Kg 70 Kg

6
Guarantee
The 9905 spring compressor is covered by a 12 month parts
and labour warranty covering failure due to manufacturers
defects. This does not cover failure due to misuse or
operating the Spring compressor outside the scope of this
manual - any claims deemed to be outside the scope of the
warranty may be subject to charges including, but not limited
to parts, labour and carriage costs. This guarantee does not
cover consumables such as clamps, strut support pad and
safety cable. In the unlikely event of warranty claims, contact
your distributor as soon as possible.
Note: Proof of purchase will be required
before any warranty can be honoured.

7
Getting To Know Your Spring Compressor
15
1
2
3
4
5
13
5
8
9 9
10
8
6
7
6
11
12
14
1. Ram/s
2. Foot Bracket
3. Strut Support Adjuster
4. Strut Support
5. Lower Clamp Adjuster
6. Lower Clamps
7. Safety Cage
8. Upper Clamps
9. Upper Clamp Adjuster
10. Storage Tray
11. Safety Lock Lever
12. Air Inlet
13. Compression Start Point
13. Safety Cable
15. Foot Control Pedal

8
Assembly Instructions
FITTING THE FEET BRACKETS
FITTING THE STRUT PLATE
n Place the spring compressor in a well lit area on a rm level surface.
nRemove the cap head bolts and nuts from the bottom of the frame (See Fig.1).
nLine up the holes on the feet brackets with the holes on the frame.
n Secure the feet brackets in place by retting and fully tightening the cap head
bolts and nuts (Fig. 2).
nFit the strut support plate to the strut support adjuster using the nuts provided;
Ensure that the spring is tted (see Fig.3 & Fig. 4).
Fig. 1
Fig. 3
Bolts
Adjuster
Spring
Foot Pedal
Nuts
Fig. 2
Note: The foot pedal (Fig.2) should be tted to the right hand side of the frame.
Note: Do not overtighten the nuts; There should be some give in the spring.
Fig. 4

9
nThe air control pipes need to be connected to the rear of the foot control pedal
in their correct position (Fig.5 & Fig.6).
n Push each pipe rmly into the relevant tting.
n The air supply hose can either be tted directly to the air inlet (Fig.8), or a quick
coupler could be tted (Fig.9).
Note: The pipe is fully seated when it cannot be removed by simply pulling on
the pipe.
Note: To remove the pipe press the ring on the air tting and pull the pipe at
the same time.
Note: Use a thread sealant, such as PTFE tape to ensure an airtight seal.
Assembly Instructions
CONNECTING THE AIR PIPES
CONNECTING AN AIR SUPPLY
Fig. 5 Fig. 6
Yellow Pipe Yellow Pipe
Black Pipe Black Pipe
Transparent
Pipe
Transparent
Pipe
Fig. 7
Fig. 8 Fig. 9
Air Inlet

10
Operating Instructions
OPERATING THE SAFETY CAGE
SET THE COMPRESSOR TO THE STARTING POINT
nWith the lock lever not engaged, the safety cage can be lifted to the upper
position (Fig,10) when not in operation, and pulled down and locked during
operation(Fig.11)
nThe air supply will be cut and the spring compressor will not operate unless the
safety lock lever is engaged (Fig.12); Lower the cage fully and turn the safety
lock lever until it is fully engaged.
nWith the airline connected and the cage lowered and locked; Press the up
pedal on the foot pedal control until the plate above the ram/s is inline with the
start point on the rear panel (see Fig.14 & Fig.15).
Before inserting a spring, the compressor needs to be set to the ‘starting position’:
Fig. 10 Fig. 11 Fig. 12
Fig. 13
Note: Turn the lock lever clockwise to lock and anti-clockwise to unlock.

11
Operating Instructions
FITTING A SPRING
nSet the spring compressor to the starting level as shown.
nLift the safety cage above the spring compressor.
nFit the spring over the lower clamps (Fig.16 & Fig.17).
nTurn the lower clamp adjusters until the spring is vertically straight (Fig.18 & Fig.19).
nFit the upper clamps securely over the spring.
nAdjust the upper clamps so they are securely holding the spring (Fig.20).
nLower the safety cage and lock the safety lock lever (Fig.21).
nPush the safety cable through the spring so that it secures the spring by at least 1
coil, and connect it to the opposite side of the frame (Fig.22 & Fig.23).
Compression Starting Position
Resting
Position
Fig. 14
Fig. 15
Fig. 16
Fig. 17 Fig. 18
Fig. 19

12
Operating Instructions
COMPRESSING A SPRING
nTo compress the spring simply press the ‘UP’ foot pedal and the spring will start to be
compressed.
nRemove your foot from the pedal once the spring is compressed enough.
nTo support the strut / shock absorber, where applicable, place the strut support
underneath the strut / shock absorber (Fig.24); Turn the black handle anti-clockwise
and set the support into position & turn the black handle clockwise to lock the
support in position.
nOnce the operation is complete; Press the ‘down’ pedal on the foot control and the
spring compressor will return to the starting position.
nFollow these instructions in reverse to remove the spring.
Note: Ensure an adequate air supply is connected to the spring compressor.
Fig. 20 Fig. 21
Fig. 22
Fig. 23
Strut Support
Handle / Adjuster

13
Maintenance
nGenerally keep the spring compressor clean.
nCheck the ram piston for signs of corrosion, and clean as
necessary - Do not use a harsh abrasive such as sand paper.
nPeriodically check the frame to make sure all bolts are tight and
inspect for cracked welds, bent, loose, or missing parts.
nPeriodically check pneumatic connections for possible leaks,
replace or properly repair damage before use.
nIf the paint becomes badly chipped, it is suggested to repaint
the spring com-pressor; This will prevent rusting.
nAlways leave the spring compressor in it’s lowest position
when not being used for extended periods, or during storage.

14
Exploded drawing

15
Parts List
Ref. No. Description Part. No.
1Ram Y3310
2Safety Lock (Micro-switch only) Y3410
3Frame Y4011
4Foot Control Pedal Assembly Y4100
5Top Tray / Tool Tray Y4100
6Safety Cage A9203
7Lock Lever (Complete) A3410
8Strut Support Spring Y4310
9Strut Support Pad Y4320
10 Strut Support (adjuster & Pole) Y4350
11 Right Upper Clamp Adjuster (complete) Y4650
12 Left Upper Clamp Adjuster (complete) Y4750
13 Sliding Frame Y4600
14 Right Lower Clamp Adjuster (complete) Y4550
15 Clamp (small) Y4710
16 Left Lower Clamp Adjuster (complete) Y4450
17 Clamp (large) Y4810
18 Rear Cover Y4850
19 Sliding Frame Support Y4150
20 Safety Cable Y4113

16
JHM Butt & Co Ltd
Station Yard, Station Road, Bawtry, Doncaster, South Yorkshire DN10 6QD
This manual suits for next models
1
Table of contents
Other Butts of Bawtry Air Compressor manuals
Popular Air Compressor manuals by other brands

Craftsman
Craftsman 921.153620 owner's manual

Scheppach
Scheppach GK240of Translation of original instruction manual

Parkside
Parkside PKO 270 A3 Operation and safety notes

TECH
TECH DAC001 owner's manual

Ingersoll-Rand
Ingersoll-Rand IRN 20HP Operation and maintenance manual

Bavaria
Bavaria BAC 200/20 OF operating instructions

EINHELL
EINHELL TE-AC 400/100 10 V Original operating instructions

Rona
Rona RCK2-4 operating manual

Powerbuilt
Powerbuilt AC4025 Owner's Manual and Operating Instructions

Zanotti
Zanotti RCV series Use and maintenance instructions

Vector
Vector Vec 251 user manual

Craftsman
Craftsman 919.176730 owner's manual