Pneu-box PB-300 User manual

1
PNEU-BOX (PB-300)
PROTABLE HIGH PRESSURE AIR COMPRESSOR 4350 PSI
Operation Manual
Please red all instructions and warnings in this manual before using this HPA compressor
RETAIN FOR FUTURE REFERENCE

2
Contents
1. Safety Introductions
2. Product Specifications
3. Description of Product Structure
4. Operational Instructions
4.1 Power Supply
4.2 External 12V Battery
4.3 Air-pumping Operation
5. Temperature Protection System
6. Maintenance
6.1 Lubricating Oil Refueling Operation Instructions
6.2 Moisture Release Operation Instructions
6.3 Filter Element Replacement
6.4 Burst Disc Replacement
7. Troubleshooting
1. Safety Introductions
1.1 Before preparing to pump an air gun, cylinder or other equipment, make sure that the
pumped equipment is under the maximum pressure, and do not pump excessively.
Otherwise, it will cause a risk of explosion and injury or death.
1.2 When using this machine, you are required to wear goggles to prevent accidental
damage to your eyes.
1.3 The maximum air pressure of the machine is 300 bar (4350 psi). When the pressure
of the adjustable pressure gauge is set, it should not exceed 300 bar (4350 psi).
Otherwise, the machine will be damaged or the risk of explosion will occur, and
cause injury or death.
1.4 This machine can only compress air, use no other gases. Otherwise it will damage
the machine or risk explosion, and cause injury or death.
2. Product Specifications
2.1 Power input voltage: 110~220V (AC), power output voltage 12V (DC)
2.2 Rated Voltage of Compressor: 12V (DC)
2.3 Rated power of Compressor: 350W
2.4 Maximum pressure output by electric pump: 300bar (4350psi)

3
3. Description of Product Structure
1. Power Plug-in Outlet
2. ON/OFF Button
3. Temperature Display
4. Pressure Release Valve
5. Burst Disc
6. Release Coupling
7. Adjustable Pressure Gauge
8. Moisture Release Valve
9. Cooling Fan
10.Lubrication Port
11. Handle
1
2
3
7
4
6
8
5
9
10
11

4
4. Operational Instructions
4.1 Power Supply
4.1.1 Connect the 2-prong power cord to the power outlet of the compressor (Figure
4.1.1). Becareful not to 3-prong power cord to the wall socket first.
4.1.2 Connect the 3-prong power cord to the 110-220V (AC) power socket (Figure
4.1.2).
* Once the fan inserted into the power supply starts to turn, the buzzer prompts
the sound to be emitted. The motor and fan of the compressor will not work.
4.2 External 12V Battery
4.2.1 Connect the 2-prong power cord across the connection to the power outlet of
the compressor (Figure 4.2.1).
4.2.2 Connect the red clamp across the connection to the positive pole of the battery,
and the Black clamp across the connection to the negative pole of the battery.
* Once connected to the battery, the prompting tone from buzzer sounds. The
motor and fan of the electric pump will not work.
Figure 4.1.2
Figure 4.1.1
Figure 4.2.1

5
4.3 Air-pumping Operation
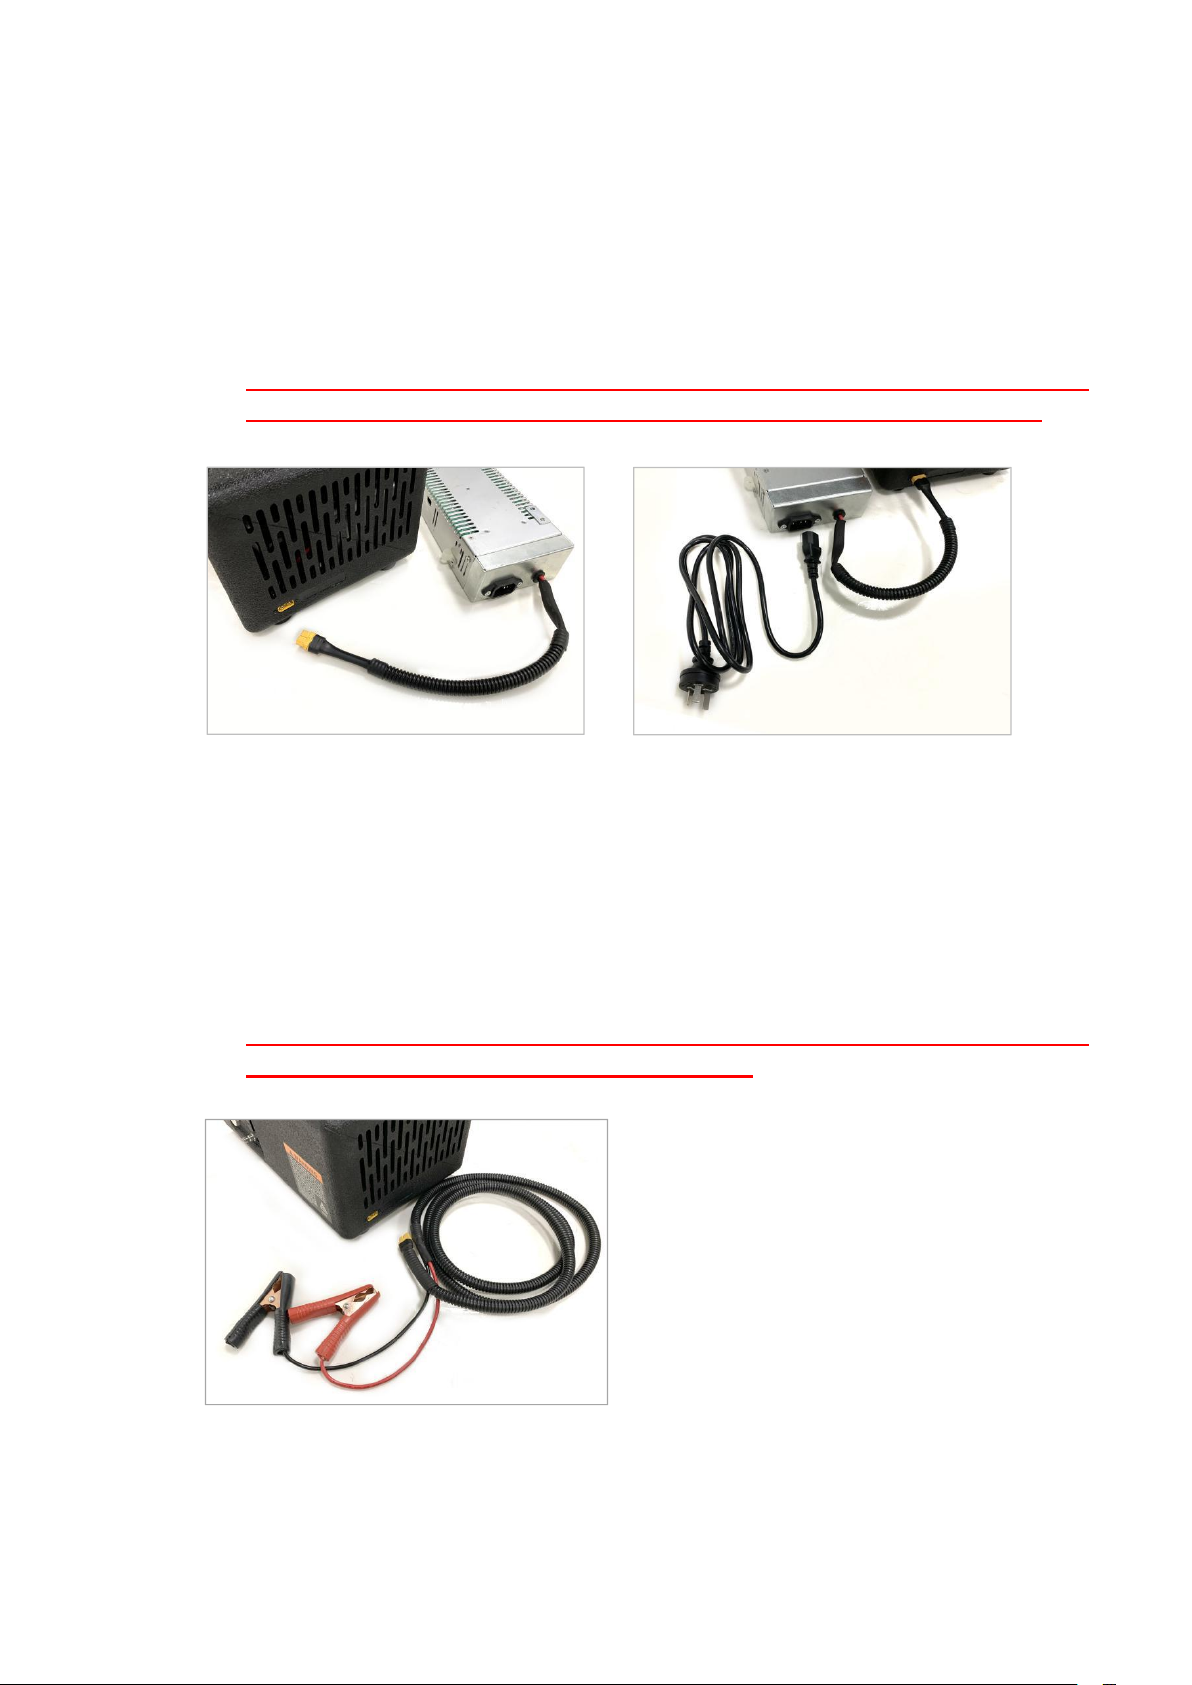
4.3.1 Connect the power supply according to 4.1 power supply instructions for Power
Supply Use or 4.2 Instructions of External 12V Battery Application.
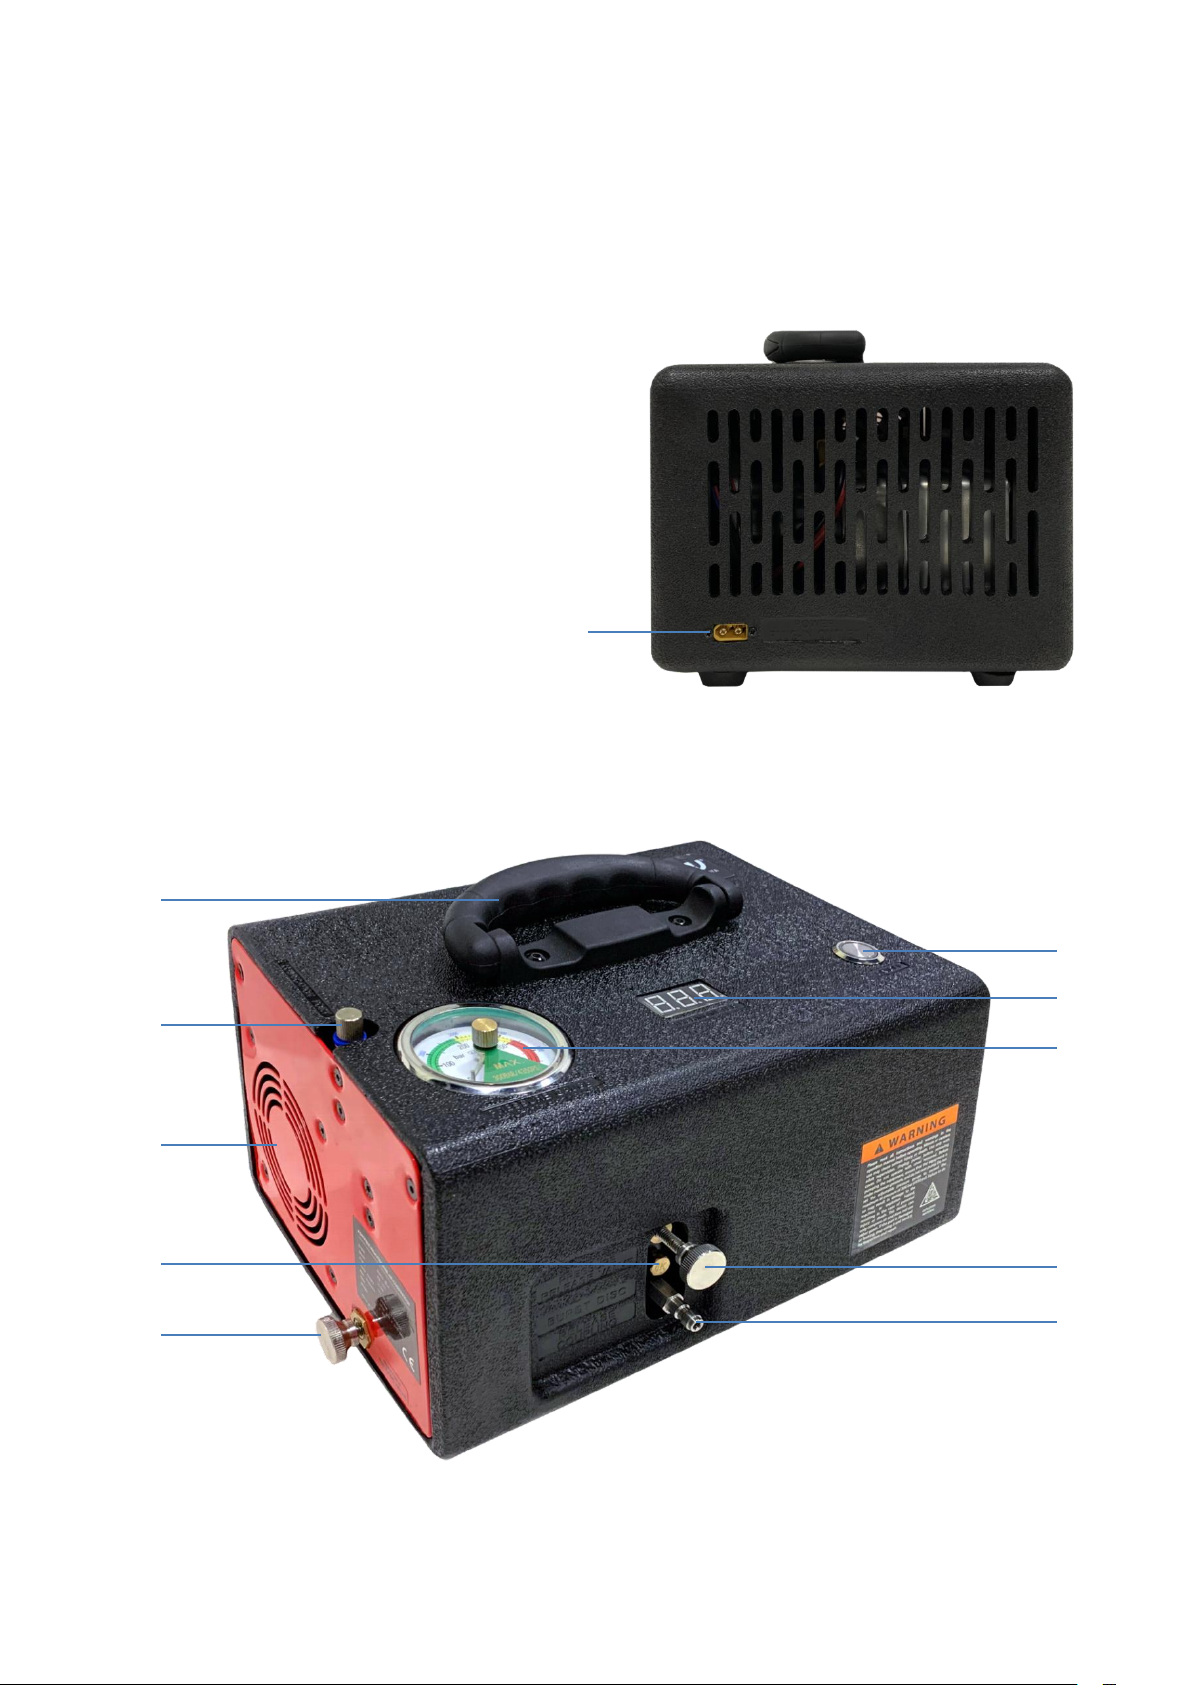
4.3.2 Find out the position of the adjustable pressure gauge and set the ideal pressure
value through the knob of the pressure gauge. A clockwise rotating pressure
value increases and a counterclockwise rotating pressure value decreases.
WARNING: The maximum pressure of this compressor is 300bar (4350psi). When
setting the pressure of the adjustable pressure gauge, it should not exceed 300bar
(4350psi). Otherwise, it will possibly damage the machine or risk explosion and
even cause injury or death.
4.3.3 Connect the female quick connectors from both side of output hose to the male
connectors from compressor and pumped equipment, the one with filter connects
to compressor (Figure 4.3.3).
Note: Check whether the connection between the female quick connectors and
the male connectors are secure.
4.3.4 Turn and tighten the release button clockwise, and ensure that the inflated
equipment does not leak.
Note: If you want to pump a completely airless PCP air rifle, you need to load it first
and then start to pump it. Please refer to your air rifle instructions for further help.
4.3.5 Press ON/OFF button, the light changes to green, the compressor starts to work.
Note: You can stop pumping at any time by pressing the start button. If you need
to restart the compressor, you need to release the gas in the output hose,
referencing to 4.3.6.
4.3.6 When the pressure reaches the set pressure value, the compressor will stop
automatically. The buzzer emits a reminder sound (low-frequency sound),
Note: The fan of the compressor will continue working to cool down. When the
temperature display of the compressor is lower than 45°C, the fan will stop working.
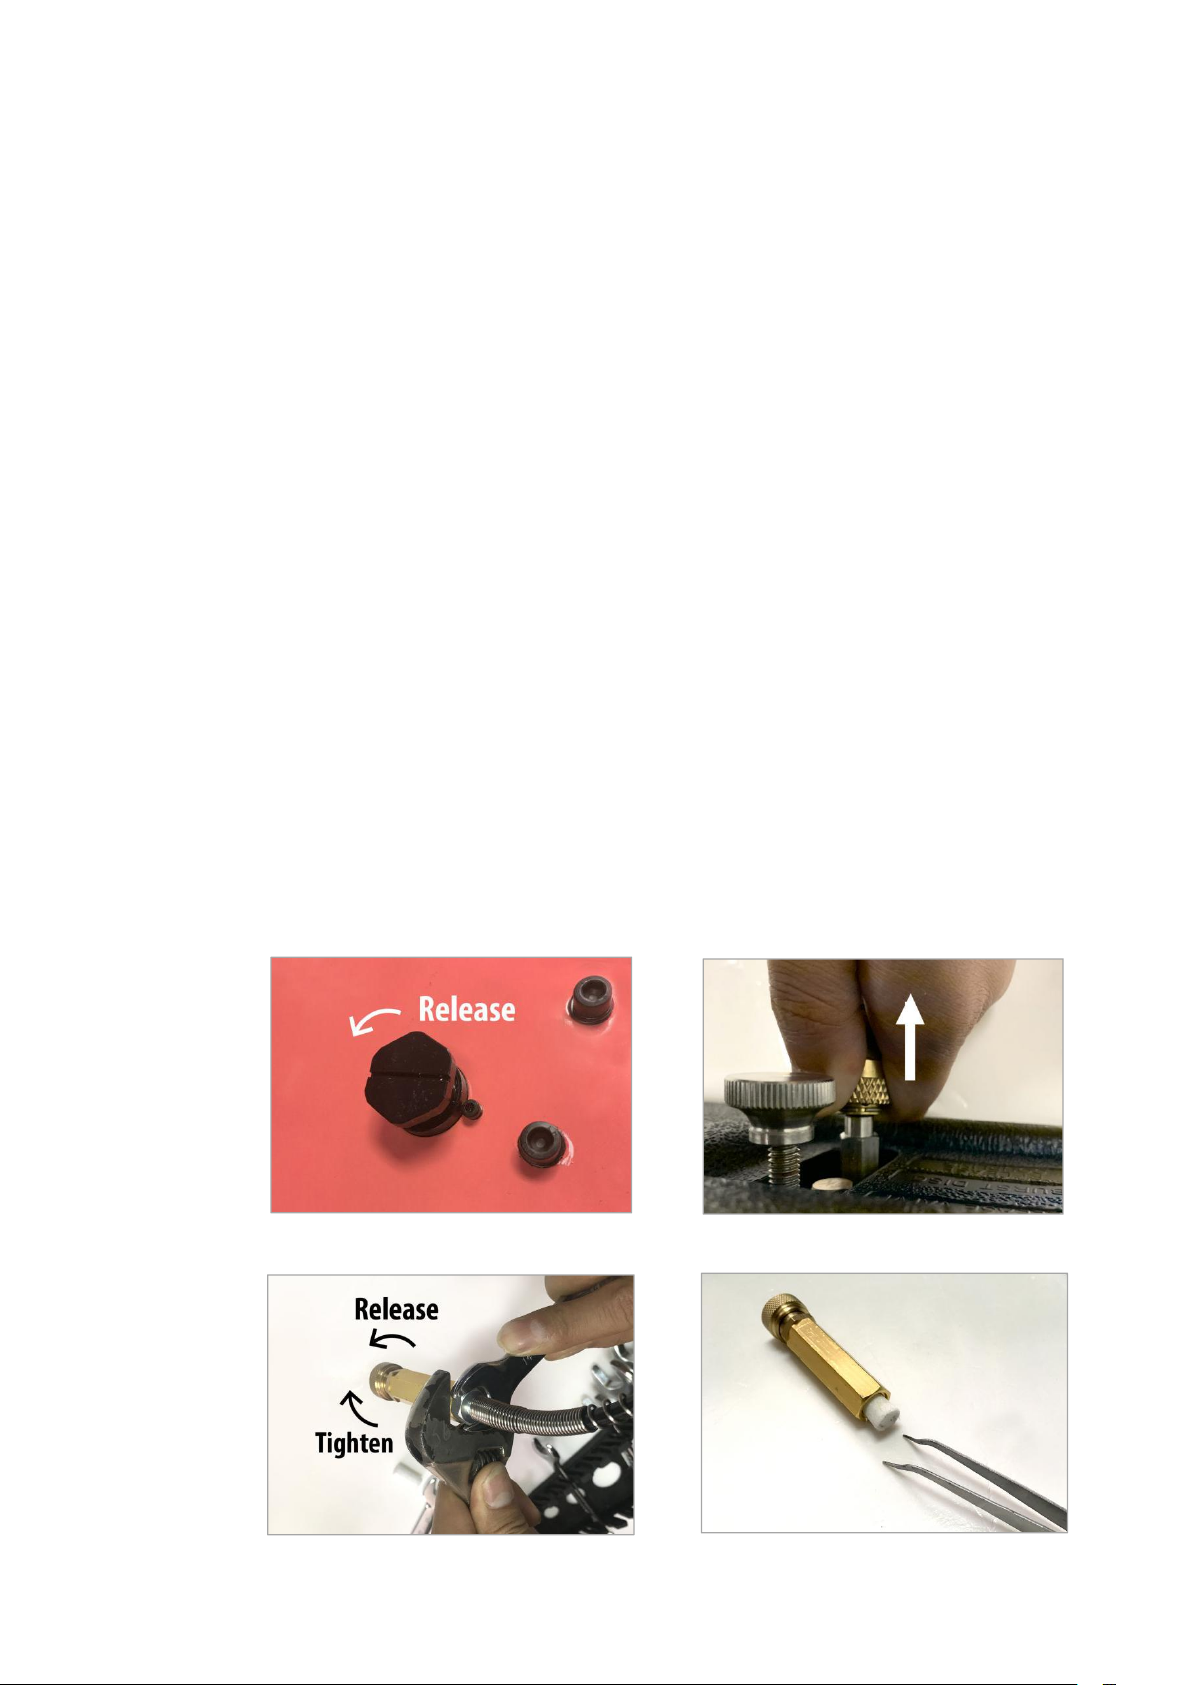
4.3.7 Release the air in the hose by rotating the counterclockwise (Figure 4.3.7). When
the pressure gauge indicates 0psi/bar, the air in the hose is released completely.
Note: When loosening the release button, there may be gas or liquid ejecting at
high speed from the air release button of the compressor. Please keep your
fingers/hands/eyes away from this part as far as possible.
4.3.8 Remove the pumped equipment and pull out 3-prong power cord or straddle
clamp.
Figure 4.3.7
Figure 4.3.3

6
5. Temperature Protection System
5.1 When the temperature is higher than 70°C, the machine stops automatically and
alarms (high frequency sounds). And the fan continued to work.
5.2 When the temperature is below 45°C, the fan stops working.
5.3 You need to press the ON/OFF again to continue working.
6. Maintenance and Maintenance Methods
6.1 Lubricating Oil Refueling Operation Instructions
6.1.1 Before using for the first time, first find the Lubrication Port, and then turn the knob
cover counter-clockwise (Figure 6.1.1). Fill 1ml (about 10 drops) silicon oil, run the
compressor with no load for one minute, so that the cylinder is filled with silicone oil,
which will prolong the life and normal operation of the compressor.
6.1.2 Fill 0.5ml (5 drops) of silicon oil every 5 cycles.
6.1.3 If the compressor has not been operated for more than 5 days, you must start
again the 6.1.1 operation.
Note: Only silicone oil can be used to lubricate the compressor. No other lubricants
can be used. Otherwise, the guarantee will fail, even cause explosion and lead
serious injury or death.
6.2 Moisture Release Operation Instructions
6.2.1 The compressor should be cleaned every 15 cycles.
6.2.2 Find out the position of moisture release valve, turn the knob cover
counter-clockwise (Figure6.2.1)
6.2.3 Fill the lubrication port with1ml (about 10 drops) of silicon oil, run the compressor
with no load for three minutes. Then fill another 1ml (about 10 drops) silicon oil to
the lubrication port, continue run the compressor with no load for another two
minutes. Finally, turn off the power supply of the compressor and tighten the
moisture release valve clockwise.
6.2.4 This process will discharge excessive lubricant and moisture in the compressor, so
as to achieve the function of pollution discharge.
Note: When loosening the moisture release button, there may be air or liquid, which
is ejected from the bottom of the air compressor at high speed. Please keep your
fingers/hands/eyes away from this part as far as possible.
Figure 6.1.1
Figure 6.2.1

7
6.3 Filter Element Replacement
6.3.1 Replacement of filter cotton in filter tank
6.3.1.1 Change every 40 cycles. First, it is required to release the air inside the
machine. The pressure gauge reading is 0 psi/bar. Find the position of the
filter tank at the bottom of the machine. Open the lid of the filter tank
counterclockwise with a wrench. Take out the filter cotton with tweezers and
replace it with new filter cotton. (Figure 6.3.1.1)
6.3.2 Replacement of filter cotton for flexible pipe
6.3.2.1 Change every 20 cycles.
6.3.2.2 Push the connecting ring on the female connector and remove the filter and
output hose from the compressor (Figure 6.3.2.2).
6.3.2.3 Find the joint on the filter and turn the large side of the filter counterclockwise
until the filter is separated (Figure 6.3.2.3).
6.3.2.4 Find the old filter element located in the larger side of the filter. Pull the old
filter element out of the filter with tweezers or other tools (Figure 6.3.2.4).
6.3.2.5 Replace the new filter element and press the new filter element into the larger
side of the filter.
6.3.2.6 The larger side of the filter is screwed clockwise into the smaller side to
re-engage the filter (Fig. 6.3.2.3).
6.3.2.7 Re-connect the female connector to the air compressor, push the female
connector ring and press it into the female connector. Before running the
compressor, it is necessary to ensure that the connecting ring is locked.
Figure 6.3.2.3
Figure 6.3.1.1
Figure 6.3.2.4
Figure 6.3.2.2

8
6.4 Burst Disc Replacement
Find the position of the burst disc, use the tool to
rotate counterclockwise to remove the damaged
burst disc, replace it with the same size (6K)
burst disc, tight it clockwise, otherwise it will leak
air (Figure 6.4).
7. Troubleshooting
7.1 Compressor doesn’t work.
Solution: Make sure that one end of the 3-prong power cord is plugged into a regular
wall socket and the other end is plugged into the air compressor. If a 12V battery is
used, ensure the normal connection of the crossover wires.
7.2 Compressor can't pump air normally.
Solution: Check whether the air release button and moisture release button are
tightened and whether the pumped equipment is leaking.
7.3 Automatic shutdown of electric pump before reaching specific
pressure.
Solution: Make sure that the setup of pressure gauge turntable (automatic closing) is
set correctly. Whether the temperature of the electric pump is too high, the
temperature protection system automatically stops. Press the start button again to
blow up when the machine temperature drops to 45°.
7.4 When the compressor has abnormal sound & vibration during use.
Solution: Shut down immediately and unscrew the moisture release valve
counterclockwise, then remove the hose and restart the compressor to check for
abnormal sound and vibration. If so, please return it to the factory for repair. Do not
try to repair it yourself.
MODEL
PNEU-BOX PB-300
DESCRIPTION
Portable High Pressure Air Compressor
POWER
350W
POWER SUPPLY
12V DC
MAX. PRESSURE
300bar (4350psi)
SIZE
323mm x 225mm x 195mm
WEIGHT
8kg
Figure 6.4
Table of contents
Popular Air Compressor manuals by other brands

Campbell Hausfeld
Campbell Hausfeld Portable Vertical Compressor VT631538 Replacement parts list

Iwata
Iwata FREESTYLE AIR operating manual

Aerfast
Aerfast AC4504 operating manual

Campbell Hausfeld
Campbell Hausfeld HM7500 operating instructions

Porter-Cable
Porter-Cable CLFRP350 instruction manual

briwatec
briwatec ZIRKON D060 D Translation of the original instructions