Buzz Connect Hubba-X4 Duo User manual

Hubba-X4 Duo. Issue 2-7 Page 1
Hubba-X4 Duo user guide
Issue 2-7 February 2018
Basic set-up
Ensure that the breather top (1) is always tightly screwed on.
Ensure that the power connector (3) is fully connected (either DC or mains) –To do this gently line up
the plug to the socket and rotate carefully until the spline engages. Now the socket will slide fully
into the plug at which point the locking ring on the plug can be rotated clockwise keeping the plug
firmly in position. Make sure that the locking ring is fully tightened.
If the LAN socket (2) or the AUX socket (5) are not in use then the waterproof cap should be securely
in place to protect the connectors.
The status indicator (4) is able to show a variety of conditions –refer to page 3 for full details.
External GSM antenna
Internal Wi-Fi antennas
External antenna
extension leads –up
to 20m
AUX socket (5)
LAN socket (2)
Mains PSU (3)
DC Power cable (3)
Status indicator (4)
Breather (1)
Roof mount
Power switch.
Down = on

Hubba-X4 Duo. Issue 2-7 Page 2
Contents
Page
Basic Set up 1
Front panel indicators 3
Status indicator 3
DC connection 4
External GSM antenna 4
How to change the SIM(s) 5
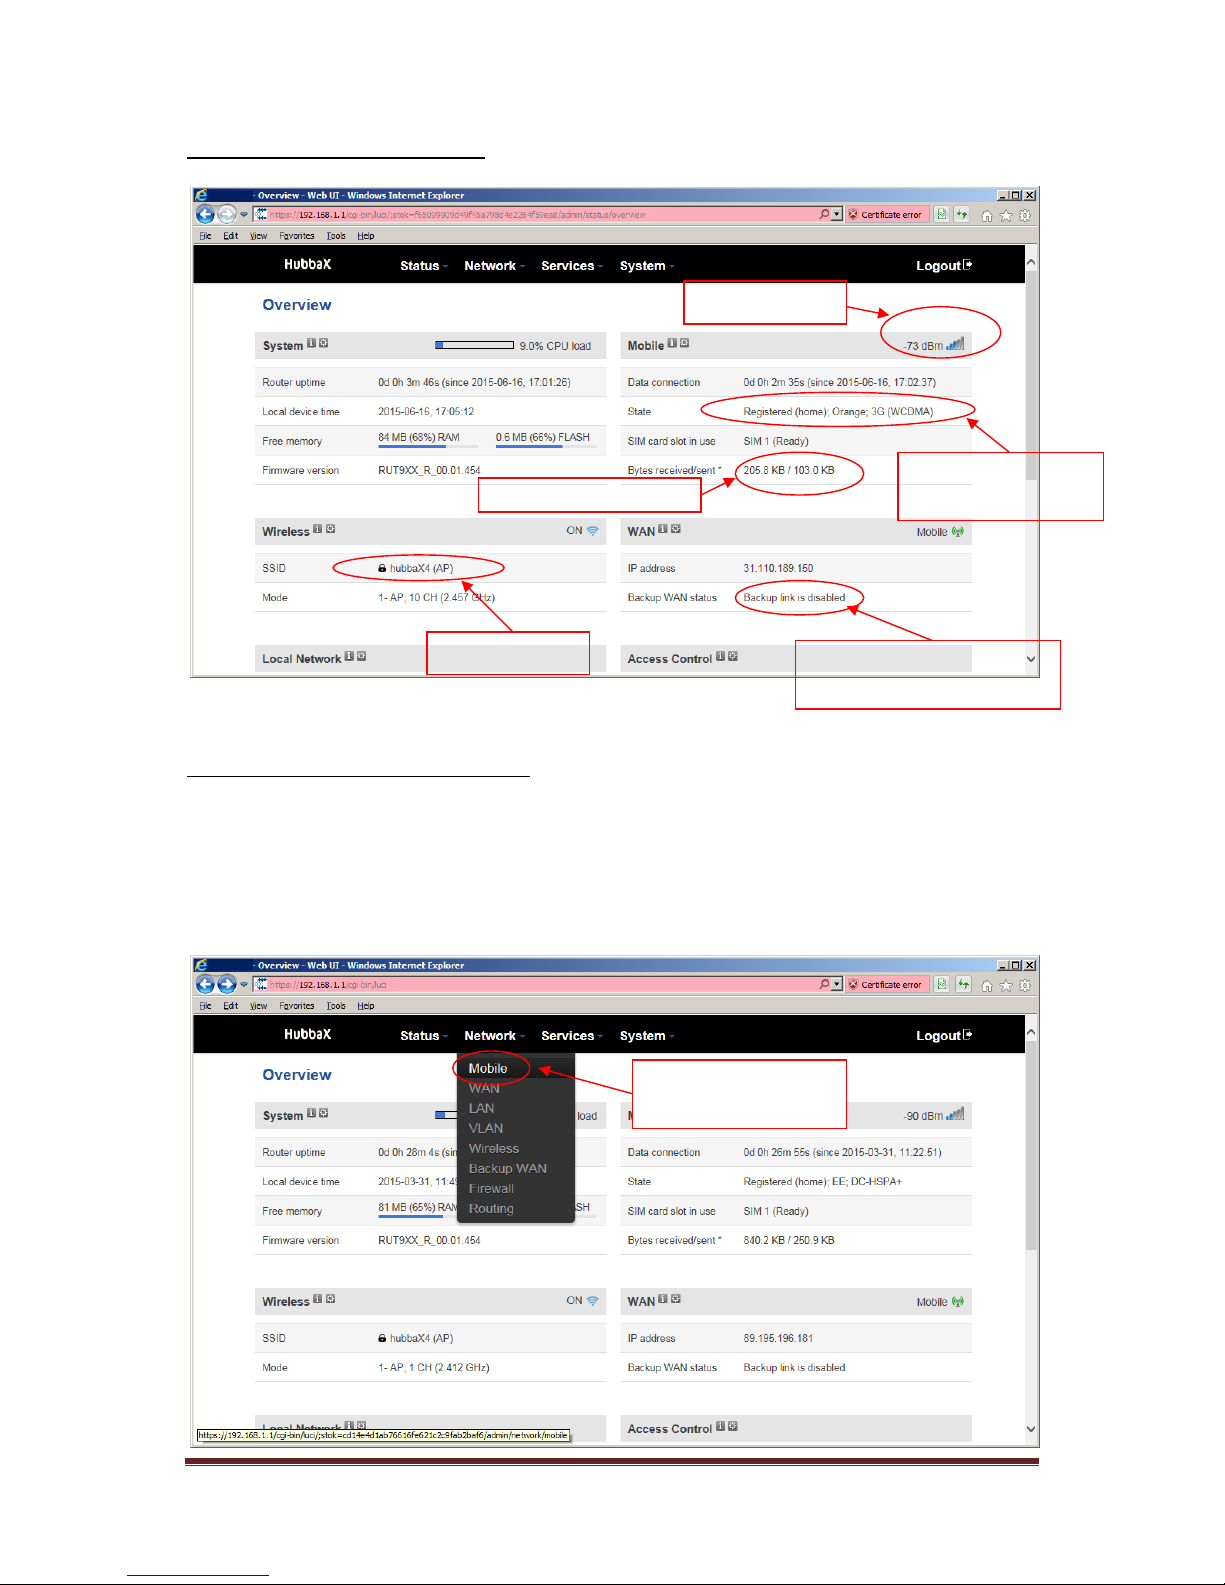
Accessing the Hubba-X4 Duo via the web interface 7
The Hubba-X4 Duo overview page 8
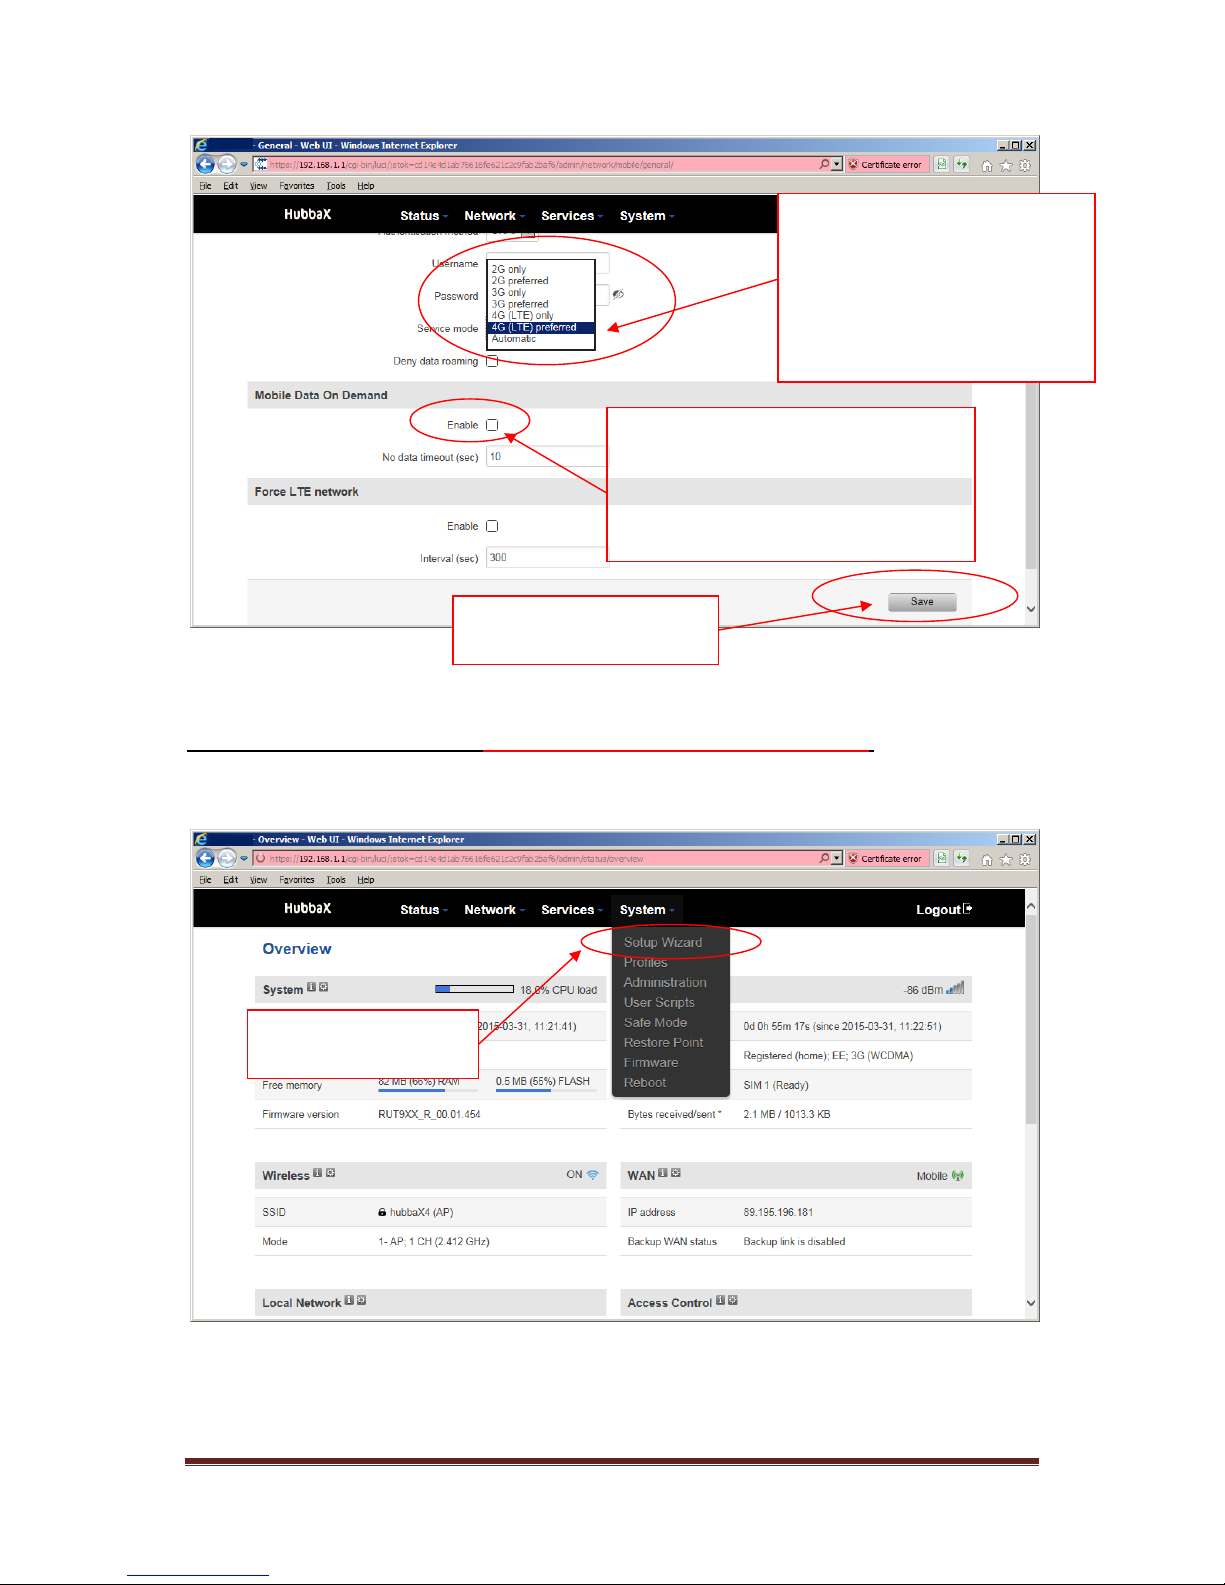
Configuring APNs manually 8
Using the wizard to configure the APN 10
Configure SIM failover 12
Configure WAN failover 14
Configure Wi-Fi 16
Setting data limits 18
Using Wi-Fi as WAN (Use harbour/marina Wi-Fi) * 19
Switch off Wi-Fi as WAN 21
Port forwarding 22
Dynamic DNS (DDNS) 24
Cat5 connector assembly 25
Note that this warning symbol is used to highlight important information.
* The use of Wi-Fi as WAN (Repeating an external signal via the HubbaX4 Duo) will only
work satisfactorily in certain situations. We also recommend the use of an external antenna to
improve the Wi-Fi connectivity. Please check the following to help assess whether it may operate
successfully:-
1. Check that there are only a few Wi-Fi stations within range of your vessel, more than 6 or so may
cause issues.
2. Make certain that the Wi-Fi station you want to use, the donor station, gives out a strong signal.
3. Check that there is a reasonably clear line of sight between you and the donor station, objects in
the way will reduce the signal quality, which will in return reduce the speed and reliability of the
connection.
4. The more users there are per donor station the slower the data rate so pick one that isn’t free
and you know gives a good connection (try more than one).
Please note that even if all of these conditions are met then there is still a chance that the repeated
signal may be of poor quality.

Hubba-X4 Duo. Issue 2-7 Page 3
Front Panel Indicators
Status indicator
Flashing green and red = no SIM or a bad PIN - if a SIM has been installed then you will need to check
that it is seated and oriented correctly. If the SIM is okay then you may need to confirm the PIN.
Flashing green, red and yellow = connecting to GSM
Slow flashing red = connected to 2G but data session is not established
Slow flashing yellow = connected to 3G but data session is not established
Slow flashing green = connected to 4G but data session is not established
Constant red and blinking rapidly = data being transferred during a 2G data session
Constant yellow and blinking rapidly = data being transferred during a 3G data session
Constant green and blinking rapidly = data being transferred during a 4G data session
Power
Status, see below
for explanation
Wi-Fi
LAN activity
Signal strength –more
bars = better signal

Hubba-X4 Duo. Issue 2-7 Page 4
DC Connection
The DC voltage should be in the range 12V to 24V and approximately 1A is required for
correct operation. Care should be exercised with regard to polarity and to the quality of the supply,
large voltage spikes may cause damage to the Hubba-X4 Duo.
Do not attempt to power the unit using POE via the LAN (2) connection.
External GSM antenna
The antenna type shown above is the cross polarised type. However, there are also single antennas
which are fitted to magnetic mountings so can be attached to a variety of metal surfaces and these
are used in pairs for the GSM reception or Wi-Fi signals. For best results these single antenna types
need to be placed at least 30 cm apart.
External GSM
Antenna
Adaptor
Roof mount
GSM antenna
extension cables
Heat shrink sleeves
DC flying lead
Brown is +V.
Brown with black tracer is 0V

Hubba-X4 Duo. Issue 2-7 Page 5
Ensure that the heat shrink sleeves are tight fitting over the external antenna connections –
a hot air gun or similar will shrink the tubing but take care not to damage the cables.
The pigtails at the bottom of the antenna should not be subjected to unnecessary pulling or weight
and any jumper cable connecting to the antenna must be supported (fixed in place). The antenna is
not designed to carry the weight of long jumper cables as this will stress the connector terminations
on it.
How to change the SIM(s).
Firstly: disconnect power to the unit or switch the unit off using the power switch –failure
to do this may cause irreparable damage to the SIMs and/or the Hubba-X4 Duo’s circuitry. Once the
power has been disconnected undo the eight screws holding the lid on. Gently remove the lid –a
little force may be required to break the watertight seal.
When the lid is removed you will see that a ribbon cable connects it to the main body of the
unit. We strongly advise that this cable is not used to allow the lid to hang on it, this may damage
the cable and/or the indicator PCB. If it is impossible to support the lid so that the ribbon cable isn’t
stressed then the indicator PCB can be separated from the lid by removing the two retaining screws.
Keep theses screws and washers safe so that it can be reassembled. When replacing the lid ensure
that the cable is folded around the right hand side of the router PCB.
Ribbon cable
Retaining
screws
Indicator
PCB

Hubba-X4 Duo. Issue 2-7 Page 6
Please note the orientation of the SIMs and make certain they are firmly pushed into the holder(s)
Once the SIMs have been installed, replace the lid, remembering to set the ribbon cable to the right
hand side of the router PCB. Do not over tighten the eight screws securing the lid or the
waterproof seal may be compromised.
SIM 1
SIM 2
Reset button.
Do not use unless advised by
Buzznetworks to do so.

Hubba-X4 Duo. Issue 2-7 Page 7
Accessing the Hubba-X4 Duo via the web interface
Make certain that a computer is connected to the Hubba-X4 Duo using either a cat5 cable connected
to the LAN socket (2) or Wi-Fi using the hubbaX4 signal and the password buzzmarine. Make certain
that the Hubba-X4 Duo has been switched on for at least two minutes before continuing.
A warning may be given saying that it is unsafe to continue to the screen for the router (see below).
Please click the ‘Continue to this website (not recommended)’ option to continue.
the following screen will now appear. Type in the password ‘admin01’ and press login.
Type ‘192.168.1.1’ in the address
bar of an Internet Explorer page
Password is admin01

Hubba-X4 Duo. Issue 2-7 Page 8
The Hubba-X4 Duo overview page.
Configuring APNs for the SIMs manually
The Hubba-X4 Duo is capable of auto recognising a large number of APNs. However, if the router
does not connect within a few minutes then the APN will have to be set manually. The best way of
completing this is described below.
Signal strength
Network operator
and connection type
Amount of data used
Shows whether a backup
connection is configured
Wireless name
Select ‘mobile’ from
the Network tab

Hubba-X4 Duo. Issue 2-7 Page 9
Select the SIM
SIM 2 has been set for EE where the APN name is ‘everywhere’ , the user name is ‘eesecure’ and the
password is ‘secure’. Note that the authentication method is set to ‘CHAP’ allowing the username
and password to be set.
Select SIM 1 or 2
Enter the APN here
Ticking this box will stop
this SIM from roaming on
to foreign networks
(Roaming charges could be
expensive)

Hubba-X4 Duo. Issue 2-7 Page 10
Using the Wizard to set the APN –Please note this method is not recommended.
Note that you must have a SIM installed in the SIM 1 slot to use this method
This box allows you to select
which type of data connection is
preferred. Use the ‘only’ options
if you are certain. It is preferable
to use automatic unless the
connection is erratic.
Click the ‘Save’ button to
confirm the details
Tick this box if you only use data very
occasionally and don’t wish to have a
permanent connection. This saves data
but takes a minute or two for data to
start flowing.
Select ‘Setup Wizard’
from the System tab.

Hubba-X4 Duo. Issue 2-7 Page 11
If you have two SIMs then you will need to select the correct SIM.
Select Step 2 - mobile
Click the down arrow to see
the APN options –note that
EE has been selected already
but we will ignore that.
The required APN
is selected

Hubba-X4 Duo. Issue 2-7 Page 12
Configure SIM failover
This will allow the Hubba- X4 Duo to swap connectivity between two SIMs based on a set of
predetermined parameters
Click ‘Save’ to confirm
your selection.
Select ‘Mobile’ from
the Network tab

Hubba-X4 Duo. Issue 2-7 Page 13
SIM failover has now been set. It should be noted that the data connection will be lost for a minute
or two when the SIMs swap over.
The SIM to always
be used first.
Tick the box to allow SIM
switching when checking for
the parameters below
Options for SIM switching to happen
(SIM1 to SIM 2 on this screen). Some of
these options may, if selected, require
additional parameters.
Click the SIM2 to SIM1 tab
Options for SIM switching to happen
(SIM2 to SIM 1 on this screen). Some of
these options require (when ticked)
additional parameters.
Click the save button to
confirm your settings

Hubba-X4 Duo. Issue 2-7 Page 14
Configure WAN failover
The WAN failover allows the 3G connection to be used if the WAN connect fails (an ADSL line for
example). In this case the ADSL wired connection would be plugged into the AUX socket (5) on the
Hubba-X4 Duo.
In order that the failover to and from a mobile WAN connection works correctly you must
use the correct APN for the SIM or SIMs, do not use the wizard. See ‘Configuring APNs for the SIMs’
method 1 on page 8.
Select ‘WAN’ from the Network tab
Select the WIRED interface option
as the main WAN
Save the selection

Hubba-X4 Duo. Issue 2-7 Page 15
Wired is now at the top
–highest priority
Move mobile
connection up one
Tick mobile for
backup WAN
Now save these details.

Hubba-X4 Duo. Issue 2-7 Page 16
Configure Wi-Fi
Your Hubba-X4 Duo is configured with Wi-Fi called hubbaX4 which has the password buzzmarine.
Should you wish to change these settings then please follow the diagrams below.
Select ‘Wireless’ from
the Network tab
Click the ‘Edit’ button

Hubba-X4 Duo. Issue 2-7 Page 17
Switch the wireless on
Select the wireless channel, or select
‘Auto’. Auto may make your internet
connection appear erratic though.
The name of your Wi-Fi
connection.
Click the ‘Wireless Security’
tab to take you to this page.
Encryption types –best left as the
defaults WPA-PSK+ WPA2-PSK
mixed mode and cypher as auto.
WiFi password or key can be any
combination of characters but
must be at least 8 in length.
Click ‘Save’ to confirm
your settings

Hubba-X4 Duo. Issue 2-7 Page 18
Setting data limits
It can be useful to prevent the SIM or SIMs you are using from exceeding the maximum allocated
amount of data (8GB for example) by setting data limits on the SIMs.. This may be used as a method
of avoiding overage charges but the accuracy depends entirely upon the parameters entered by the
user.
Buzz Connect will not be responsible for any claim(s) regarding additional charges from
mobile operators.
Don’t forget to click the Save button at the bottom of the screen to confirm the changes.
Select ‘Mobile’ from
the Network tab.
Click the ‘Mobile Data
Limit’ tab.
Select the SIM
to limit.
Check this box to ensure
the SIM is not used once
the data limit is reached.
Data limit in MB. Remember
that 1GB = 1000MB.
Refresh period
for SIM data.
Refresh day in
the period.

Hubba-X4 Duo. Issue 2-7 Page 19
Using Wi-Fi as WAN (Use harbour/marina Wi-Fi)
This is a useful facility as it will allow the existing Wi-Fi antennas to connect to an external Wi-Fi
source and rebroadcast it from your Hubba-X4 Duo. This will enhance any local Wi-Fi and also
appear as your usual Wi-Fi (use same SSID and password as you would normally).
Firstly you need to set up the WAN to be Wi-Fi.
Select ‘WAN’ from the Network tab
Select Wi-Fi to be the
WAN connection.
Save the setting

Hubba-X4 Duo. Issue 2-7 Page 20
Now set up the incoming Wi-Fi
Scan is now complete
Click to start the scan to see which
Wi-Fi networks are available
Select the network
you wish to use
Select the scan option to get and
external Wi-Fi connection
Optional back up routes
in this order –top first
Table of contents